Check out 21 quick tips designed for parents and seniors to make using their iPhone easier and help build digital confidence.

Navigating the digital realm can sometimes feel overwhelming, especially for parents and older individuals who may not be as familiar with today’s tech.
But as iPhones become more central to our everyday routines, understanding how to harness their potential can significantly improve daily life.
From basic settings to communication tools, we’ll explore simple yet effective tips in this guide to help parents and seniors feel confident and comfortable using their iPhones.
Also see: 15 built-in wellness features to keep track of your health on iPhone, iPad, and Apple Watch
1. Increase the text size and make it bold
Make the overall system font size bigger so that it’s easier to see menus, options, app names, and everything else, without glasses or straining your eyes.
- Go to the iPhone Settings app.
- Tap Display & Brightness.
- Turn on Bold Text.
- Next, tap Text Size.
- Drag the slider to the right to increase it.

Want to make the text even bigger? Go to iPhone Settings > Accessibility > Display & Text Size > Larger Text. From here, turn on the switch next to Larger Accessibility Sizes, and it will add more levels to the slider below, which you can drag to the right to increase the font size.
2. Turn on Display Zoom
The Larger Text option in Display Zoom settings zooms in on system elements, making them slightly bigger with larger controls.
- Open iPhone or iPad Settings.
- Tap Display & Brightness.
- Scroll to the bottom and tap Display Zoom.
- Select Larger Text and tap the checkmark icon or Done, followed by Use Zoomed.

3. Use Per-App Settings
While the above settings affect the entire system across all apps, you can use Per-App Settings to change specific settings just for the selected app. For instance, this can be used to adjust the text size of Notes, Messages, Safari, or the News app independently of the above system settings.
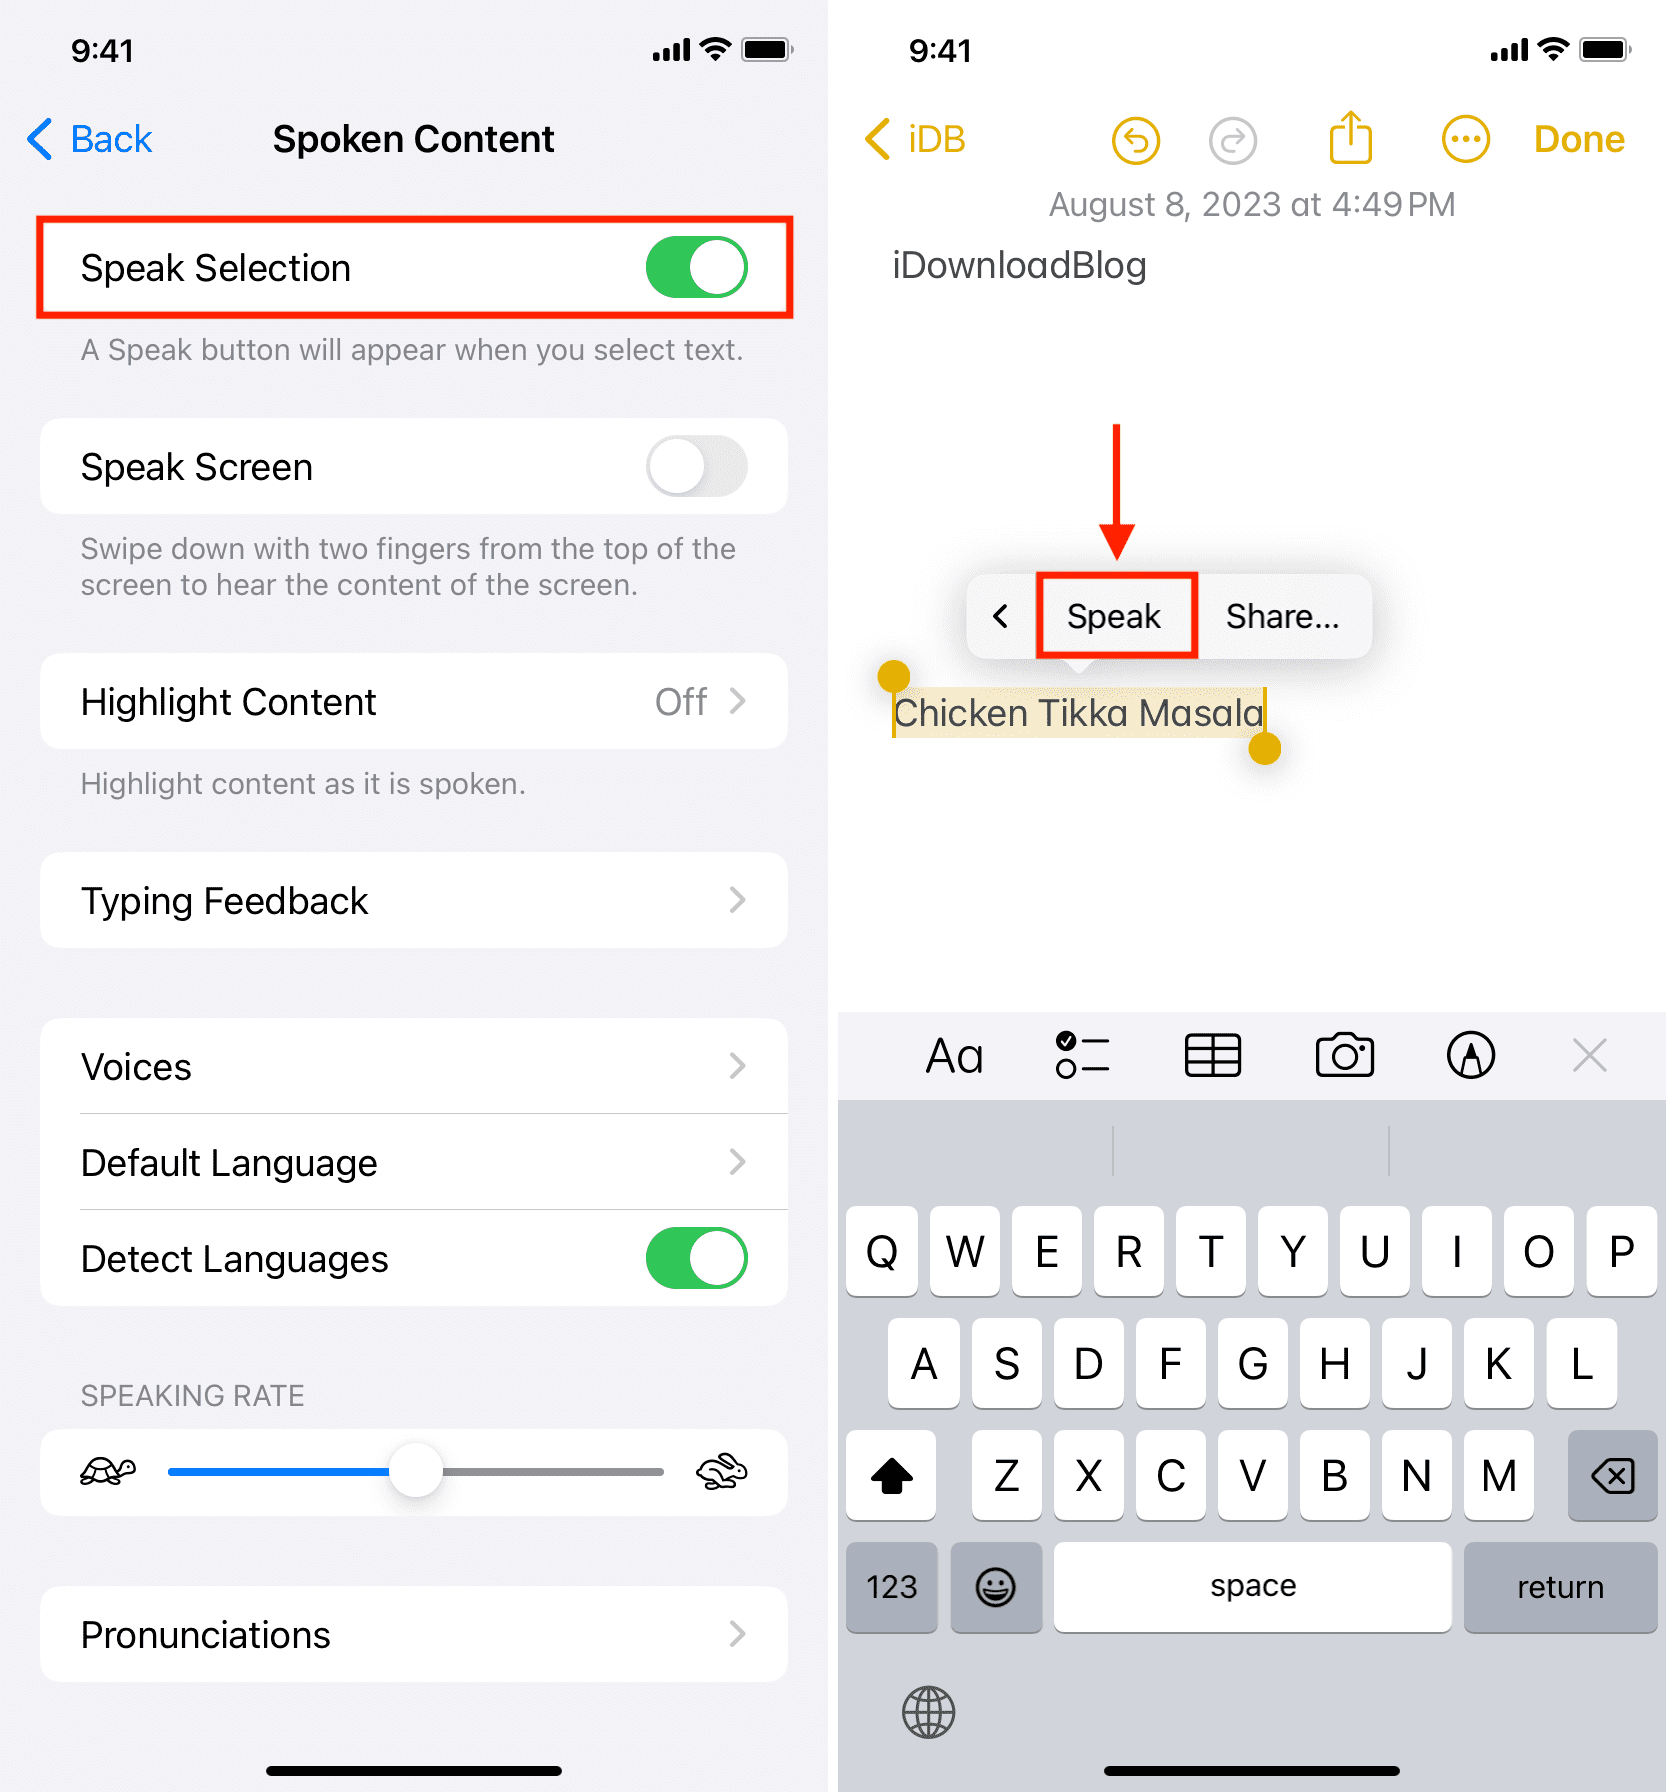
4. Have your iPhone speak selected text
Go to iPhone or iPad Settings > Accessibility > Read & Speak > Speak Selection and turn it on.
5. Set up favorite contacts
Having favorite contacts makes it effortless to call people like your spouse, kids, grandkids, doctor, and close friends. You can learn how to do that in our tutorial on speed dialing on iPhone. Furthermore, you can add one or a few contacts to your iPhone Home Screen and call them in one tap.
6. Add emergency contacts
Everyone should have emergency contacts set up on their iPhone, iPad, and Apple Watch so that close family and friends can be reached in case of emergencies.
7. Set up Medical ID
Medical ID lists your emergency contacts, ongoing health conditions, medications, blood type, and other critical information. Medical ID can be accessed even from the Lock Screen, which makes it useful for first-aid responders to treat you or call your emergency contacts if you fall down or get into an accident.
8. Add medication reminders
Some people have medications that need to be taken on a set schedule. If you fall into that category, you can set up medication reminders, and then your iPhone will notify you when it’s time to take them. It also lets you log in whether you have taken or skipped the medicine, so you don’t accidentally double-dose.
9. Use the Magnifier to read smaller text
Your iPhone has a built-in Magnifier that can be used to read smaller fonts like those on a medicine bottle or food packaging. This feature can be particularly useful if you require reading glasses and they aren’t nearby, or if you otherwise have issues with tiny text. Simply use the iPhone Magnifier to enlarge the writing.
10. Change the flashlight brightness
While you probably know how to turn on the flashlight, you might not know that you can also adjust its intensity and change the focus area. In addition to this, you can make things easier by adding a huge flashlight button to your iPhone Home Screen.

11. Set ringtone volume to max and prevent it from changing
If your alert sounds are too low, and you find yourself missing texts or phone calls, you can try bumping the ringtone volume to its maximum setting.
- Open the Settings app and tap Sounds & Haptics.
- Drag the Ringtone And Alerts slider all the way to the right.
- Next, turn off the switch for “Change with Buttons” to prevent the ringtone sound from being lowered unknowingly using the volume button.
- Tip: Tap Haptics and set it to Always Play to ensure the iPhone vibrates when you get a phone call.

12. Turn on LED alerts
You can also set your iPhone to flash its camera light when you get a phone call or text notification. This makes it easier to see a new alert, particularly during the night or when you’re at a distance from your phone and can’t hear its ringtone.
13. Turn on Face ID or Touch ID and use a 4-digit passcode
Securing your iPhone or iPad with a passcode is essential to keep your data, banking apps, chat history, and everything else secure. However, it can be a pain to manually type the passcode every time you want to use your iPhone. You can remedy this by adding Face ID or Touch ID, or you can choose a shorter 4-digit passcode to make unlocking your device less of a chore.
14. Learn how to send voice notes instead of typing text messages
Typing a couple of texts is fine, but if you don’t feel like sending a bunch of messages back and forth, you might consider sending a voice note.
15. Learn how to use Siri to call, text, etc.
Siri is Apple’s built-in AI voice assistant, and you can use it to call someone, open apps, learn more about the weather, send a text message, do simple calculations, set alarms, and much more. Simply invoke Siri on your iPhone and speak one of the following commands:
- Call [name] like Call James.
- FaceTime [name] like Sebastien.
- How is the weather today?
- Do I need to carry my umbrella?
- Will it rain today?
- Will it rain in the next 2 hours?
- How is the weather in Ohio?
- How much is 67 times 45?
- Open Calculator.
- Open ESPN.
- Search for dog food on Google.
- Set an alarm for 7:30 AM.
- Set a timer for 15 minutes.
- Remind me to take the turkey out of the oven in 2 hours.
- And much more!
If you’ve set up smart bulbs, thermostats, power plugs, or other accessories, you can also ask Siri to:
- Turn on or turn off the light.
- Switch off the coffee machine.
- Set the temperature to 24 degrees, etc.
16. Add widgets like Calendar to the Home Screen
Widgets are extensions of an app that let you see useful information straight from the Home Screen without having to open the app.
Most Apple and third-party applications support widgets, and you can add them to the Home Screen whenever you want. I think the following widgets can be helpful for most people:
- Calendars
- Batteries
- Contacts
- Photos
- Weather

17. Declutter the Home Screen
Finding and opening apps can become confusing and time-consuming if you have too many on your Home Screen. To keep things simple, remove unnecessary apps and widgets from there. Next, drag frequently used applications to the first Home Screen page, while lesser-used ones can be placed on the next pages or inside folders.
18. Set Safari to auto-close browser tabs
Too many open Safari pages can slow down the browser and your phone. If you don’t want to bother closing them manually, you can go to Settings > Apps > Safari > Close Tabs and set your iPhone to automatically close browser tabs after a day, week, or month.
19. Use Back Tap
You can set up the double or triple Back Tap feature, and once it’s activated, simply tapping the back side of your iPhone will perform the chosen action. For instance, you can set your iPhone Back Tap to open the camera, switch on the flashlight, lock the screen, grab a screenshot, trigger Siri, and much more.
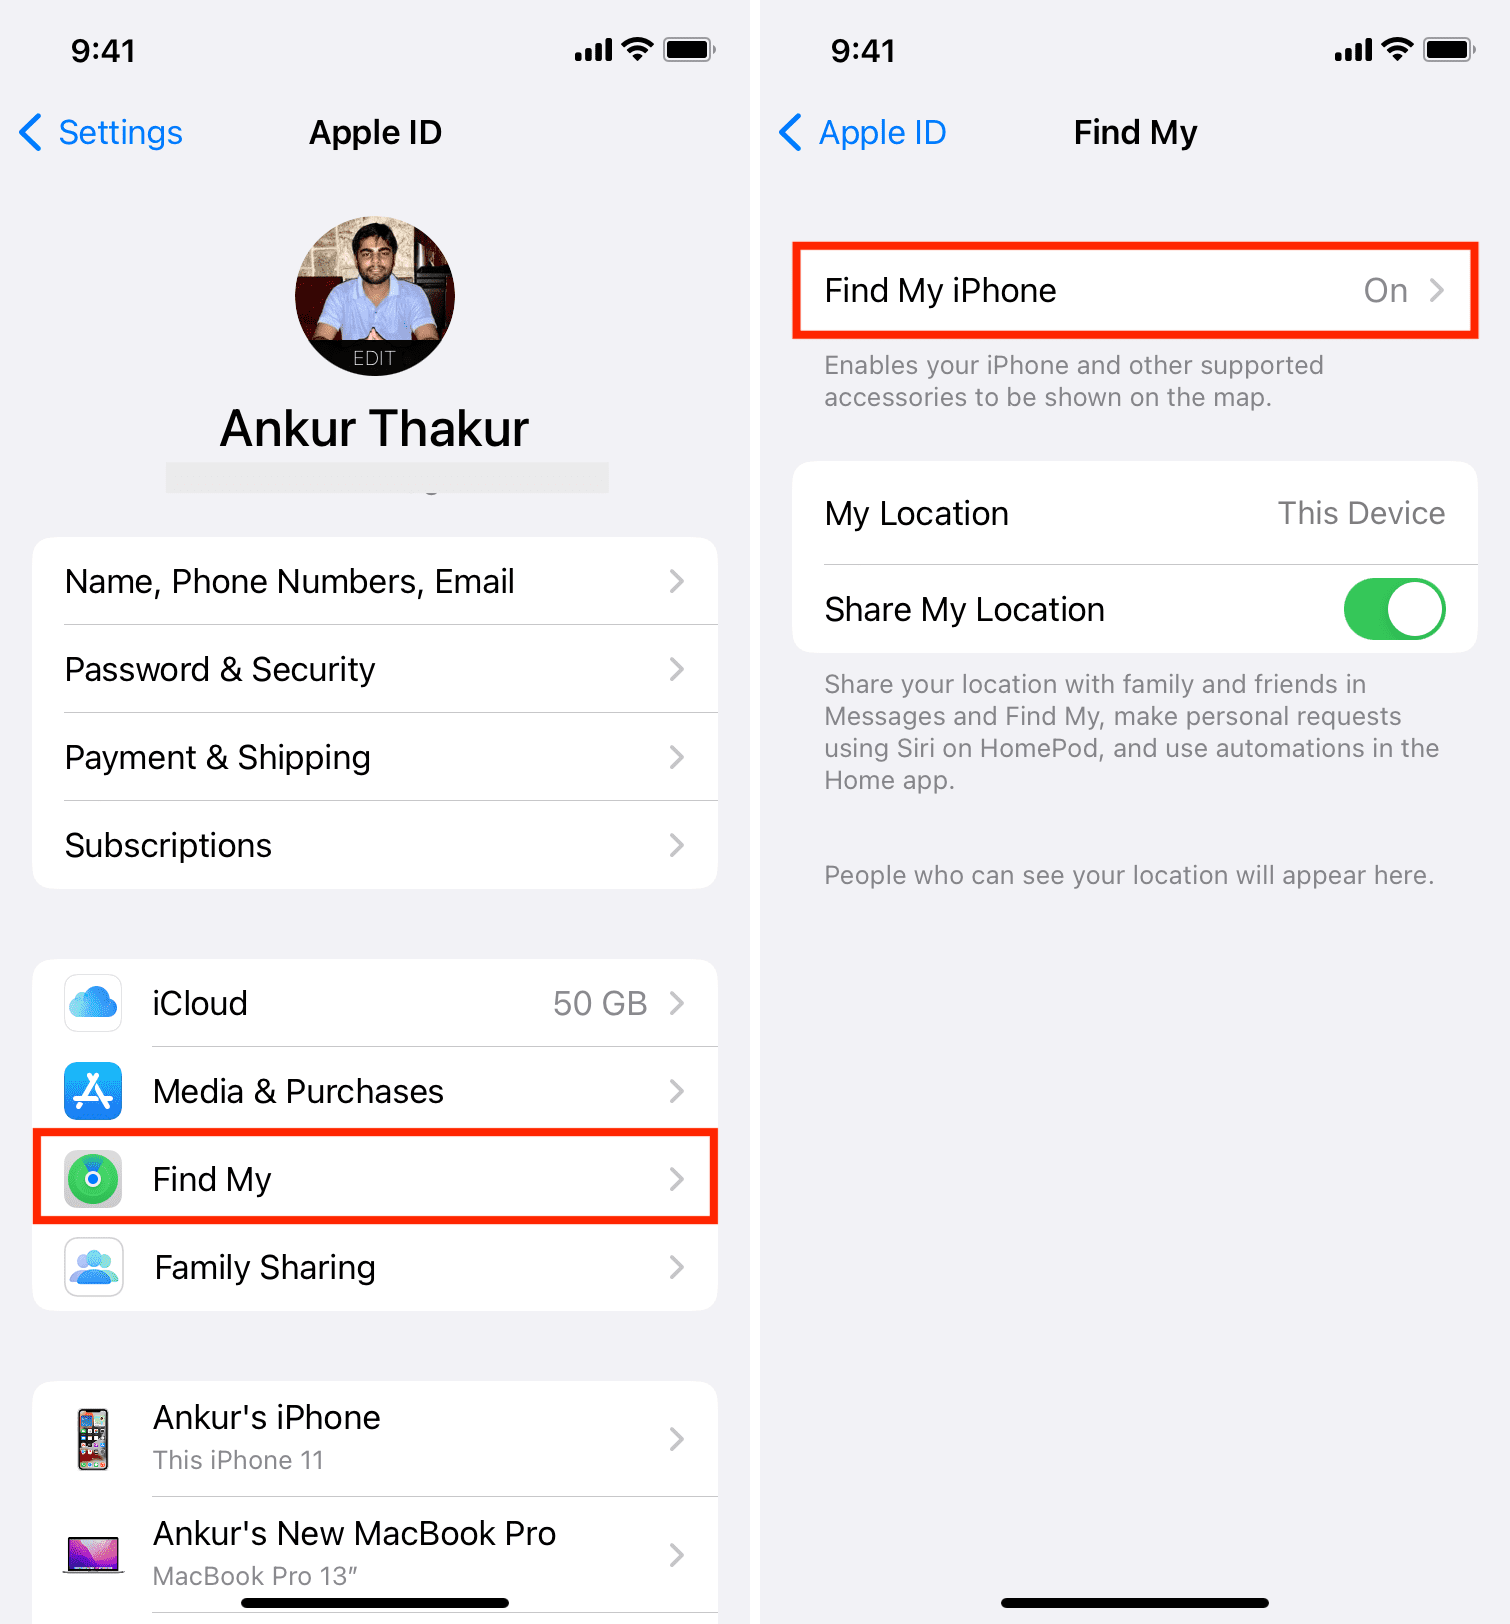
20. Make sure Find My is enabled
Find My feature can help you locate your stolen iPhone as well as find it if you misplace it somewhere inside the house. Go to iPhone or iPad Settings and tap your name at the top. Next, tap Find My and make sure Find My iPhone/iPad is on.
21. Learn about accessibility settings
Finally, you must explore your iPhone’s impressive accessibility options tucked under Settings > Accessibility and see if something there can be helpful to you.
Here are some features worth checking out:
- VoiceOver: Speaks the items on the screen, ensuring it’s easy to operate your iPhone if you have vision problems or can’t see at all.
- Zoom: It magnifies the screen, making it easier to see.
- AssistiveTouch: Adds a floating multi-functional virtual button to your iPhone or iPad screen.
- Assistive Access: Strips down your regular iPhone operating system into a minimalistic phone with just a few apps and features.
- Motion: Use the options here if you are not comfortable with motion & visual effects. You can also use it to stop GIFs from animating in a web browser.
- Sound recognition: Your iPhone will listen for certain sounds, like the doorbell, smoke alarms, appliances, etc., and notify you of them.
- Live Captions: iPhone will display real-time captions in FaceTime and other apps.
- Live Speech: If you have difficulty speaking, you can type what you want to say, and your iPhone will speak those written words. It can be used even when you’re on a phone call. And on top of that, you can also pair it with Personal Voice to speak in your voice!
- Action button: If your iPhone has an Action Button, you can configure it to do one thing that’s very important.
Check out next: 40+ things I do on a new Mac