You may not be a complete novice when it comes to capturing photos with your iPhone camera. But you may not be an expert either. If you fall somewhere in between and want to take your photos to the next level, we have some terrific tips for iPhone photography.
To see the following tips in action, check out this clip from iDB’s video expert, Harris.
Photography tips for iPhone
While Harris goes into full detail with some excellent tips, we’ll also highlight several of them below.
Technique
Before you move onto navigating the camera app and snapping your photos, you’ll want to get the perfect shot in view. These techniques will help you use the viewfinder to frame the picture and focus on your subject.
Rule of Thirds
The Rule of Thirds is one of the first techniques taught to beginning photographers. As the Digital Photography School explains:
The basic principle behind the rule of thirds is to imagine breaking an image down into thirds (both horizontally and vertically) so that you have 9 parts.
By using a grid, you put the important parts of your shot at the intersections or lines. This creates a well-balanced and appealing finished photo.
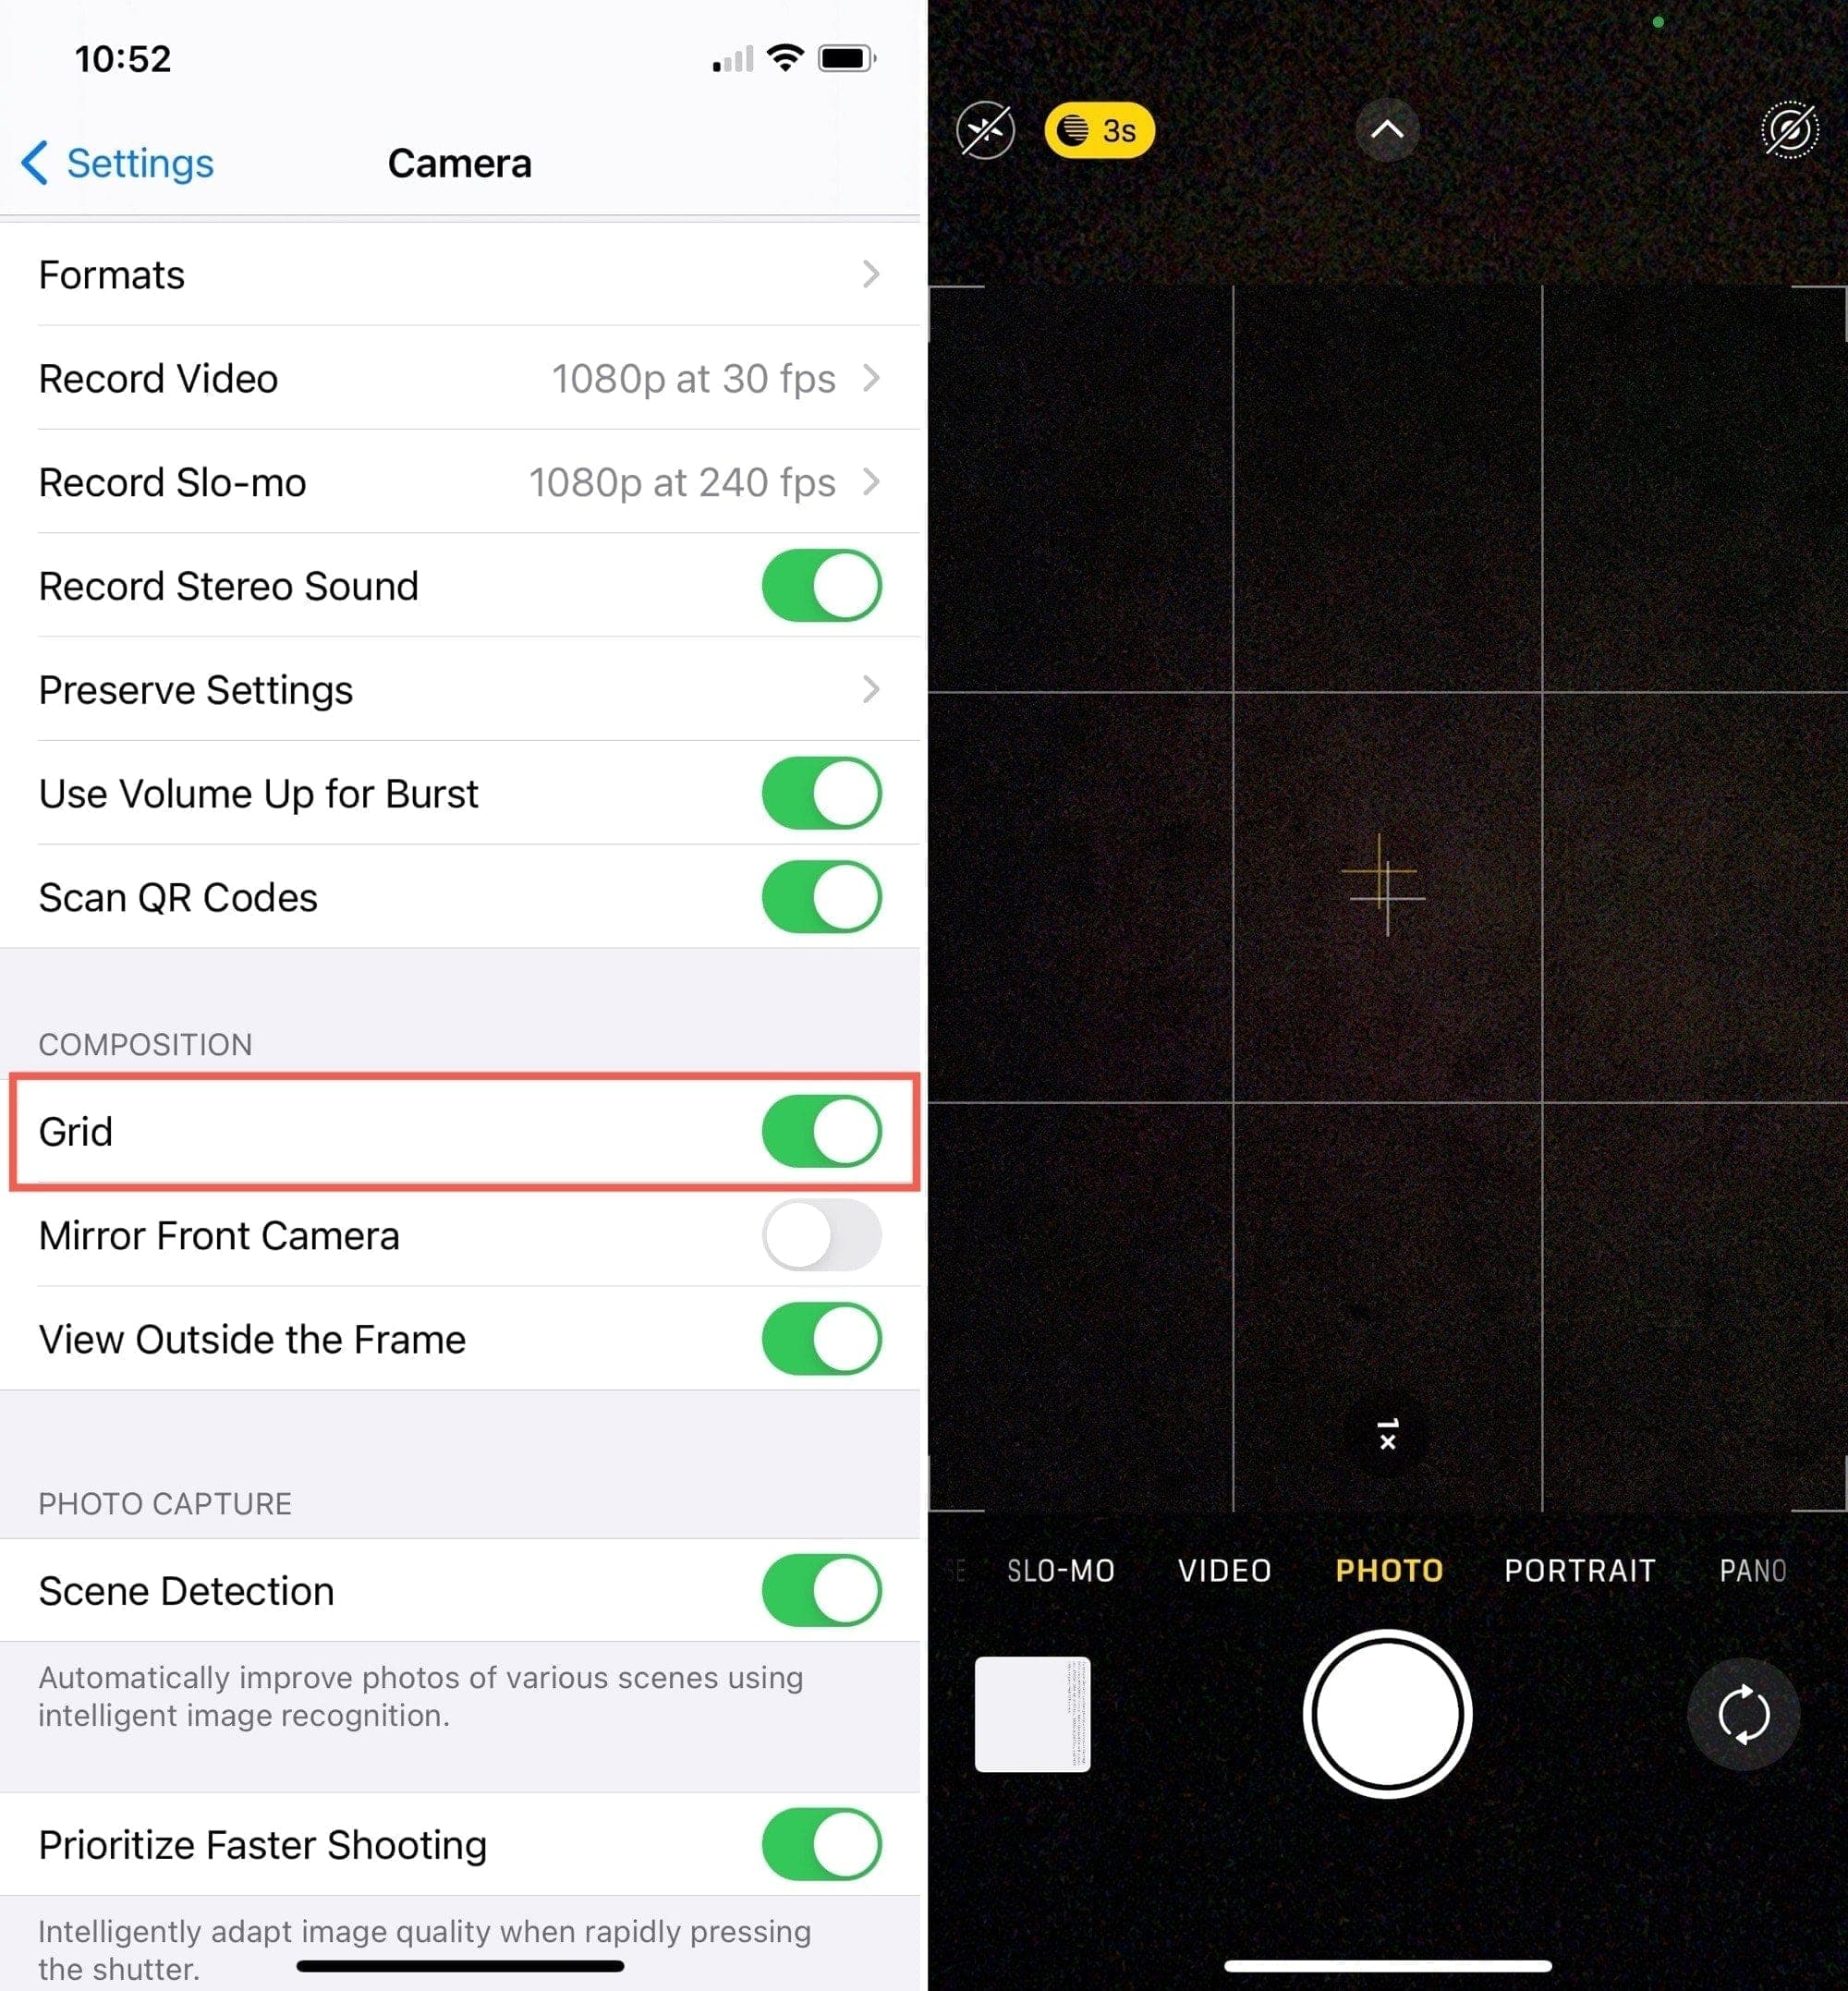
To enable the grid, open Settings > Camera. Then under Composition, turn on the toggle for Grid.
Exposure and focus
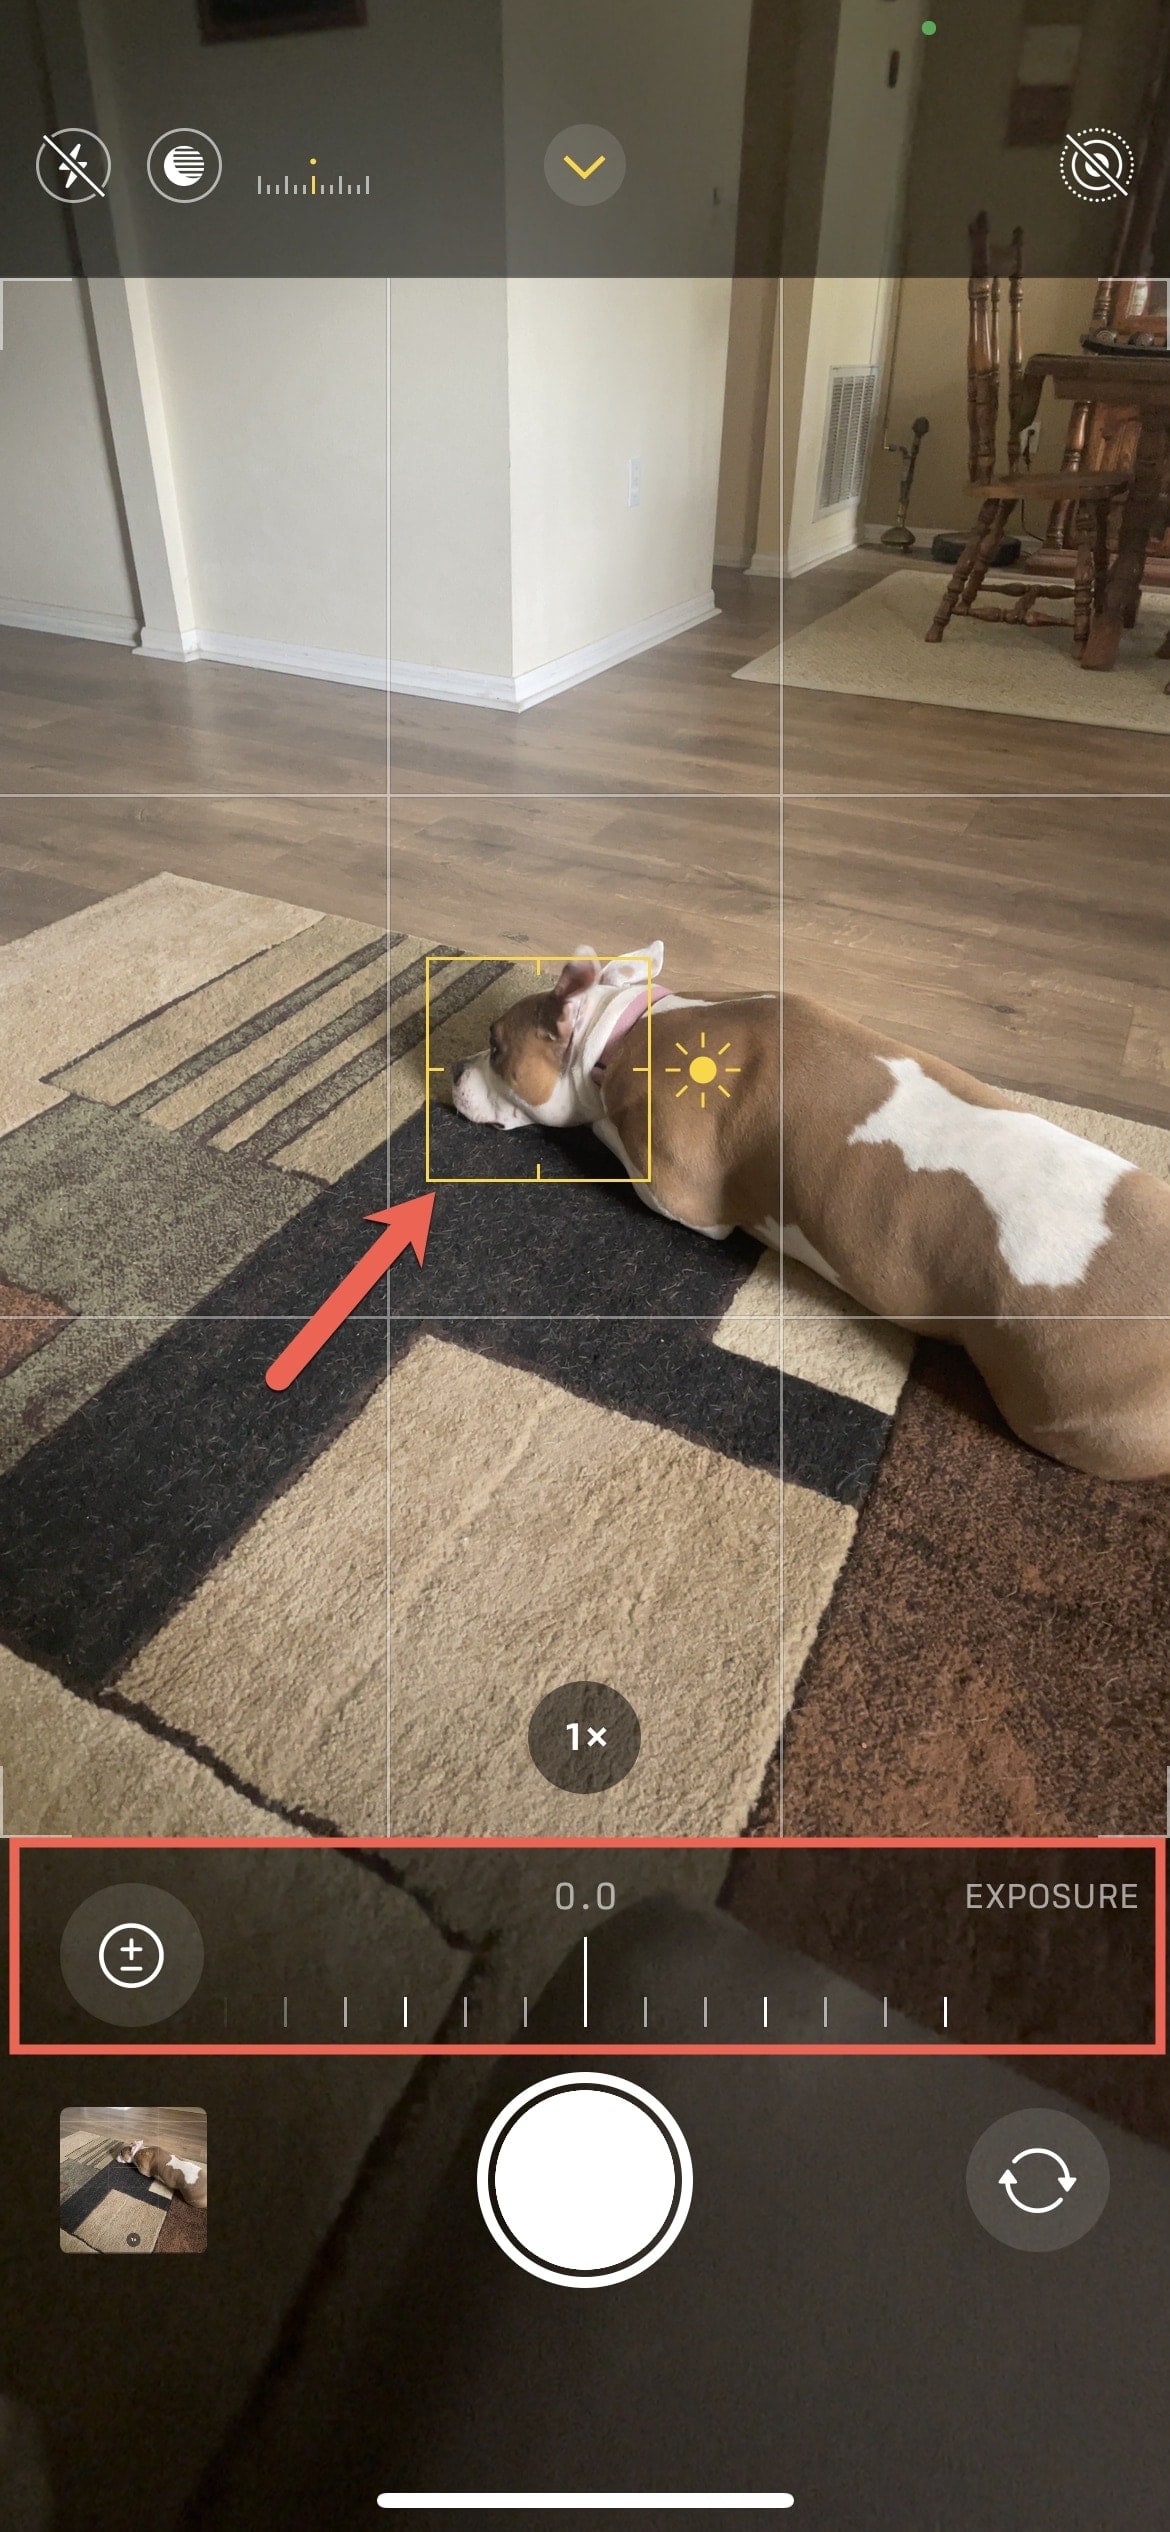
The Camera on iPhone offers features to get the correct exposure and help with focus. With the Camera open, tap the arrow at the top or swipe up from the Shutter button to reveal the Exposure icon. Then use the slider to adjust.
You can also tap on the viewfinder to display the Focus box (yellow square). Then slide up or down to adjust the exposure. Tap and hold to lock the Focus.
Related: How to lock focus and exposure separately on iPhone
Snapping the photo as just the right time is important but can also prove difficult, depending on your subject. If you’re capturing a simple, static object you have more time than if you’re getting a shot of child, animal, or action scene. With these navigational tips, you can grab the photo you need without fumbling.
- Snap a photo using either the Shutter button at the bottom of the screen or with off your Volume buttons.
- Hold the Shutter button instead of tapping it to capture a quick video.
- Slide the Shutter button to the right to lock the camera in video mode.
- Slide the Shutter button to the left to capture a burst of photos.
- Swipe up from the bottom or down from the top to view different shooting modes and other features. This lets you set the timer, turn the flash on or off, use Night Mode, or apply a filter.
Tip: You can apply a filter to your photo before or after you snap it. So if you don’t want to miss the perfect shot, wait until after to check out the filters.
Camera settings
While you find several settings for the iPhone Camera, there are a few that you should take a moment to consider and adjust. Head to Settings > Camera.
Photo format
At the top of the Camera settings, you’ll see an option for Format. This lets you choose between High Efficiency and Most Compatible for your captures.
- High Efficiency: Most advanced, smaller file size, HEIF/HEVC format.
- Most Compatible: Easier uploads and conversions, JPEG/H.264 at 60 FPS, and 1080p at 240 FPS.
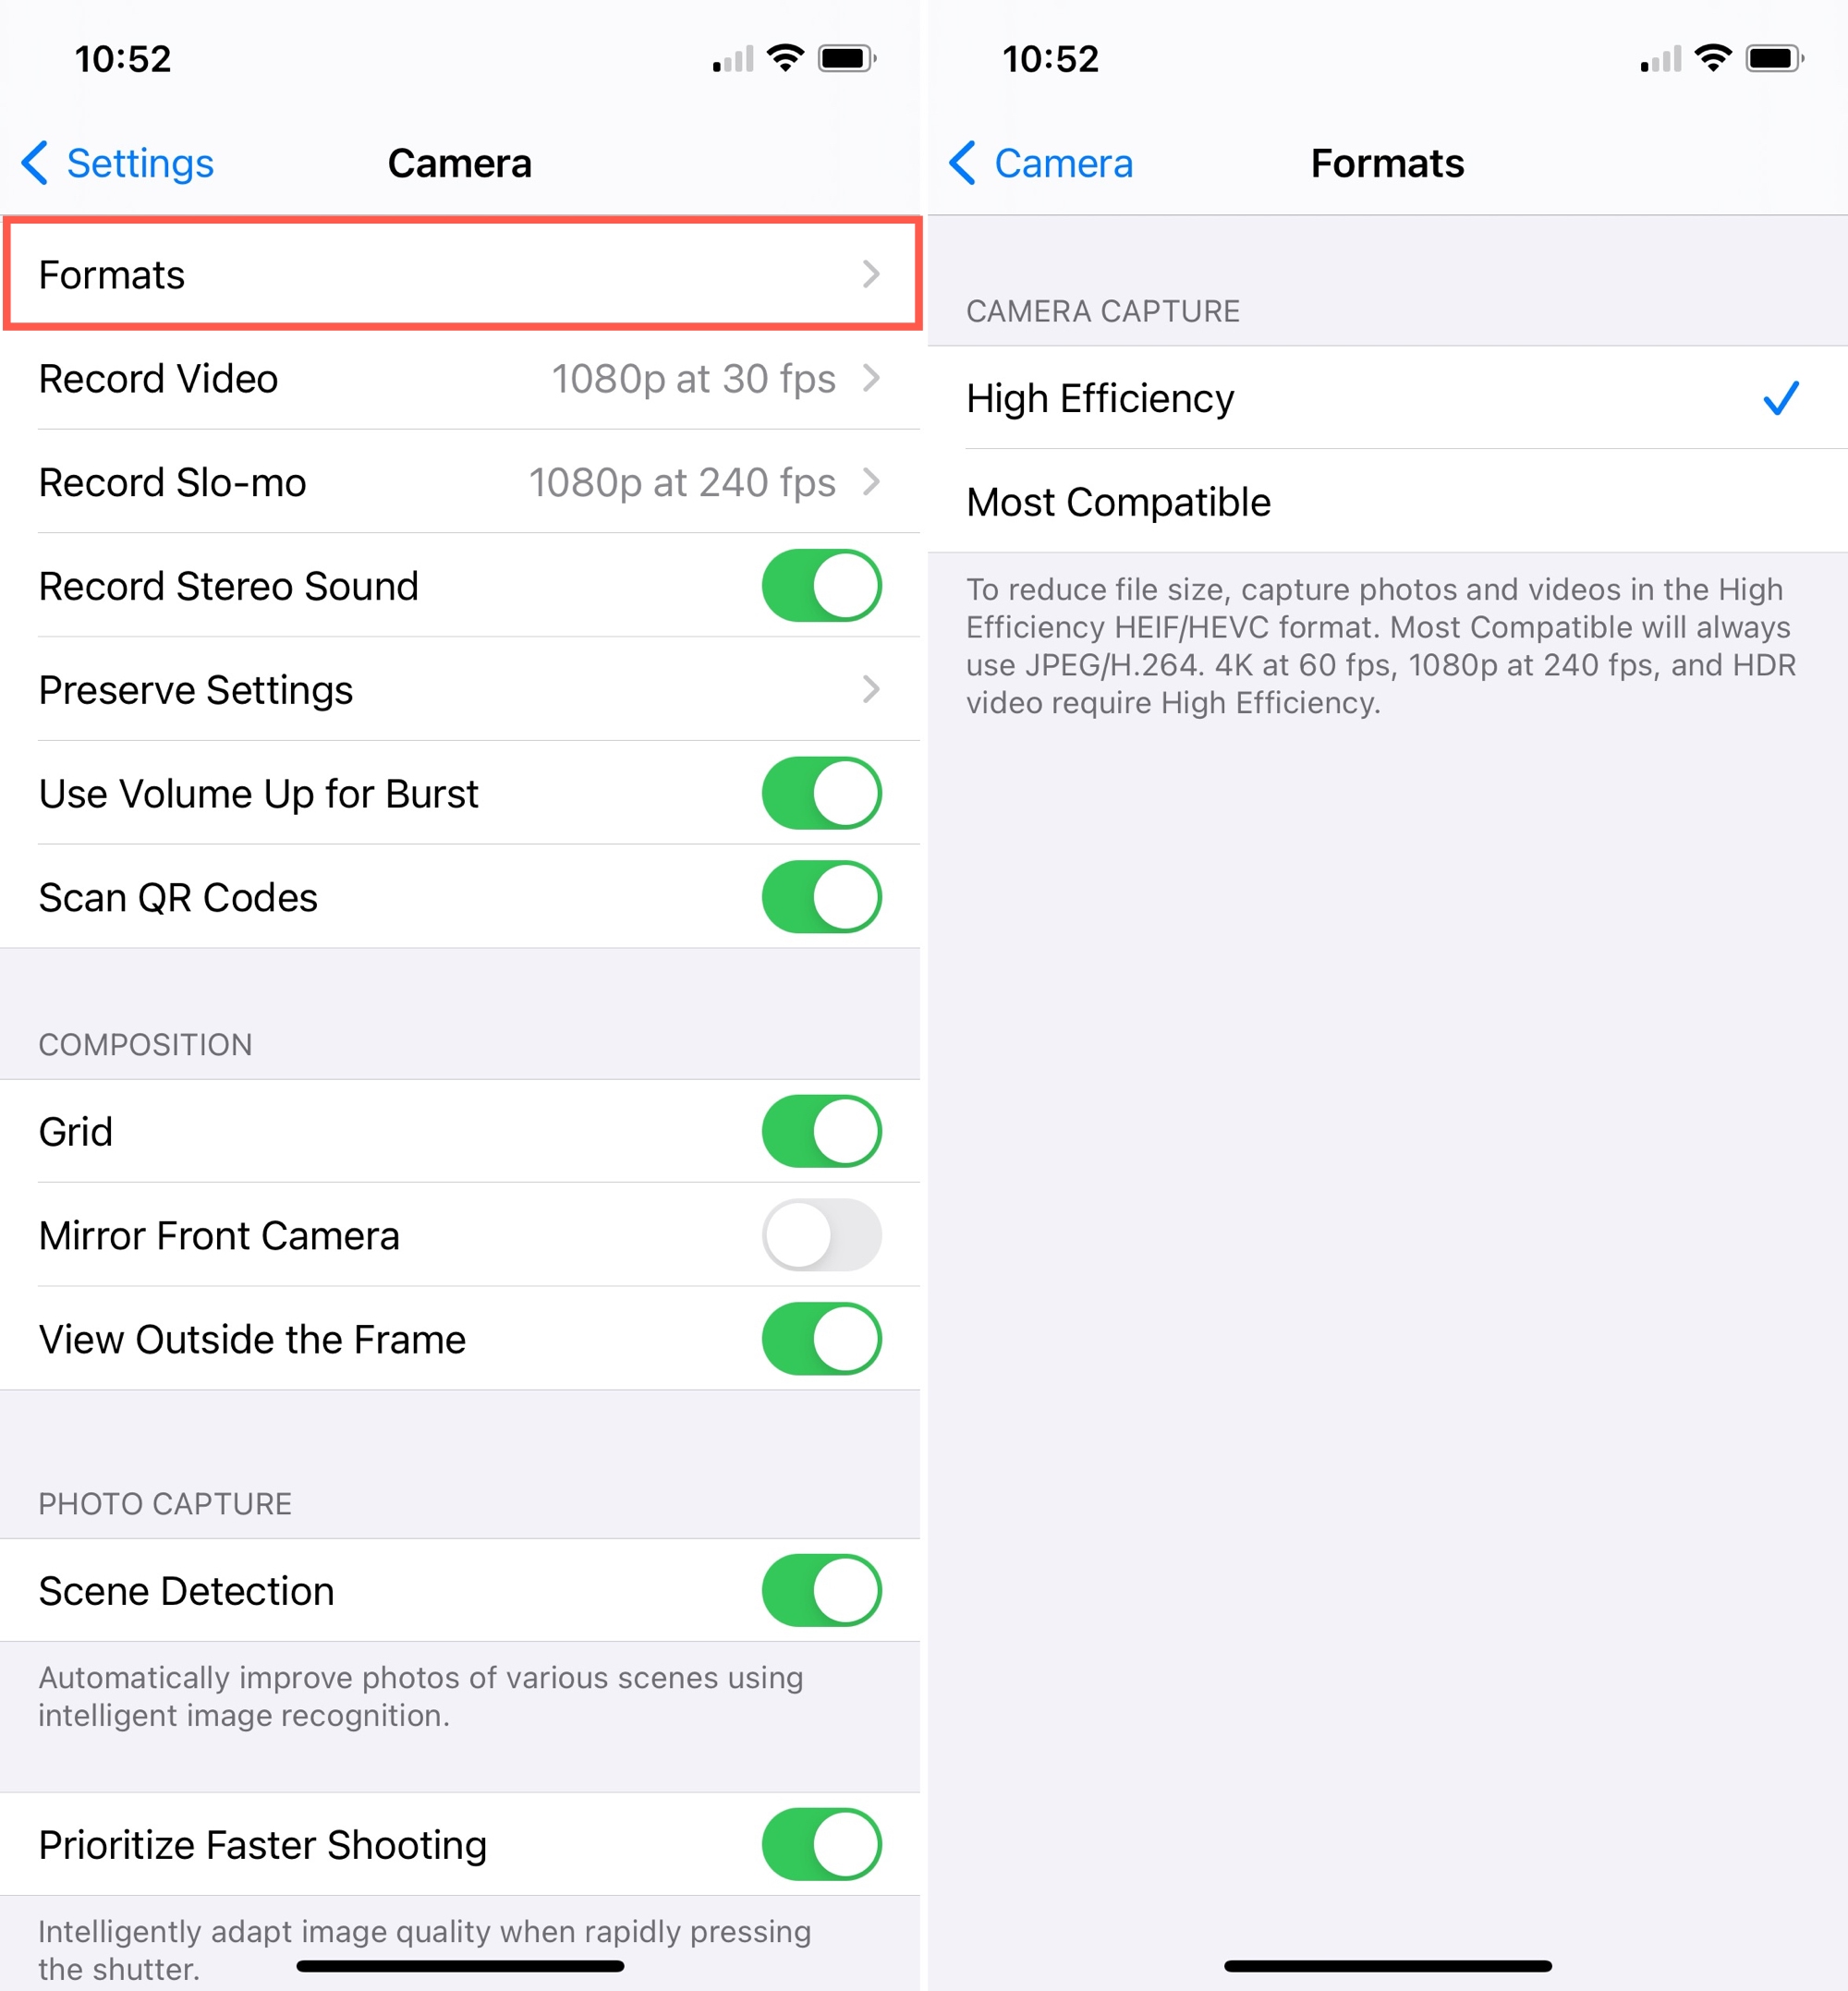
For HDR, you’ll need this set to High Efficiency. Check out what are HDR, Auto HDR & Smart HDR shooting modes.
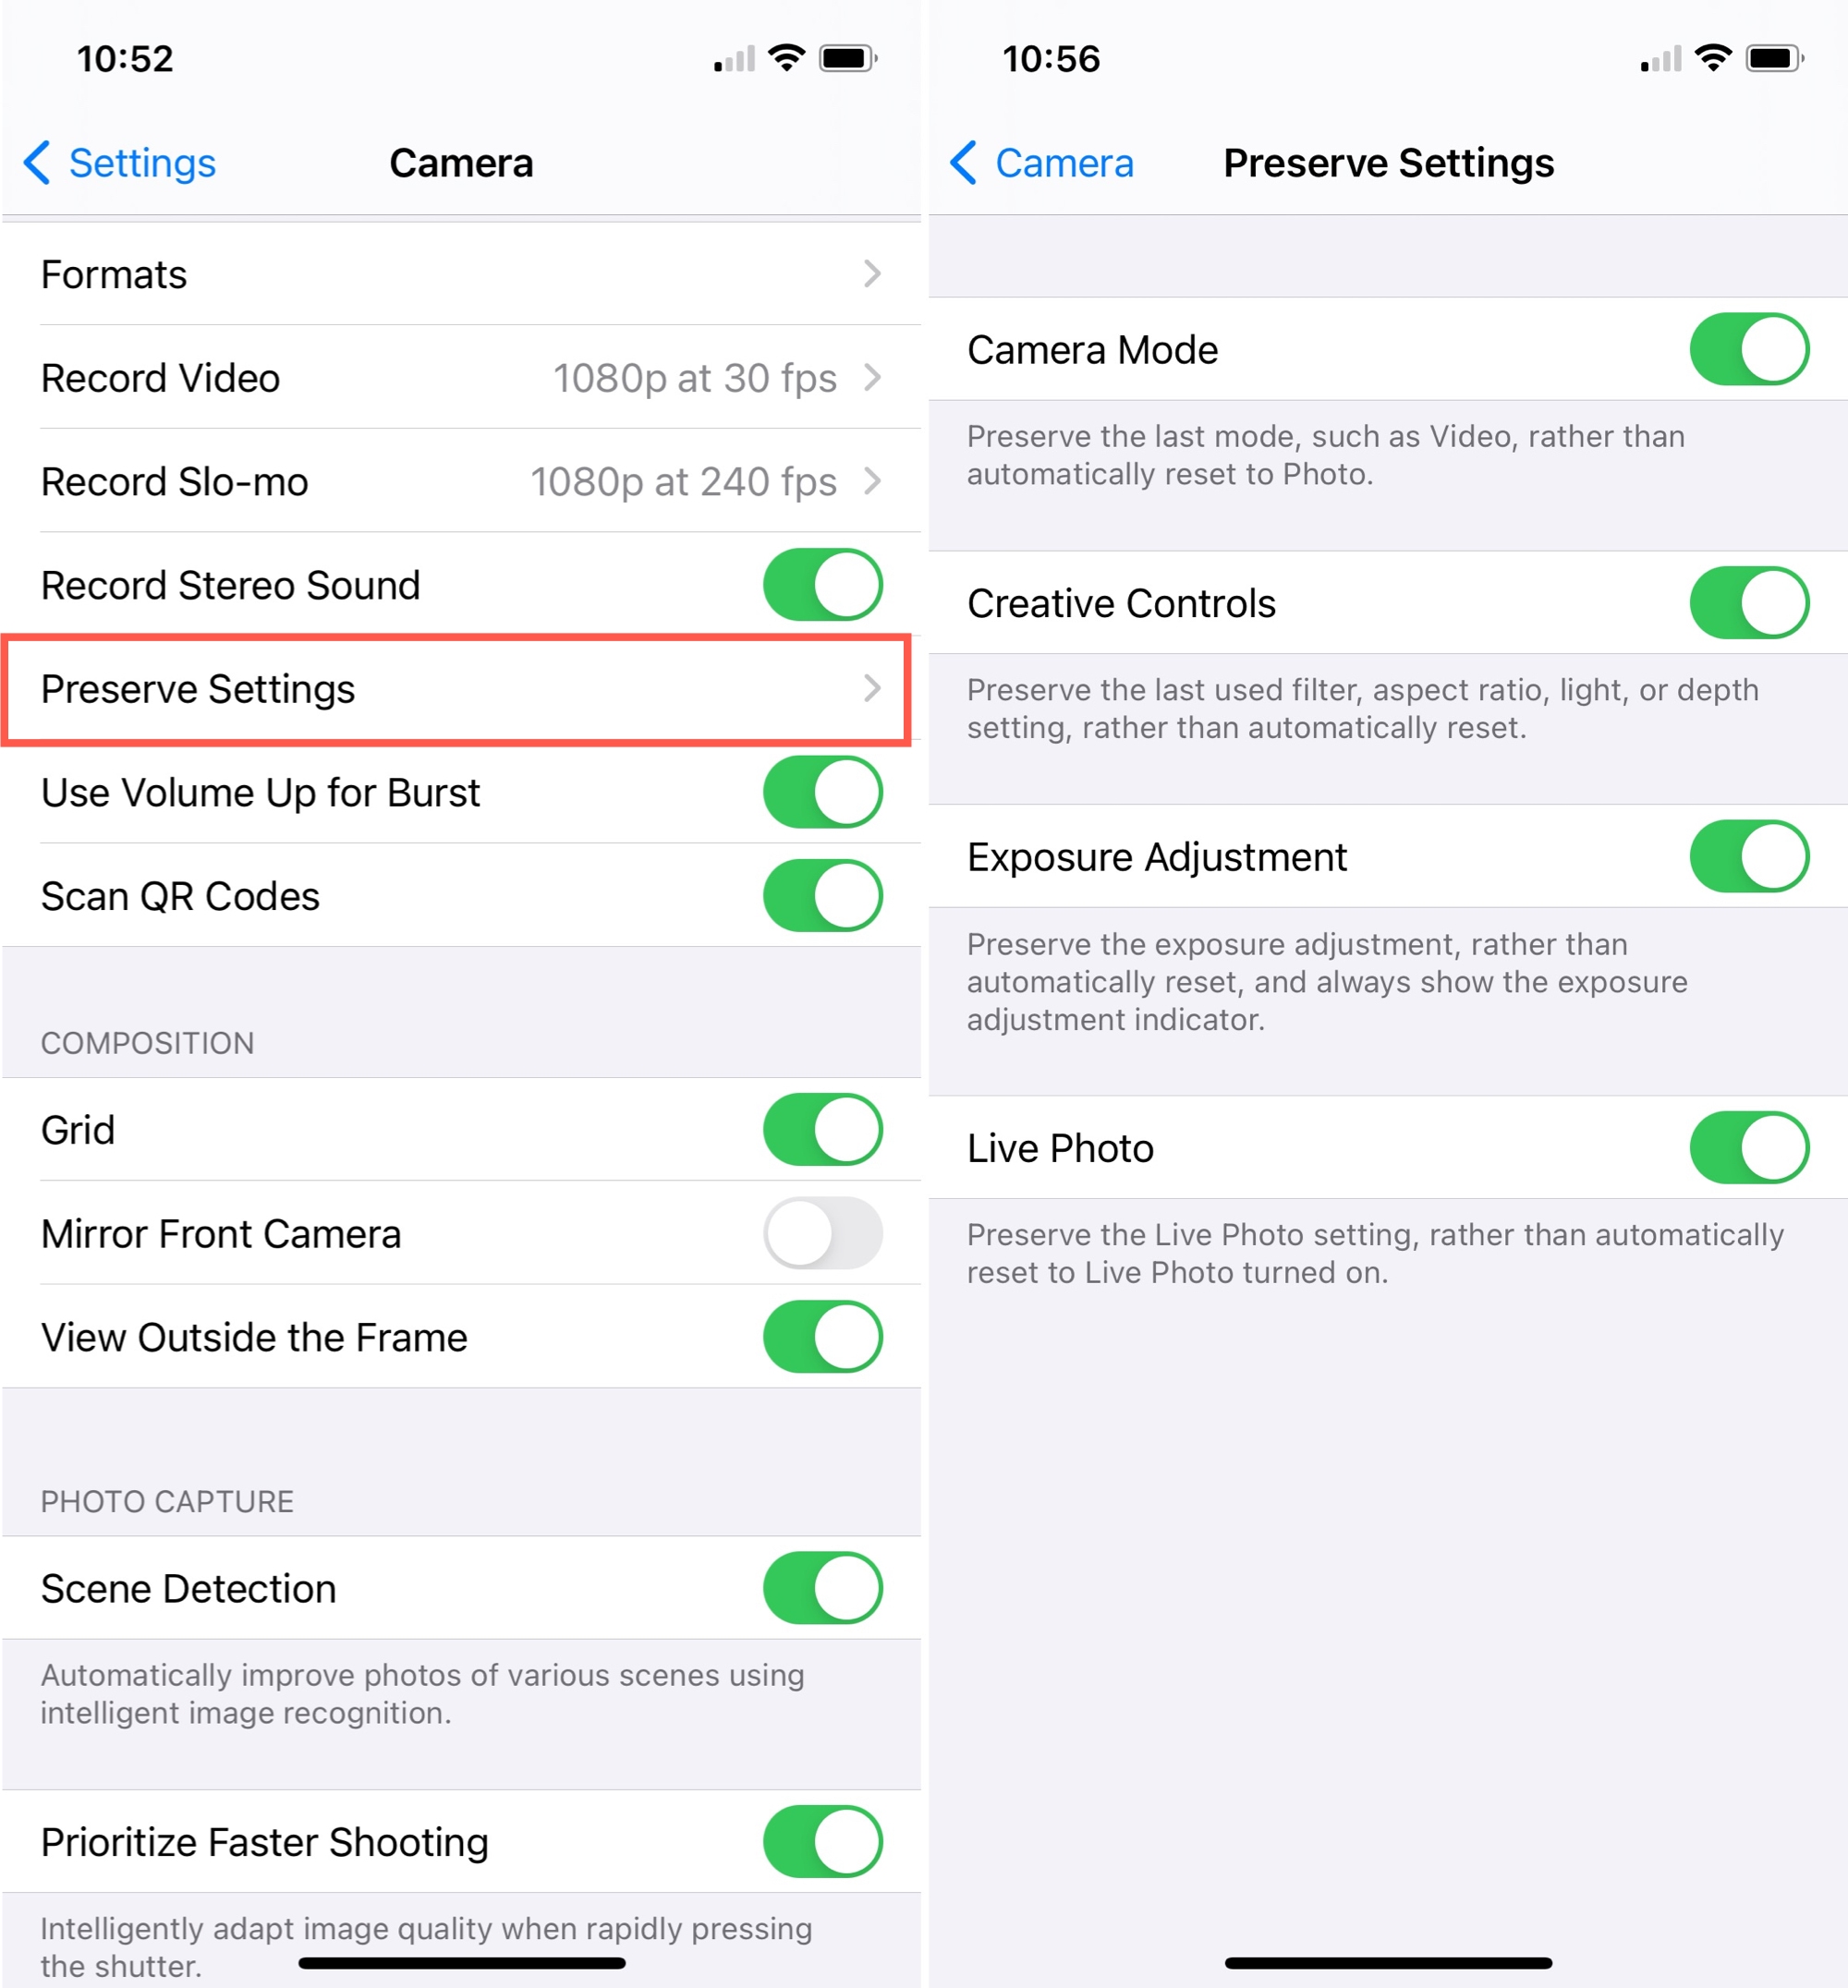
Preserve your settings
If you make changes that you want to use moving forward, you can save them. Tap Preserve Settings and enable the toggles for settings you want to keep for Camera Mode, Creative Controls, Exposure Adjustment, and Live Photo.
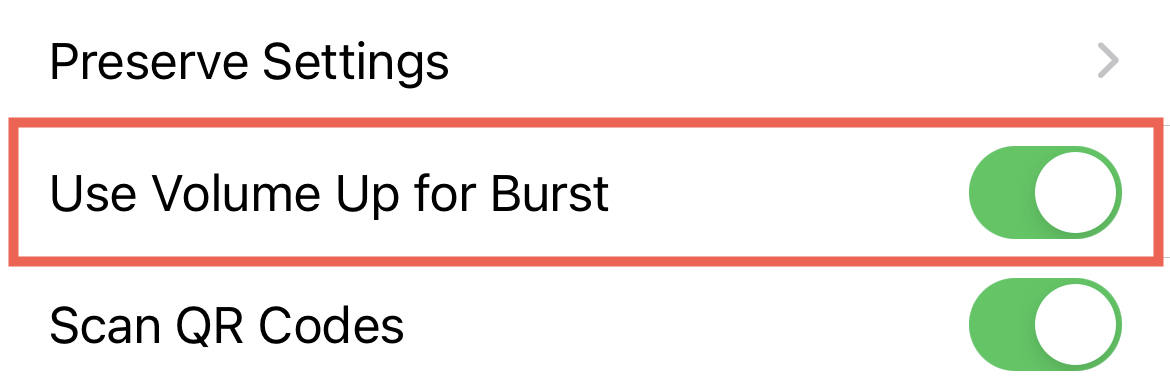
Use Volume Up for Burst
One more setting that’s super handy is the Use Volume Up for Burst option. If you enable this toggle, you can hold the Volume Up button on your iPhone to capture a burst of photos. This way, you don’t have to slide the shutter button, allowing you to capture that burst faster.
Related: What is burst mode on iPhone and how do you use it
Practical tips and features
Check out these additional tips, suggestions, and features. We covered many of them in-depth in our Tutorials section, so be sure to have a look for full details.
- How to export Live Photos as standalone videos
- How to change the key photo for a Live Photo on iOS and Mac
- How to add loop and bounce effects to Live Photos
- How to add captions to photos and videos in Photos on iOS and Mac
- How to make the most of Portrait mode
- How to remove depth effect from Portrait mode photos
- How to scan QR codes and documents from the Home screen
- How to scan QR codes on iPhone through Control Center
- How to markup and annotate photos on iPhone and iPad
- How to rotate photos on iPhone or iPad
- How to easily rotate videos on iPhone or iPad
- How to rotate, straighten, crop, trim or flip a video in the Photos app
- How to search for pictures in the improved Photos app
- 3 ways to see places where your iPhone photos were taken
Wrapping it up
Tips for capturing better photos are always helpful. And unless you’re a professional photographer, hopefully some of these suggestions will help you!
Have tips or recommendations of your own for iPhone photography? Share them in the comments below or hit us up on social media. You can find us on both Twitter and Facebook.