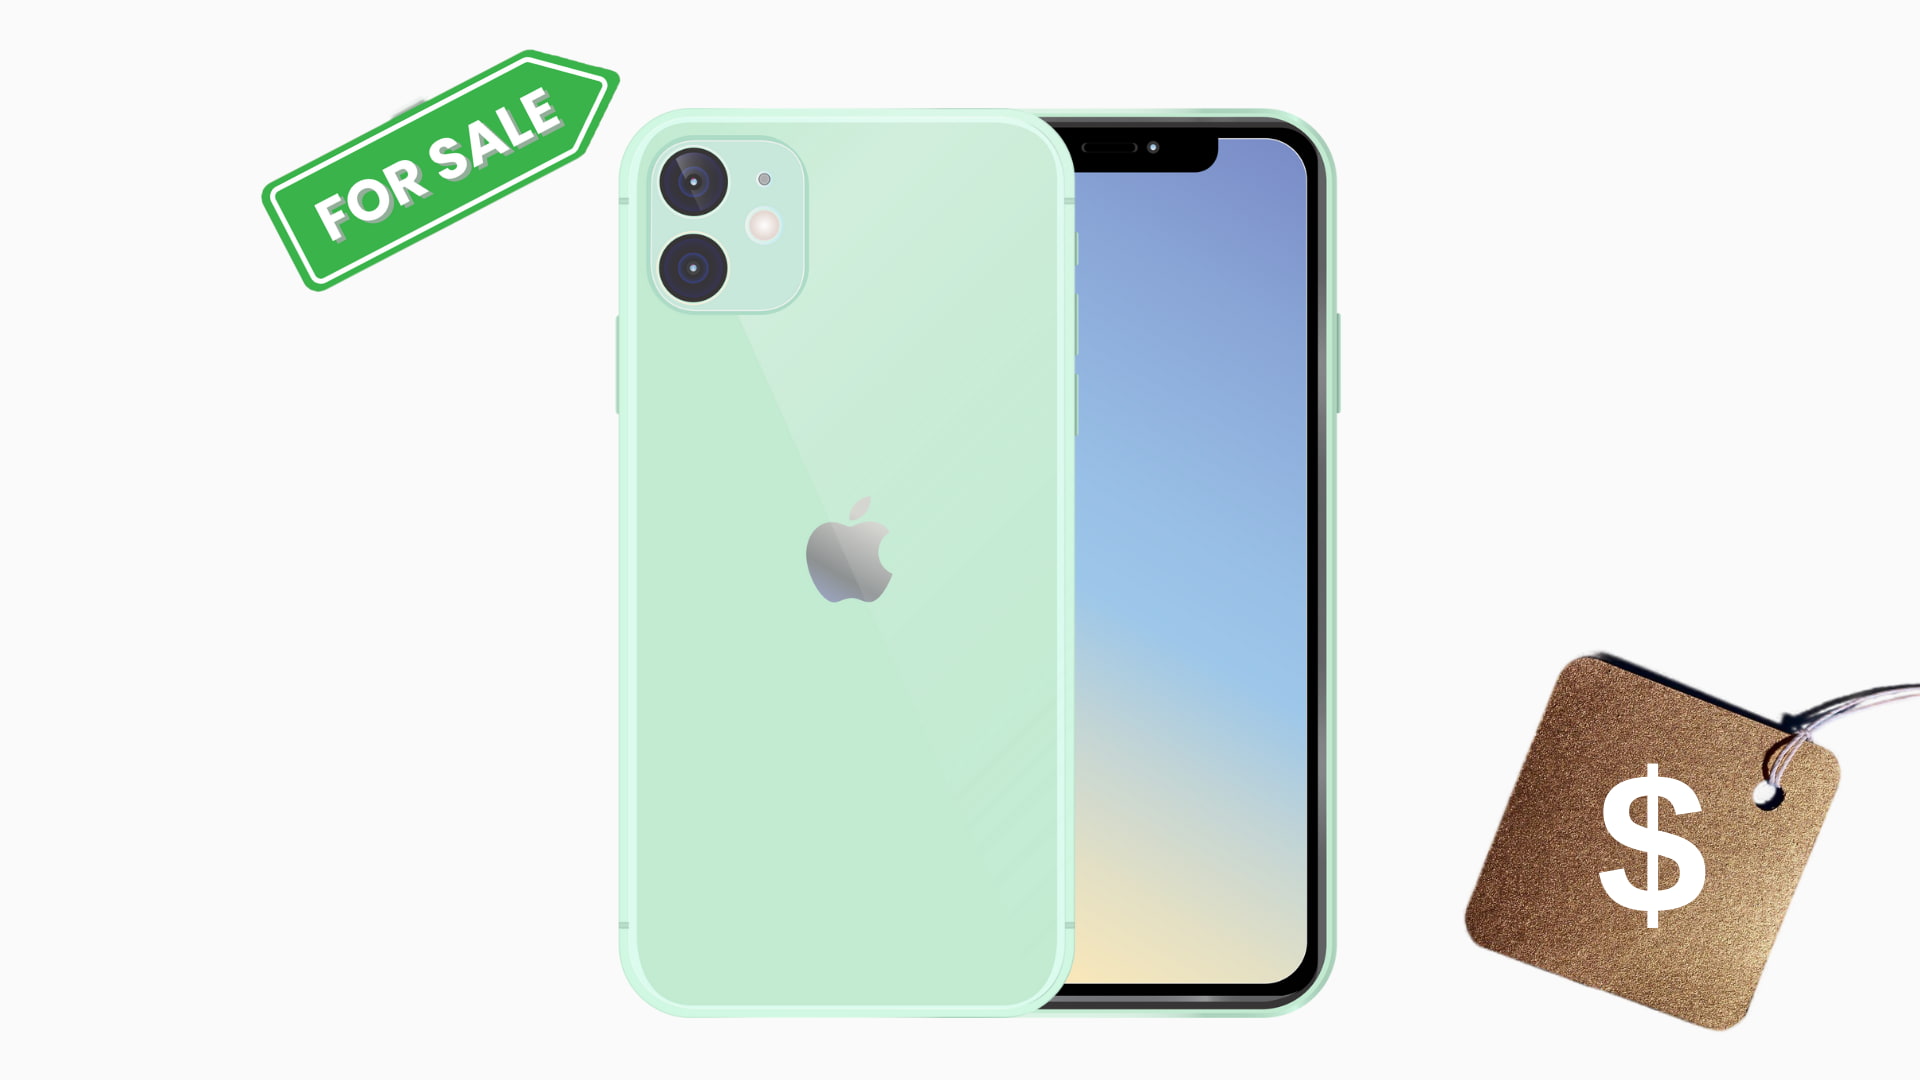
If you update your iPhone on a regular basis, it makes sense to give the old one to a family member, sell it, or trade-in with Apple to get store credits. Passing on your iPhone is also good for the environment. But before you go ahead, you must follow some essential steps to ensure your personal data doesn’t unknowingly go into the hands of the next iPhone owner. To help, we have created this comprehensive guide that covers everything you must do before saying goodbye to your iPhone, iPad, or iPod touch.
What not to do before selling or giving away your iPhone
Before mentioning what to do, it’s vital to inform you about what you must not do. Once you decide to sell, give away, or trade in your iPhone:
- Don’t manually delete any contacts, reminders, calendar events, photos, or videos, as this will remove them from your iCloud or Google account.
- Don’t start removing the apps one by one. You must keep it so that it can be backed up. We’ll tell you about removing apps later in this guide.
Are you using eSIM on your iPhone?
As you may already know, your iPhone XS and later supports one physical nano-SIM and one eSIM. Like me, if you use two phone numbers on your iPhone, this is important.
Before selling, contact your carrier or browse their website’s eSIM section and ensure that you won’t have difficulty setting up the eSIM on your new device. Once you are comfortable, you can move ahead with the remaining must-dos.
To initiate the transfer, if your carrier asks you to remove the plan from this iPhone, go to Settings > Cellular > tap the second plan > Remove Cellular Plan.
The next important question is, do you still have the iPhone with you, or have you already given it away? If the old device is still with you, that’s perfect. You can take your time to follow the things mentioned here carefully. If it isn’t with you, learn about your options.
What to do before selling or giving away your iPhone
Here’s a list of 15 things you must do before you hand over your iPhone or iPad to the next owner:
1. Back up your iPhone
The data that’s currently on your device is valuable. Thus, you must first back up your iPhone to iCloud or a computer. It’ll also back up the Apple Watch if you have one.
After you back up the device, follow the remaining things mentioned here.
Also, here are some tips related to backing up your iPhone.
Accelerate the backup
Before backing up, you can delete unnecessary social media apps like Facebook, Twitter, etc., which will reduce the backup size and time. Plus, these apps already store all your data on their servers. When you log in to these apps on your new device, sign in using the same username, and you’ll get everything back. For more, you can follow our guide to stop unnecessary apps from being a part of the iPhone backup.
Create a temporary iCloud backup
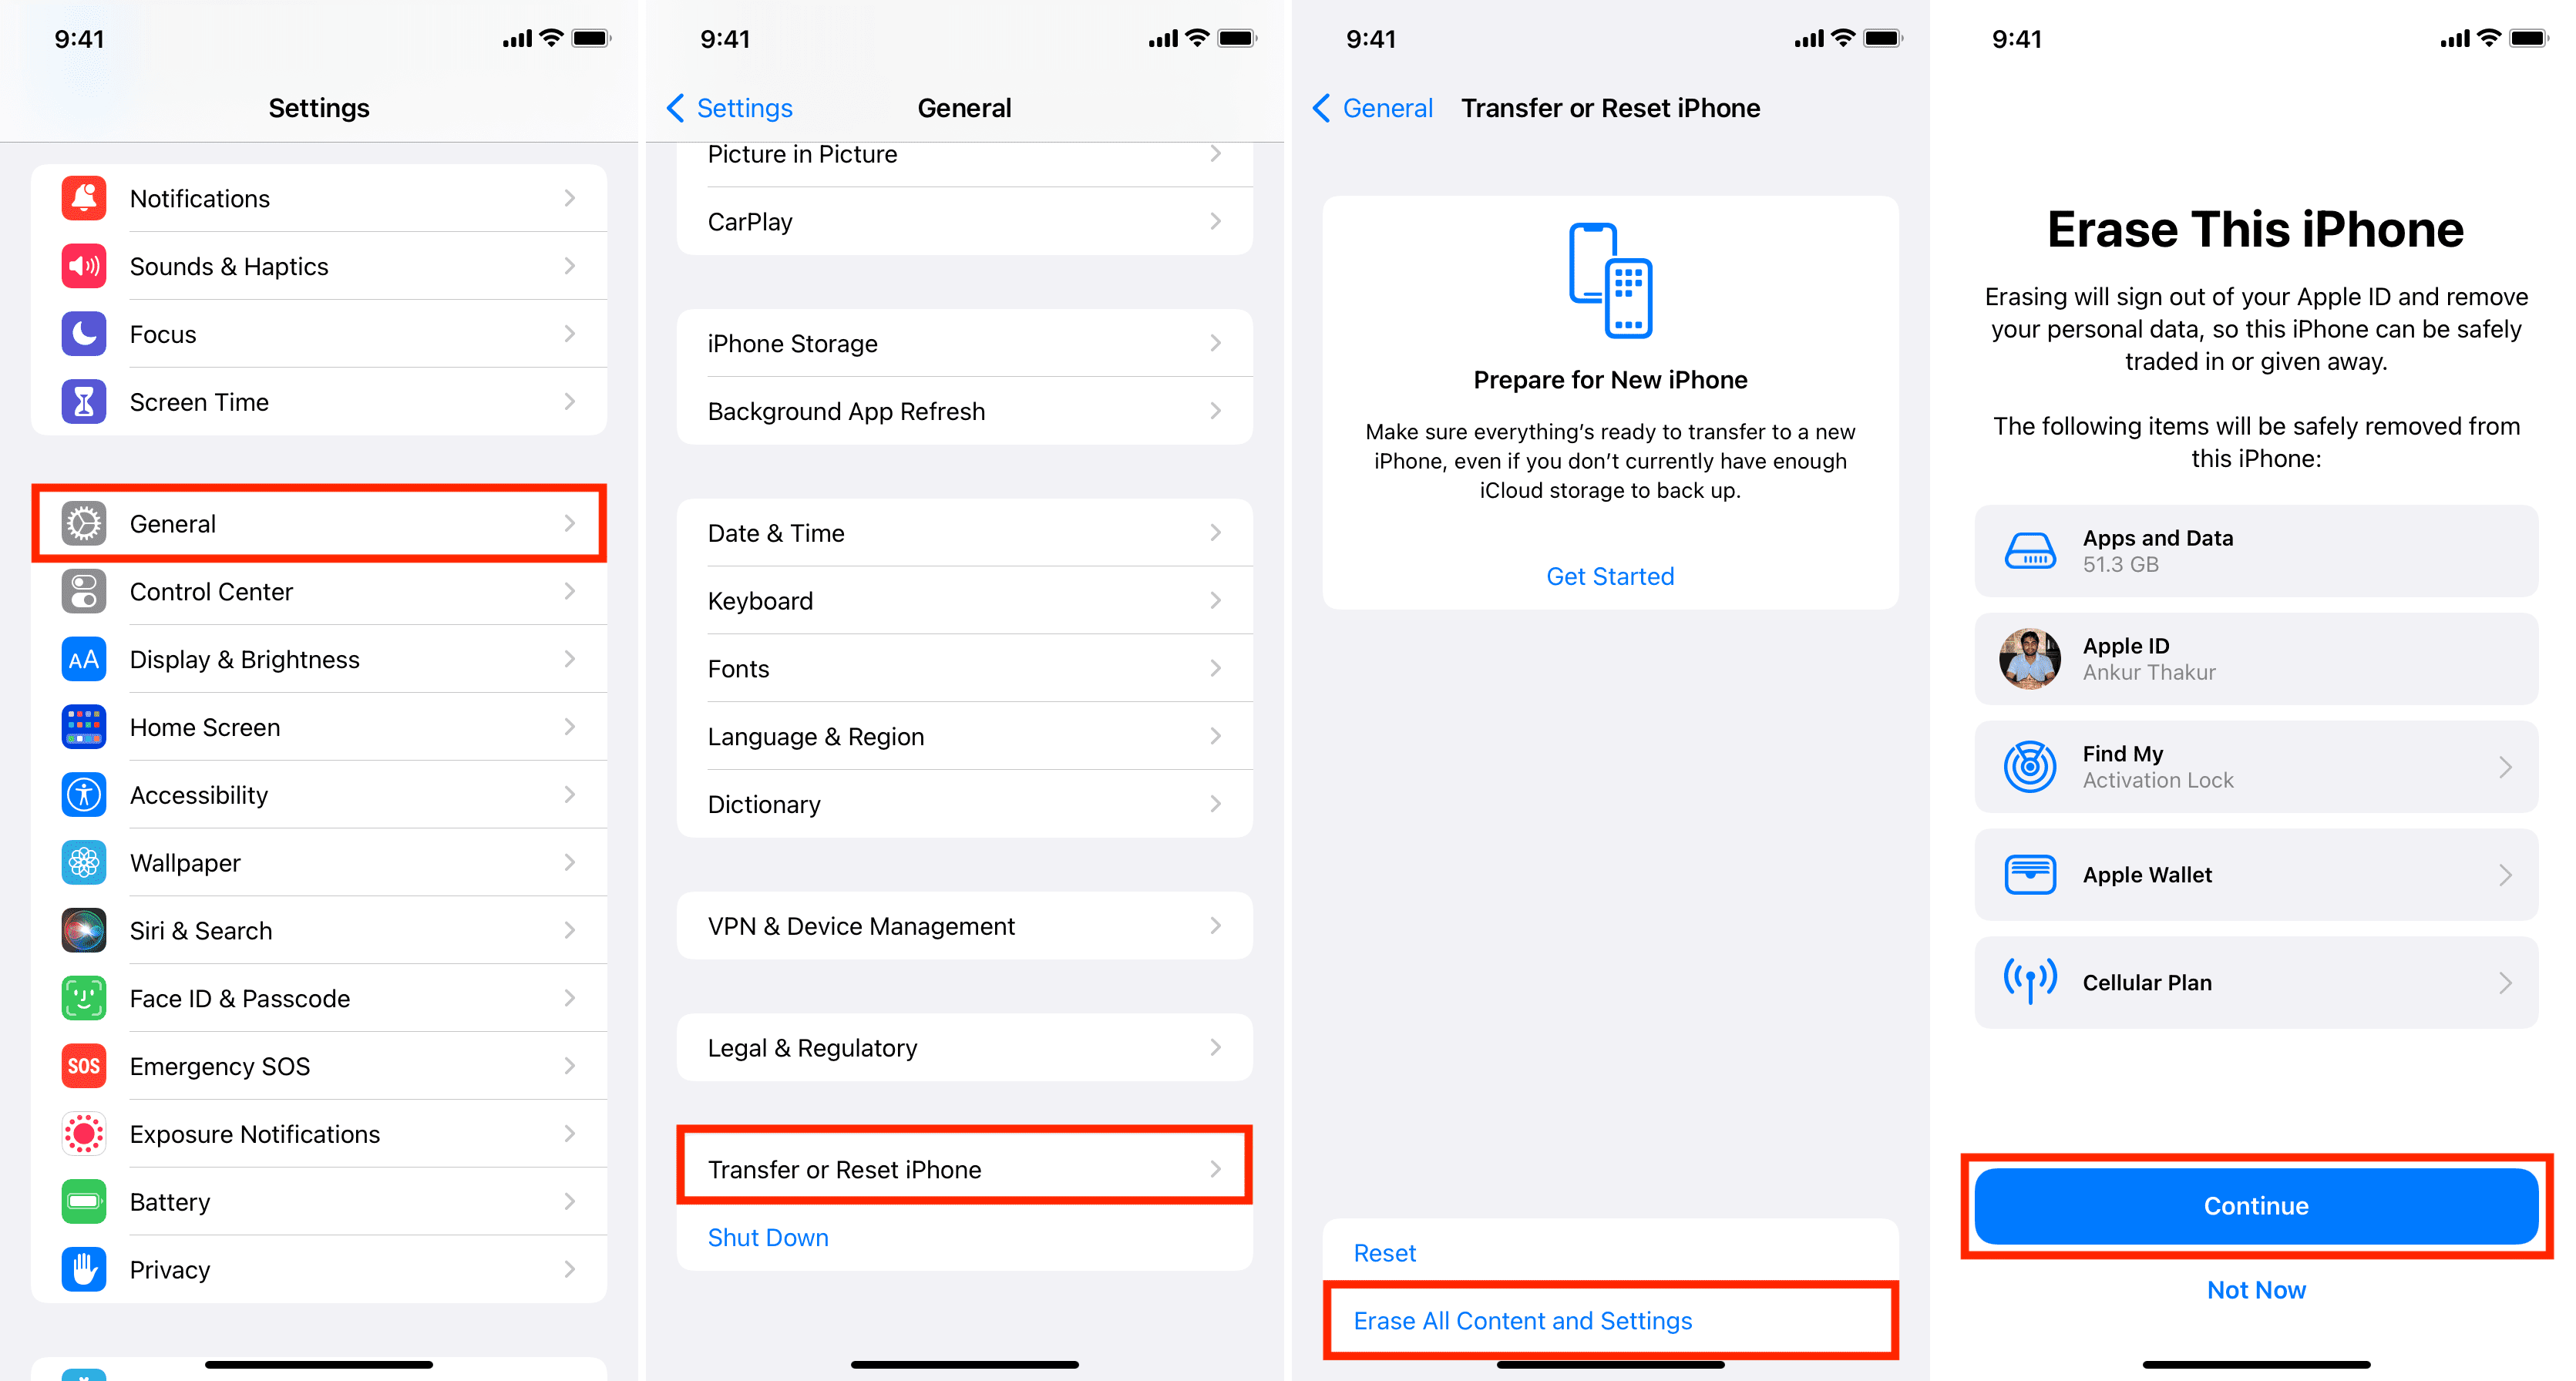
Suppose you’re on the 5GB free iCloud plan or have insufficient free iCloud space. In this case, if the iPhone you’re selling is updated to iOS 15, you can create a temporary iCloud backup of this device for 21 days and restore it to the new device. This is Apple giving you as much free iCloud storage as your old device backup requires to help you effortlessly move everything to your new iPhone. To do this, go to Settings > General > Transfer or Reset iPhone > Get Started.
2. Back up your third-party apps
On my iPhone, I use GoDaddy Studio to make important images. Before moving to a new iPhone, I ensure all its projects are backed up to the cloud.
Similarly, for third-party chat apps like WhatsApp, I go to the in-app settings and ensure that everything is safely backed up.
3. Move your photos and videos somewhere else
If you already use iCloud Photos, you can skip this one. But if you don’t, and to save space, you have turned off Photo Library in iCloud Backup, make sure to move your memories from your iPhone to your computer. You can also use a service like Google Photos or Amazon Photos to store your pictures and videos.
Related: How to access photos on iCloud using iPhone, iPad, Mac, and a web browser
4. Unpair your Apple Watch
Before selling or giving away your iPhone, make sure you have unpaired your Apple Watch.
5. Turn off Find My iPhone
Find My iPhone also enables Activation Lock on your iPhone. If you don’t turn it off and force-erase your iPhone, the next person can’t use it. With Activation Lock enabled, the iPhone is nothing more than an expensive paperweight!
Therefore, before selling, giving, or trading, go to Settings > your name > Find My > Find My iPhone and turn it off.
Extra info: Some eBay and online sellers use this trick to sell locked iPhones and later ask for extra payment to share the Apple ID and password to remove Activation Lock!
6. Turn off iMessage and FaceTime
Go to Settings > Messages and turn off the switch for iMessage. Now, go back to the main Settings screen and tap FaceTime. Turn off the switch for FaceTime as well.
7. Deregister iMessage if you are moving to Android
If you’re moving to a new iPhone, you don’t have to follow this. But if you’re getting rid of this iOS device and plan to use an Android phone, make sure you deregister iMessage. Doing this will ensure that you don’t miss regular texts people send on your current phone number.
8. Unlock your carrier-locked iPhone for more resale value
If your iPhone is locked to your carrier, it’s a good idea to unlock it so that the new owner can use it with any other carrier of their choice. Unlocking the iPhone also increases the resale value significantly. In case of uncertainty, follow this post to check if your iPhone is locked on not. If it is, contact your carrier and ask them to unlock the device.
Related: How to find the estimated value of your device with Apple GiveBack
9. Sign out of iCloud and Apple ID
The next important step is to sign out of iCloud and your Apple ID. To do this, go to iPhone Settings > your name and tap Sign Out from the bottom. When it asks if you would like to keep a copy of your contacts, Keychain, and other data, keep them turned off as you don’t need them on this device.
10. Take screenshots of apps and Home Screen layout
All the apps you have ever downloaded are listed in your App Store purchase history. The most popular ones are also listed in the Top Free Apps section of the App Store.
Still, you might have some apps that you don’t use often but are necessary. Now, after you restore your iCloud or computer backup, iPhone will start downloading all the apps and even keep the layout of the Home Screen.
But if you decide to set up your iPhone as new (which many, including me, prefer), you may take screenshots of your Home Screen and save them to Google Drive or AirDrop them to another device. After setting up your iPhone, these will help in downloading all the apps.
Must read: 30+ things I (iDB’s founder) always do when setting up a new iPhone
11. Erase everything from your device
This is the most important step to ensure no data is left on the iPhone or iPad you are selling or giving away. But before you do that, double-check you have backed up correctly.
Once you are ready to erase everything from this iPhone, go to Settings > General > Transfer or Reset iPhone > Erase All Content and Settings. Read the on-screen message, tap Continue and follow along. During this, make sure you remove the eSIM if you were using one.
12. Remove the SIM Card
Before parting with your iPhone or cellular iPad, save yourself a trip to the carrier store by safely ejecting the physical SIM card.
13. Clean your iPhone to make it look nice
Your old iPhone may be the first iPhone for the person you’re giving or selling your device to. So, to make it a pleasant experience for them, take five minutes to clean your iPhone.
Use a soft dry cloth to wipe the front and back of the device. Carefully clean the speaker grills, earpiece, and other such places too. Be careful not to use any sharp metal pin.
14. Keep the iPhone accessories in one place
Before giving away the iPhone, collect its original box, charging cable, adapter (if available), and the SIM ejector tool. These aren’t costly things, but their inclusion will undoubtedly make the buyer’s experience better. Not to forget a higher resale amount!
If you’re switching to a different model of iPhone, most likely, the cases and screen protectors you bought for this old iPhone will be of no use. So, you may bundle that as well to ensure a big smile on the second owner’s face.
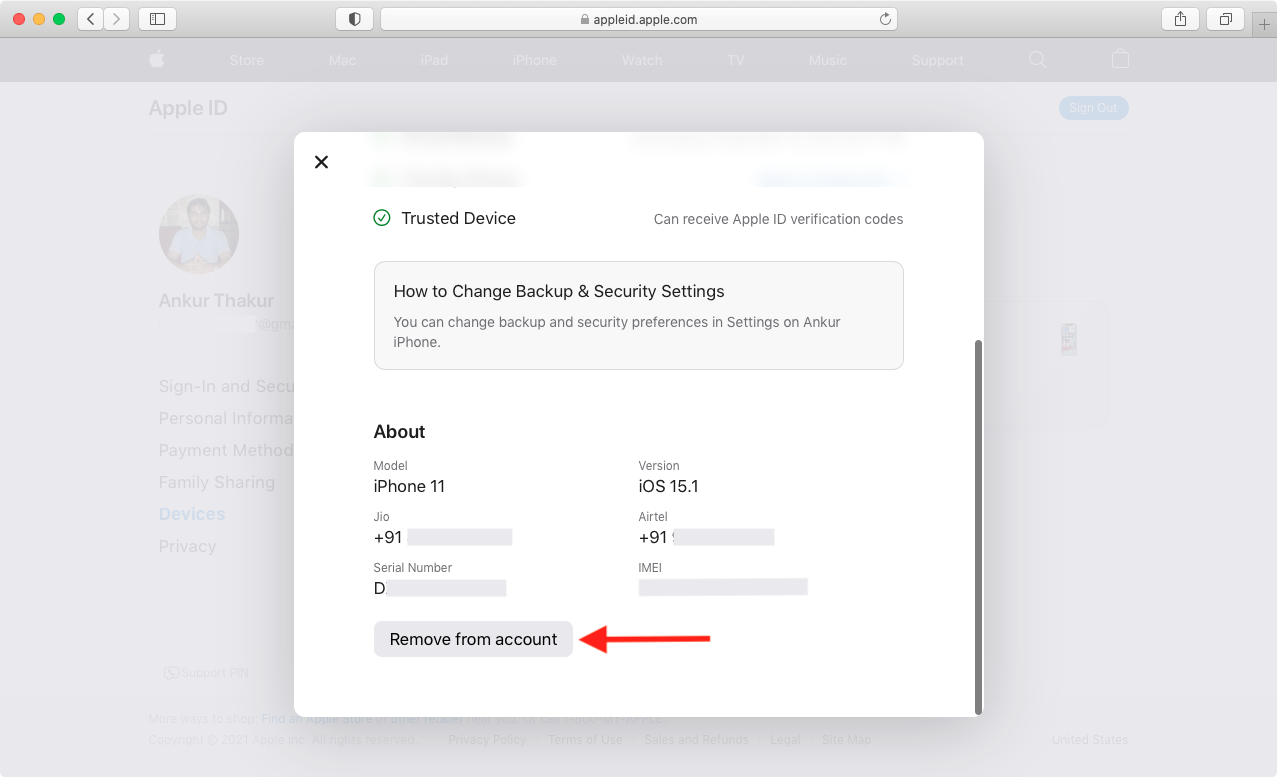
15. Remove this iPhone from the list of your trusted devices
When you have successfully given away or sold your iPhone, one last thing to ensure is that it doesn’t still show in your list of devices.
If you have another iPhone or iPad, learn how to remove a device from your Apple account on iPhone and iPad. You may also do the same from a web browser by following these steps:
- Visit appleid.apple.com and sign in using the Apple ID you used on the old iPhone.
- Click Devices.
- If the old iPhone appears here, select it and click Remove from account.
What to do if the iPhone isn’t with you?
If the iPhone isn’t with you, you can still follow a few of the things mentioned above. And for the rest, you can ask the new owner to follow that.
- If the old device still has your Apple ID, check our guide to remotely erase your old iPhone via the Find My app on your current iPhone or by using iCloud.com. You can also remotely lock the device and (force) ask the owner to meet you. Once you regain physical access to the iPhone, follow the above steps to erase everything properly.
- Use your other Apple device or iCloud web to change your Apple ID’s password.
- Remotely disable Apple Pay on the old iPhone.
- Remove old iPhone from your Apple ID.
- Deregister iMessage if you’re moving to an Android phone.
What will happen to my app purchases?
Once you sign in to your new iPhone using the same Apple ID as the old iPhone, you can redownload all the purchased apps.
For in-app purchases, open the concerned app and tap Restore Purchases.
Rest assured, you don’t have to pay for the paid apps, subscriptions, or in-app purchases again. These things are tied to your Apple ID and not the device. So, there shouldn’t be any issue in getting these back.