Here are 18 simple yet important tips to protect your Mac so that all your files, documents, and sensitive data remain safe and do not fall into the bad hands.
Related: How to secure your iPhone
1. Set a unique password
The most important, basic, and obvious way to prevent unwanted access to your Mac is by locking it with a passcode and not sharing it with anyone. Once you do this, macOS will ask for the password when Mac boots or wakes up after sleep, or locking it.
You most likely have already set a password, but in case you haven’t, go to System Settings > Touch ID & Password > Password. From here, you can also change the password if you believe someone else knows it. This password setting is also available in the Users & Groups section.
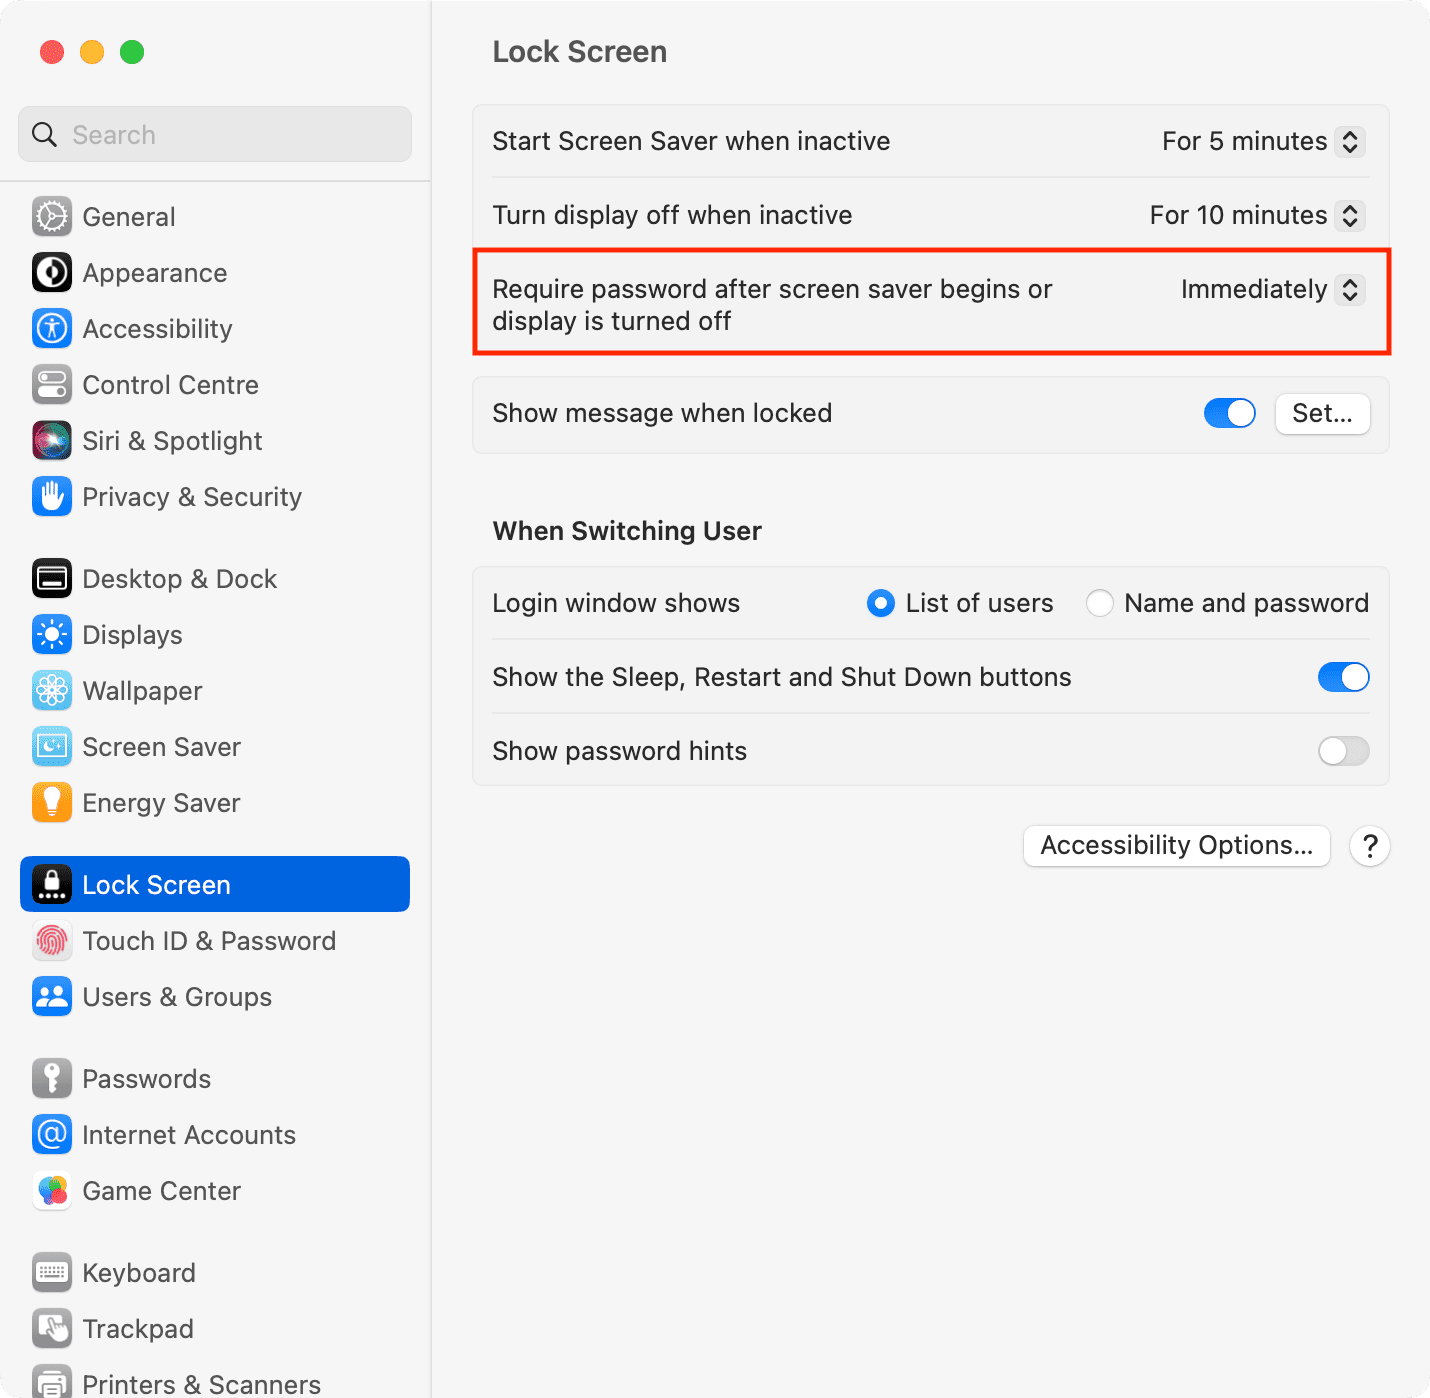
2. Ask for the password immediately
For optimum security, you should set your Mac to ask for the password immediately after the display is turned off (put to sleep), or the screen saver has been activated:
- Go to System Settings > Lock Screen.
- Click the drop-down menu next to ‘Require password after screen saver begins or display is turned off’ and select Immediately.
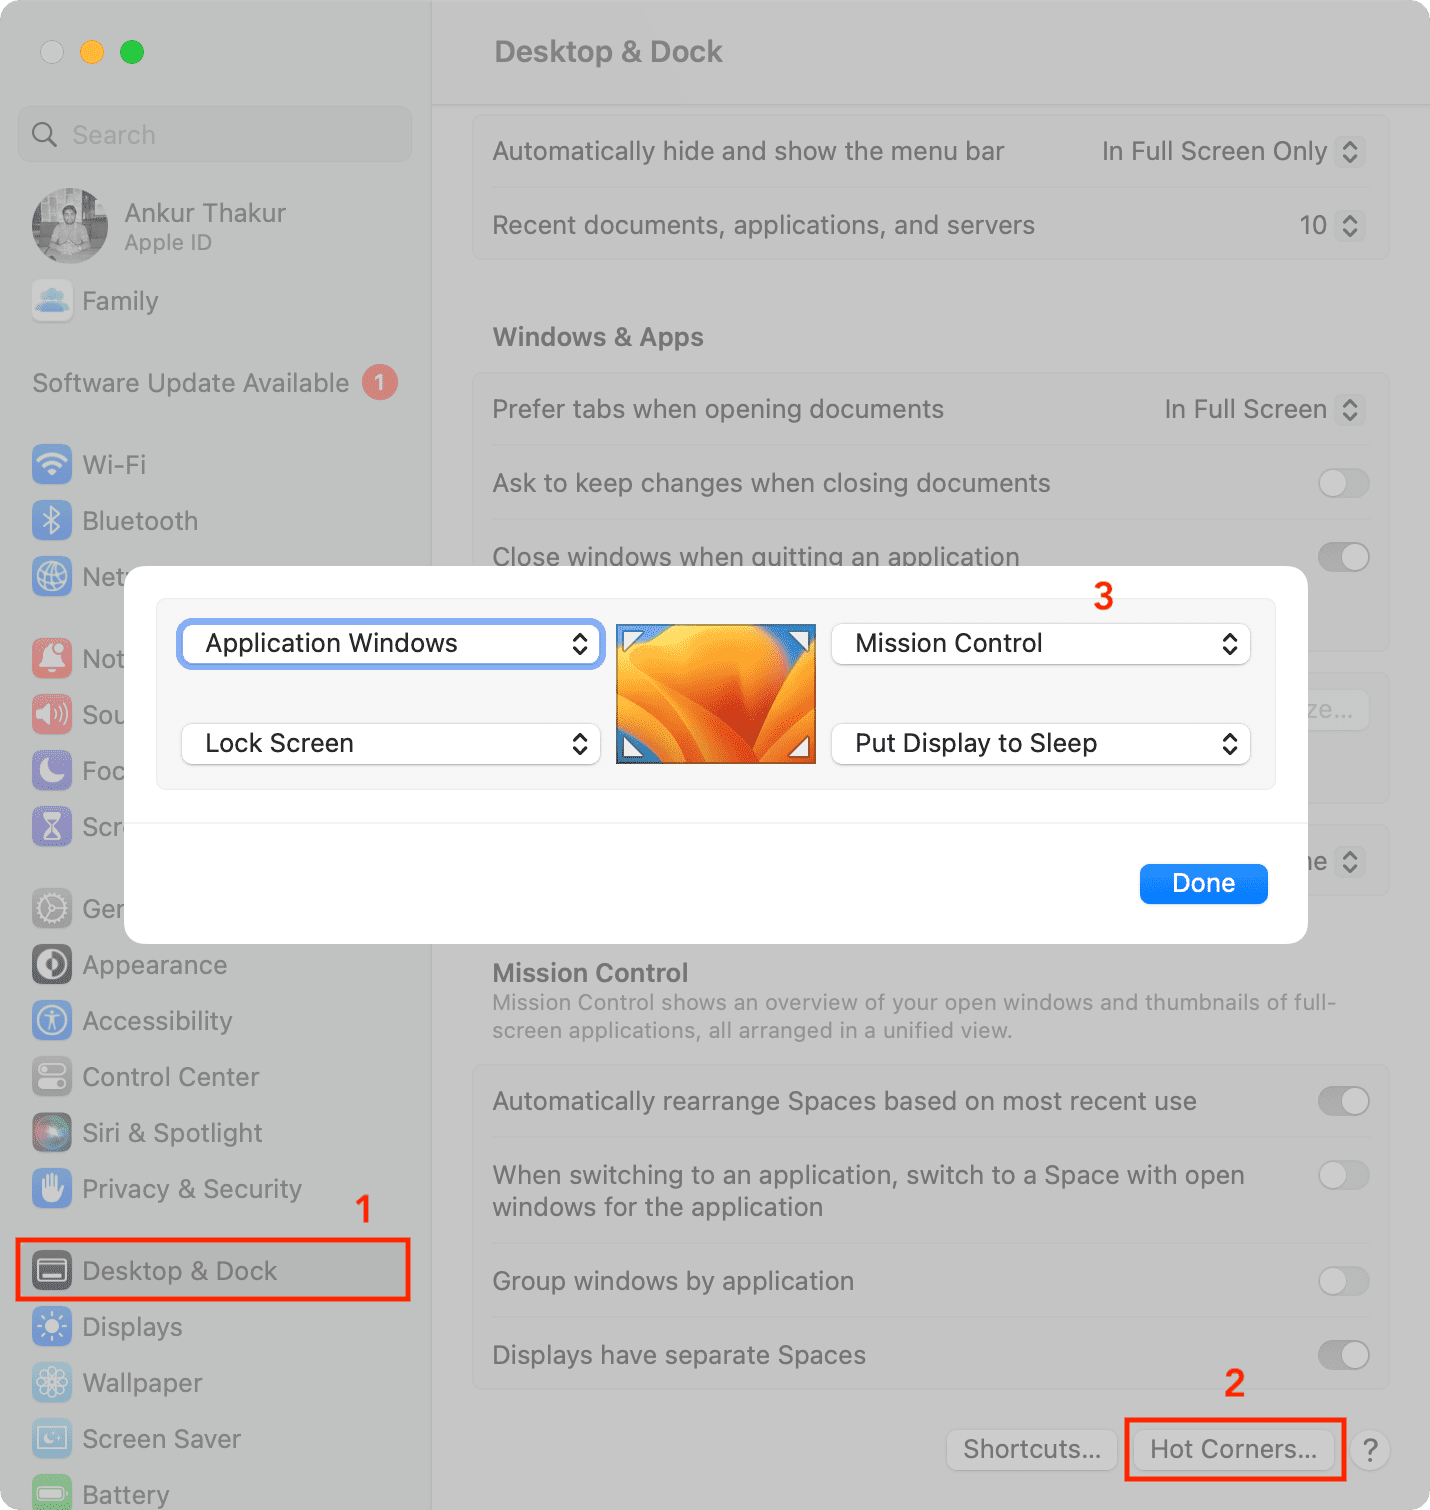
3. Use Hot Corners to instantly lock your Mac
It’s easy to lock your Mac by clicking the Apple icon and choosing Lock Screen or by pressing the Control + Command + Q keys together.
However, an even faster method that I use is by configuring Hot Corners. Doing so, whenever I drag my mouse/trackpad pointer to one of the selected corners of my Mac’s screen, my computer is locked instantly. It’s very quick and convenient.
4. Set your Mac to log out after inactivity
Do you often walk away from your desk with your iMac, Mac mini, or Mac Studio or leave your MacBook unattended? In that case, you must lock it using the methods mentioned above. In case you haven’t, set your Mac to automatically log out the user after a period of inactivity. Doing this ensures your files are secure and inaccessible if your Mac is left unattended:
- Go to System Settings > Privacy & Security.
- Scroll down and click Advanced.
- Enable the switch next to Log out automatically after inactivity.
- By default, the Log out after time is set to 60 minutes, but you can change it to a shorter period, like 30 minutes or 5 minutes.
- While you’re here, you can also enable ‘Require an administrator password to access systemwide settings‘ to prevent unwanted changes to your settings.

5. Save your work before locking your Mac
Even after you have locked your Mac, anyone can press and hold your Mac’s power button to turn it off and then press the power button to turn it back on.
Now, because you set a password, that person can’t get inside your computer and do any damage. However, all unsaved work will be lost when the intruder forcefully powers off your Mac.
If you’re about to leave your Mac unattended during a work lunch break for instance, remember to save any ongoing work to prevent the risk of losing it before locking the device.
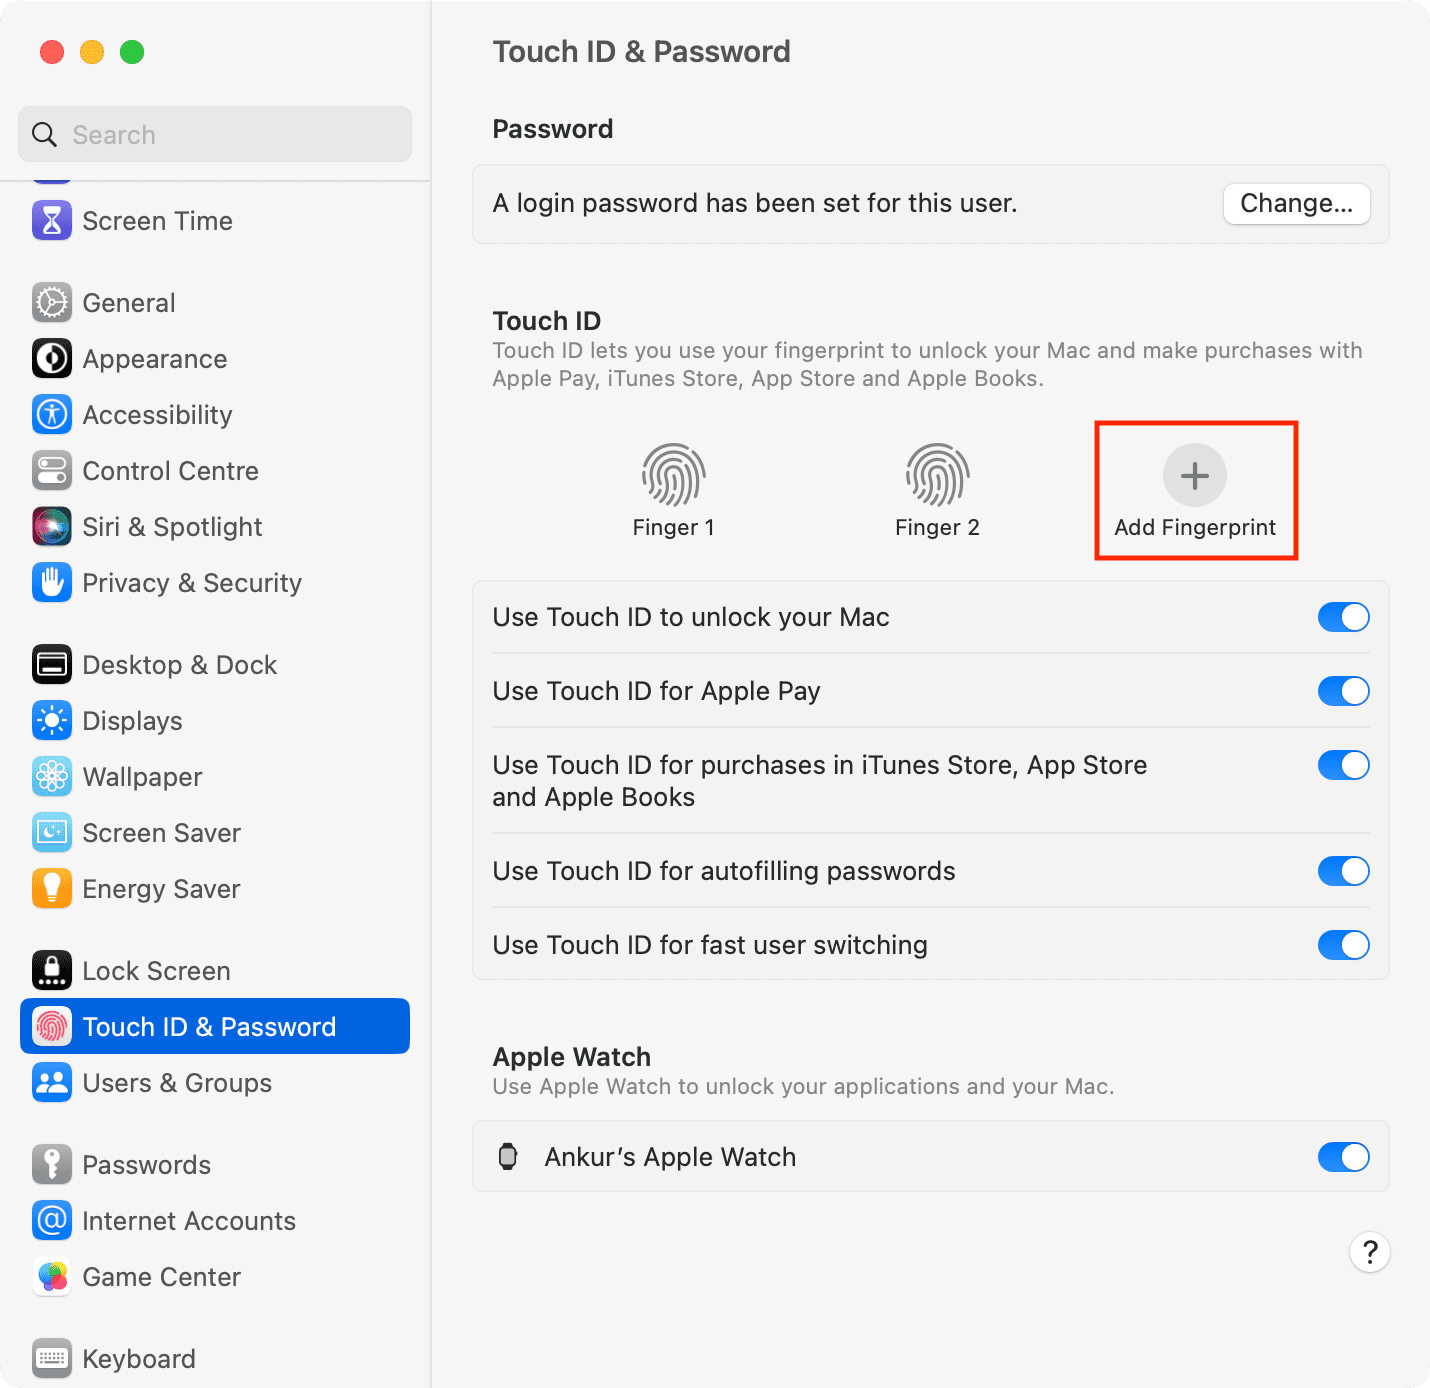
6. Type your Mac’s password discreetly or use Touch ID or your Apple Watch
WSJ did a couple of videos on the weak security of iPhone passcodes, where the thief would see or record a person manually entering the device passcode in a public place. Later, the thief steals the iPhone and uses the device passcode to change the Apple ID password, which can potentially locks out the victim from their iPhone as well as their Apple ID forever.
If you use your MacBook in public places, be careful when manually entering your system password. And for most secrecy, use Touch ID on your Mac to unlock it. Besides that, you can also auto-unlock your Mac with your Apple Watch. Both these methods eliminate the need to type your password manually.
Related: Apple wants to replace passwords with passkeys secured by Face ID and Touch ID
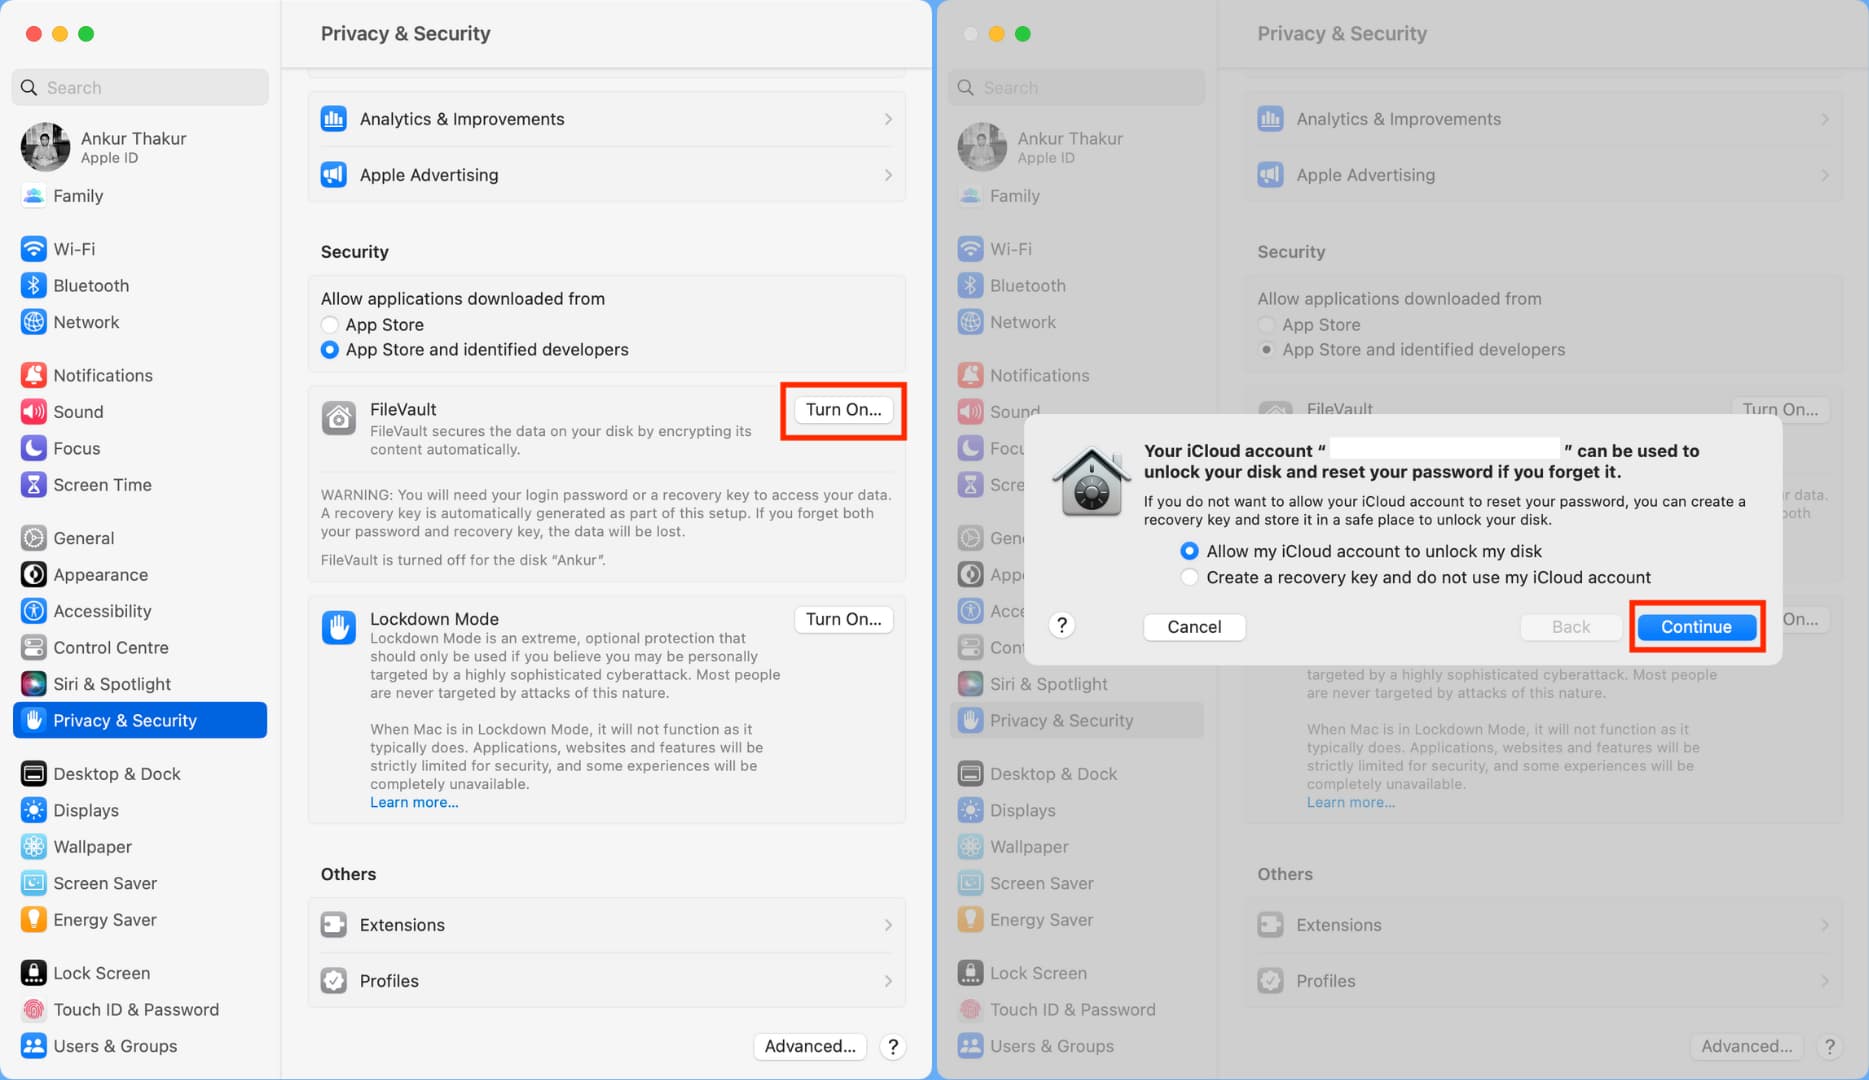
7. Turn on FileVault
Mac’s FileVault encryption encodes your files and ensures no one can see or copy them without the login password. If you have sensitive files on your MacBook or fear that your Mac mini or Mac Studio can be stolen and its files misused, you must enable FileVault to encrypt and protect the information on your computer:
- Open System Settings and click Privacy & Security.
- Scroll down and click Turn On next to FileVault.
- Enter your Mac’s admin password and click Unlock.
- Now, you can set a recovery key (that you must never lose) or simply allow your iCloud account to unlock the disk. I’m selecting the iCloud option. After that, click Continue.
- Depending on how many files you have on your Mac, it may take a long time for encryption to finish. However, if your Mac has Apple silicon (M1, M2, and its successors), or it’s an Intel Mac with Apple T2 Security Chip, or if it’s an iMac Pro, then files on your drive are already encrypted automatically, and thus it should take just a short time for FileVault encryption to finish. You can learn more about it all.
8. Block remote access and extra sharing connections
In case remote login & management and other sharing options like Bluetooth file sharing from an Android device or screen sharing are not necessary, you can turn them off to make your Mac more secure:
- Open System Settings and click General > Sharing.
- Turn off all the options you don’t use.

9. Turn on Firewall
Once Firewall is enabled on your Mac, it acts as a shield against any unwanted incoming network connections from other devices or the internet.
- Open System Settings and click Network.
- Click Firewall.
- Enable the switch for Firewall.
- You can click the Options button to further customize it or block all incoming connections or turn on stealth mode. This Apple Support tutorial tells you all about it.

10. Secure sensitive files and folders with one more password
If other family members or office colleagues use your computer, you can take an easy step to lock your private images, videos, audio, documents, etc., with an additional password.
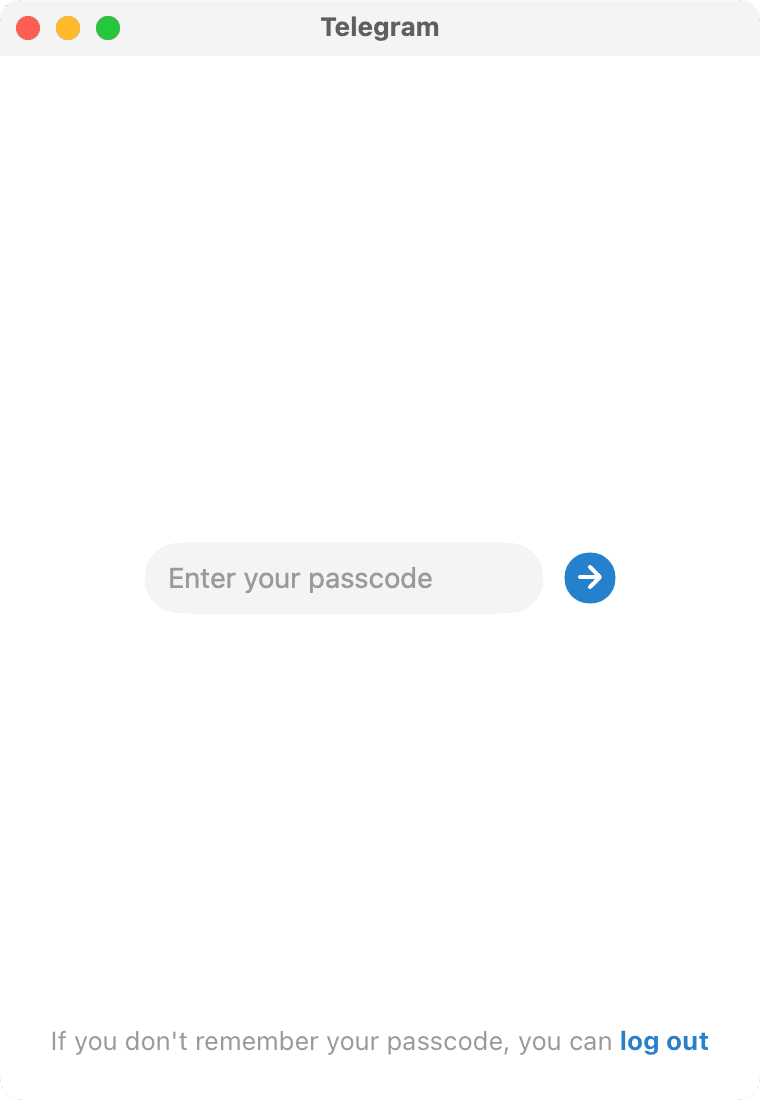
11. Lock supported apps
Some Mac apps like Telegram allow you to set a password lock to prevent unwanted access. You can explore the in-app settings of the concerned app and look for such an option or contact the app developer and request them to add app lock in a future update.
Related: How to lock your notes on iPhone, iPad, and Mac
12. Create separate users
This is a convenient and safe solution to prevent unwanted access to your files and still let other people use your Mac. All you have to do is create a separate standard user for your Mac, which allows that person to use your Mac but keeps your and their files separate and inaccessible.
You can create as many separate accounts as you need. For example, you can create different user accounts for your spouse, child, siblings, and so on. Besides that, you can also enable Guest login.
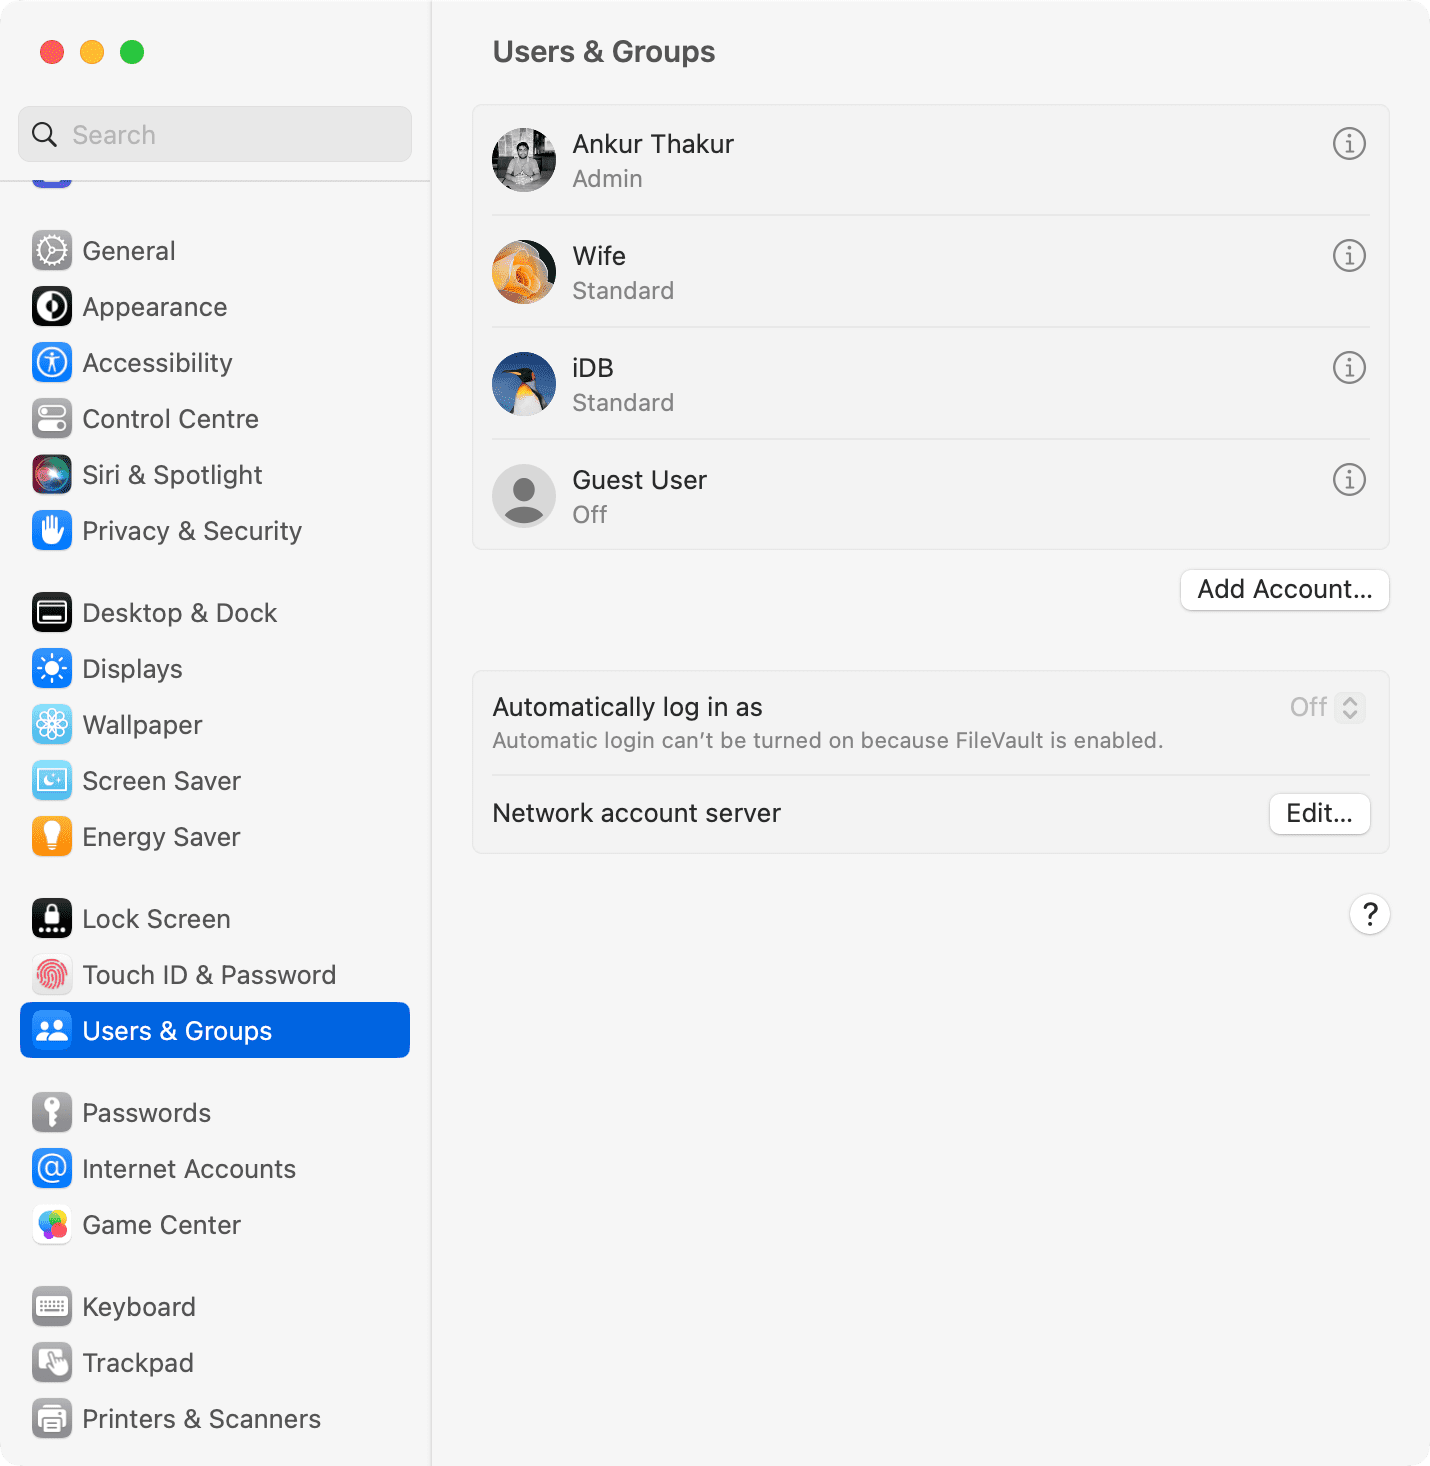
13. Don’t add anyone but you as the Mac’s administrator
While you can create as many standard user accounts as you want, we recommend having only one admin account: yours! Do not give administrator rights to any other user, as it would give them full control over your Mac.
You can see all standard and admin users of your Mac by going to System Settings > Users & Groups. To turn an admin into a standard user, click the info button ⓘ next to that user’s name and turn off the switch for ‘Allow this user to administer this computer.’
14. Stop using personal pictures as the screen saver
Screen saver can be seen by anyone near your Mac. For maximum privacy and to prevent photo misuse, you can use beautiful stock photos as the screen saver on your office Mac as opposed to using your family pictures.
15. Prevent sensitive files, folders, and data from appearing in Spotlight
If your setup involves letting other users use your Mac, you can still prevent personal folders from appearing in Spotlight Search. This way, if that person uses Spotlight to find something, the folder you exclude won’t show up in the search results.
16. Regularly back up your Mac
macOS has the handy Time Machine feature to back up your Mac to an external drive. Use this frequently to ensure all your files and memories are safe and easily recoverable in case something unfortunate happens to your computer. Take it one step further by doing remote backups with services like Backblaze.
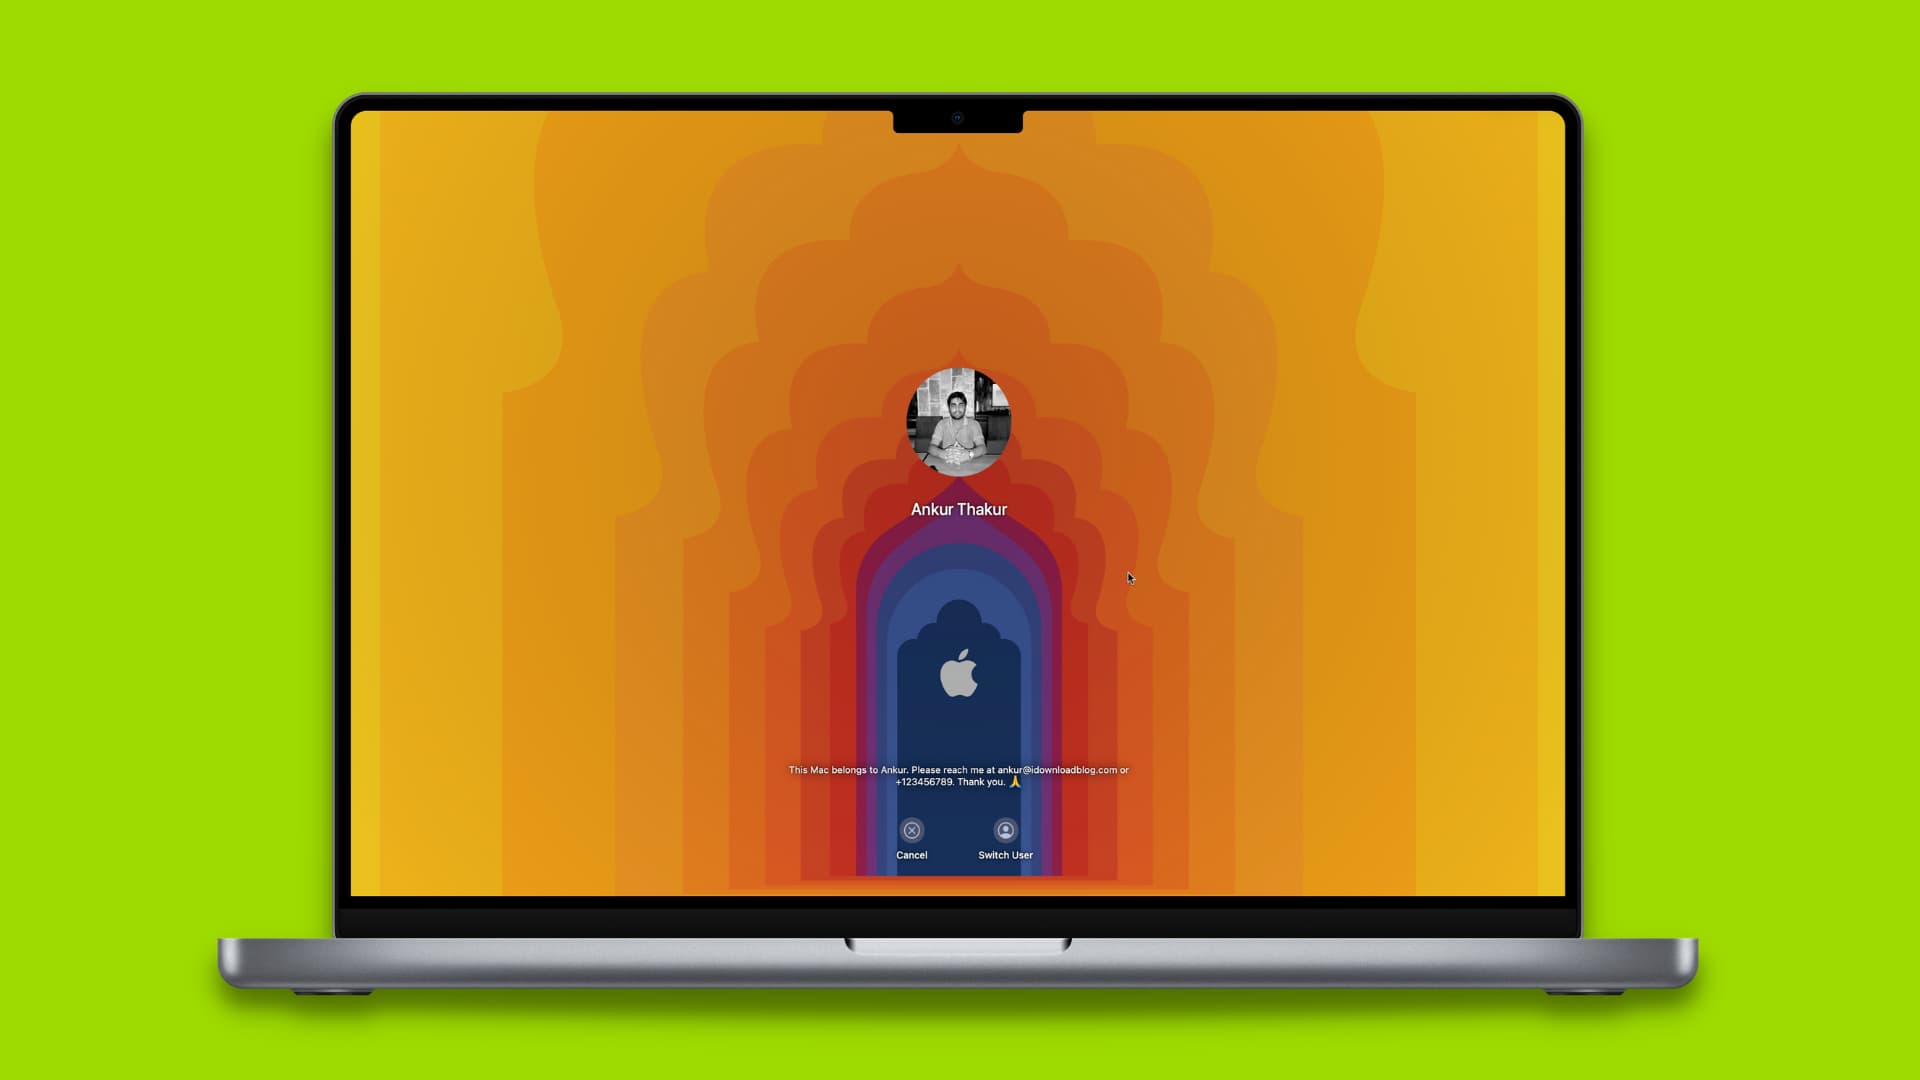
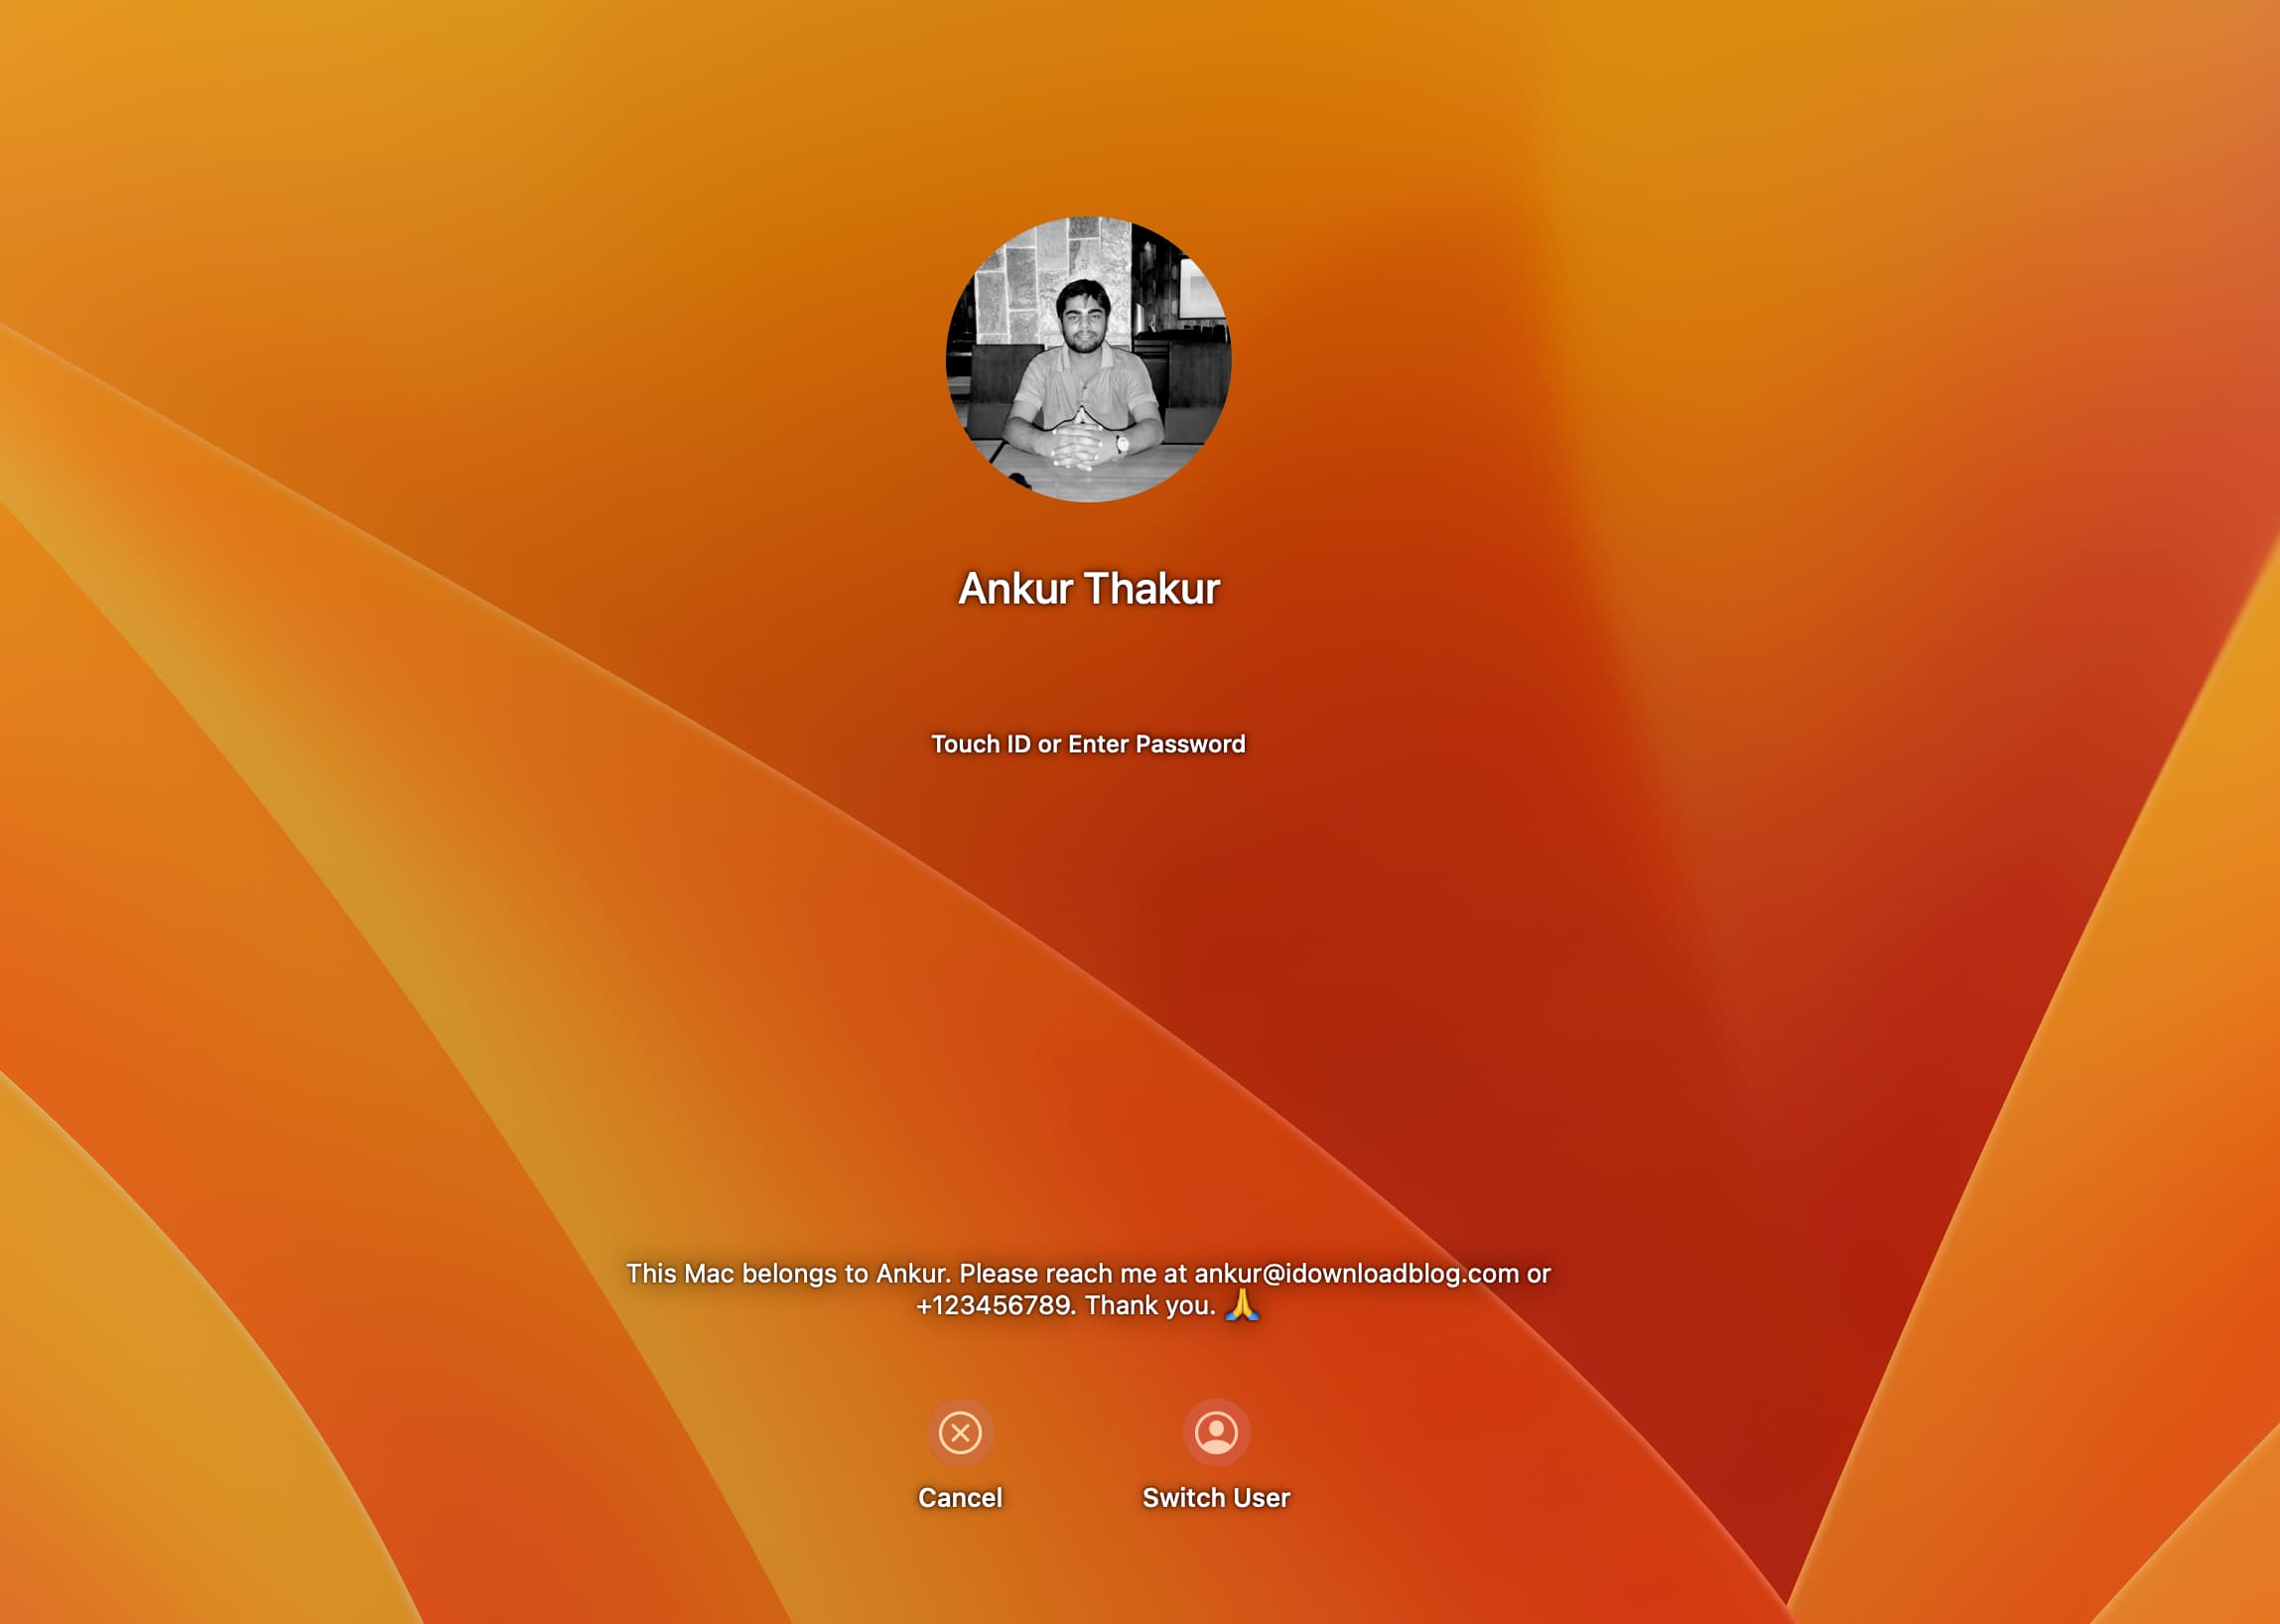
17. Show a message on Mac’s Lock Screen
You can display a message with an instruction, request, phone number, email, or anything on your Mac’s Lock Screen and login screen. This way, if you ever misplace your Mac, the finder can see it when they boot up the machine and reach out to you to return it.
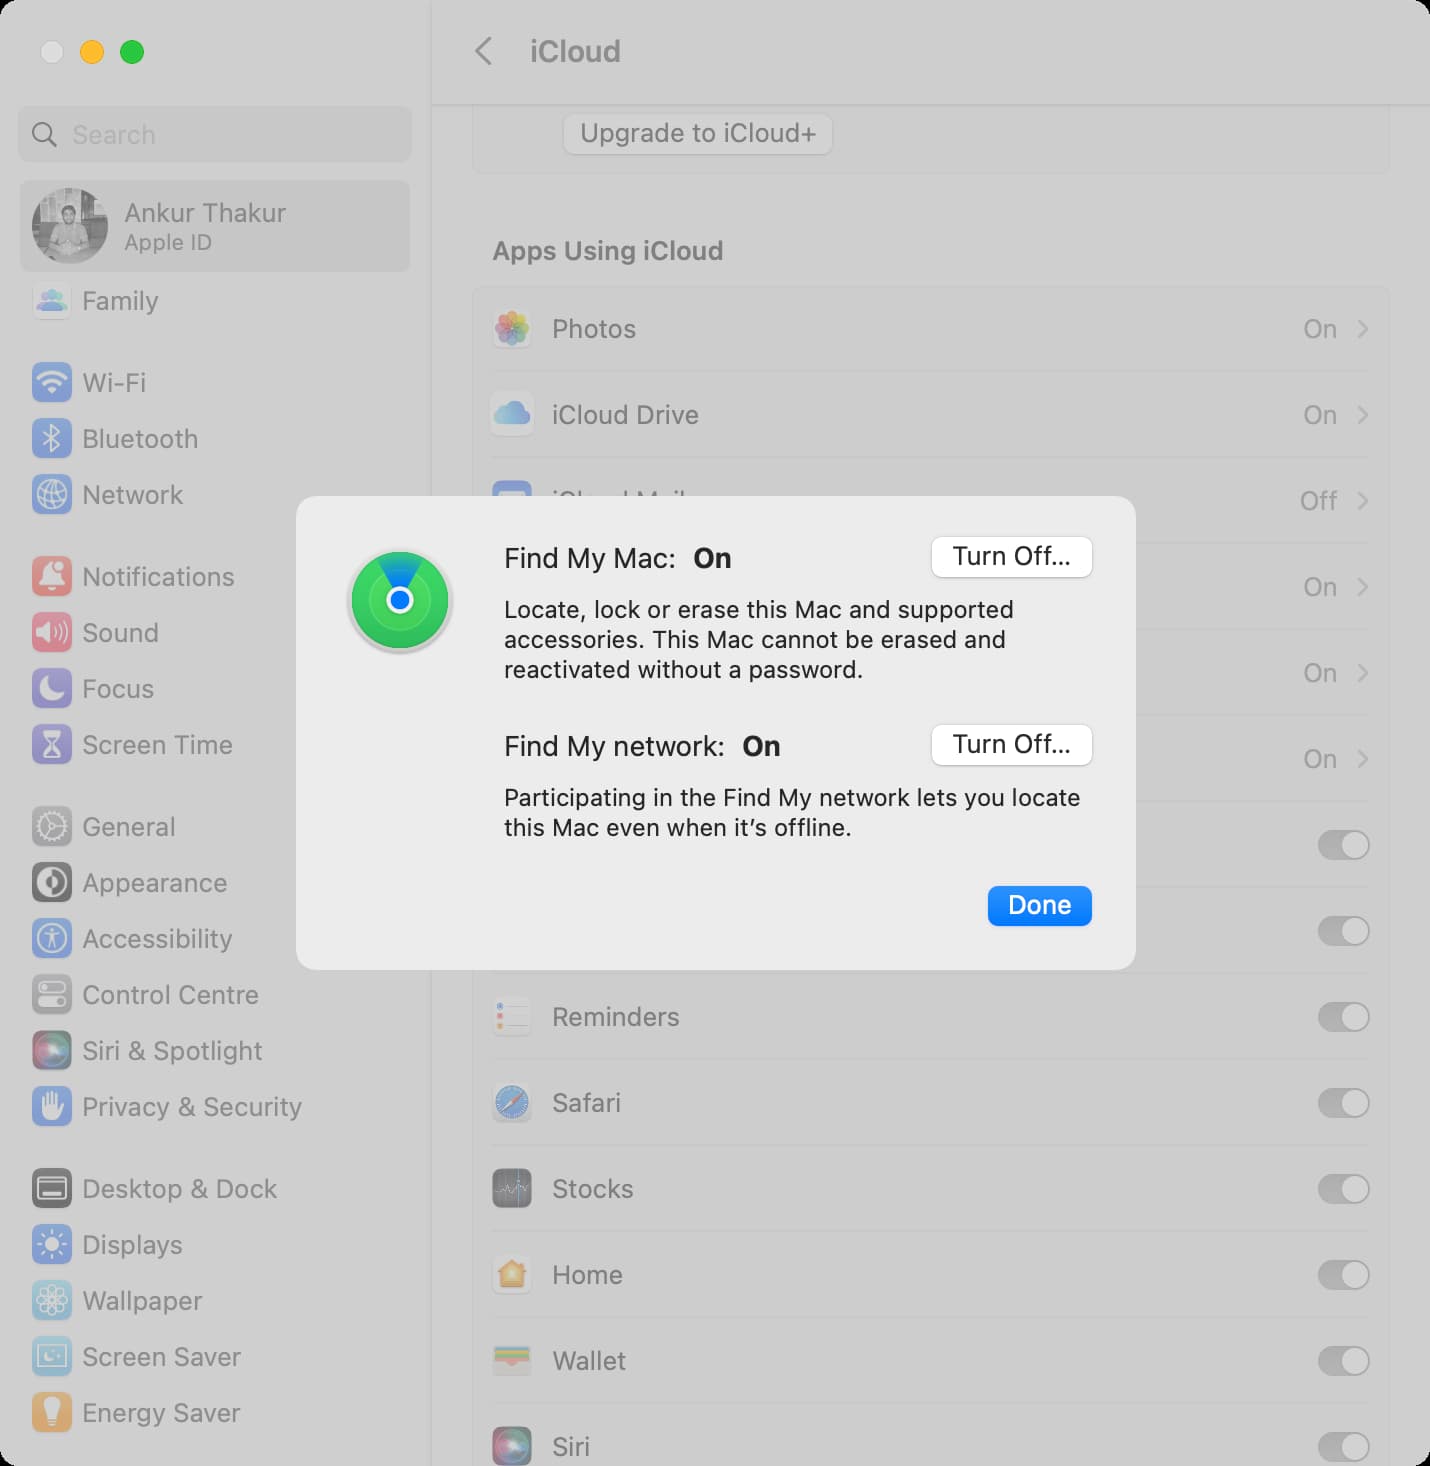
18. Do not turn off Find My
Find My service is automatically enabled when you set up your Mac and log in using your Apple ID. It’s a safety feature that lets you know the location, play a sound, display a message, and remotely erase all data from your Mac. Plus, the added Activation Lock prevents anyone else from using it unless they enter your Apple ID password.
Overall, it’s a very helpful feature, and you must not turn it off. You can access it in System Settings > Apple ID > iCloud > Show All > Find My Mac.
These were some of the practical ways to secure your Mac. What else do you use on your Mac that can come in handy in protecting your data? Please share with us in the comments.
Check out next: