In this tutorial, we’ll show you how to back up your iPhone or iPad to iCloud, a Mac, or a Windows PC.
Why back up your iPhone or iPad
Backing up your iPhone or iPad ensures your data, settings, game progress, etc., are safe, and you have the option to restore them after you erase your device or purchase a new one. Having a device backup is helpful in the following circumstances:
- When you upgrade to a new iPhone or iPad, having a backup of your old iPhone lets you restore it during setup. As a result, all your essential data gets transferred to the new device.
- iPhone can run into problems, and sometimes the only solution is to erase the device. Once it’s erased, all the data is gone. Having a backup allows you to recover meaningful data.
- If you try iOS beta software and want to downgrade at some point, having an archived backup will help get essential data back.
What’s included in iPhone and iPad backups
Device backups include app data, settings, Home Screen and app organization, messages, ringtones, Visual Voicemail password, etc.
Note: Things that are already uploaded and stored in iCloud, like iCloud Photos, music, contacts, calendar events, messages, voice memos, etc., aren’t included in backups. Aside from that, Apple Pay information and settings, Face ID or Touch ID settings like facial data or fingerprints, are not a part of your device backup.
What remains unaffected even if you don’t back up your iPhone?
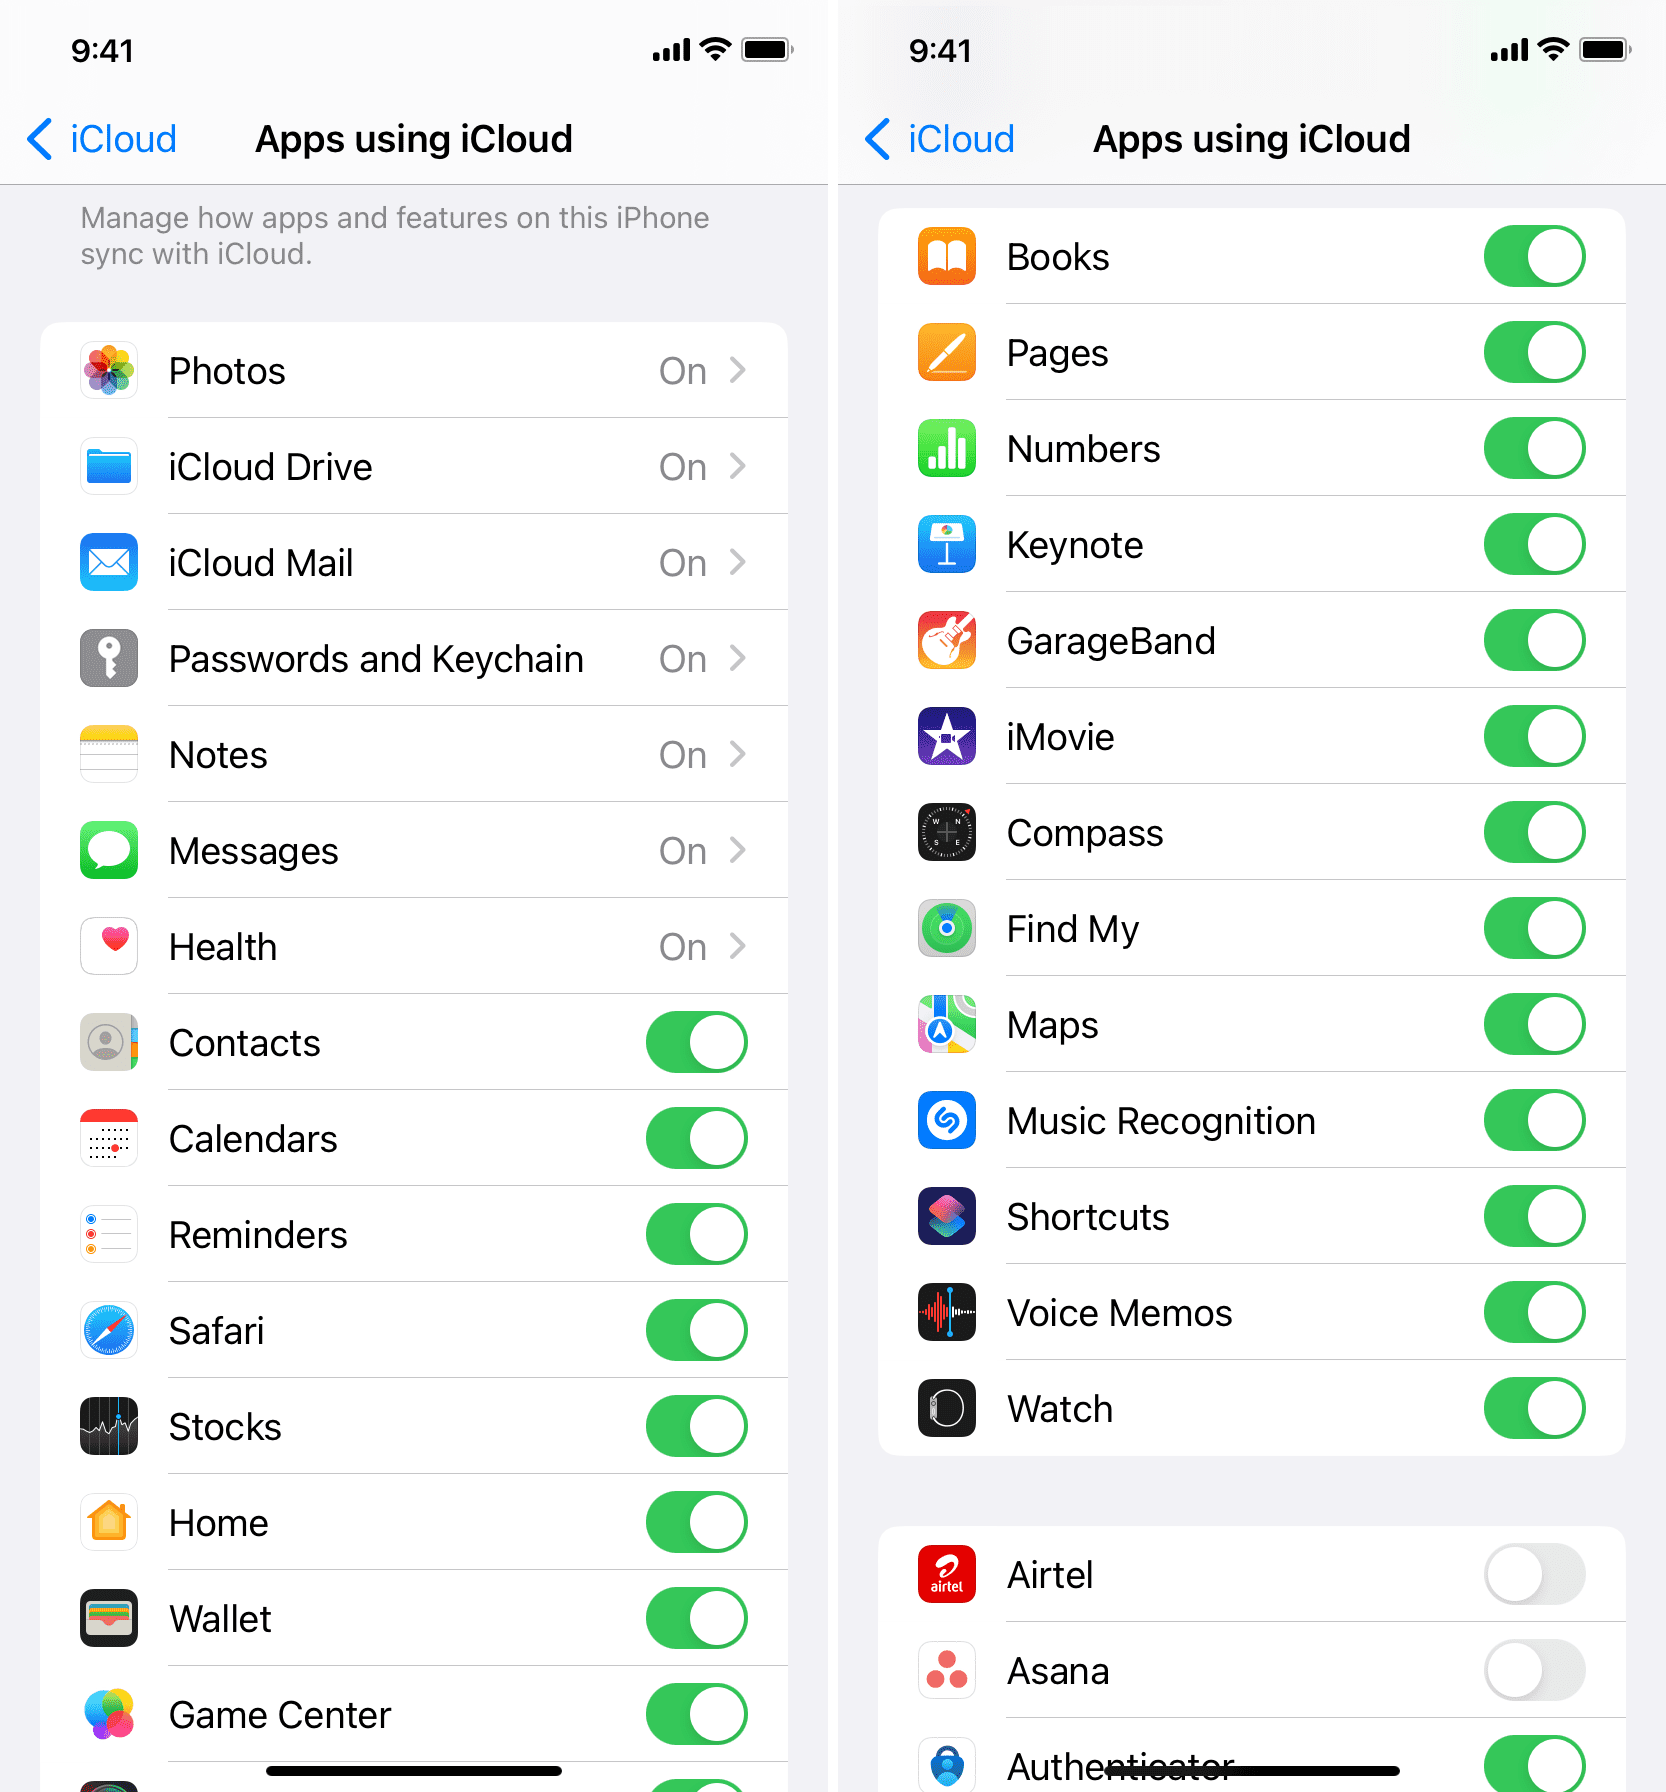
Even if you don’t back up your iPhone, but keep iCloud enabled for Photos, Drive, Passwords and Keychain, Notes, Messages, Health, Contacts, Calendars, Reminders, Wallet, and other apps, their data will stay safe. Anytime you log in to a new or erased Apple device and sign in with your Apple ID, you’ll get back all this essential data. You can learn more here: Back up important iPhone data without a full device backup
Similarly, Apple apps like Books, Pages, Numbers, Keynote, GarageBand, iMovie, Compass, Find My, Maps, Shazam, Voice Memos, Shortcuts, Watch, etc., can store your projects and other relevant data in iCloud. These too, stay safe irrespective of whether you back up your iPhone or not.
Finally, like Apple apps, third-party apps can access iCloud and store their data there. For example, WhatsApp can back up your chats safely to iCloud. So, if you ever delete and reinstall the WhatsApp app or set up WhatsApp on another iPhone, you have the option to restore your chats and media.
Where can you back up your iPhone or iPad?
You can back up to iCloud (via Wi-Fi or cellular data) or a Mac or Windows PC using Finder or the Apple Devices app.
Should you back up to iCloud or a computer?
iCloud backups are undoubtedly easy and happen automatically in the background. Plus, iCloud backups are always encrypted. However, with every Apple ID, you only get 5 GB of online storage, and device backups can quickly fill this up. Secondly, you need an internet connection to back up to iCloud.
Backing up to a Mac or PC has no storage limitation as long as your computer’s drive has enough free space. With this, you don’t need an internet connection. However, you need to manually connect your iPhone or iPad to the computer using a cable or have them connected to the same Wi-Fi for wireless backup (more on it later). Finally, computer backups can be encrypted, but the encryption is turned off by default (we’ll show you how to enable it below).
Back up your iPhone or iPad
To iCloud
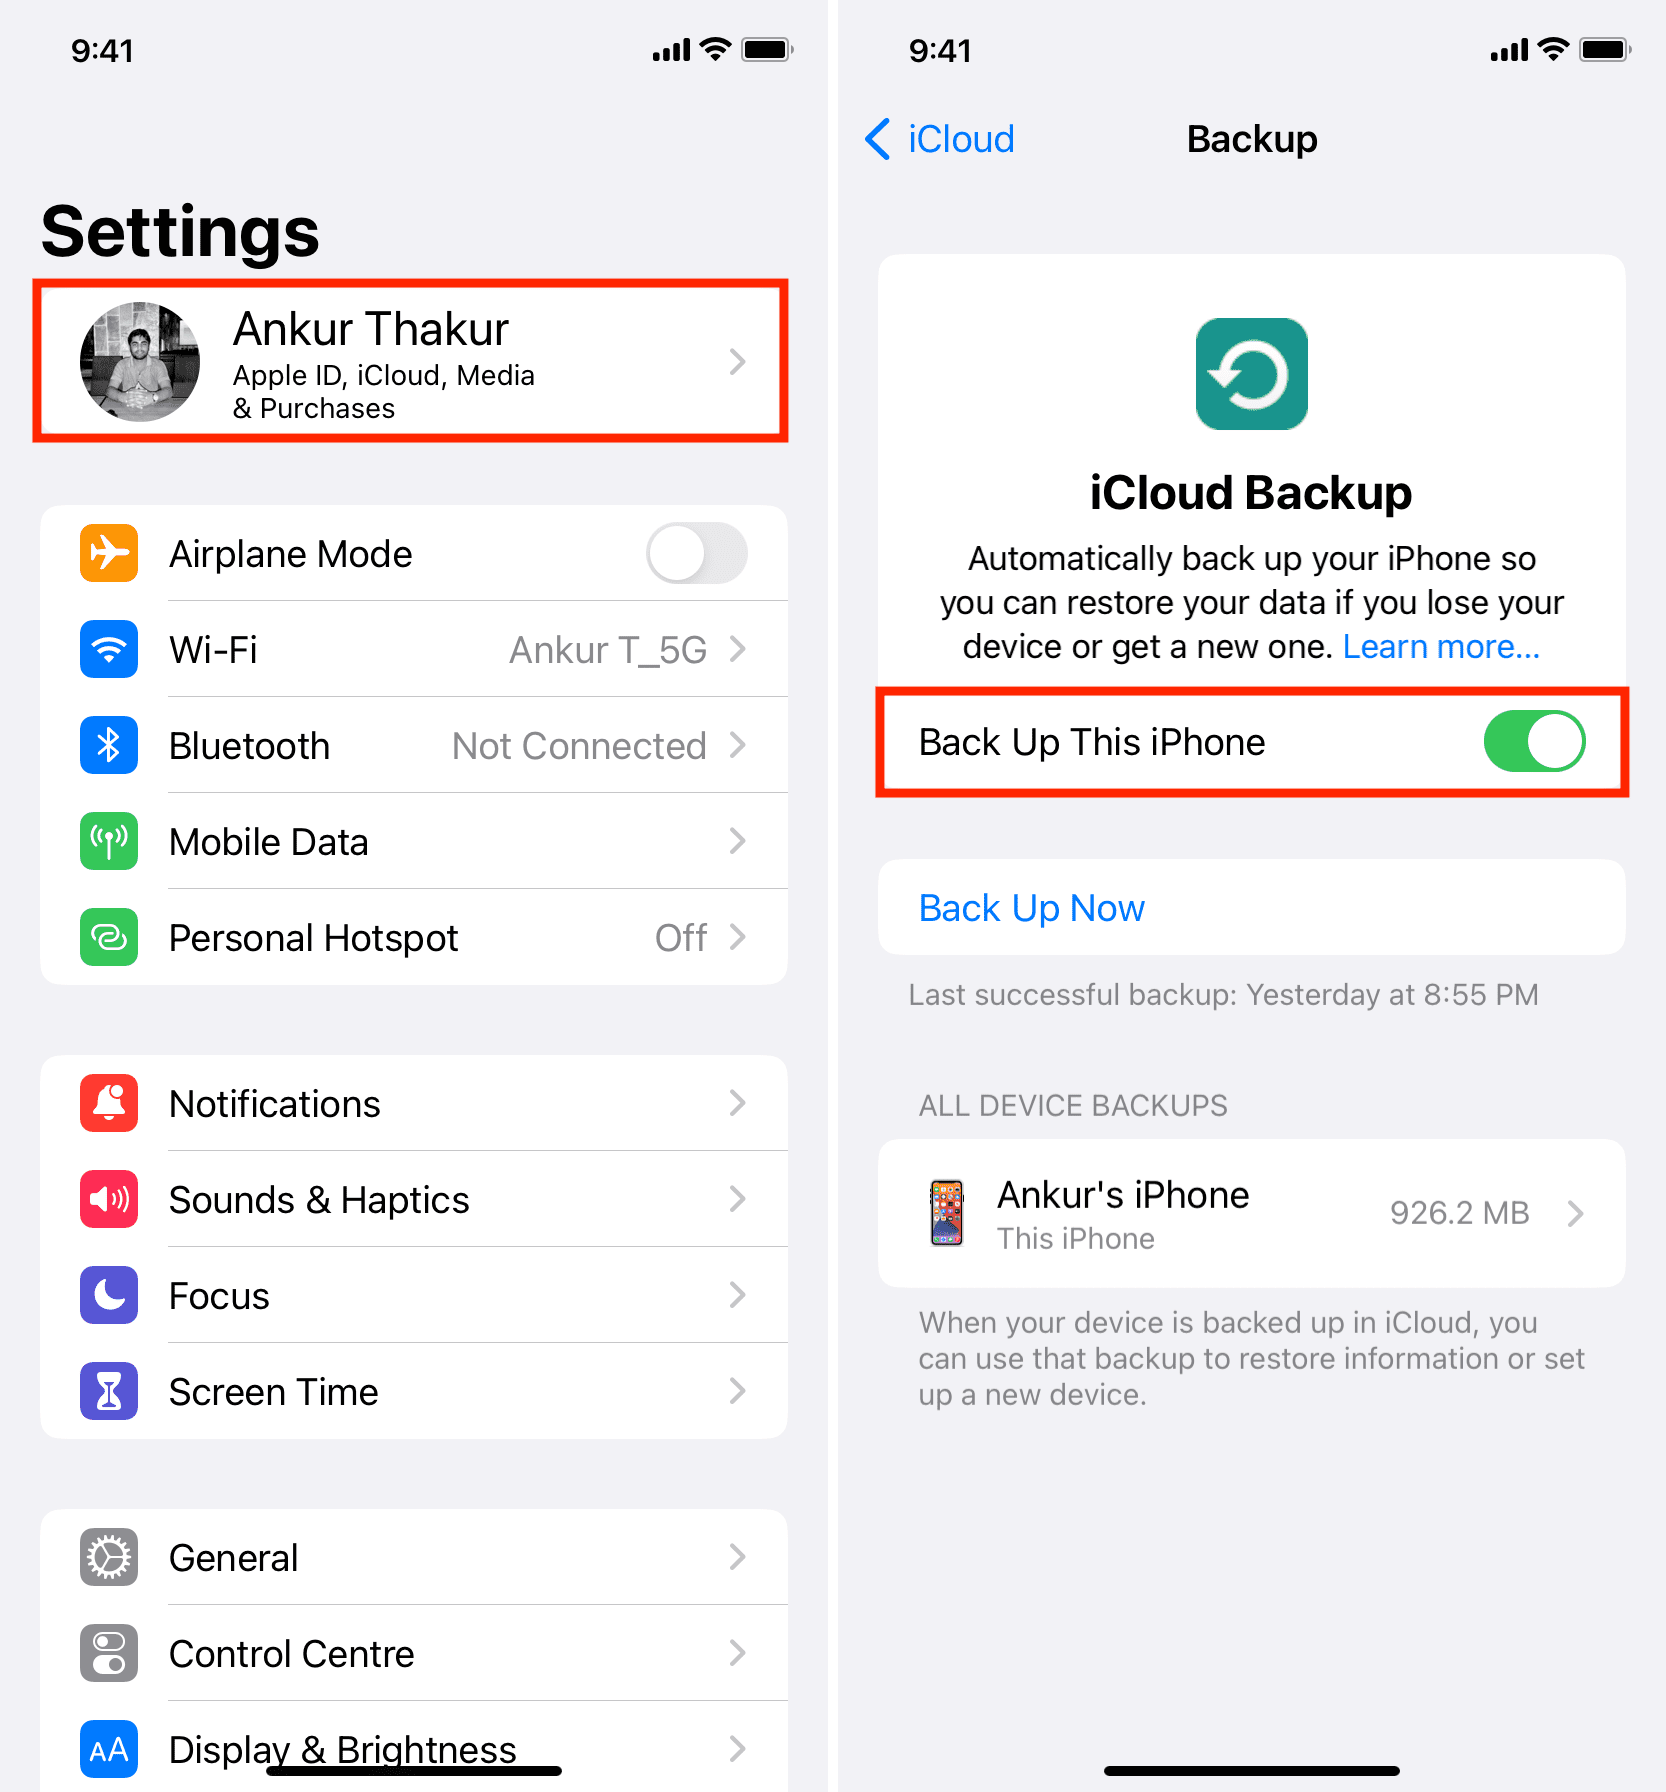
- Open the Settings app and tap your Apple Account name at the top.
- Tap iCloud.
- Choose iCloud Backup.
- Enable the switch for Back Up This iPhone.
- Tap Back Up Now, and it will start backing up your device.
- Even if you don’t tap Back Up Now, you can exit this screen, and your iPhone will automatically back up when it’s connected to Wi-Fi and is charging with its screen locked.
Important points:
- Do you see an error saying you don’t have sufficient iCloud space to complete the backup? In that case, free up your iCloud storage or upgrade to iCloud+.
- If you bought a new iPhone or iPad, Apple offers unlimited free iCloud storage for about three weeks, so you can easily back up your old iPhone fully to iCloud and restore it onto a new device.
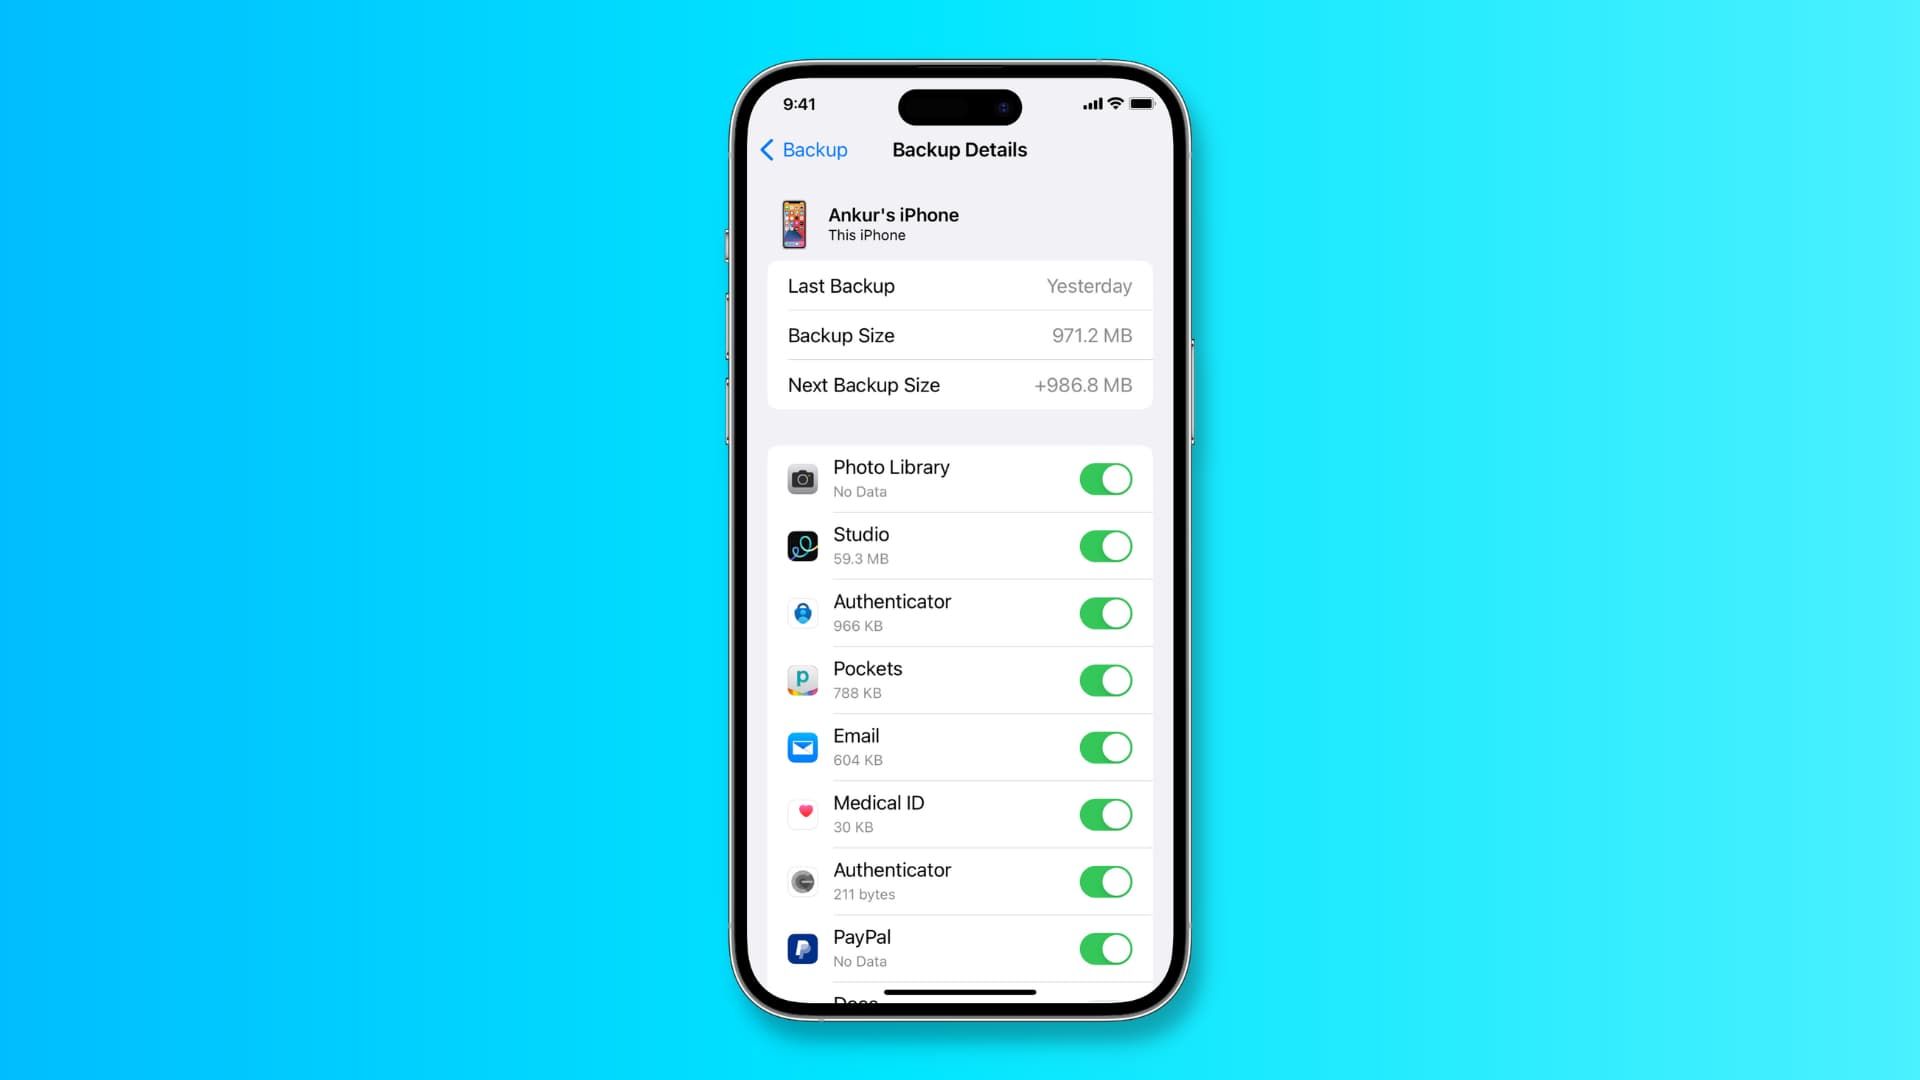
- iCloud also offers a convenient option to only back up certain apps and exclude the rest. This results in a significantly smaller backup file, which is great if you’re on the 5 GB free iCloud tier. Plus, it’s faster to restore when setting up a new device.
- If the iCloud backup fails for reasons unknown to you, please read our separate guide that takes care of such issues.
- Finally, if you don’t have access to Wi-Fi, you can back up using cellular data.
To Mac
- Connect your iPhone or iPad to your Mac using an appropriate USB cable.
- Open Finder and click your iPhone or iPad name in the left sidebar. If you don’t see it, wake up your iPhone and unlock it. If the problem continues, follow these solutions.
- Click Trust if you see it in Finder and enter your device passcode on your iPhone or iPad.
- Make sure you’re in the General section of your iPhone inside Finder.
- Optional: From this screen, you can check the box for Encrypt local backup and set a password that you must remember or note somewhere safe. You can also choose to save it in iCloud Keychain. After that, you’ll have to enter your iPhone or iPad passcode on that device, and then the backup should start immediately. Once you encrypt the backup, it will also include your saved passwords, Wi-Fi settings, website history, health data, Activity data from your iPhone or Apple Watch, and call history. If you continue with unencrypted backups, the backup file won’t include these sensitive pieces of information.
- Finally, click Back Up Now.
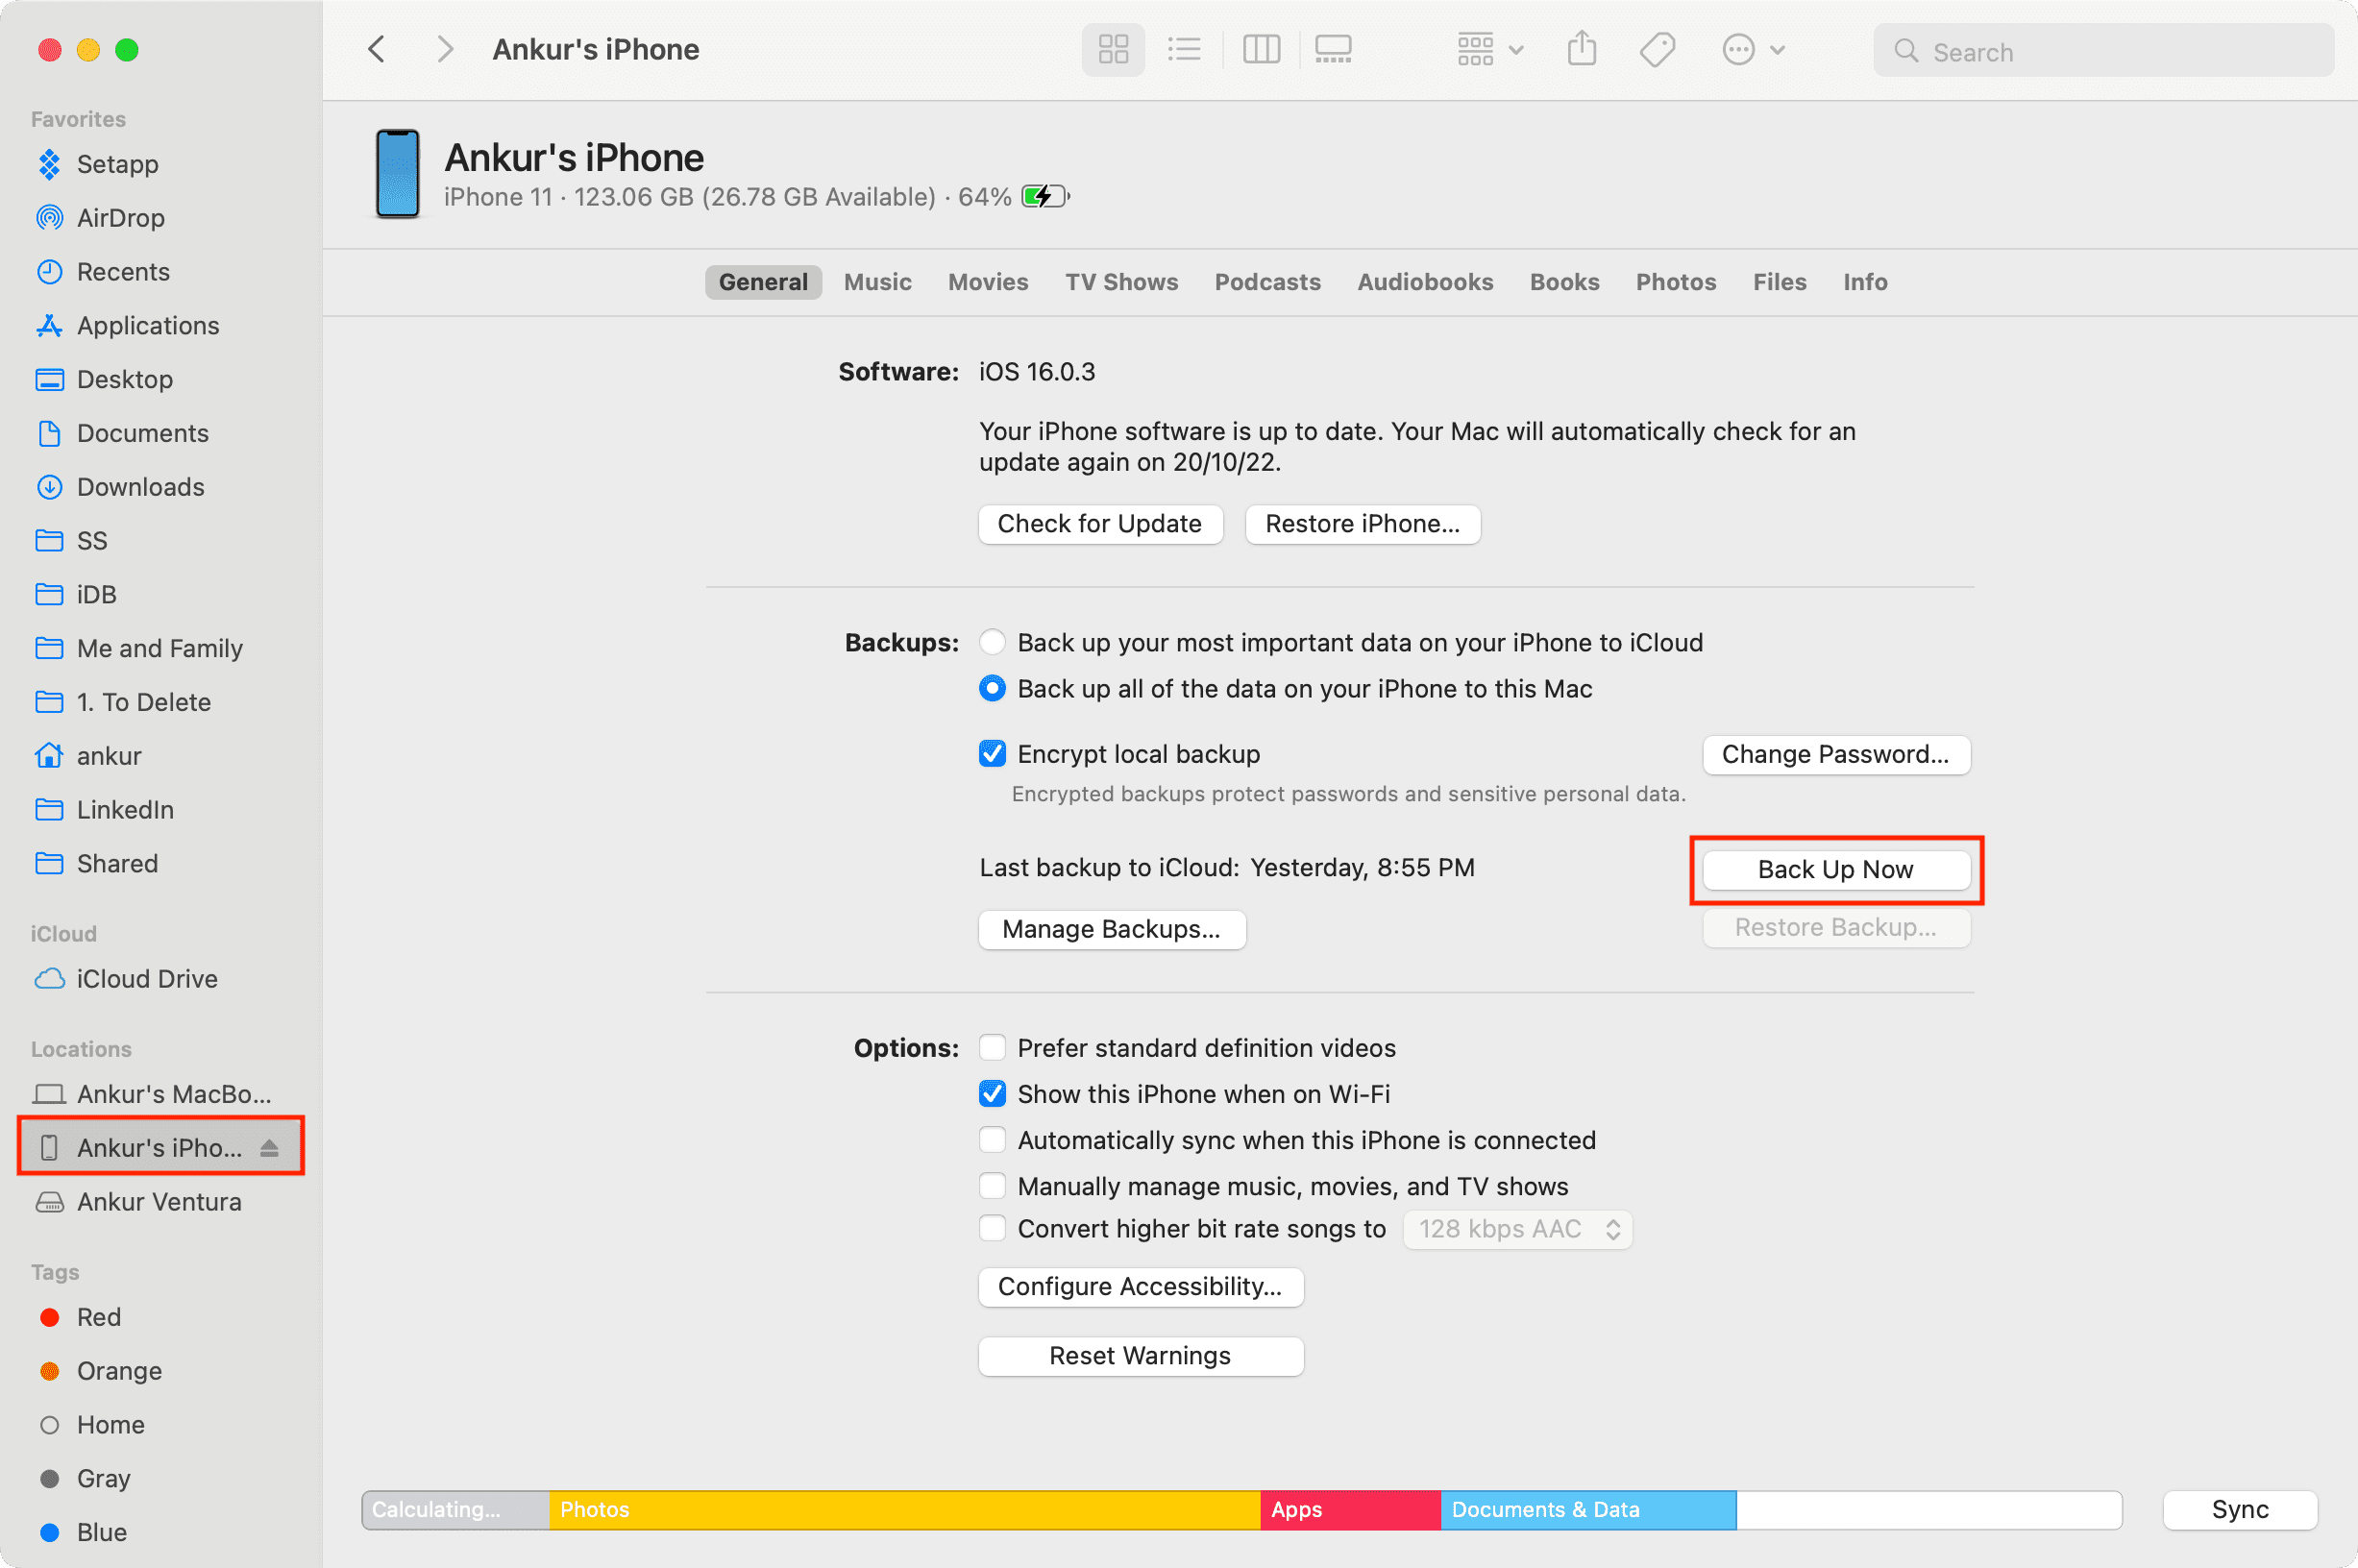
Your Mac will take some time to back up your iPhone or iPad. You can see the status at the bottom of the screen. Once the backup is completed, you’ll see the date and time of this/your last backup.
Note: If your Mac is running macOS Mojave (released in 2018) or earlier, you’ll have to use iTunes.
Important points:
- Your Mac only keeps the latest backup of an iPhone or iPad. So when you make a new backup of that same device, the old one is removed and replaced by this new one. Doing so ensures iOS or iPadOS backups don’t eat up all of your Mac’s local space. However, if you archive a backup file, it stays separate and is not overwritten. Here’s when you should archive a backup file and how.
- iPhone backups can get huge in size! So, make sure you have sufficient free space on your Mac. If not, you’ll see an error saying, “Could not back up the iPhone because not enough free space is available on this Mac.”
- You can also back up your iPhone to an external drive.
- You can go the extra mile and back up your iPhone to both iCloud and your Mac. But, of course, you’ll have to follow their respective steps individually.
To Windows PC
The fundamentals are similar to backing up on a Mac. And we have outlined the process in our Apple Devices app guide.
FAQs:
How to back up an iPhone to a computer wirelessly?
The first time you connect your iPhone via a cable to your Mac, check the box for “Show this iPhone when on Wi-Fi.” After this, whenever your Mac and iPhone are on the same Wi-Fi network, your iPhone will appear in Finder’s left sidebar. Click it and choose Back Up Now to back up your iPhone or iPad wirelessly to your computer.
Can you back up iPhone to iPad?
You can’t back up your iPhone to an iPad. But you can sign in with the same Apple ID on both devices. After that, your contacts, reminders, photos, calendar events, etc., will appear on your iPhone as well as your iPad.
How to stop backing up your iPhone or iPad?
If you no longer want to back up your iPhone to iCloud, go to Settings > your name > iCloud > iCloud Backup and turn off the switch for Back Up This iPhone. Once you turn off iCloud Backup, your last iCloud backup file will be stored for 180 days. After that, it’s deleted.
Check out next: