Learn how to archive a backup of your iPhone or iPad on a Mac to keep it intact, rather than have it overwritten by future backups.

Backing up your iPhone or iPad through the Finder on macOS or the Apple Devices app on Windows overwrites the previous backup file.
Keeping only the newest backup data reduces storage consumption, but there’s a caveat you should be aware of.
About archiving iPhone backups
An archived backup is never overwritten by subsequent backups.
In fact, you’ll have at least two backups of the same device, one archived and the other an ongoing backup overwritten every time you back up the same device again. You can archive as many backups as you want, but doing so may fill up your Mac’s storage.
Importantly, iPhone backups created on different iOS versions are incompatible. For example, you cannot restore an iPhone running iOS 16 from a backup that was created on iOS 27. In other words, you should first back up your iPhone using the current stable version of iOS, then archive the backup before installing the iOS 27 beta.
Doing this will enable you to downgrade to iOS 26 (until Apple allows) using an iOS 26-compatible backup file if you change your mind later. Conversely, you cannot restore an iPhone from an iOS 27 backup after you’ve already installed iOS 26.
Create and archive an iPhone backup on a Mac
- Connect your iPhone or iPad to a Mac using a USB cable.
- Select the device in the Finder’s sidebar and trust it, if prompted.
- Click Back Up Now and wait until it completes, which may take some time.
- When the backup has been created, click the Manage Backups button.
- Control-click or right-click this backup in the list and choose Archive from the menu.
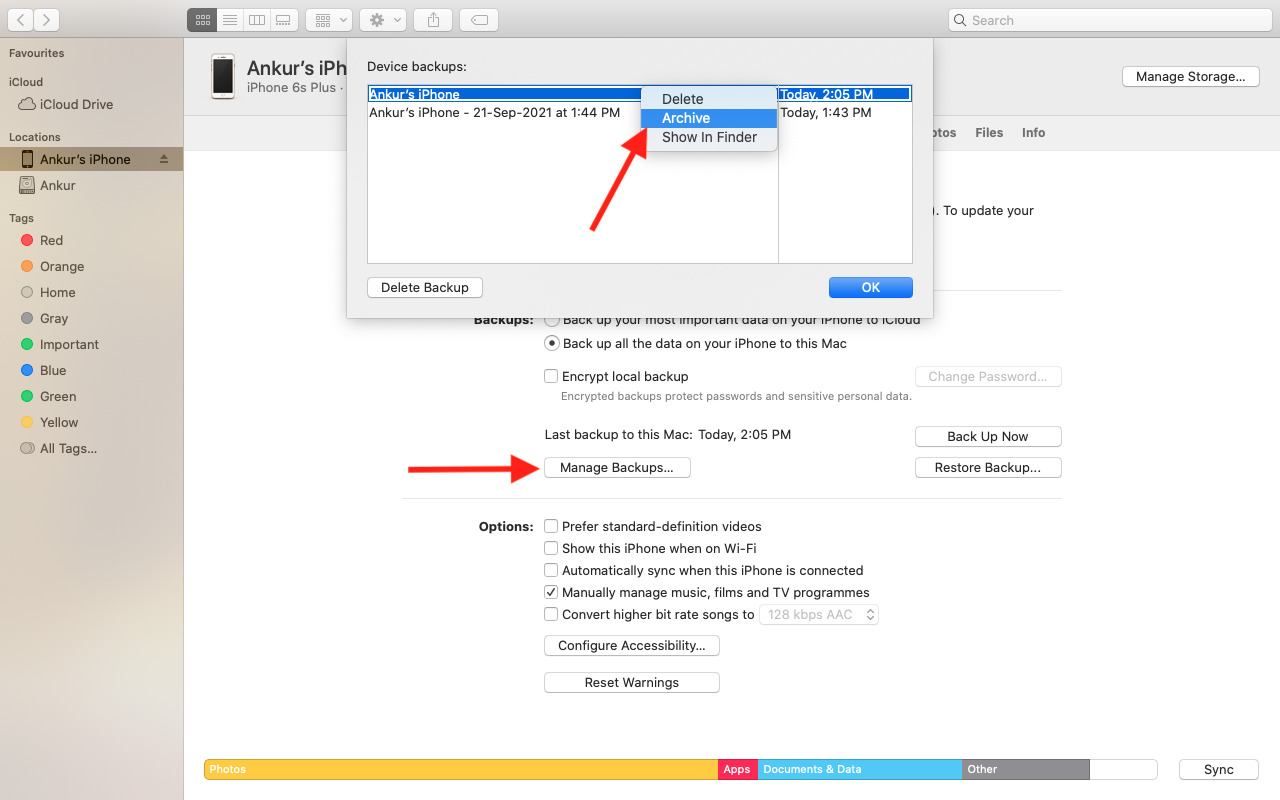
Future backups won’t overwrite this one. Instead, they’ll be saved into a new backup file. You can tell a backup file has been archived if it shows a timestamp in the list.
Restoring your iPhone from an archived backup
After downgrading from the iOS 27 beta, you’ll want to restore your iPhone from an archived iOS 26 backup. Plug the device into your Mac’s USB port, open Finder, and select the device in the sidebar. You should see a prompt asking to restore the device from a backup; select your archived backup to continue.
If iOS is already set up on the device, click the Restore Backup button instead and choose an archived backup file to restore from (you’ll need to turn off Find My).
A restored iPhone will have all the data and settings from the archived backup file, except for content stored in iCloud, which will download automatically when you log in to your Apple account, including your contacts, reminders, and calendar events.
Note: Archiving the backup only applies to apps, data, and some settings, not the actual iOS software itself. You’ll still need to go through the iOS software downgrade process first before restoring the data from your archived backup file.
Check out next: 30+ things I always do when setting up a new iPhone