Those high-quality snaps and videos you take on your iPhone, iPod touch or iPad can pretty quickly eat up all of the available storage space on your device.
There are a number of techniques to increase your free storage, like deleting apps you no longer use, emptying system caches and so forth, but they all pale in comparison to the simplest of solutions—actually moving storage-hungry photos and videos off your device to safely store them in the cloud.
In this post, we’ll tell you all you need to know about the most popular cloud storage solutions. We’re going to detail backing up your media to each of them and discuss recommended strategies for freeing up as much storage space as possible without destroying your personal memories or changing your workflow much.
Before we begin
A few disclaimers before we get to it.
Aside from Apple’s iCloud Photos feature, which pretty much functions on auto-pilot due to its tight integration with iOS, setting up a third-party service to manage your photos entails the following steps:
Firstly, you must sign up for the service, usually on the web, download a companion iOS app from the App Store and grant it permission to access your media.
Secondly, you shall enable camera upload functionality within that app, which usually requires granting access to your location because these kinds of apps resume uploading when your location changes.
Thirdly, you will disable cellular uploads to avoid burning your data allotment unnecessarily, as well as adjust other features to your liking, such as the resolution for your uploads.
Fourthly, and most importantly, your device should be on Wi-Fi, connected to power, and the app must be left open during the initial sync.
After the app finishes uploading, you’ll delete items in Photos manually or use a third-party app to get that job done even faster. And then, you’ll wipe clean your Recently Deleted album, at which point you’re going to regain storage space that was previously taken up by your backed up media.
To speed up the initial upload process, consider using a desktop app for your service, if available. Before using a dedicated Mac app, however, make sure to transfer all your media from an iPhone, iPod touch or iPad to your computer.
Related: How to transfer photos and videos from iOS device to Mac
In most cases, your uploaded photos and videos are privately stored on servers until you choose to share them or change their privacy settings.
Due to a much enhanced iOS Spotlight, which can search inside apps, backed up photos and videos might be discoverable in Spotlight and searchable by name, contact, tag and other parameters.
Related: How to tell Spotlight to search inside specific apps
It’s worth pointing out that some cloud-storage apps let you adjust cache size to help further trim down storage usage on entry-level iOS device models.
And with that in mind, we’re ready to begin.
The best cloud storage services for your iPhone photos
Here are the four best cloud options to safely upload and save photos and videos from your iPhone.
iCloud Photos
iCloud Photo is designed to simplify saving photos and videos to iCloud. It works like a charm. The edits you make on one device automatically update everywhere, and your media is automatically organized into Moments, Collections and Years in Photos on your iPhone, iPod touch, iPad, Mac and iCloud.com
The Photos app will begin syncing your media with the iCloud when you leave it open and your device is connected to Wi-Fi. iCloud Photos is probably the best choice due to its tight integration with iOS and the rest of Apple’s ecosystem.
In addition to your iPhone, iPod touch, iPad and Mac, your iCloud Photos are accessible through the web interface at iCloud.com, and on Windows PCs with the iCloud for Windows app.
iCloud Photos costs nothing, but you won’t get much mileage out of it with a free 5 GB account. Apple currently offers three paid iCloud storage tiers: 50 GB/200 GB/2 TB, respectively, priced at $0.99/$2.99/$9.99.
I always recommend folks to upgrade their iCloud storage to 50 GB before enabling iCloud Photos. Don’t worry; it is possible to downgrade after buying iCloud storage.
Apple’s solution is seamless and you can ask Siri to search through your photos and videos based on dates, locations and album titles, or find them yourself by tapping the magnifying glass icon within the Photos app.
Related: Helpful resources for iCloud Photos
How to back up photos and videos with iCloud Photos
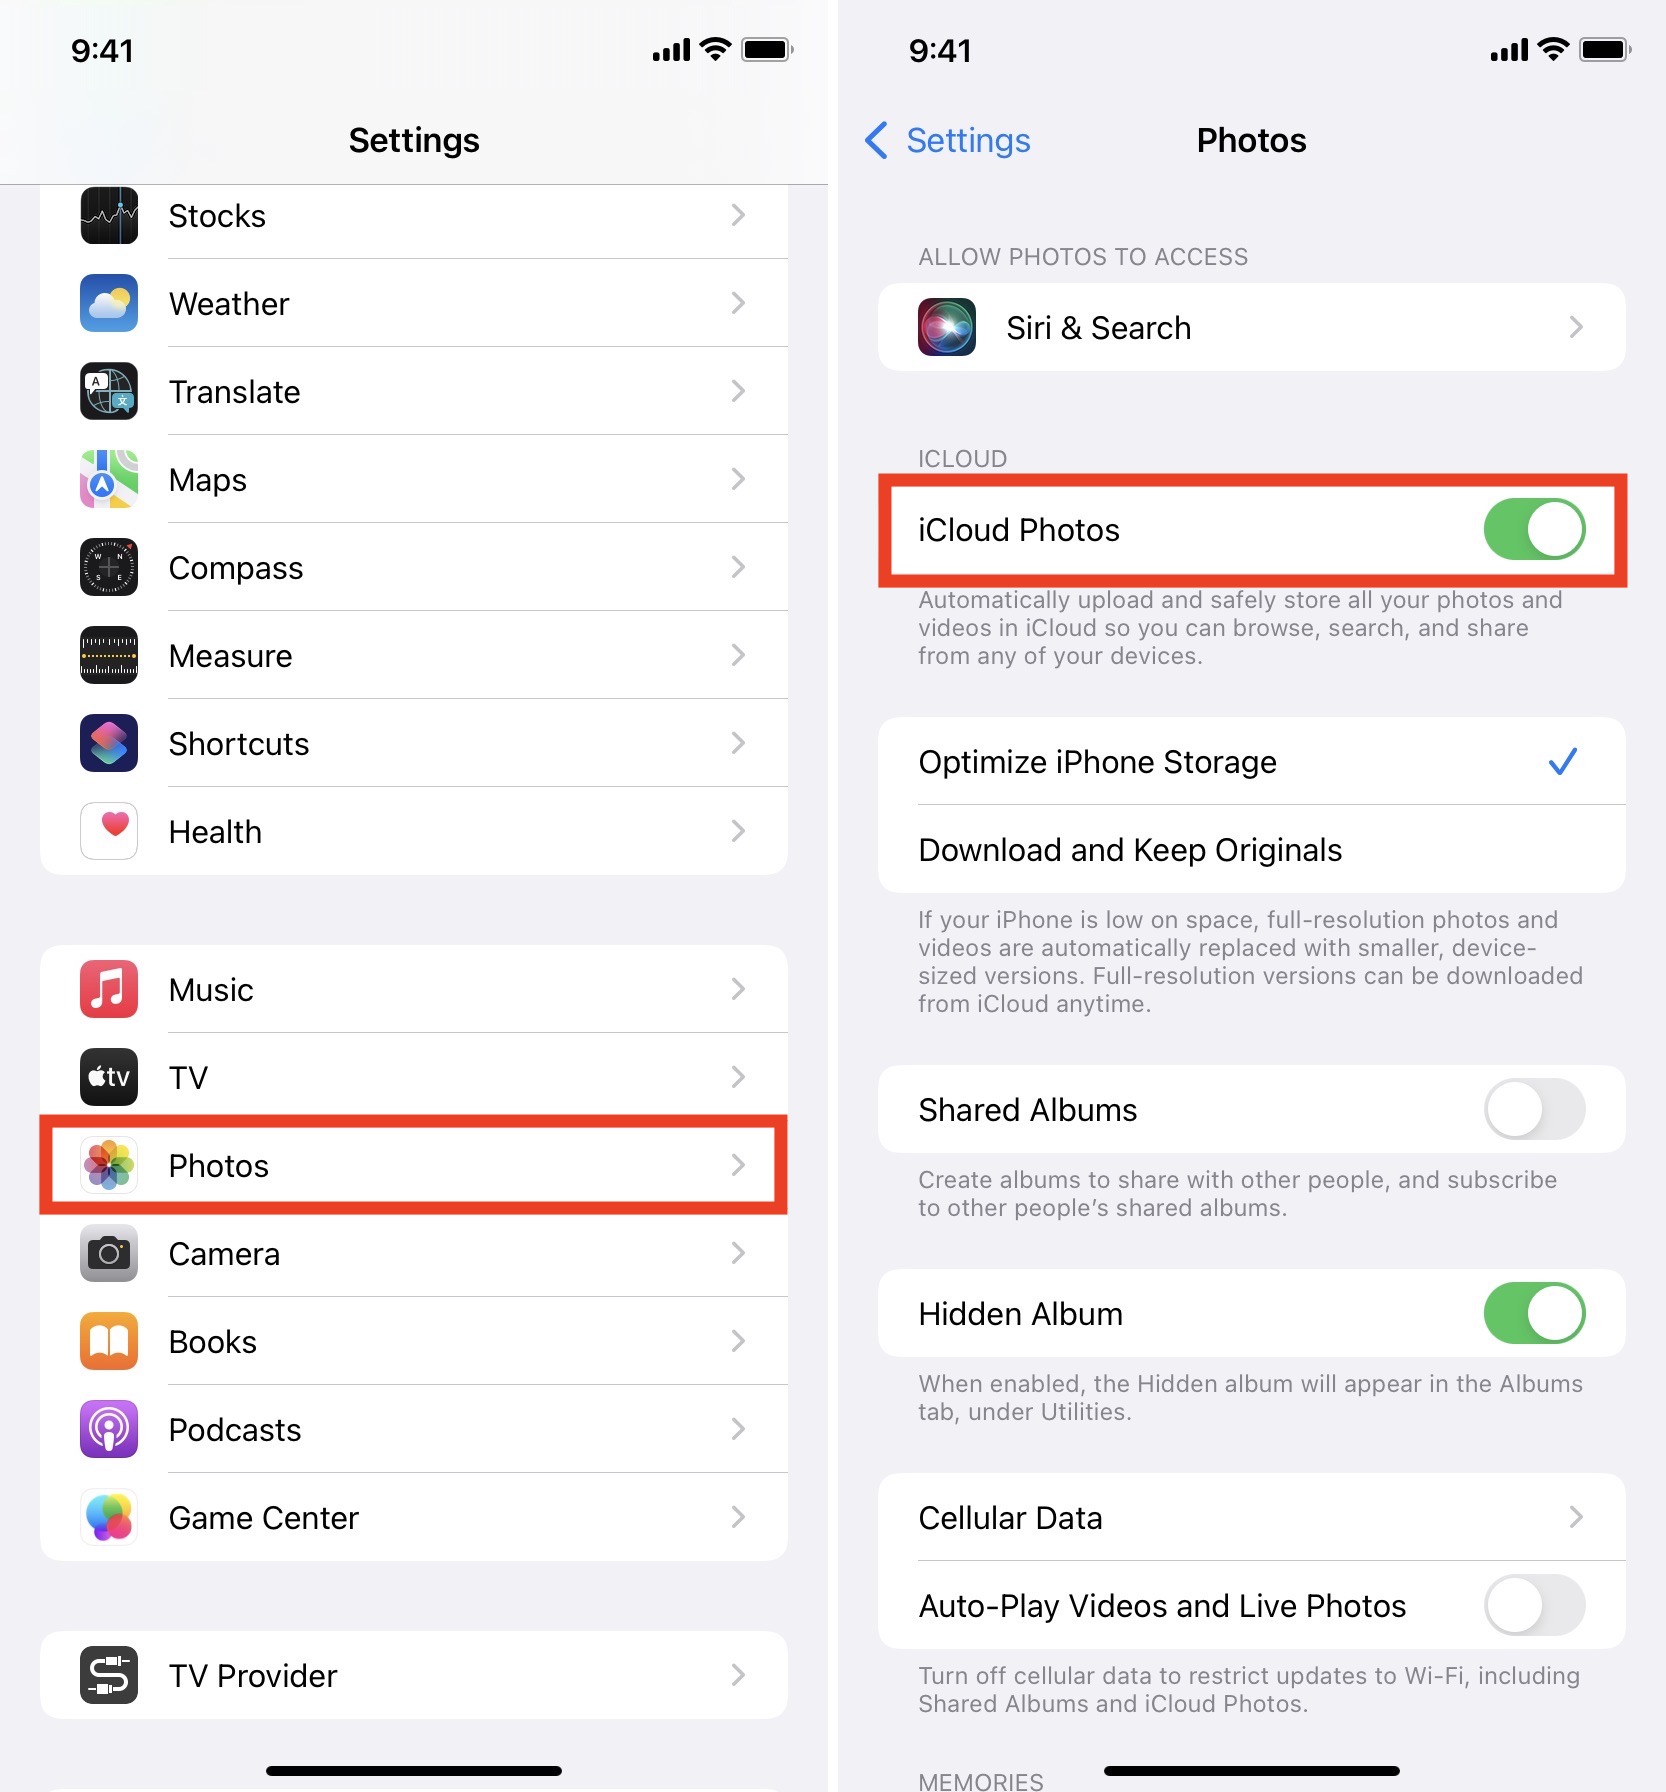
1) Open Settings on your iOS device.
2) Scroll down and tap Photos.
3) Enable iCloud Photos.
4) Tap Optimize iPhone Storage to replace full-resolution photos and videos with device-optimized versions while keeping originals in iCloud. However, editing a photo or video within Photos will prompt iOS to download its full-resolution version from iCloud to this device.
Tip: To have Photos upload new photos taken on this device to iCloud and send them to all your devices, enable the My Photo Stream option (if you see it).
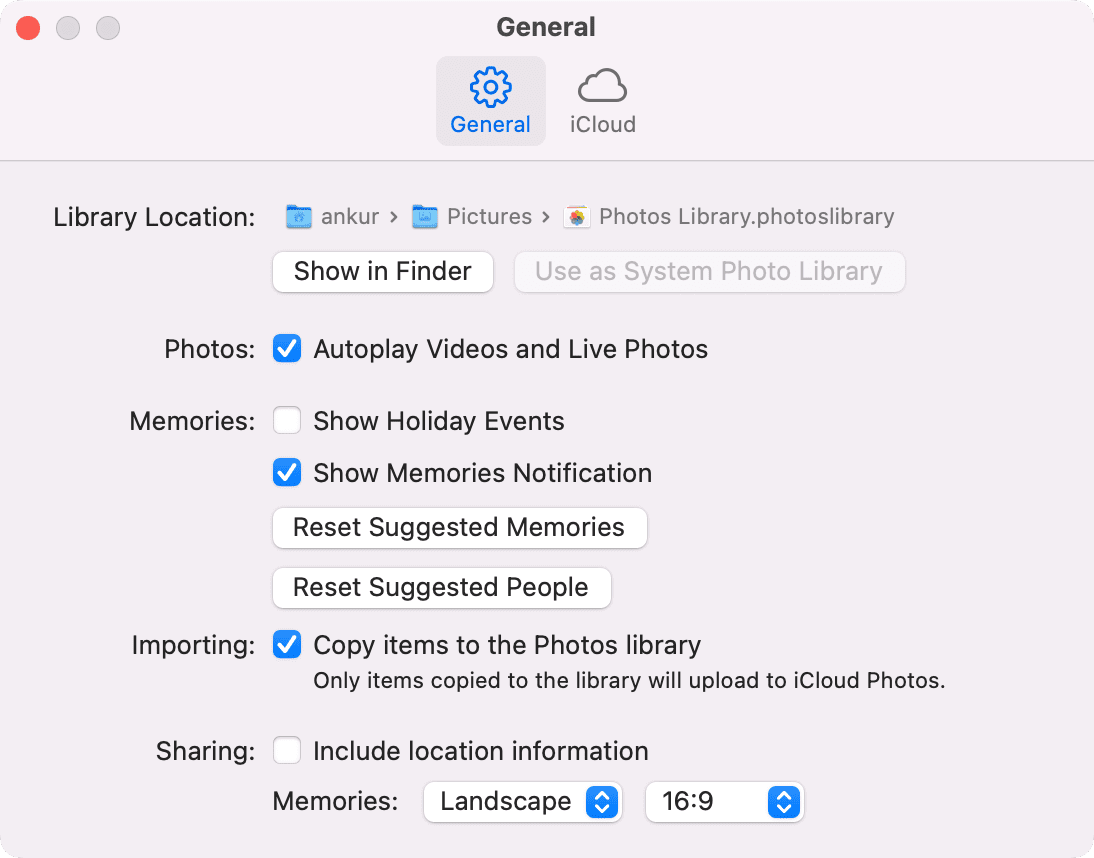
5) Launch Photos on your Mac and press Command + Comma (,) keys.
6) Under the iCloud tab, enable iCloud Photos and select Download originals to this Mac.

Tip: Even if you tell Photos not to store original-resolution photos and videos on this Mac, your media is always kept in its full resolution in iCloud.
Needless to say, any changes applied to your media in the Photos web app at iCloud.com—including deleting a photo, uploading additional media from your computer and more—will be pushed to all your other iCloud devices.
About My Photo Stream
Important: You will see the My Photo Stream option only if your Apple ID was created a few years ago. This feature is no longer available on newly created Apple IDs.
My Photo Stream lets you import your most recent photos on other iCloud devices. Keep in mind that My Photo Stream doesn’t work with video and Live Photos.
iCloud keeps up to a thousand photos for a maximum of 30 days from the date they got saved in My Photo Stream. It’s great that My Photo Stream uploads don’t count against your iCloud storage.
Photos added to My Photo Stream from other devices will appear in the Photos app, organized in Moments, Collections and Years. To see your photos on My Photo Stream, tap Photos > Albums > My Photo Stream, or go to Photos > Albums > My Photo Stream in Photos for Mac.
To have all your My Photo Stream items automatically download to your computer, launch Photos for Mac and go to Preferences > General > Copy items to the Photos library option.
After turning My Photo Stream off, all its photos are removed from your device, including those that you have manually imported to your Camera roll. Photos from My Photo Stream on your other devices aren’t affected.
It is therefore recommended that you save any My Photo Stream items that you wish to keep to your Camera roll before you turn My Photo Stream off.
Google Photos
Google Photos is a great option for those looking for a versatile cross-platform photo manager. Available on iOS, Android and in any web browser at google.com/photos/, it can help you free up a significant amount of storage space as it only stores highly optimized thumbnails on your iOS device.
To see your Google Account storage usage, go to Google One Storage.
All personal Google Accounts include 15 GB of free storage shared across Google Drive, Gmail and Photos. Should you need more storage, Google will happily upsell you to 100 GB/200 GB tiers that will set you back $1.99/$2.99 per month, respectively. There is even a 2 TB plan at $9.99 per month.

Related: Helpful resources for Google Photos
How to back up photos and videos with Google Photos
1) Download and open Google Photos on your iOS device.
2) Tap your profile picture from the top right.
3) Tap Turn on backup.
4) Choose one of the following options and tap Confirm:
- Storage saver: This will downscale all images sharper than sixteen megapixels and restrict video uploads to 1080p. Both photos and videos will also be recompressed for smaller file sizes. Or,
- Original quality: This stores full-resolution media without any downscaling or recompression. Use this if you want to maintain the exact original quality.

5) Go back and tap your profile picture > Google Photos settings > Manage device storage > Free up space if you want your originals removed from this device after they’re backed up in Google Photos.
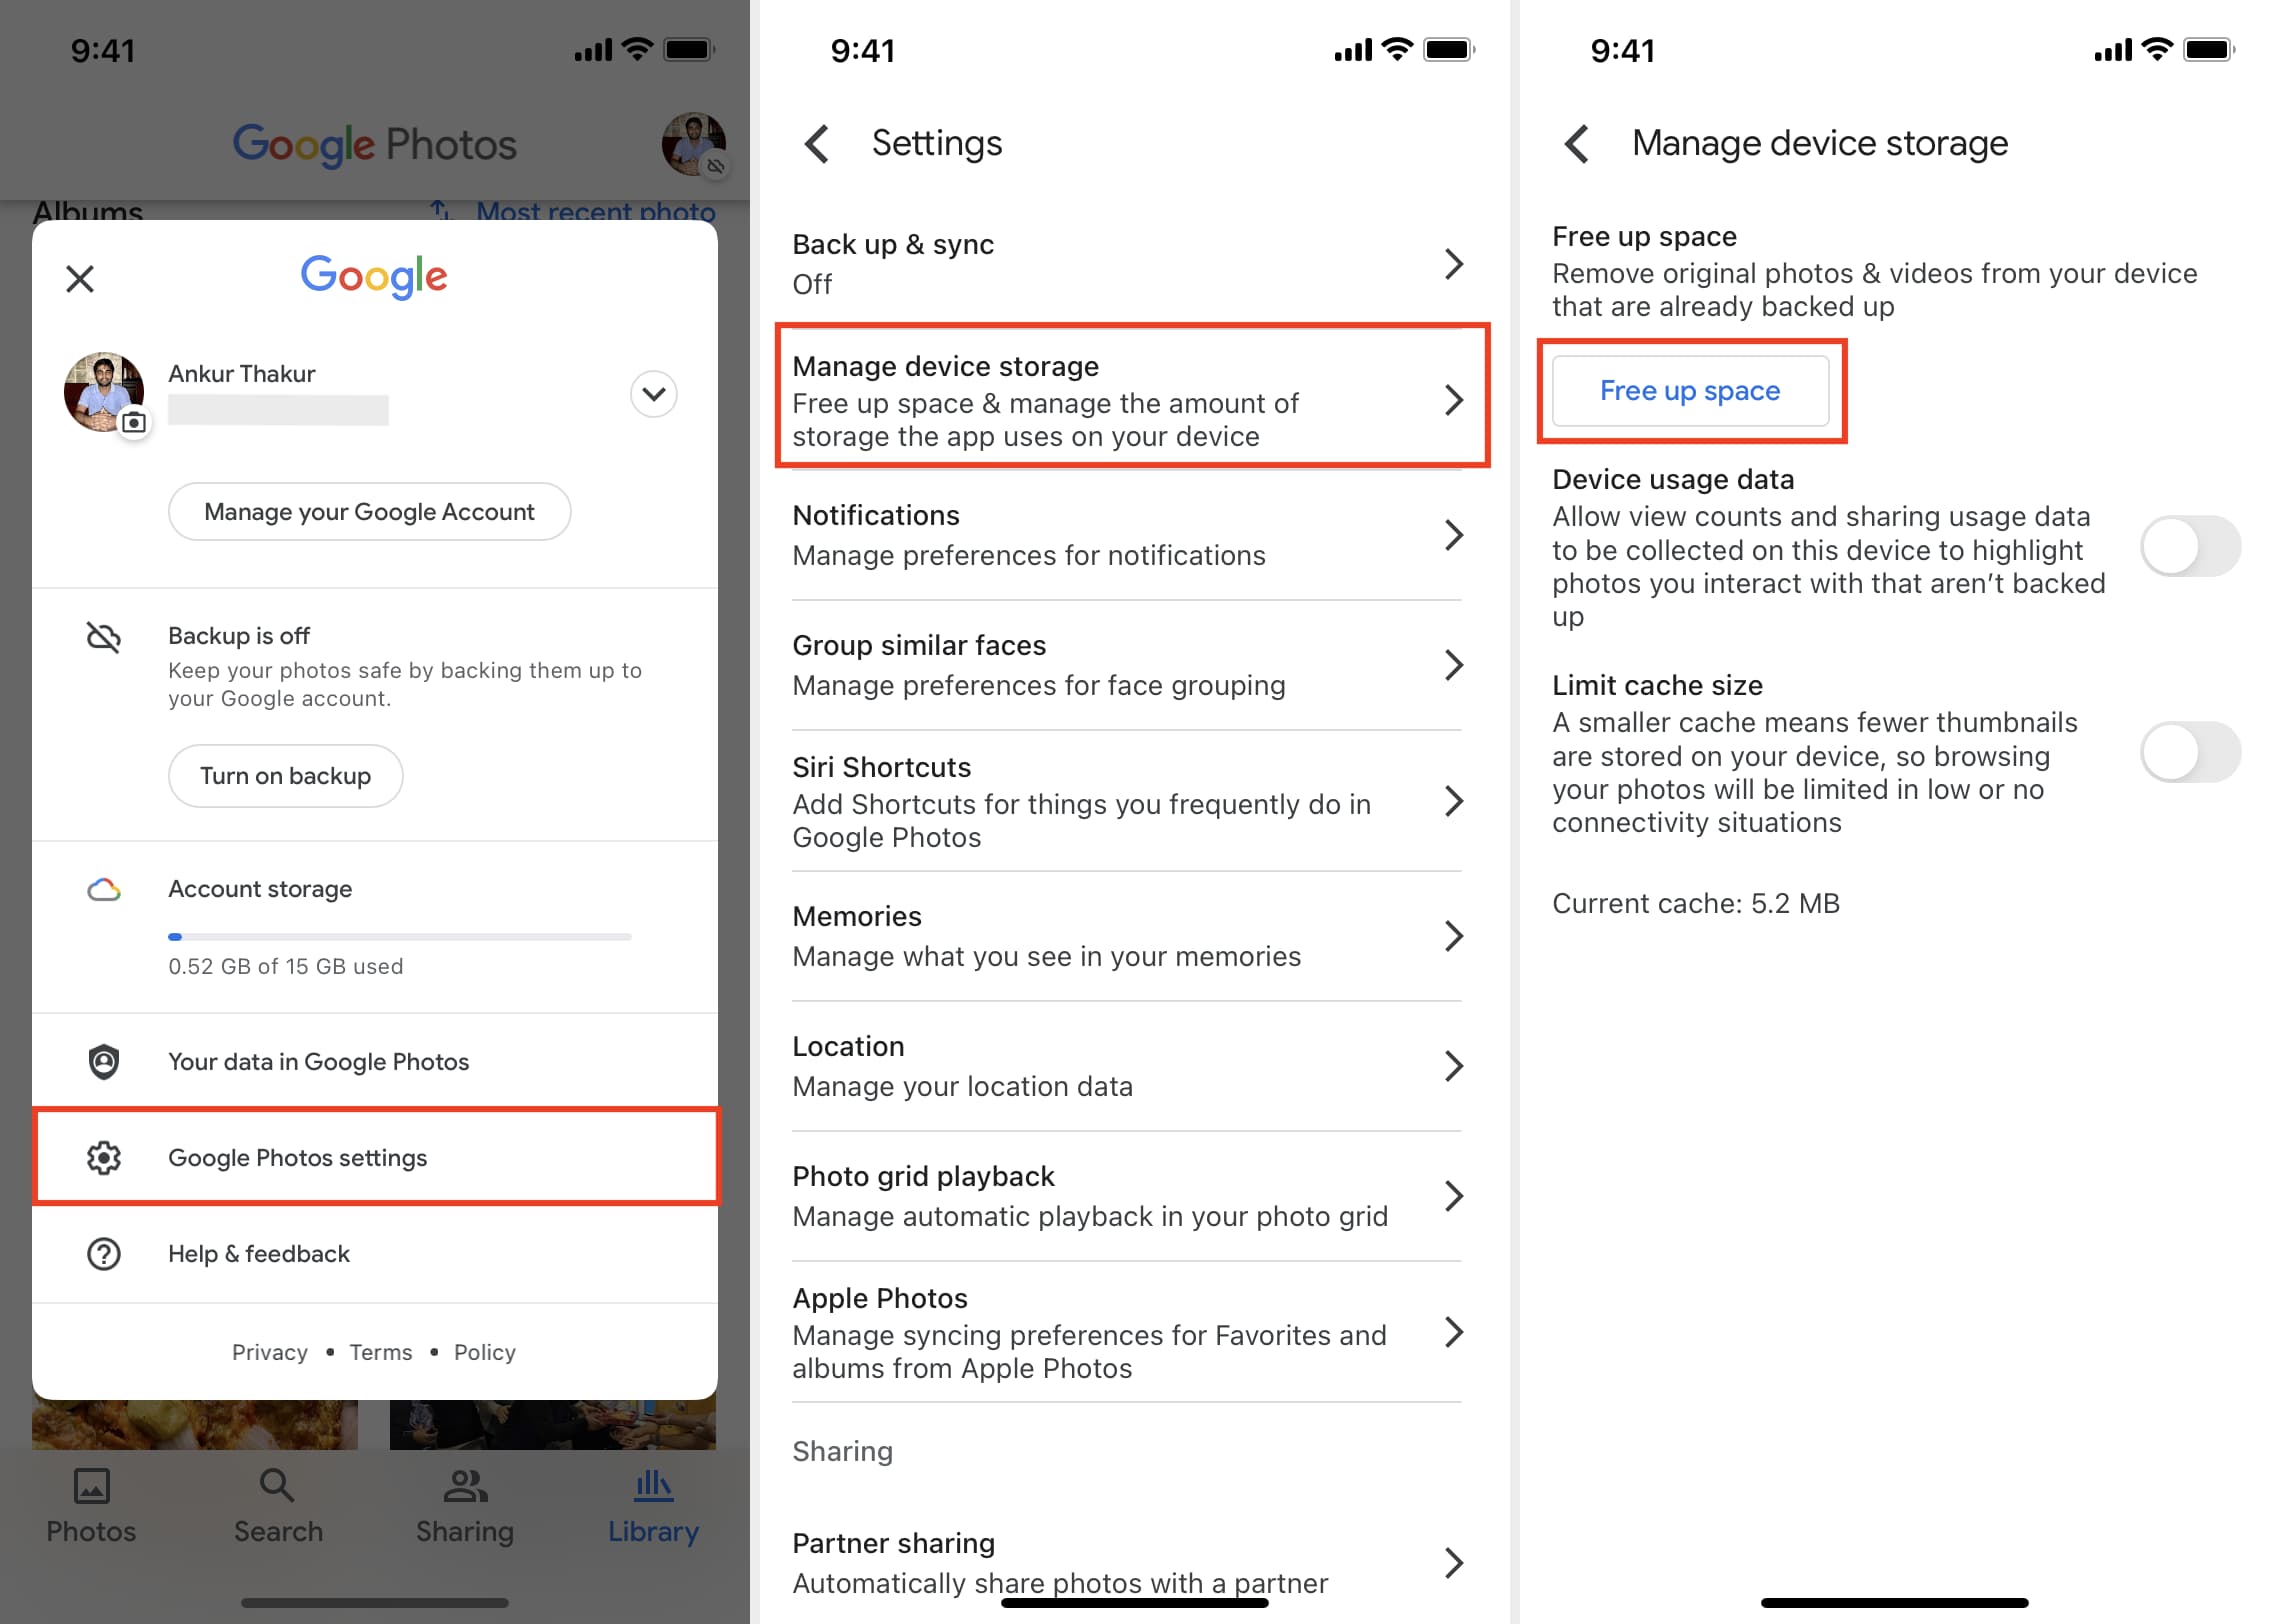
Tip: Choosing Free up space replaces original-resolution items on your device with highly device-optimized thumbnails. Unless you buy more storage from Google to use with the Original setting, you won’t be able to re-download your photos and videos in their original resolution, quality and file size.
Follow this guide to back up photos and videos on your desktop to Google Photos.
Flickr
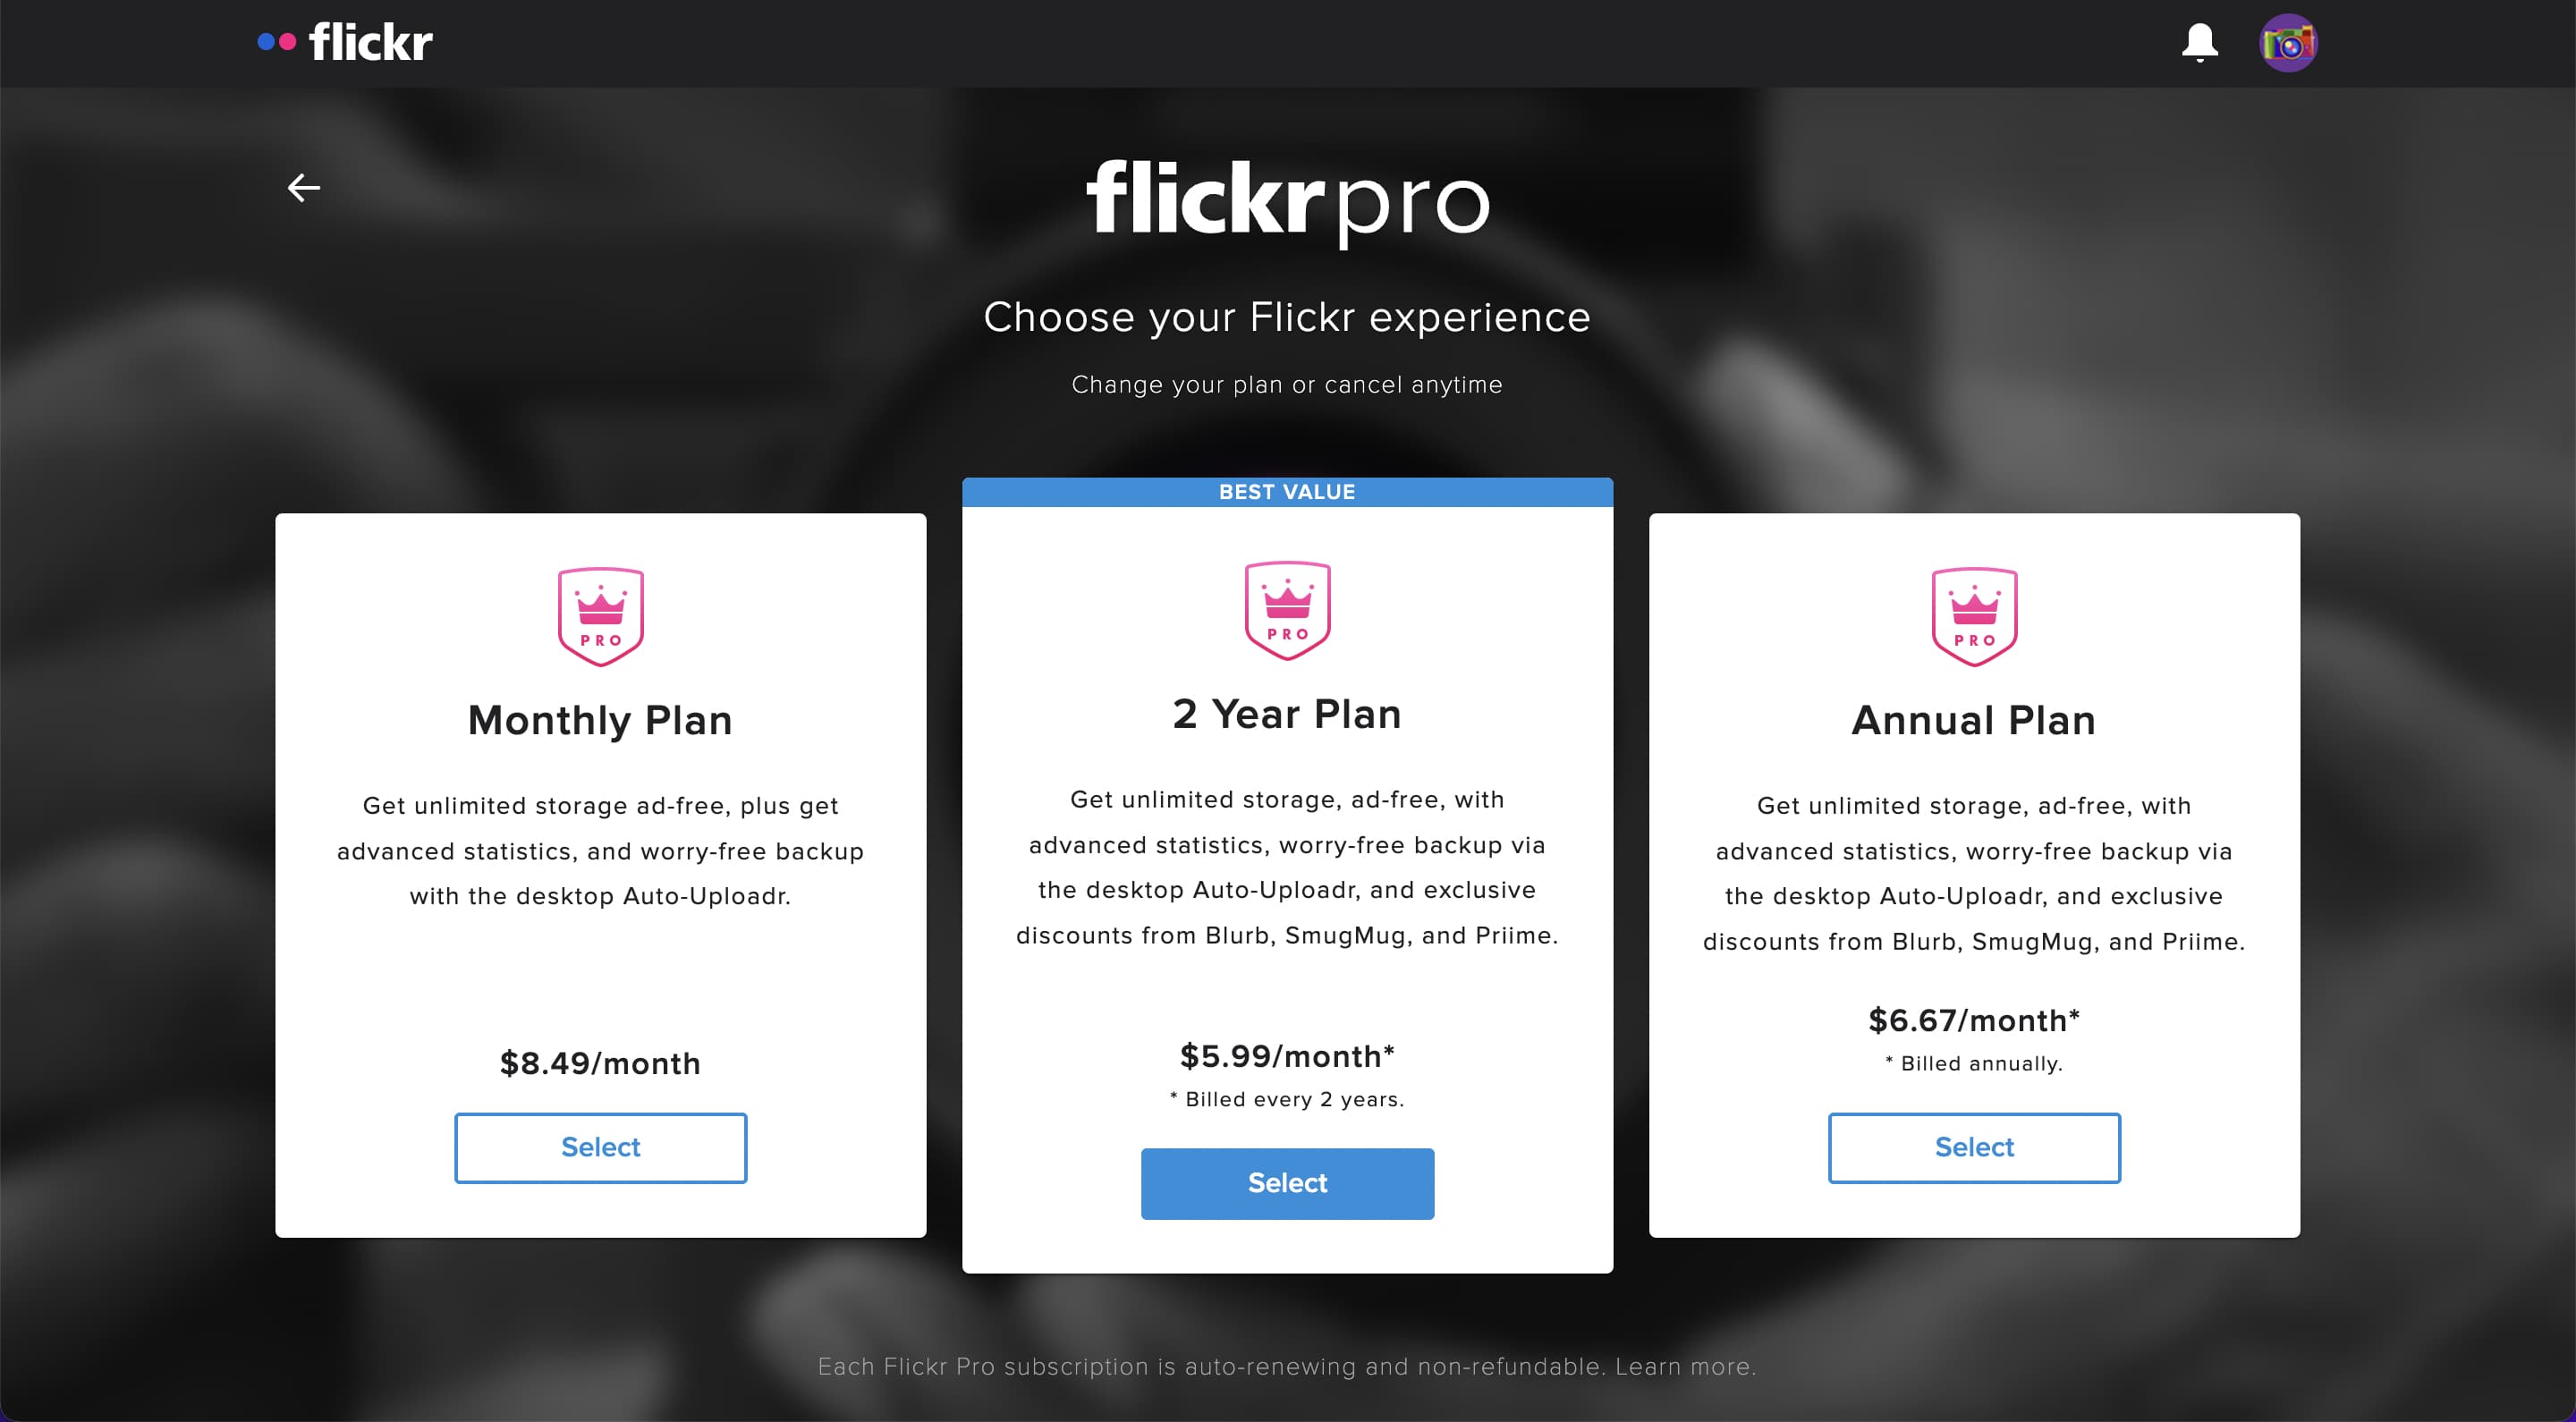
With a Flickr Pro account, you can “upload as many photos as you can take, always at true full resolution.” Flickr Pro gives you unlimited storage for $8.49 per month, $6.67 per month when billed annually, or $5.99 per month with a two-year plan.
Each individual photo can be up to 200 MB, and images can be no more than 31.25 times wider than they are tall. Flickr accepts most image formats, including JPEG, non-animated GIFs and PNG. Non-supported formats will be automatically converted to JPEG after uploading.
Using Spotlight, you can search for albums, groups or recently-viewed photos on Flickr without opening the app.
Flickr is also available on your Apple TV. To get started, search for “Flickr” in the App Store on your Apple TV. Then open the app, select Your Flickr at the top and connect your Flickr account.
How to back up photos and videos with Flickr
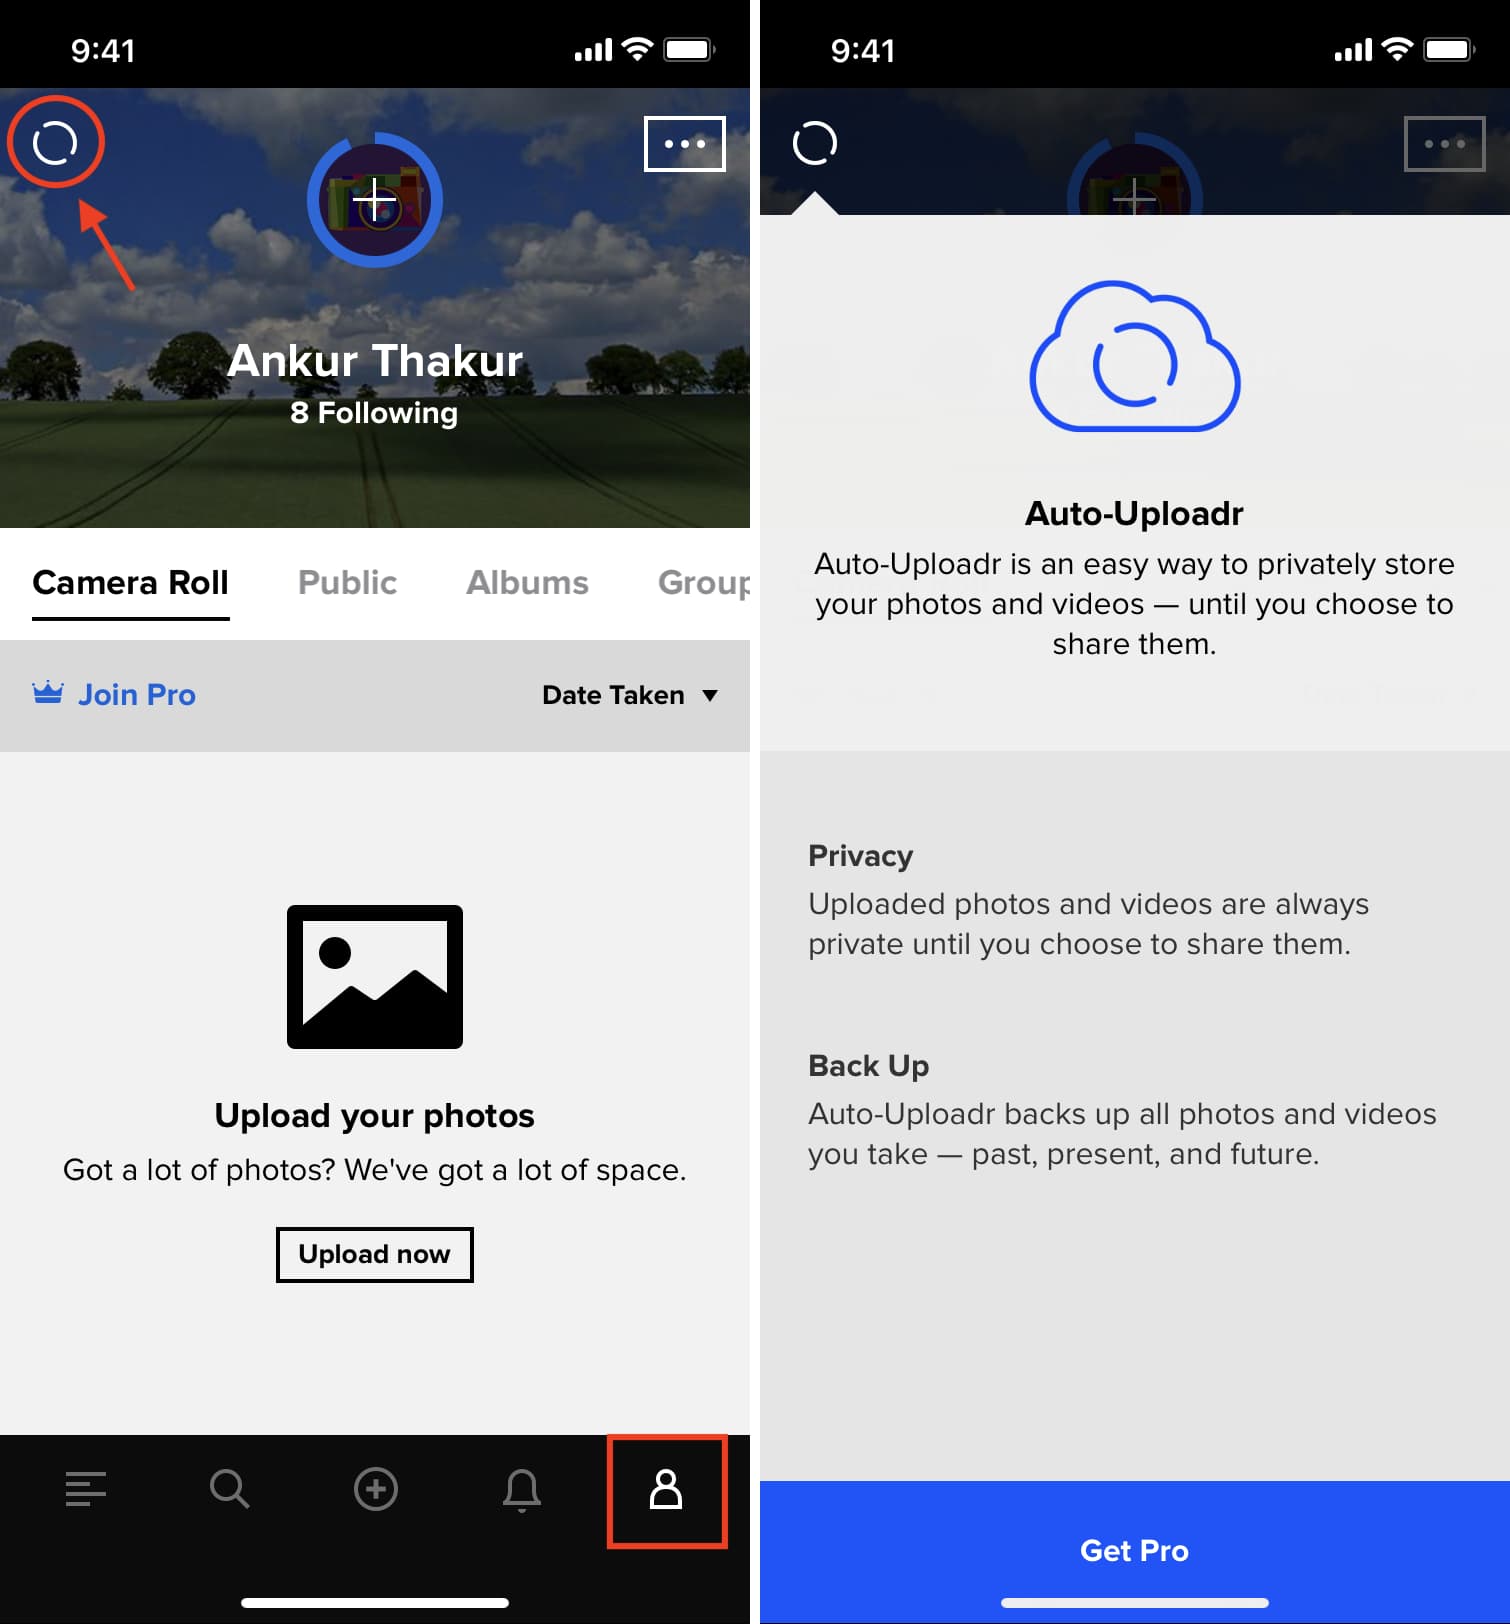
1) Download and open Flickr on your iOS device.
2) Tap the profile icon from the bottom right.
3) Tap the circular icon at the top left to open Flickr’s Auto-Uploadr settings.
Tip: Deselect Allow uploading over cellular to prevent unwanted charges.
Auto-Uploads will only back up your photos and videos that haven’t been uploaded before and are stored in your default photo and video folder.
The official Flickr Uploadr app for Mac and Windows, along with other related tools, is available for download from Flickr to speed up the initial upload process.
OneDrive
OneDrive, a Microsoft service, gives you 5 GB of storage for free, with an optional 100 GB tier priced at $1.99 per month. 1 TB of free storage is available to all Microsoft 365 subscribers. Bonus storage can be obtained via referrals, based on your loyalty, Bing usage and using camera upload functionality.
Your photos, videos, and other files uploaded to OneDrive are readily available in mobile and desktop Office apps and in any modern web browser pointed at OneDrive.com.
You can search content in your OneDrive from anywhere using Spotlight, including finding images by name, contact or tag, without having to open the app.
Related: Helpful resources for OneDrive
How to back up photos and videos with OneDrive
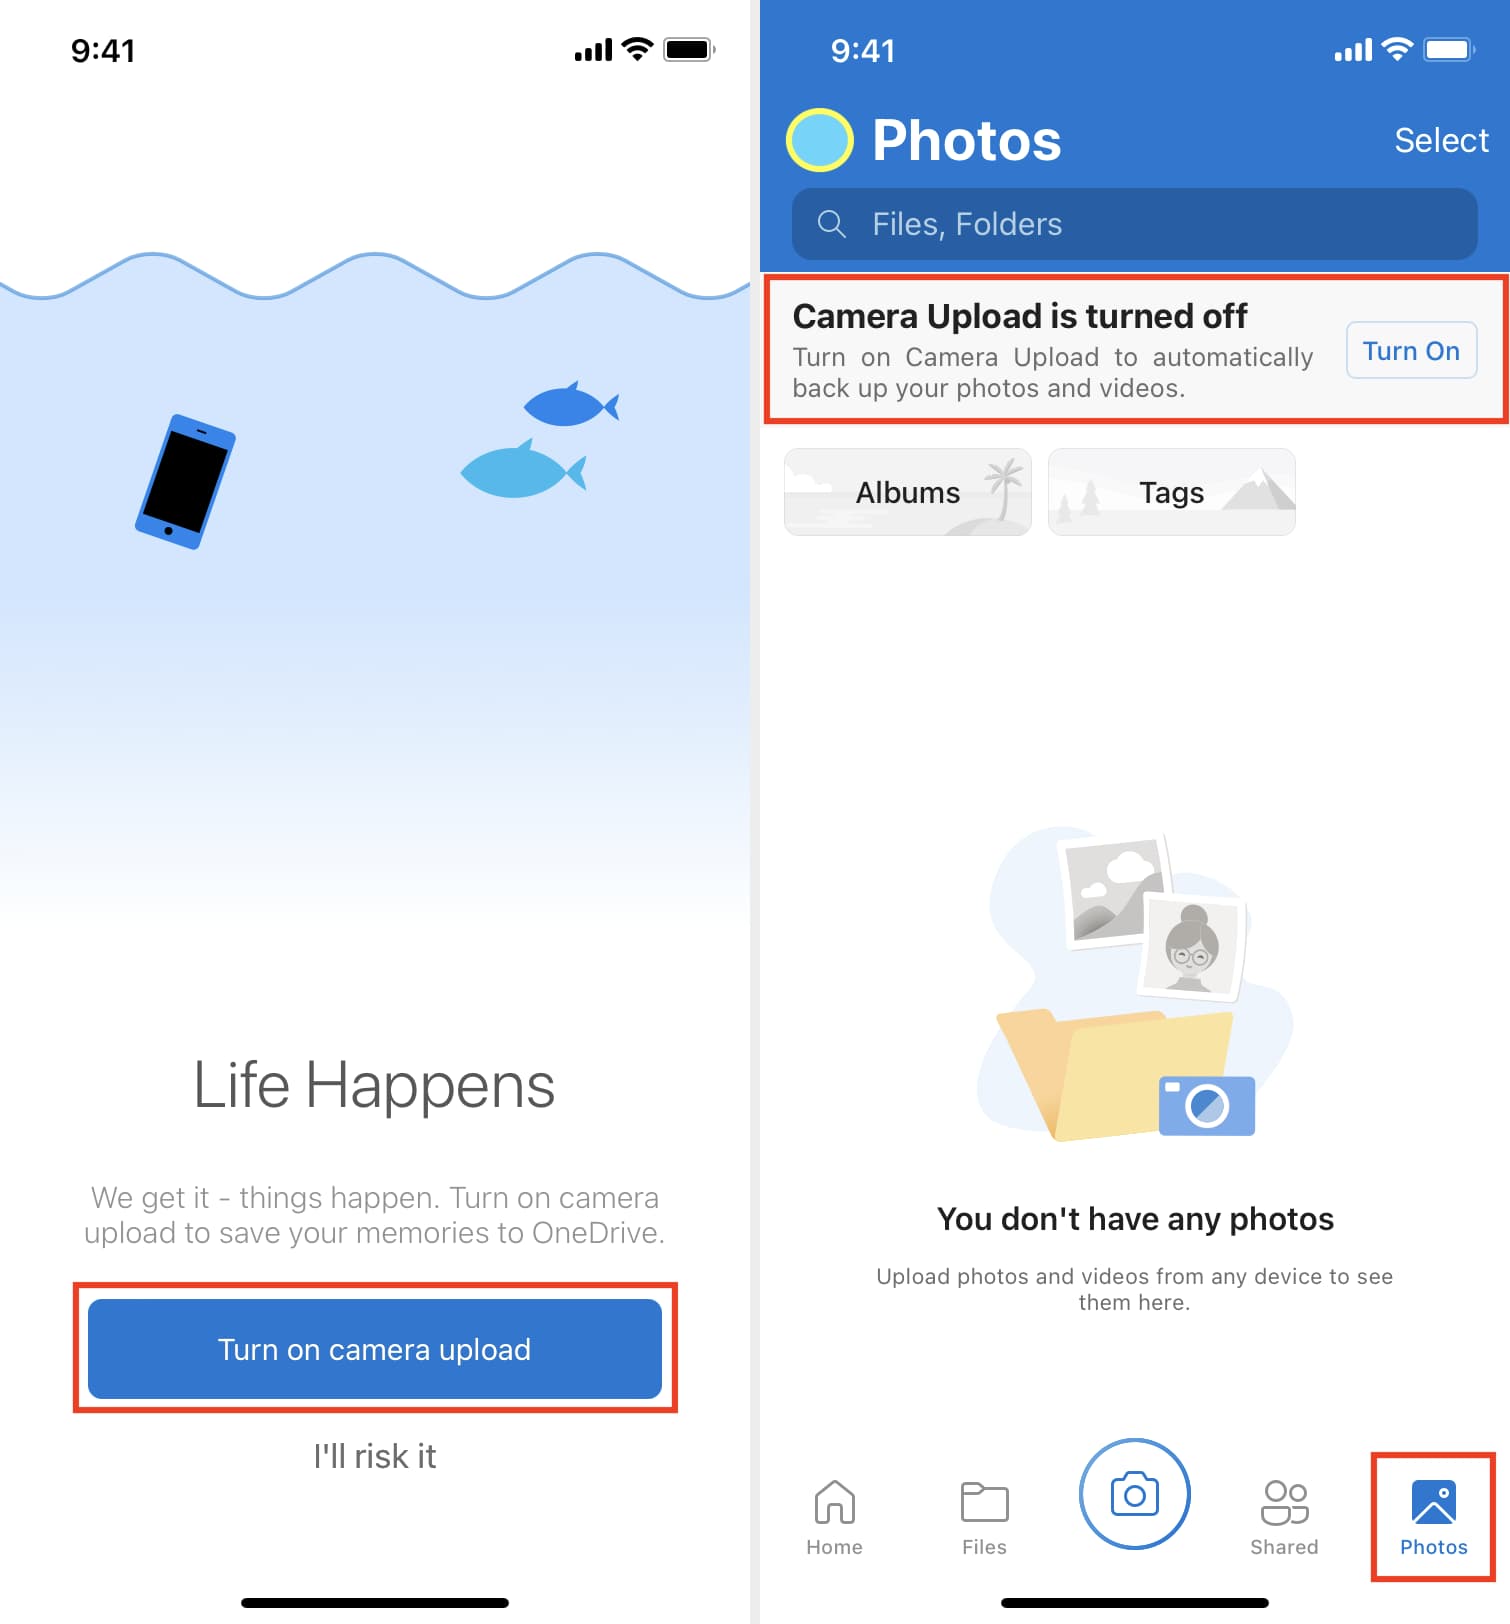
1) Download and open OneDrive on your iOS device.
2) You can tap Turn on camera upload during initial set up or tap Photos from the bottom left.
3) Tap Turn On next to Camera Upload is turned off.
All photos and videos are uploaded at their original sizes on Wi-Fi. The official OneDrive uploader with support for Finder overlays, file syncing and more is available free of charge in the Mac App Store.
Final thoughts
And that’s it, ladies and gentlemen; you should be now ready to make a jump to the cloud and deal with those dreaded low-storage warning messages in iOS.
Each of the aforementioned services has its own benefits and drawbacks. Do take your time and learn their ins and outs before taking the plunge.
The “Does this service recompress my media?”, “How does it integrate with iOS?” and “How is it going to adjust my workflow?” are the three most important questions you should be asking yourself in making your decision.
iCloud Photos, for instance, is hassle-free, works like magic and always keeps your originals in the cloud. I’m a big believer in iCloud Photos, as it has been keeping my media in perfect sync for more than a year now.
It gives me peace of mind as I can safely edit my photos and videos on any iCloud device, knowing that any changes will show on my other devices and that I can always revert to the item’s original version.
On the other hand, Google Photos works well with Android as well and keeps everything organized everywhere. What I really, really like about Google Photos is the small file sizes. Take, for example, a 13MP image taken on an iPhone, which typically results in a 5+ MB file.
In Google Photos, you end up with a circa 500KB file that’s still a 12MP photo that looks just as crisp as the original image. Thanks to recompression, Google Photos is able to upload multi-gigabyte photo libraries in a fraction of the time, with no discernible difference in content quality.
Flickr’s iOS app is gorgeously designed and has perhaps the most powerful built-in camera, filters and other cool features to touch up your snaps. I also appreciate that all edits are non-destructive, so changes are easily reversible.
Regardless of the service you choose to back up your photos and videos, Apple’s third-party development restrictions do impose certain limitations that will force you to adjust your workflow.
For starters, as your photo library now lives elsewhere, no longer is it advisable to edit your media in Apple’s stock Photos app. Instead, you’ll manage, edit and share your photos and videos inside the OneDrive app, the Google Photos app, etc.
Thankfully, sharing backed up media won’t be a problem. For instance, I can launch Google Photos and directly share any image to WhatsApp, Messenger or any app which implements iOS multi-purpose share menu.
Yes, you shall lose some functionality, and tight integration with iOS and the Photos app will fly out of the window. At the end of the day, these are acceptable trade-offs given the amount of storage space you will regain—especially when all the other storage-saving techniques are exhausted or would be futile.
Check out next: