In this guide, I go over a list of over 40+ things I always do to ensure the best user experience after setting up a new or erased Mac.

Sebastien, iDB’s founder and editor-in-chief, wrote an article in which he shared over 30 things he always does when setting up a new iPhone. I recently bought a new Apple Silicon MacBook Pro and a Mac mini, and inspired by his article, I thought I’d do a similar one for Mac.
I have been using a Mac for over ten years now. Over time, I have developed some habits like using Hot Corners, multiple virtual desktops, and more.
Whenever I have to switch to a different Mac, I change several settings, make customizations, and tweak the following things without fail to make the computer truly mine and have it behave the way I prefer.
Please have a look at the things I do after setting up my Mac, and don’t forget to let us know what setting you like to tweak right off the bat.
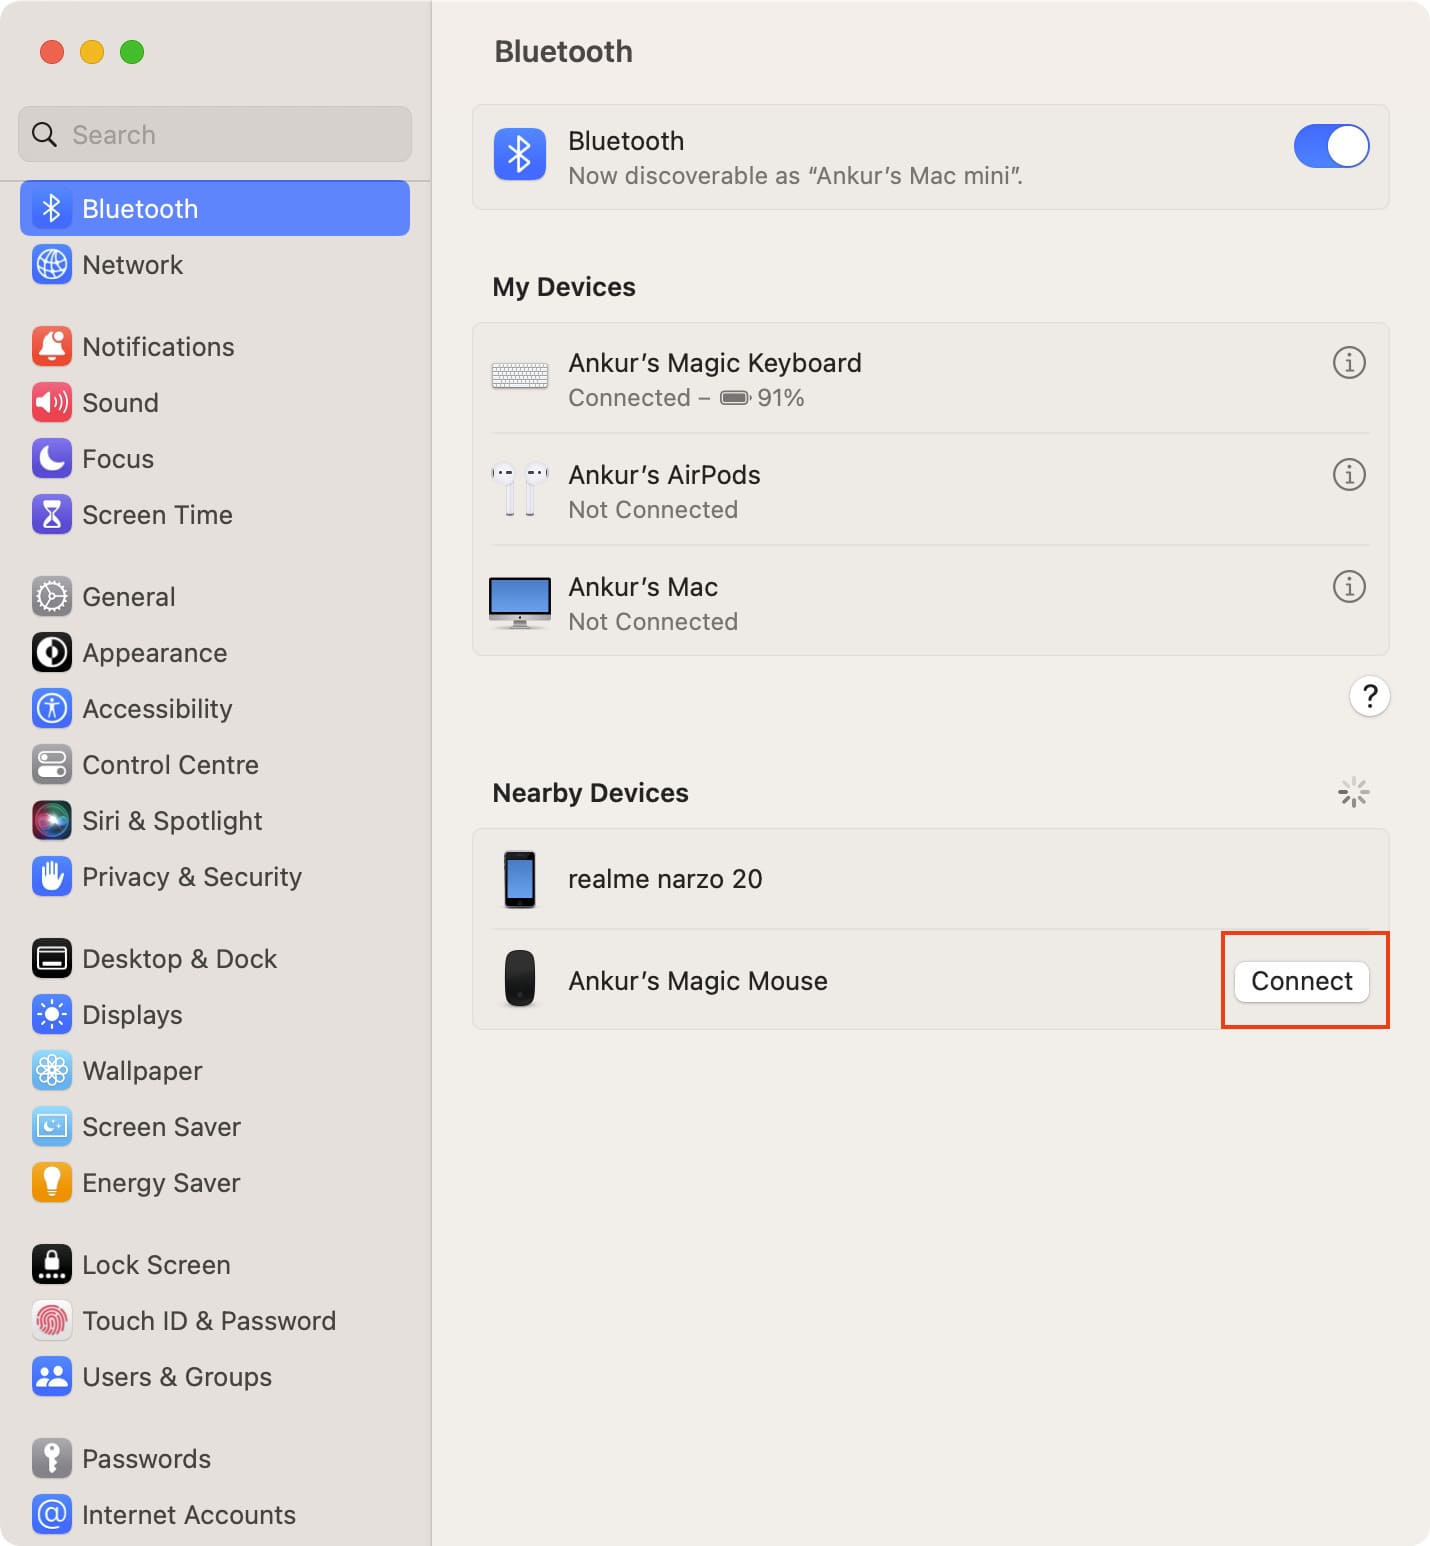
1. Connect the Magic Mouse to Mac mini
I don’t have to do this if I’m setting up a MacBook. However, when setting up a Mac mini or Mac Studio, macOS shows a screen to connect my Magic Keyboard during the initial setup screens. But for a mouse, I have to use a wired one to finish the setup. Therefore, once I’m inside, the first thing I do is disconnect my five-dollar wired mouse and pair my Magic Mouse by going to System Settings > Bluetooth.
2. Set the right tracking speed for my mouse
I don’t like the default tracking speed. I want my mouse to quickly go from one edge of the screen to the other, even if I move it slightly. To set this, open System Settings > Mouse and adjust the Tracking Speed.
Additionally, I also set secondary click, smart zoom, and swipe gestures for my Magic Mouse.
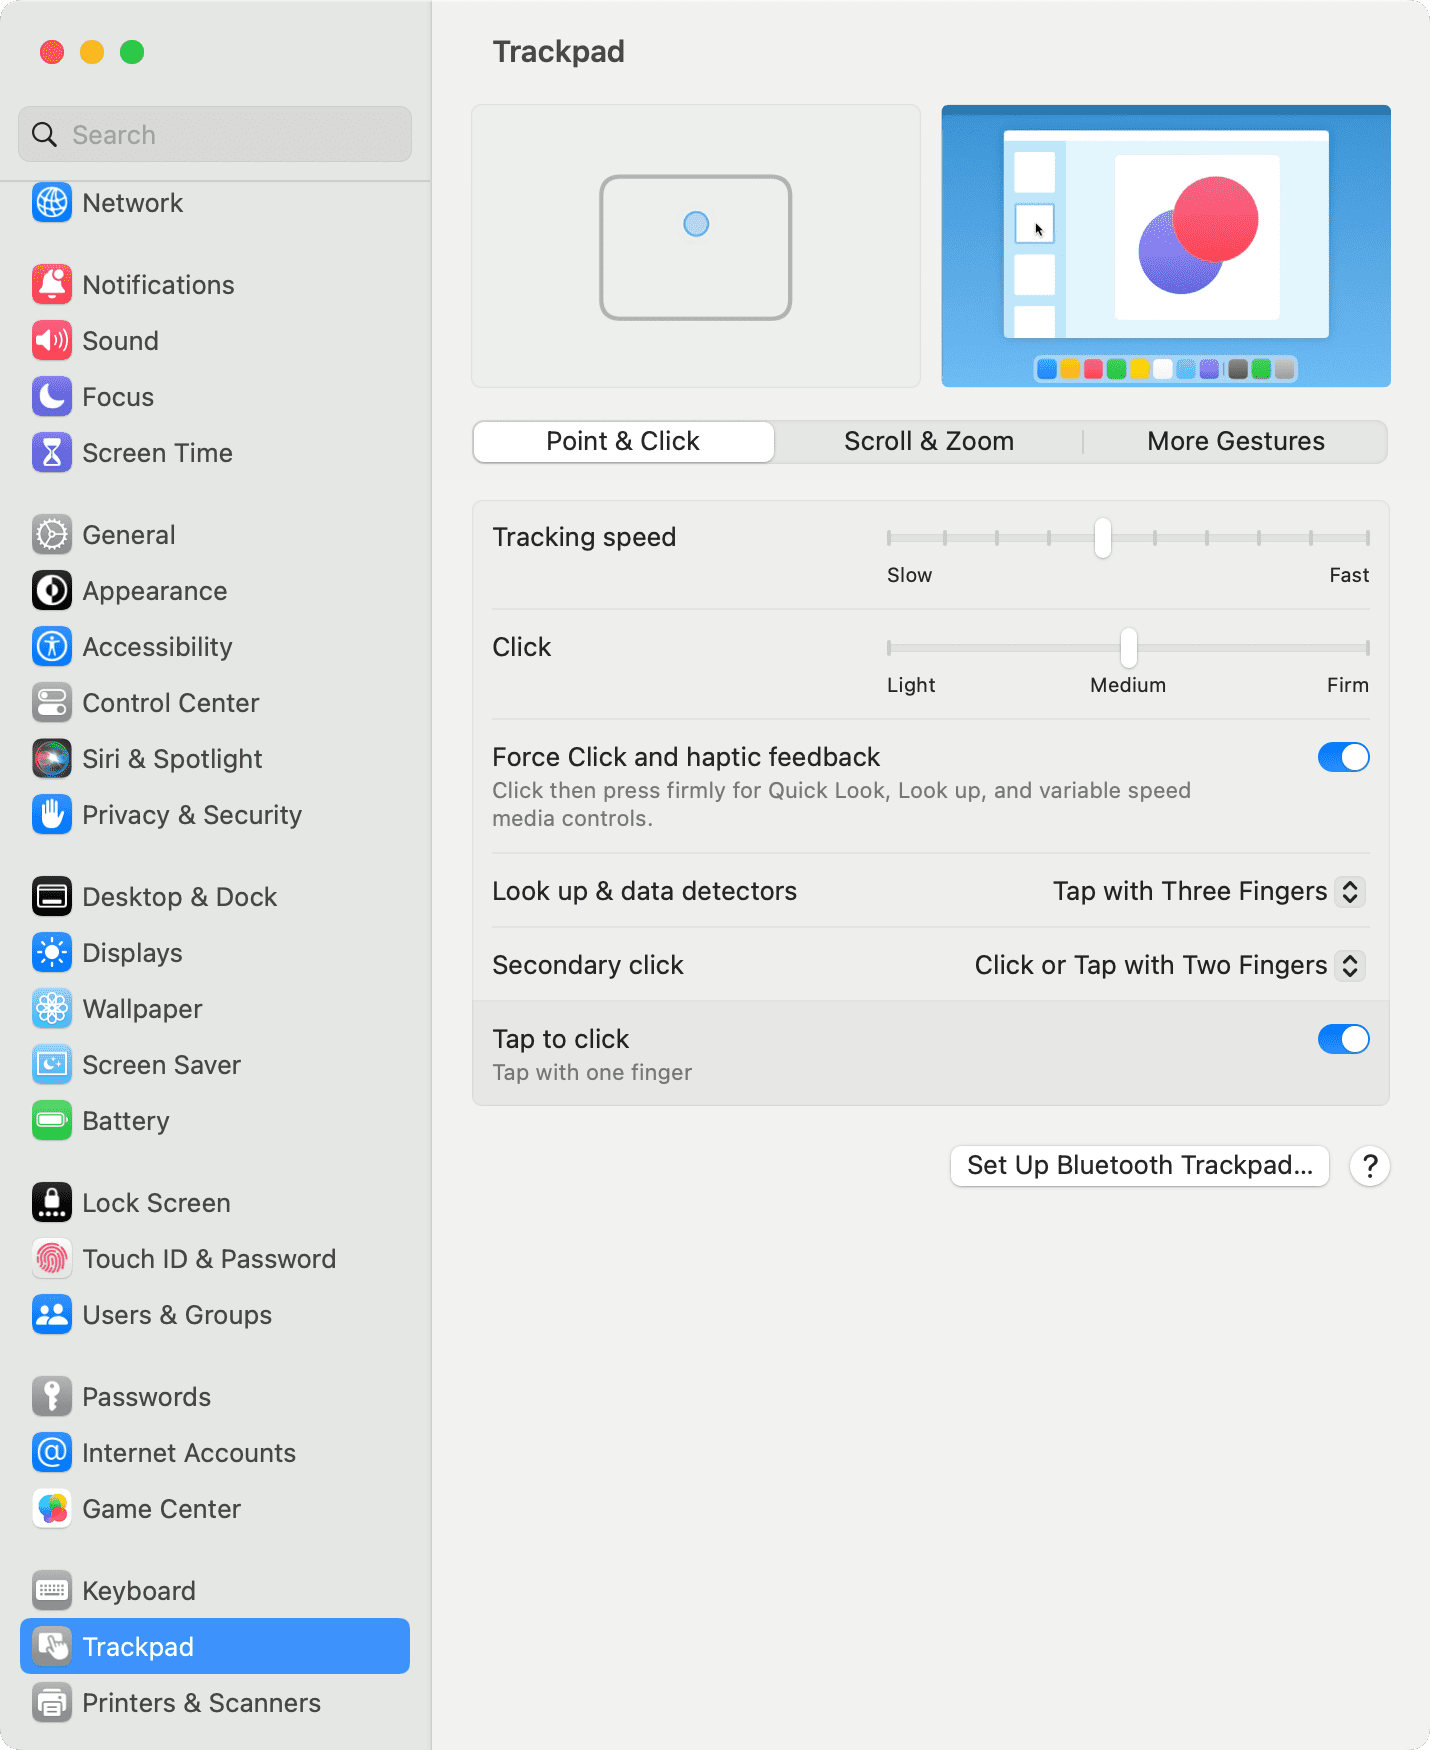
3. Use “tap with three fingers” for Look Up
When I set up my new MacBook Pro, Look Up is set to force-click with one finger. I always go to System Setting > Trackpad and choose Tap with Three Fingers for Look up & data detectors.
4. Enable “Tap to Click” in Trackpad settings
From System Settings > Trackpad, I also enable Tap to click with one finger. This makes it easier to click than force pressing the MacBook’s trackpad.
5. Enable three-finger drag to move windows and select text
When Apple introduced the Force Touch trackpad on MacBooks in 2015, they hid the three-finger drag in Accessibility settings. I love three-finger drag to move windows and select text so much that even if I borrow your Mac for 2 hours, I will undoubtedly enable it.
To use 3-finger drag on a MacBook, go to System Settings > Accessibility > Pointer Control > Trackpad Options. From here, enable Use trackpad for dragging and set the Dragging style to Three Finger Drag.
6. Make sure passwords are in place
I use iCloud to store nearly all my passwords. After I sign in to my Mac using my Apple ID during the setup process, it syncs all the passwords. But still, I make sure everything is there by going to the Passwords app (or System Settings > Passwords in older versions on macOS). If you use something like 1Password or Dashlane, you can download that to make the login process effortless.
7. Set up additional Touch ID fingerprints
Mac supports up to three fingerprints. However, during the initial setup, you can only add one fingerprint to your MacBook’s Touch ID or Magic Keyboard with Touch ID. So, once I’m in, I go to System Settings > Touch ID & Password > Add Fingerprint and register the index finger of my other hand and also add my wife’s finger.
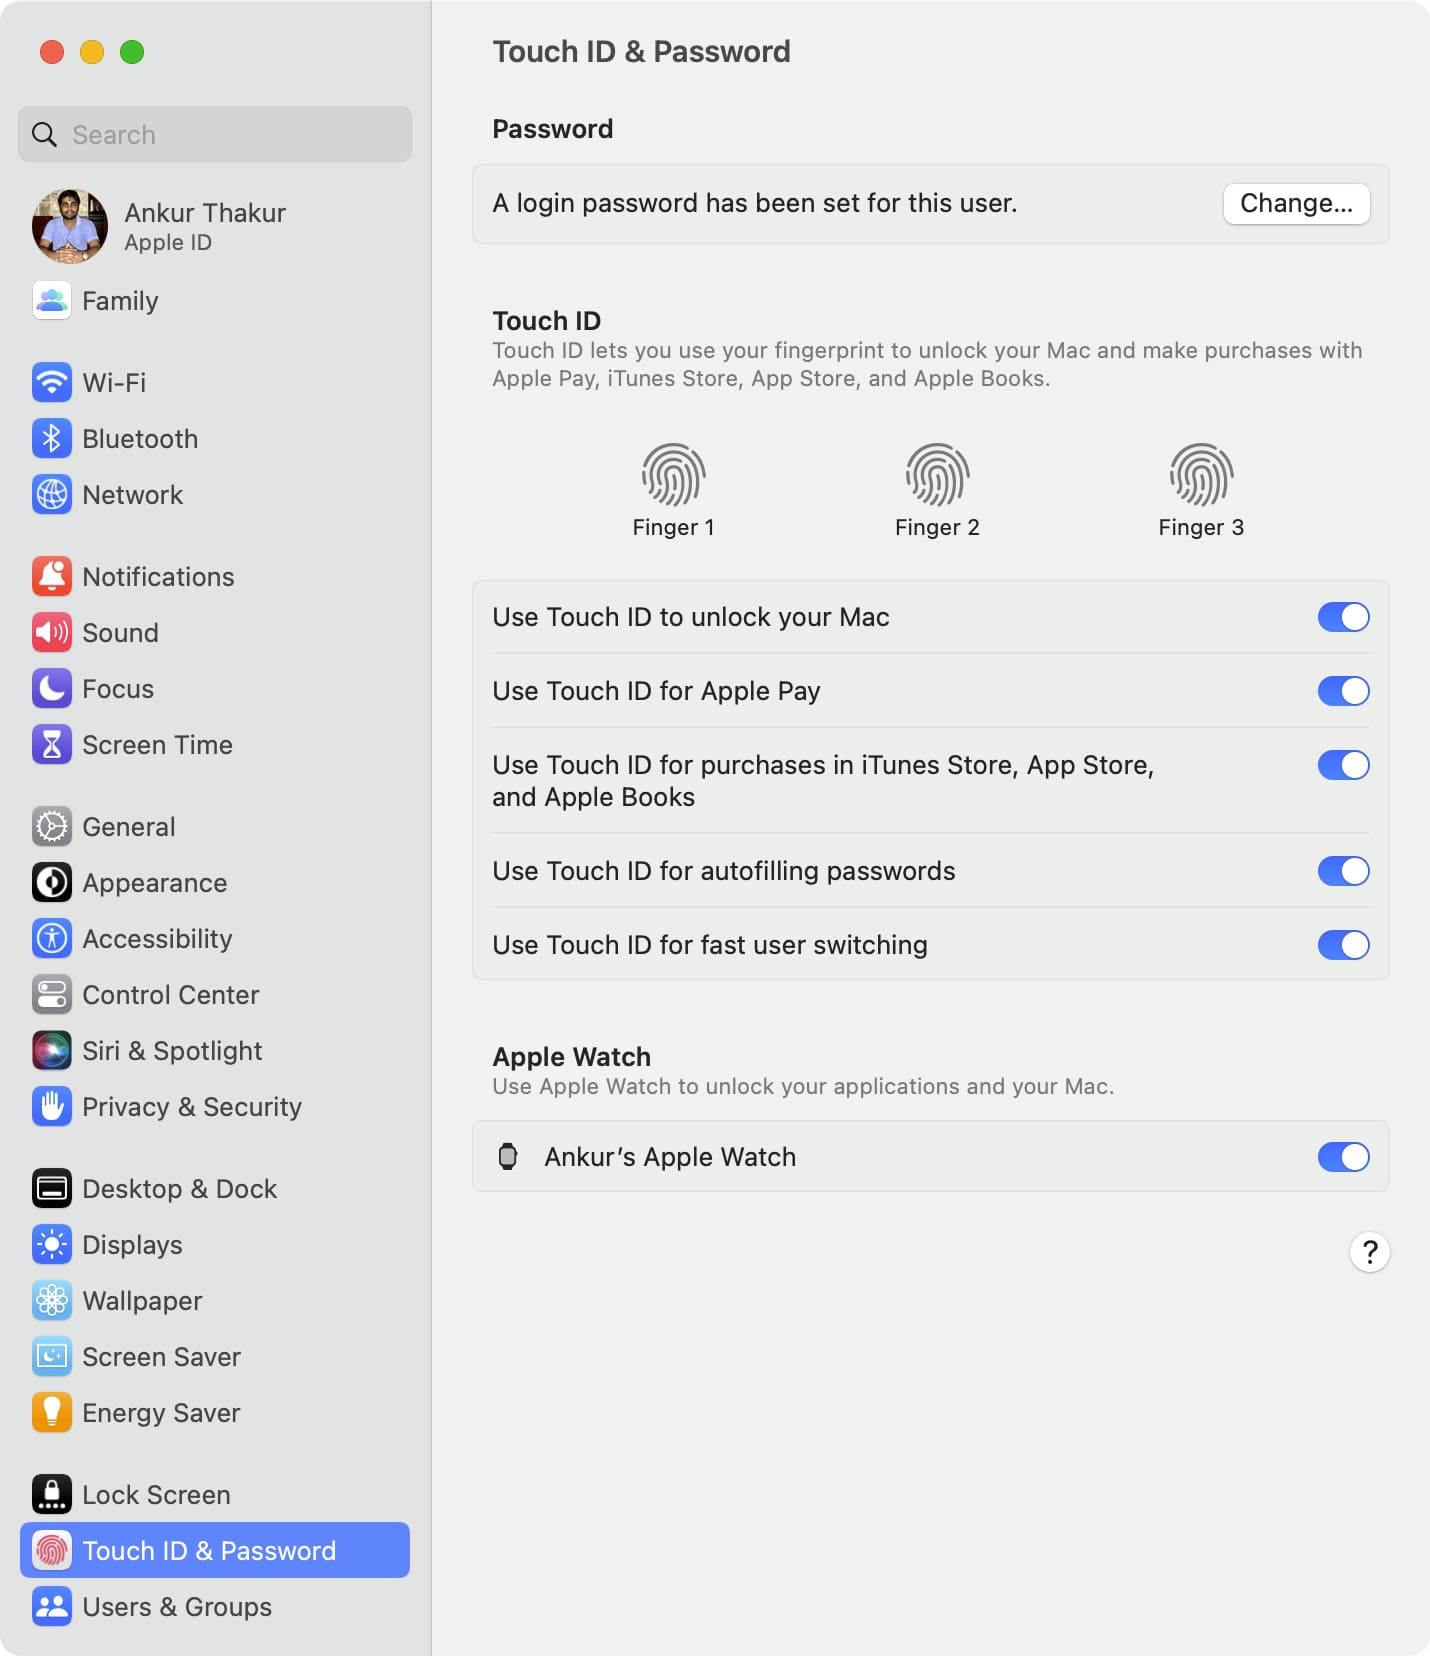
8. Allow my Apple Watch to unlock my Mac
Touch ID on my MacBook Pro and Magic Keyboard is excellent. But since I have an Apple Watch, I enable “Use your Apple Watch to unlock apps and your Mac.”
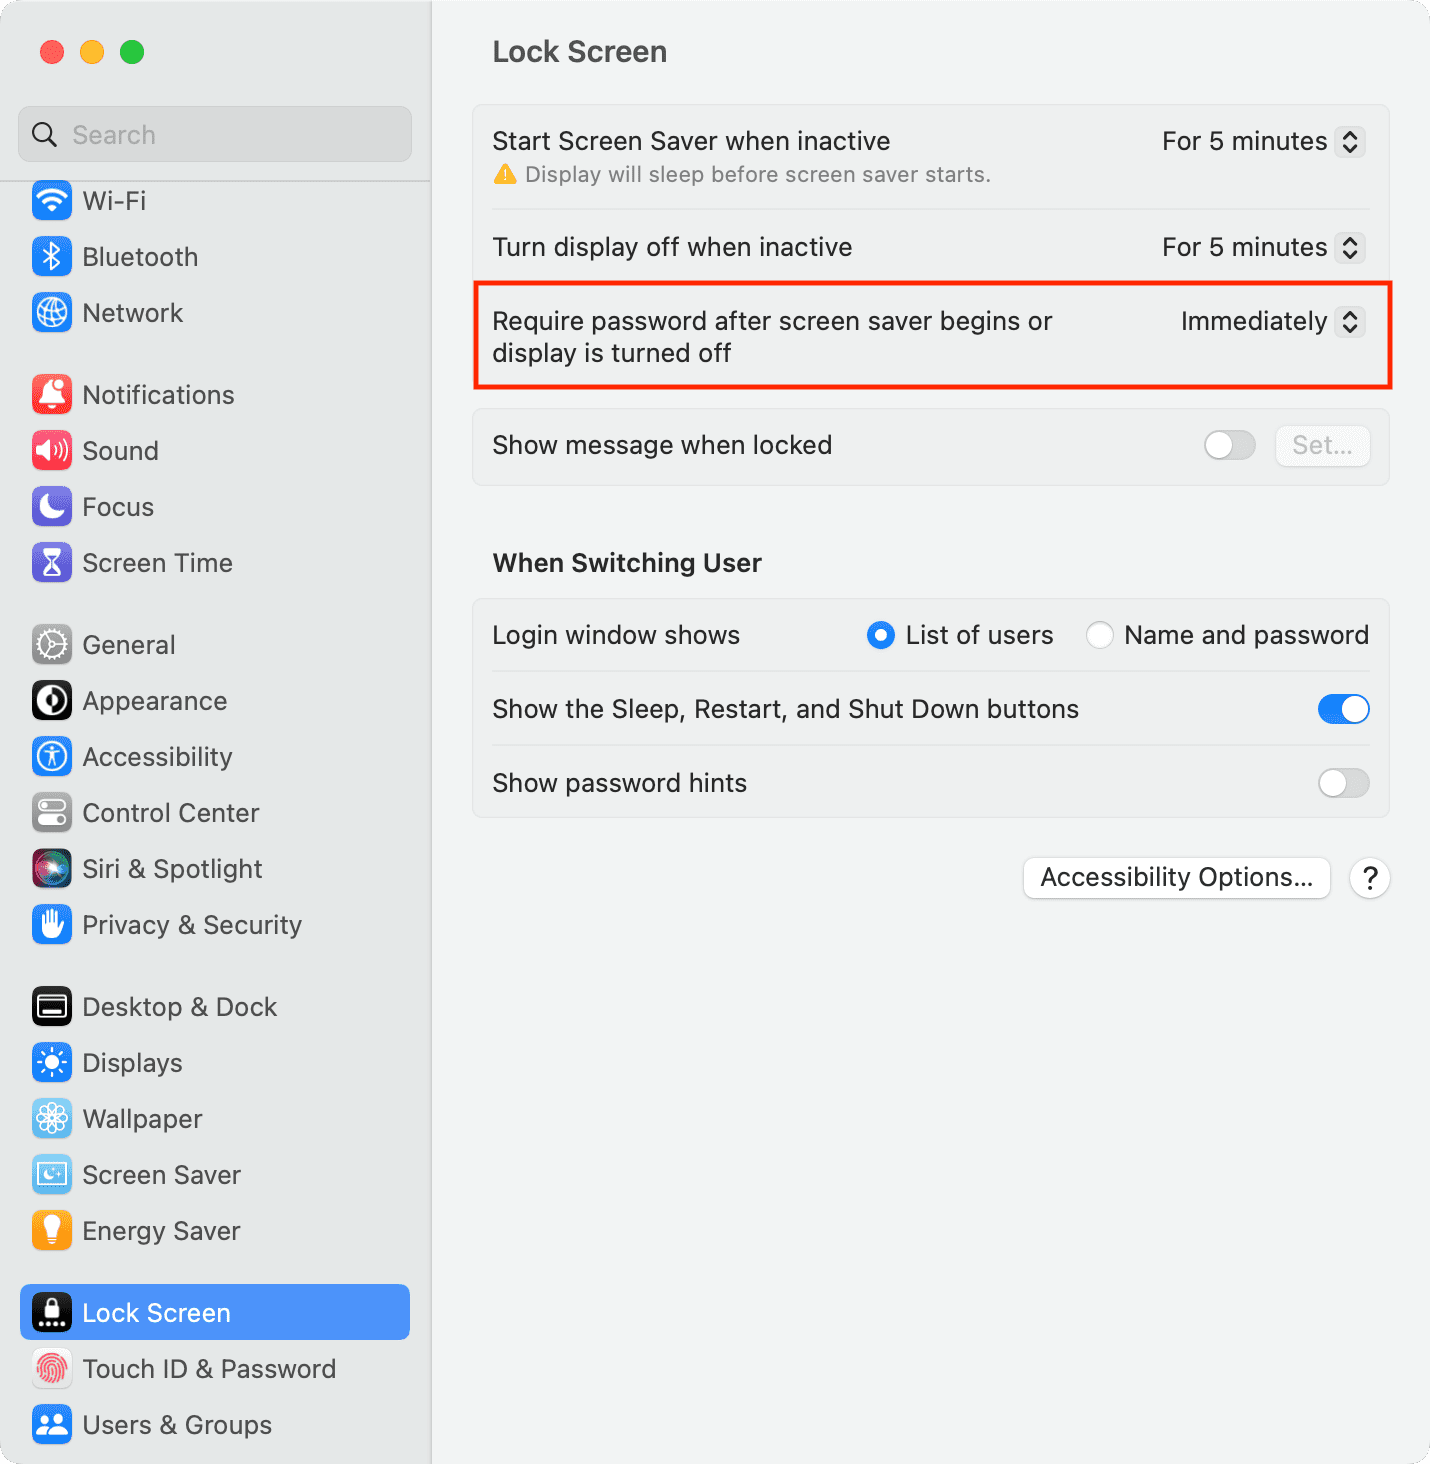
9. Require password immediately
I want my Mac to lock immediately when I bring my pointer to a corner of the screen (this is explained below under Hot Corners). But by default, Mac locks only after some time. So, I go to System Settings > Lock Screen and choose Immediately for ‘Require password after the screen saver begins or display is turned off.’ This increases the security of my Mac.
10. Open apps like Notes, Reminders, Calendar, and more so everything can sync from iCloud
During the initial setup, I always sign in using my Apple ID. But to ensure all my notes, reminders, calendar events, etc., sync to my new Mac, I have to open their respective apps so that they can download.
11. Disable Desktop and Documents folder for iCloud Drive and turn off iCloud Photos
I’m on the free 5 GB iCloud plan. So, I go to System Settings > Apple Account > iCloud > Photos and turn off Sync this Mac. Next, I click Drive (or iCloud Drive > Options) and turn off Desktop & Documents Folders to prevent all files on my desktop and documents from uploading to iCloud and filling its space.
12. Sign in to App Store
Even though I sign in with my Apple ID during the first Mac setup, for some reason, the App Store needs another sign-in. So, I have to do that before I can download apps from the Mac App Store.
13. Download my essential apps
A computer without essential apps isn’t very productive. So, after setting up my new or restored Mac, I download these useful apps using Safari.
Chrome: I use multiple Chrome profiles for my different tasks. I have one for iDB, one for some other work, and one for personal work. Having different profiles keeps the browsing history, settings, and everything separate.
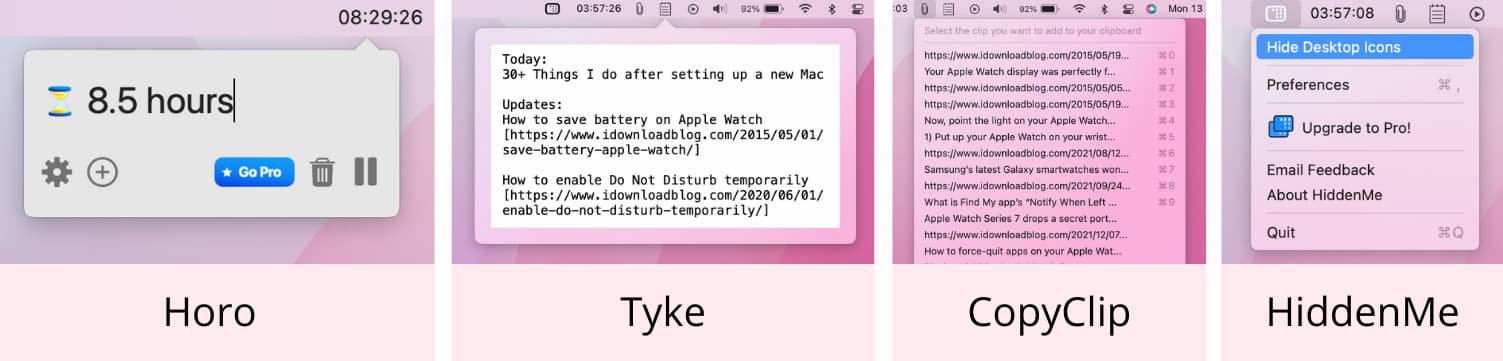
Horo: It’s an excellent countdown and count-up timer app that lets me keep track of how many hours I have already worked for.
Tyke: It’s a tiny note app that sits in Mac’s menu bar and helps me quickly jot things.
CopyClip: The tiny CopyClip icon sits in Mac’s menu bar and keeps a list of my last 25 clipboards. Anytime, I can copy them in just two clicks.
HiddenMe: I have to take many screenshots on my Mac for iDB posts. HiddenMe lets me hide the items from my Mac’s desktop so that the screenshots appear neat and distraction-free.
AppCleaner: It lets me cleanly delete Mac apps and their hidden folders. Sometimes when you can’t delete a Mac app by the usual methods, AppCleaner will let it do for you. I have been using it for many years now.
All the above apps are free. So give them a try.
14. Set up multiple profiles in Chrome
After downloading Chrome, I sign in to multiple profiles, which syncs my history, extensions, and passwords from Google Password Manager and keeps them separate. It’s like having two or more Chrome browsers on my Mac!

15. Log in to essential services like Grammarly, Slack, etc.
Once I have everything in the Apple Passwords app and Chrome’s Google Password Managers, I log in to all services used daily, like Slack, Grammarly, Pixabay, Trello, and such.
16. Download Multi-Account Containers and Enhancer for YouTube extension
Multi-Account Containers in Firefox browser is kind of like Profiles on Chrome. It lets me use different accounts of the same services in one Firefox Window (in different tabs). For instance, I have three Gmail accounts in three containers.
Secondly, I watch YouTube on my Mac in Firefox. And my YouTube experience is always incomplete without Enhancer for YouTube extension. It lets me loop a video, play the video in a popup while I read YT comments, block ads, and so much more.
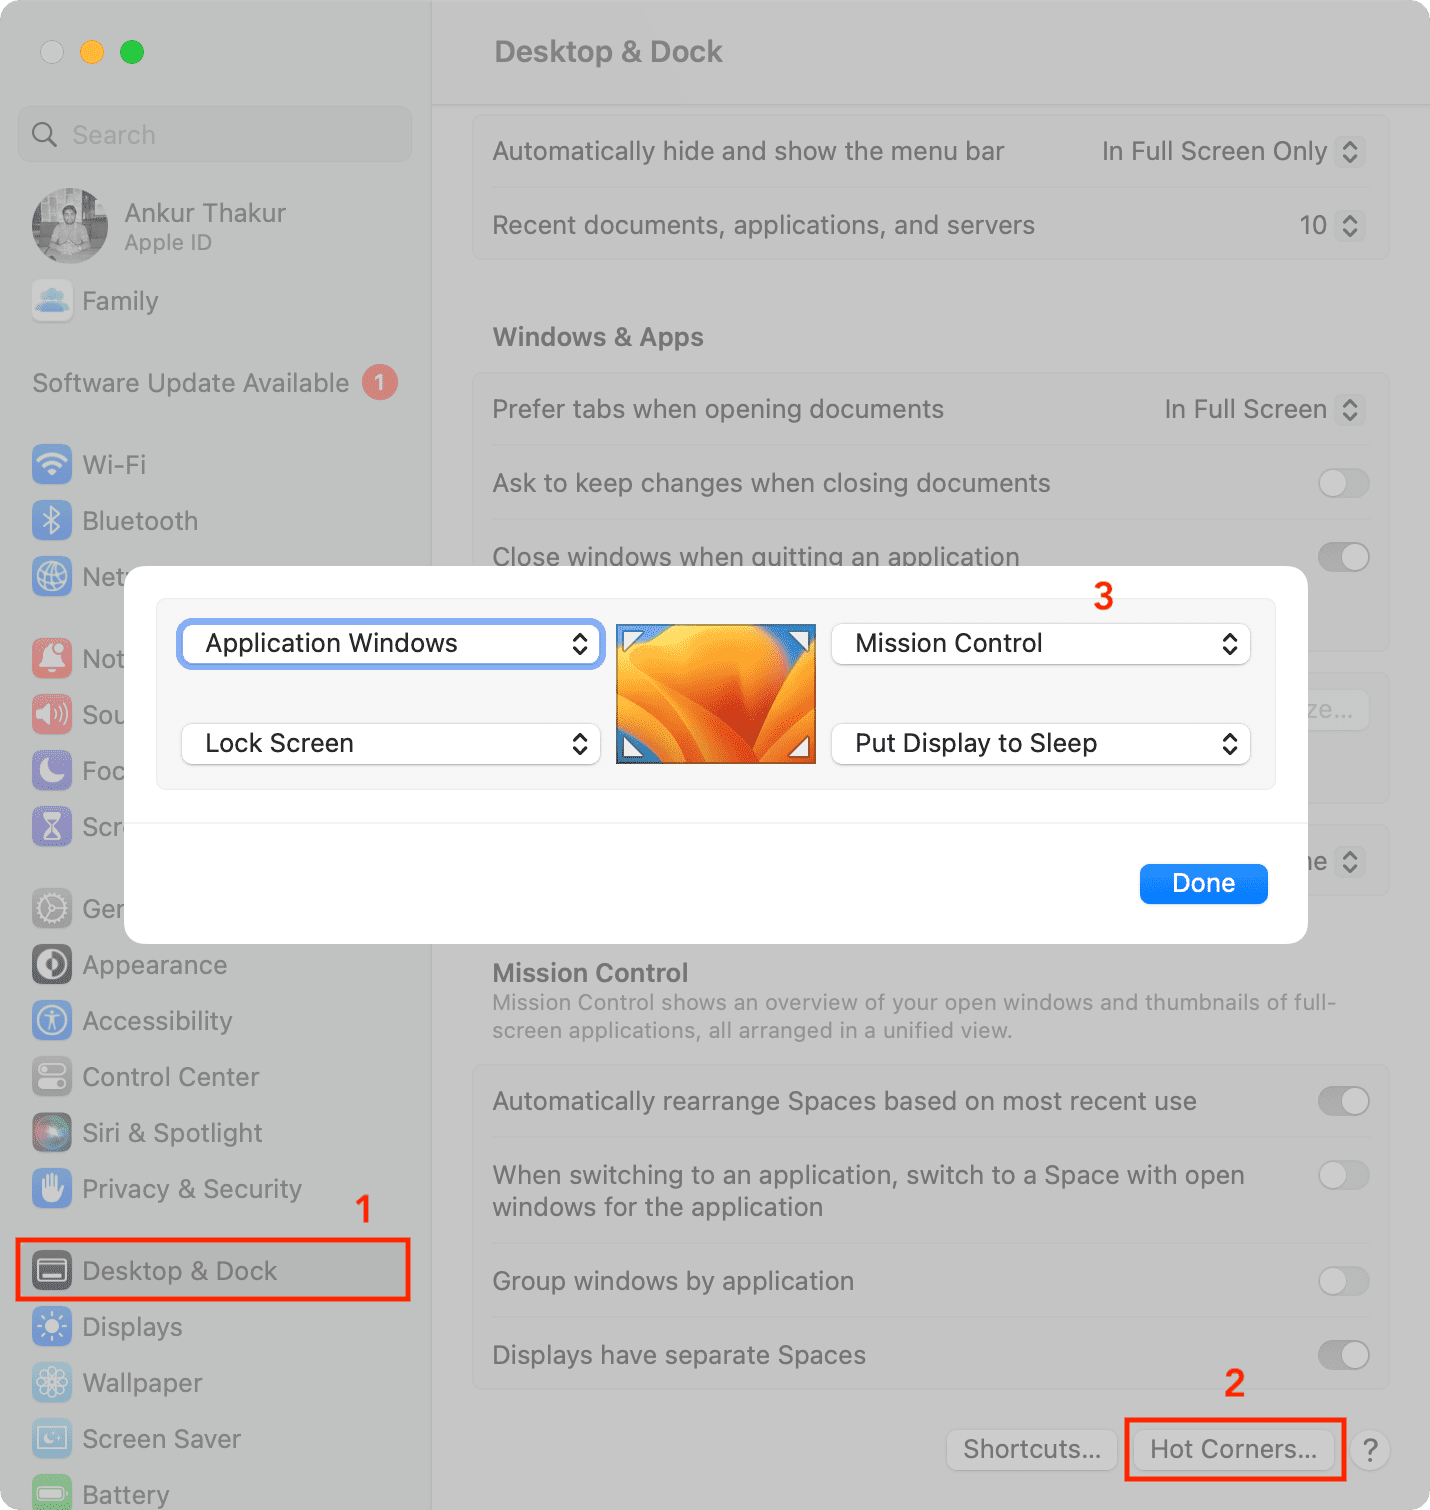
17. Set up Hot Corners
I simply cannot use a Mac without this. To use Hot Corners, go to System Settings > Desktop & Dock > Hot Corners. The image below shows my four Hot Corner settings.
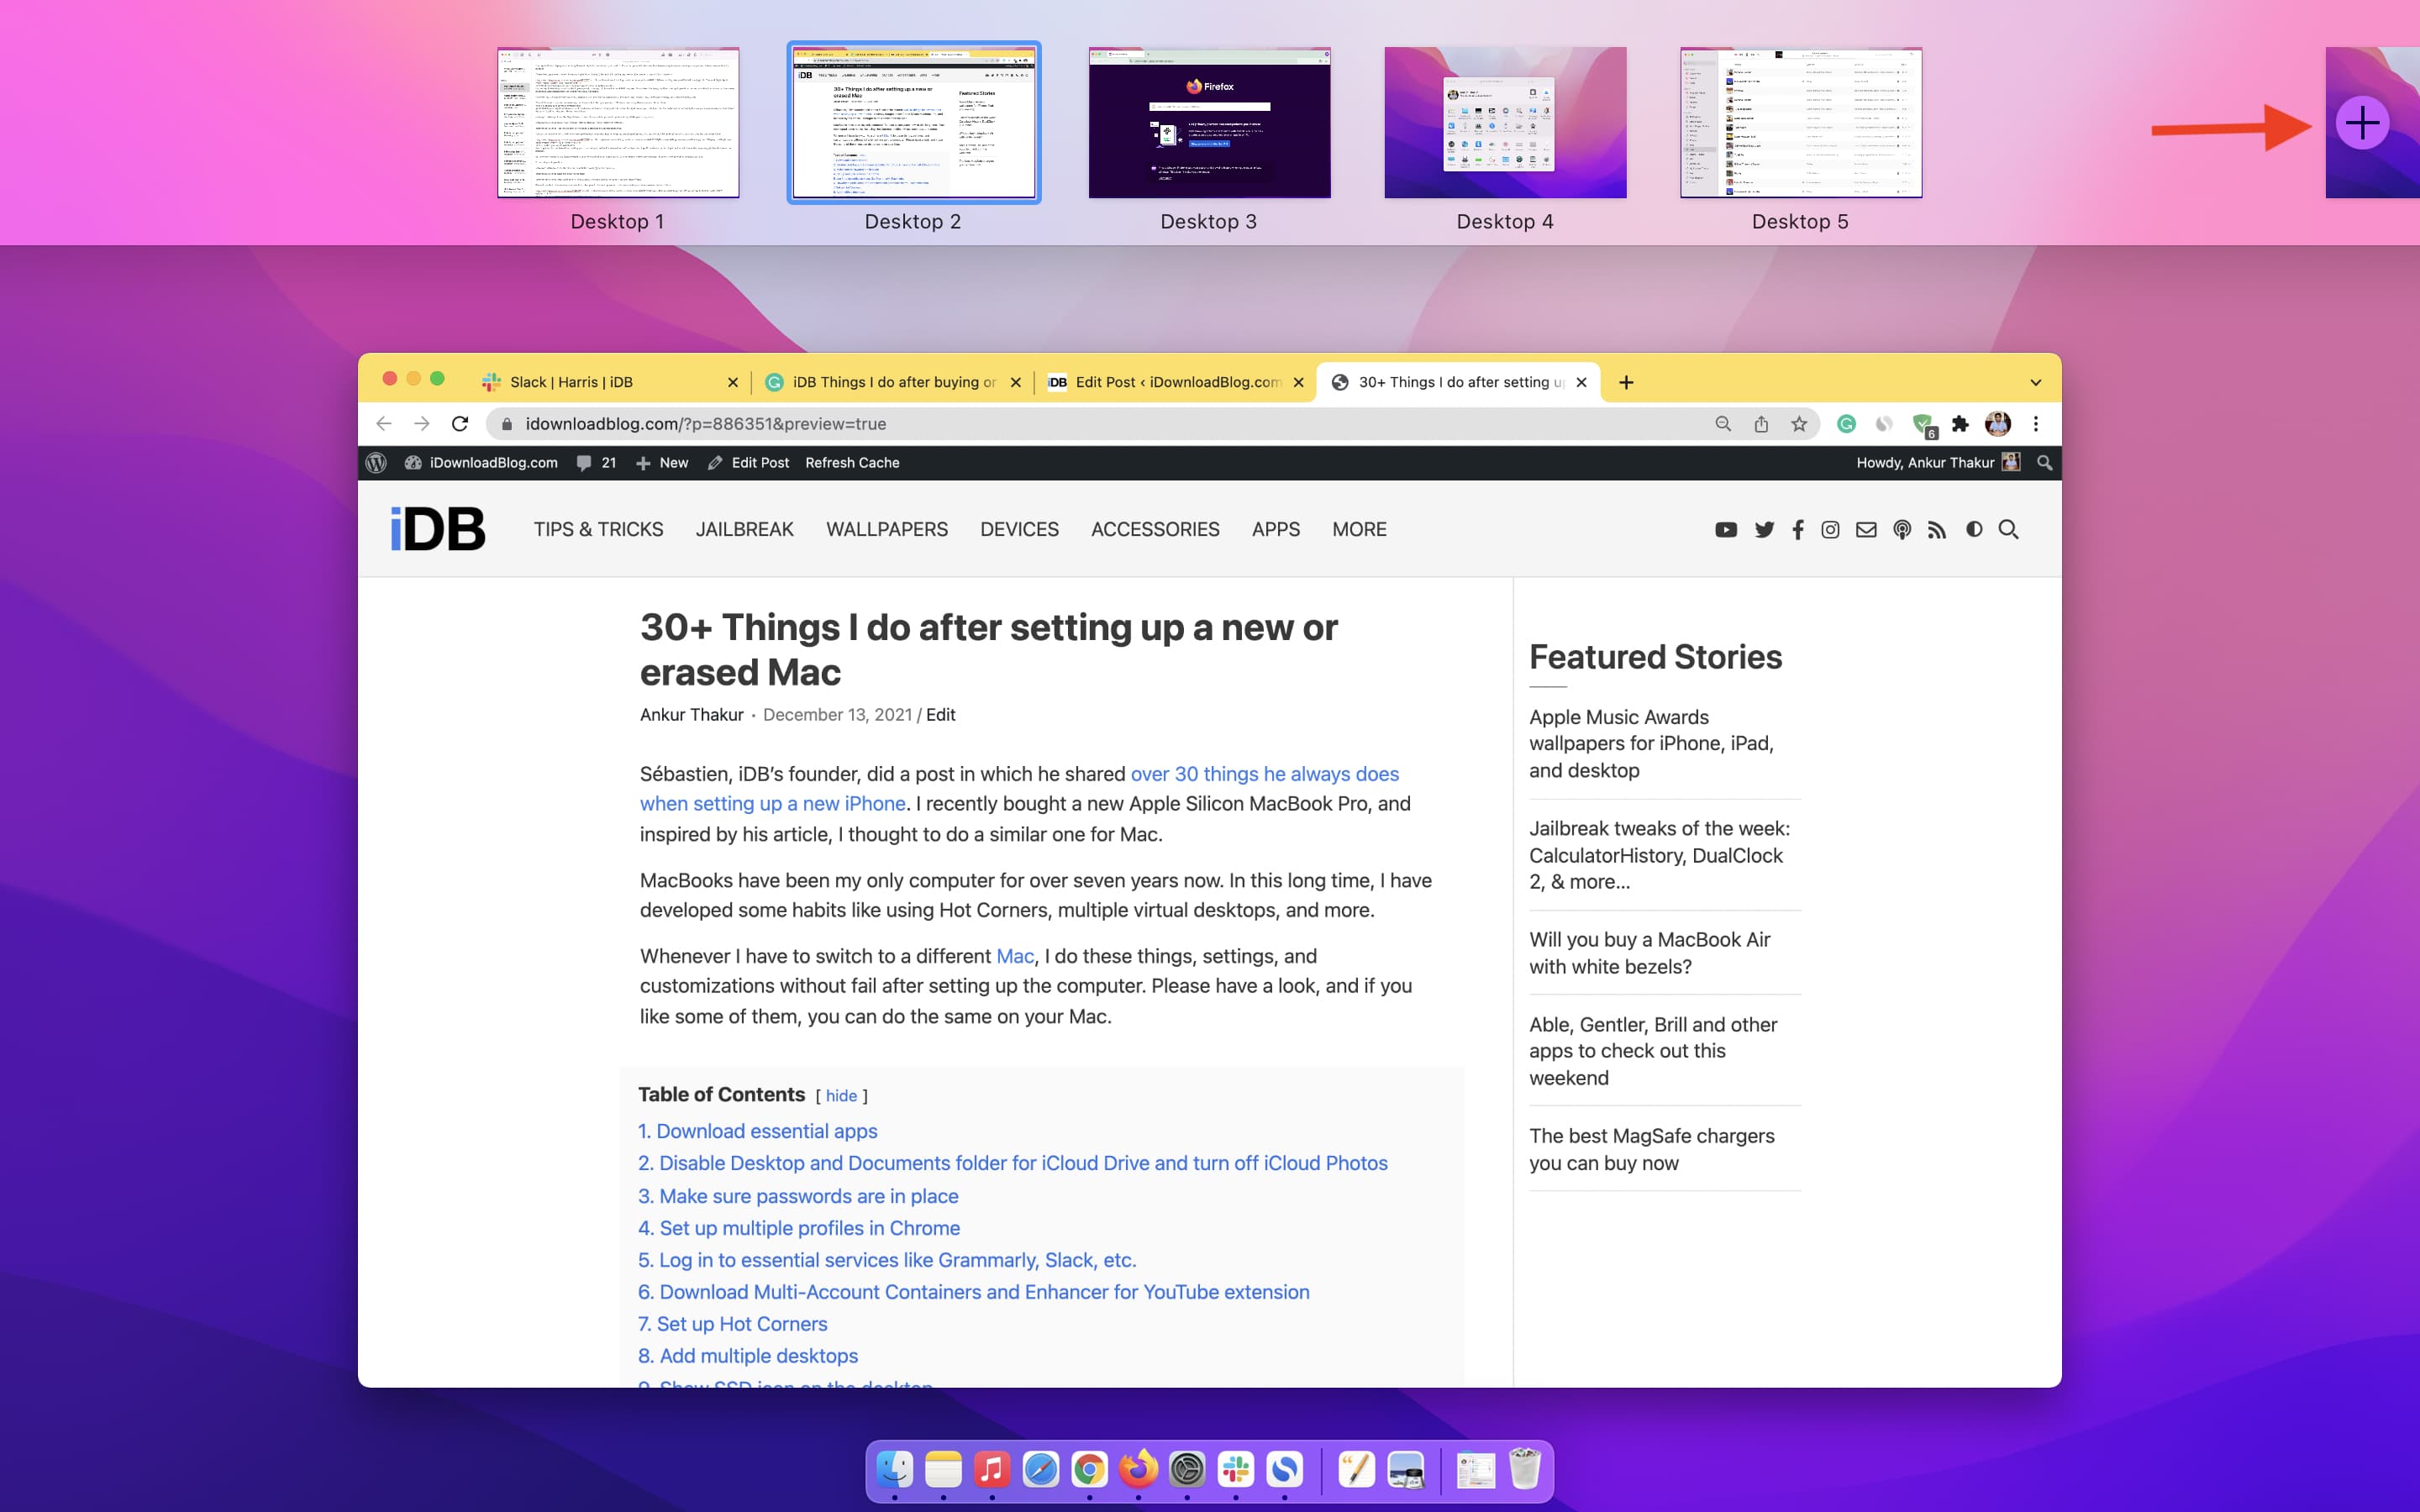
18. Add multiple virtual desktops
I can never work on just one desktop. I keep at least four or five spaces with one app on each, and I quickly switch among them by swiping horizontally with four fingers on MacBook’s trackpad (two fingers on Magic Mouse) or pressing the Control + left/right arrow keys.
You can add multiple desktops by entering Mission Control and clicking the plus icon from the top right.
19. Remove unnecessary apps from Mac’s Dock and add the ones I need
By default, Apple places its apps on the Dock. I don’t need Apple TV or Contacts and most other Apple apps here. Plus, I like to have just a few apps here. So, I drag them out of the Dock to remove them. After that, I add useful apps like Chrome, System Preferences, SimpleNote, etc.
20. Resize the Dock and set it to hide automatically (also, set a faster hiding animation)
My MacBook has a small 13-inch screen. As a result, I like my Mac’s Dock to have very few apps and be small in size. This gives me more room for my windows. Plus, I also set it to stay hidden and only appear when I bring the pointer to the bottom of the screen.
For this, I go to System Settings > Desktop & Dock and set a small size, enable magnification, and activate Automatically hide and show the Dock.
Tip: I use this handy Terminal Command to kill Dock’s animation. As a result, the Dock shows up instantly when I take the mouse pointer to the bottom of the screen.

21. Enable Scale effect instead of Genie effect
I’m not too fond of the Genie effect while minimizing apps, as it feels slow. I like the Scale Effect from System Settings > Desktop & Dock > Minimize windows using.
22. Set essential apps to open automatically on startup
I like important apps like Chrome, CopyClip, Horo, and Notes to open automatically when I switch on my Mac. You can do this in System Settings > General > Login Items & Extensions > plus icon for Open at Login.
23. Show the SSD icon on the desktop
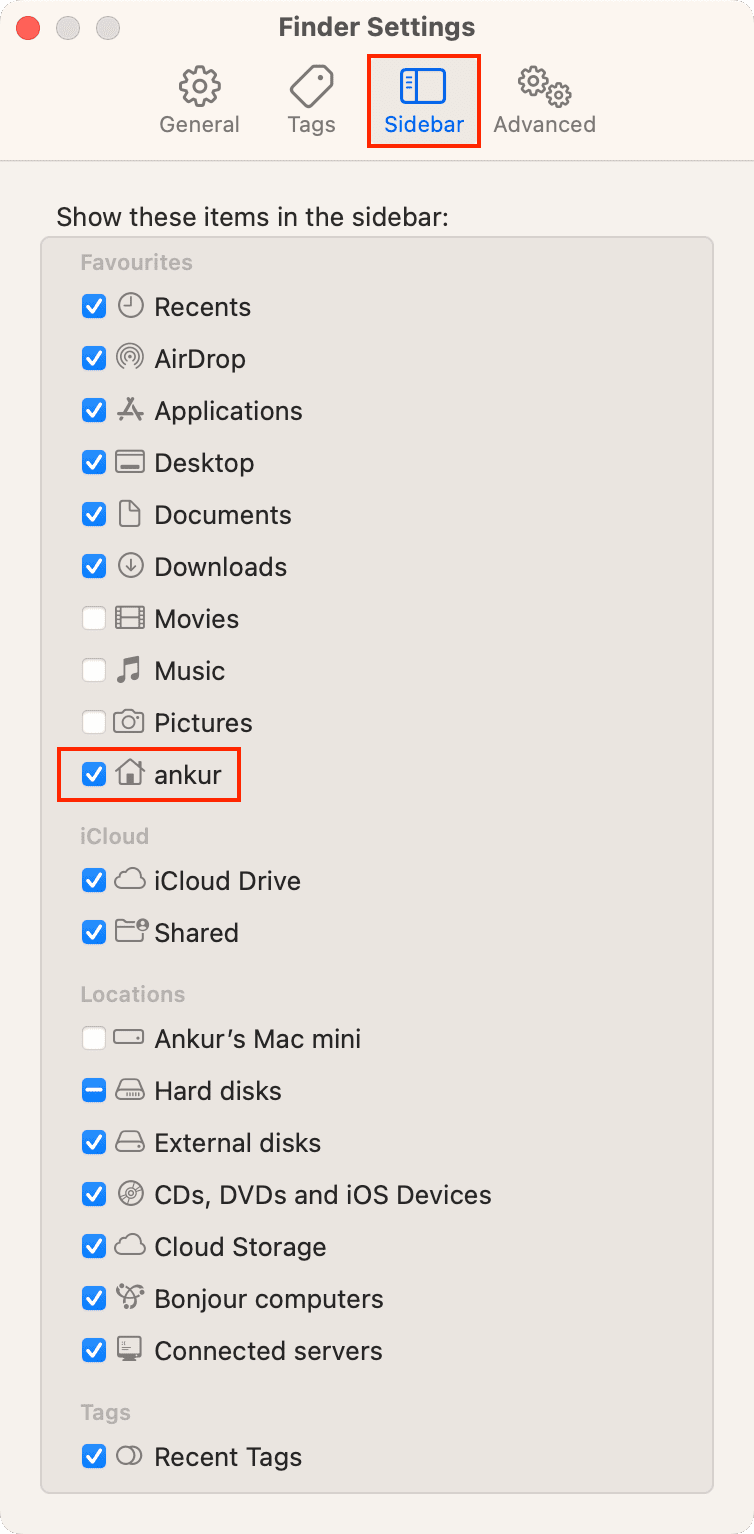
By default, the internal SSD/hard disk icon is not shown on the desktop. So, I click Finder > Settings from the top menu bar and check Hard disks to have it appear on my Mac’s Desktop. After that, I rename it by selecting the drive and pressing the enter key.
Additionally, I also go to the Sidebar section of Finder settings and show the Home folder in the Finder sidebar.
24. AirDrop only the essential folders and files from my old Mac
I never set up my new Mac using my old Mac (or Windows PC), as I want to avoid unnecessary files coming over to it. So, during the initial setup, I choose to configure my new Mac without using my existing computers. However, once I’m set up, I transfer essential folders and files from my old Mac to the new one using AirDrop.
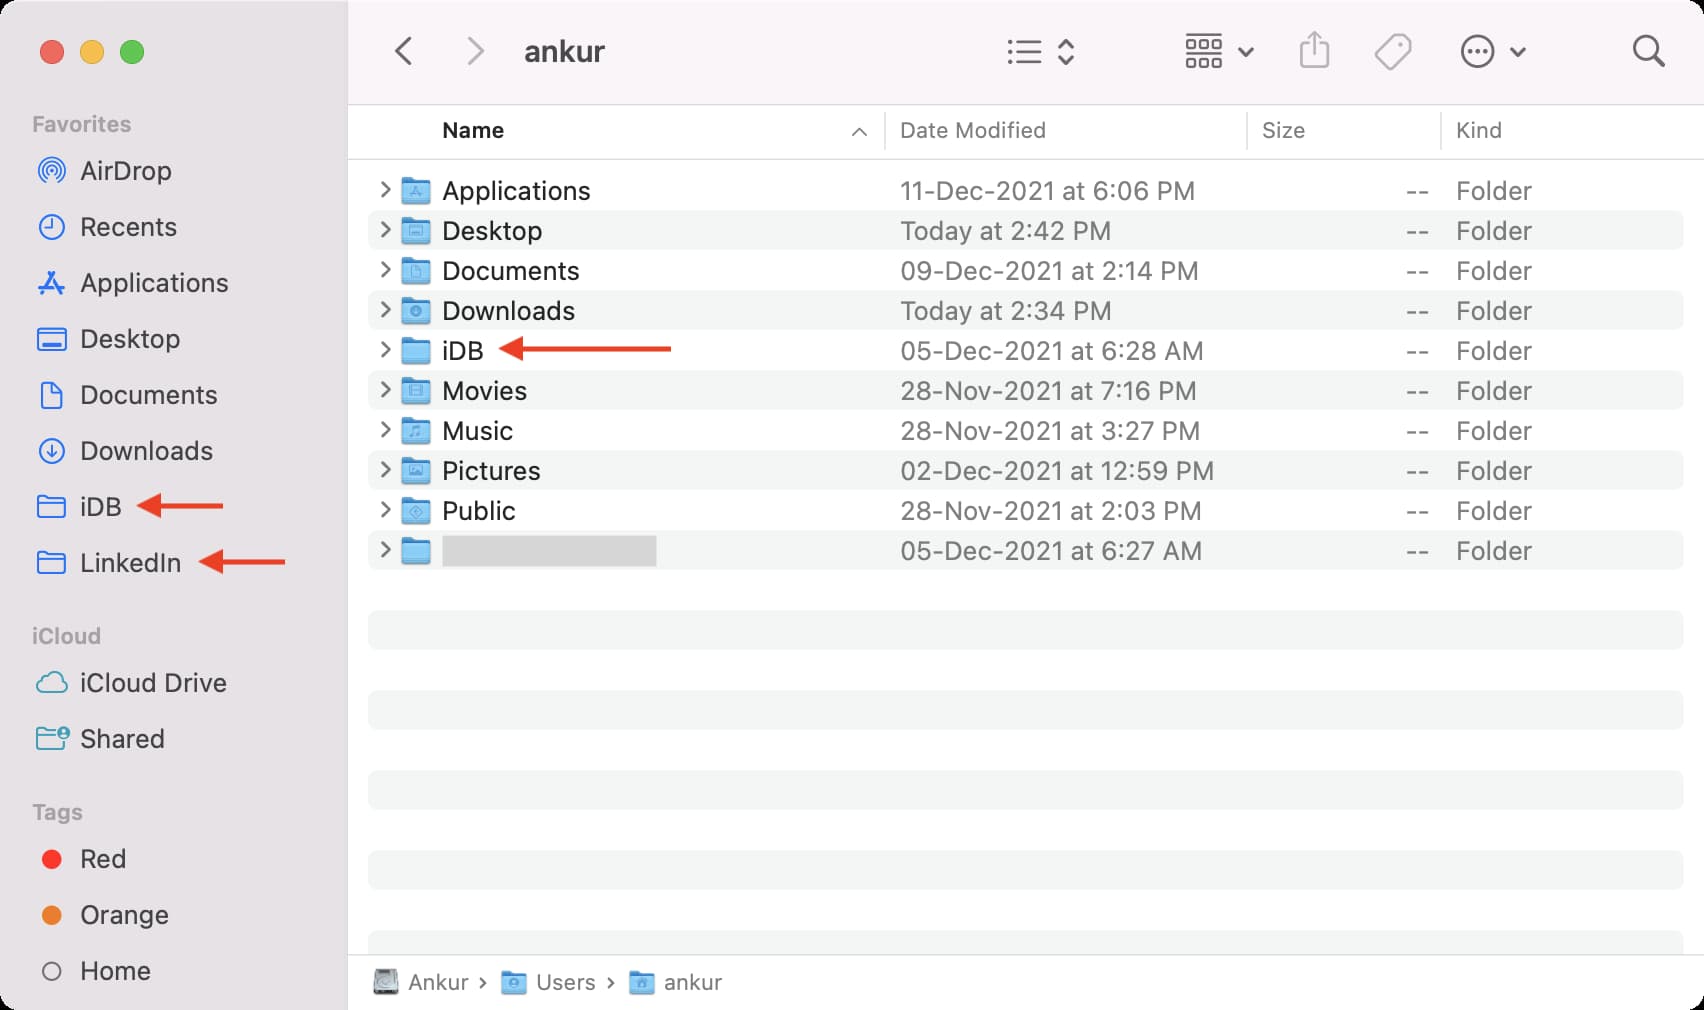
25. Create folders to keep everything organized
In addition to my iDB work, I also do some side projects for my personal life. So, I have a few primary folders in the main user section, where I save all useful related files. For example, in the screenshot below, you can see a folder called iDB, where I keep everything related to it.
Next, I add my most-used folders to the Finder sidebar for quick access. You can do this by simply dragging a folder onto the sidebar.
27. Sort items in Finder by name or date modified instead of leaving it at None
Annoyingly, the files in Finder are set to sort by ‘None.’ So, I right-click and set them to sort by name or date modified.
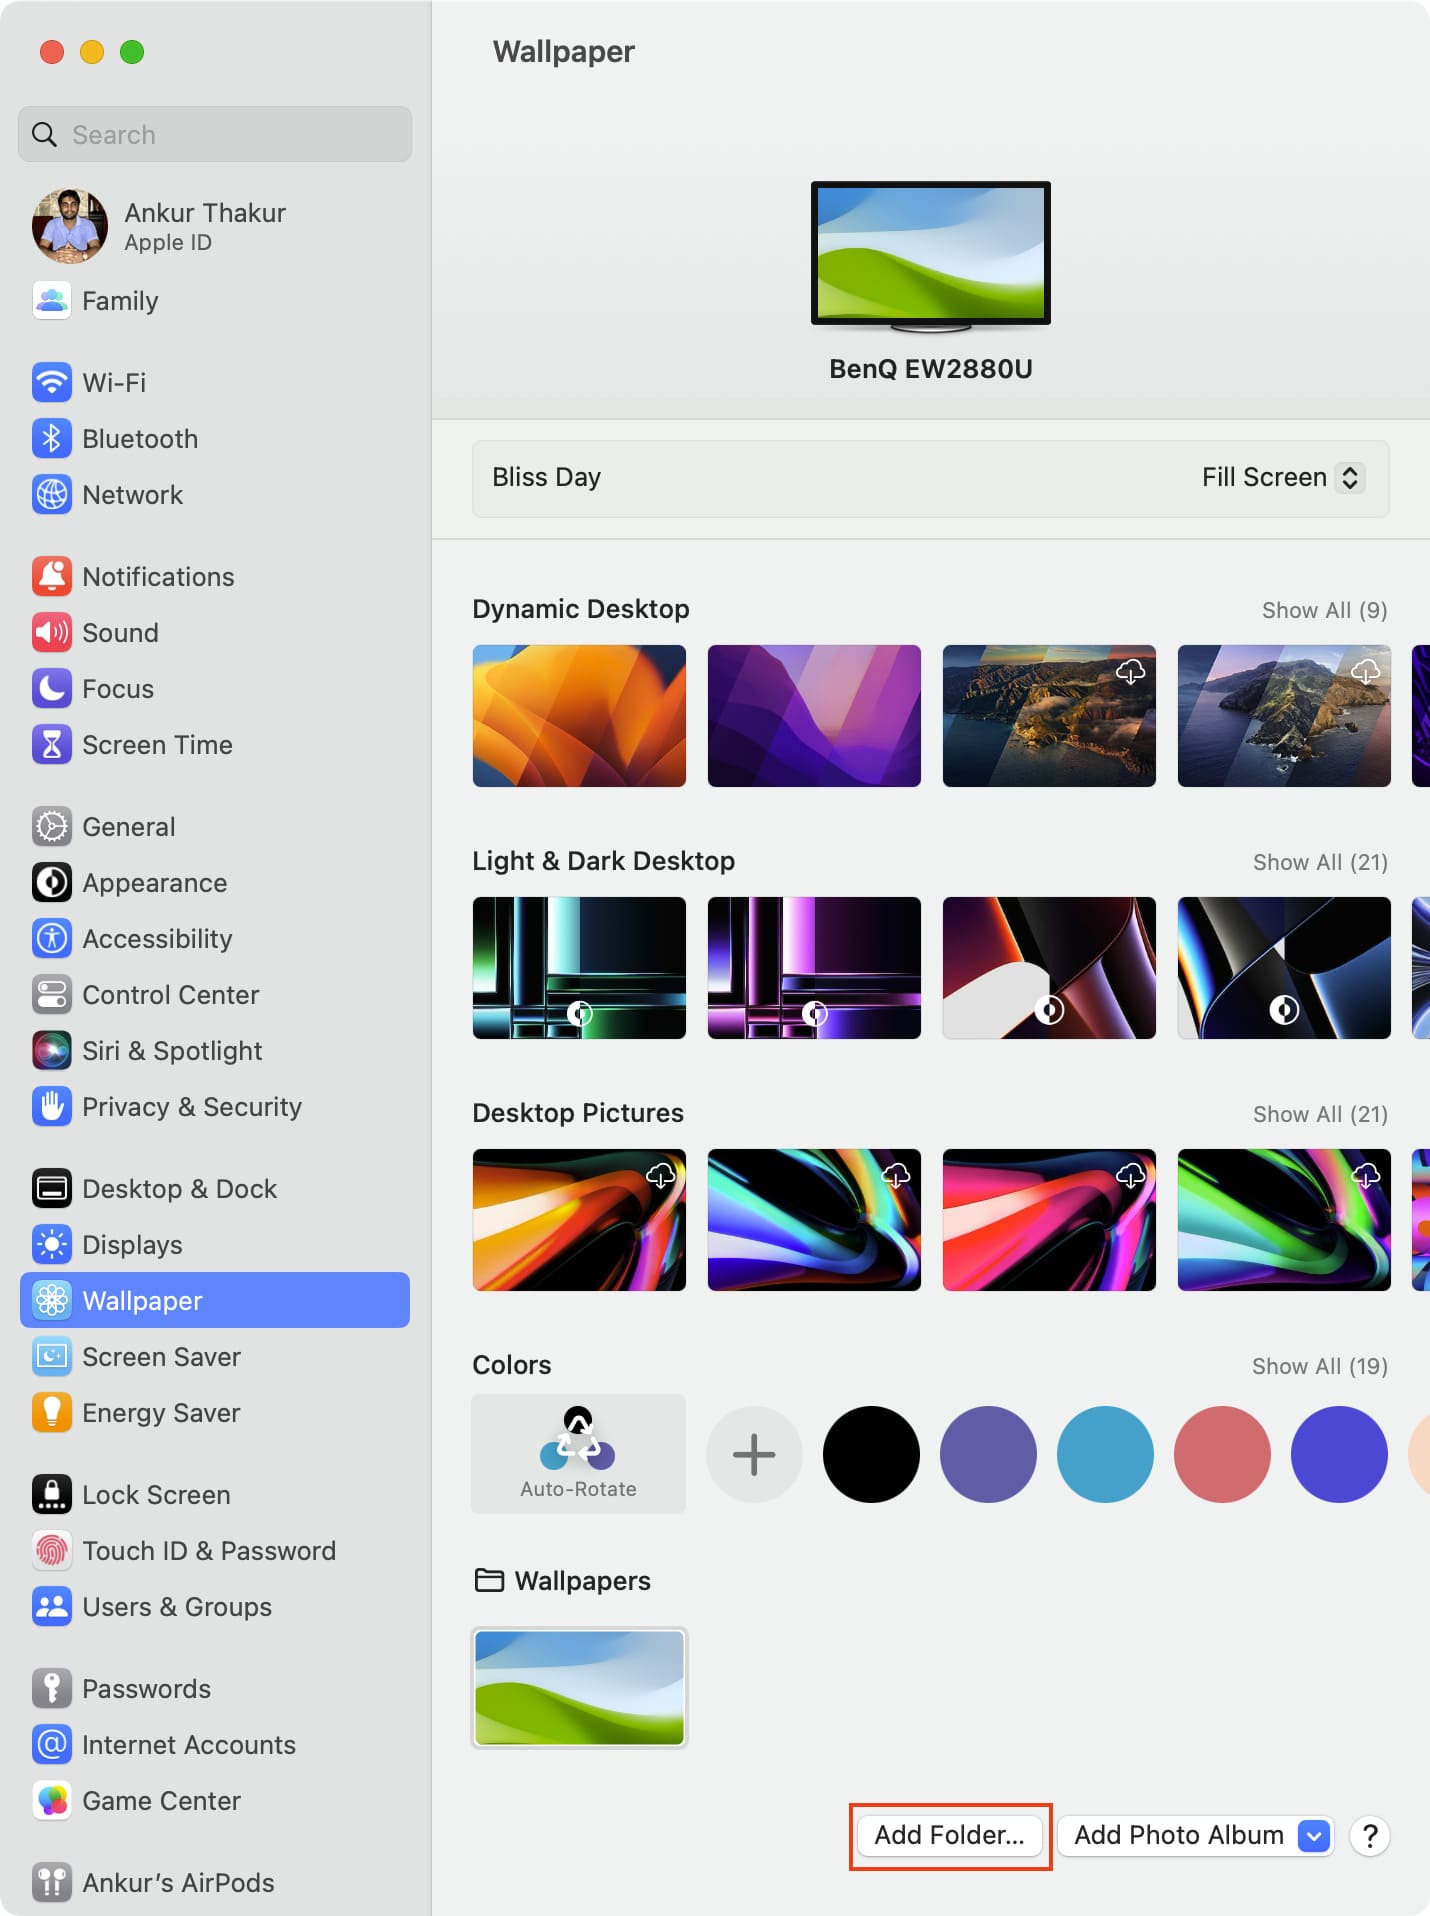
28. Create a wallpaper folder and add it to System Settings
I like having new wallpapers on my new Mac. So, before I go to iDownloadBlog or Unsplash to get fresh wallpapers, I create a folder in Finder titled ‘Wallpapers.’ Next, I add all downloaded images to this folder. After that, I go to System Settings > Wallpaper > Add Folder or Album and select the wallpapers folder. From now on, images I add to this Finder folder will automatically show up in the Wallpaper section of System Settings, which makes it convenient to switch wallpapers.
29. Set trash to empty automatically after 30 days
If I haven’t cared to recover something from the trash within 30 days, chances are I won’t need it. So, to keep my internal 256 GB SSD free and fast, I have set my Mac to automatically empty the trash in 30 days.
To do this, click the Apple icon > About This Mac > More Info > Storage Settings > Turn On next to Empty Trash Automatically.

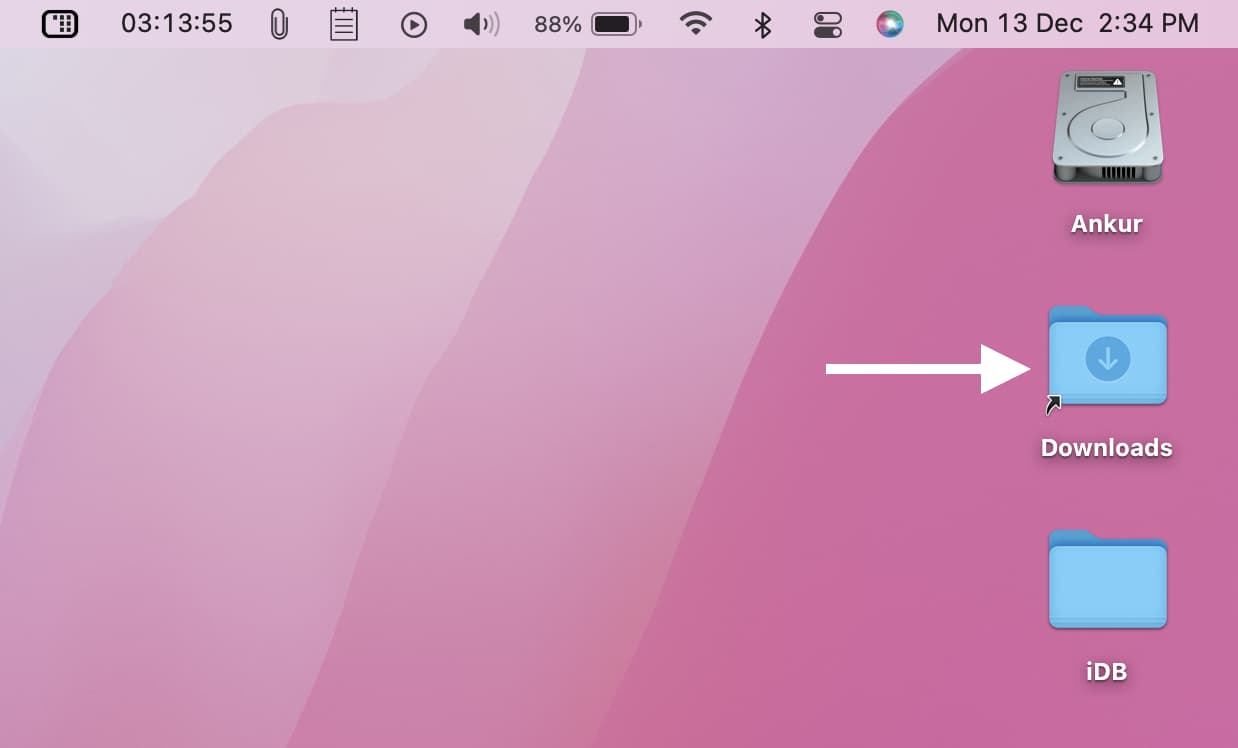
30. Make shortcuts to the Downloads folder on the desktop
I like having the Downloads folder on my desktop, and in this post, I show you how to create it on your Mac.
31. Create a shortcut to open my daily websites in zero clicks!
I open five websites (iDownloadBlog, Slack, Grammarly, Google Docs, and Google Sheets) without fail every morning when I start iDB’s work. So, I have created a shortcut that does this automatically for me. I don’t have to click even a single button!
I like to have this in the menu bar as it lets me quickly switch between AirPods and my MacBook’s incredible built-in speakers.
Go to System Settings > Control Center and select Always Show in Menu Bar next to Sound.
In addition, I like having the Bluetooth icon in the menu bar, as it lets me connect to other devices quickly. To do this, simply drag the Bluetooth icon out of the Control Center onto the menu bar. You can also do this from System Settings > Control Center and set Bluetooth to Show in Menu Bar.
33. Download dictionary
Open the Dictionary app and go to its settings to add more languages.
When I open the Music app and if it asks for authorization, I make sure to do that. This ensures my songs are updated across my iPhone and Mac.
35. Set a proper computer name
By default, it seems Mac uses your name + Mac’s model as your computer name. For example, Ankur MacBook Pro. But I like to change it so that I can differentiate it from my other Macs when using AirDrop. I usually add the word “New.” Like Ankur’s New MacBook Pro. Here’s how to rename your Mac.
36. Make sure iMessage and FaceTime are enabled correctly
I open these apps, click Messages/FaceTime > Settings from the top menu bar, and make sure the correct accounts are added here.
37. Show Safari Status Bar
Despite Chrome being my main browser, I use things like PayPal in Safari. By default, when you hover the mouse pointer on a link in Mac’s Safari, it doesn’t show the URL. But after you press Command + / or click View > Show Status Bar, you can see the URL in the bottom left when you place the mouse pointer on a web page link.

38. Show scroll bars only while scrolling
I take several Mac screenshots to use in iDB articles. Now, I think the scroll bar on the edge of the app window is an unwanted addition to my screenshots. So, I go to System Settings > Appearance and select When scrolling under the ‘Show scroll bars‘ heading.
39. Hide shadows from Mac’s screenshot
I take many screenshots of app windows by pressing Command + Shift + 4 and then the Space Bar. But these screenshots have a shadow to them. Here at iDB, we don’t include that. So, I follow this guide with a small Terminal command to remove the shadow from Mac’s screenshots.
40. Set up Mac widgets
I don’t use widgets too often. But at times, it’s nice to have the weather and calendar widget for a glance.
My iDB editor and I live on different continents with distinct time zones. I can see his local time in Slack. But still, I like to have a world clock widget. It’s not necessary, but it’s something I fancy.
After setup, Mac adds the keyboard language in the top menu bar. This is great if you often switch between multiple languages while typing. But I don’t; therefore, I hold the Command key and drag the keyboard language icon down to the desktop to get rid of it.
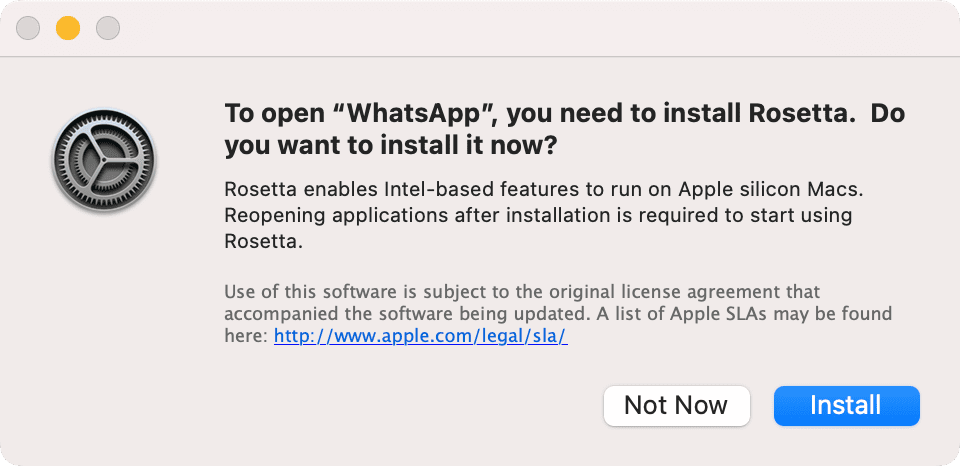
42. Install Rosetta
Several Mac apps are still not built to support Apple silicon natively. So, while downloading or installing an app, if I get a popup to install Rosetta, I do that so that in the future, all such old apps can be installed and run without problems.
43. Update the Mac
In most cases, when you take your new Mac out of its box, it’s likely that by that time, Apple has already published a software update. Now, during the initial setup, Mac asks if I want to update it. I don’t do that then, as I’m too excited to finish the setup and go inside my new Mac. But once I’m done setting up my Mac, I open System Settings > General > Software Update to get the latest and greatest macOS version on it.
What about you?
These were almost all the things I do on my new or restored Mac? Thank you for reading! Do you do something that isn’t mentioned here? If yes, please share that with me using the comments box below.