The iDB team has already showed you at least three ways to install TrollStore 2 on kernel file descriptor (kfd) exploit-vulnerable devices by way of Misaka, Picasso, and PureKFD. But each of these are package manager apps or system customization apps where TrollStore isn’t their primary focus, and they each have different system requirements (both hardware and software).
For this reason, iOS developer Huy Nguyen released a dedicated kfd exploit-based TrollStore installer called TrollStar, and since it lacks all the extra fluff that the other options we mentioned above have, it should be more user-friendly, lighter weight on system resources, and possibly even preferred by the populace. Best of all, it works on all devices, whether they’re arm64 (A11-) or arm64e (A12+).
In today’s tutorial, we’ll show you how you can install TrollStore 2 using the newer TrollStar utility, so this is a topic that interests you, then you won’t want to go anywhere.
What you need to know
Before you install TrollStore 2, you need to know what it is. It’s a perma-signing utility that allows you to permanently install .ipa or .tipa files on your iPhone or iPad. It works similarly to sideloading except that you don’t need to use your Apple ID or re-sign the apps every seven days as you do with AltStore or Sideloadly. That’s because TrollStore exploits a CoreTrust bug in iOS & iPadOS 14.0-16.6.1, 16.7 RC (20H18), and 17.0.
Getting TrollStore 2 on your device requires a completely different set of requirements. For example, you need to have a kfd exploit-vulnerable device to install TrollStore using the TrollStar method. This means your device must be running between iOS or iPadOS 16.0-16.6.1. While TrollStore supports newer firmware, there just unfortunately isn’t an installation method for that newer firmware yet.
If you’ve ever used TrollStore on an older firmware before, then installing it on any version of iOS 16 grants you with the same privileges that you had before. In fact, combined with tools such as the RootHide development team’s Procursus-based bootstrap and the Serotonin system tweak injection method, also known as a “semi-jailbreak,” you can run many jailbreak tweaks without a full-fledged jailbreak.
Lastly, you need to know that you must install TrollStar before you can install TrollStore. This tutorial will walk you through the entire process from start to finish, so rest assured we have you covered.
Installing TrollStore 2 with TrollStar
To install TrollStore 2 with TrollStar, you are going to need to follow each of the steps outlined for you below:
1) Download and install Sideloadly if you don’t already have it.
2) Launch Sideloadly.
3) Connect your iPhone or iPad to your Mac and be sure to “Trust” it via the prompts in Finder and on the device itself.
Note: You may not need to “trust” your iPhone or iPad if you regularly connect it to your Mac and have already trusted it previously.
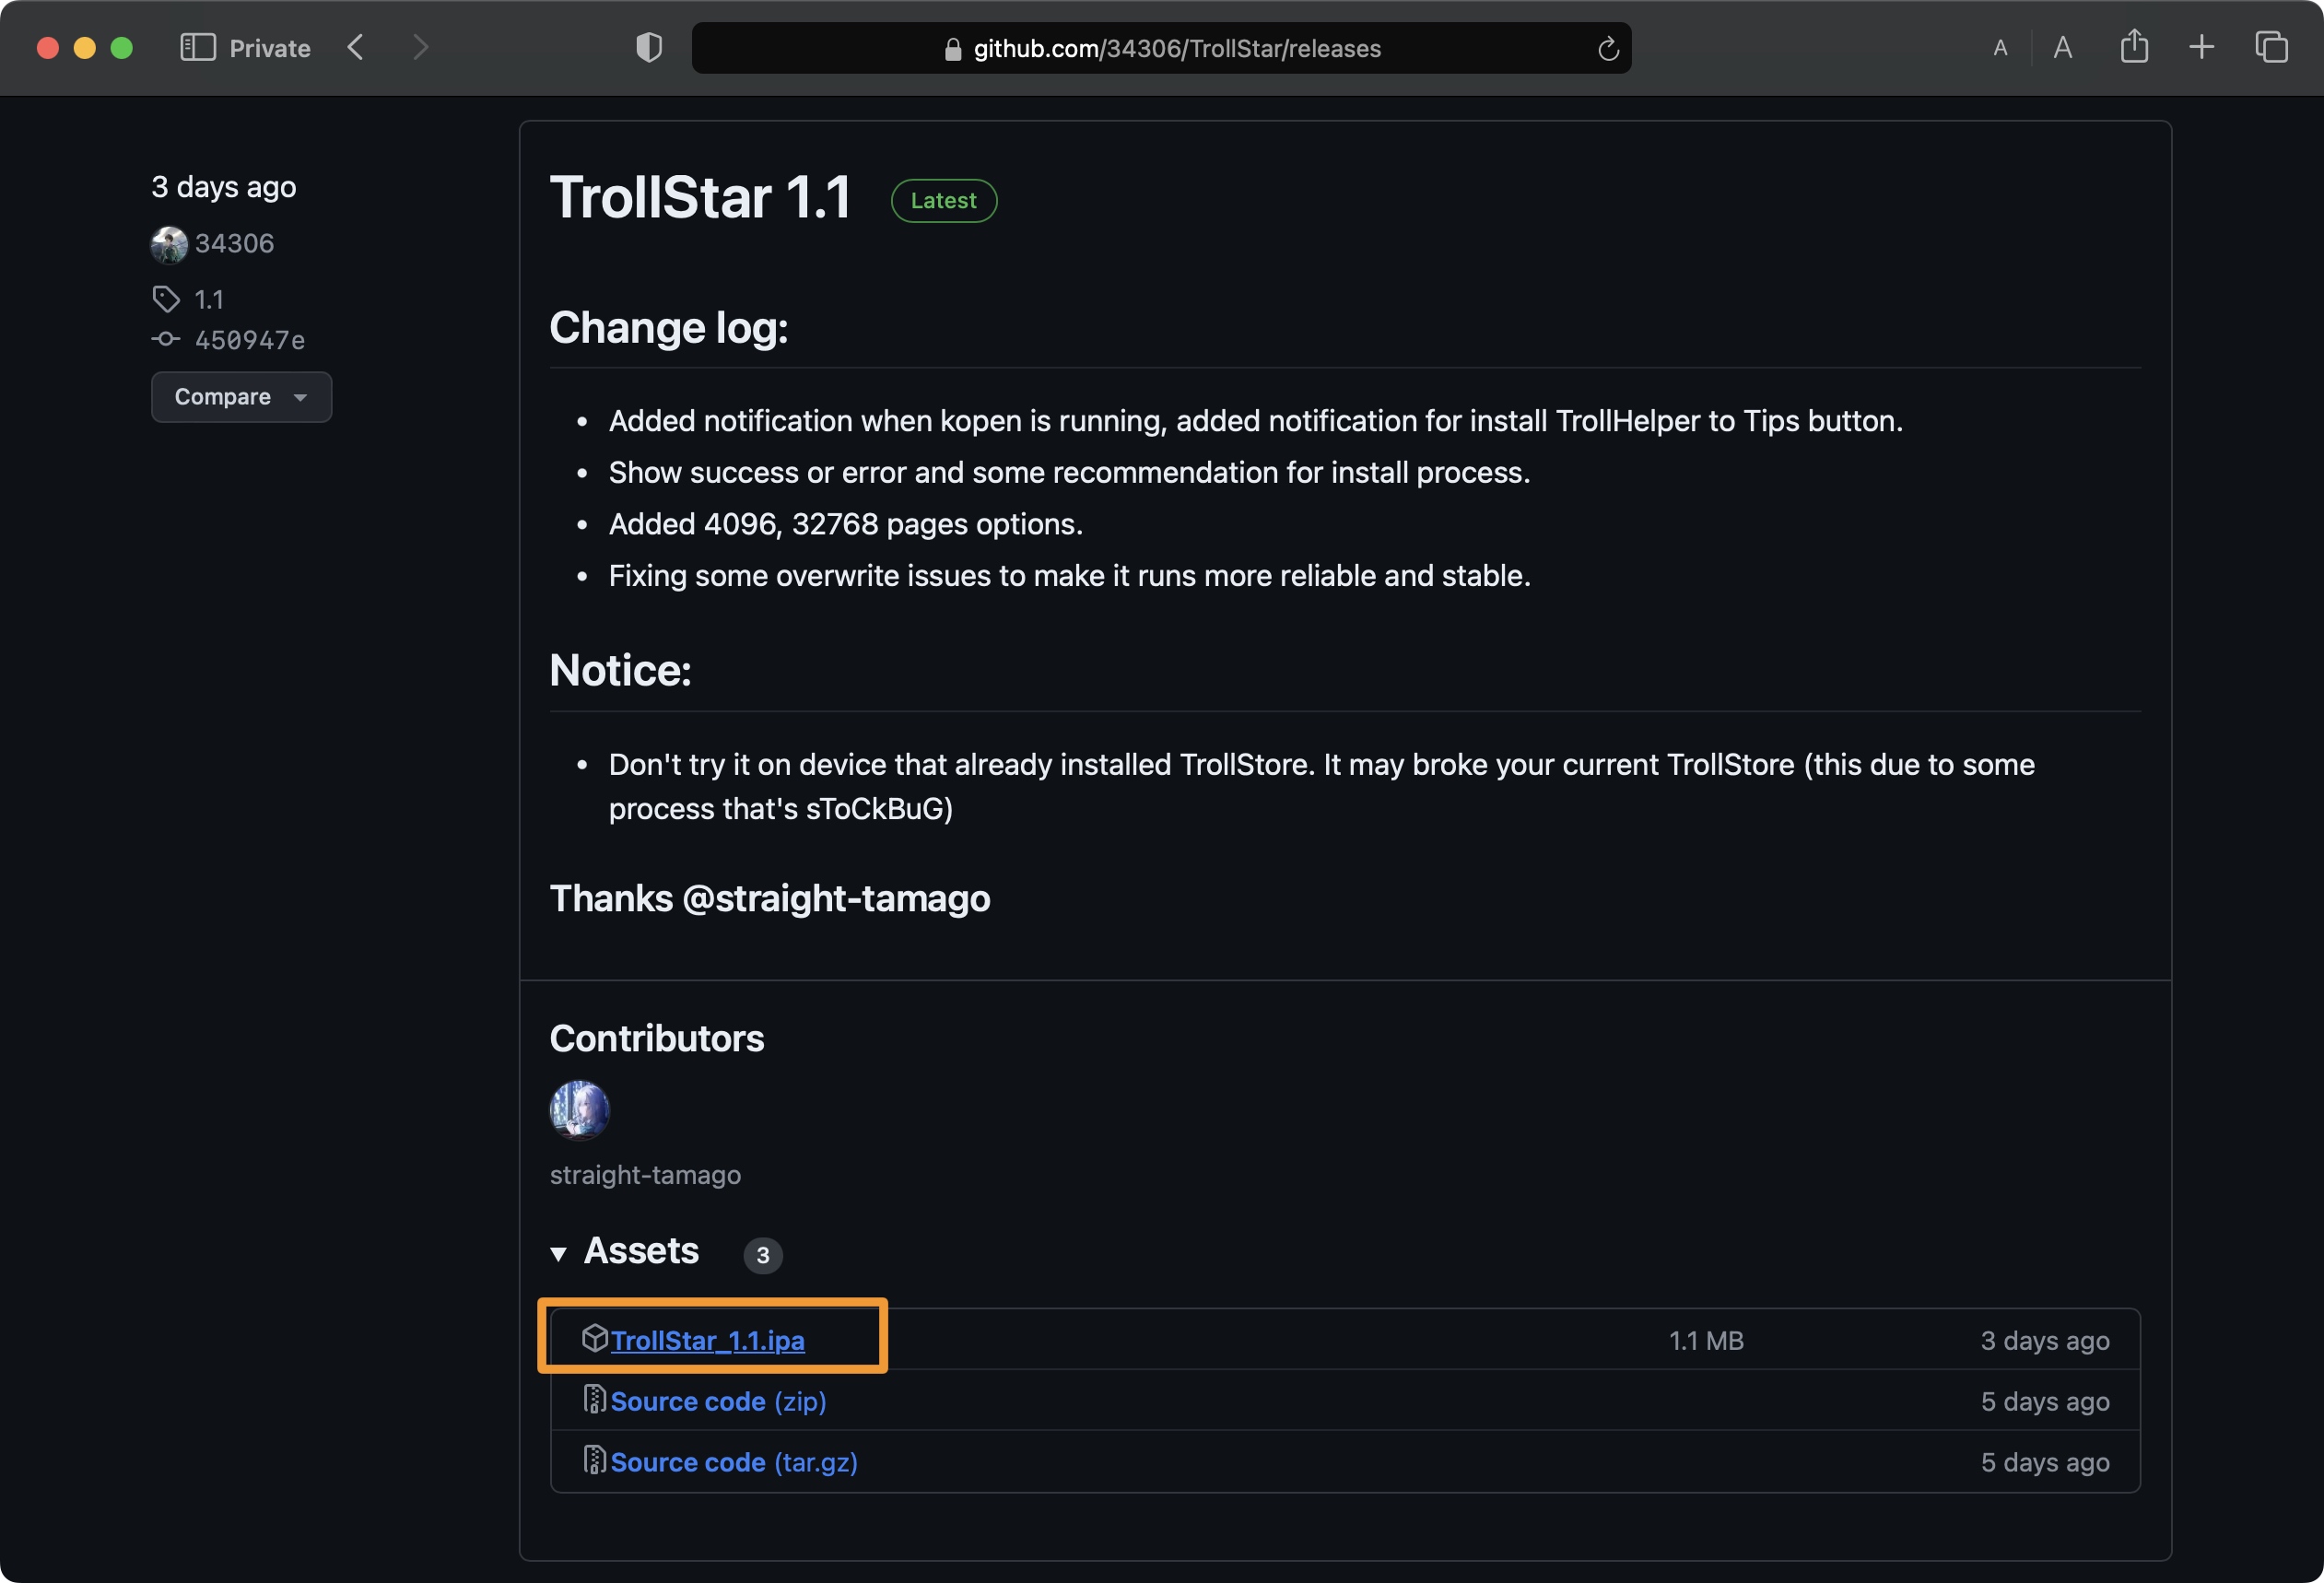
4) Visit the following URL in your favorite web browser:
https://github.com/34306/TrollStar/releases
5) Click the latest .ipa file in the releases list to initiate a download.
6) Find the downloaded file and drag it into Sideloadly:
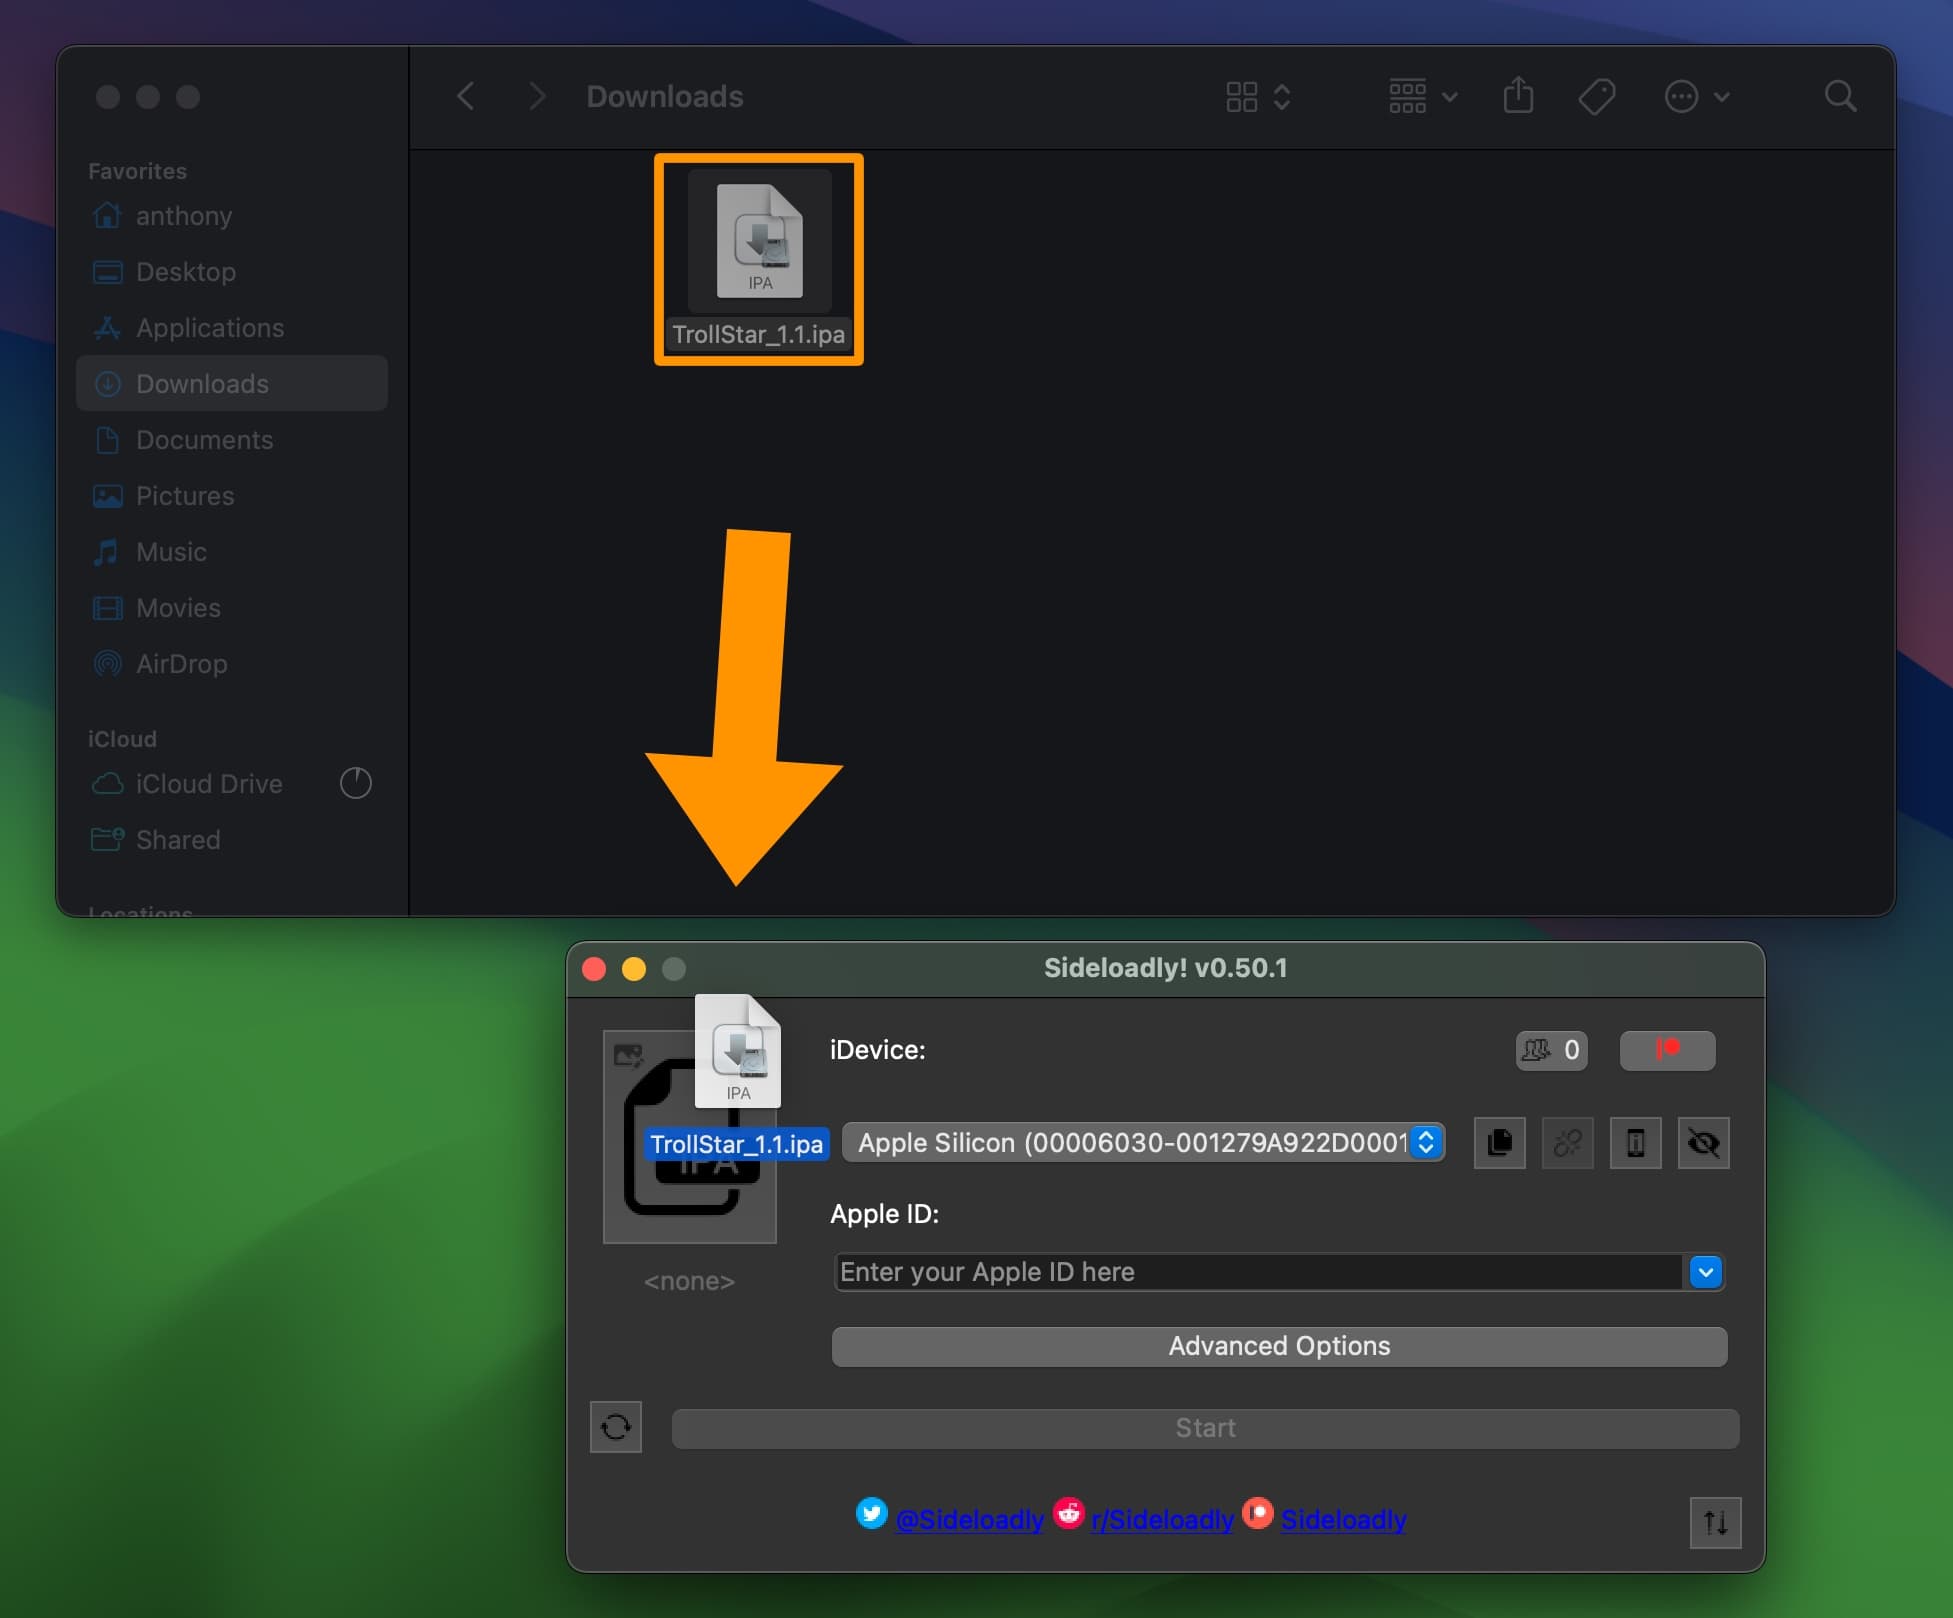
7) Select your iPhone or iPad from the combo box in the Sideloadly window:
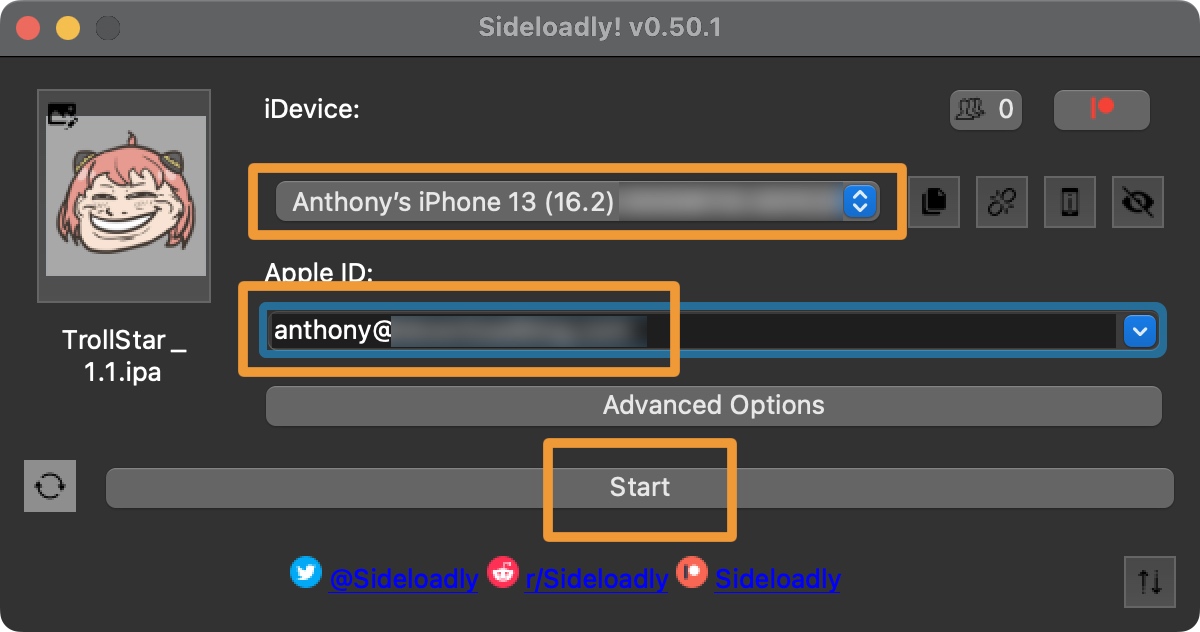
8) Enter your Apple ID in the Apple ID field.
9) Click the Start button.
10) Enter your Apple ID password when prompted to proceed:
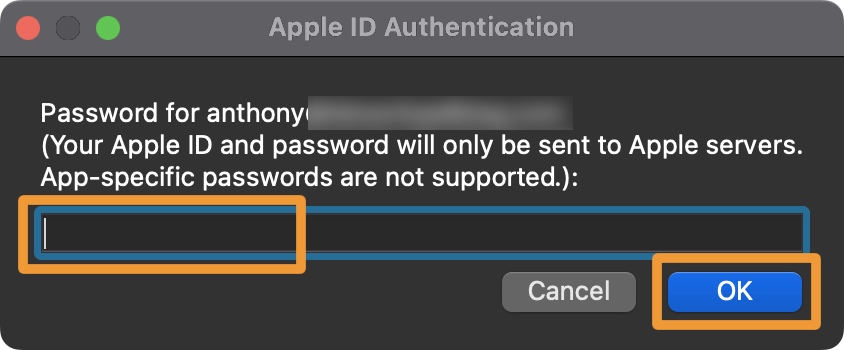
Note: Your Apple ID is used to sign the app, so you are required to enter a password. You may make a burner Apple ID if you wish to do so, but this isn’t necessary.
11) Click the OK button to move on.
Note: Once Sideloadly finishes, TrollStar will be installed on your device. Don’t attempt to launch it just yet.
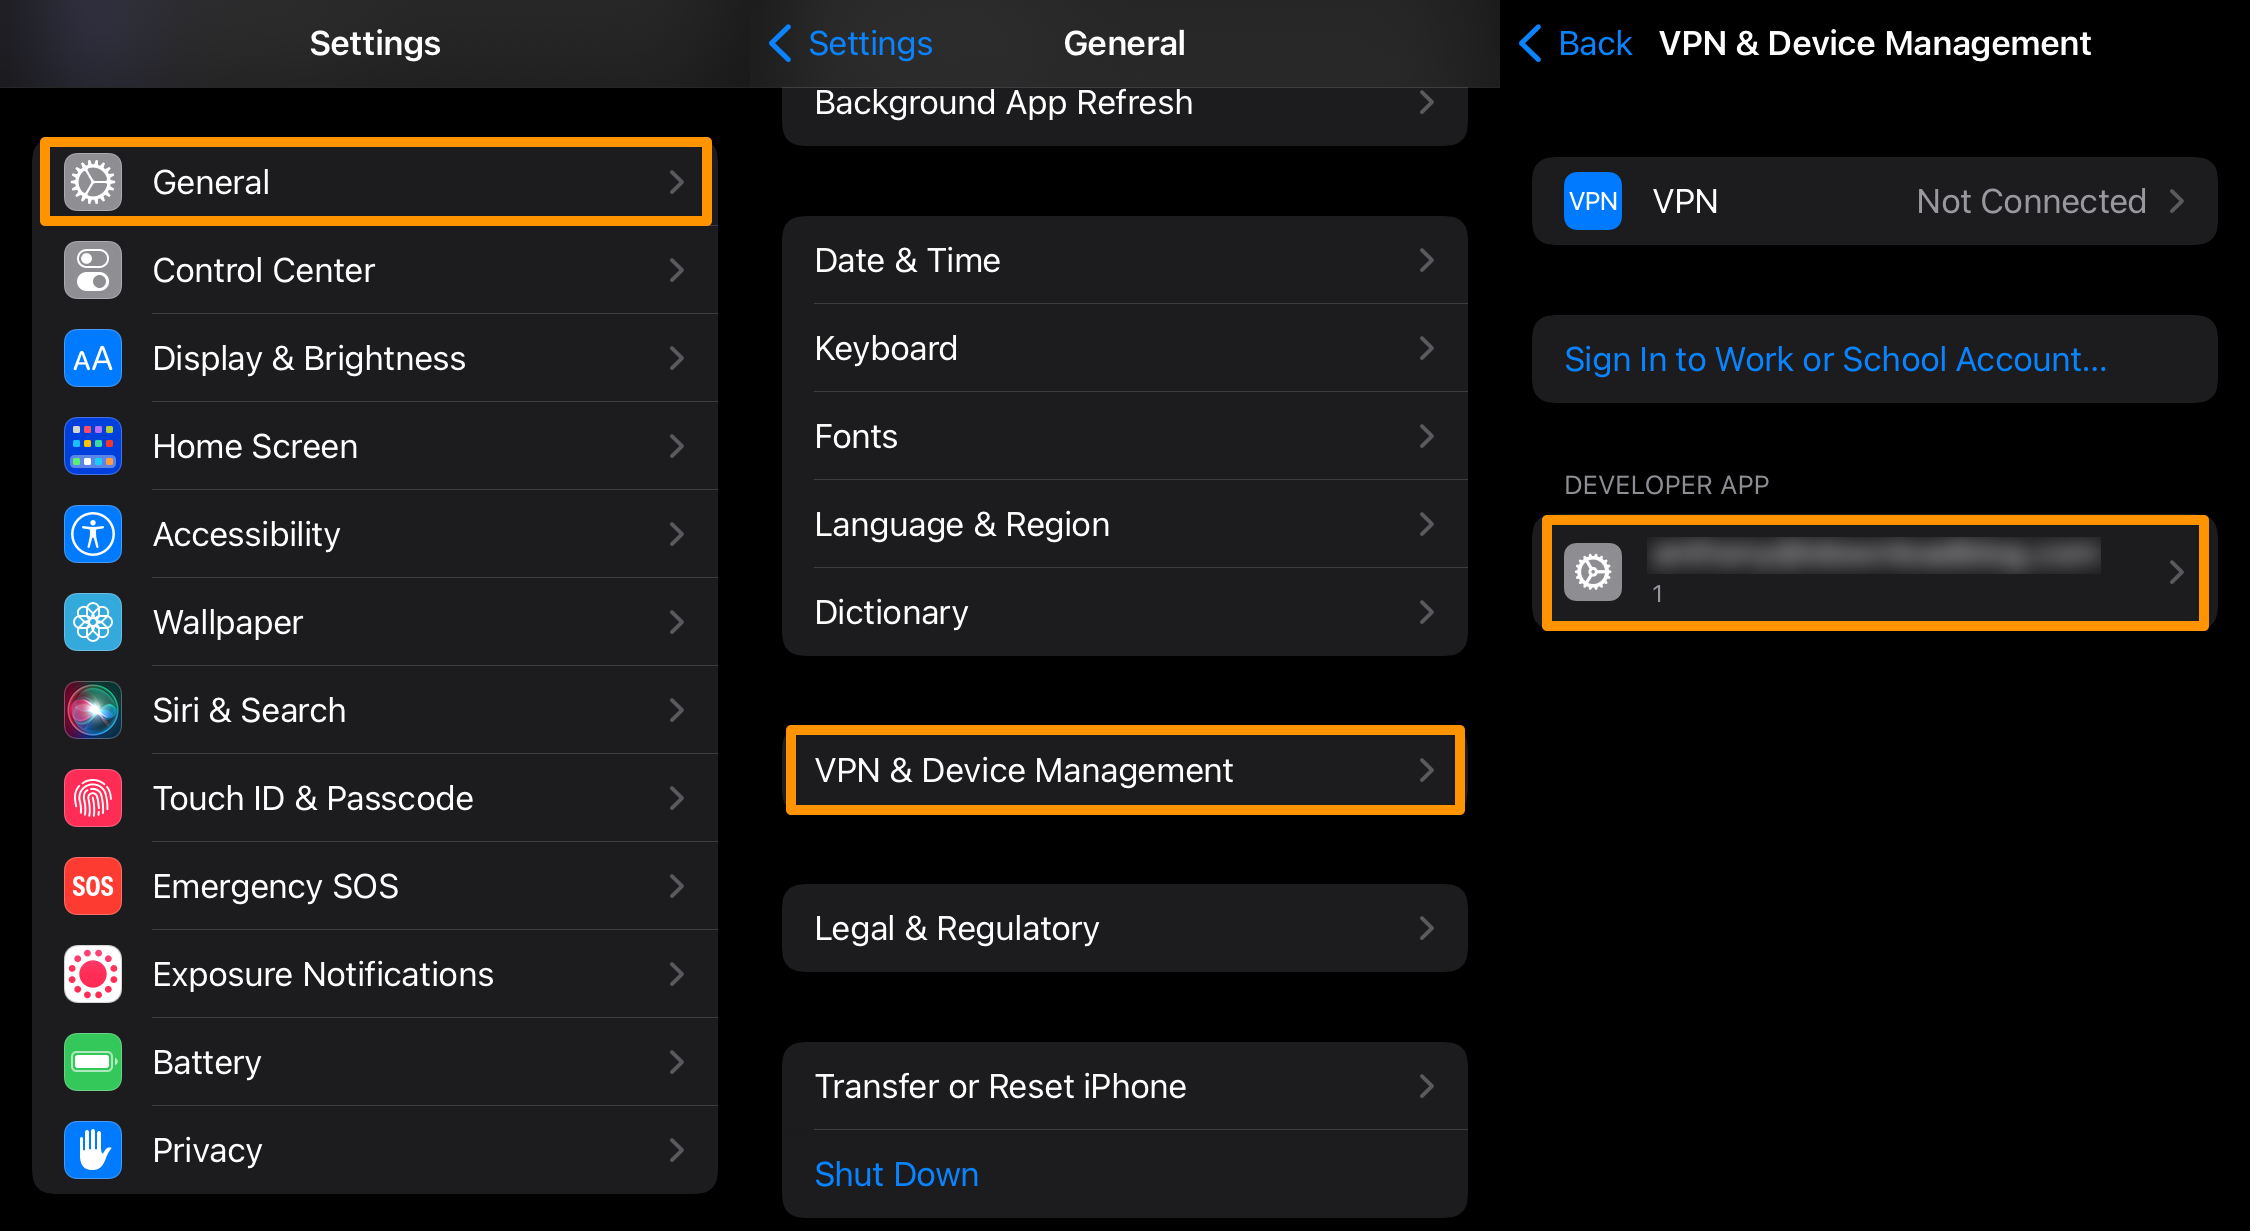
12) Launch the Settings app on your iPhone or iPad and navigate to General → VPN & Device Management and tap on your Apple ID:
13) Tap the blue Trust button with your Apple ID email inside of it:
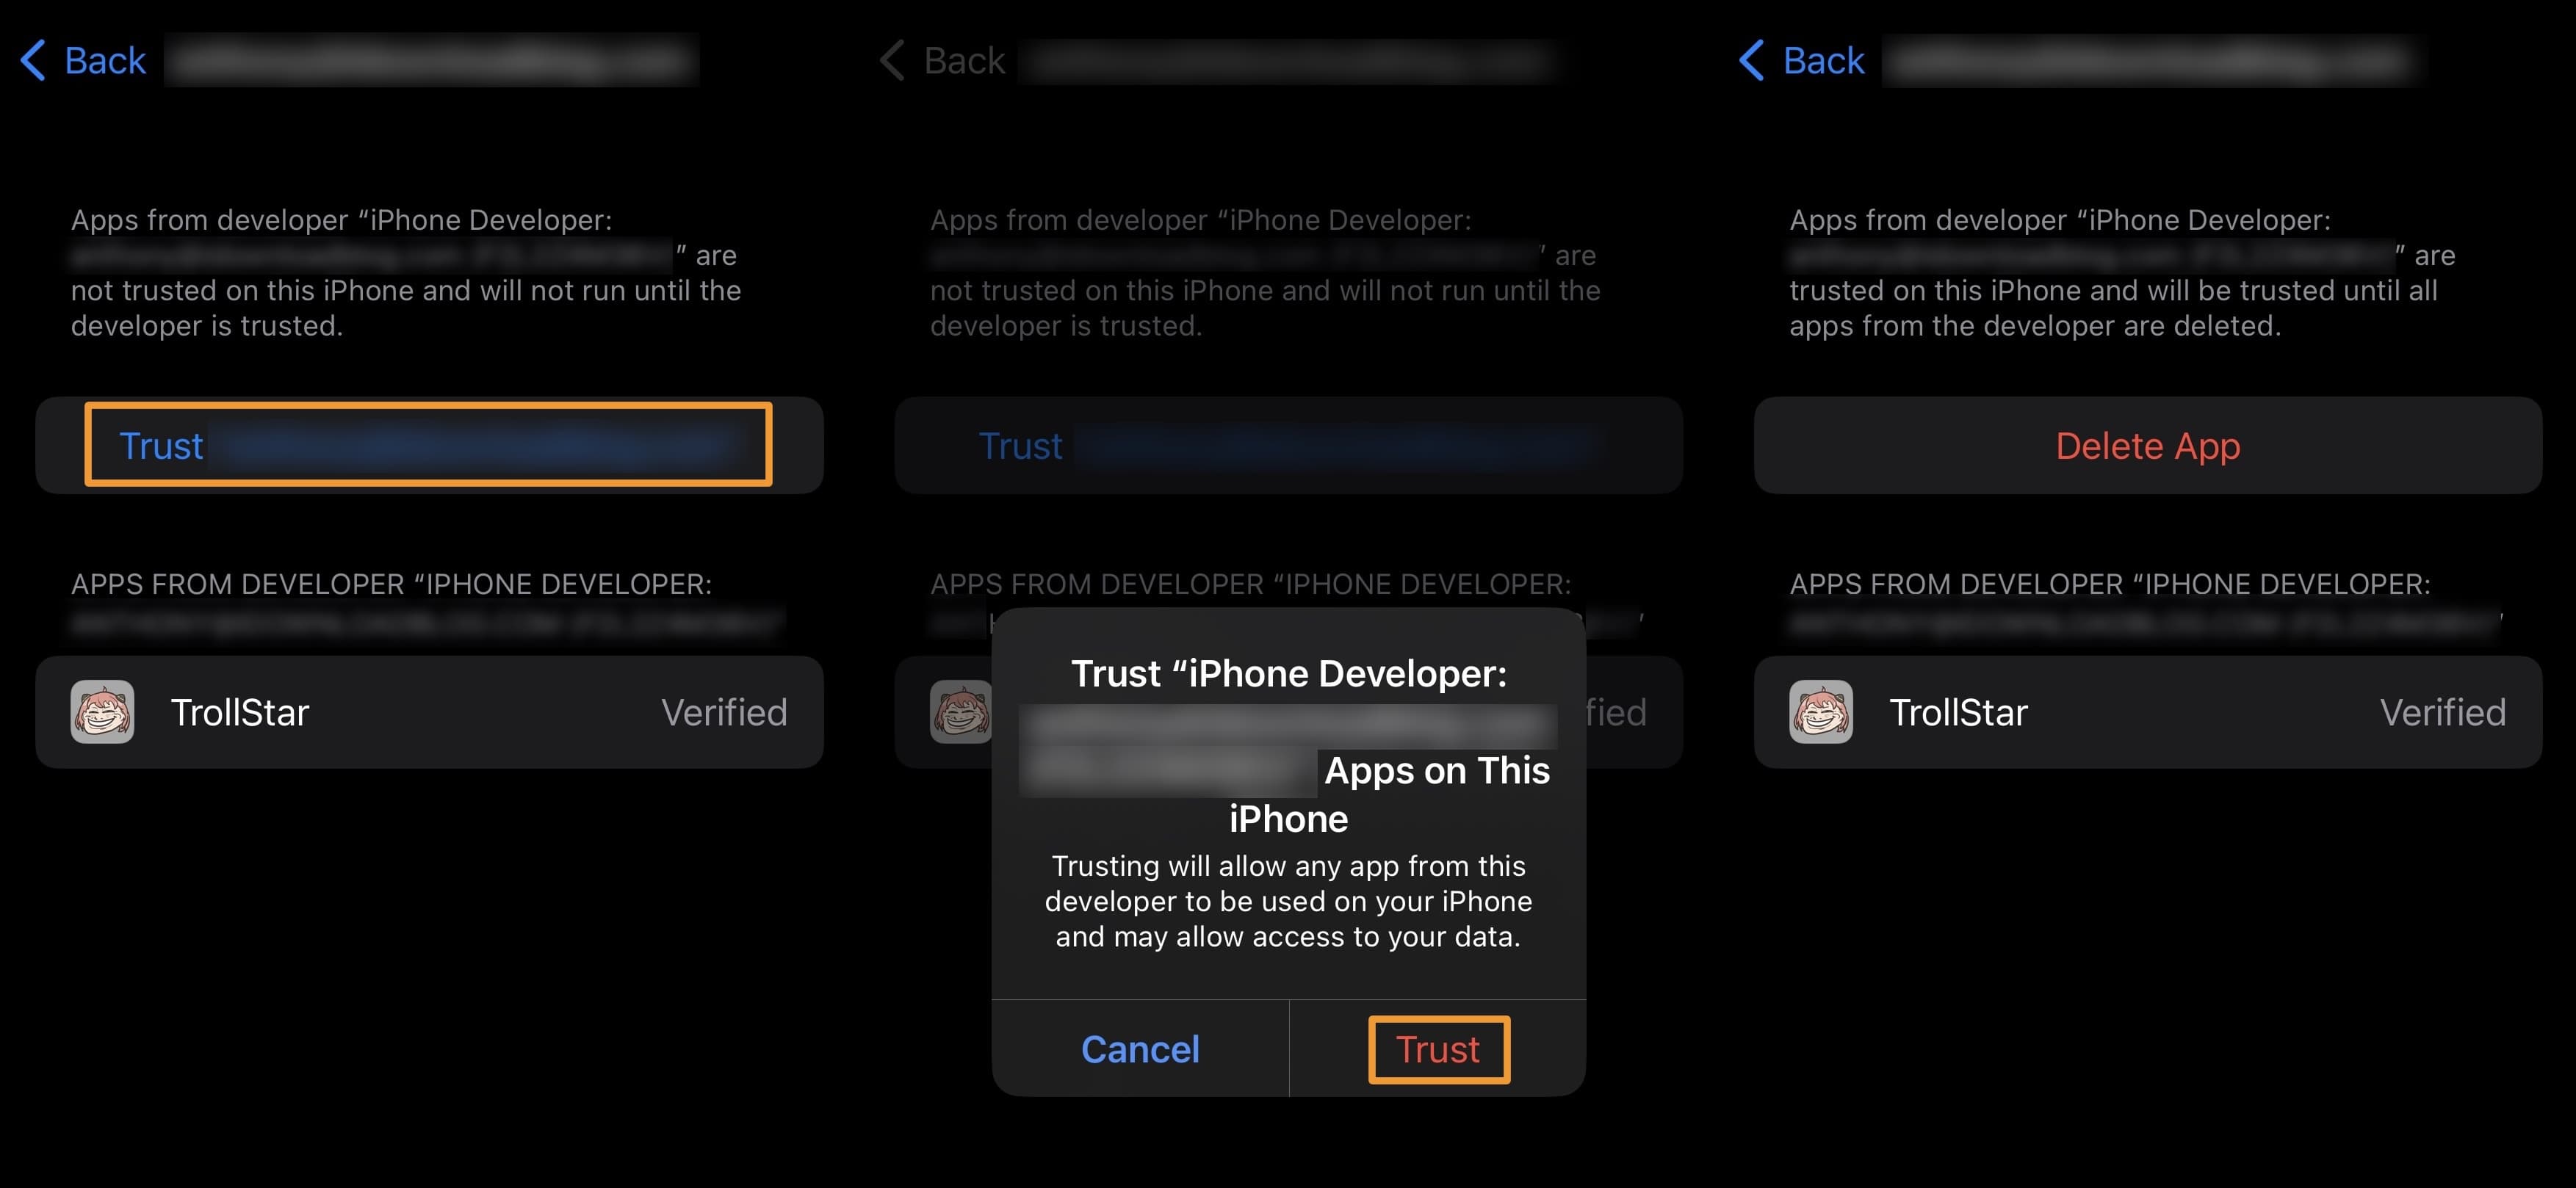
14) Tap on the red Trust button in the subsequent pop-up.
15) Make sure you have the Tips app on your iPhone or iPad.
Note: If you don’t already have the Tips app, download it from the App Store before moving on to the next step.
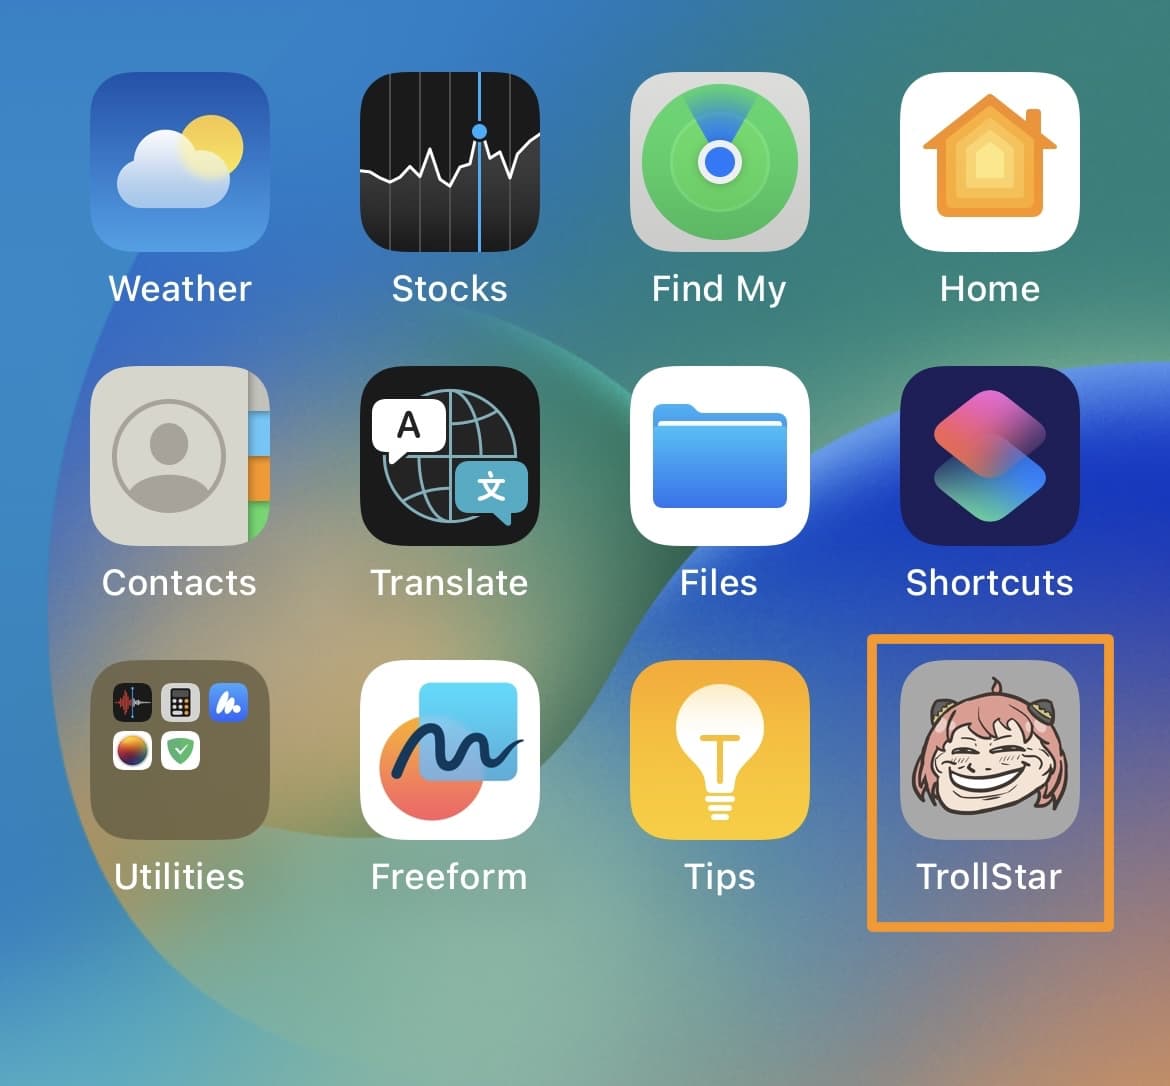
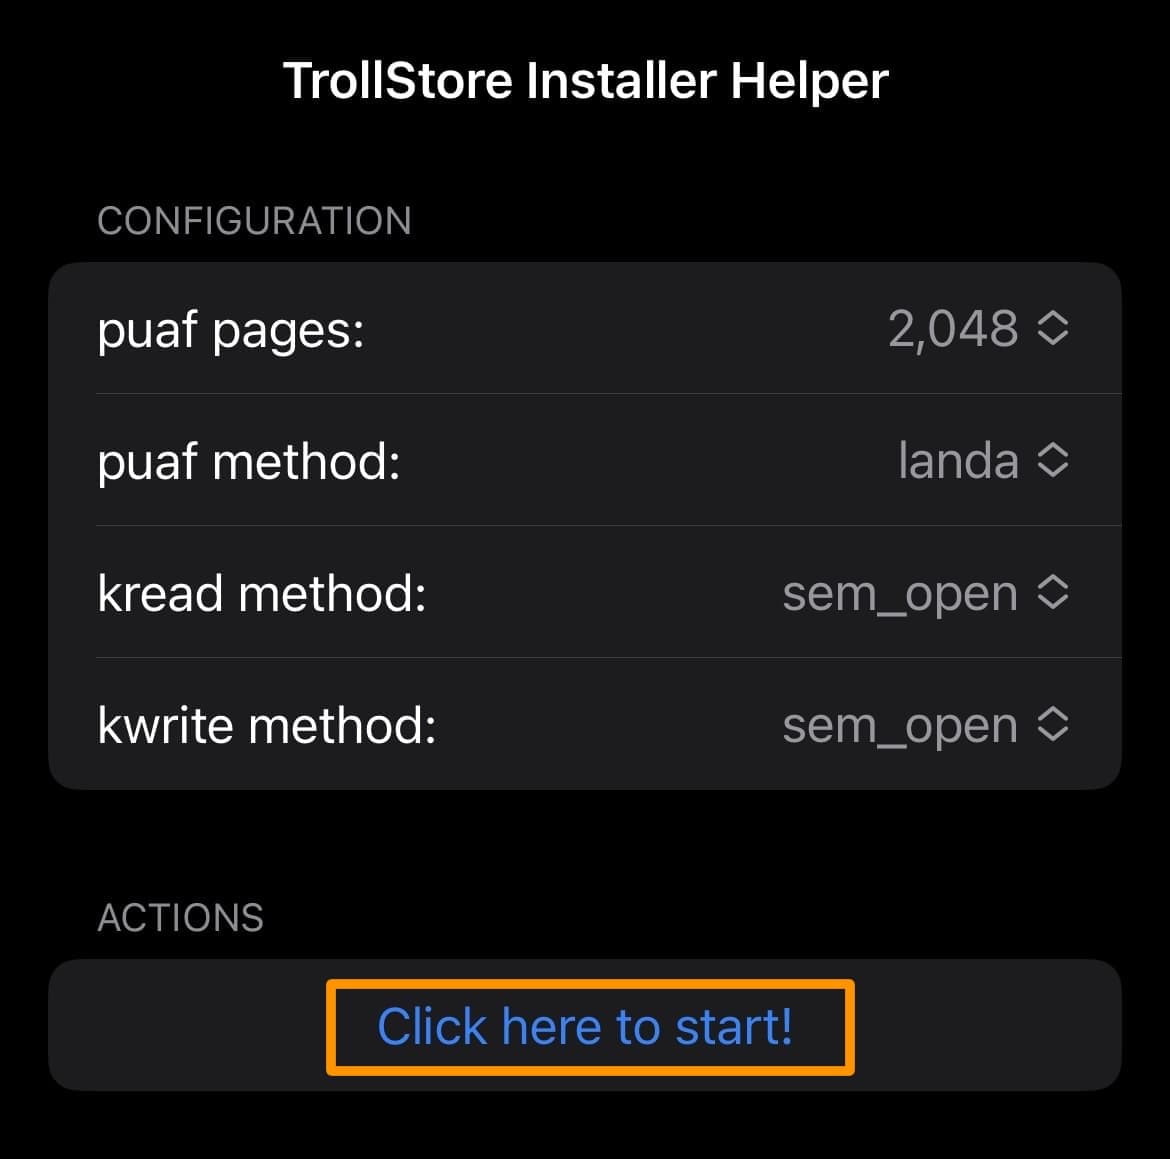
16) Launch the TrollStar app:
17) Tap the Click here to start! button:
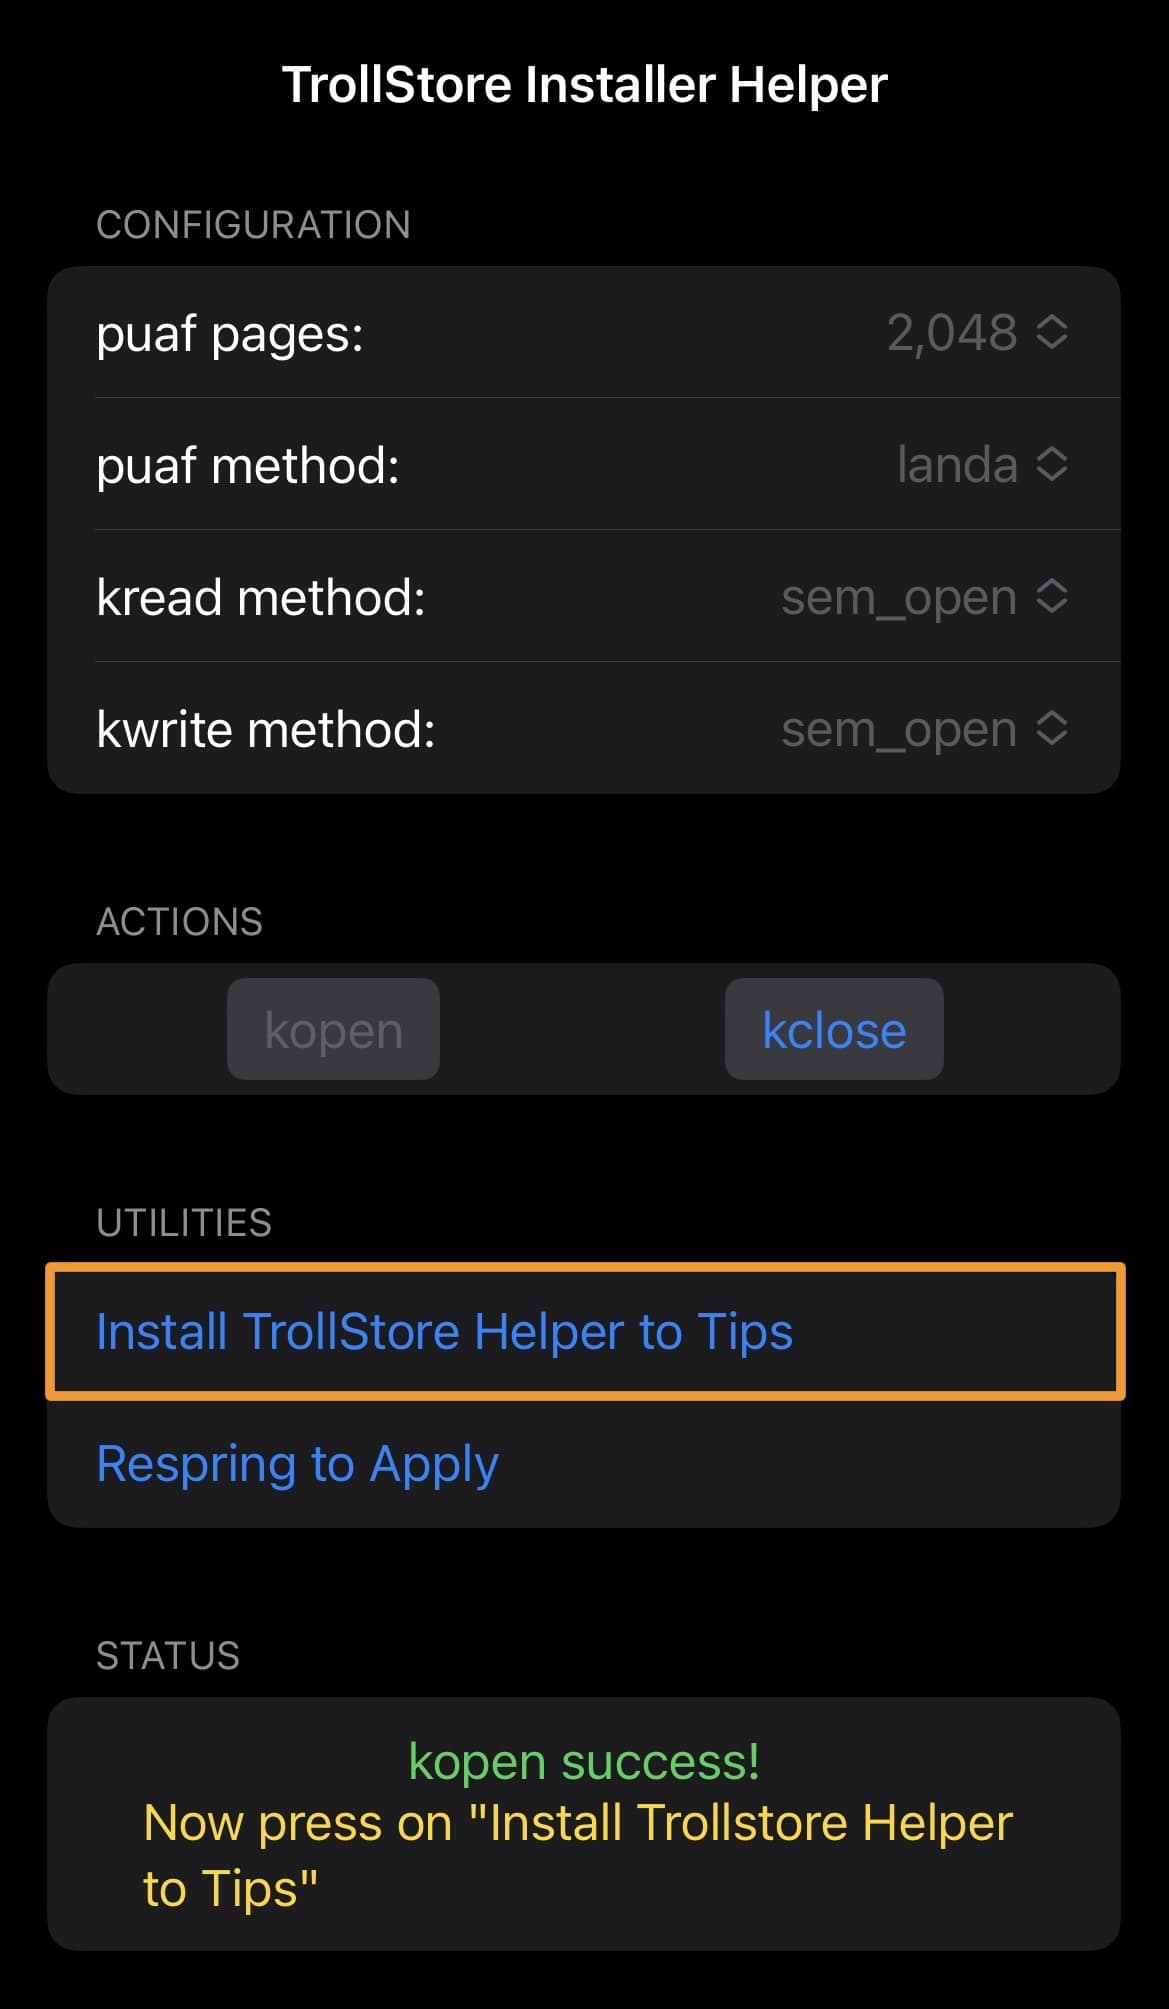
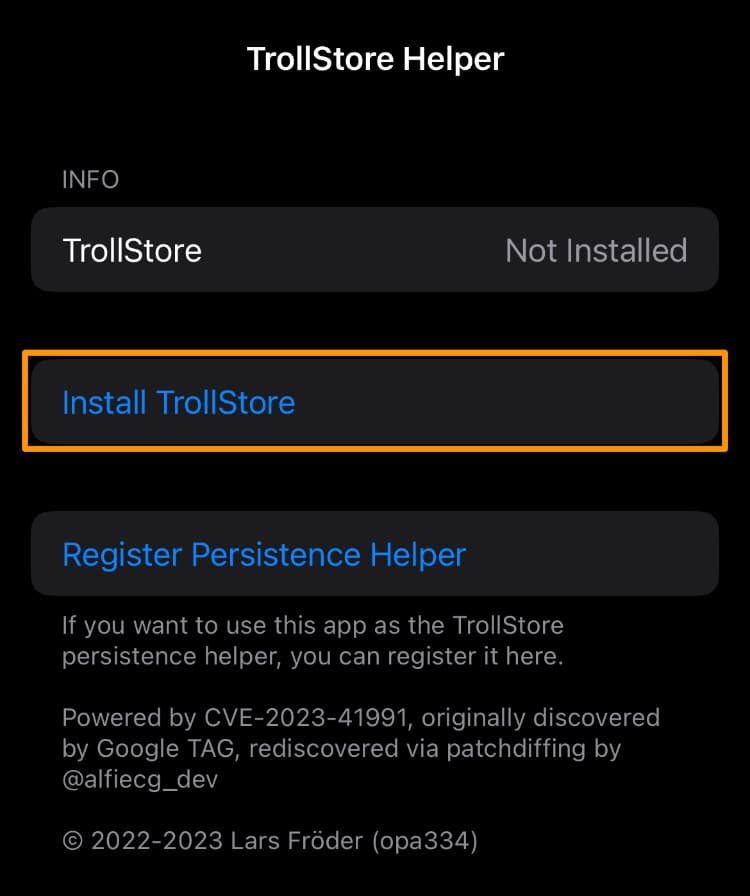
18) Tap the Install TrollStore Helper to Tips button:
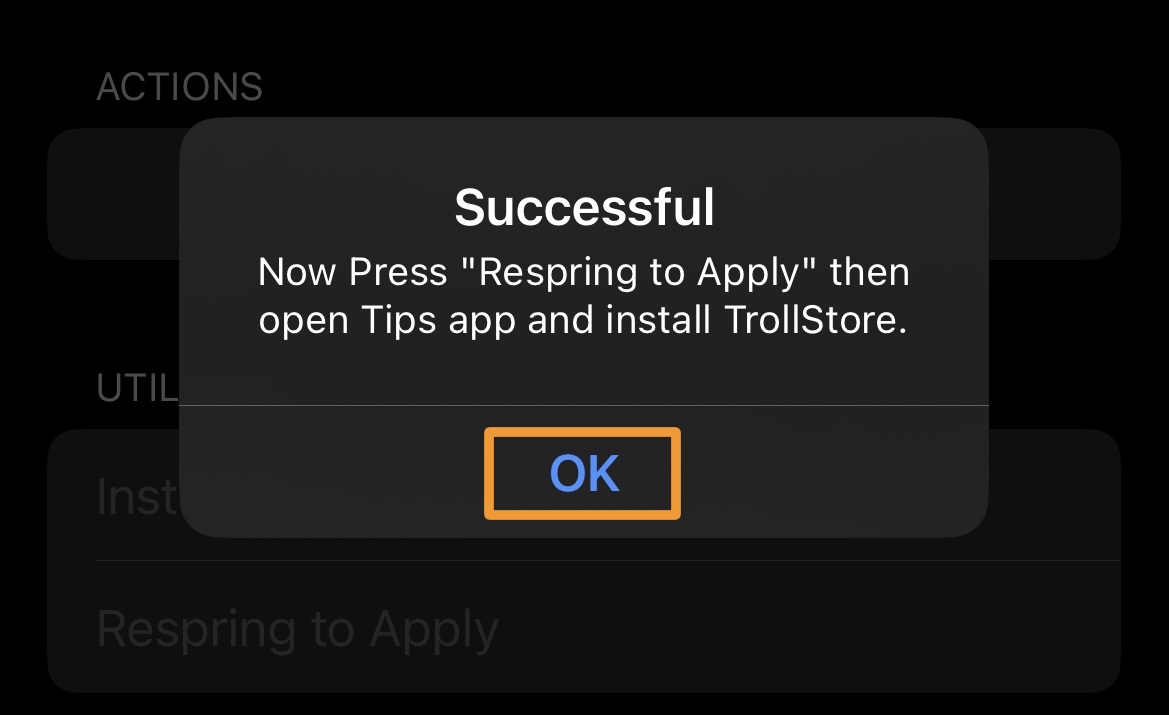
19) Tap OK in the subsequent pop-up:
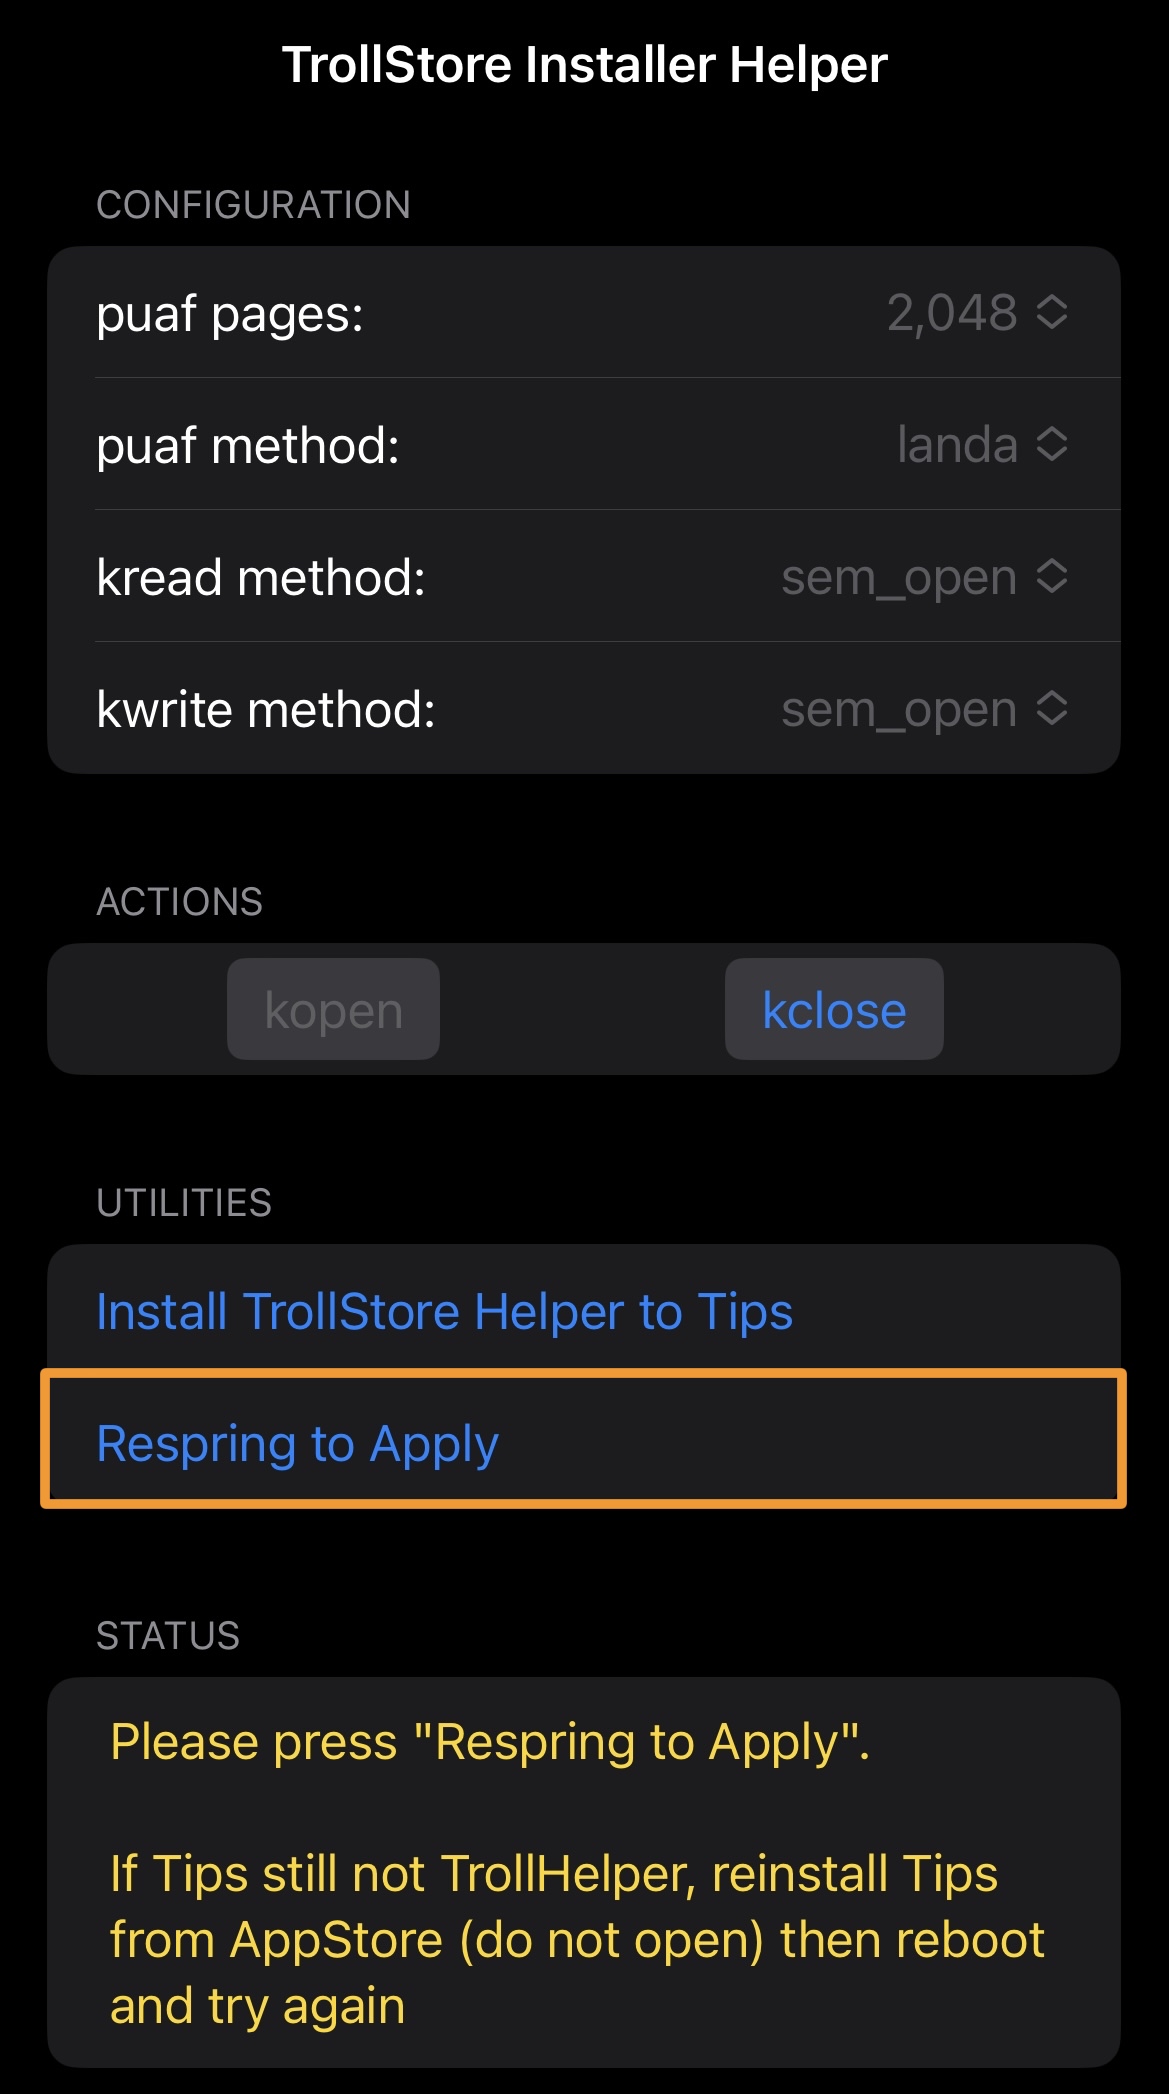
20) Tap the Respring to Apply button in the app:
21) When your device starts back up, launch the Tips app:
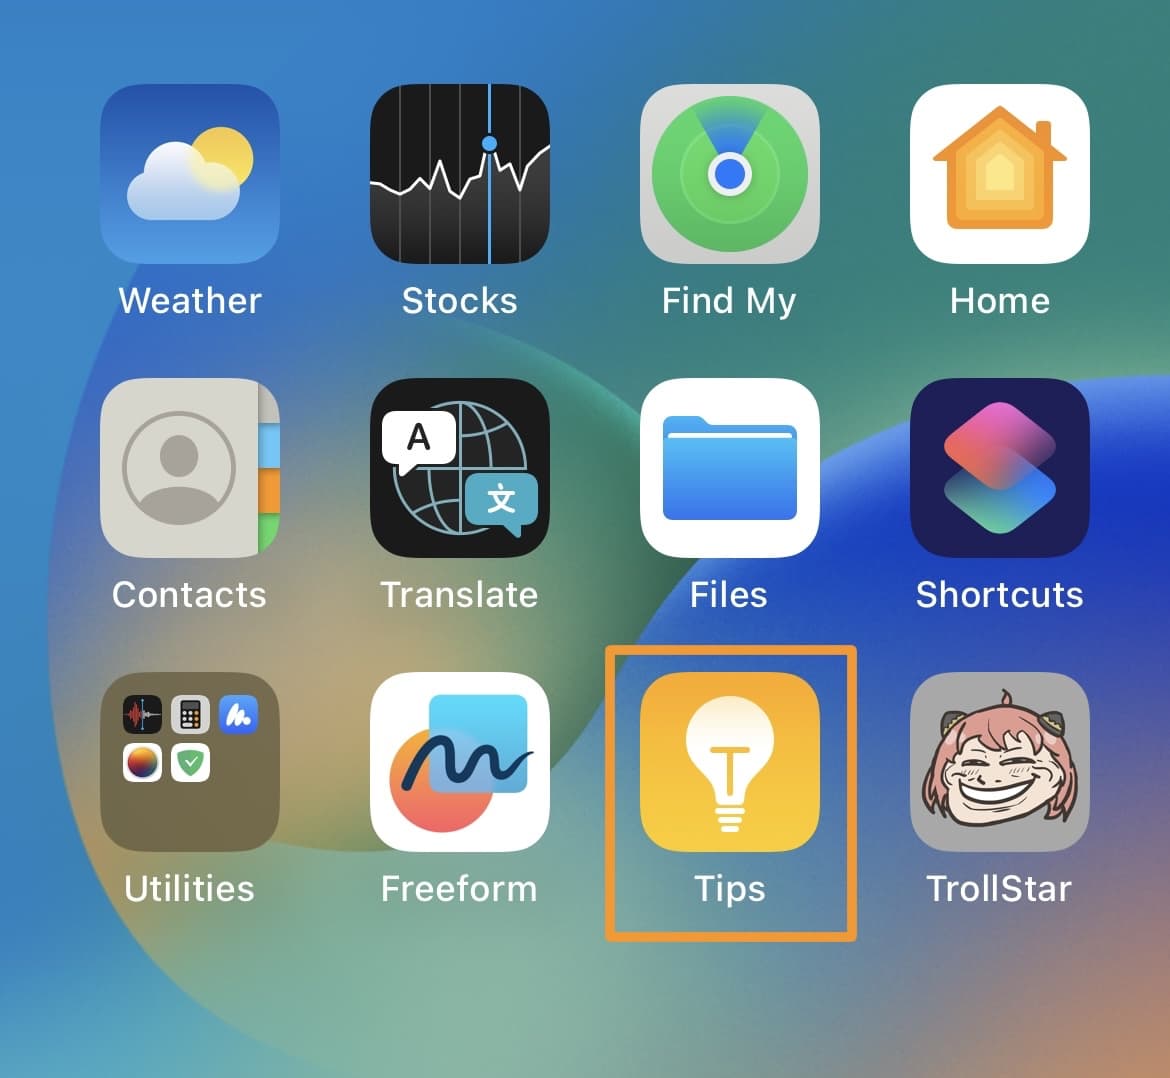
22) Tap on the Install TrollStore button:
Note: Your device will now appear to respring again.
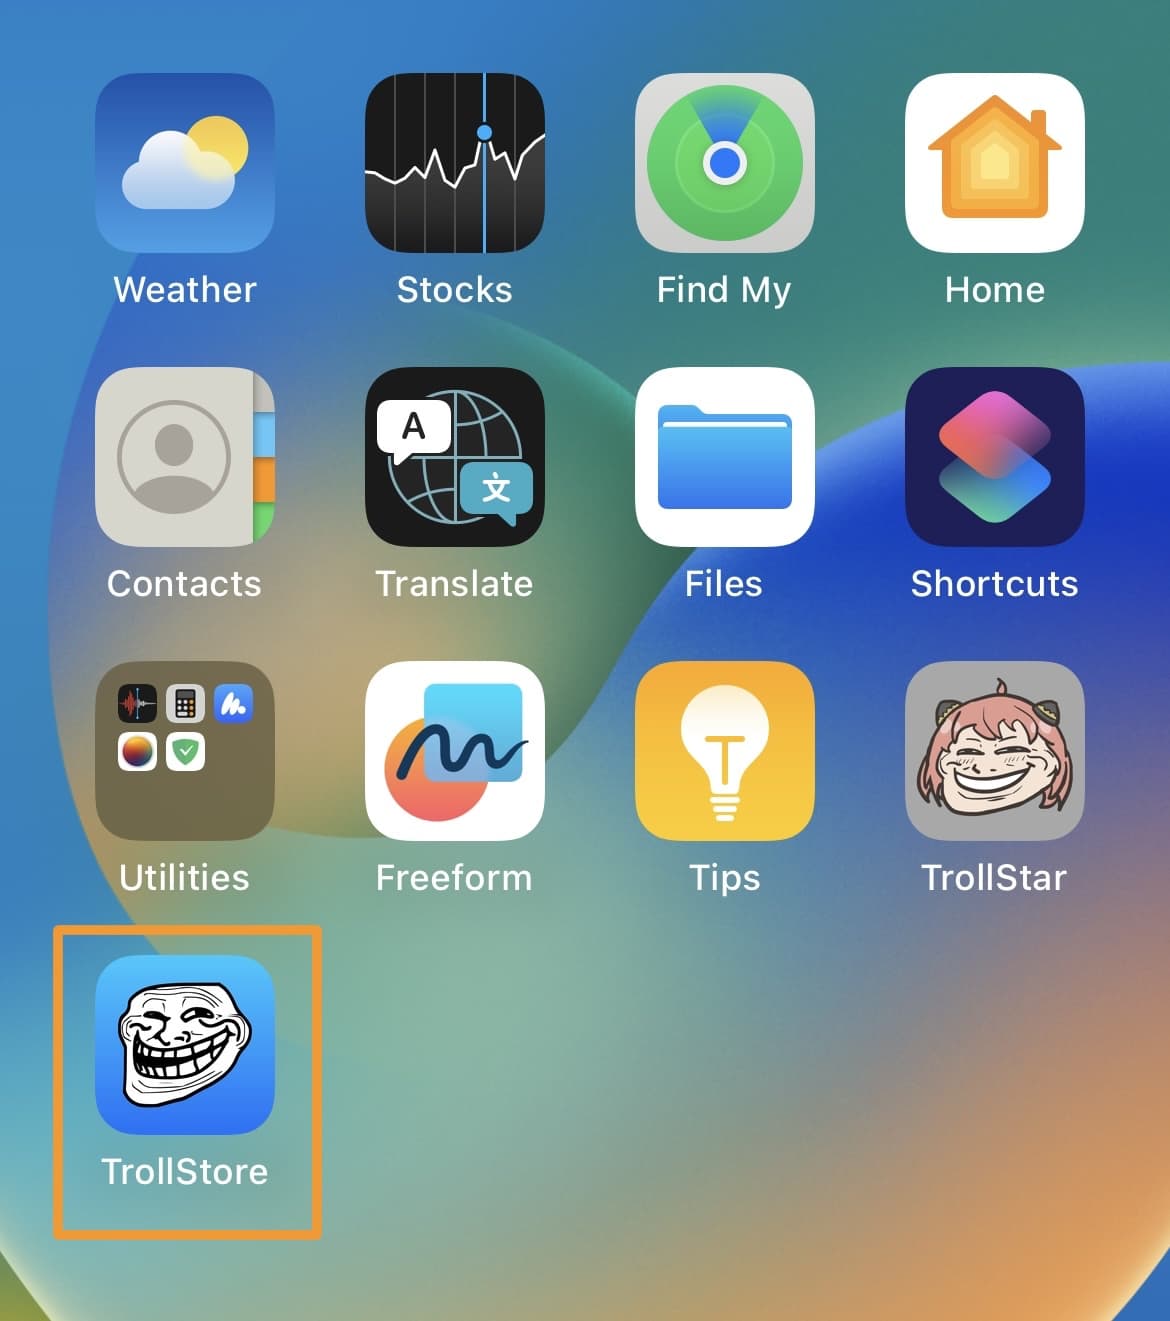
23) When it starts back up again, launch the TrollStore app:
24) Tap the Settings tab:
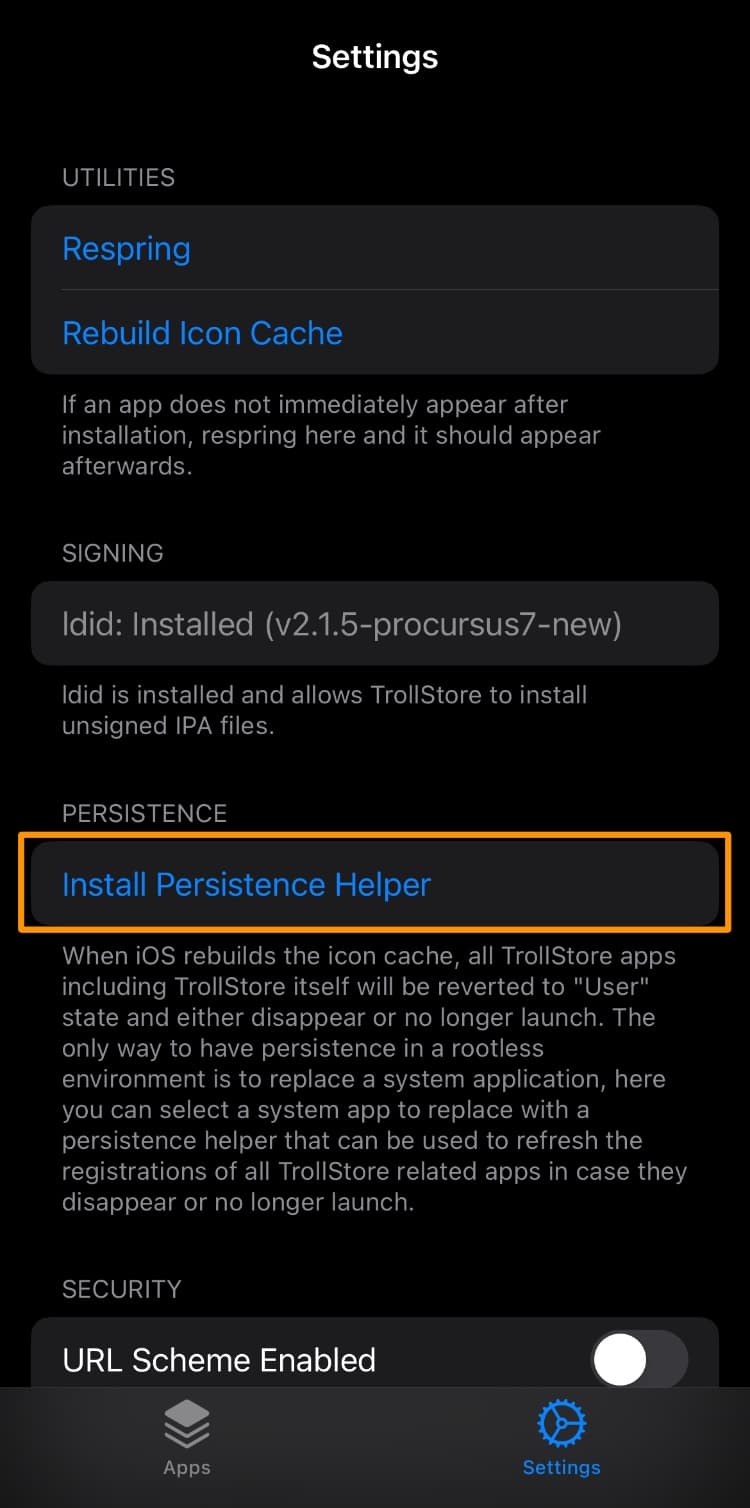
25) Tap on the Install Persistence Helper button.
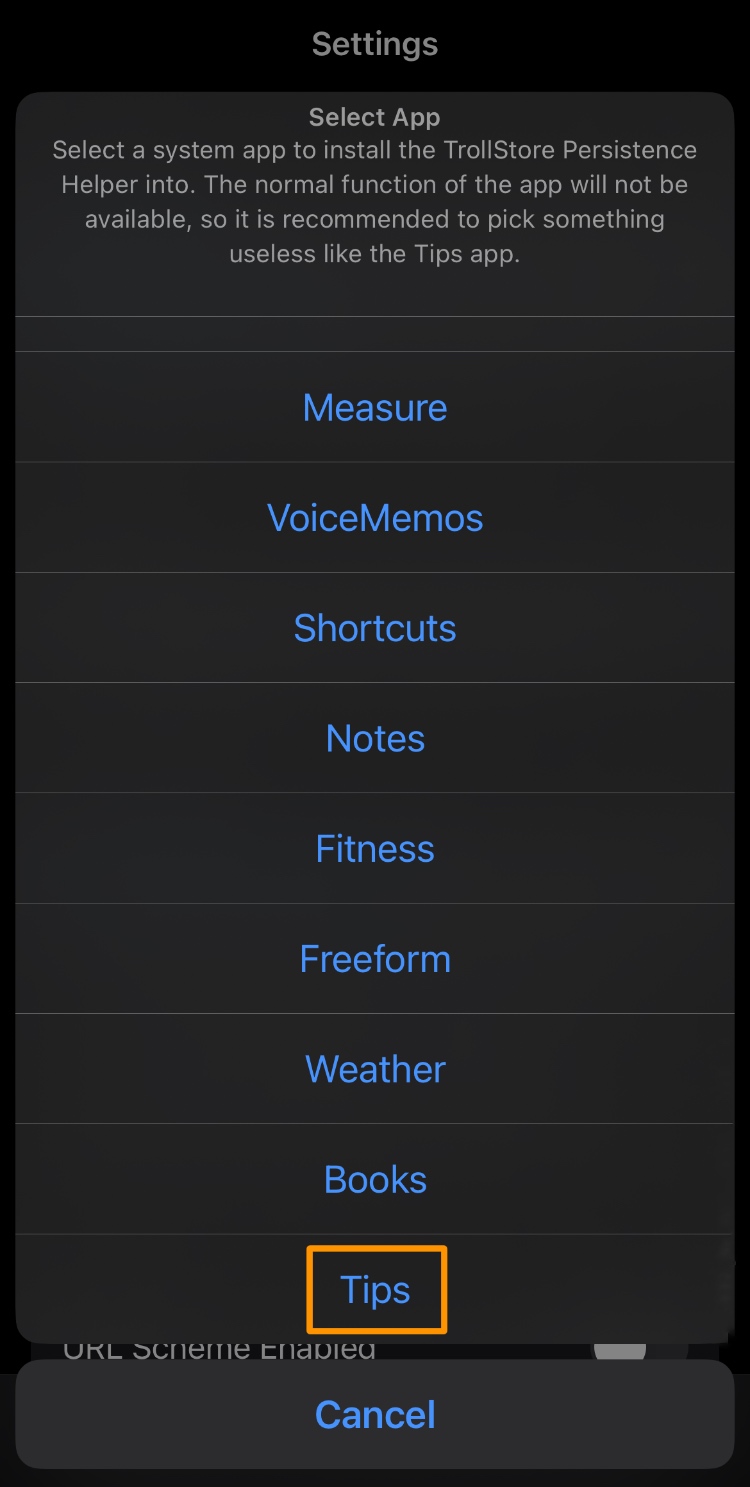
26) Select the Tips app from the list:
Congratulations! You’ve just installed TrollStore using TrollStar and you’re ready to start perma-signing .ipa files!
Conclusion
You’ve officially made it to the end of today’s tutorial, and now that you have TrollStore installed on your iPhone or iPad, you can install virtually any .ipa or .tipa file on your device and it’ll remain signed until you remove it.
- How to install TrollStore on jailbroken iOS & iPadOS 14.0-14.8.1 devices
- How to install TrollStore on non-jailbroken checkm8 devices (A9-A11) with SSH Ramdisk
- How to install TrollStore on non-jailbroken iOS 15.0-15.6.1 devices with TrollHelperOTA
- How to install TrollStore on A12+ devices running iOS 15.0-16.6.1 with Misaka
- How to install TrollStore on A12+ devices running iOS 16.0-16.6.1 with PureKFD
Did you run into any obstacles while trying to install TrollStore with TrollStar? Let us know in the comments section down below.