Check out the solutions to fix dictation issues on your iPhone, iPad, Apple Watch, and Mac.
Dictation lets you enter text using your voice instead of typing on the keyboard. It’s also known by other unofficial names like talk to text, voice to text, or speech to text.
If the dictation microphone icon is missing on the keyboard, doesn’t convert what you speak into text, or refuses to work, here are the reliable solutions to fix these problems.
Fix dictation not working on iPhone or iPad
Connect to Wi-Fi or Cellular
You can use dictation offline on iPhone 6s and later. However, not all dictation languages work without an internet connection. So, for best results, make sure your iPhone or iPad is connected to Wi-Fi or cellular data.
Plus, you’ll have to connect to Wi-Fi to download support files when you select a new dictation language or immediately after setting up your new/erased iPhone.
Enable and disable Airplane Mode
Go to the iPhone or iPad settings app and activate Airplane Mode. After waiting for around 15 seconds, tap the same toggle to turn off Airplane Mode.
Force quit the app in question and reopen it
If dictation isn’t working in a particular app, force close and reopen it. After that, tap the microphone key on the iOS keyboard and try to use dictation. It should input what you speak.
Restart your iPhone
When dictation is not working on your iPhone, or it comes and disappears from the screen, simply turn off your iPhone and turn it back on. It’s an important fix. So, make sure you don’t skip it.
Disable and re-enable dictation to refresh it
This particular step will also help you verify if you had enabled dictation in the first place.
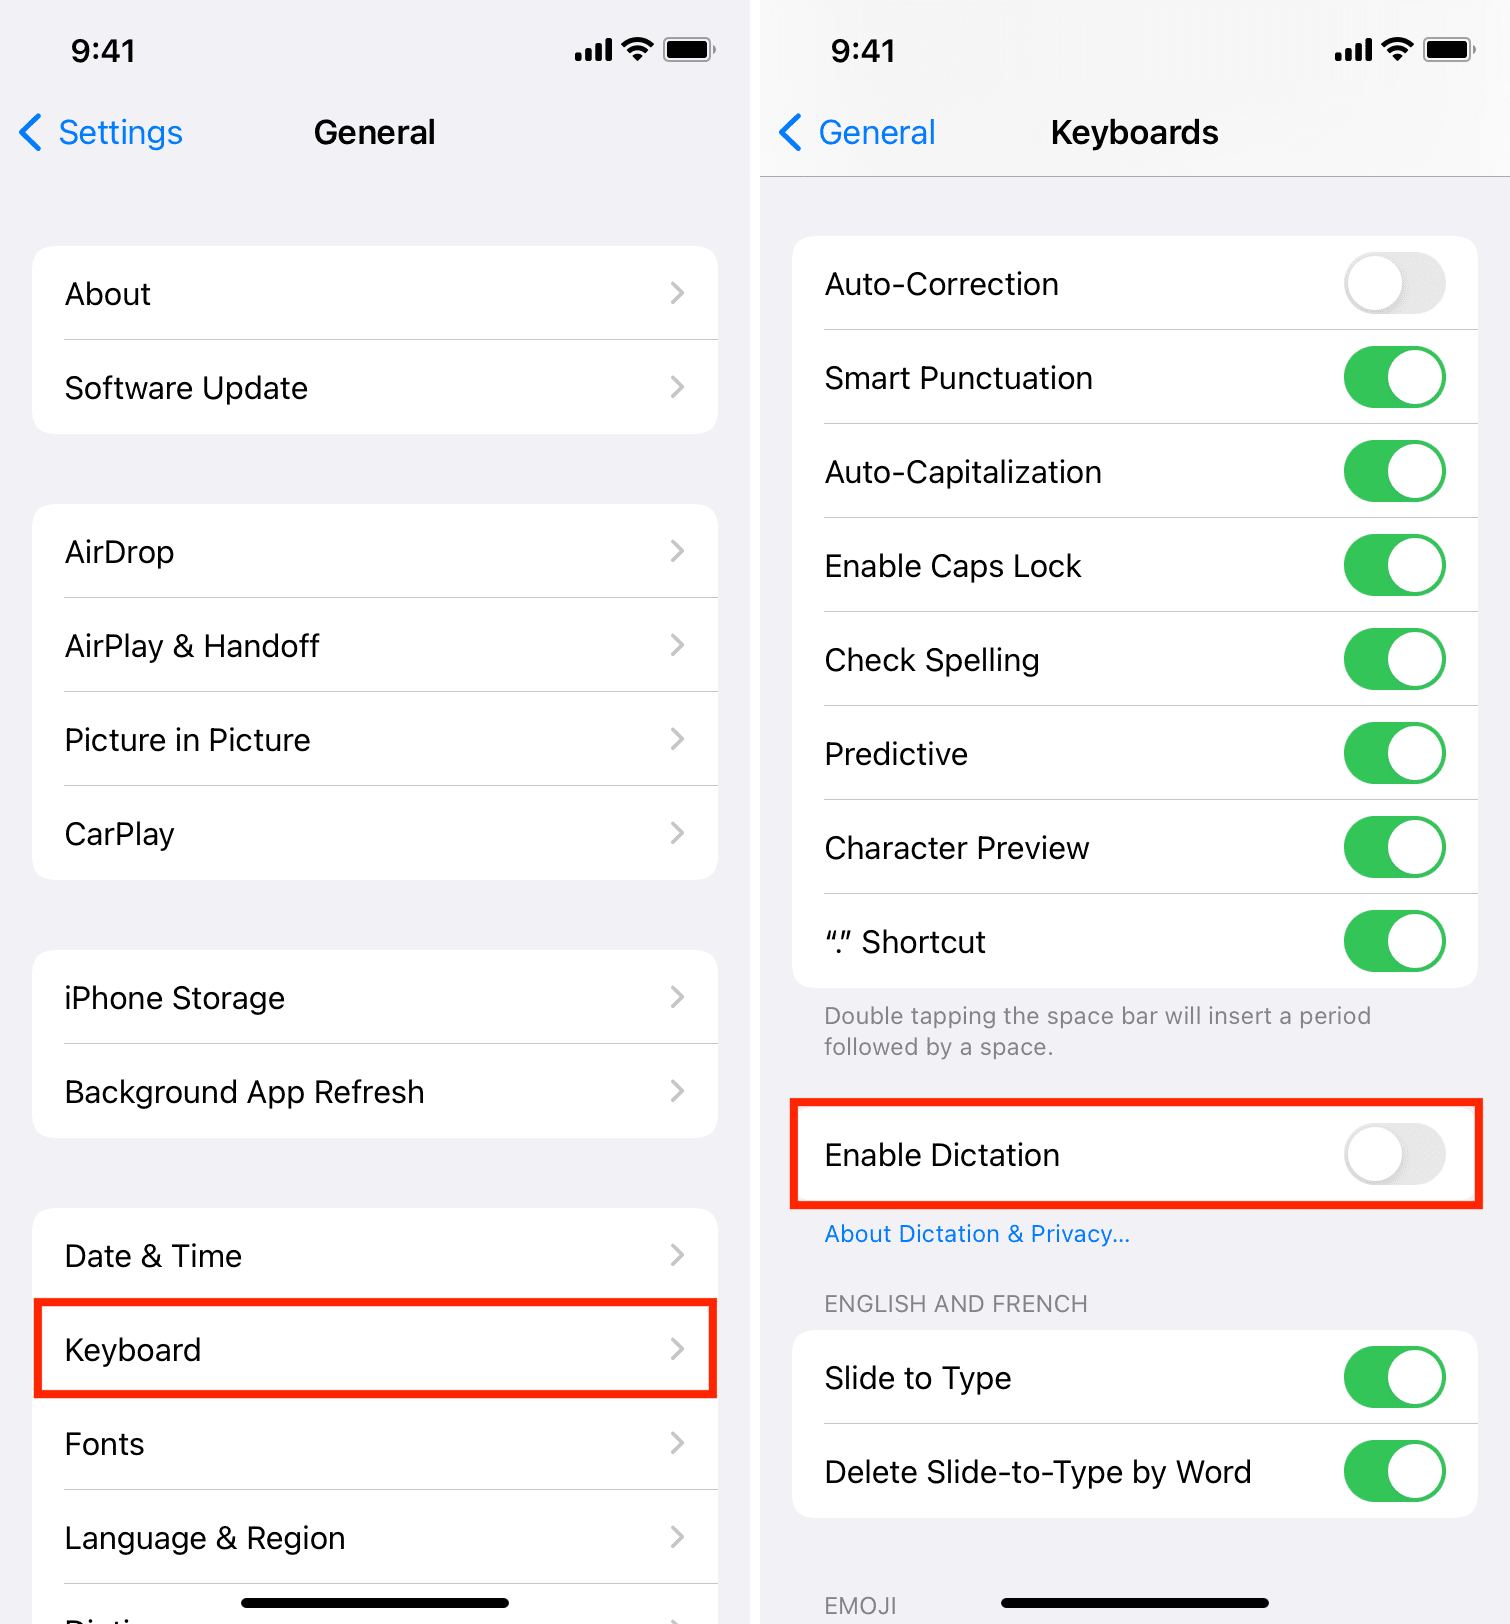
- Open the Settings app and go to General > Keyboard.
- Turn off Enable Dictation and confirm by tapping Turn Off Dictation.
- Wait for a few seconds and restart your iPhone.
- Return to Settings > Keyboard and turn on the switch for Enable Dictation.
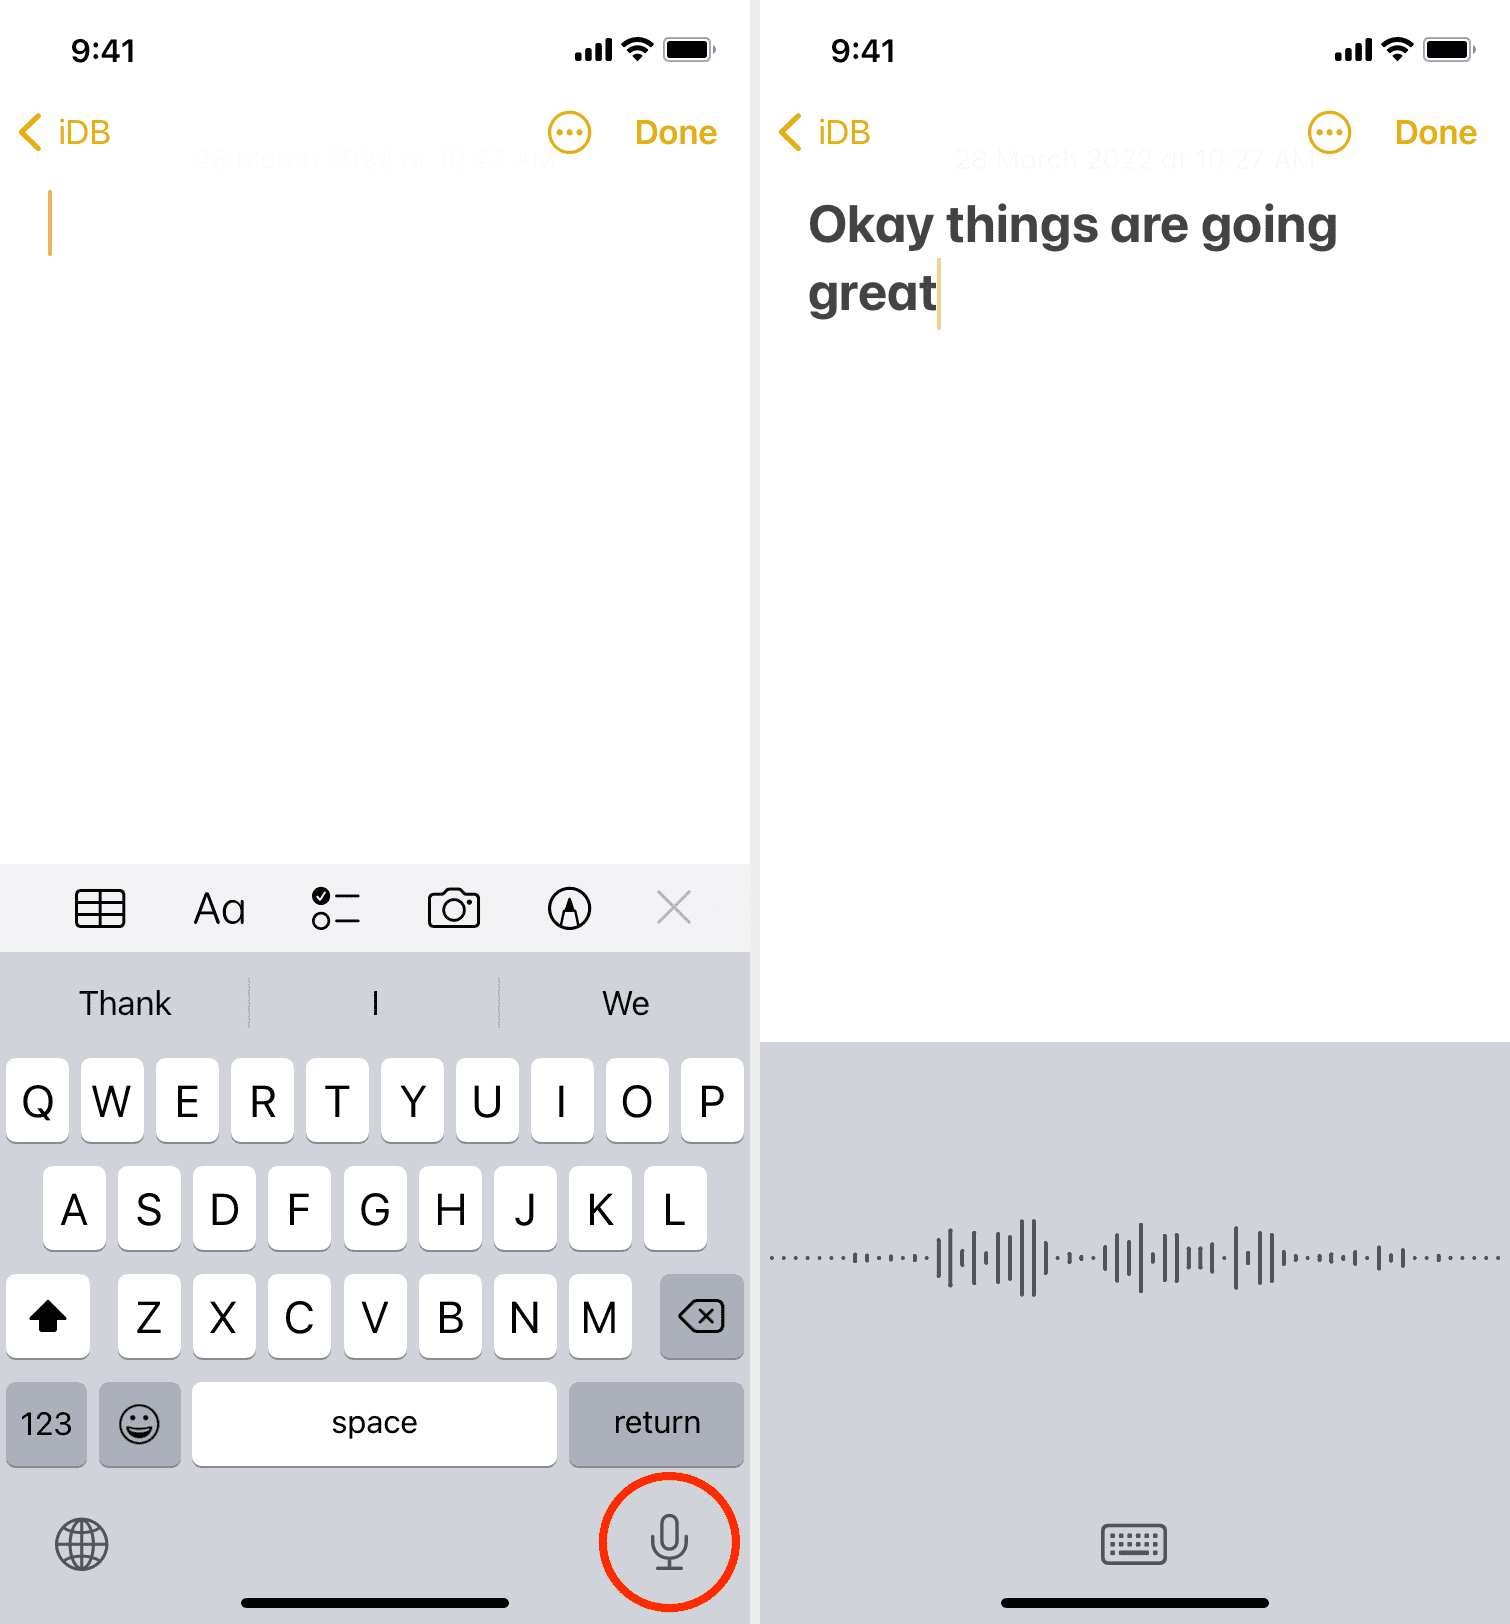
Now, open the Apple Notes app, tap the microphone icon on your keyboard, and dictation should work like a charm.
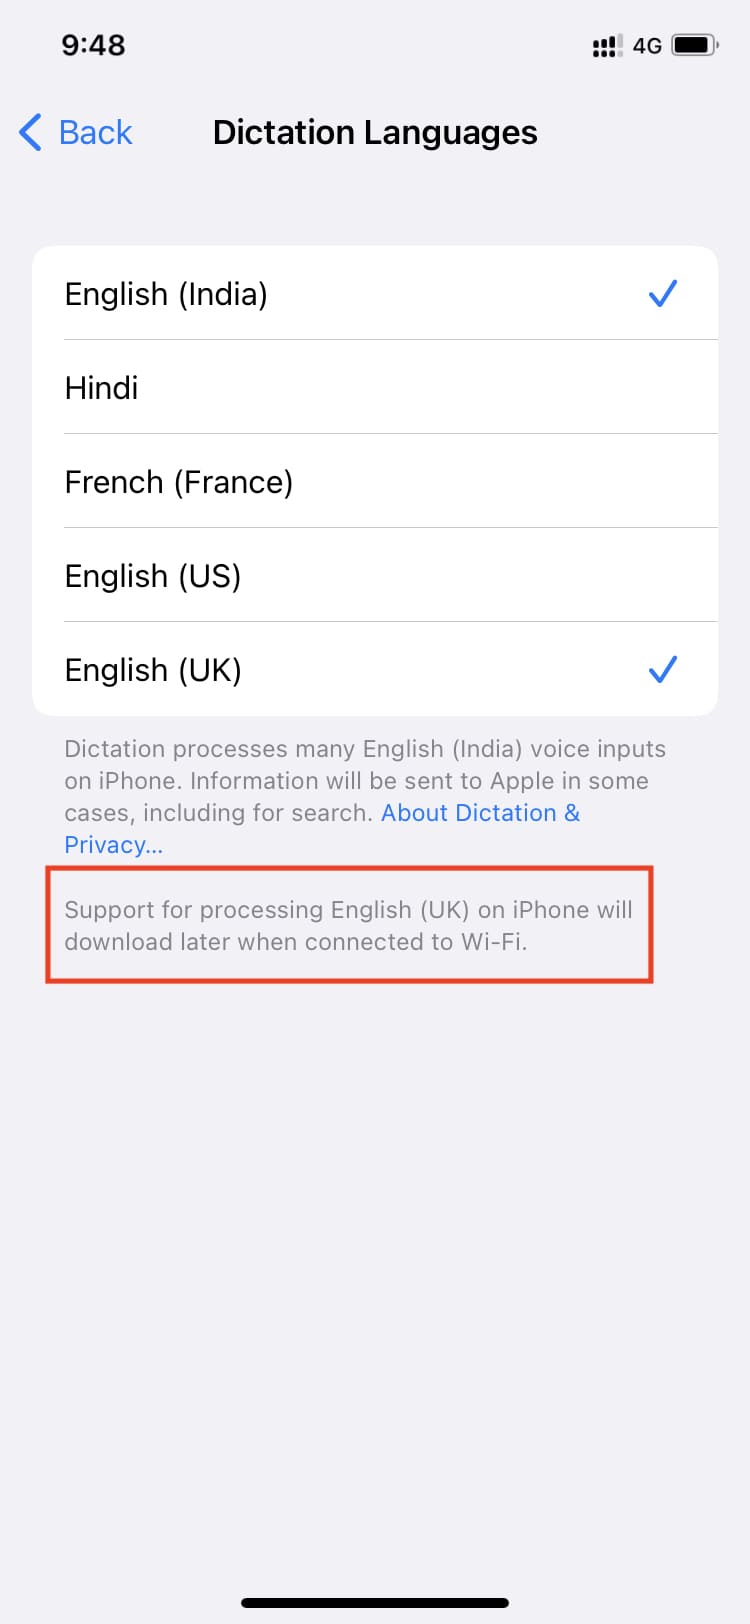
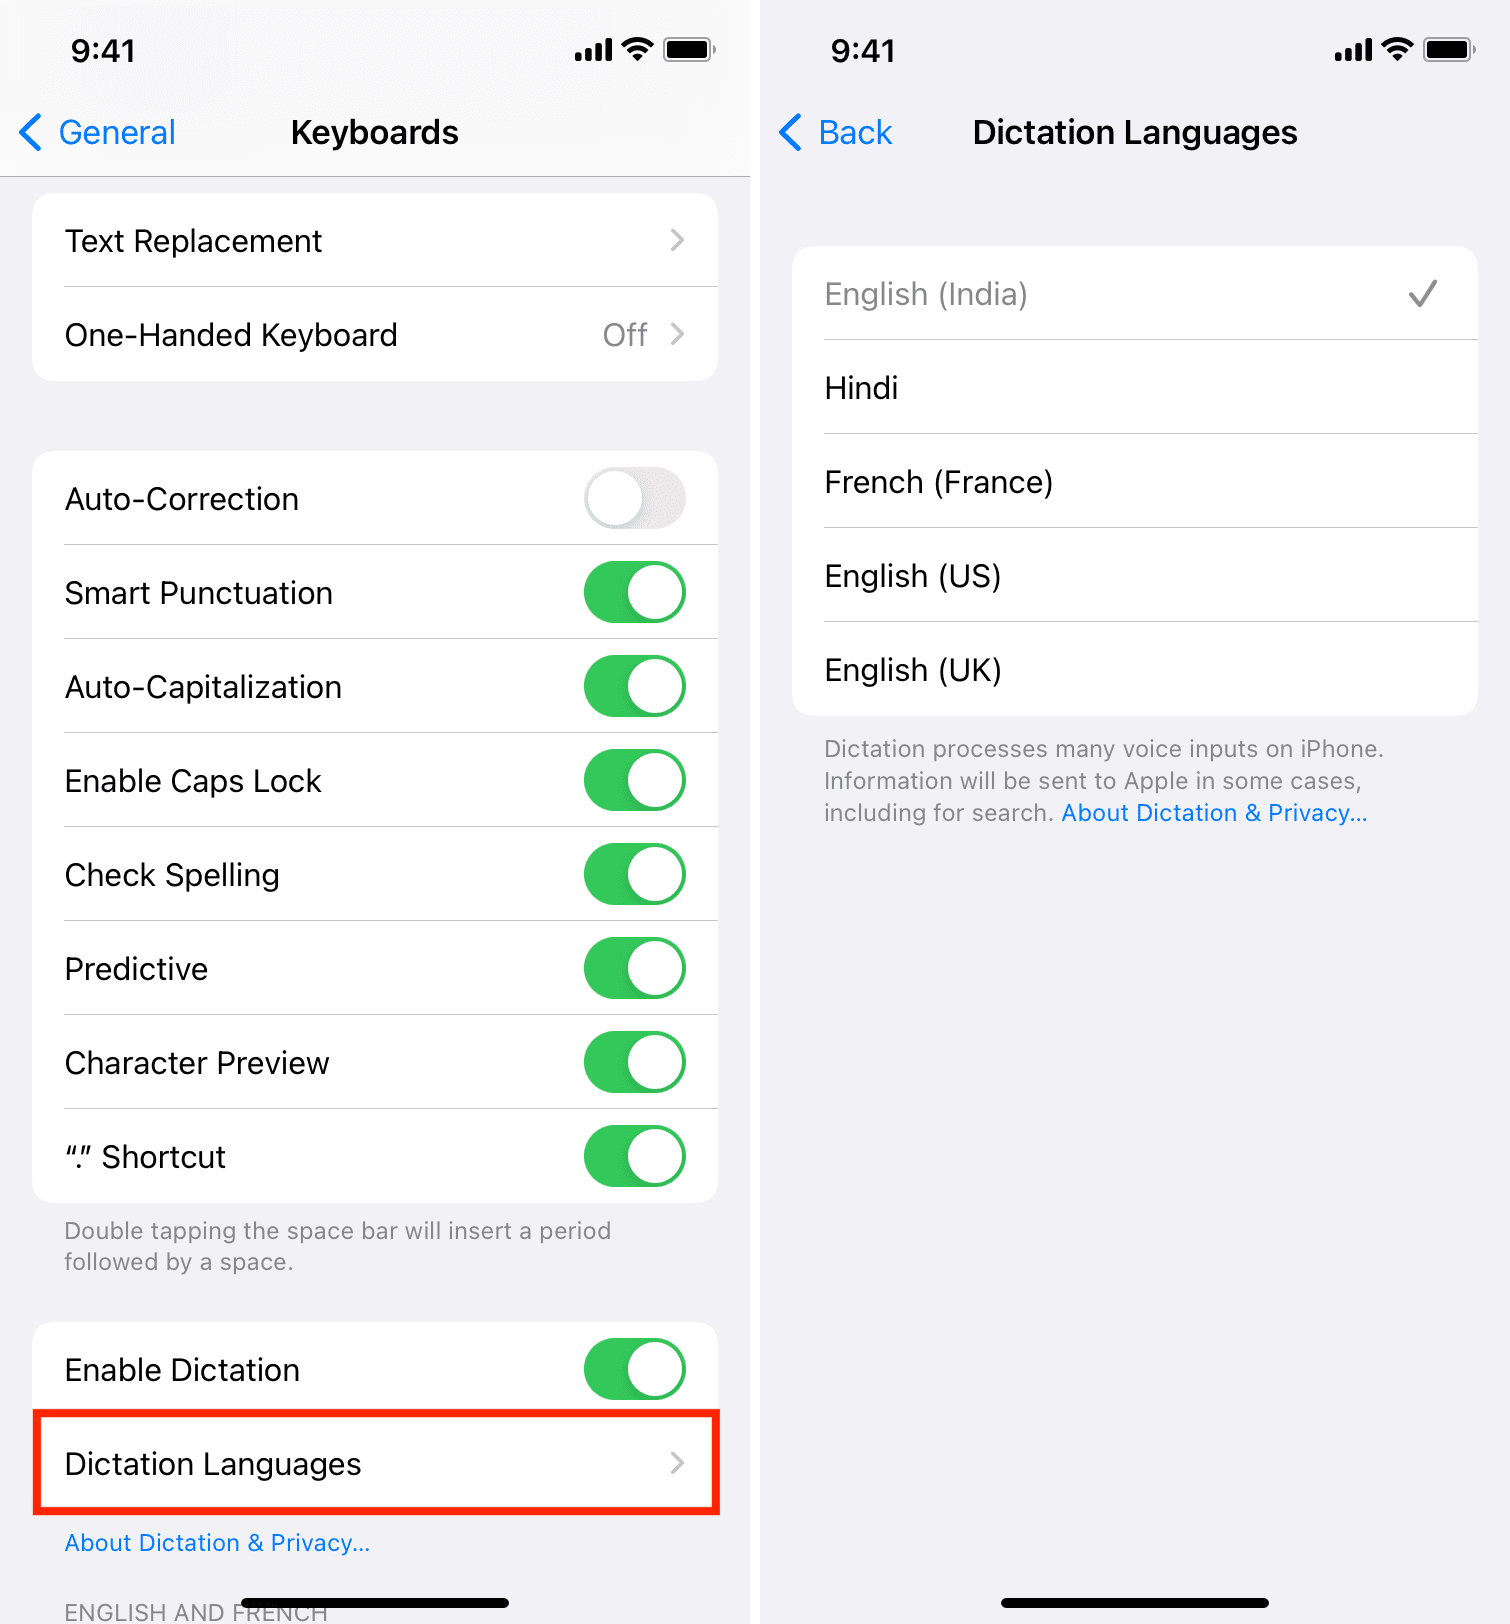
Turn off extra dictation languages
If you’re bilingual or multilingual, you might have added more than one keyboard to your iPhone. After that, you’ll see a Dictation Languages option appear below the Enable Dictation toggle. Tap it and uncheck all the languages except one. Now, restart your iPhone and try using dictation. It should work as expected.
Once that’s done, you can check more dictation languages if you want to use them. In case doing so starts causing dictation problems again, update your iPhone.
Important: Make sure you select the right accent/country for the same language.
Dictation option missing in iPhone Settings?
If you don’t see the Enable Dictation option in the steps above, follow these two fixes.
Add the iOS keyboard
You’ll lose Apple’s dictation feature if you add just a third-party keyboard (like SwiftKey) and remove the built-in Apple keyboard. Do the following to see the Enable Dictation option in iPhone keyboard settings.
- Go to Settings > General > Keyboard > Keyboards > Add New Keyboard.
- Choose a keyboard under Suggested Keyboards or Other iPhone Keyboards.
- Now go back, and you should see the Enable Dictation option. If not, restart your iPhone.
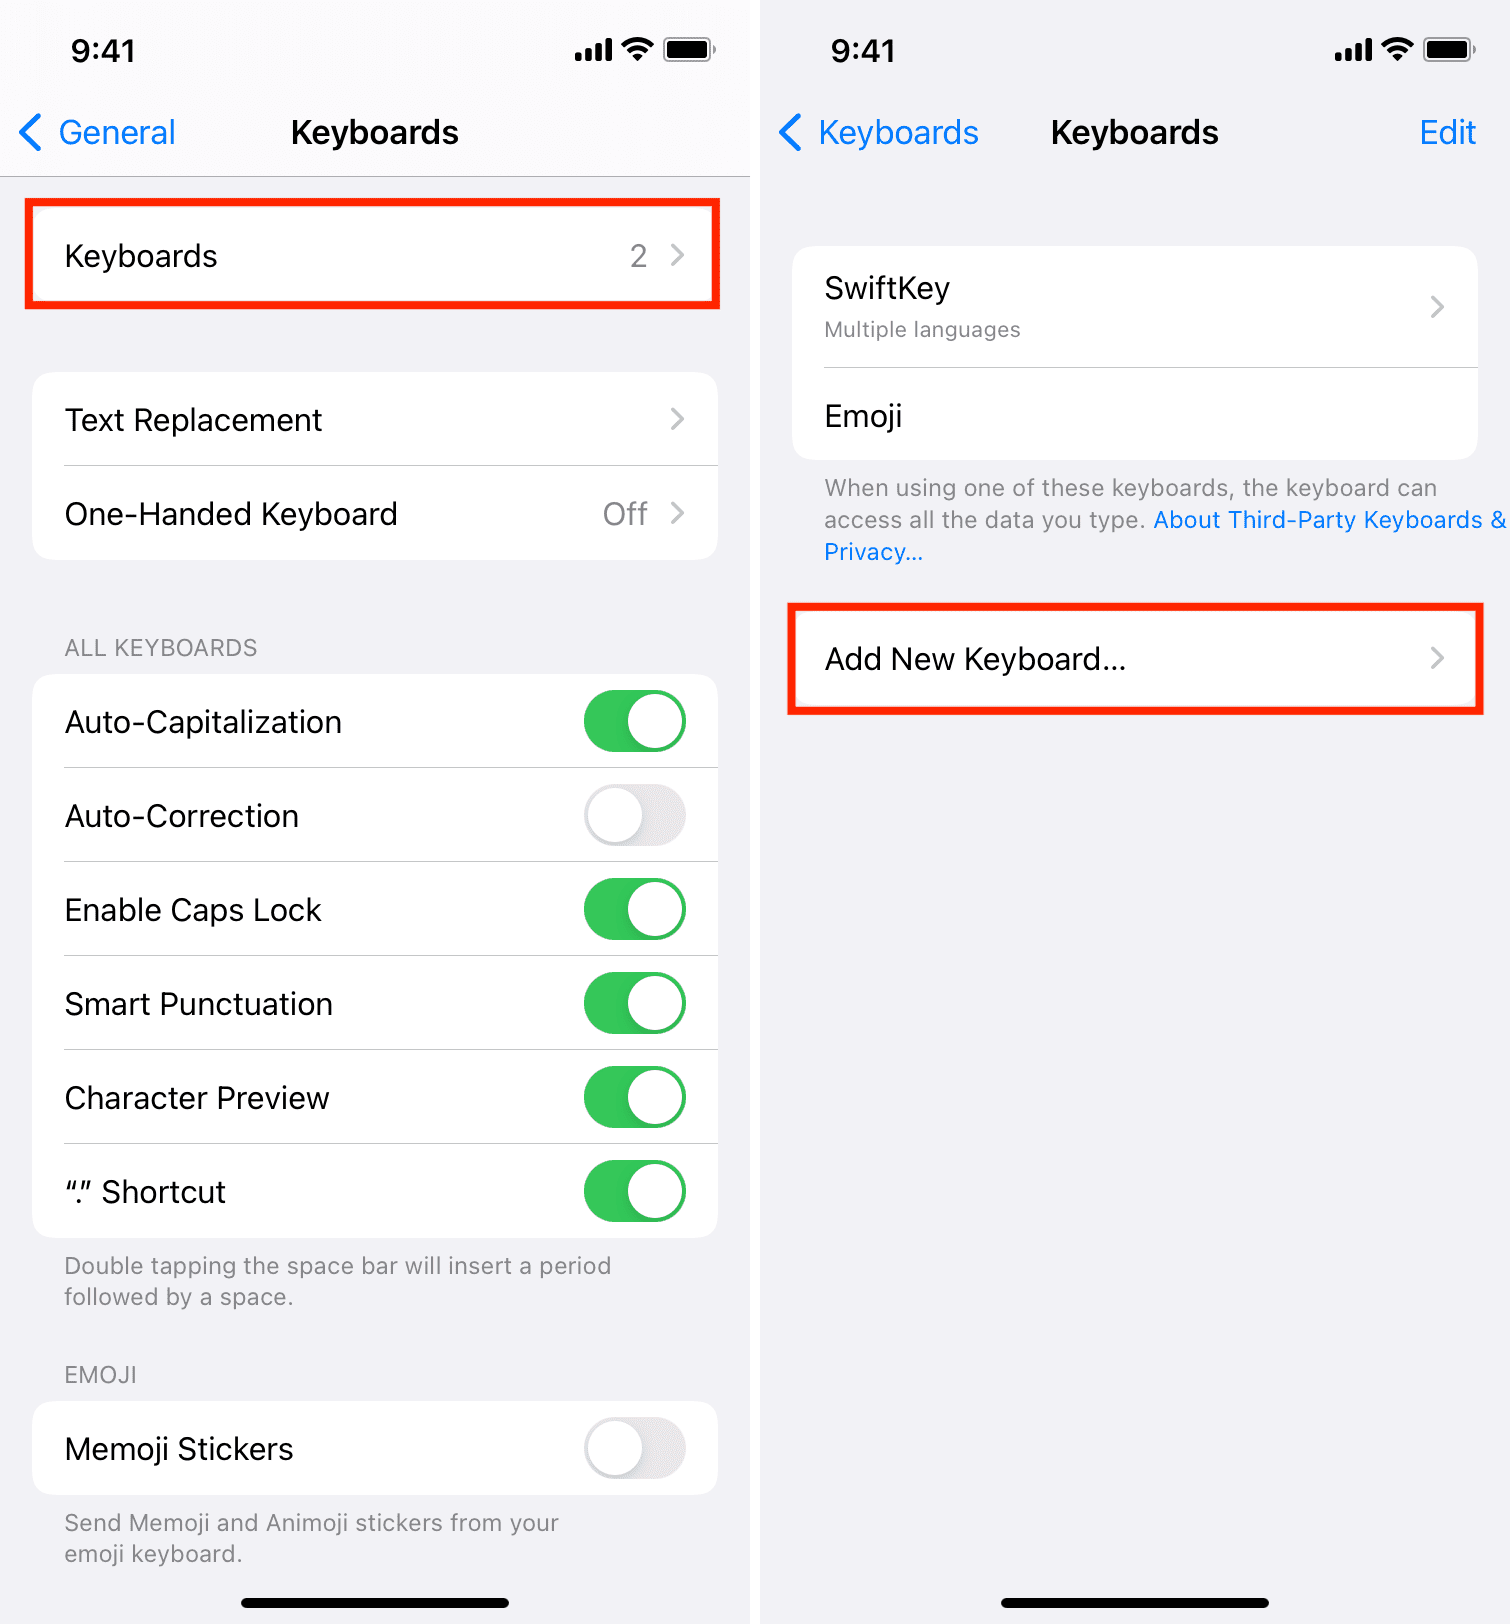
Note: Some third-party keyboard (like SwiftKey) may also offer their own dictation feature. You can use that while using the third-party keyboard.
Unrestrict Siri & Dictation
Go through these steps to ensure dictation is not restricted on your device.
- Open iPhone or iPad Settings and tap Screen Time.
- If it says, Turn On Screen Time, you can skip all the steps below. Else, tap Content & Privacy Restrictions.
- If Content & Privacy Restrictions is disabled, you can skip the steps below. If it’s enabled, tap Intelligence & Siri. On older iPhones, tap Allowed Apps.
- Make sure Siri & Dictation switch is enabled.
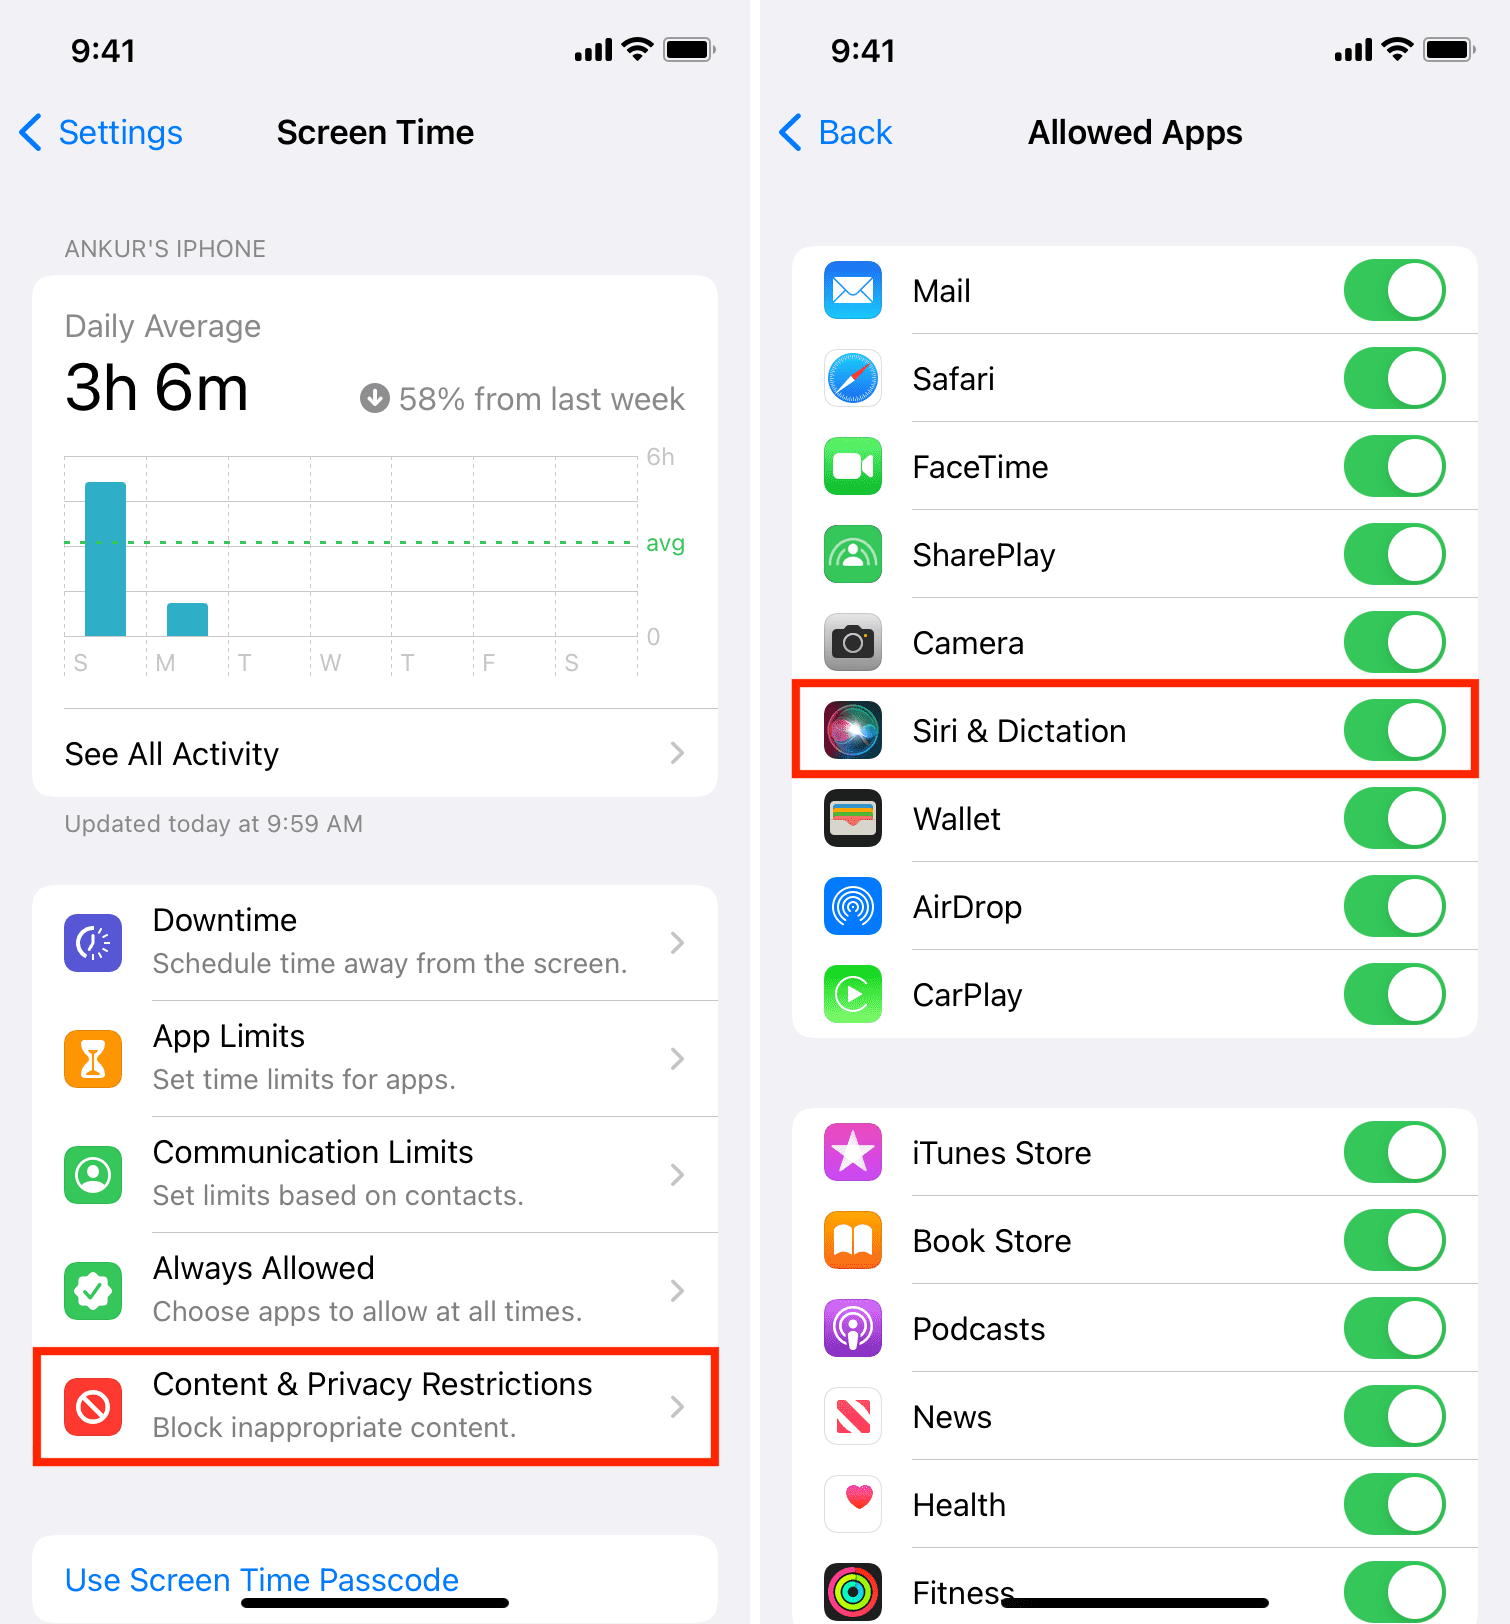
You should see the Enable Dictation option after adding the iOS keyboard and ensuring dictation isn’t restricted.
Try using dictation without AirPods or earphones
On some occasions, you may not be able to use dictation at all, or it may function poorly with wired or wireless earphones. So, disconnect them.
If dictation isn’t working at all and you use wired earphones, make sure your iPhone isn’t stuck in headphone mode.
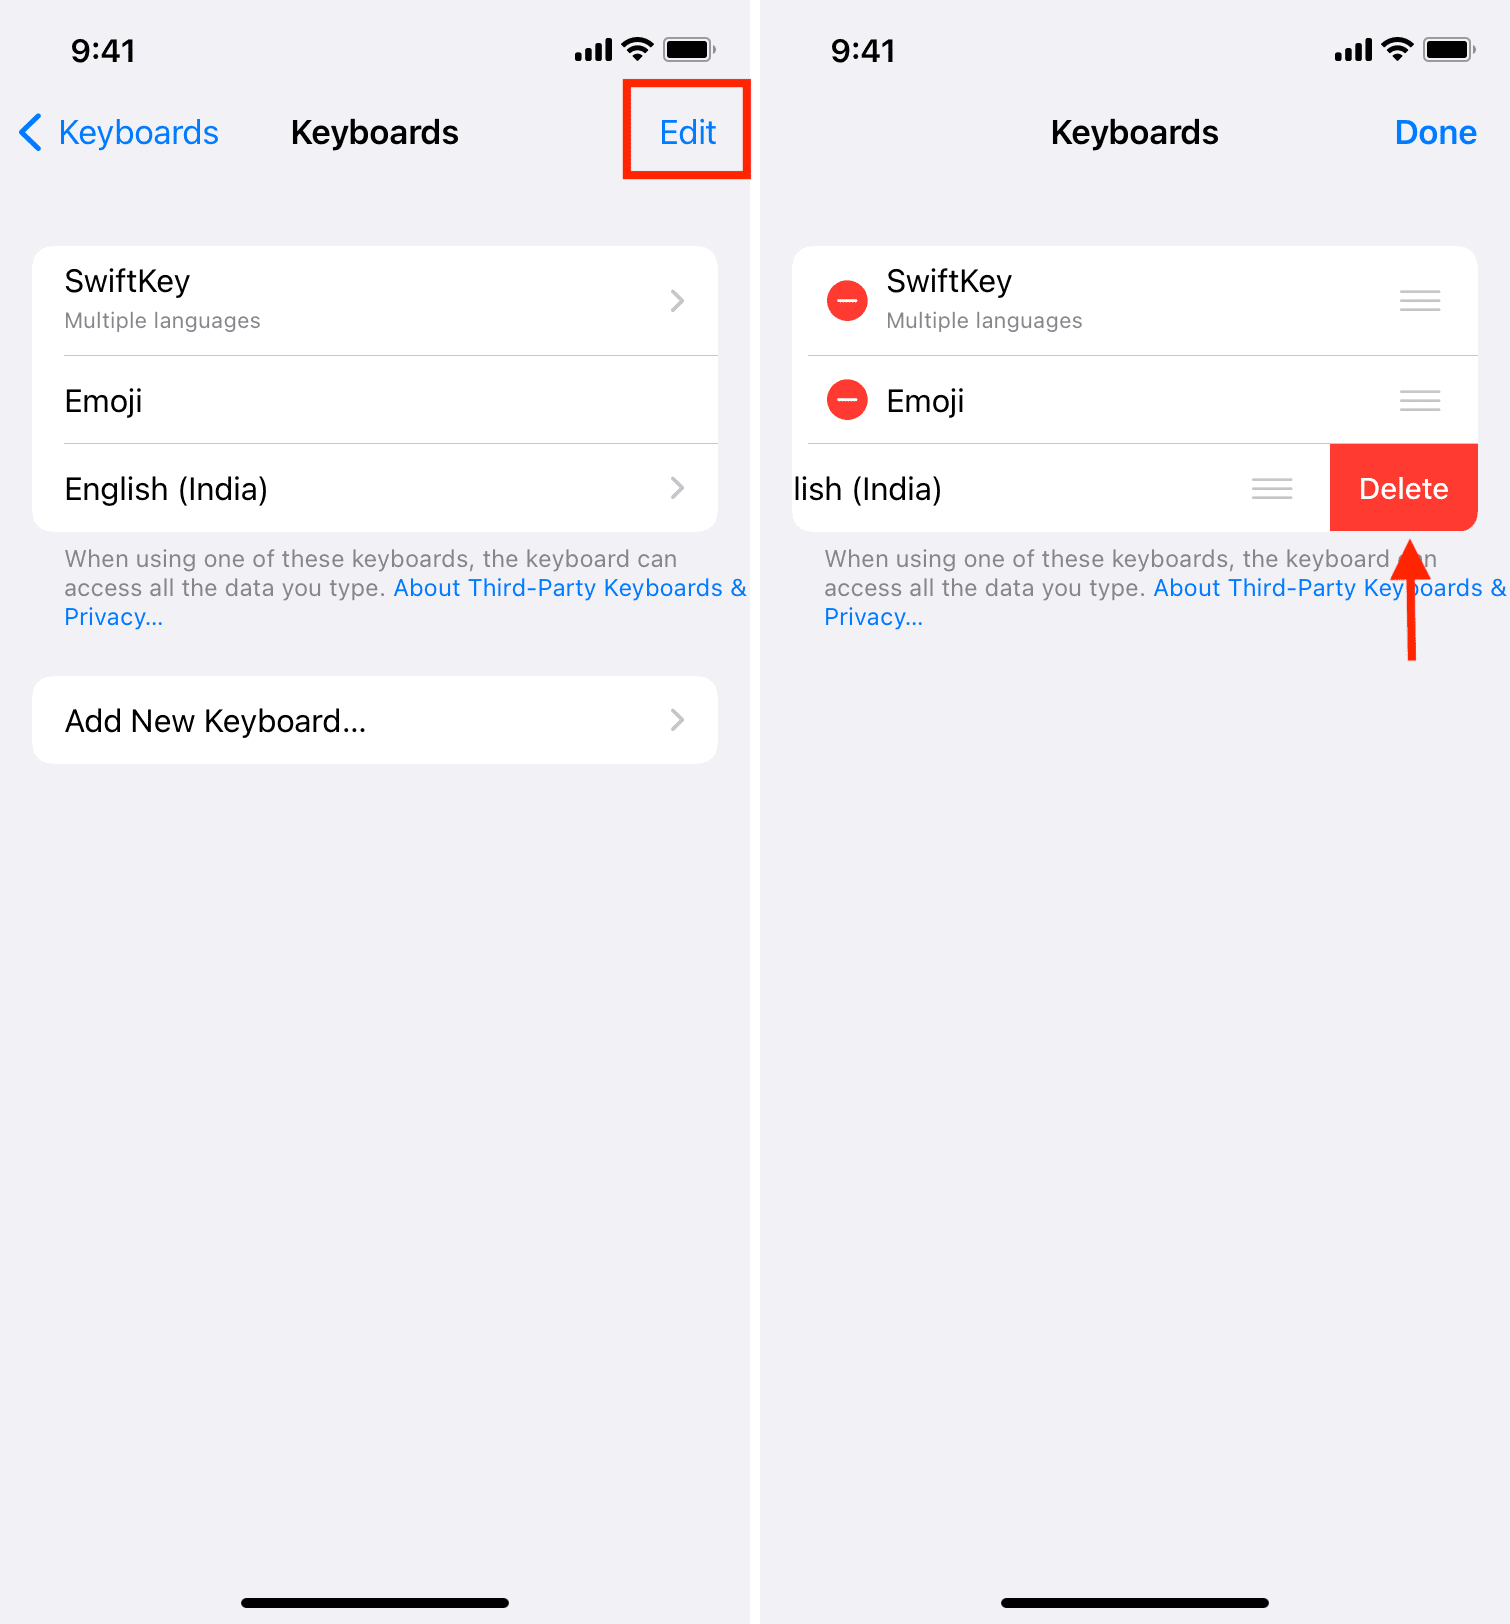
Remove the iOS keyboard and add it again
- Go to Settings > General > Keyboard > Keyboards.
- Tap Edit > red minus icon > Delete to remove the keyboards. You can leave the Emoji keyboard.
- Tap Add New Keyboard and select your desired iPhone keyboard. Now, open Notes or a similar app and use dictation. It should work well.
Turn off Siri and turn it back on
Siri and dictation are related. So, if dictation isn’t working after following the above solutions, turn Siri off and on. If that doesn’t help, reset Siri on your iPhone or iPad.
Clean iPhone’s microphone
If your iPhone’s microphone grills are dirty, it can cause blockage, which causes a poor experience on calls, Siri, voice recordings, dictation, and other related things. To fix this, make sure you remove the iPhone case and use a cloth, dry brush, or toothpick to carefully clean the microphone holes.
Important: If an external device (like earphones) is attached to your iPhone, disconnect it to ensure the on-device mic is used.
Update your iPhone
We can’t rule out the possibility of dictation being flaky because of software bugs. To fix this, go to iPhone Settings > General > Software Update and get the latest version of iOS.
Reset network settings or all settings
In case the dictation problem continues, reset your iPhone’s network settings. This should help, and if it doesn’t, you can reset all settings. We have a tutorial that explains how to do both.
Contact Apple Support
Finally, if nothing helps, contact Apple Support or take your iPhone to an Apple Store and get it inspected. If there are issues with the iPhone hardware, they will take care of it.
Fix dictation not working on Apple Watch
When dictation isn’t working on your Apple Watch, follow these basic fixes first:
- Restart your Apple Watch
- Make sure your watch is running the latest version of watchOS
- Check for Siri and Dictation restrictions on iPhone (mentioned above)
- Clean the Apple Watch for a perfect microphone experience, and remove the full-body case or cover if you are using one
In addition to the above checks, follow these solutions to fix dictation not working on your Apple Watch.
Make sure Apple Watch is connected to Wi-Fi, Cellular, or the iPhone
Your Apple Watch can connect to the internet via Wi-Fi, Cellular (on cellular models), or use the iPhone’s internet. We have explained more in this interesting post titled how to know whether your Apple Watch is connected to the internet or not. Dictation should work flawlessly once the Apple Watch has internet connectivity.
Enable dictation on Apple Watch
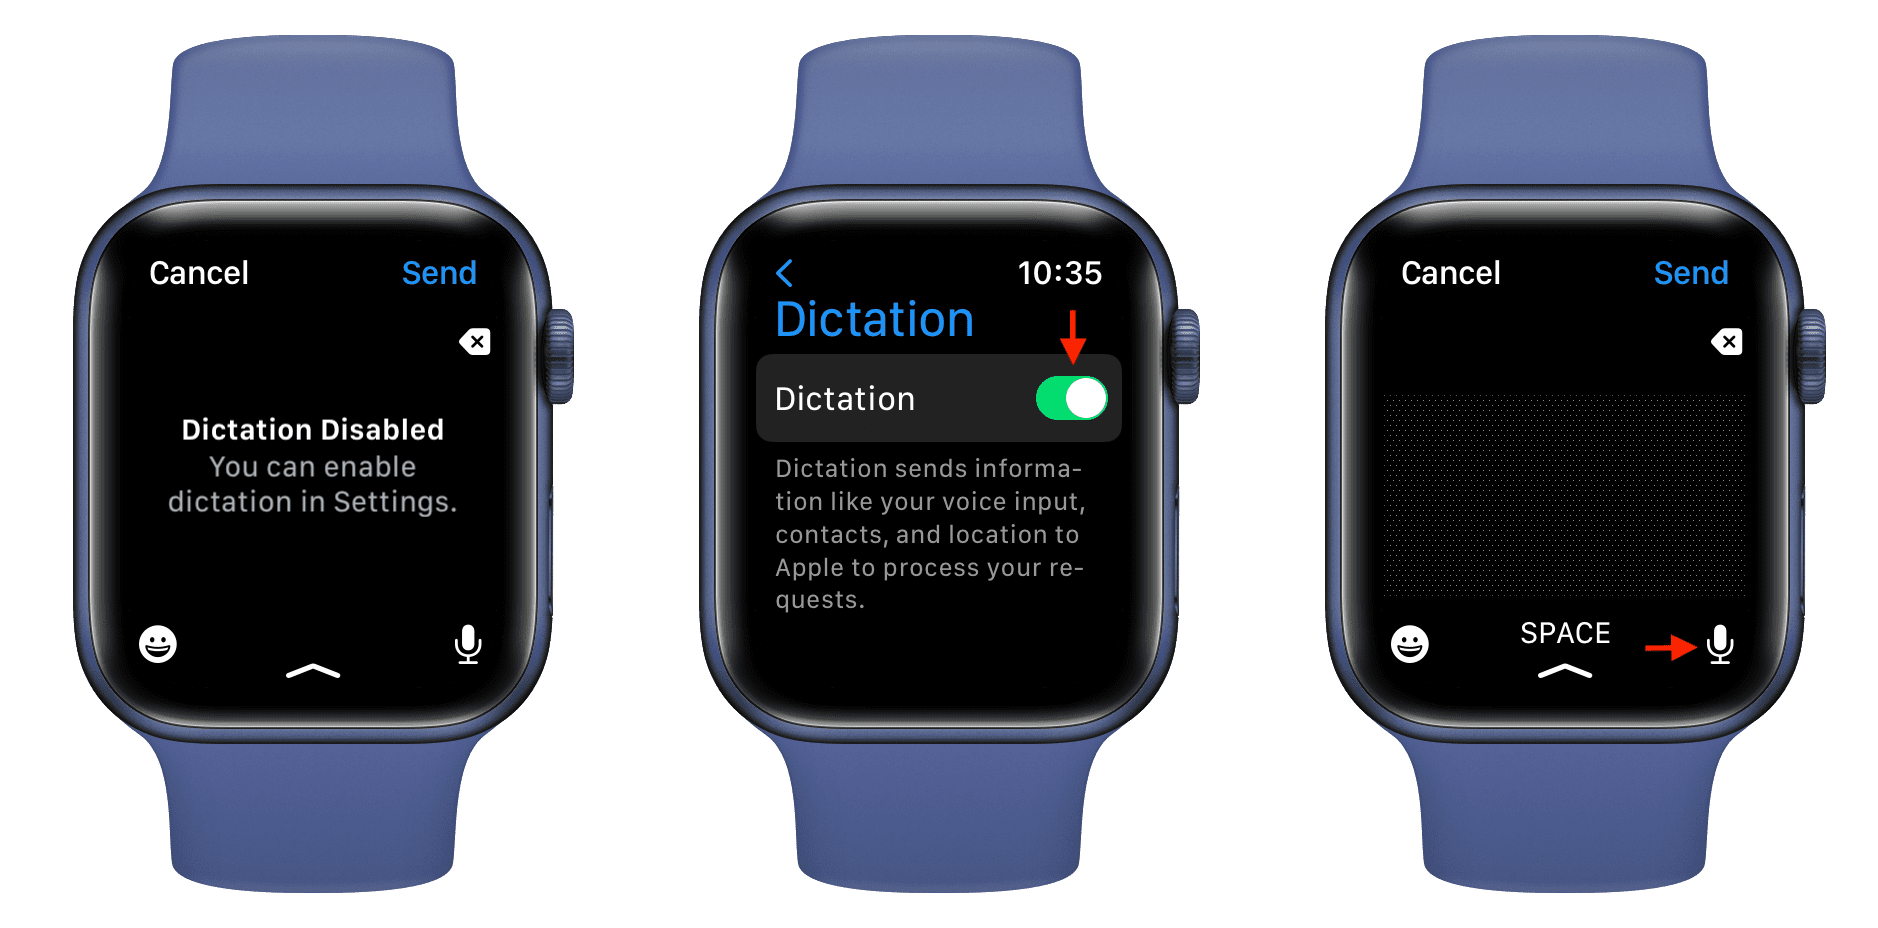
Do you see “Dictation Disabled. You can enable dictation in Settings” on your Apple Watch? Here’s how to enable (or check) dictation on Apple Watch:
- Open the Settings app on Apple Watch and tap General.
- Tap Dictation.
- Toggle on Dictation and tap Enable Dictation to confirm. Now, go back to the typing screen and tap the microphone icon to use dictation on your Apple Watch.
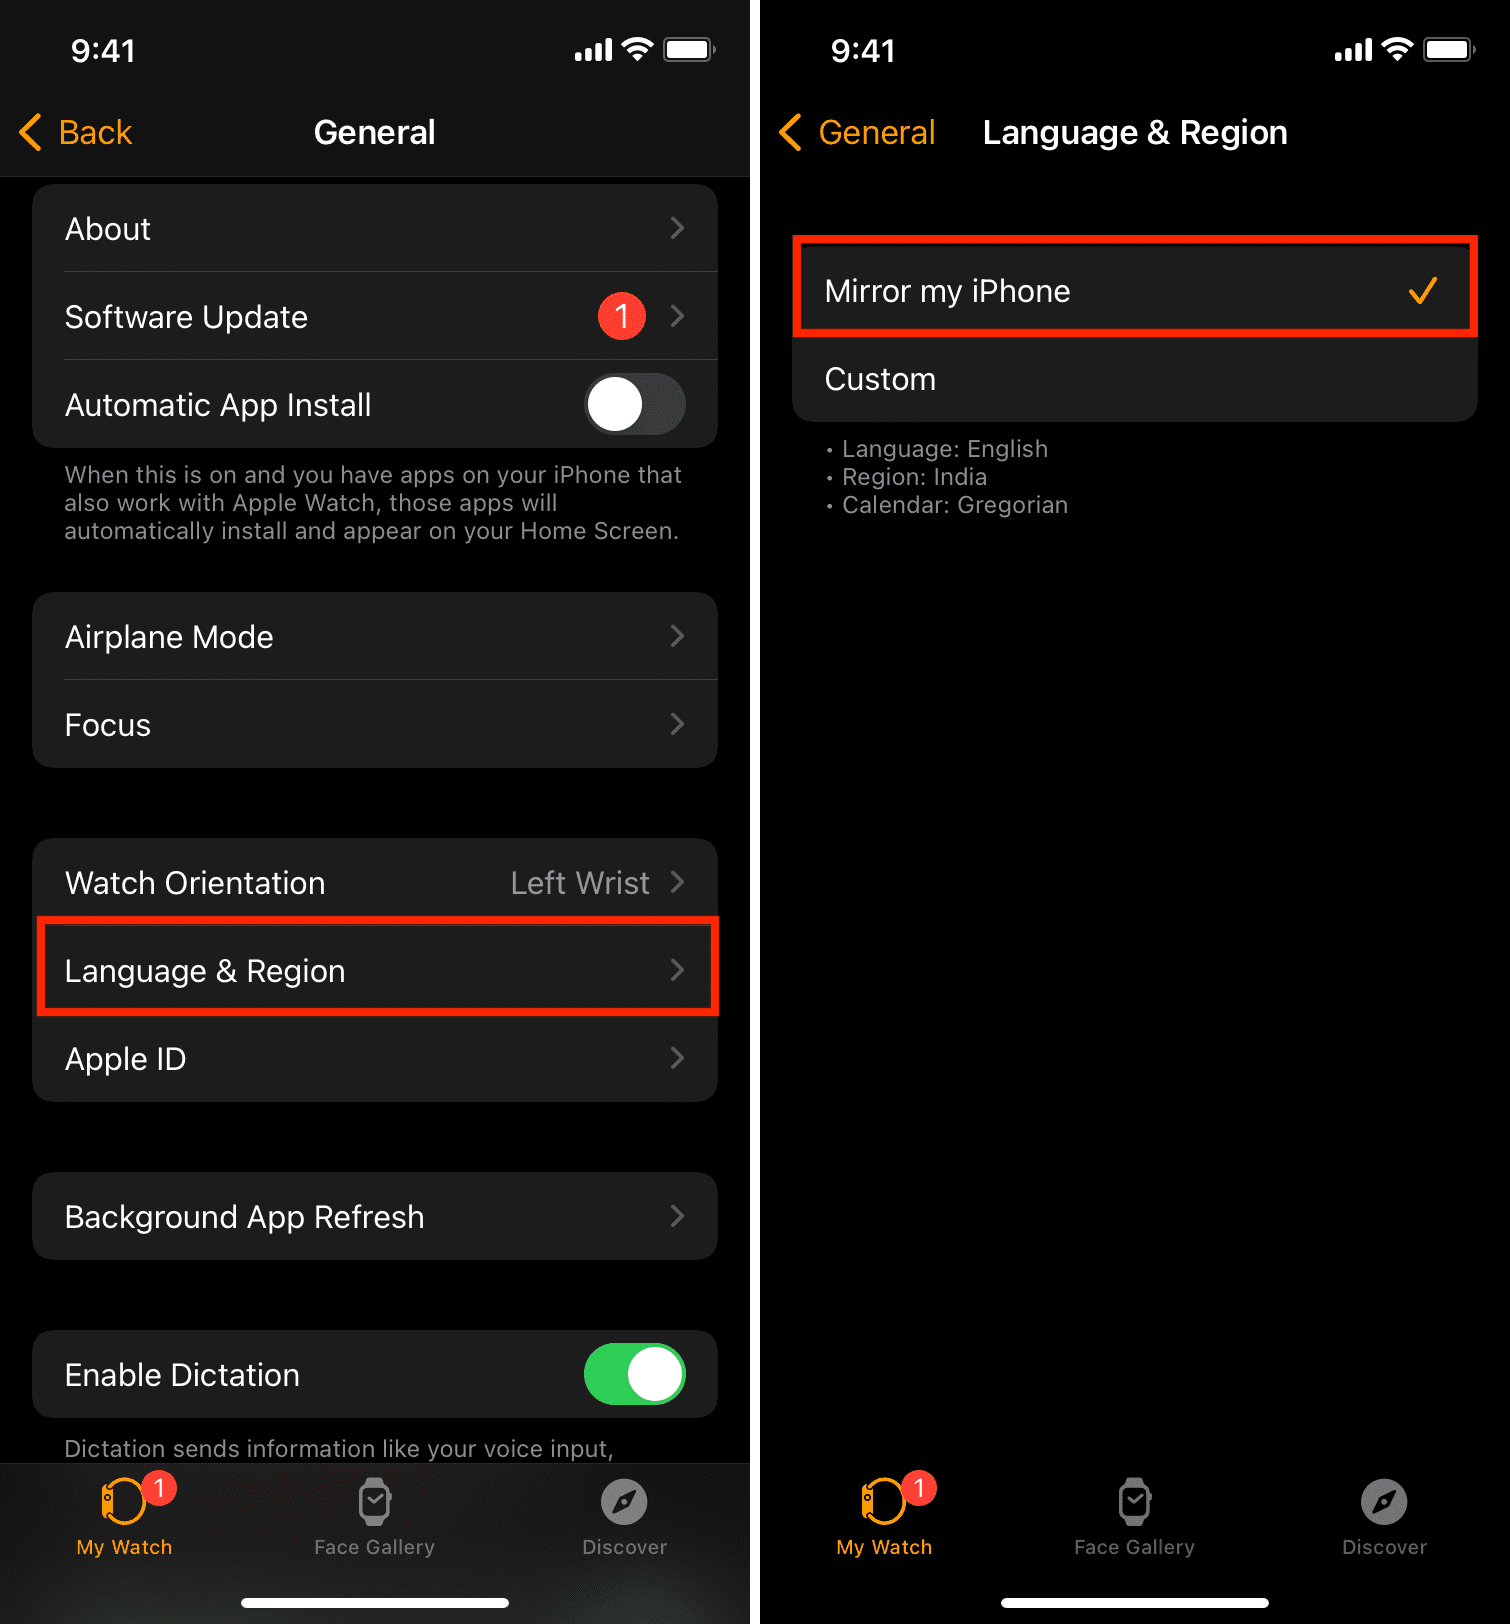
Make sure Apple Watch and iPhone language are the same
You can simply mirror your iPhone language to your Apple Watch or use different settings for your wrist. But choosing the latter may cause dictation problems on the Apple Watch.
- Open the Watch app on your paired iPhone and tap General.
- Tap Language & Region.
- Tap Mirror my iPhone.
- After a minute, restart your iPhone and Apple Watch. Now, dictation should work flawlessly on your Apple Watch and let you type with your voice.
Unpair and repair your Apple Watch
Finally, if you’re still unable to use dictation on your Apple Watch, unpair it from your iPhone and pair it again.
Fix dictation not working on Mac
Go through these tips to ensure dictation starts working on your Mac and lets you type without the physical keyboard.
Turn off Voice Control
Do you see “Keyboard Dictation is disabled when Voice Control is on” in the dictation preferences screen on Mac?
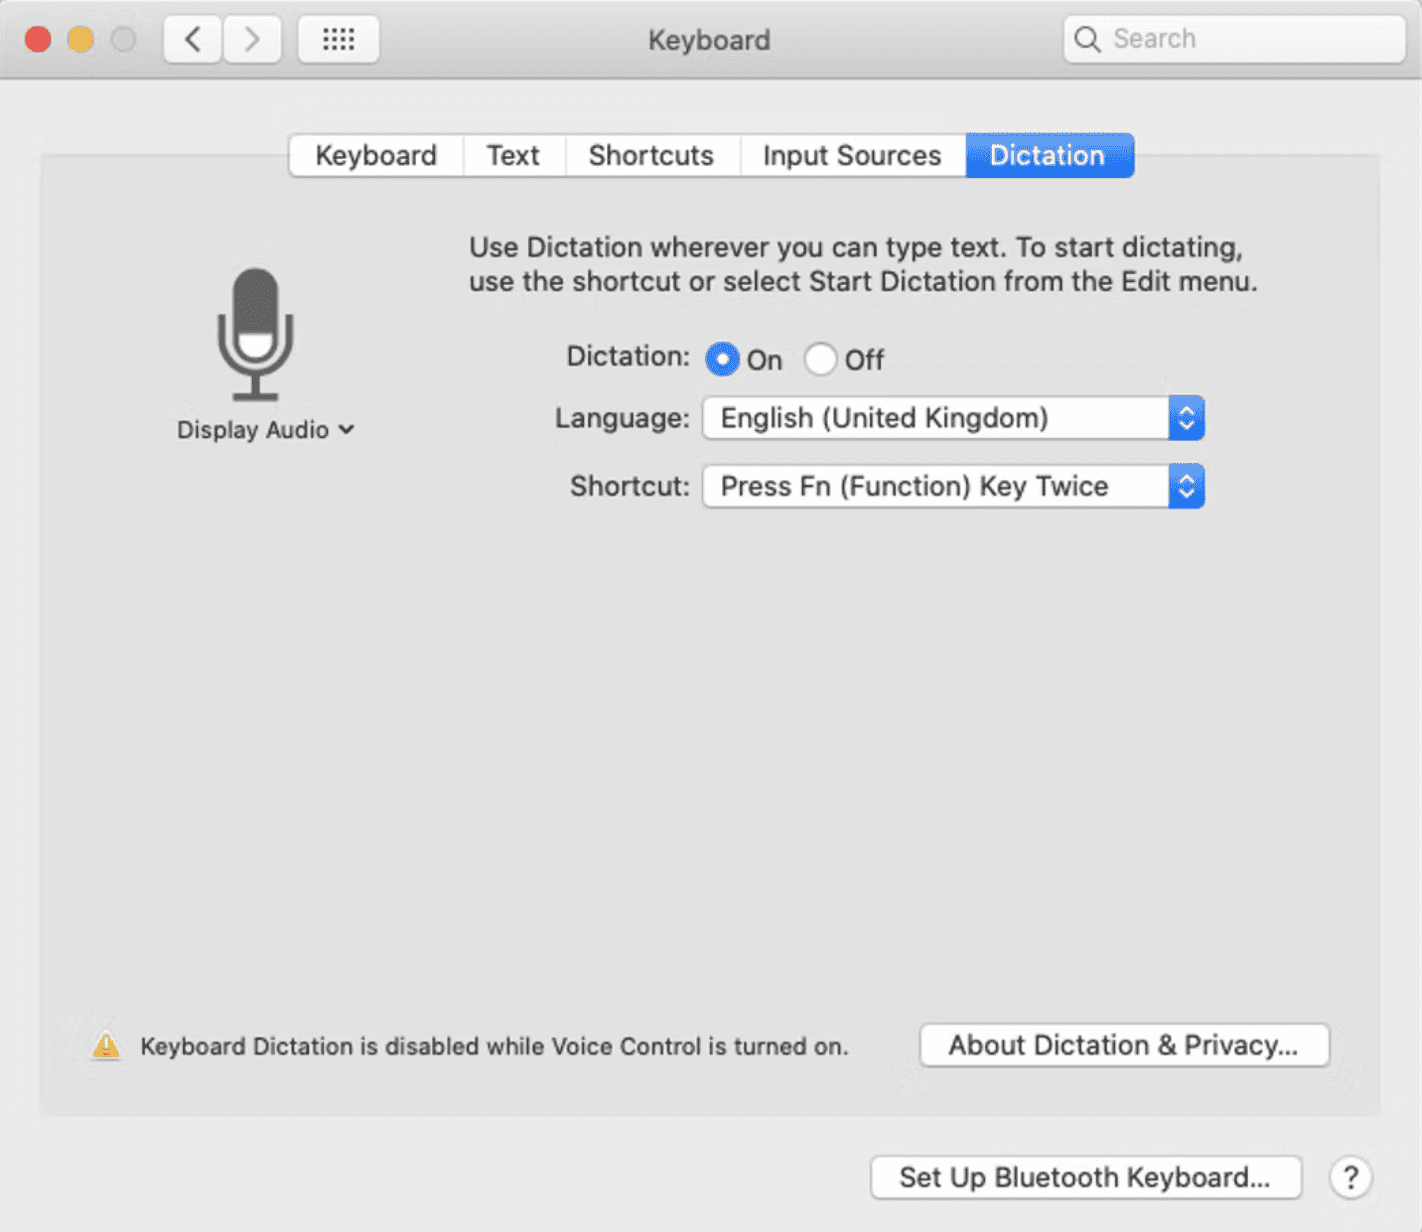
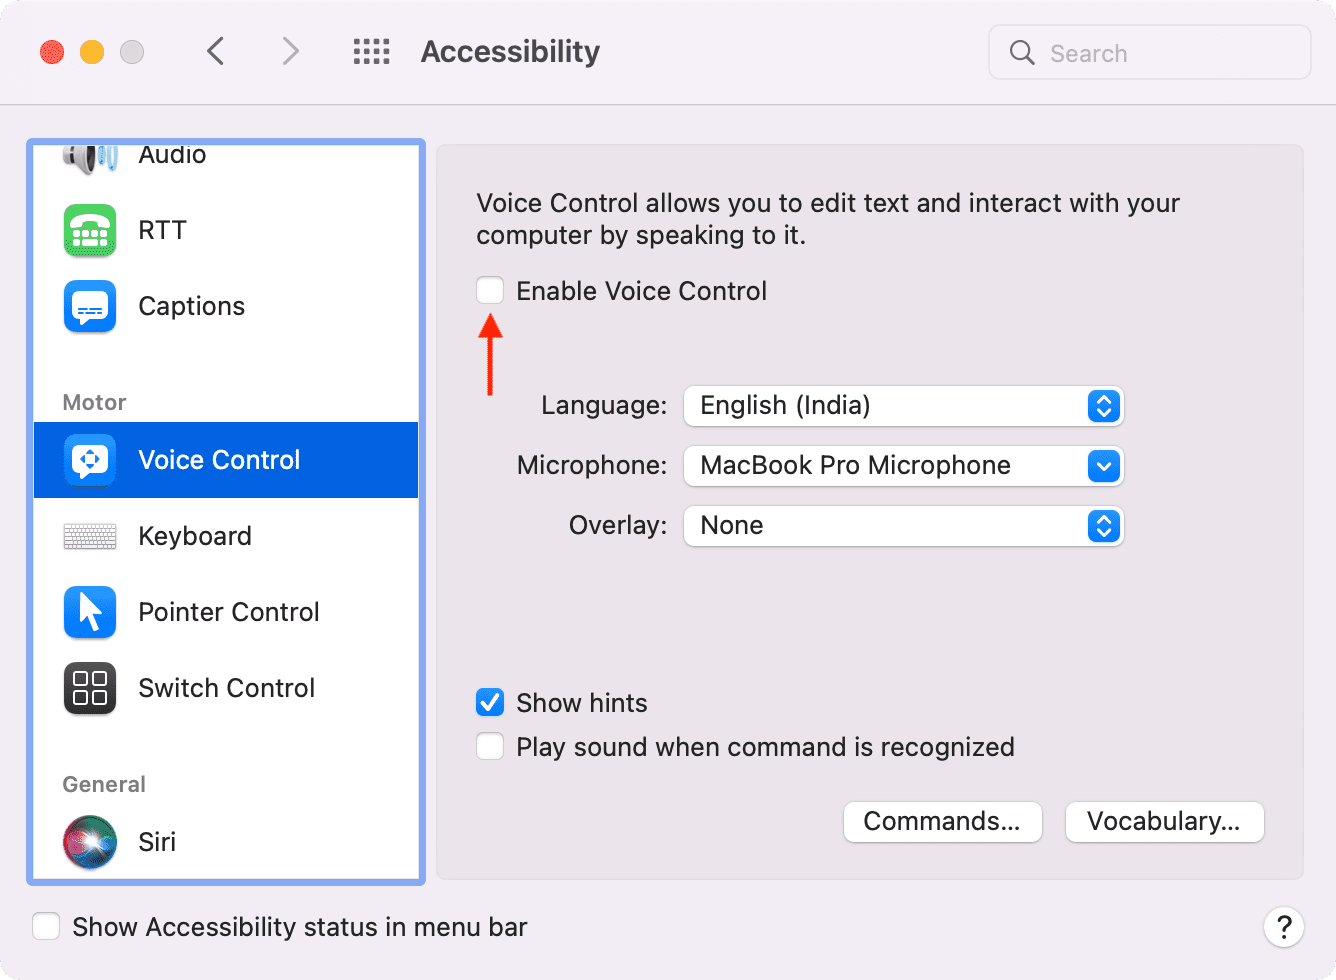
Turn off Voice Control from System Settings > Accessibility, and it should stop the conflicting issues with dictation.
If you’re on an older version of macOS, open System Preferences > Accessibility > Voice Control and uncheck Enable Voice Control.
Now, you should not see error messages in dication settings on Mac.
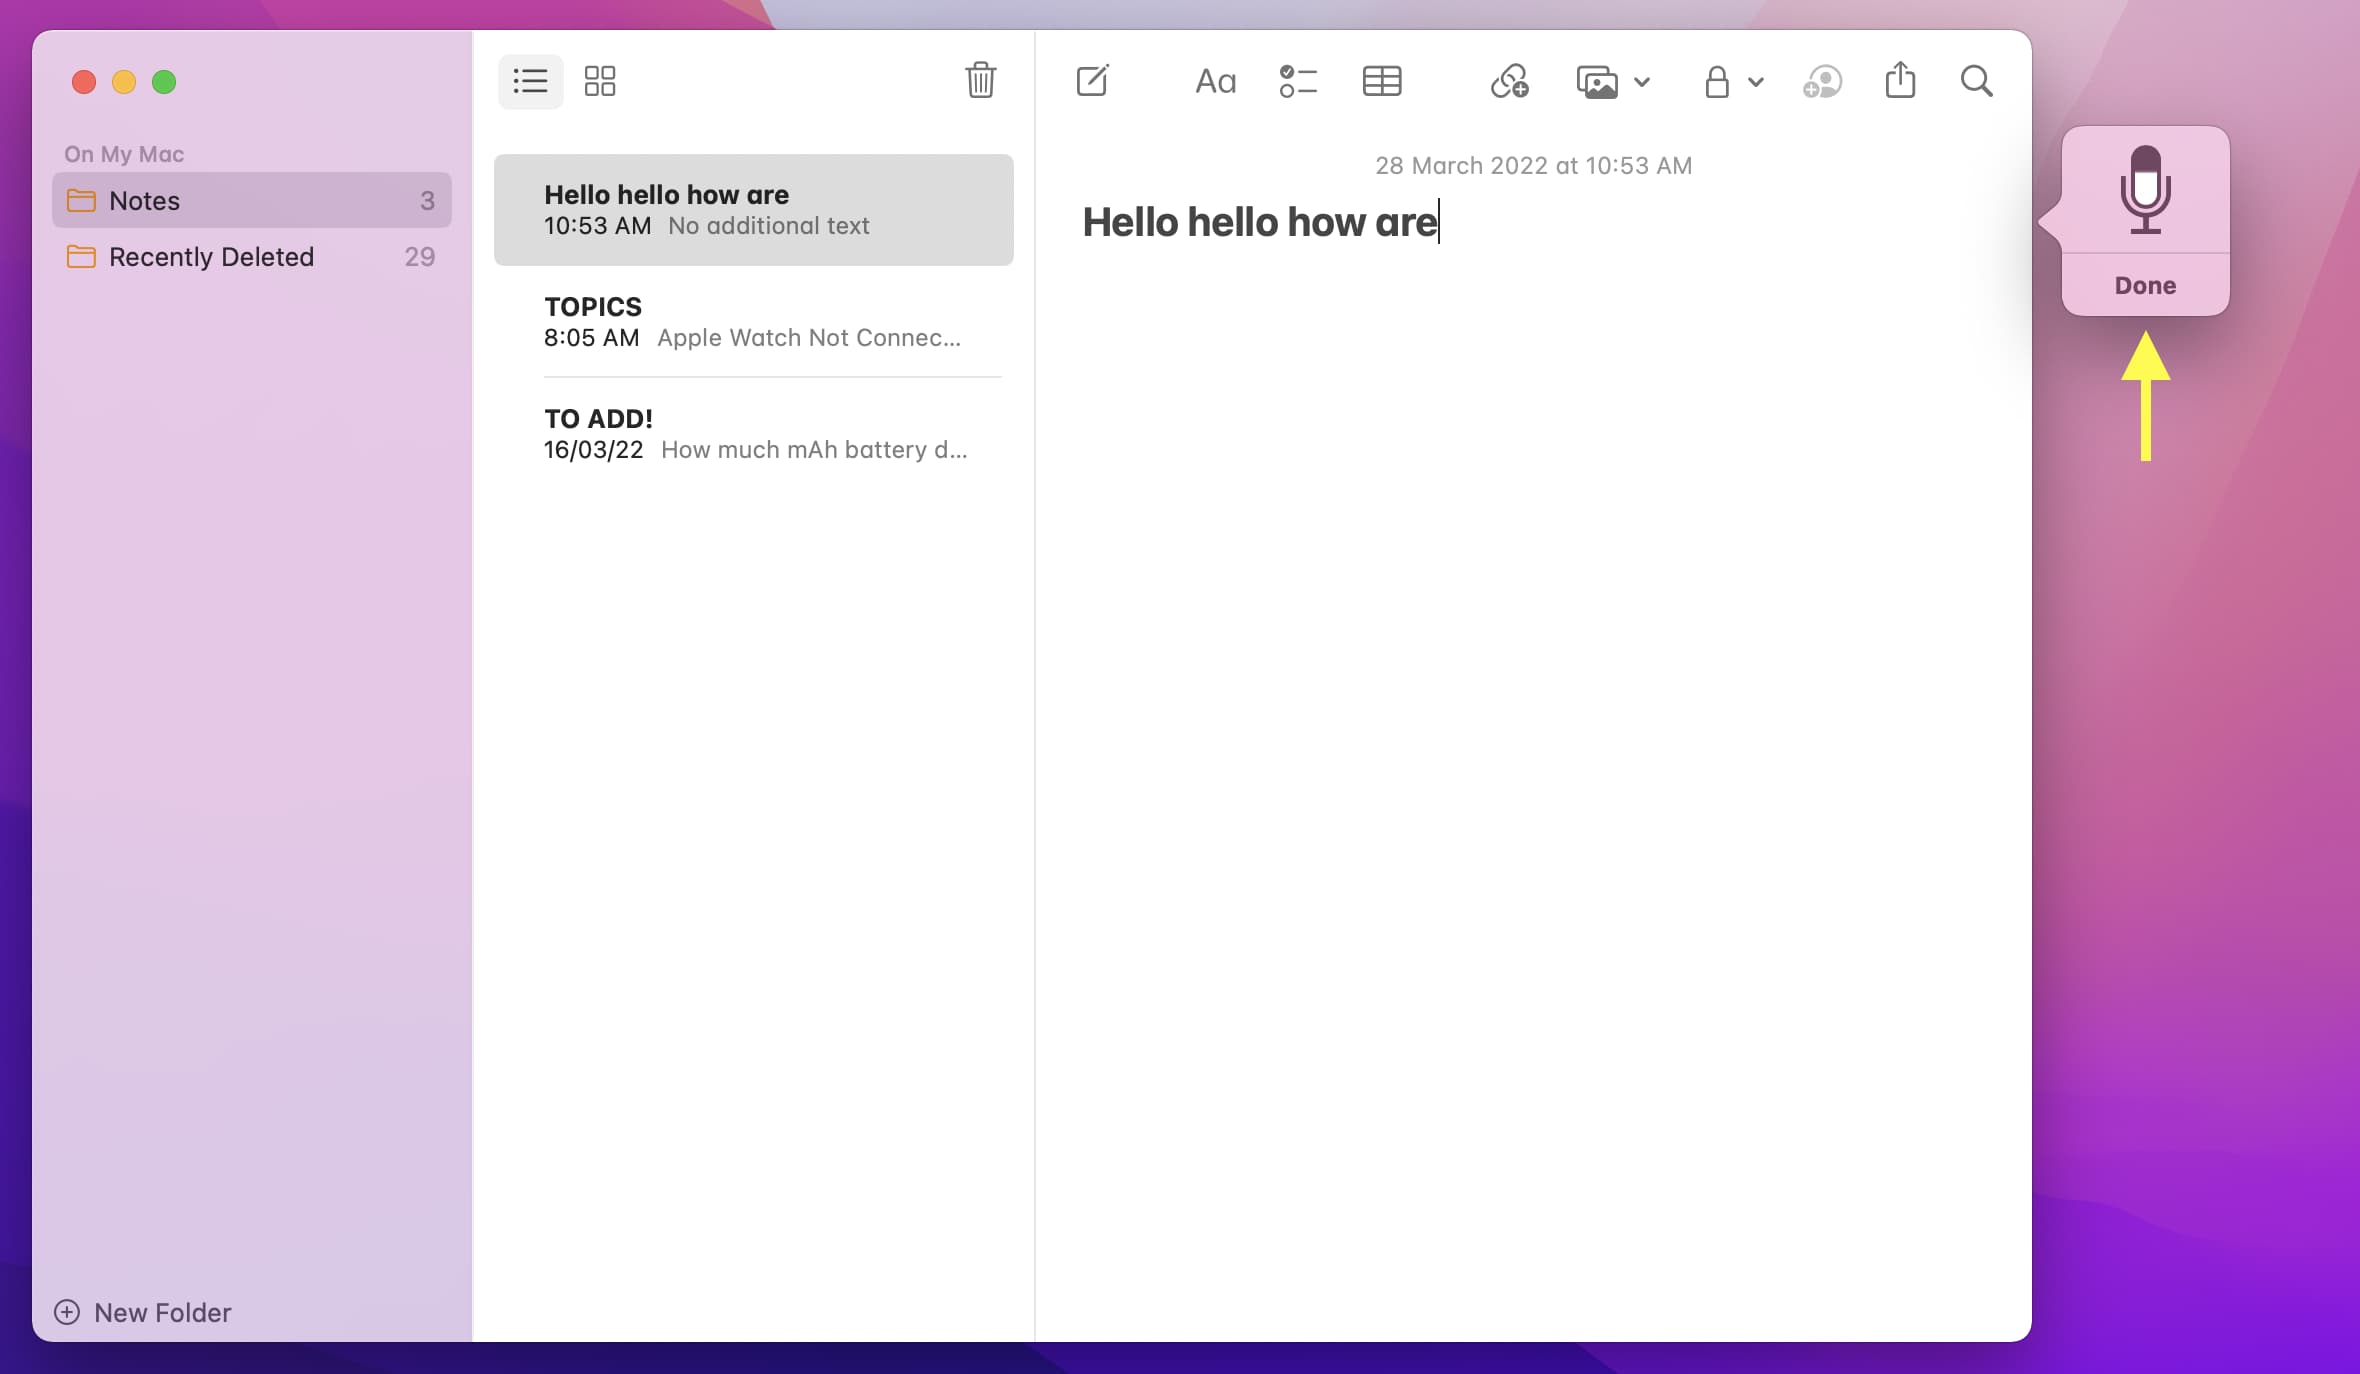
Enable dictation on Mac
To enable dictation, do one of the following:
- Press fn + D on your Mac and click Ok > Enable Dictation.
- While in a Mac app, click Edit from the top menu bar and choose Start Dictation.
- Go to System Settings > Keyboard and turn on Dictation.

Once that’s done, press the microphone/F5 once or the Control key twice (or your usual dictation shortcut) to use dictation. You can see which keyboard shortcut is set to start dictation by going to System Settings > Keyboard > Dictation.
Restart your Mac
Once that’s done, try using dictation in Notes or some other app where you can type.
Connect your Mac to the internet
You can use Voice Control to dictate text on Mac if you’re offline, but for a consistent dictation experience, make sure your Mac is connected to the internet.
Additionally, the internet is needed to use dictation if:
- Offline dictation file isn’t downloaded
- The language you’re using dictation in isn’t supported for offline dictation.
To check or refresh the offline dictation file, click the Language dropdown menu, uncheck and re-check the desired language. While you do this, make sure your Mac is connected to the internet for the support file to download locally.
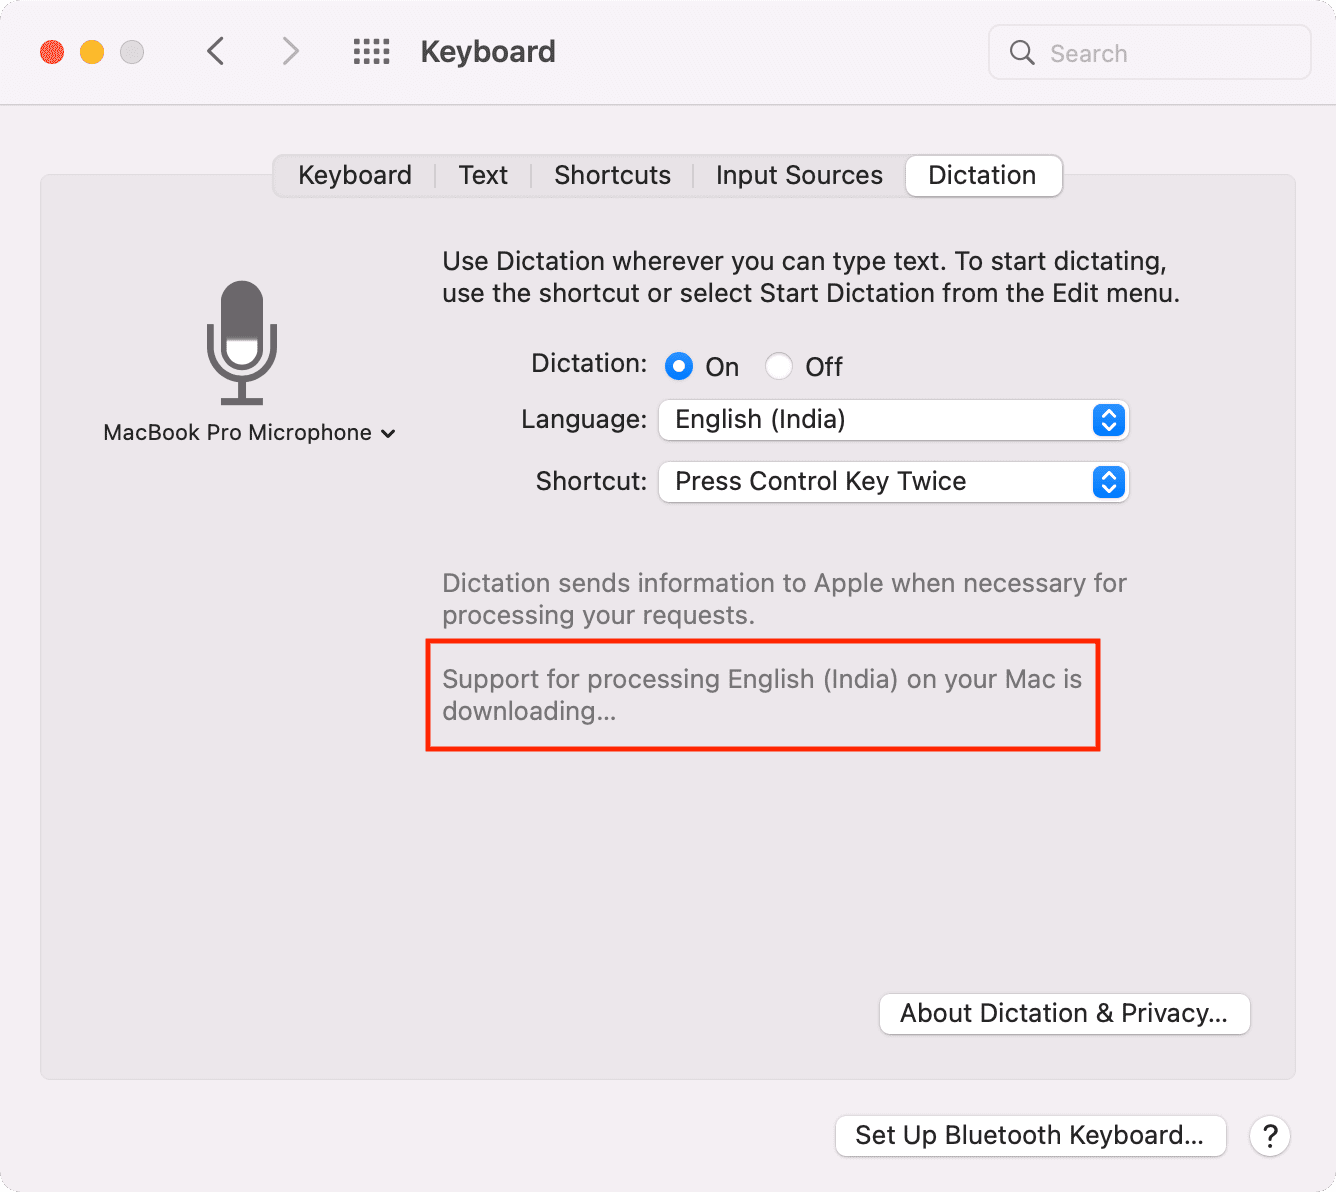
Note: On a Mac with Apple silicon (M1, M2, M3, M4, M5, and their successors), some basic dictation requests like composing messages or notes are processed on the device without needing the internet. Using dictation in the search box requires an active internet connection.
To use dictation offline on macOS Mojave or earlier, go to System Preferences > Dictation & Speech > Dictation and check the box for Enhanced Dictation.
Use dictation in a quieter room
If you’re having a patchy experience with dictation on Mac, try using it in a quieter room. This is especially helpful if you have an old Mac.
Tip: Dictation can listen to you continuously for about 30 to 40 seconds. After that, you must pause and let it process, and type what you said before speaking again.
Turn dictation off and back on
Go to System Settings> Keyboard > Dictation. From here, turn off dictation and wait for a few seconds. After that, activate it once again.
Select the right microphone for dictation
While you’re on the dictation settings screen, make sure the correct microphone is selected. Select Automatic if you often use AirPods or other audio devices with your Mac.
Quit the Mac app and retry using dictation
If dictation doesn’t work in a specific app, save your ongoing work and quit the app. You can do that by right-clicking on the open app in the Dock and choosing Quit.
If the app isn’t behaving correctly, press Command + Option + esc. From here, select the non-responding app and click Force Quit.
Disable and enable Siri on Mac
In case the problem continues, take a few seconds to turn off Siri and turn it back on. For this, go to System Settings > Apple Intelligence & Siri or Siri and toggle Siri off and back on.
Delete the Speech Recognition file
Finally, if nothing helps, follow these steps:
- From Finder, press Command + Shift + G.
- Copy this location path, paste it in the Go to Folder box, and press the return key.
~/Library/Preferences/com.apple.assistant.plist - Delete this file from here.
- Restart your Mac.
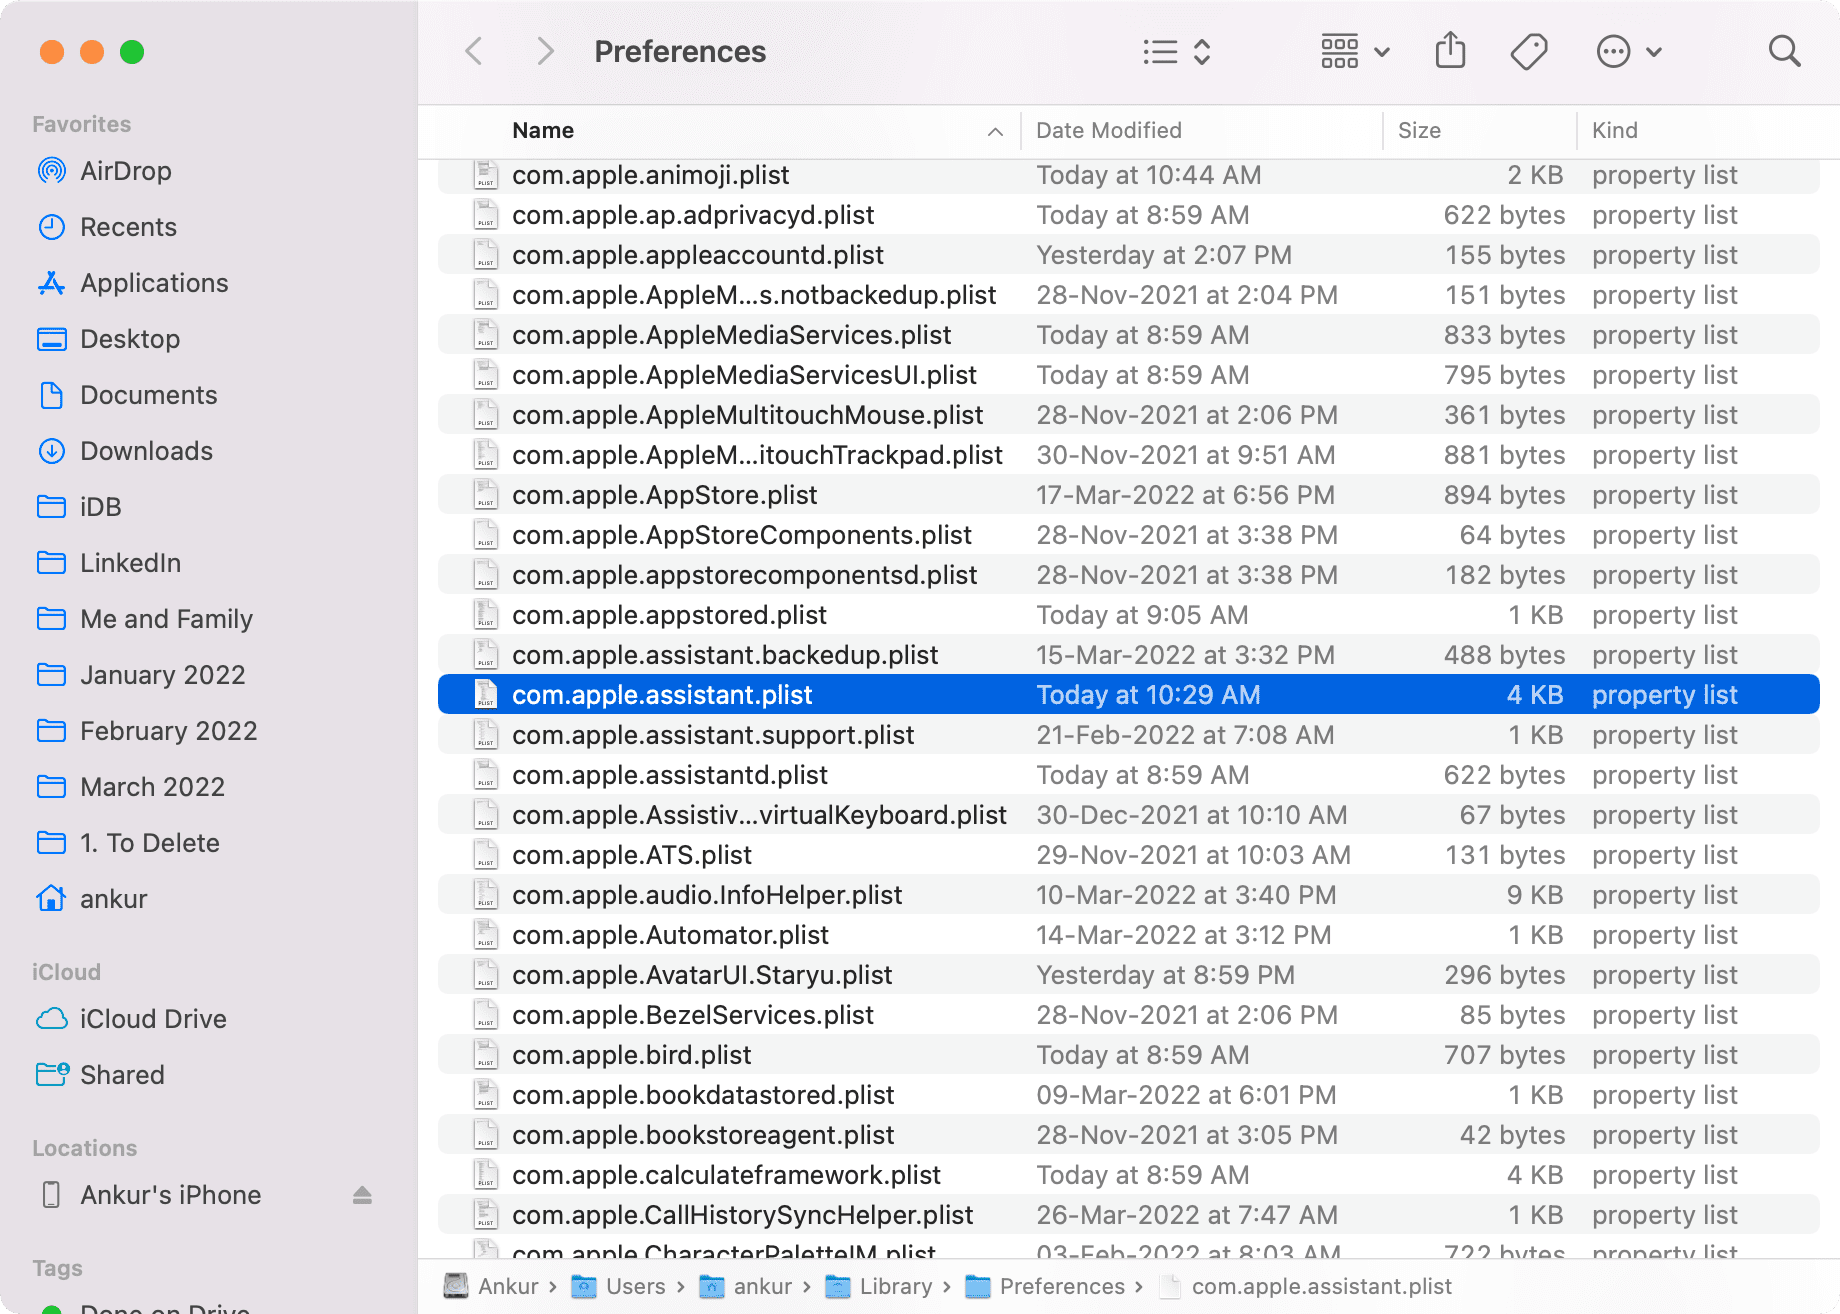
Now, try using dictation, and it should work perfectly. If the problem continues, go to ~/Library/Caches/com.apple.SpeechRecognitionCore and delete the file (if you see it).
Check out next: