Prospective jailbreakers often cling to the lowest possible firmware to cement their jailbreak eligibility in the future, sometimes only to find that a new jailbreak release supports a newer version of iOS or iPadOS that they refrained from updating to.
While upgrading to an unsigned version of iOS or iPadOS is ordinarily impossible unless you saved .shsh2 blobs for your handset when that particular firmware was signed, an alternate method for upgrading one’s firmware post-signing has been gaining steam recently. We’re referring, of course, to something that is commonly referred to in the jailbreak community as DelayOTA.
In case you’ve never heard of DelayOTA before, it’s effectively a method of updating iPhones or iPads over the air (OTA) that utilizes certain perks on Supervised iPhones and iPads to authorize the installation of firmware that is 90 or fewer days old.
This process does not require .shsh2 blobs, and will effectively let you install an unsigned version of iOS or iPadOS, assuming it meets the 90-day criteria. Firmware more than 90 days old unfortunately isn’t eligible.
What is a supervised iPhone or iPad?
You’re most likely to witness supervised iPhones and iPads being issued to employees or students by employers or educational institutions.
Supervision lets the issuing entity control what happens on issued devices. For example, device administrators can block access to features that may compromise data security or specific types of content that would contradict the purpose of device issuance. Examples might include a company denying access to AirDrop or the App Store, or perhaps even a school or college silently keeping apps updated or denying access to restricted web content.
Another little-known perk of supervised iPhones and iPads that ordinary iPhones and iPads don’t have is that they can be configured to update to unsigned versions of iOS or iPadOS, but only if the desired version was unsigned fewer than 90 days ago. This feature exists because device administrators sometimes require additional time to verify system compatibility with software updates, so Apple provides a little more leeway under these circumstances.
What does this have to do with jailbreaking?
The big question you’ve undoubtedly been wondering by now is what any of this has to do with you, and we’ll do out best to explain below…
Assuming that you’re already jailbroken on any version of iOS or iPadOS 13 or 14, you might be holding out on updating to iOS or iPadOS 15 until a jailbreak becomes available for it. If and when something drops, you might feel the urge to update so that you can enjoy the perks of a newer firmware in addition to a jailbreak, and that’s where the method discussed in this piece will come in handy.
The only problem, of course, is that Apple has been releasing and un-signing iOS & iPadOS 15 firmware versions like mad lately, so this makes that plan difficult. DelayOTA, on the other hand, lets both jailbreakers and non-jailbreakers bypass the firmware signing rule for the 90-day window, which could prove invaluable if you find yourself in the aforementioned situation since you might be able to update to a jailbreakable (or soon-to-be jailbreakable) version of iOS or iPadOS 15 at some point in the future.
How to use DelayOTA on a jailbroken handset
It’s very easy to use the DelayOTA method to install an unsigned iOS or iPadOS firmware on your jailbroken device. Please be advised that doing this will cause you to lose your existing jailbreak, and you may not get it back for a long time if there isn’t a jailbreak available for the firmware you intend to update do.
If you understand the risk mentioned above, but still wish to proceed, then you may follow along as we walk you through the process below.
Getting supervised
The first thing you’ll need to do is supervise your device. We’ll show you how below:
1) Open your preferred package manager app.
For the purposes of this tutorial, we’ll be using Cydia, however the steps should be relatively similar if you use Sileo or another package manager app.
2) Tap on the Sources tab:
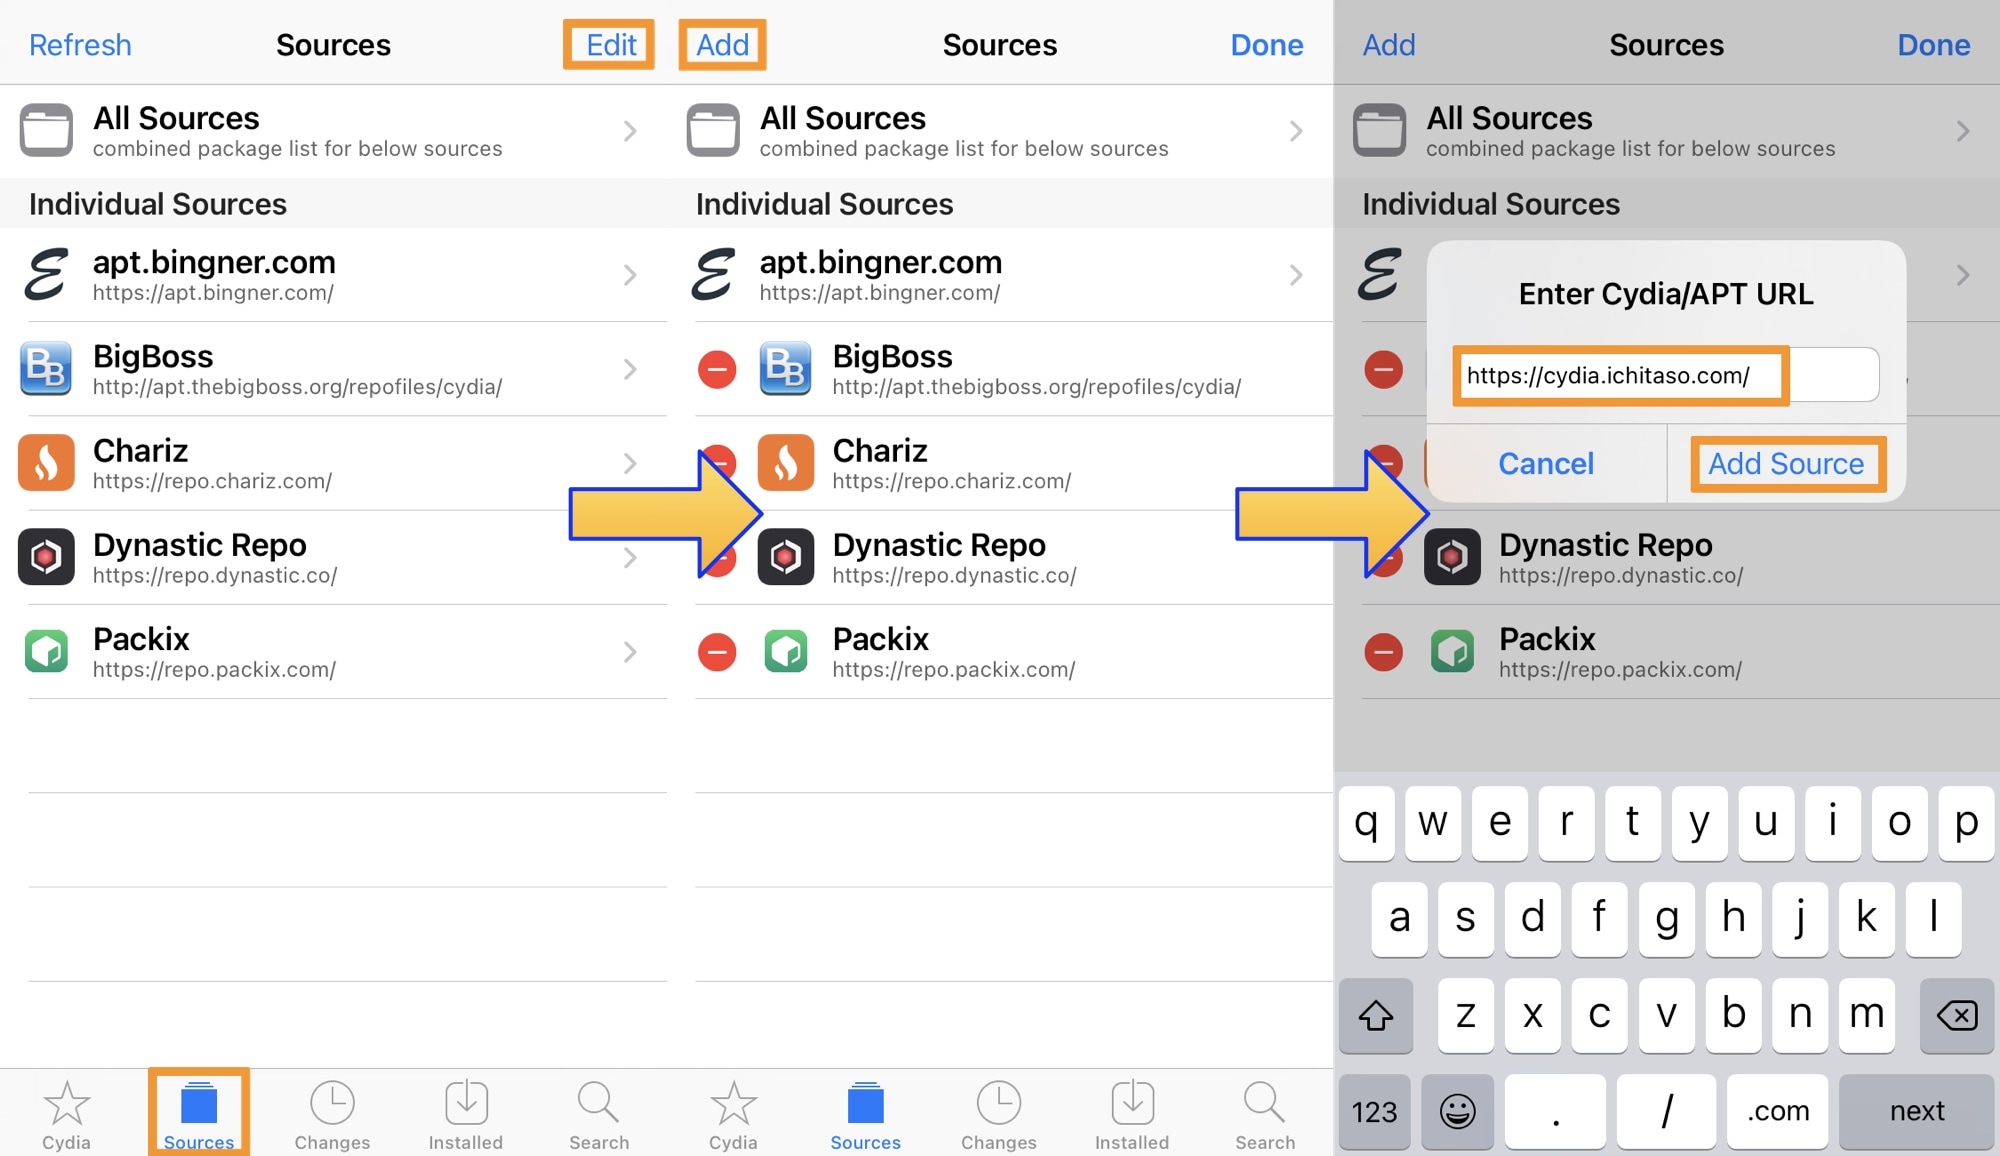
3) Tap on the Edit button.
4) Tap on the Add button.
5) Enter the following repository URL:
https://cydia.ichitaso.com/
6) Tap on the Add Source button.
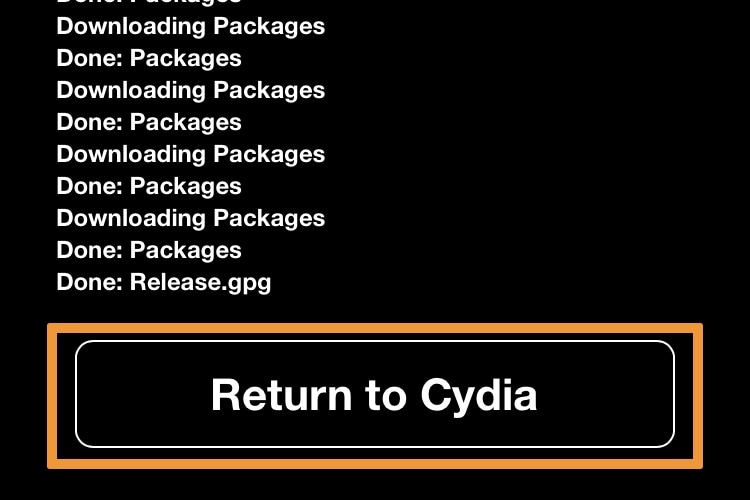
7) After the repository loads, tap on the Return to Cydia button:
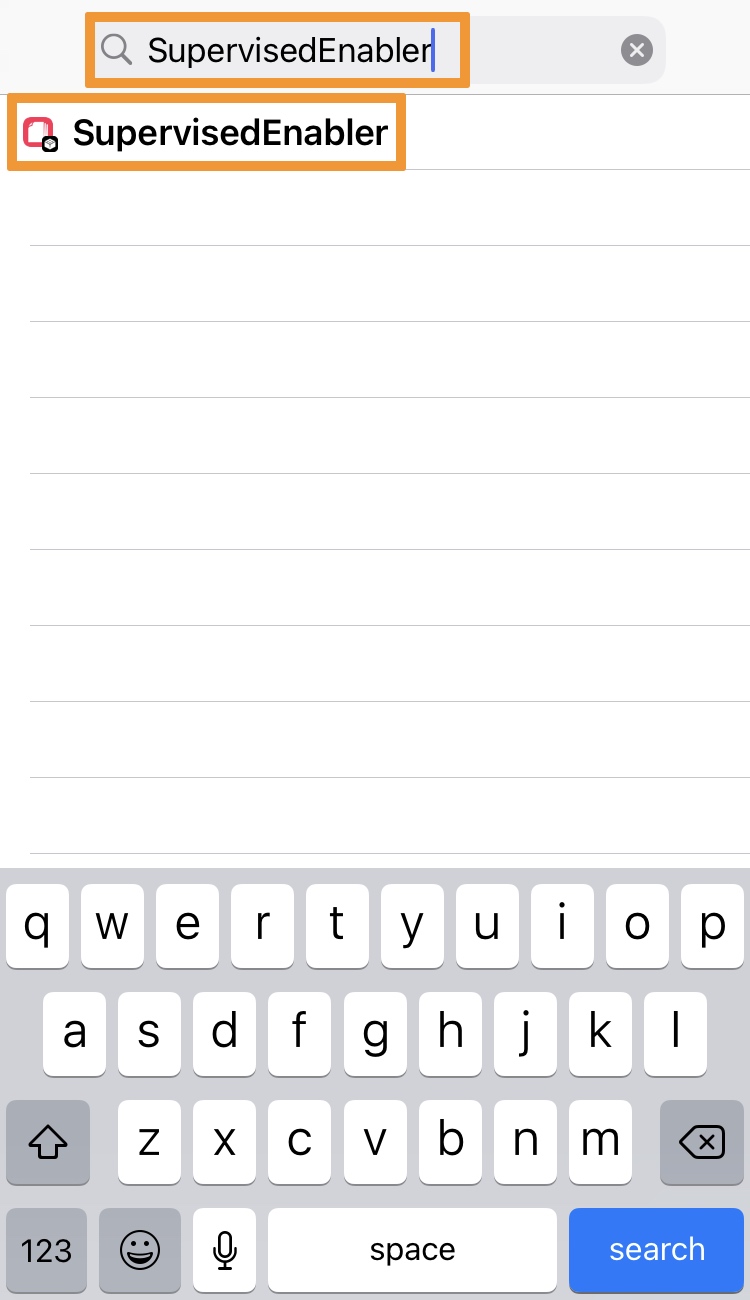
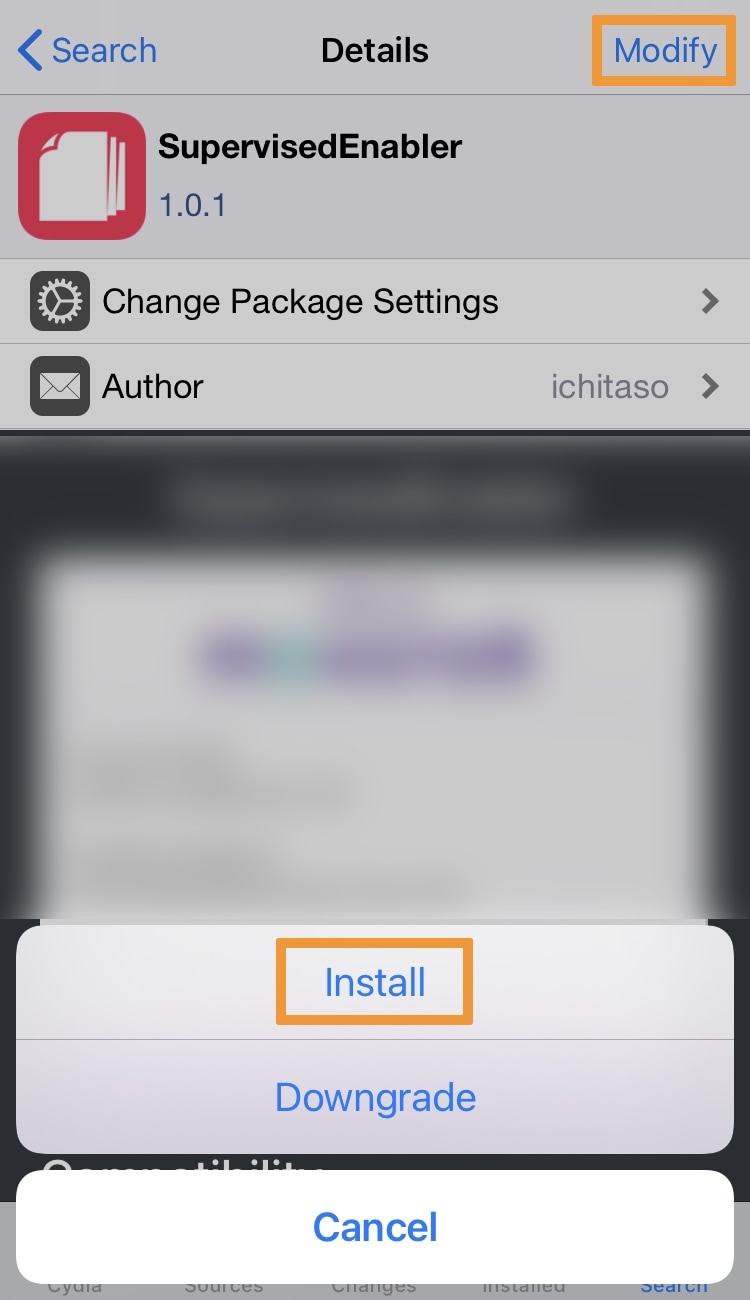
8) Tap on the Search tab at the bottom of the Cydia app and type in SupervisedEnabler. You can then tap on the matching search result:
9) Tap on the Modify button, then on the Install button:
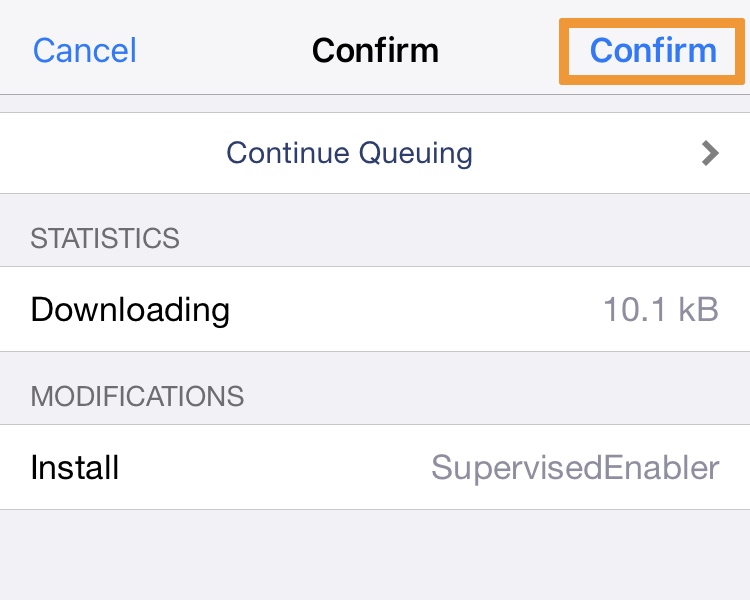
10) Tap on the Confirm button:
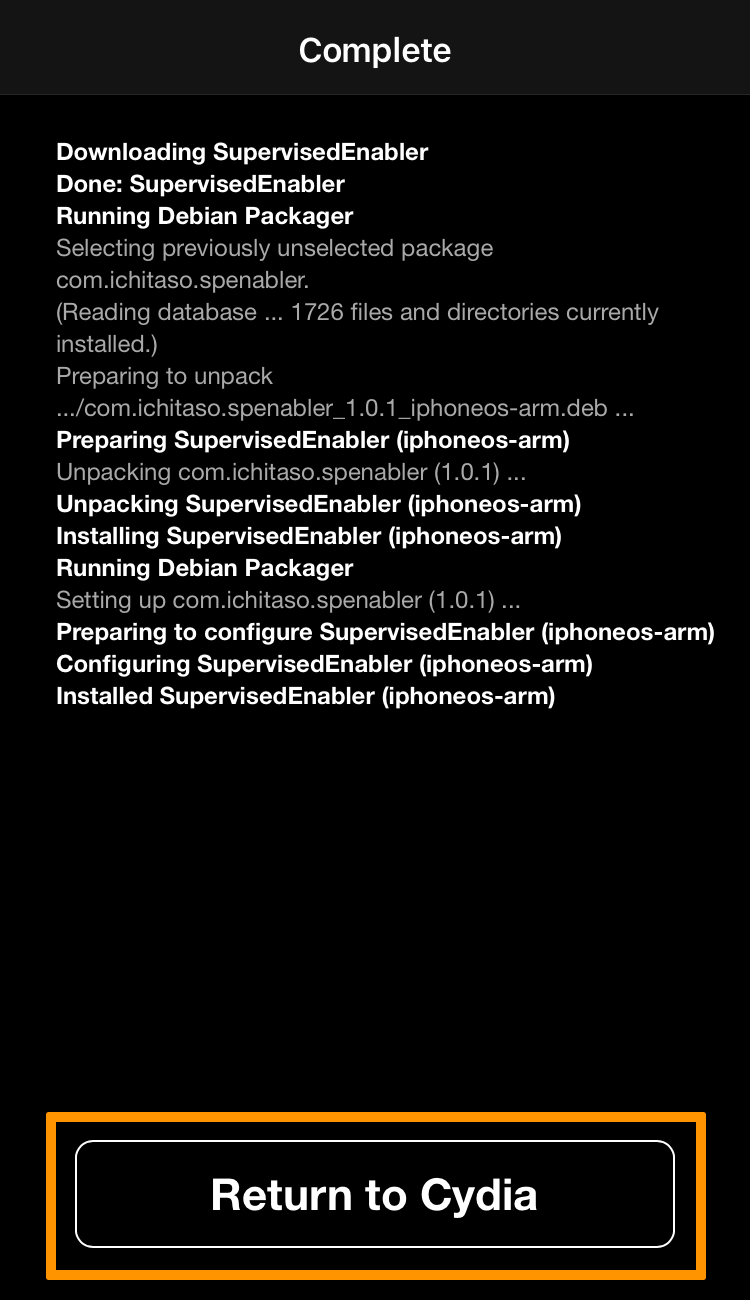
11) When the installation completes, tap on the Return to Cydia button:
You should now be able to verify that your device is supervised by visiting the Settings app. It should display a message that reads: “This [enter device type here] is supervised and managed. Learn more about device supervision…” like so:
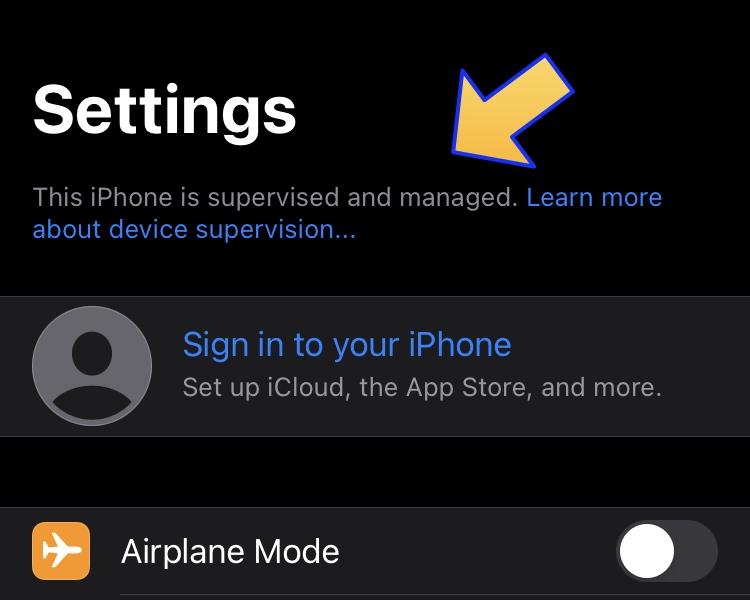
If you see the supervised message, then you’re ready to move on to the next section, which will cover removing your existing jailbreak with a rootFS restore. After you do this, your handset will retain its supervised state.
Performing a rootFS restore
To remove your jailbreak using a rootFS restore, follow the tutorial below that pertains to your jailbreak:
- How to remove the checkra1n jailbreak
- How to remove the unc0ver jailbreak
- How to remove the Taurine jailbreak
- How to remove the Odyssey jailbreak
Done with your rootFS restore? If so, you can move on to the next section of this tutorial:
Installing the DelayOTA configuration profile
The next step in this process is to grab the DelayOTA configuration profile for the firmware you wish to install. At the time of this writing, iOS & iPadOS 15.1 can be installed via DelayOTA, so that is the firmware we will be using for the purposes of this tutorial.
The steps to install the DelayOTA configuration profile are as follows:
1) Open the Safari app on your iPhone or iPad and visit the following URL:
https://dhinakg.github.io/delayed-otas.html
2) Scroll down to the desired firmware you want for the device you’re using DelayOTA on and tap on the Download Profile button:
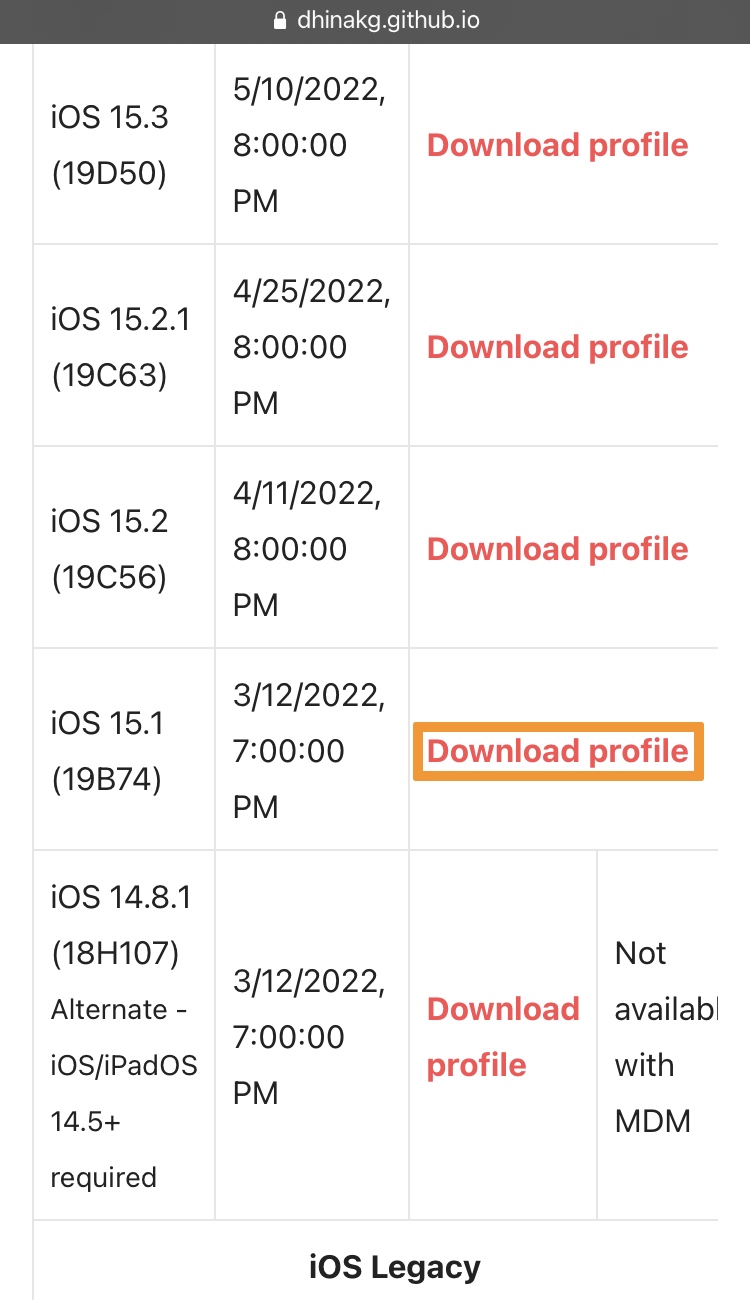
Pro Tip: If you’re using an iPhone 12 or 13 lineup device, your profile will be at the top of the page. Older non-legacy handsets such as the iPhone XS and older will be found further down the page. For the purposes of this tutorial, we’re using the iOS 15.1 DelayOTA profile for an older device since it’s still available for our device at the time of this writing.
3) Tap on the Allow button in the pop-up that asks about downloading a configuration profile:

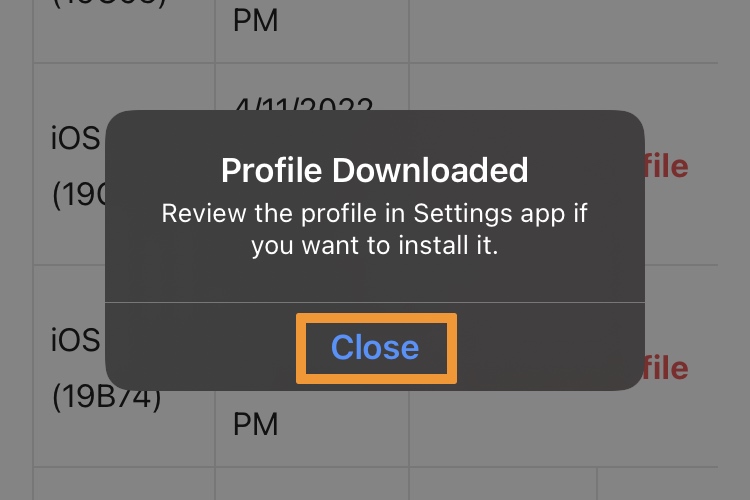
4) Tap on the Close button in the ensuing pop-up:
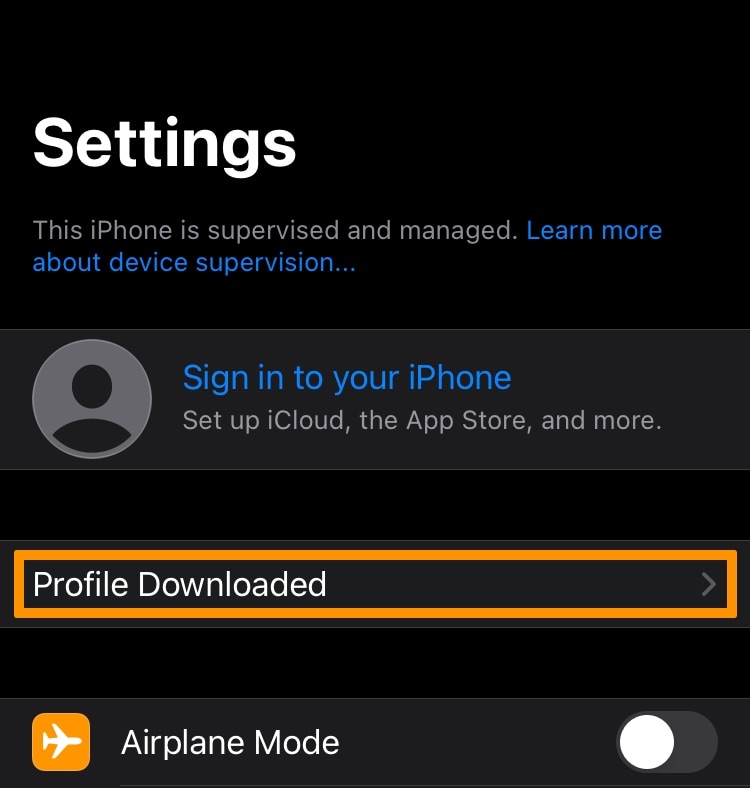
5) Open the Settings app and tap on the Profile Downloaded cell:
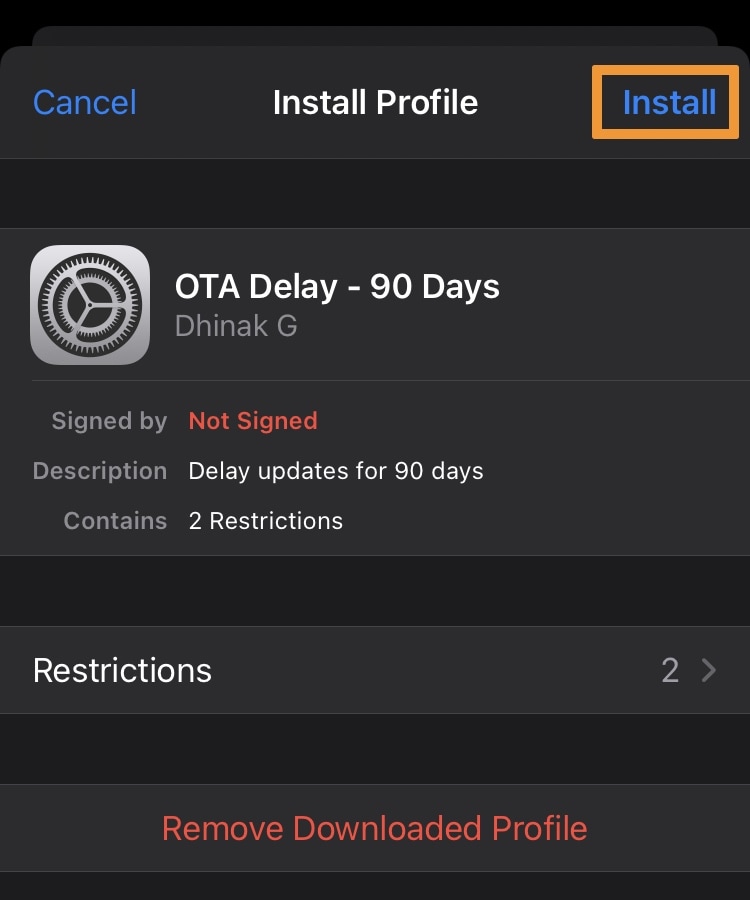
6) Tap on the Install button:
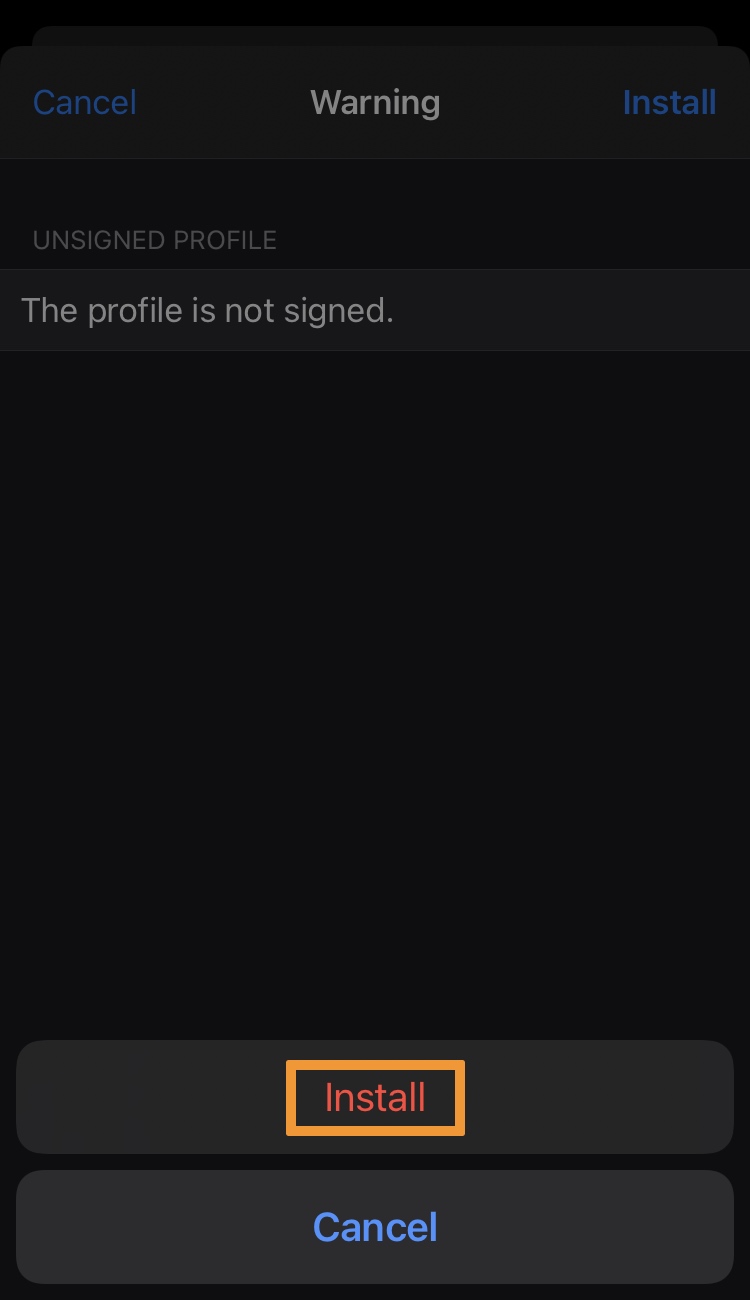
7) Tap on the Install button again:
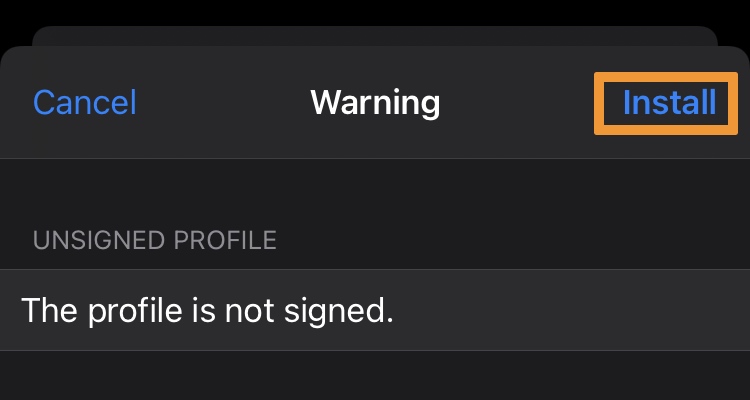
8) Tap on the Install button a third time:
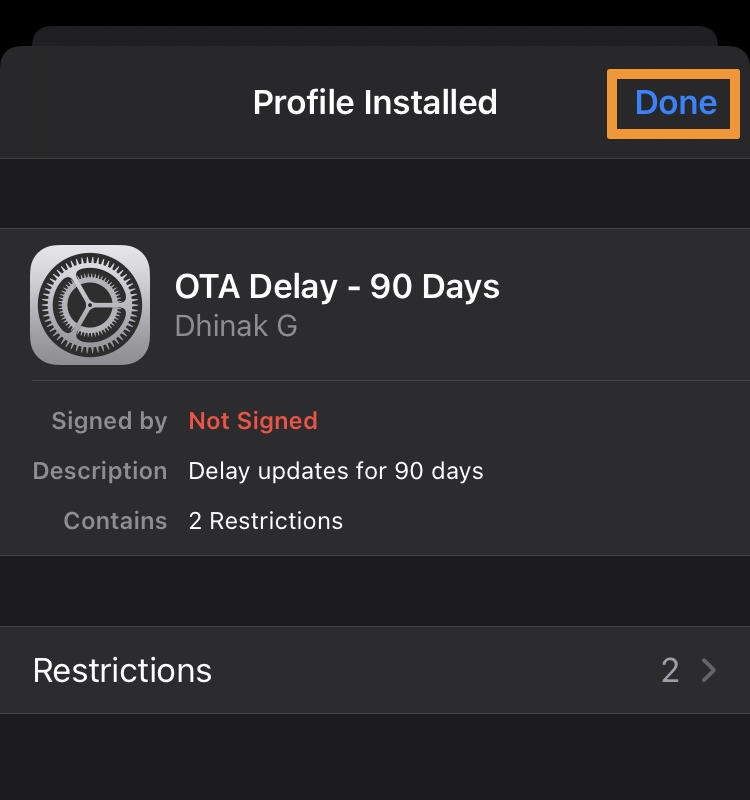
9) Tap on the Done button to finish:
10) Now that the DelayOTA profile has been installed, Reboot your iPhone or iPad.
When the device boots back up, we’ll move to install the software update we desire in the final section below:
Installing the DelayOTA software update
1) Once the configuration profile has been installed, navigate to Settings → General → Software Update:
Note: If you see a prompt to install a newer version of iOS or iPadOS 14 instead, simply scroll down to find the version of iOS or iPadOS 15 you’re looking for.
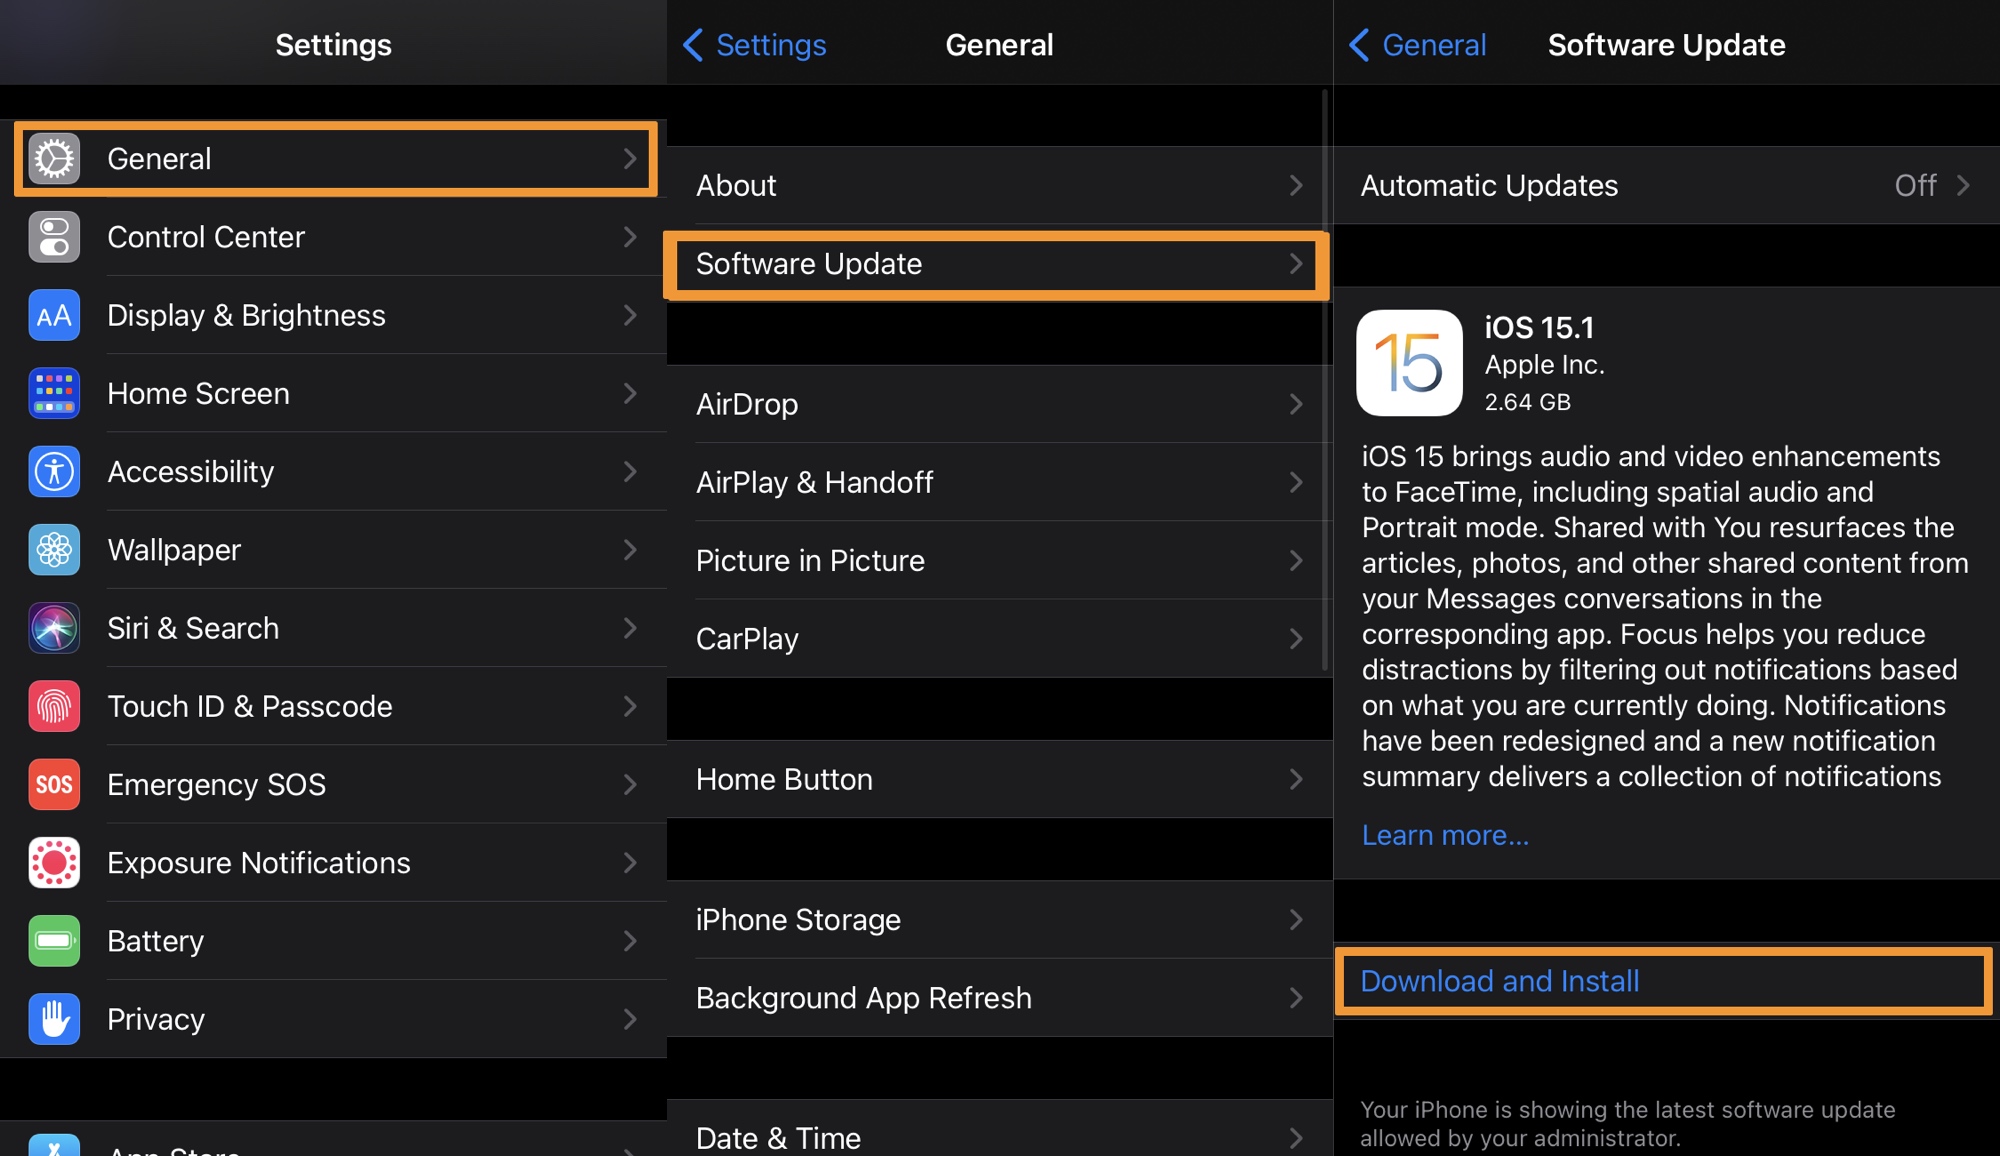
You will now be prompted to install the version of iOS or iPadOS that you downloaded the DelayOTA profile for. As you can see above, our iPhone is asking us to install iOS 15.1 despite the fact that this firmware isn’t being signed anymore.
2) Proceed with the DelayOTA software update by tapping on Download and Install.
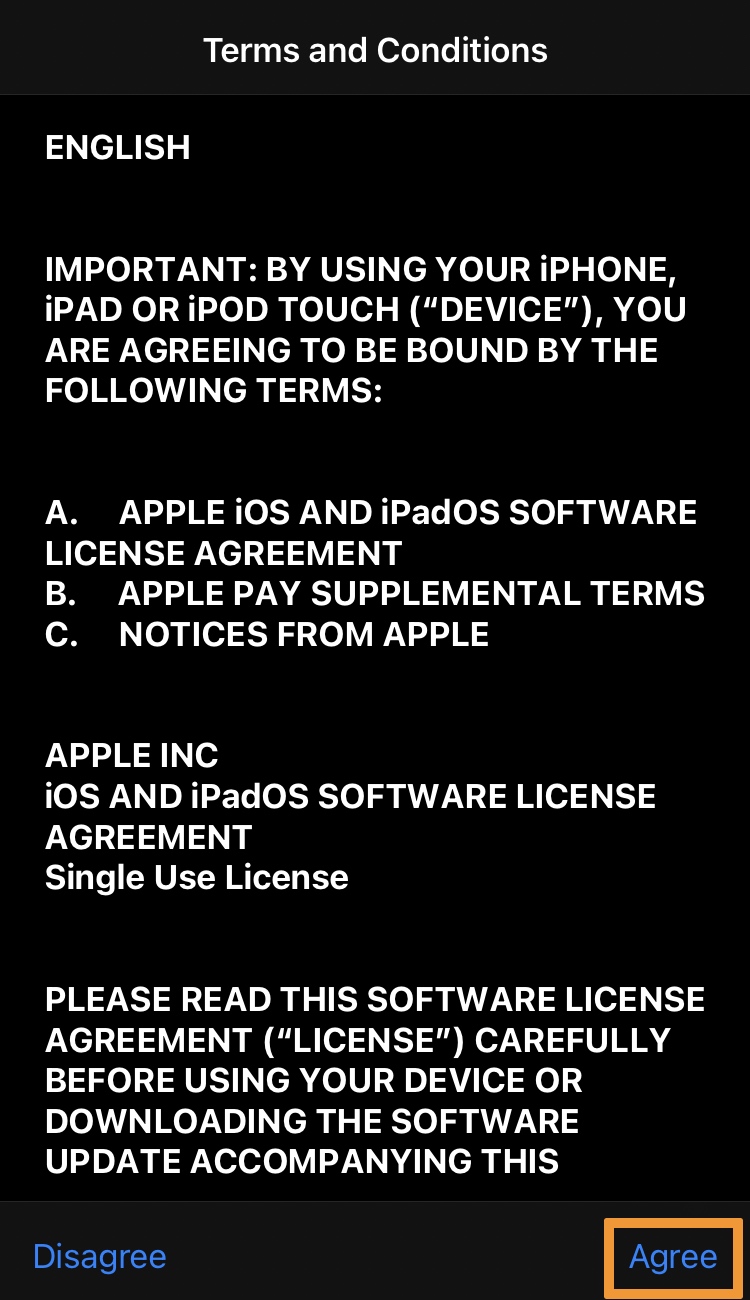
3) Enter your Passcode if prompted and Agree to the terms and conditions:
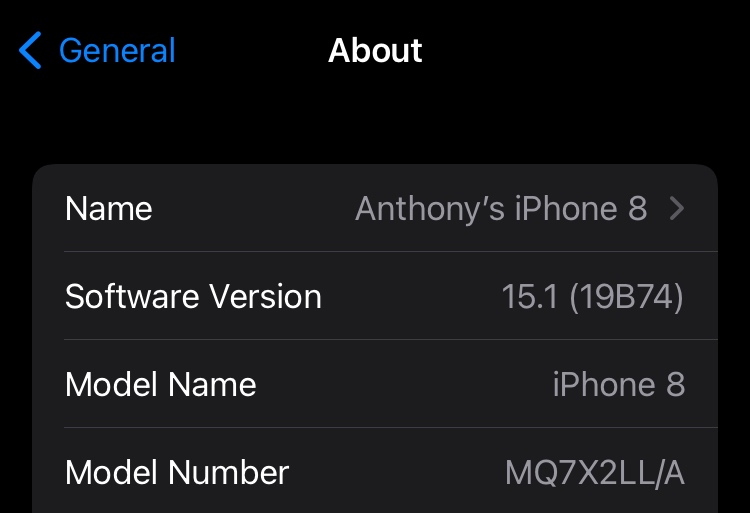
Your iPhone or iPad will now install the desired firmware. It will reboot during the install process. When it boots back up, you should be able to verify the newly installed firmware via Settings → General → About:
Congratulations! You’ve successfully circumvented Apple’s firmware signing rules to install an unsigned version of iOS or iPadOS!
Conclusion
The DelayOTA is a powerful method for upgrading to an unsigned iPhone or iPad firmware when you want to ensure jailbreak eligibility in the future, especially when there’s a lingering exploit in the wild but no available jailbreak yet.
We typically advise those wanting to jailbreak to stay on the lowest possible firmware, however we also think that prospective jailbreakers should exercise free will and make informed but decisive decisions, especially whenever there’s a possibility that a newer firmware could eventually see a jailbreak released for it.
If you’re already jailbroken, then we firmly believe that you’re better off staying on the firmware you’re already using unless the firmware you plan to upgrade to can also be jailbroken. At the time of this writing, no version of iOS or iPadOS 15 can be jailbroken, so it’s ultimately up to you whether you want to wait for an iOS or iPadOS 15 jailbreak or stay where you are currently.
Also read: How to update your NON-jailbroken iPhone or iPad to unsigned firmware with DelayOTA
Did you find this tutorial helpful? Be sure to let us know in the comments section down below!