The Automator tool on Mac might be intimidating to some users, but it can be a very handy app. You can create automated workflows, actions, or applications that help you perform tedious tasks. Along with that, there are some tasks you can do with it that are just plain neat.
Here are 10 cool things you can do with Mac Automator.
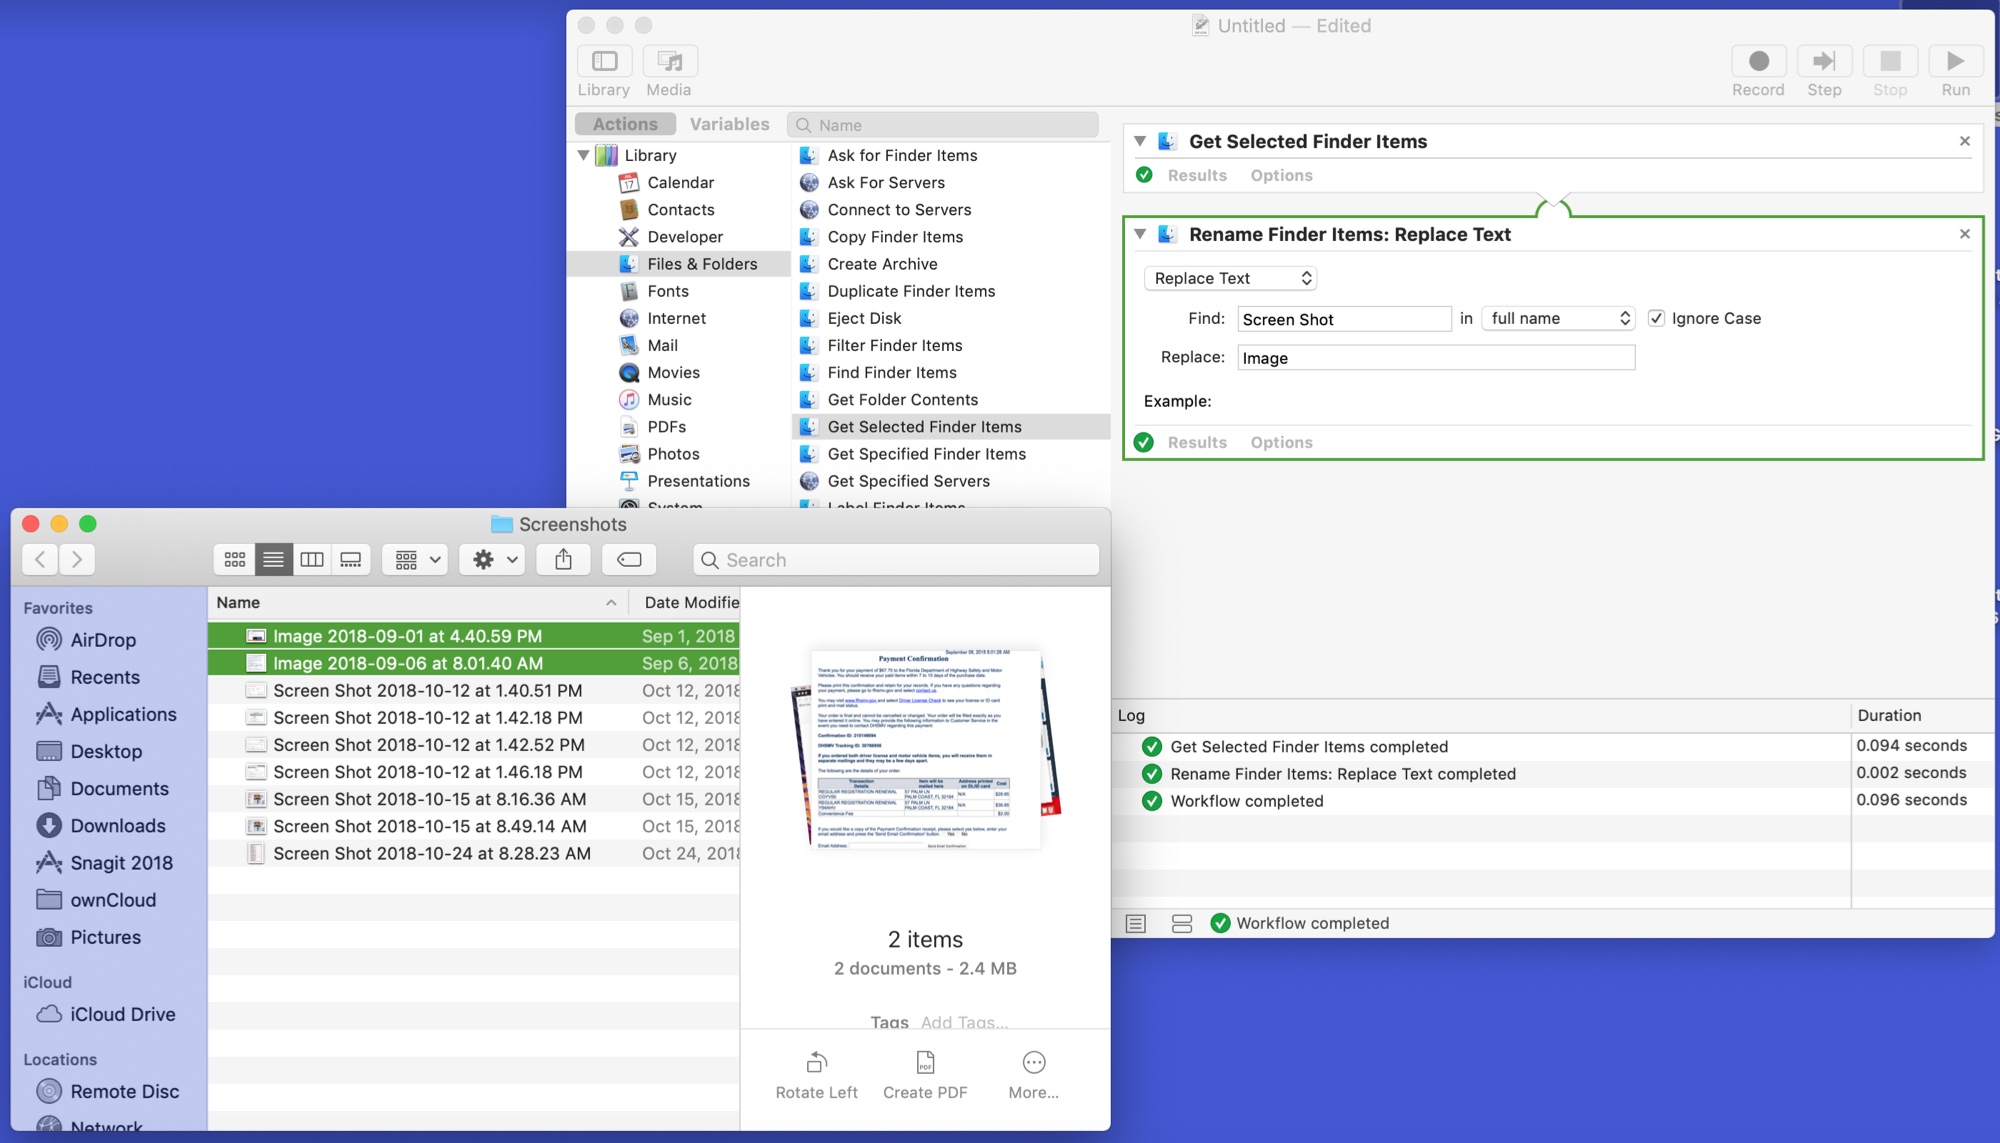
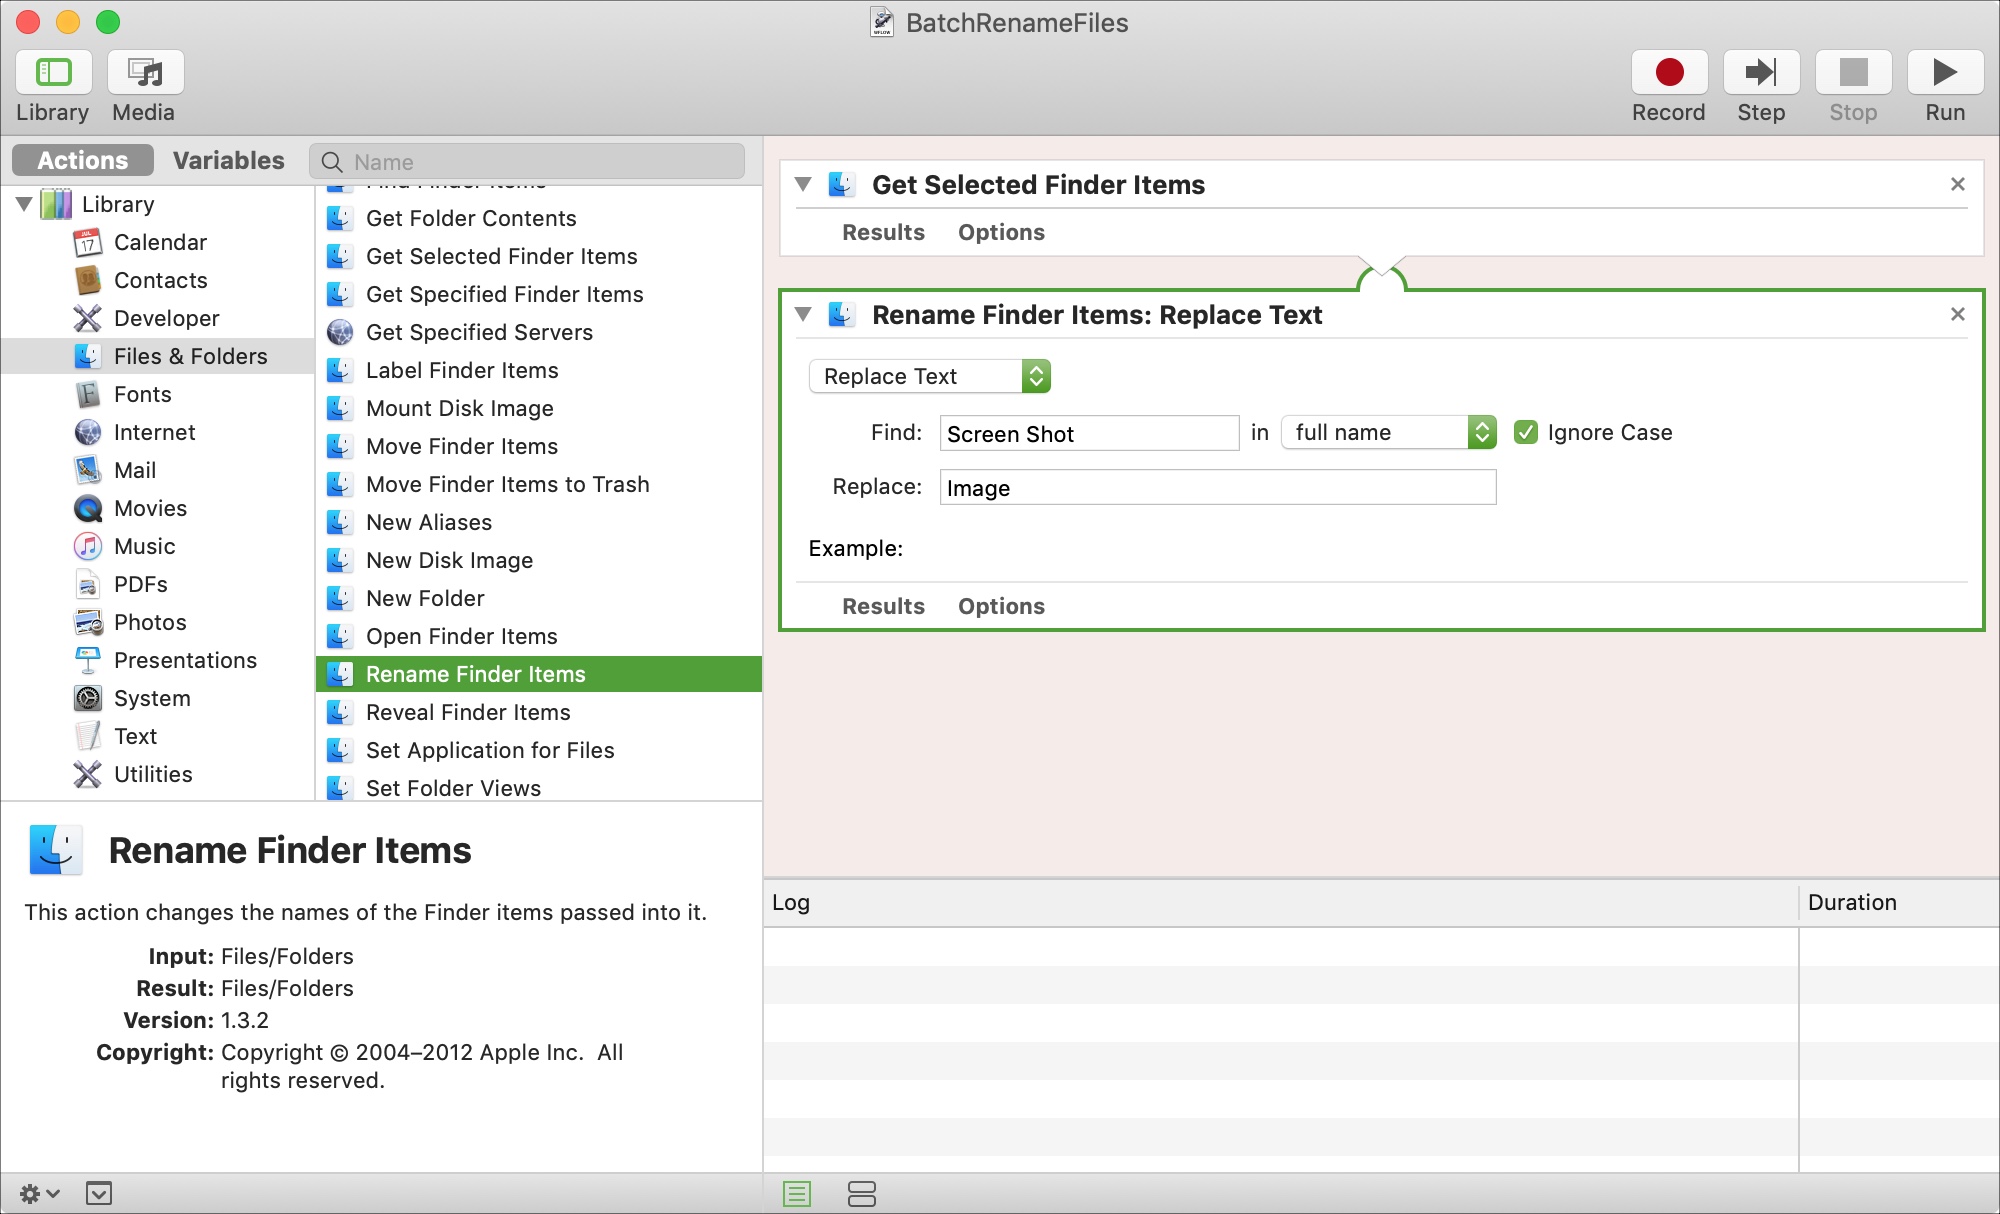
1. Batch rename files
There’s no reason to rename files one by one if you want the names to be consistent. Just use this Automator Workflow.
1) Choose Workflow as the type.
2) Make sure Action is selected in the far-left menu. Under Library, click Files & Folders.
3) To the right, select Get Selected Finder Items and drag it to the main window.
4) Under that option in the menu, select Rename Finder Items and drag it to the main window beneath the previous action.
5) A pop-up will appear asking if you want to make copies of the renamed items or change the originals. Make your choice.
6) In the Add Date or Time drop-down box, select the action you want to use. Replace Text is the one used in this example, so enter the text you want to replace and with what.
7) Open Finder to the location of the files you want to rename and select them.
8) In the Automator window, click Run on the top right.
You should then see the names of the files you selected in Finder changed to the names you set up.
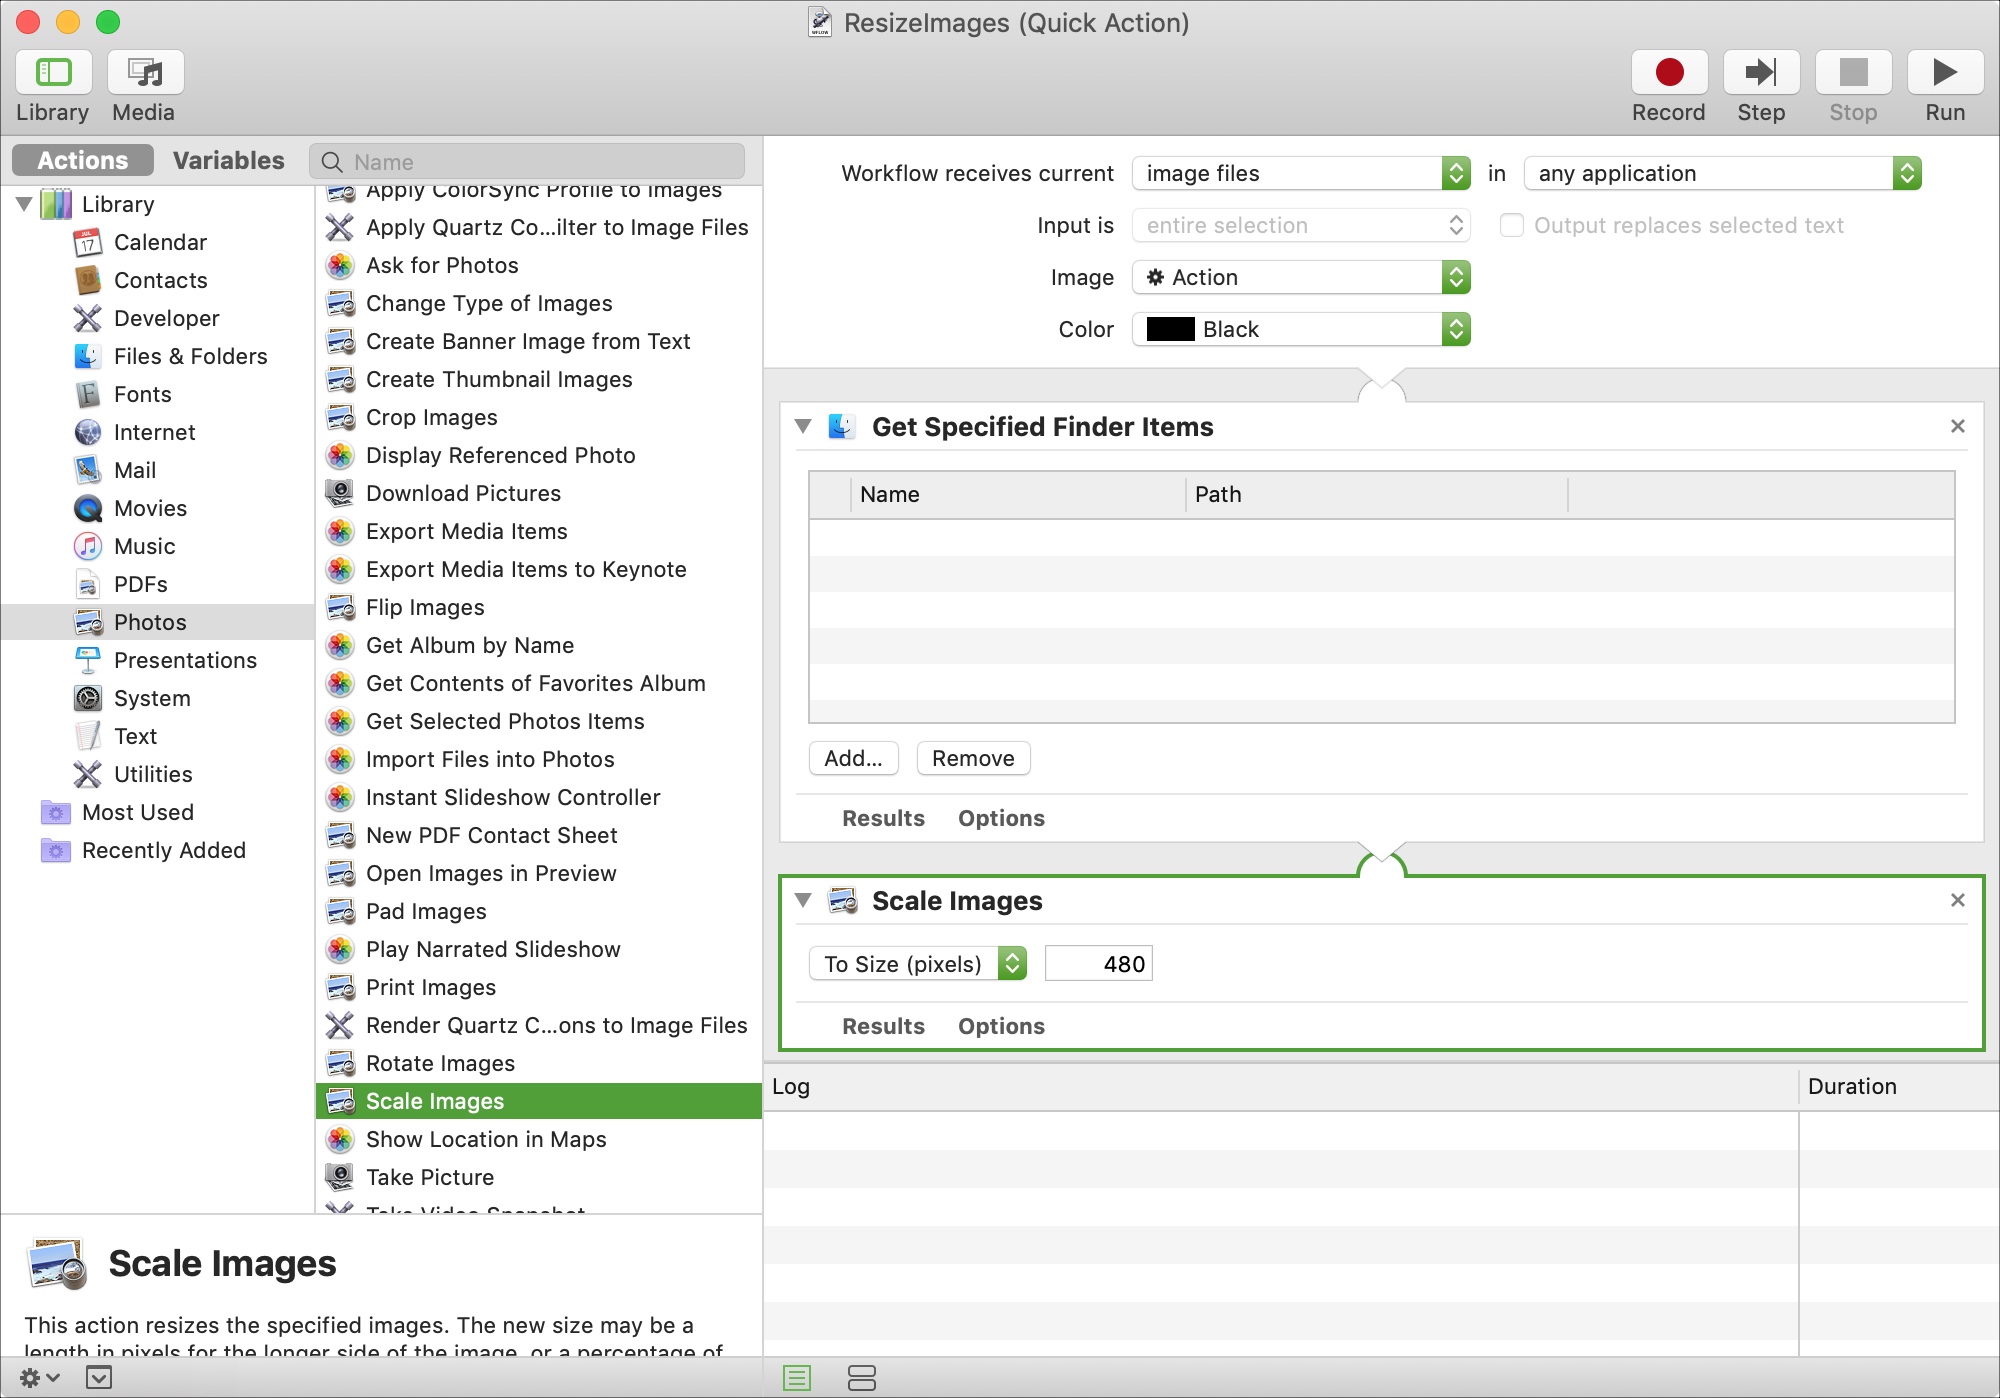
2. Resize images
Change the sizes of your images quickly and without opening any imaging software with this Automator Quick Action.
1) Choose Quick Action as the type.
2) In the Workflow receives current drop-down box, select image files.
3) Make sure Actions is selected in the far-left menu. Under Library, click Files & Folders.
4) To the right, select Get Specified Finder Items and drag it to the main window.
5) In the far-left menu, click Photos.
6) To the right, select and drag Scale Images to the main window under the Finder action.
7) Set the size you want in either pixels or percentage.
Save the Automator file with a name you’ll remember, like Resize Images. When you want to run this Quick Action, it will fall under the Services category. So, either right-click the image and select it from the Services menu or click Finder and move to Services in the menu bar.
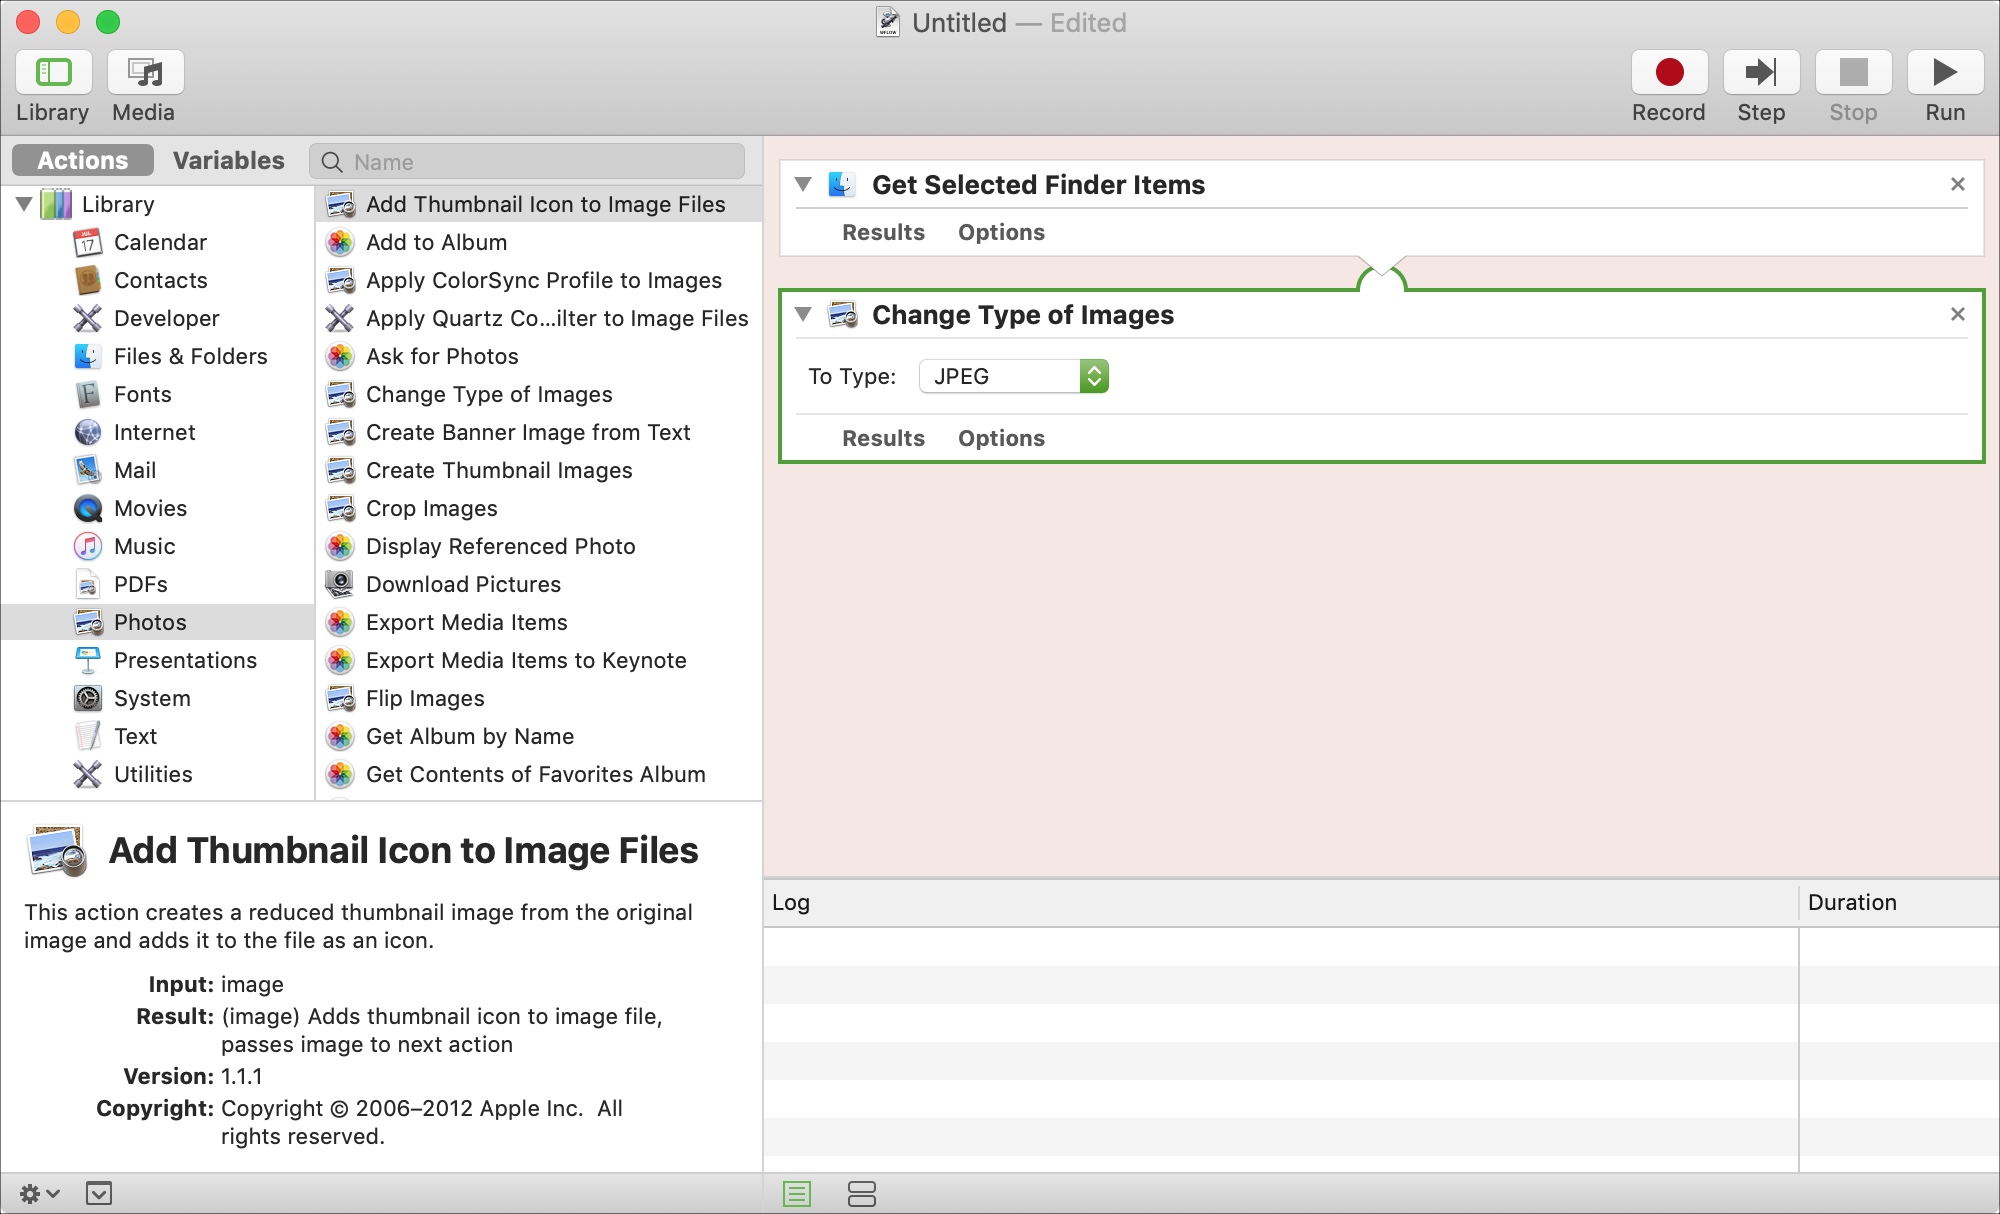
3. Convert image file formats
Maybe you need to convert an image from a JPG to a PNG or something similar. This type of conversion is also easy with Automator.
1) Choose Workflow as the type.
2) Make sure Action is selected in the far-left menu. Under Library, click Files & Folders.
3) To the right, select Get Selected Finder Items and drag it to the main window.
4) In the far-left menu, click Photos.
5) To the right, select and drag Change Type of Images to the main window below the Finder action.
6) In the To Type drop-down box, select the file format to convert the image into.
When you want to use the workflow, select your image from its location and then click Run in the Automator window. A copy of your image with the new file format will be saved to the same location. So, you’ll still have the original as well as a copy.
4. Convert PDFs to images
This Automator Workflow is great when you have a PDF that you want to convert to an image.
1) Choose Workflow as the type.
2) Make sure Action is selected in the far-left menu. Under Library, click Files & Folders.
3) To the right, select Get Selected Finder Items and drag it to the main window.
4) In the far-left menu, click PDFs.
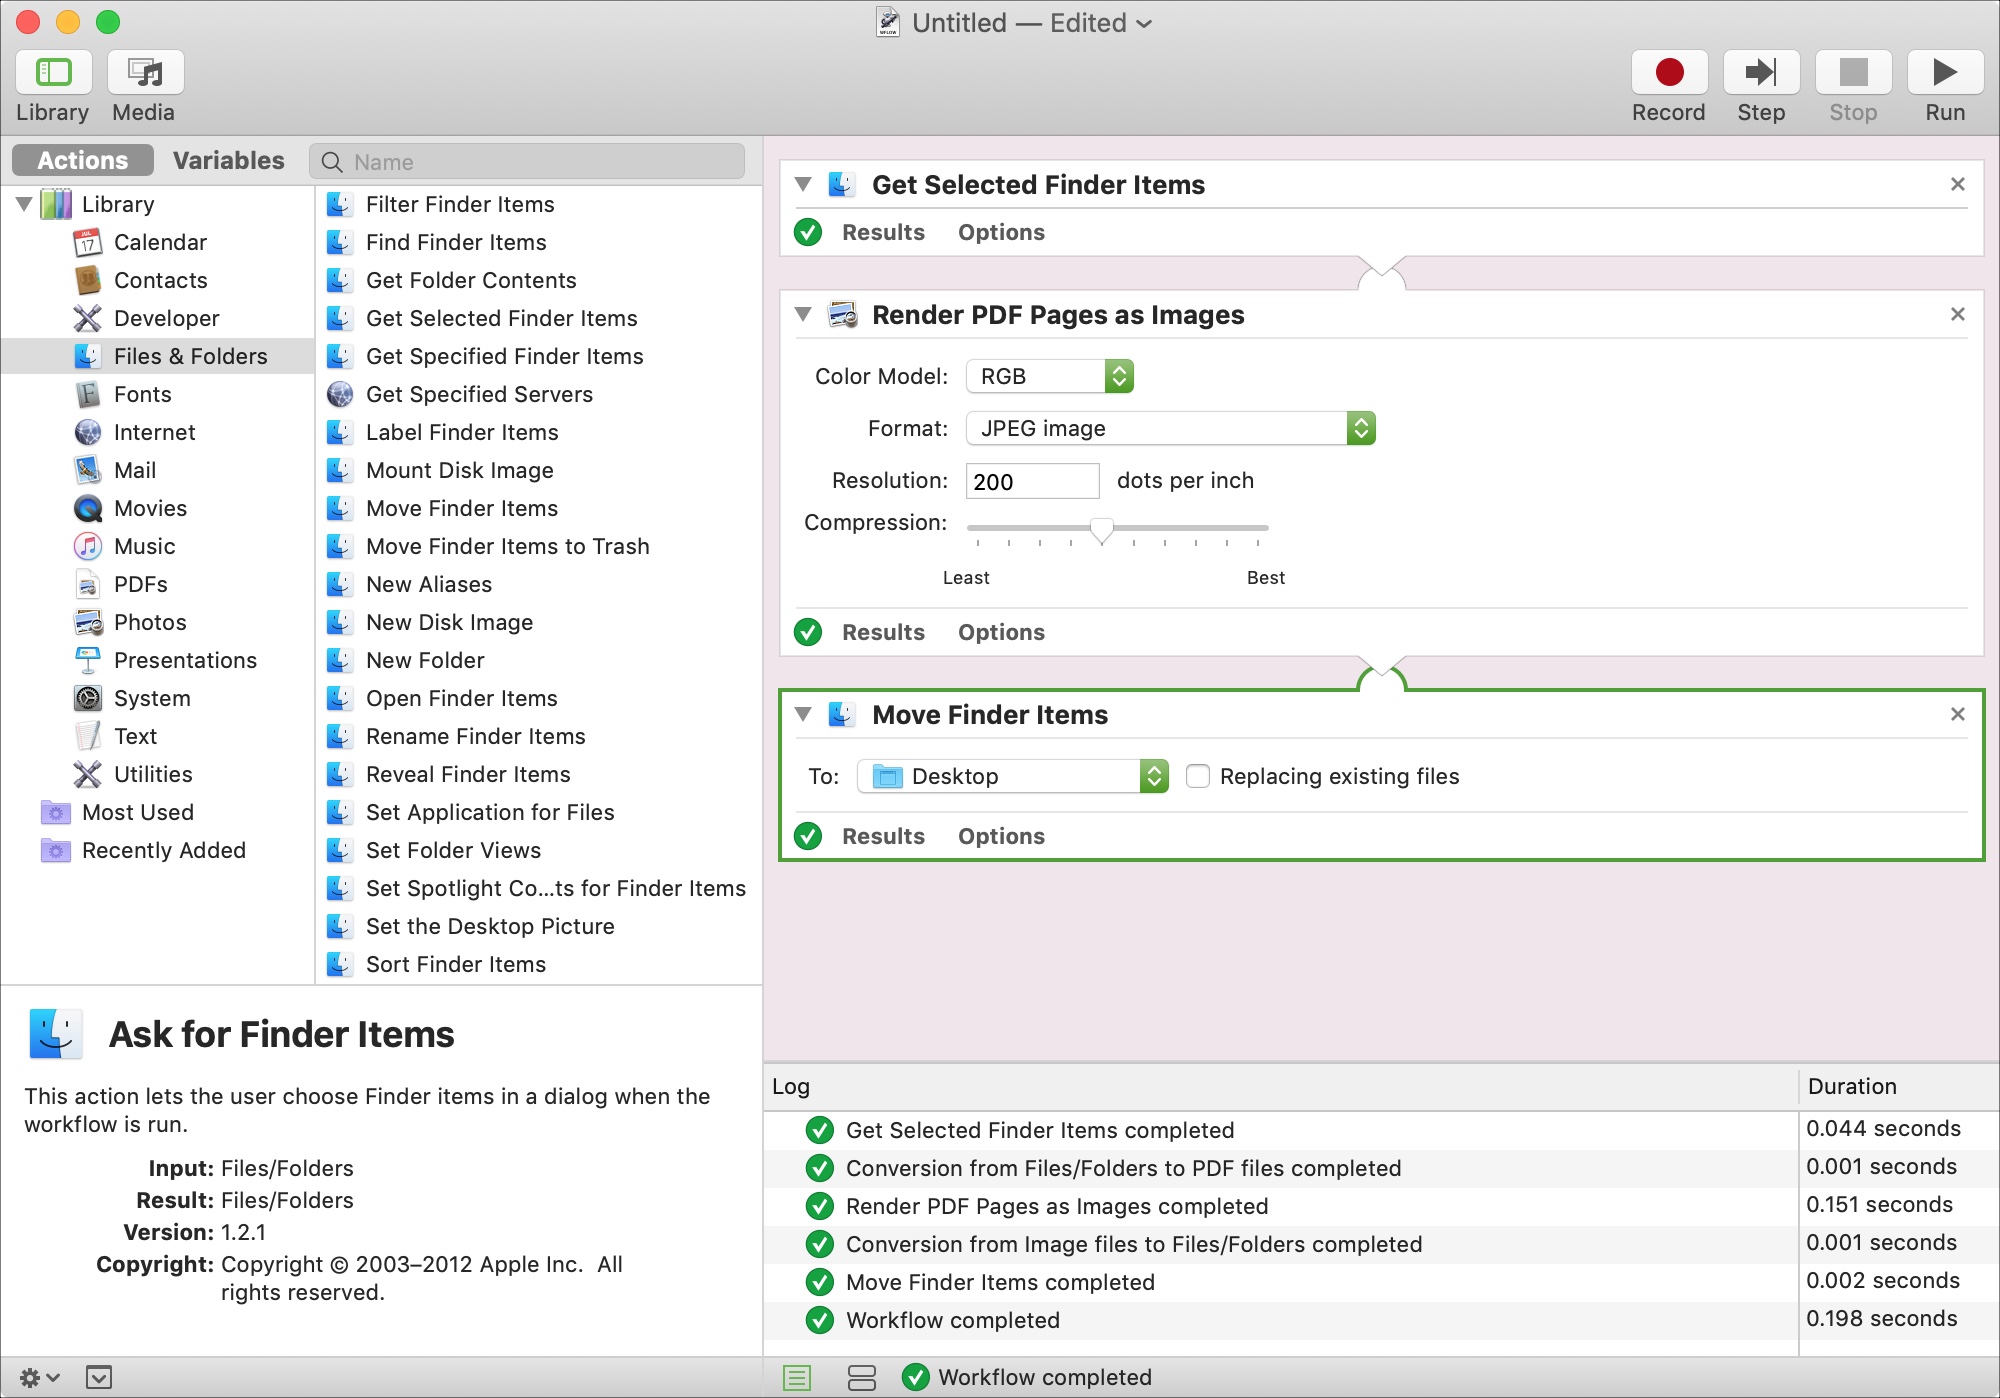
5) To the right, select and drag Render PDF Pages as Images to the main window below the Finder action. Make your selections in that box format, resolution, and the rest per your preference.
6) This step is optional but helpful for putting your conversions in a common area. On the far-left, select Files & Folders.
7) To the right, select and drag Move Finder Items to the main window at the bottom of the workflow.
8) In the To drop-down box, select your location.
When you want to use the workflow, select your PDF from its location and then click Run in the Automator window. Done and done.
5. Combine multiple PDFs
Maybe you have a few PDF files that you want to merge into a single PDF document. Here’s how to set up the Automator Workflow.
1) Choose Workflow as the type.
2) Make sure Action is selected in the far-left menu. Under Library, click Files & Folders.
3) To the right, select Get Selected Finder Items and drag it to the main window.
4) In the far-left menu, click PDFs.
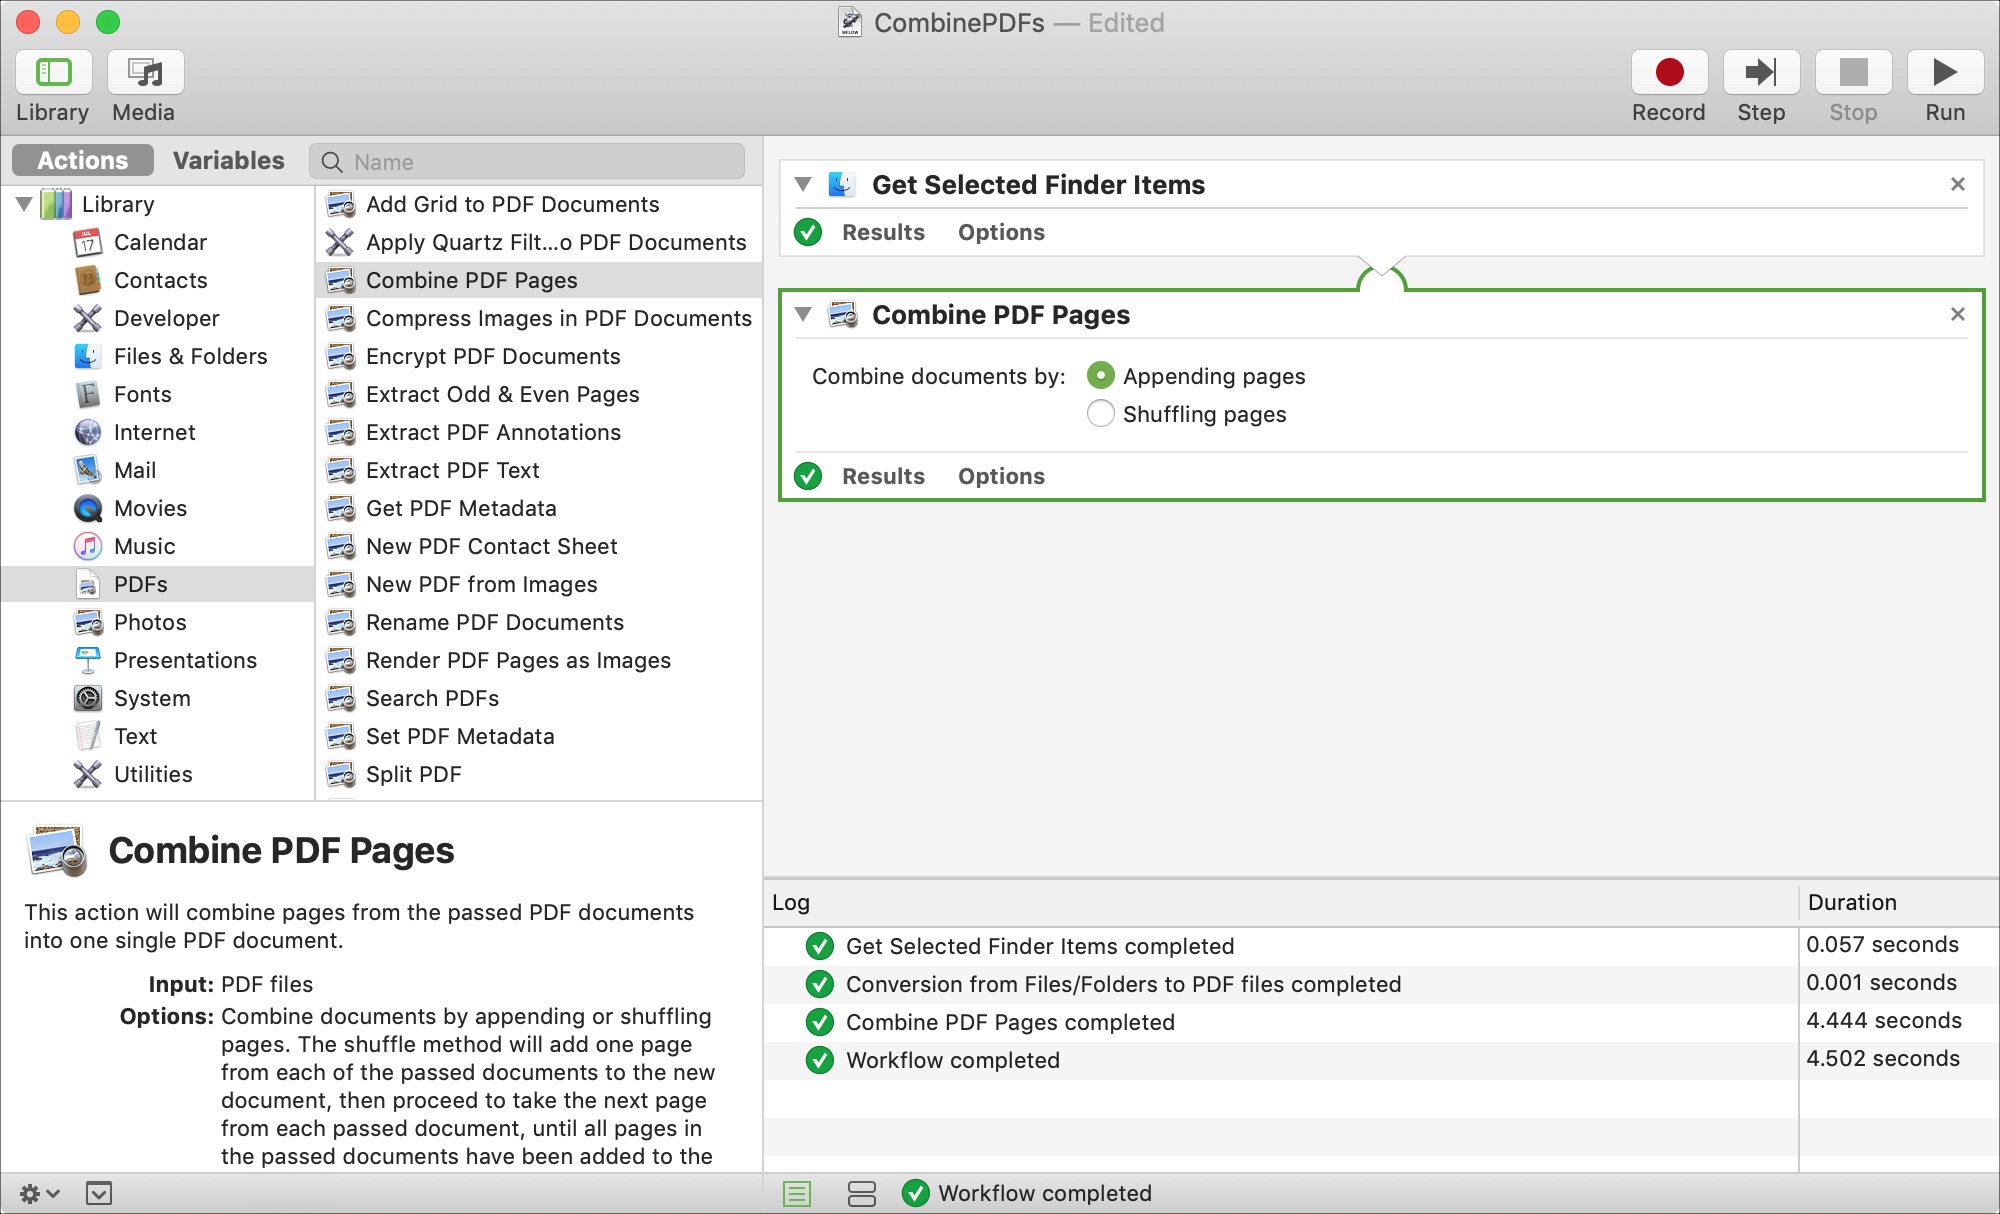
5) To the right, select and drag Combine PDF Pages to the main window below the Finder action.
6) Select either Appending pages or Shuffling pages per your preference.
7) This step is optional but helpful for putting your PDFs in a common spot. On the far-left, select Files & Folders.
8) To the right, select and drag Move Finder Items to the main window at the bottom of the workflow.
9) In the To drop-down box, select your location.
To combine your PDFs, just select them and click Run in the Automator window. Your new PDF will arrive in the location you specified.
6. Create a Light / Dark Mode switch for your Dock
If you like to change from Light Mode to Dark Mode or vice versa often, make it a simple switch with this toggle in your Dock.
1) Choose Application as the type.
2) Make sure Actions is selected in the far-left menu. Under Library, click Utilities.
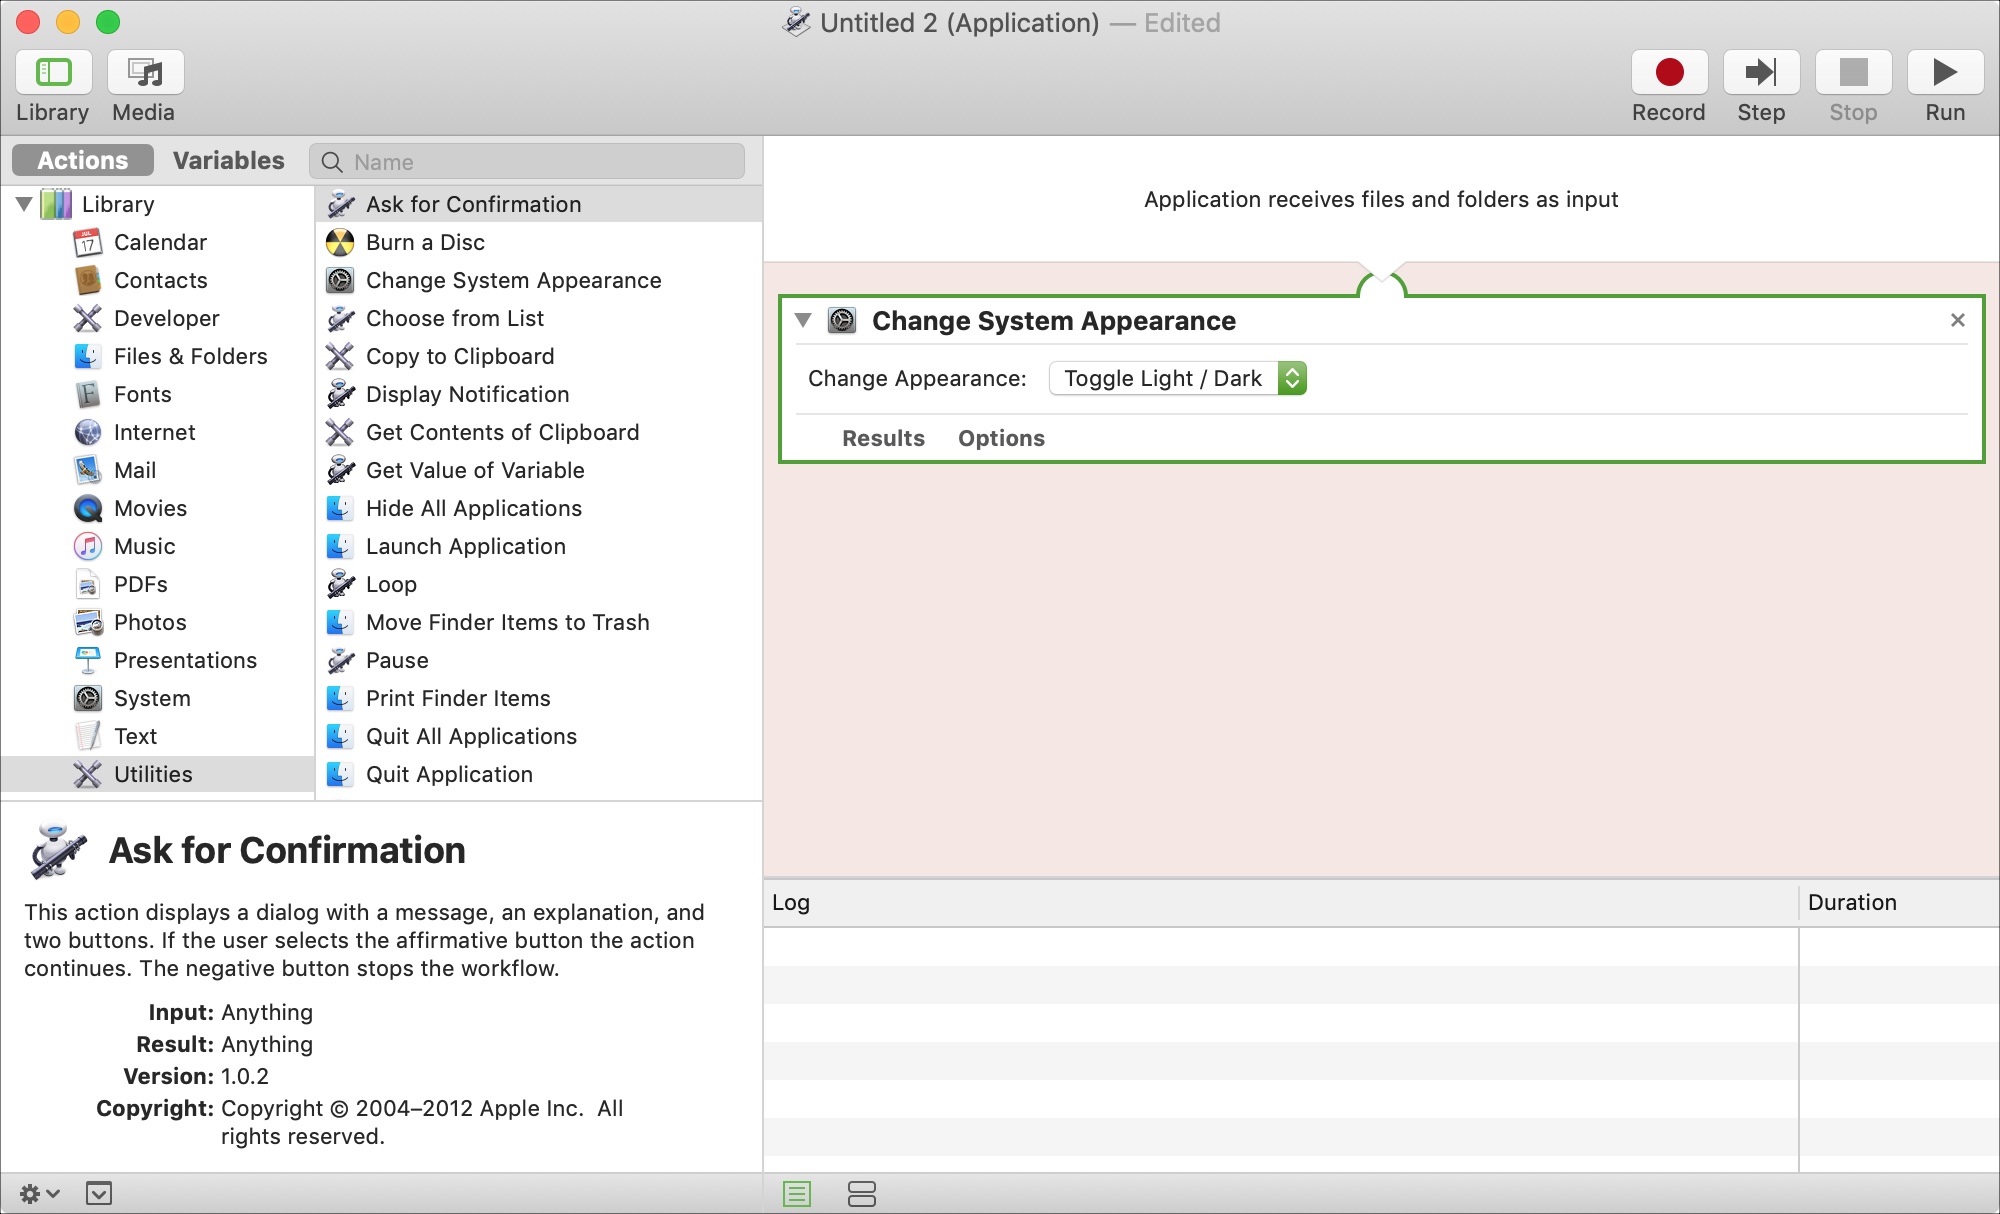
3) To the right, select and drag Change System Appearance to the main Automator window.
4) Select Toggle Light / Dark from the drop-down box.
5) Click File from the menu bar and select Save.
6) Give the file a name and save it to your preferred location, such as Applications, and click Save.
When you finish creating the switch, open the location where you saved it and drag it to your Dock. Then, just click it to make the switch between Light and Dark Mode quickly.
7. Create birthday greetings for your contacts
Be ready ahead of time when your contacts’ birthdays arrive. You can create a birthday greeting that’s ready to send with a click.
1) Choose Application as the type.
2) Make sure Actions is selected in the far-left menu. Under Library, click Contacts.
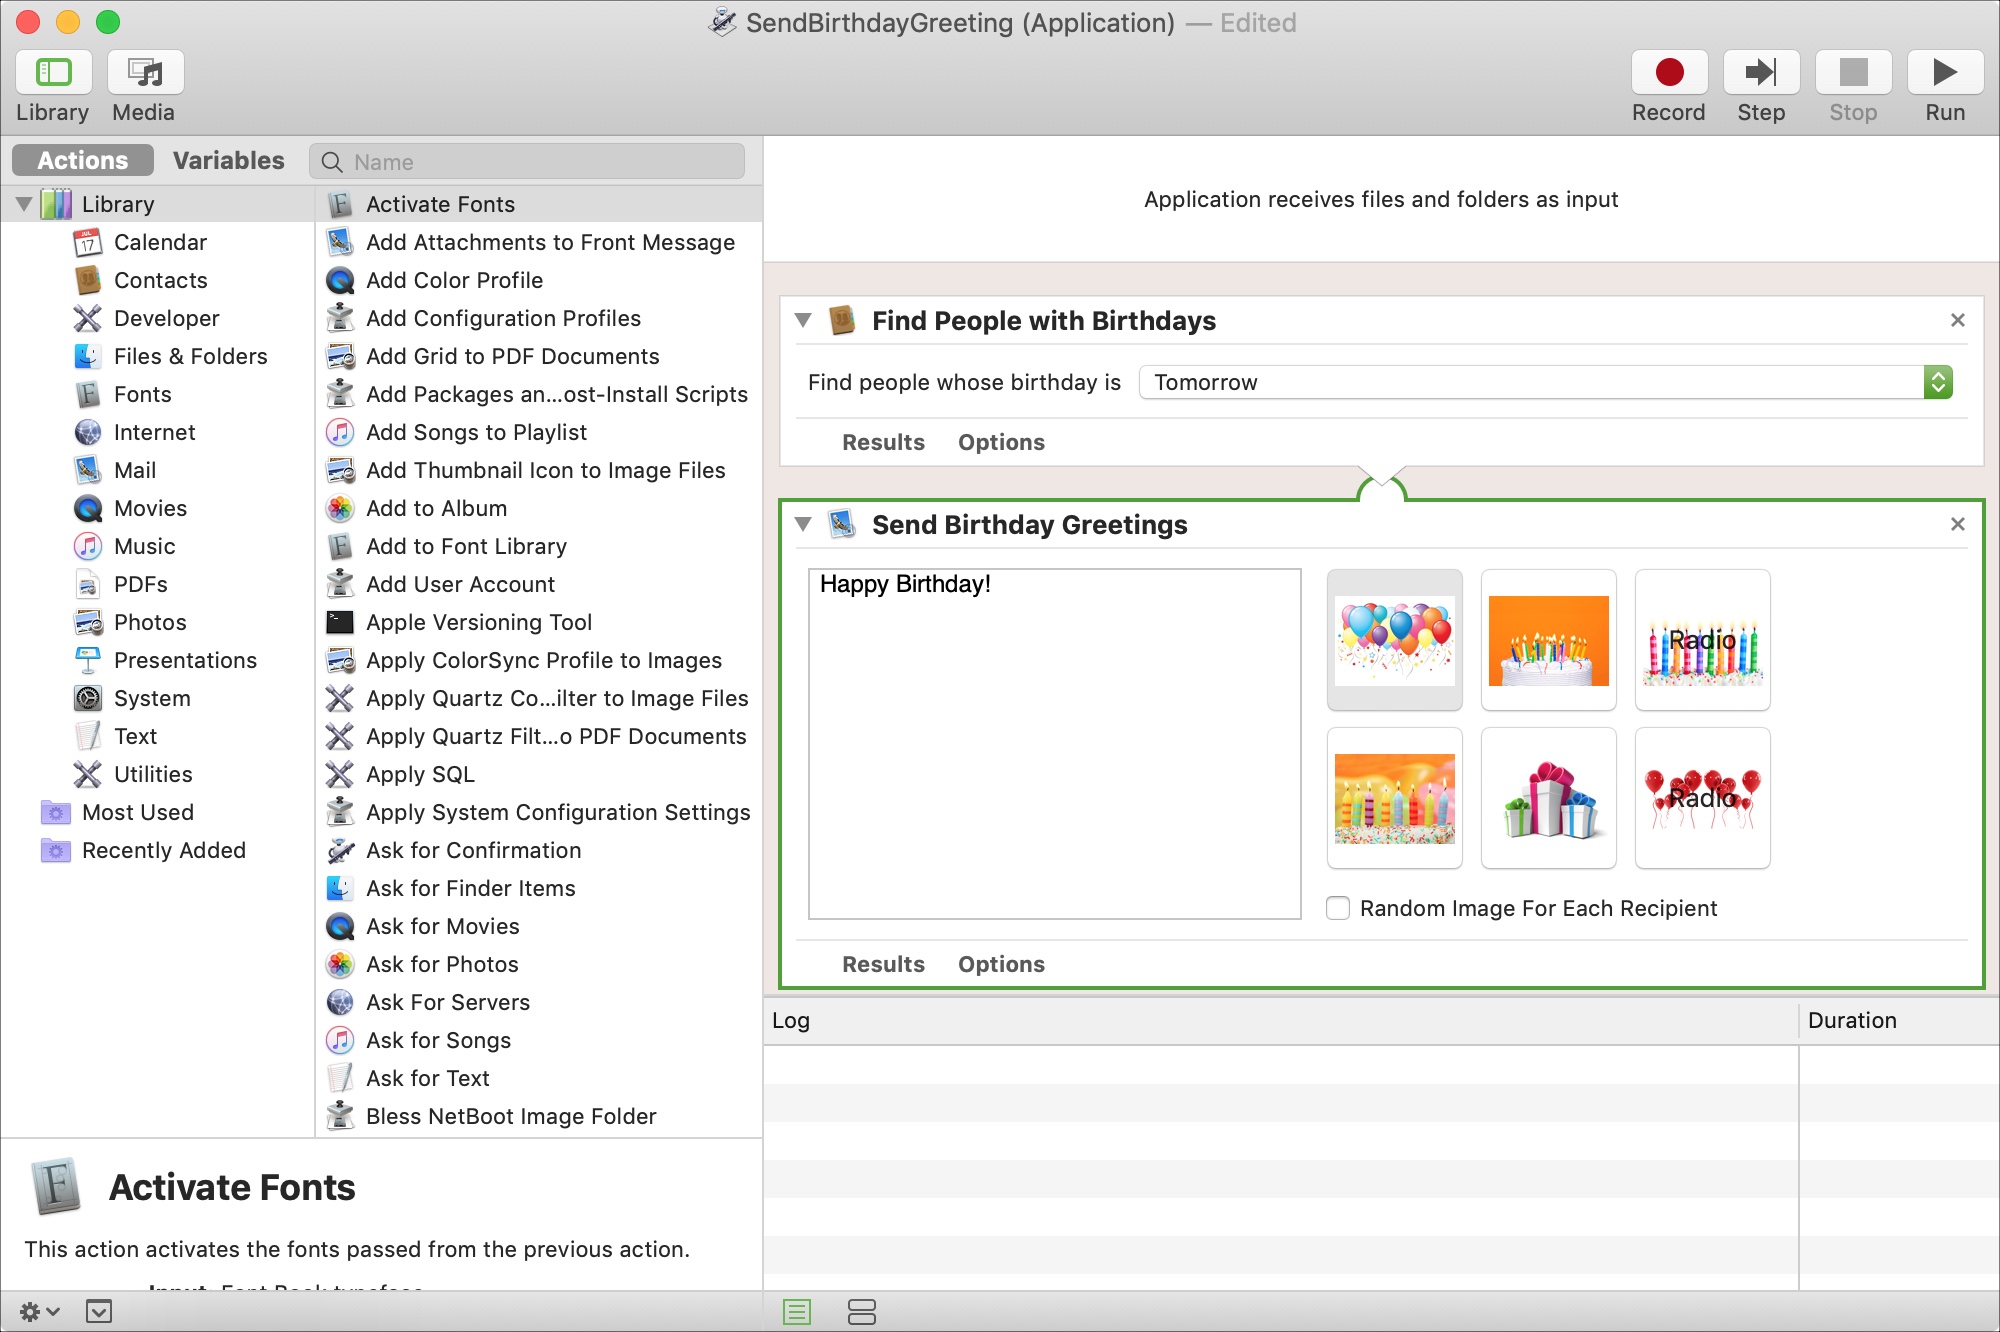
3) To the right, select Find People with Birthdays and drag it to the main window. In the drop-down, you can choose when the birthday should be, such as today, tomorrow, or next week.
4) In the far-left menu, click Mail.
5) To the right, select Send Birthday Greetings and drag it to the main window below the Contacts action. You can pick the greeting card, send a random one to each person, and add a message.
6) Give the file a name and save it to your preferred location, such as Applications, and click Save.
Now, whenever you run this application and a birthday is found for the day you selected, an email will pop open with the greeting, message, and recipient. Hit Send and you’re done.
8. Hear text files read aloud
If you need or just like to hear text from a document read aloud to you, you can set this up easily with Automator.
1) Choose Workflow as the type.
2) Make sure Action is selected in the far-left menu. Under Library, click Text.
3) To the right, select Get Contents of TextEdit Document and drag it to the main window.
4) In the same menu, select Speak Test and drag it to the main window below the previous action. You can choose the voice you want using the drop-down box.
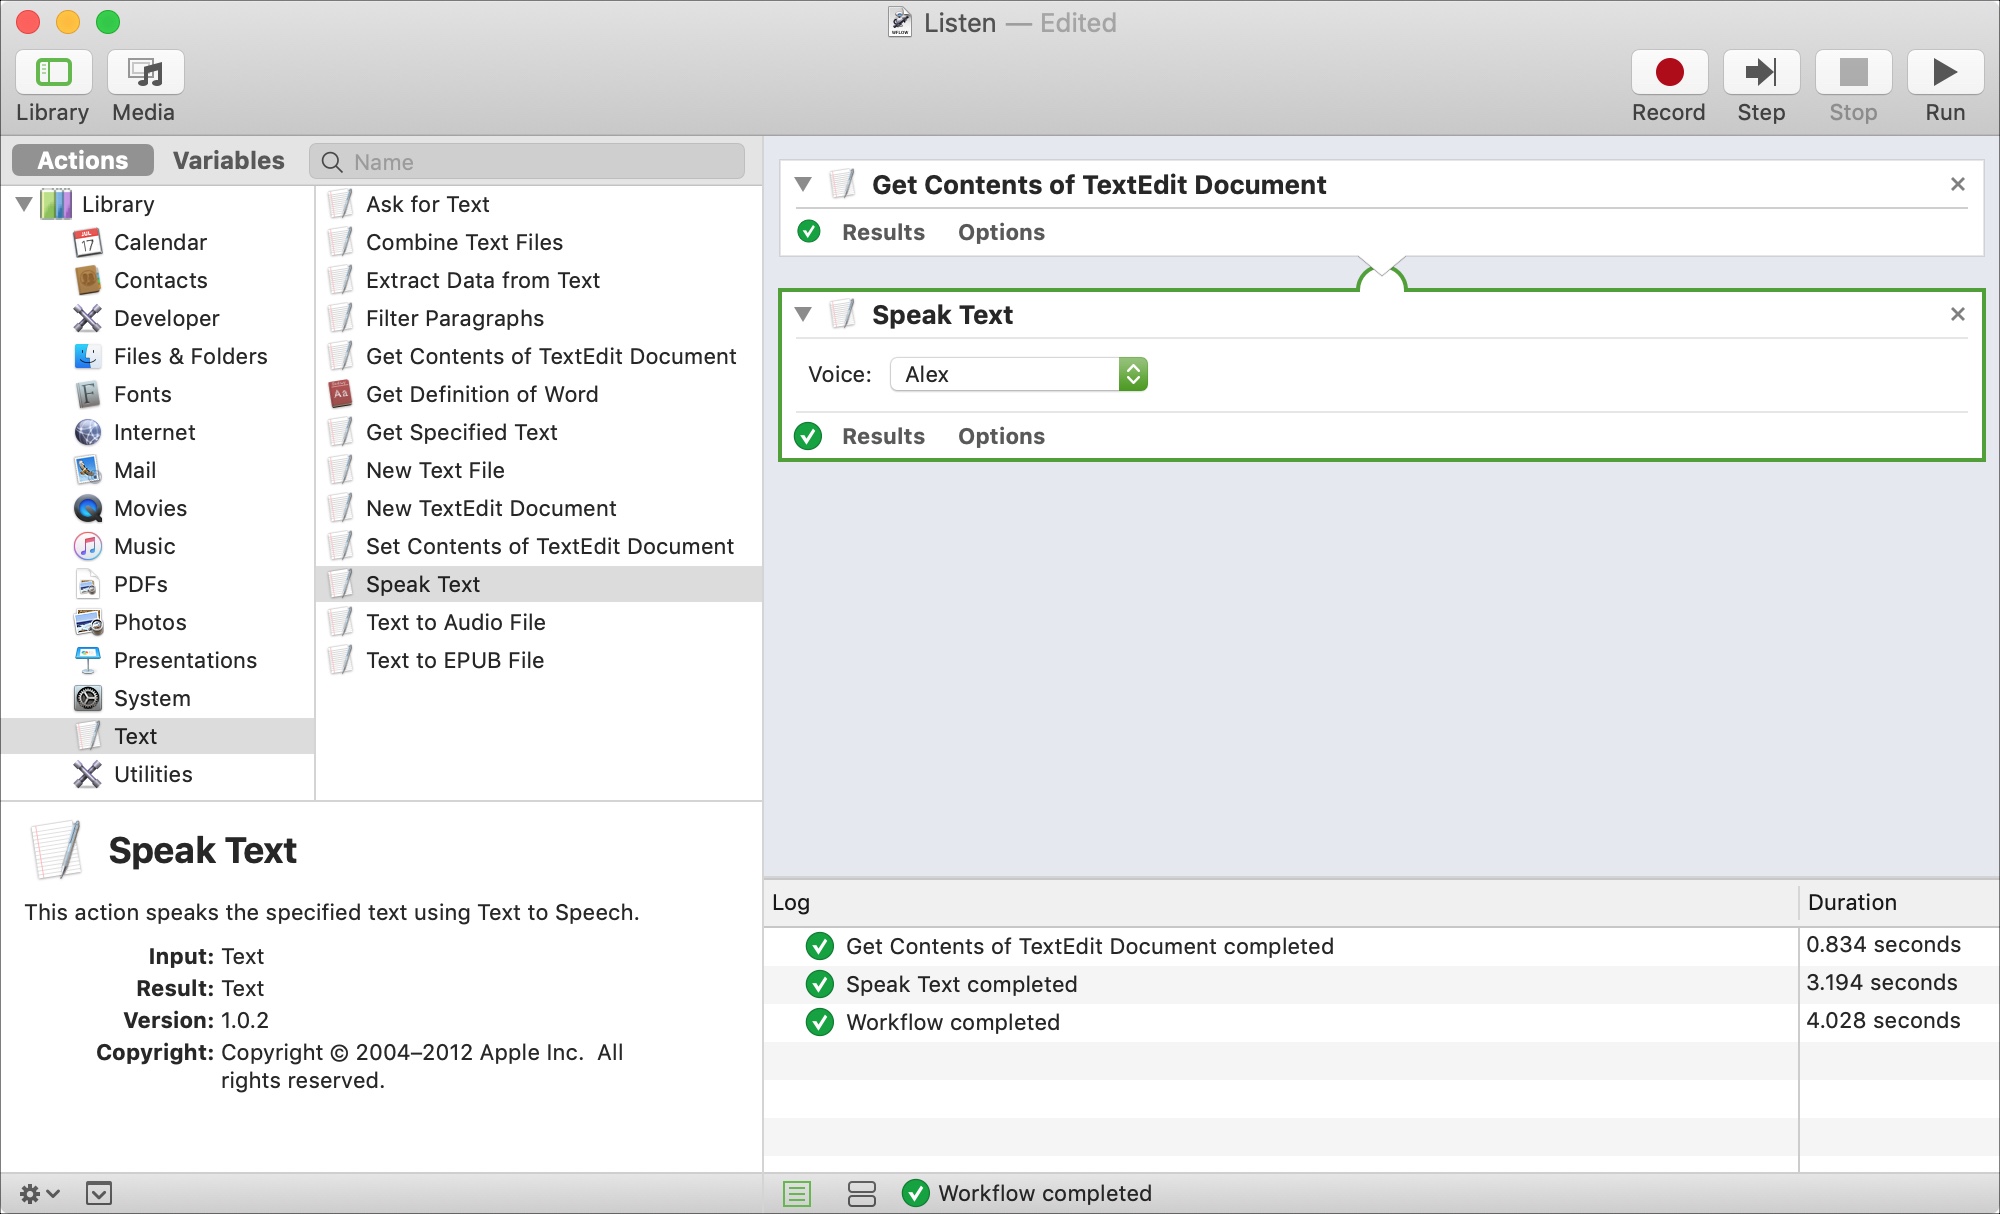
When you want to use the workflow, select your text from its location and then click Run in the Automator window. Then, sit back and listen to the words.
9. Start a quick screen recording
If you record your screen often, whether for tutorials, your YouTube channel, or your own way of taking notes, create an Automator Application to start your recording quicker than ever.
1) Choose Application as the type.
2) Make sure Actions is selected in the far-left menu. Under Library, click Movies.
3) To the right, select New Screen Capture and drag it to the main window.
4) In the same menu, select Start Screen Capture and drag it to the main window below the previous action.
5) Click File from the menu bar and select Save.
6) Give the file a name and save it to your preferred location, such as Applications, and click Save.
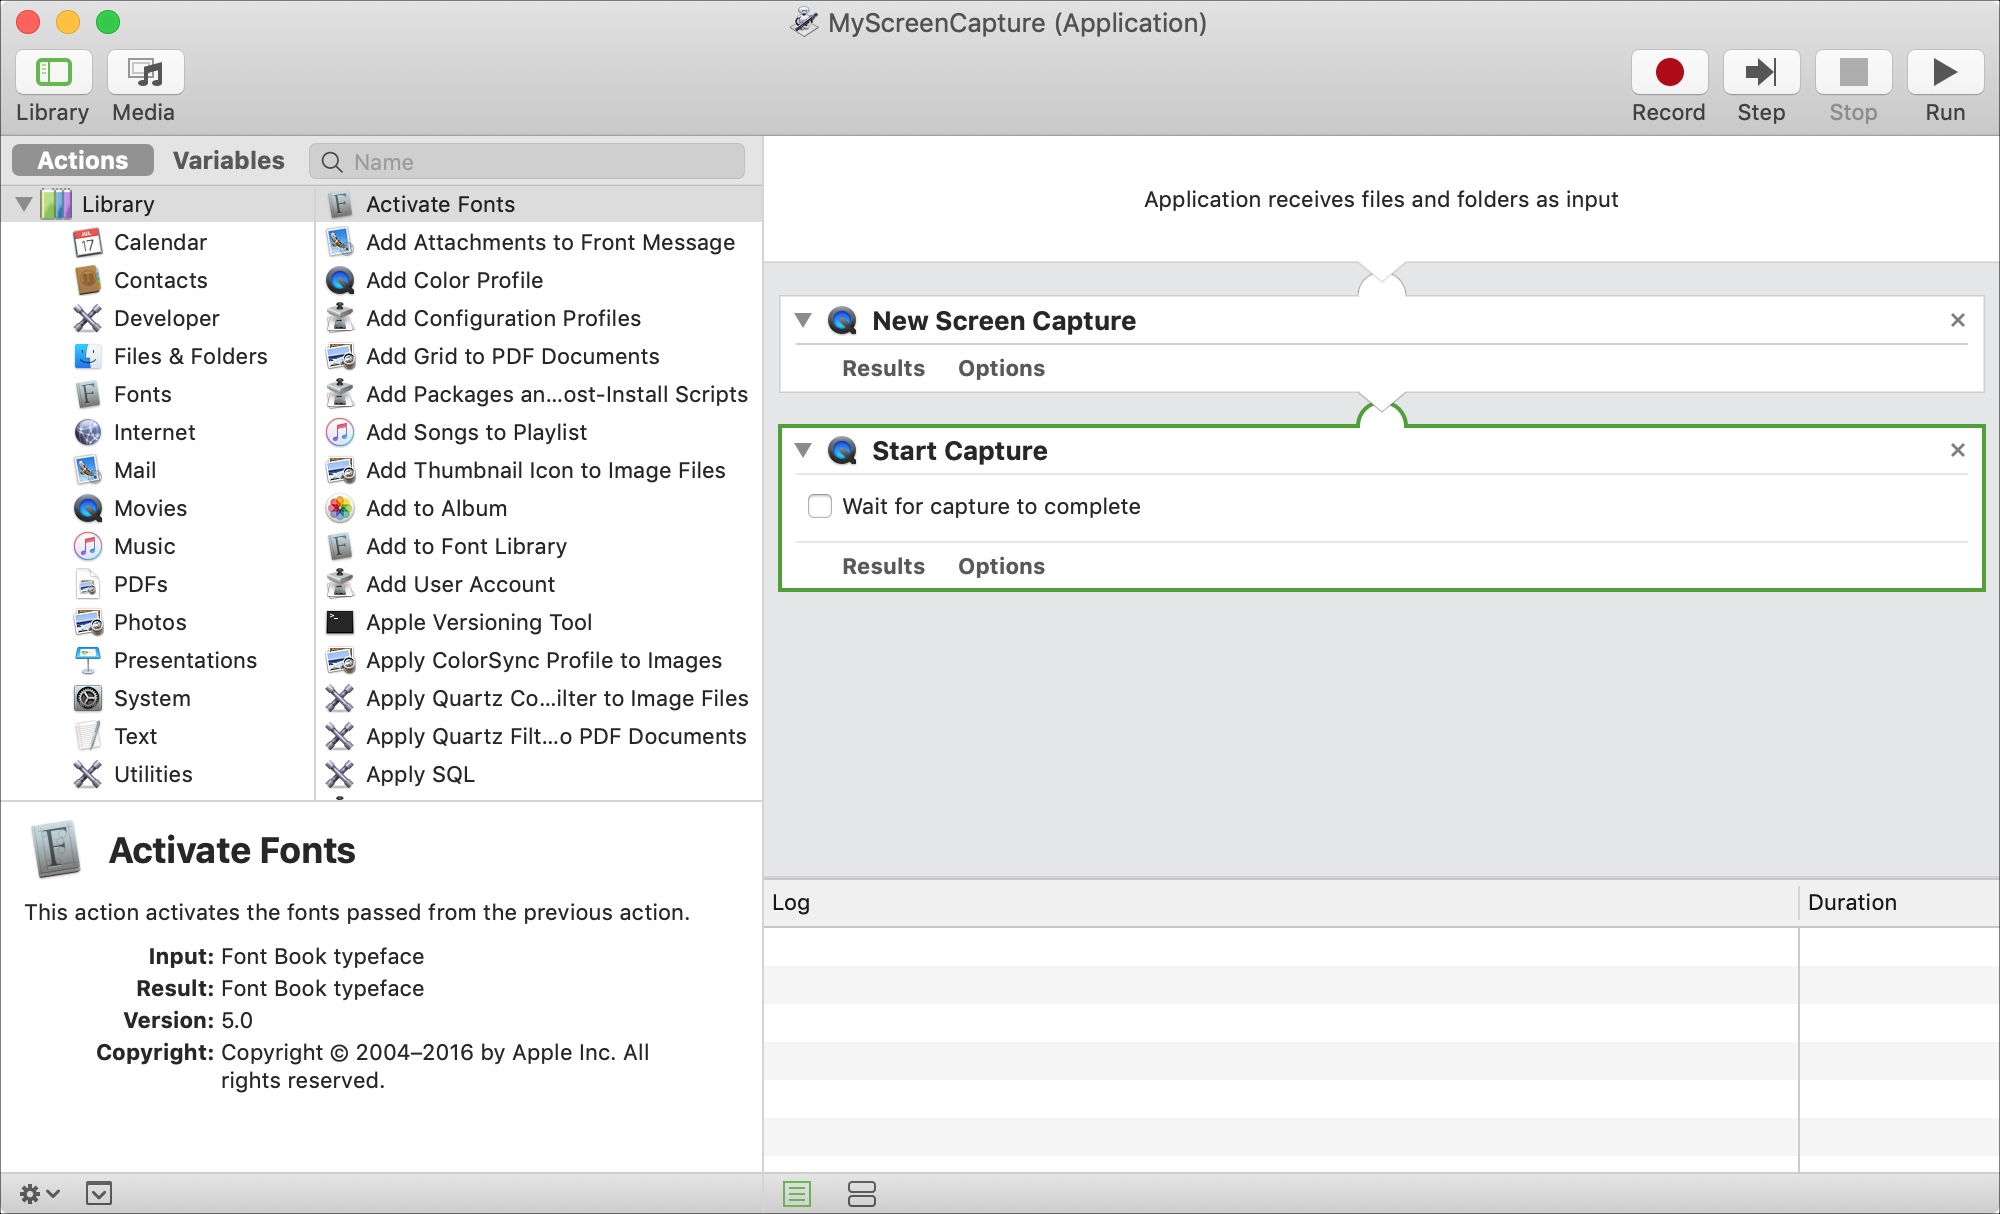
You can pop this application onto your desktop or even onto your Dock. Then, just click to start your screen recording without opening any other app.
10. Quit all of your applications
For a fast and easy way to quit all of your open applications, create a simple shortcut with Automator.
1) Choose Application as the type.
2) Make sure Actions is selected in the far-left menu. Under Library, click Utilities.
3) To the right, select Quit All Applications and drag it to the main window. Note, it’s wise to enable the Ask to save changes option so that you don’t lose any unsaved work before your applications close. You can also add applications to the Do not quit list to keep them open when you run this.
4) Click File from the menu bar and select Save.
5) Give the file a name and save it to your preferred location, such as Applications, and click Save.
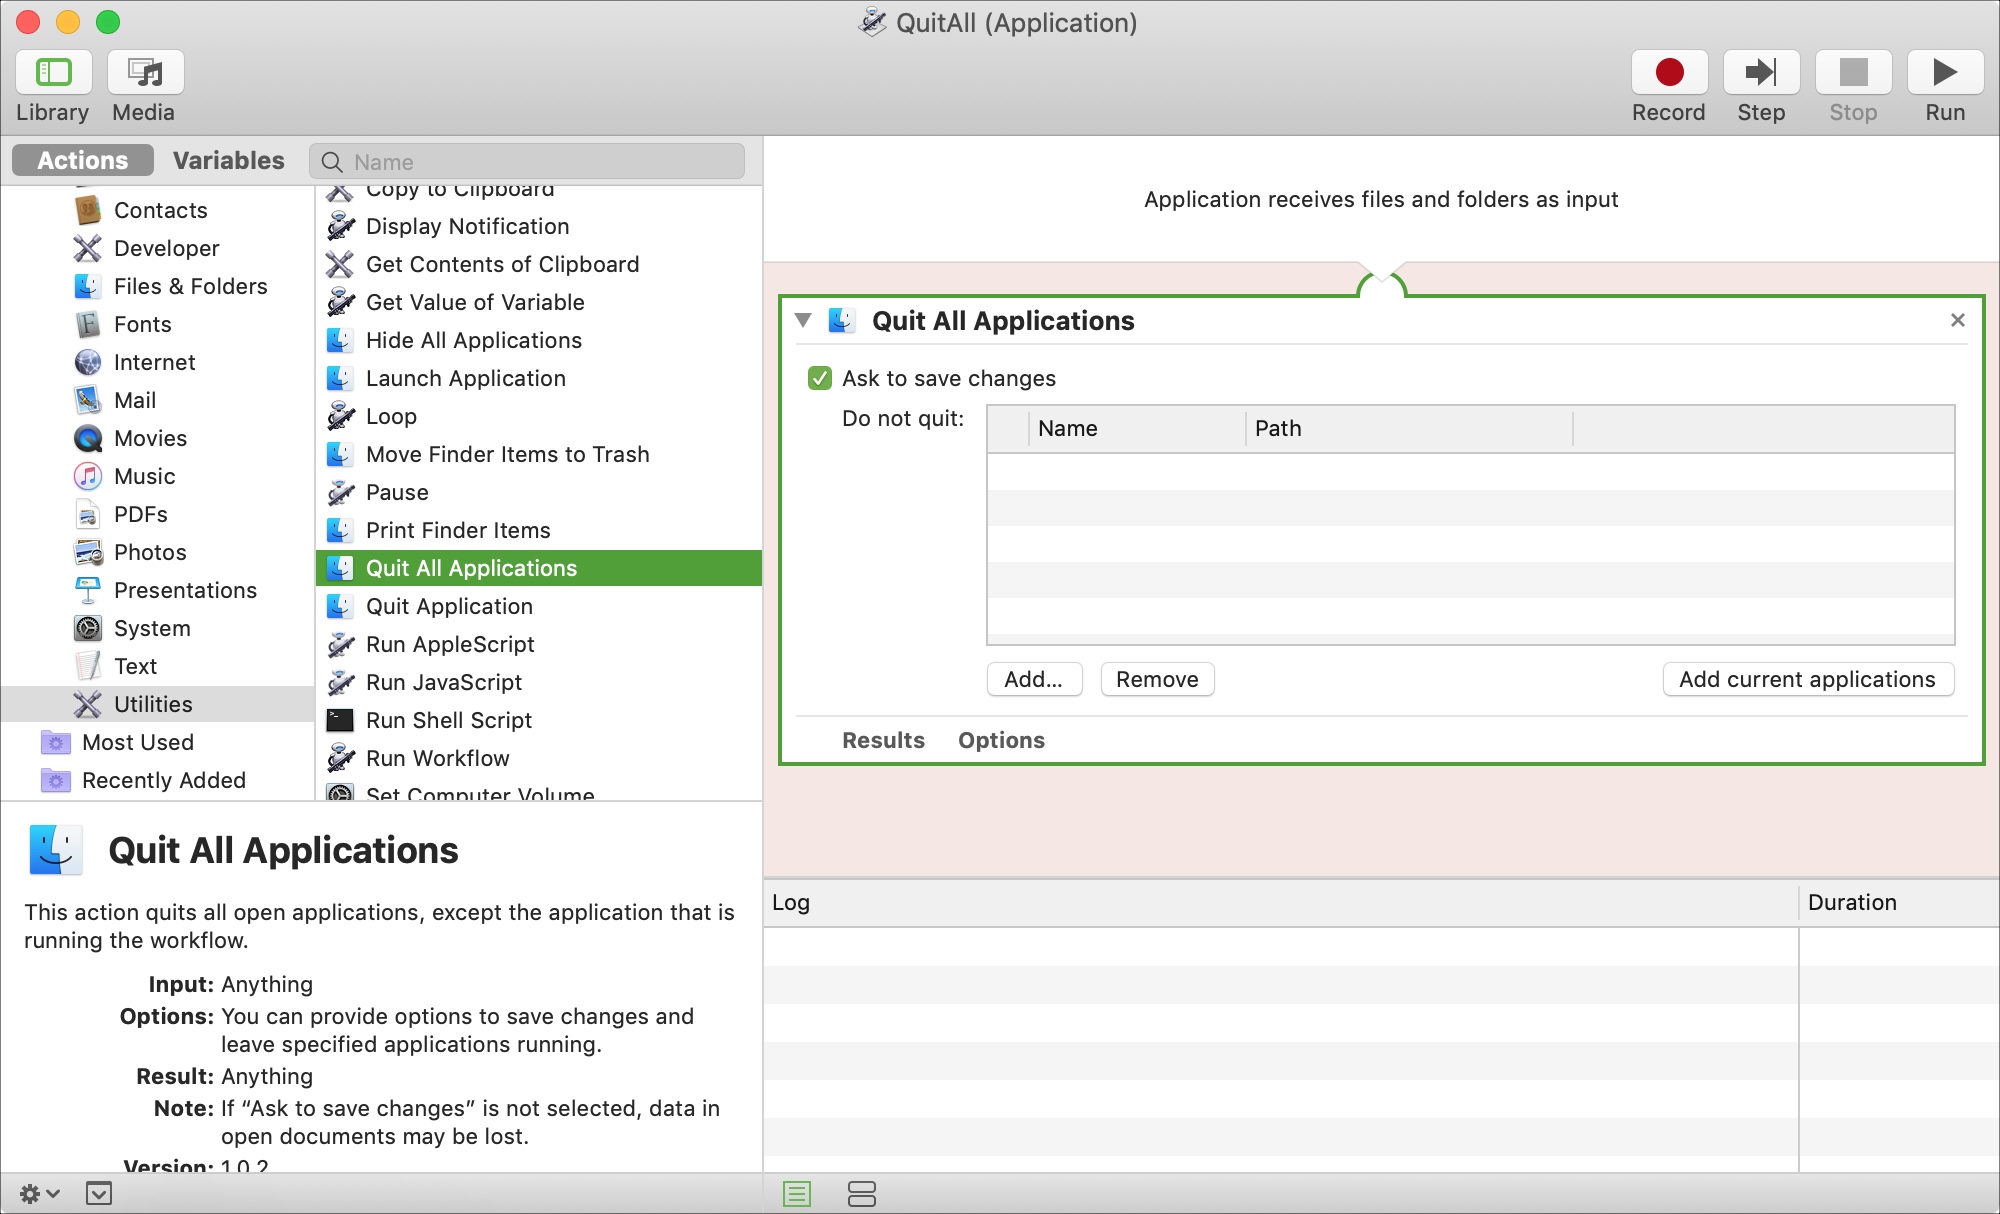
When you run the new Automator Application, the other applications you have open will close. With the save changes option marked, you will also be prompted to save your items.
Hopefully, one or more of these Automator tricks is something you find useful. Let us know which you decide to use and how you like it in the comments below!
Related helpful tips: