Learn how to create stickers from your photos and use them in Messages and other apps on your iPhone, iPad, and Mac running iOS 17, iPadOS 17, and macOS Sonoma.
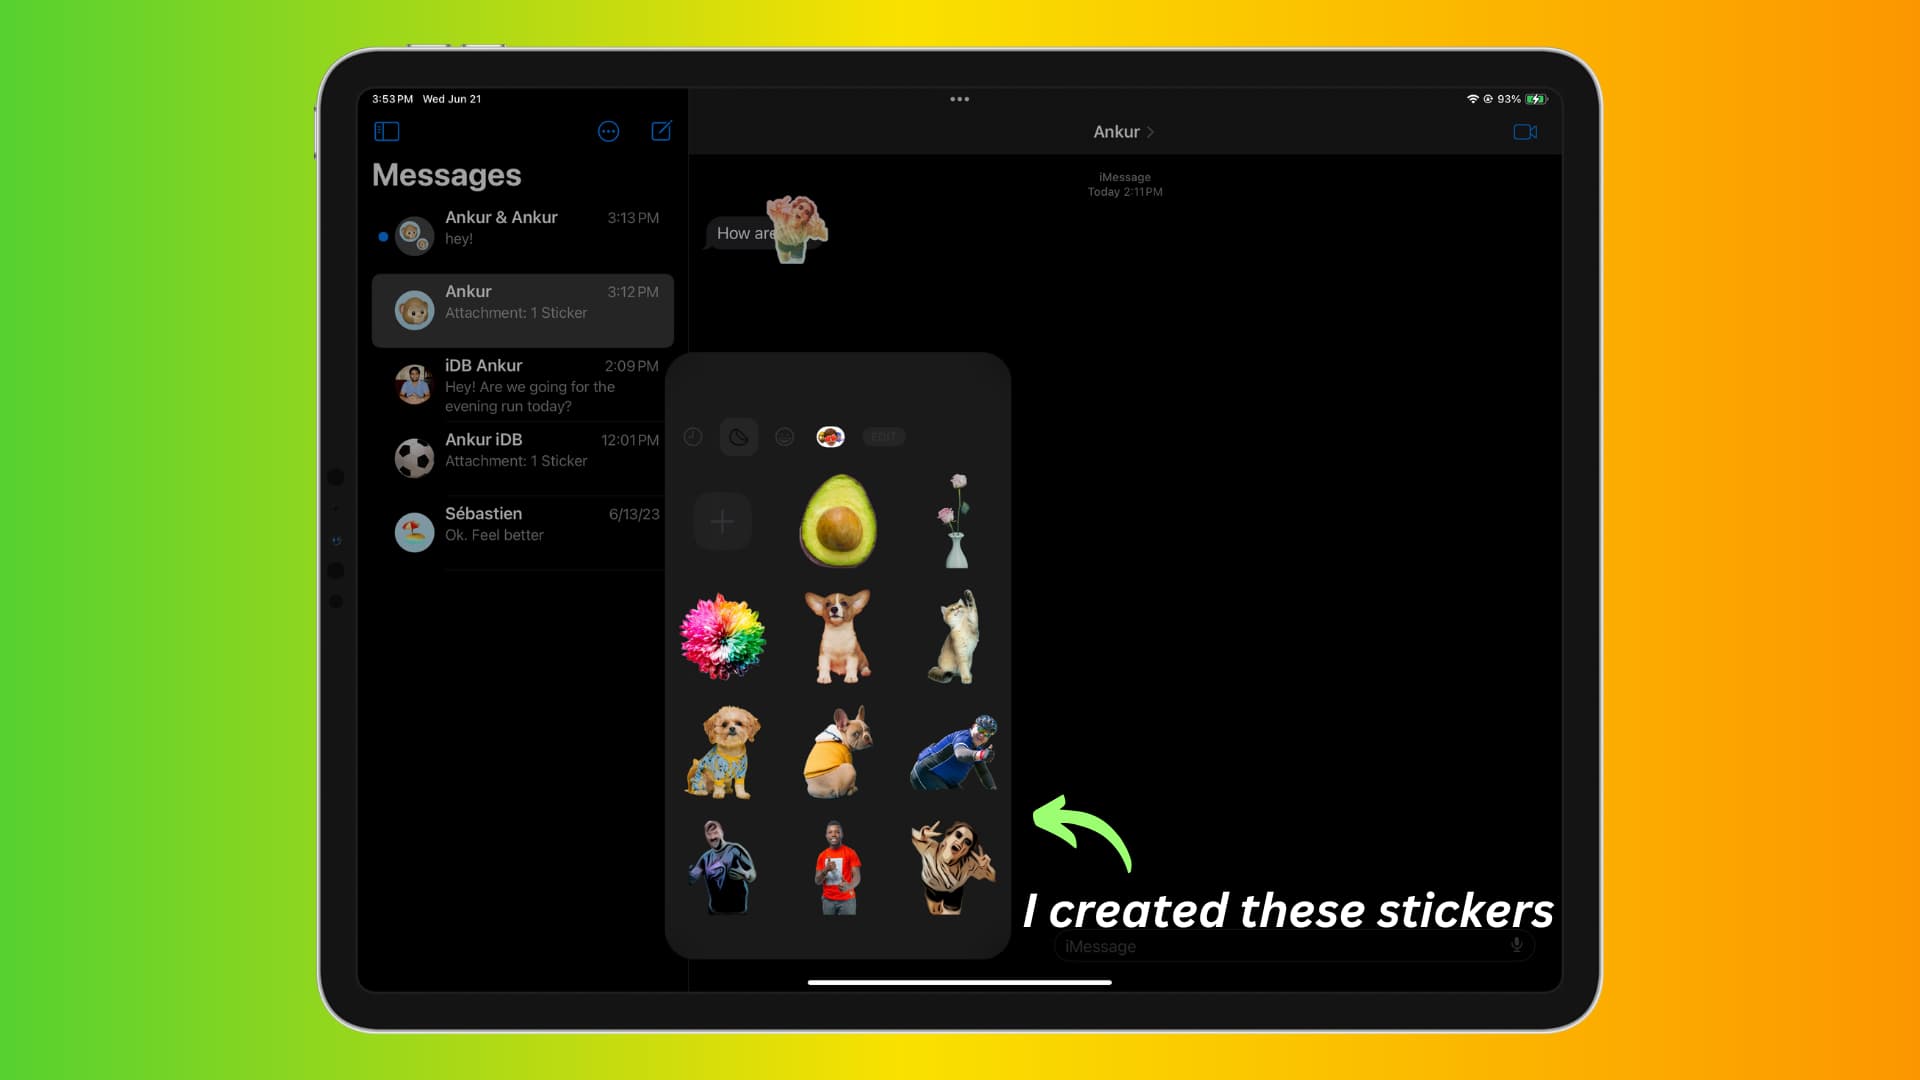
A fun new iOS feature lets you turn your picture, family photo, pets, and other objects of an image into a sticker to use in Messages and other App Store apps. In this tutorial, we’ll show you how.
Please note that I’ve used my iPad for this article. But the steps for iPhone are similar, and you should have no trouble following them.
Turn your still photos into stickers
1) Make sure the picture you want to turn into a sticker is saved to the Apple Photos app or the Files app on your iPhone or iPad.
2) Go inside the Photos app or the Files app and open the image.
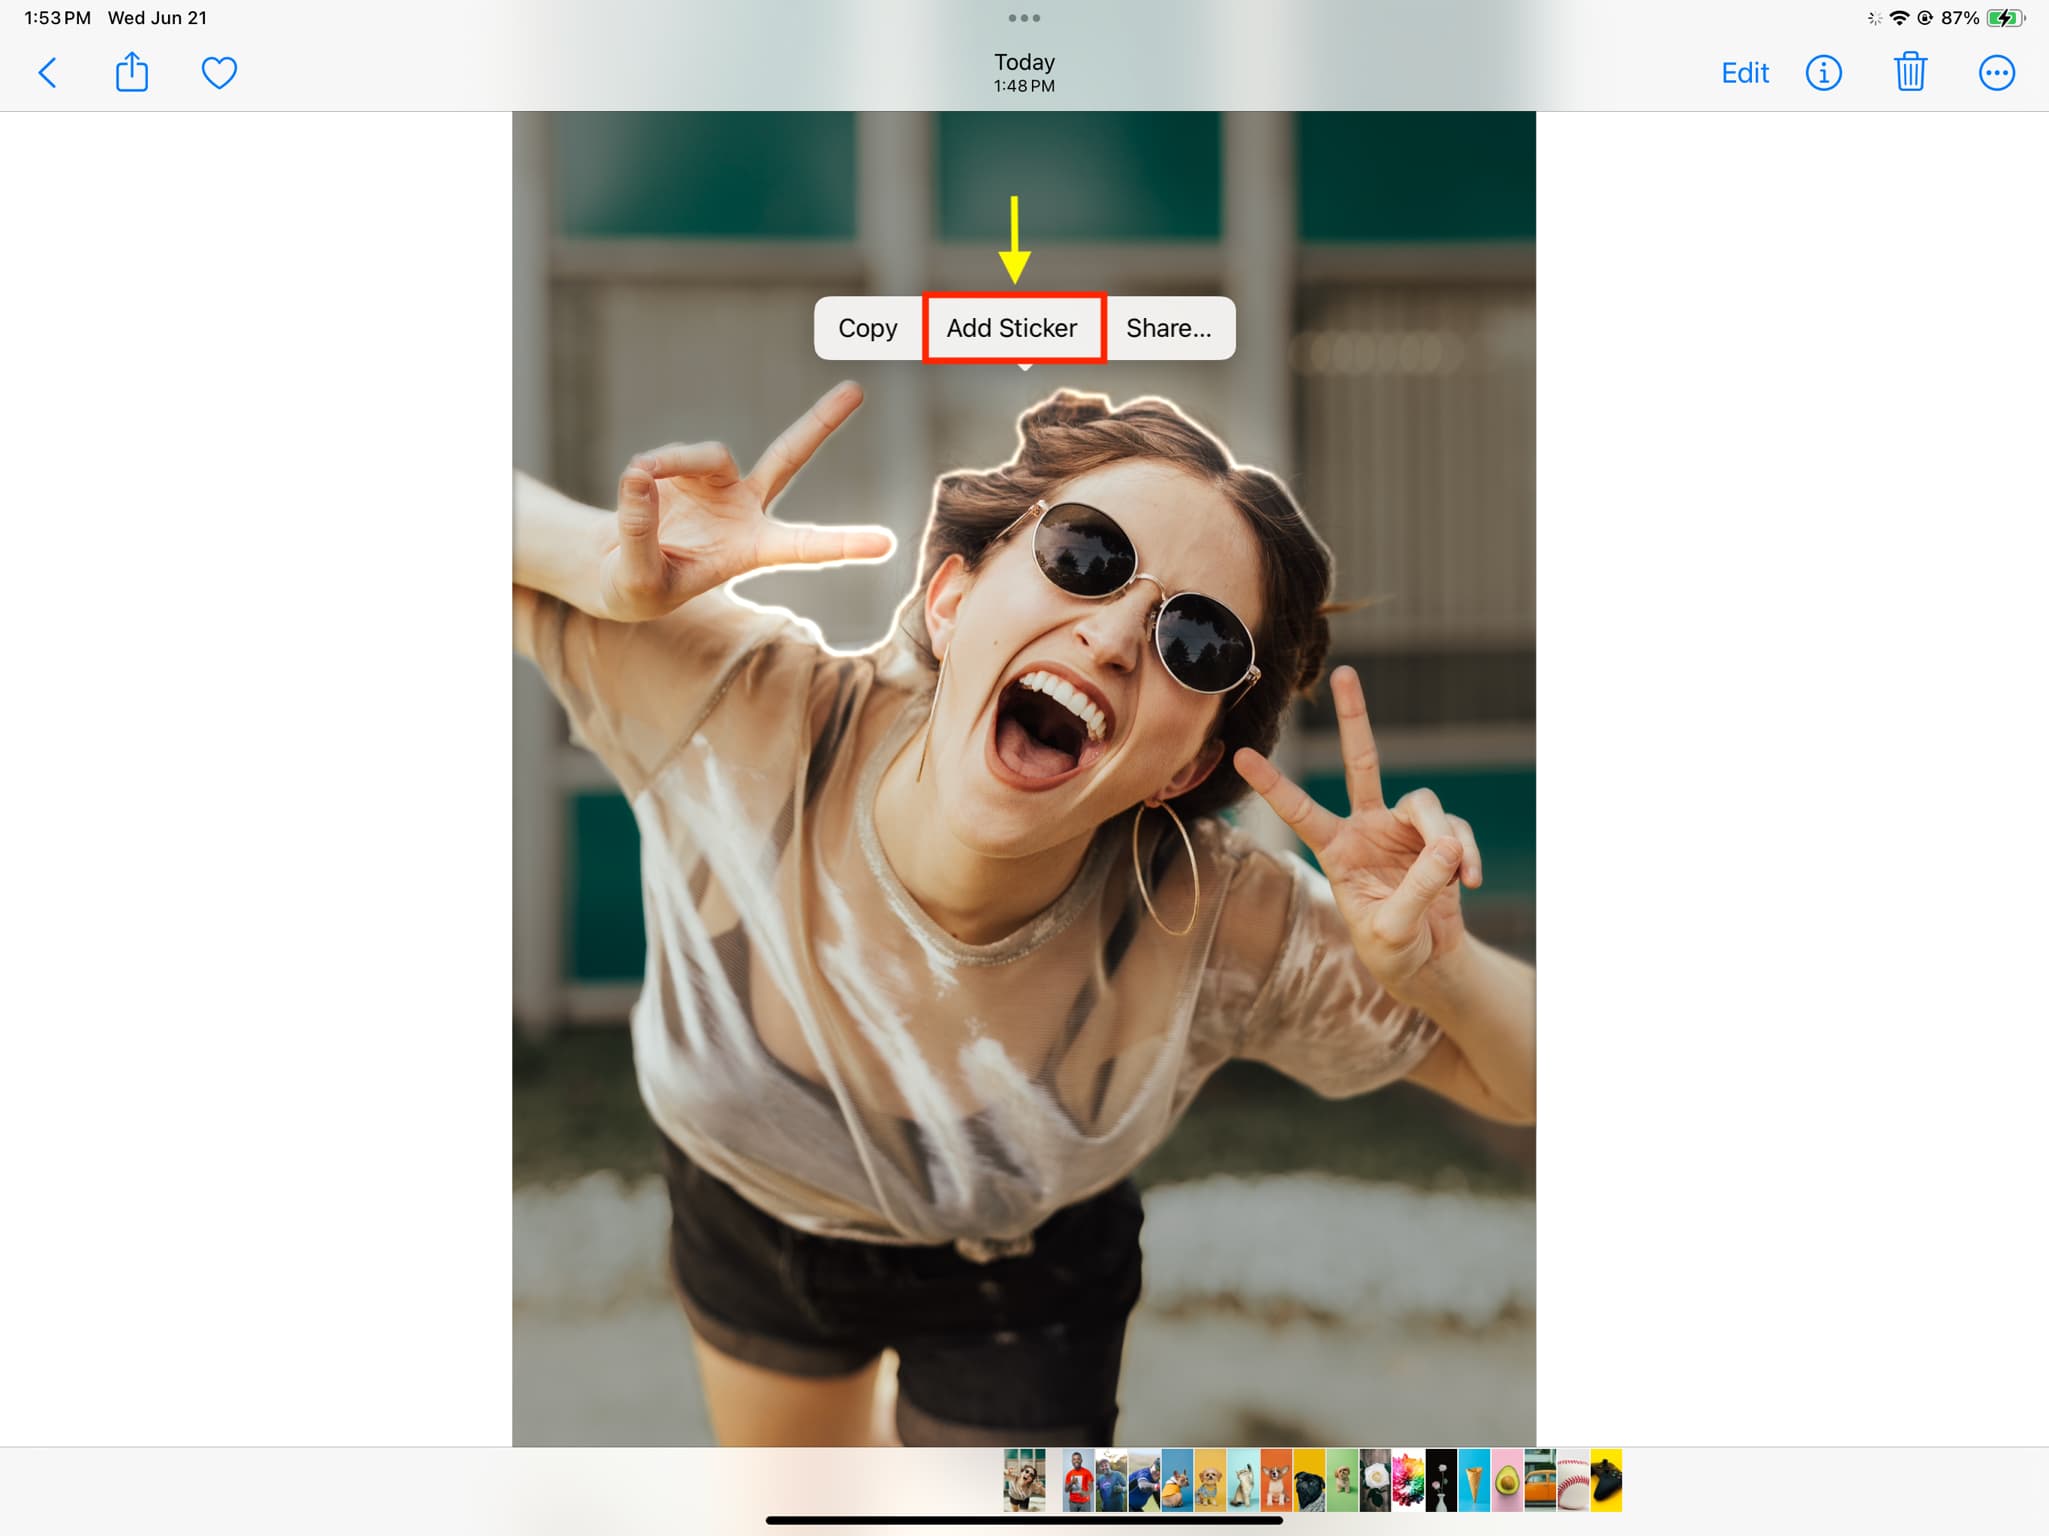
3) Touch & hold the main subject of the image, like your face, people, pet, object, or some other prominent thing.
4) When you touch & hold, you will notice a white line run across the edges of the main subject, and a menu strip will pop up. Tap Add Sticker.
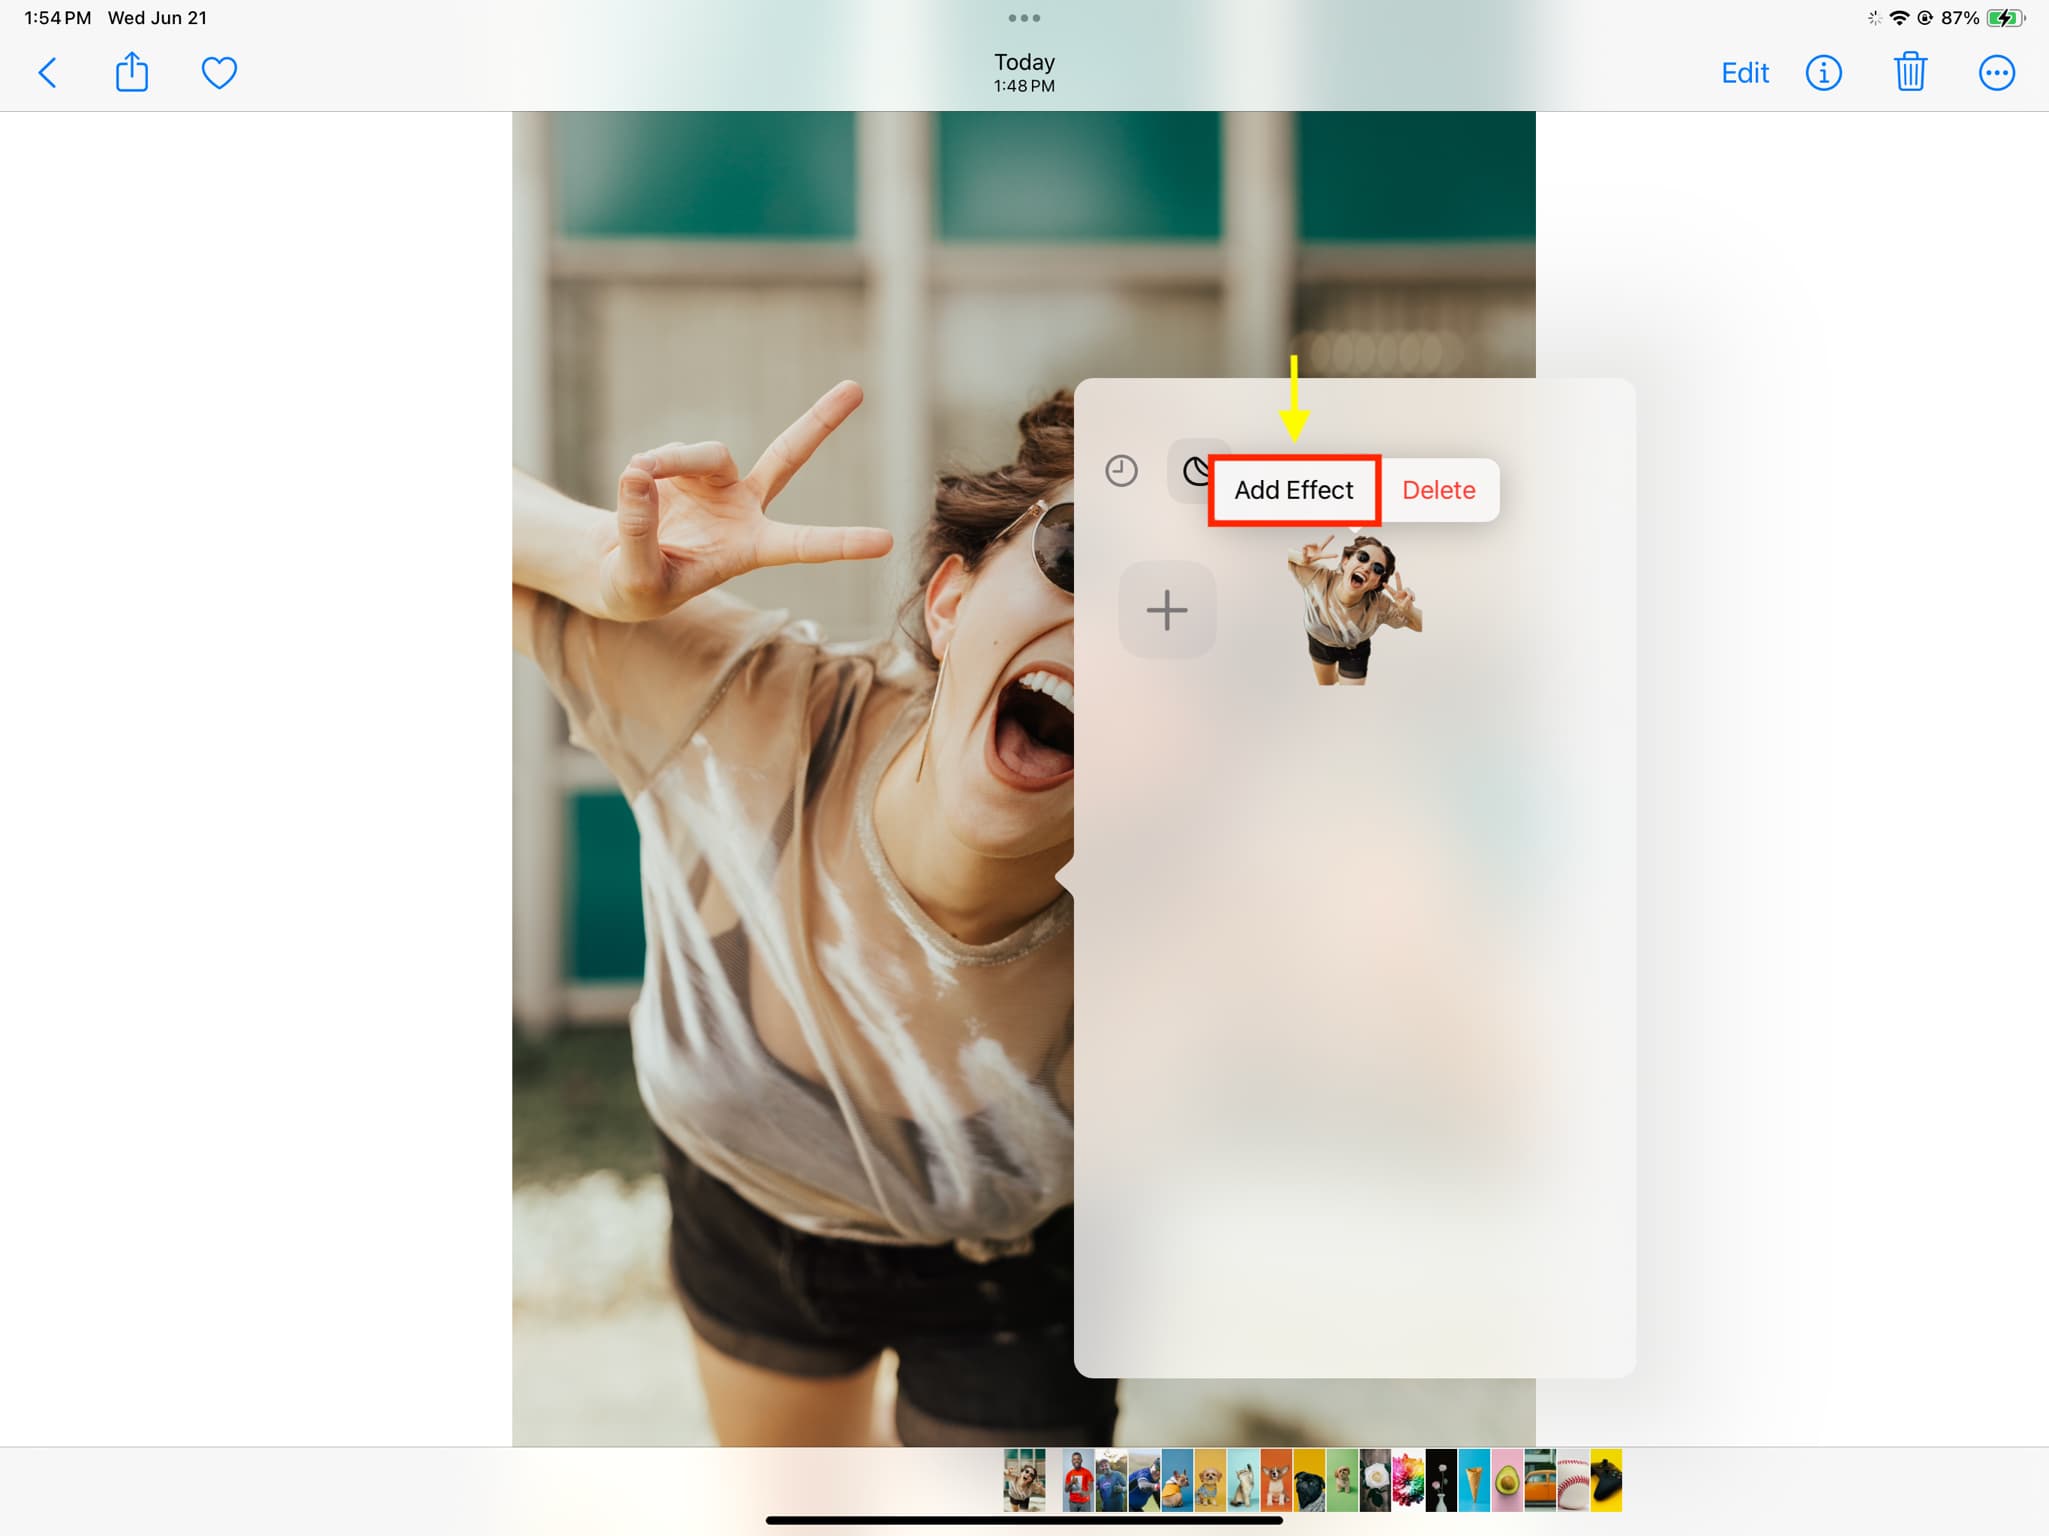
5) You’ve successfully turned yourself or the main subject of that photo into a sticker. It’s saved now, but you can further customize it, and to do that, tap Add Effect protruding from the newly created sticker. If you don’t see this option, touch & hold the created sticker and pick Add Effect.
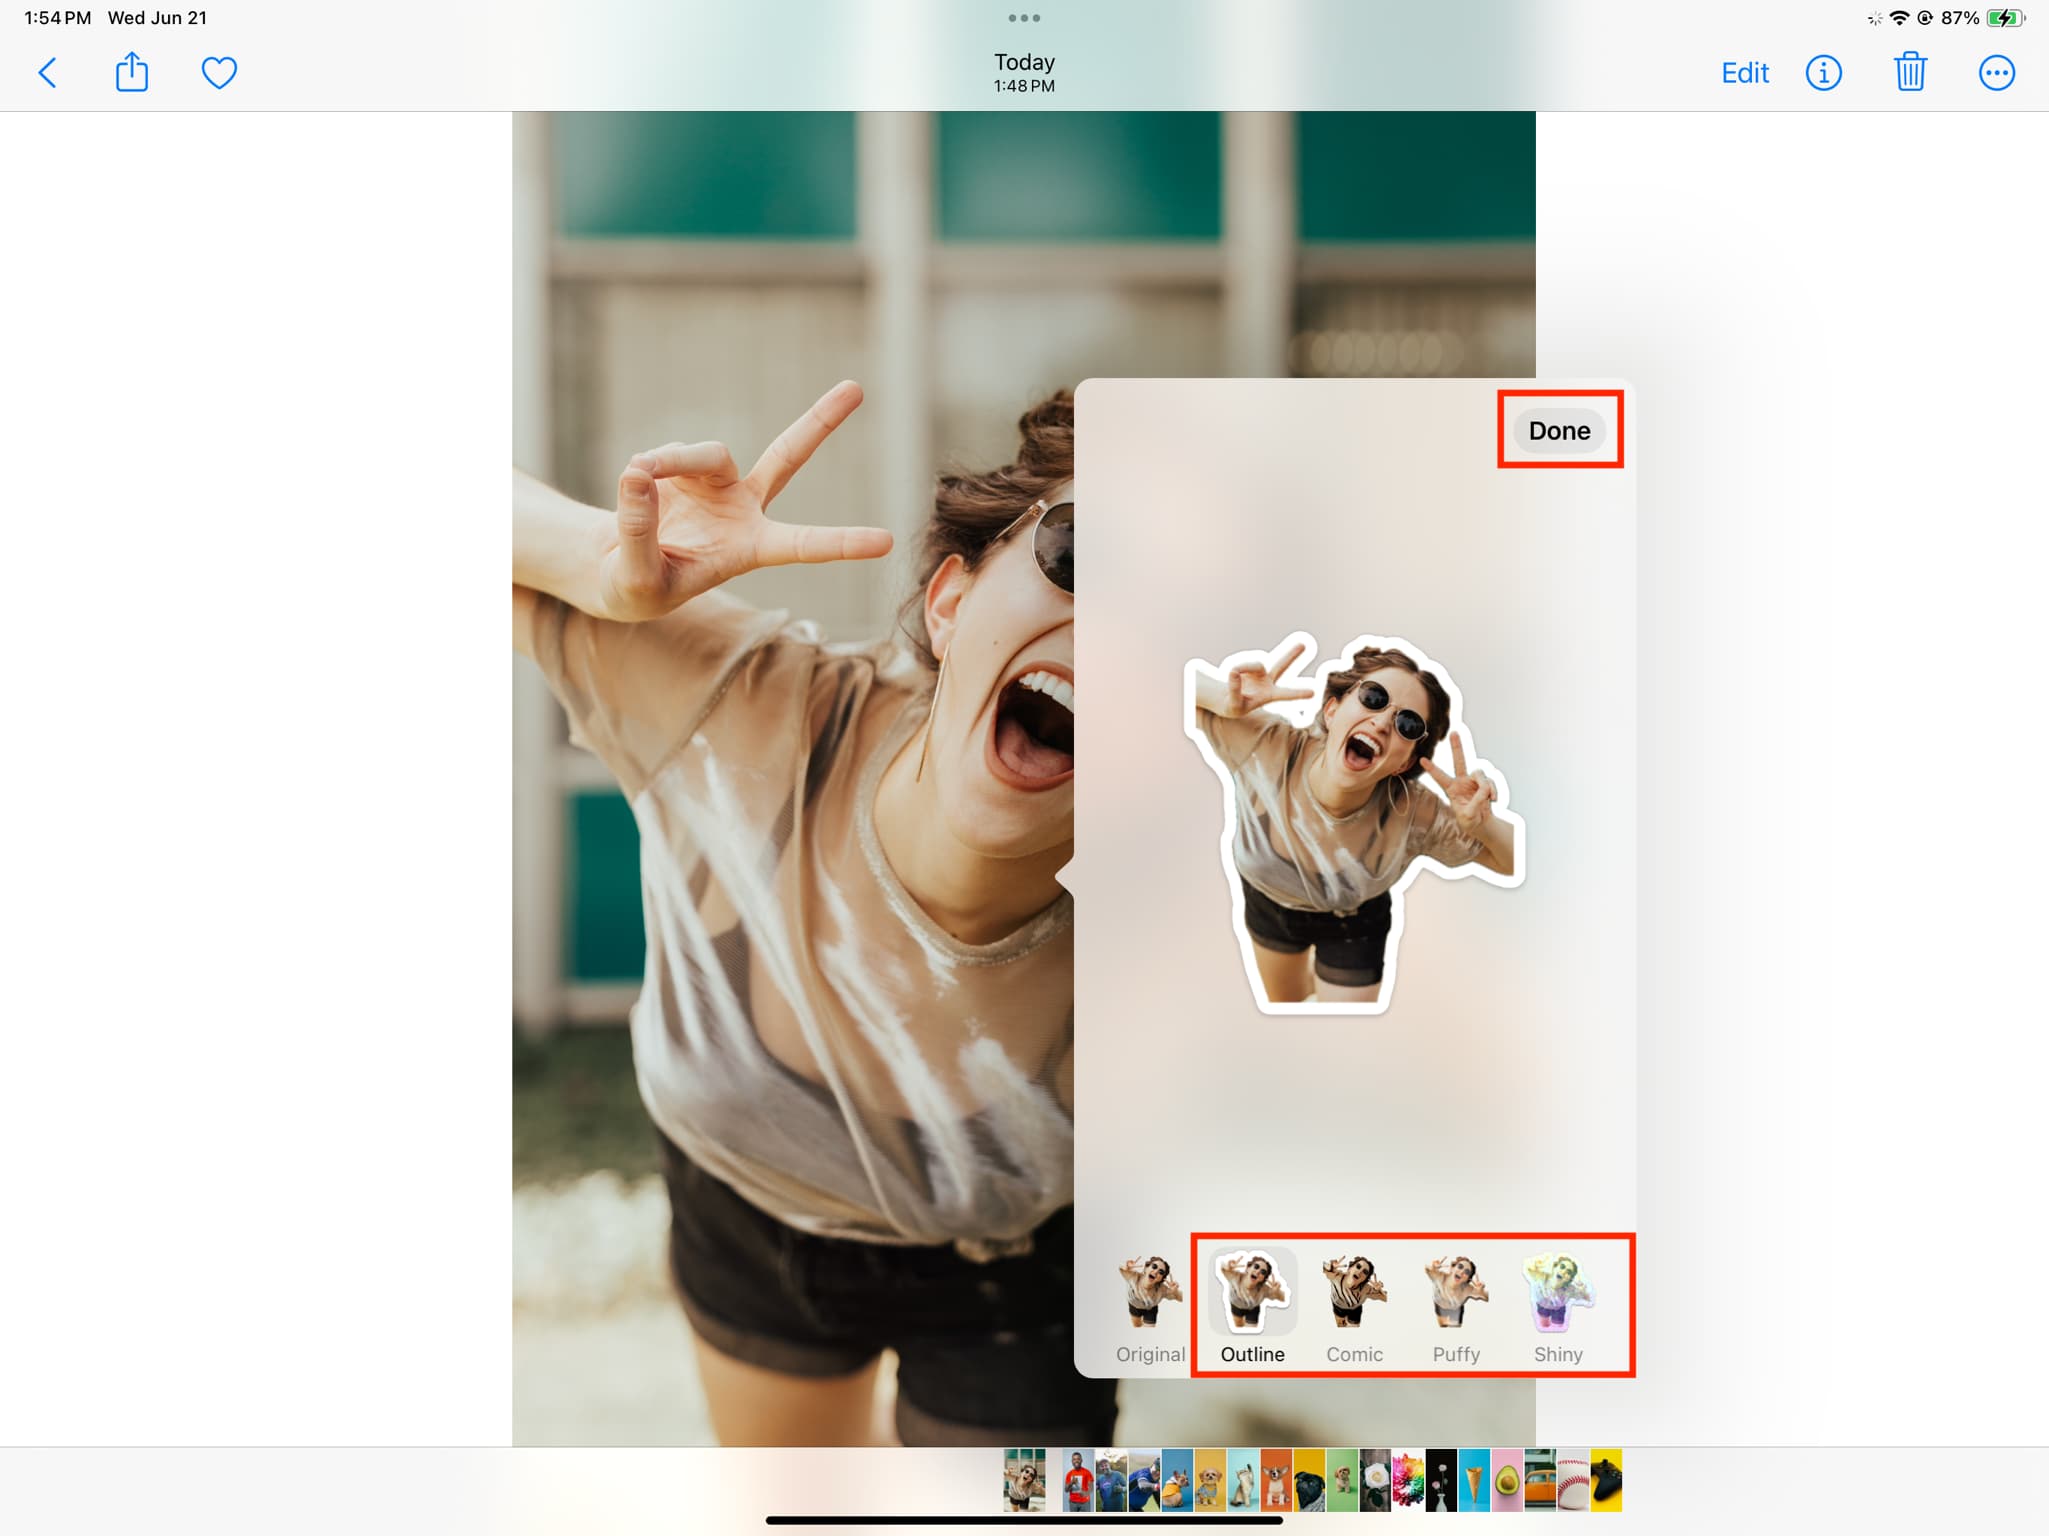
6) Now select one of the four effects named Outline, Comic, Puffy, or Shiny, and tap Done.
Note: You can’t create these stickers on your Mac.
Turn your Live Photos into animated stickers
Just like you can touch & hold the main subject of a still image and turn it into a still sticker, you can also touch & hold the main subject of a Live Photo and tap Add Sticker. This will turn that subject into an animated sticker.
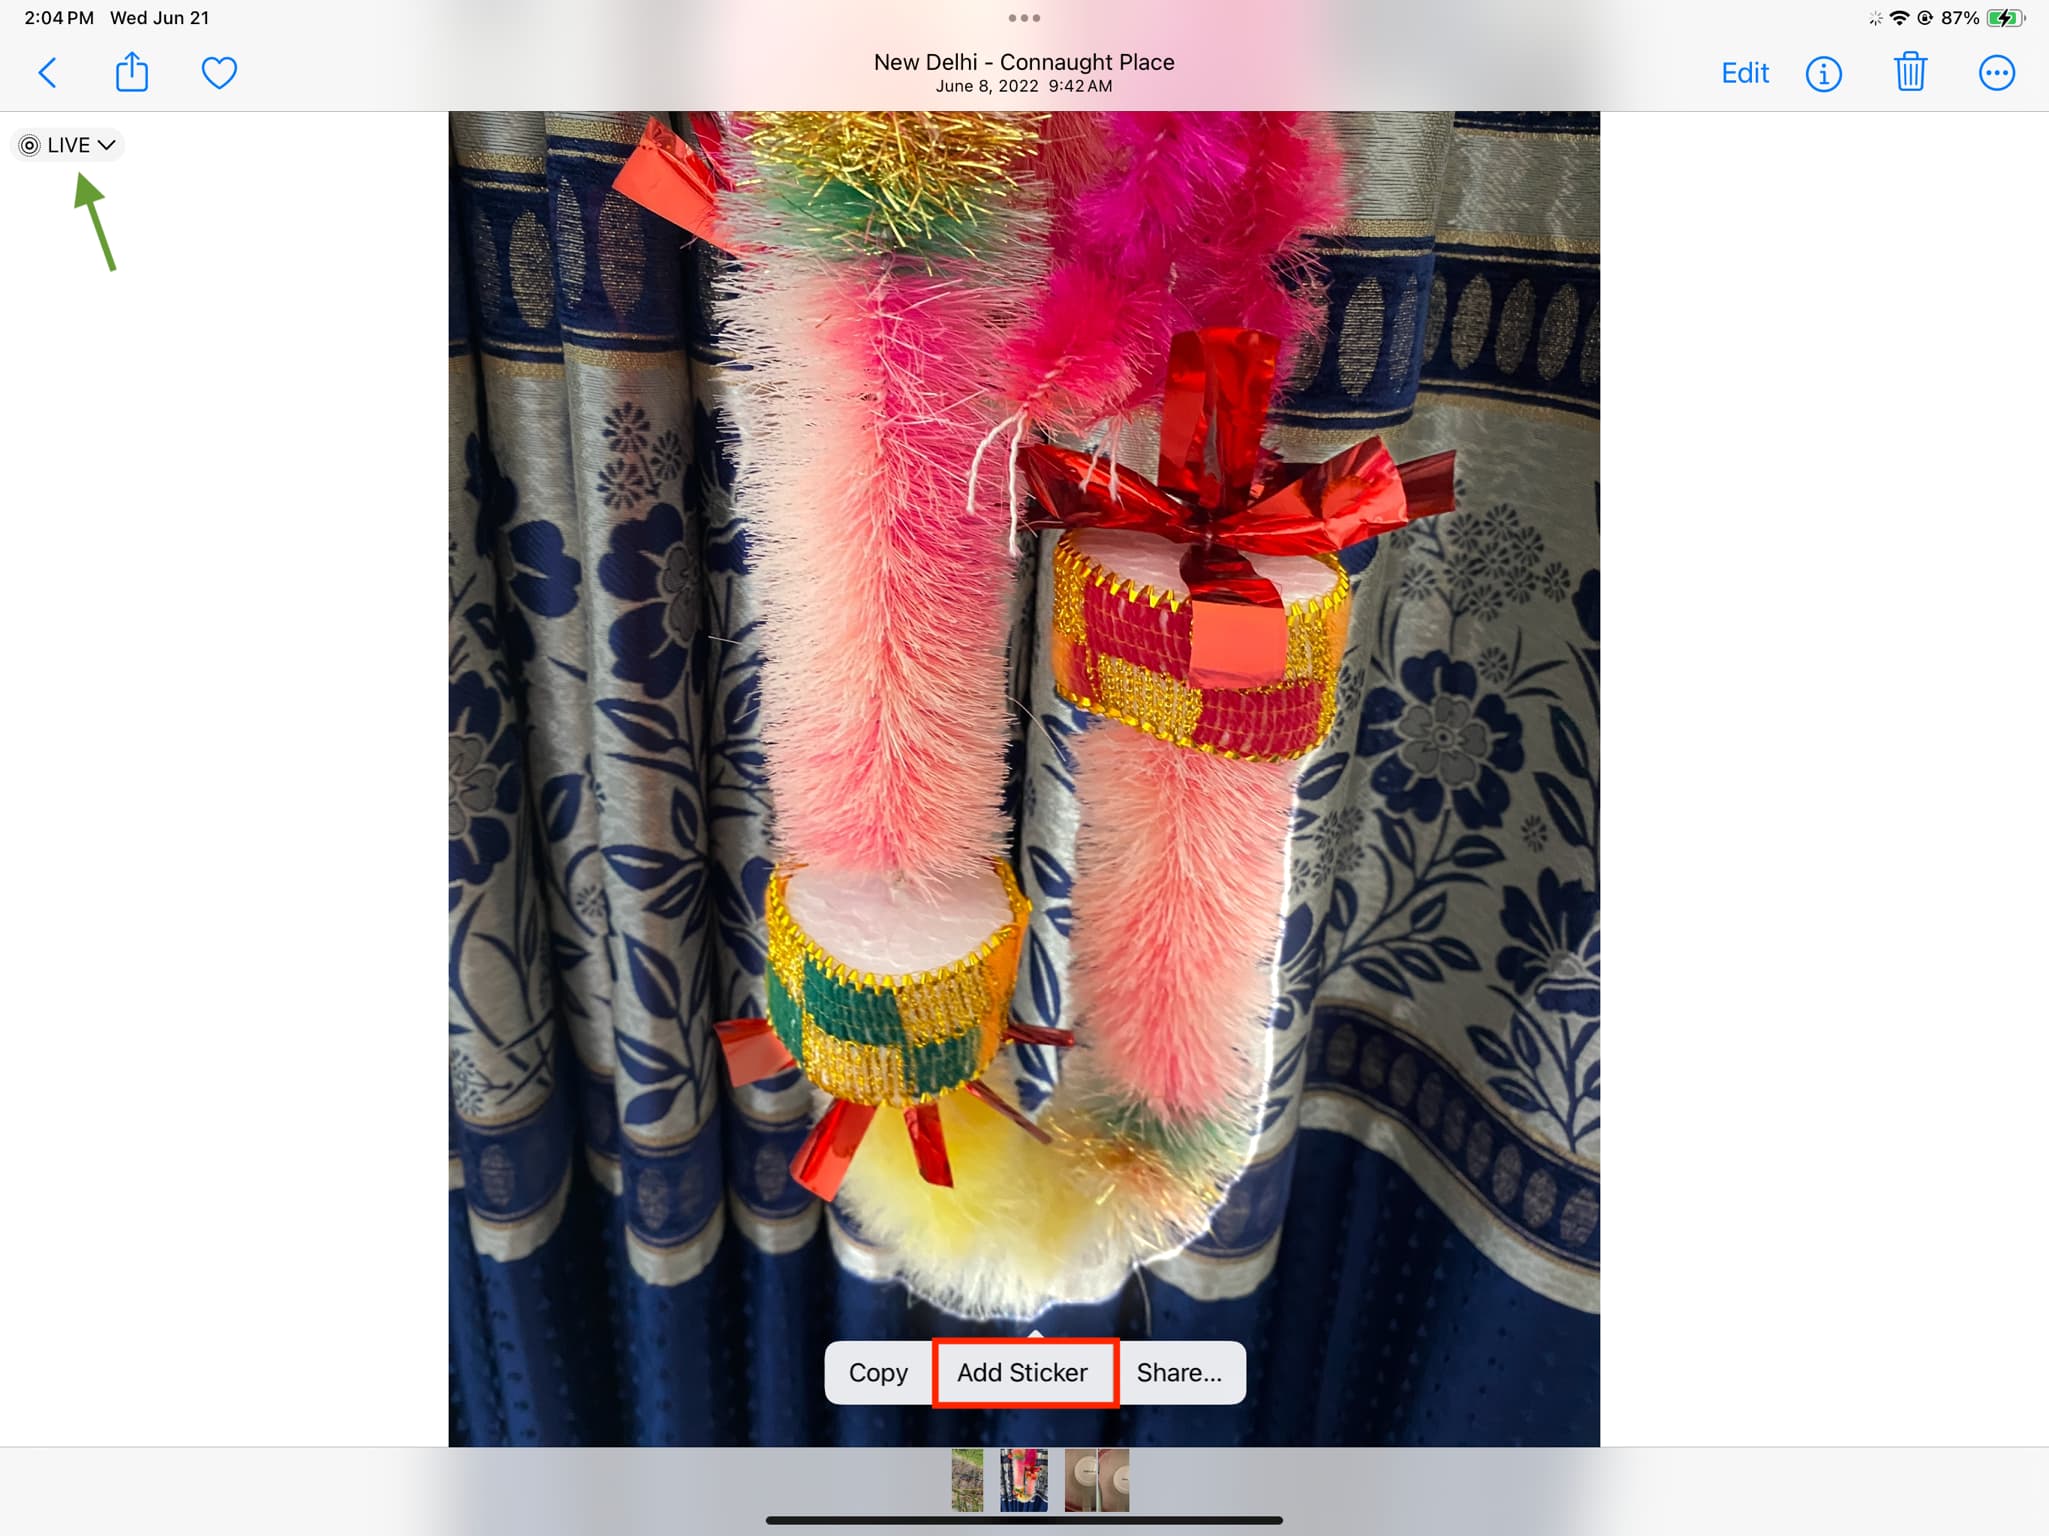
If you take Live Photos or have existing ones, you must give it a go. I’m sure you’ll love them.
Note: Since touching & holding a Live Photo starts playing its animation, you may have to try a few times before you see the Add Sticker option.
Use your photo stickers in the Messages app
Still and animated stickers you create on one device, like an iPhone or iPad, sync via iCloud to all your other Apple devices having the same Apple ID. Here’s how to use them in iMessage chats.
On iPhone or iPad
1) Open the Messages app and start a new conversation or go inside an existing one.
2) Tap the plus button (+) that’s near the text typing box.

3) Choose Stickers.
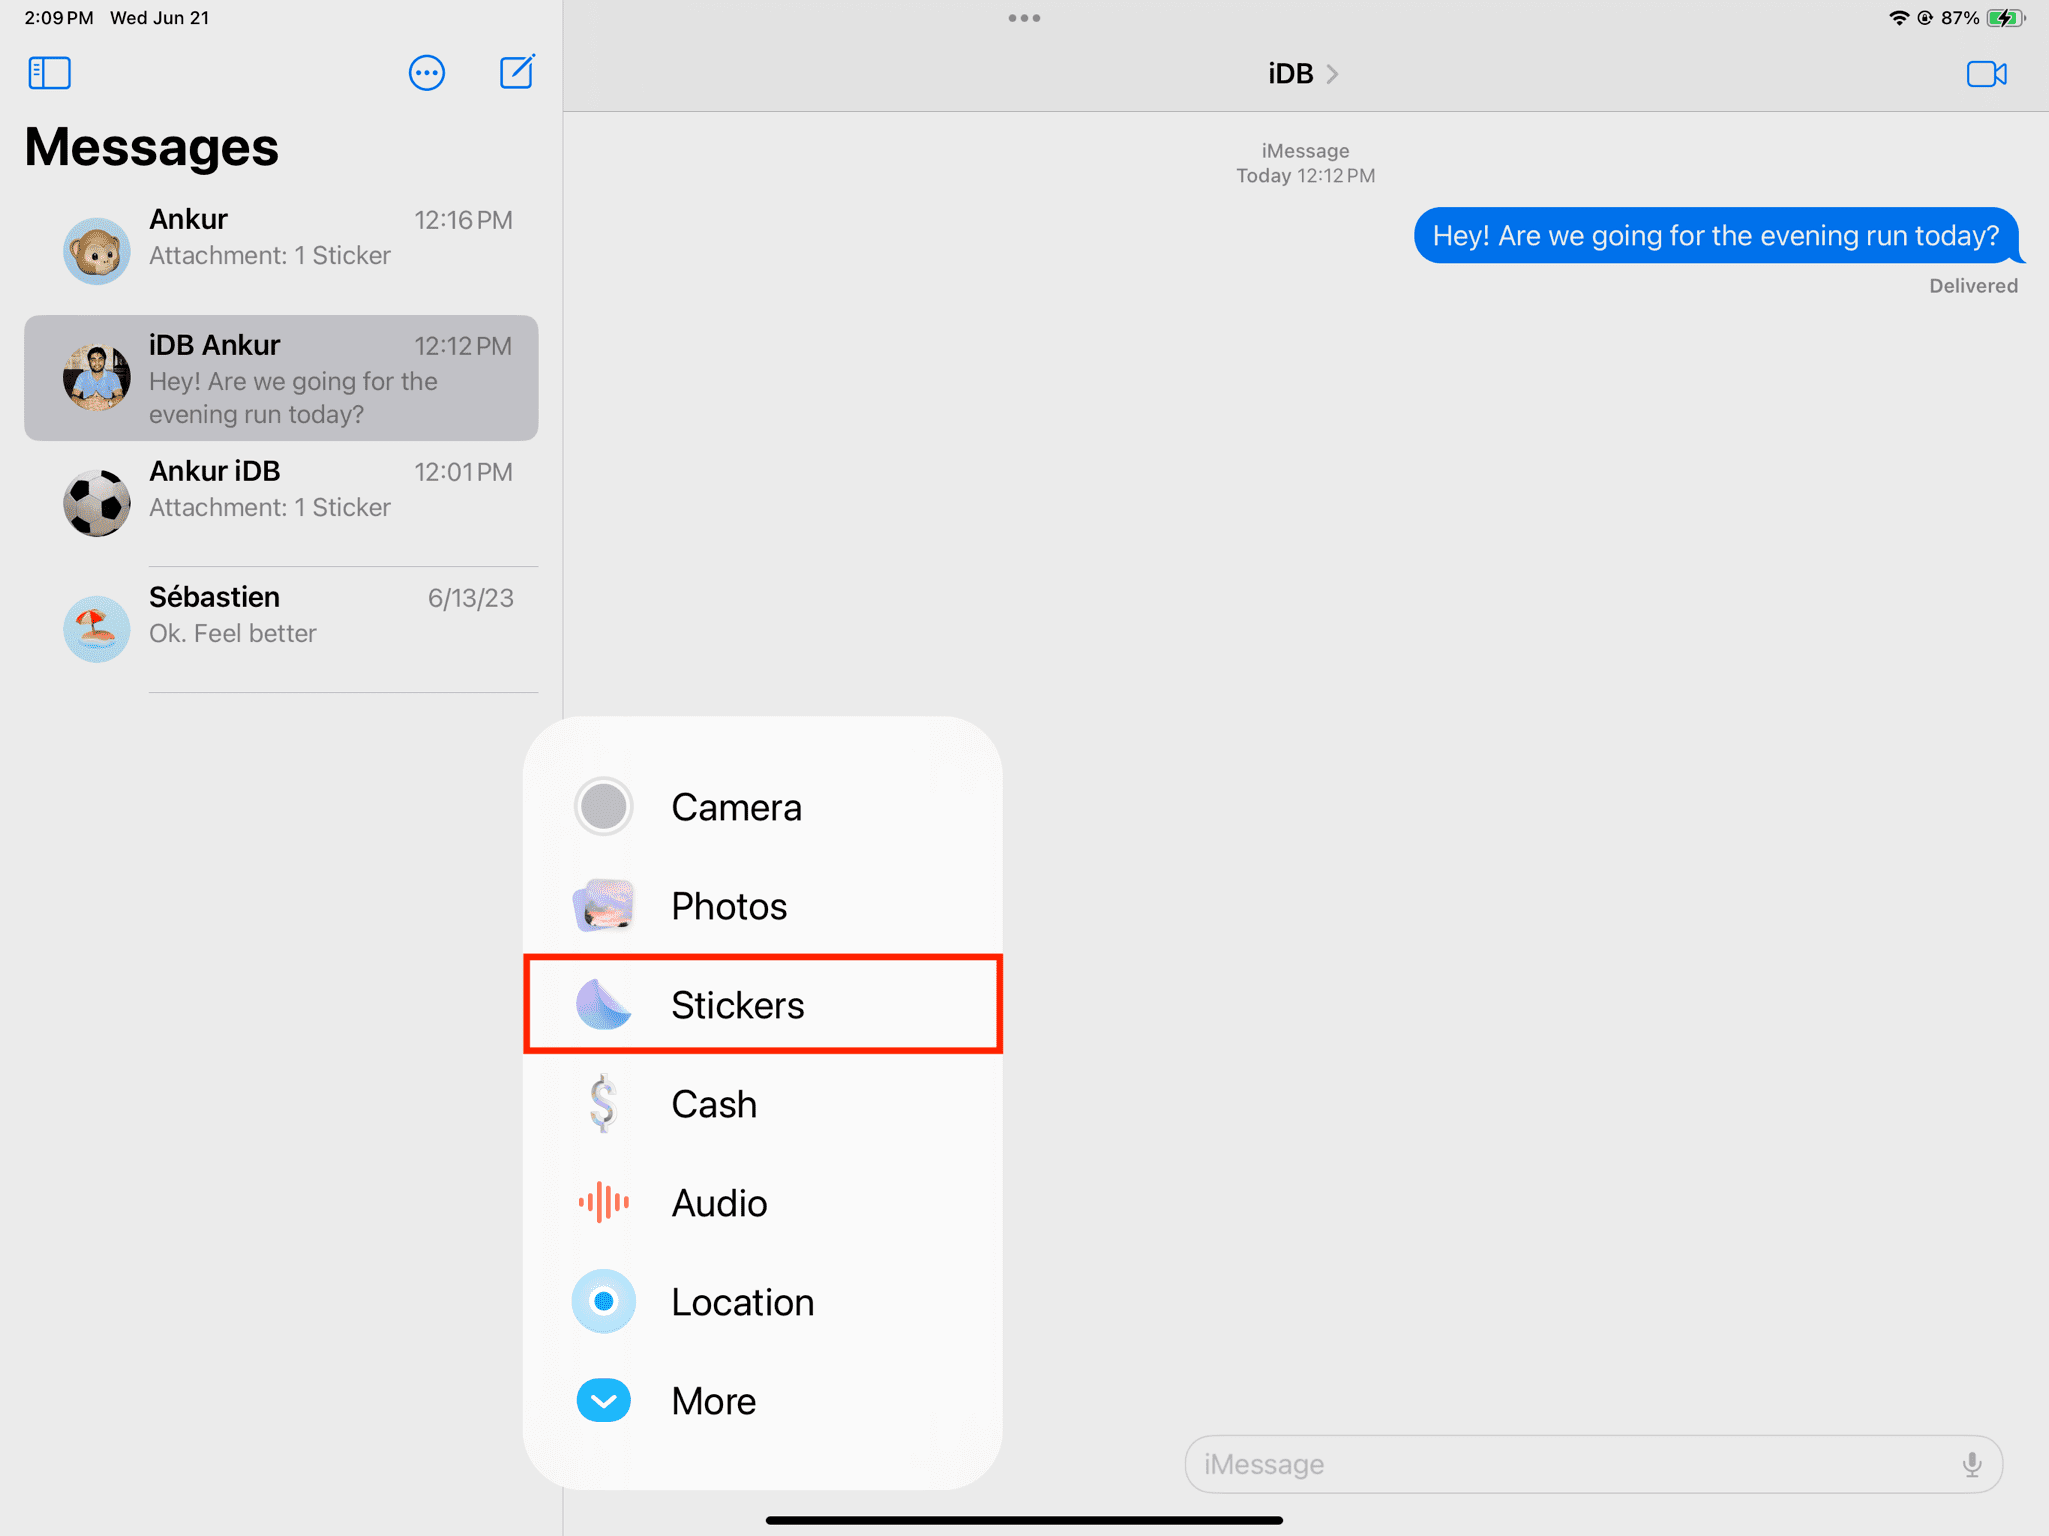
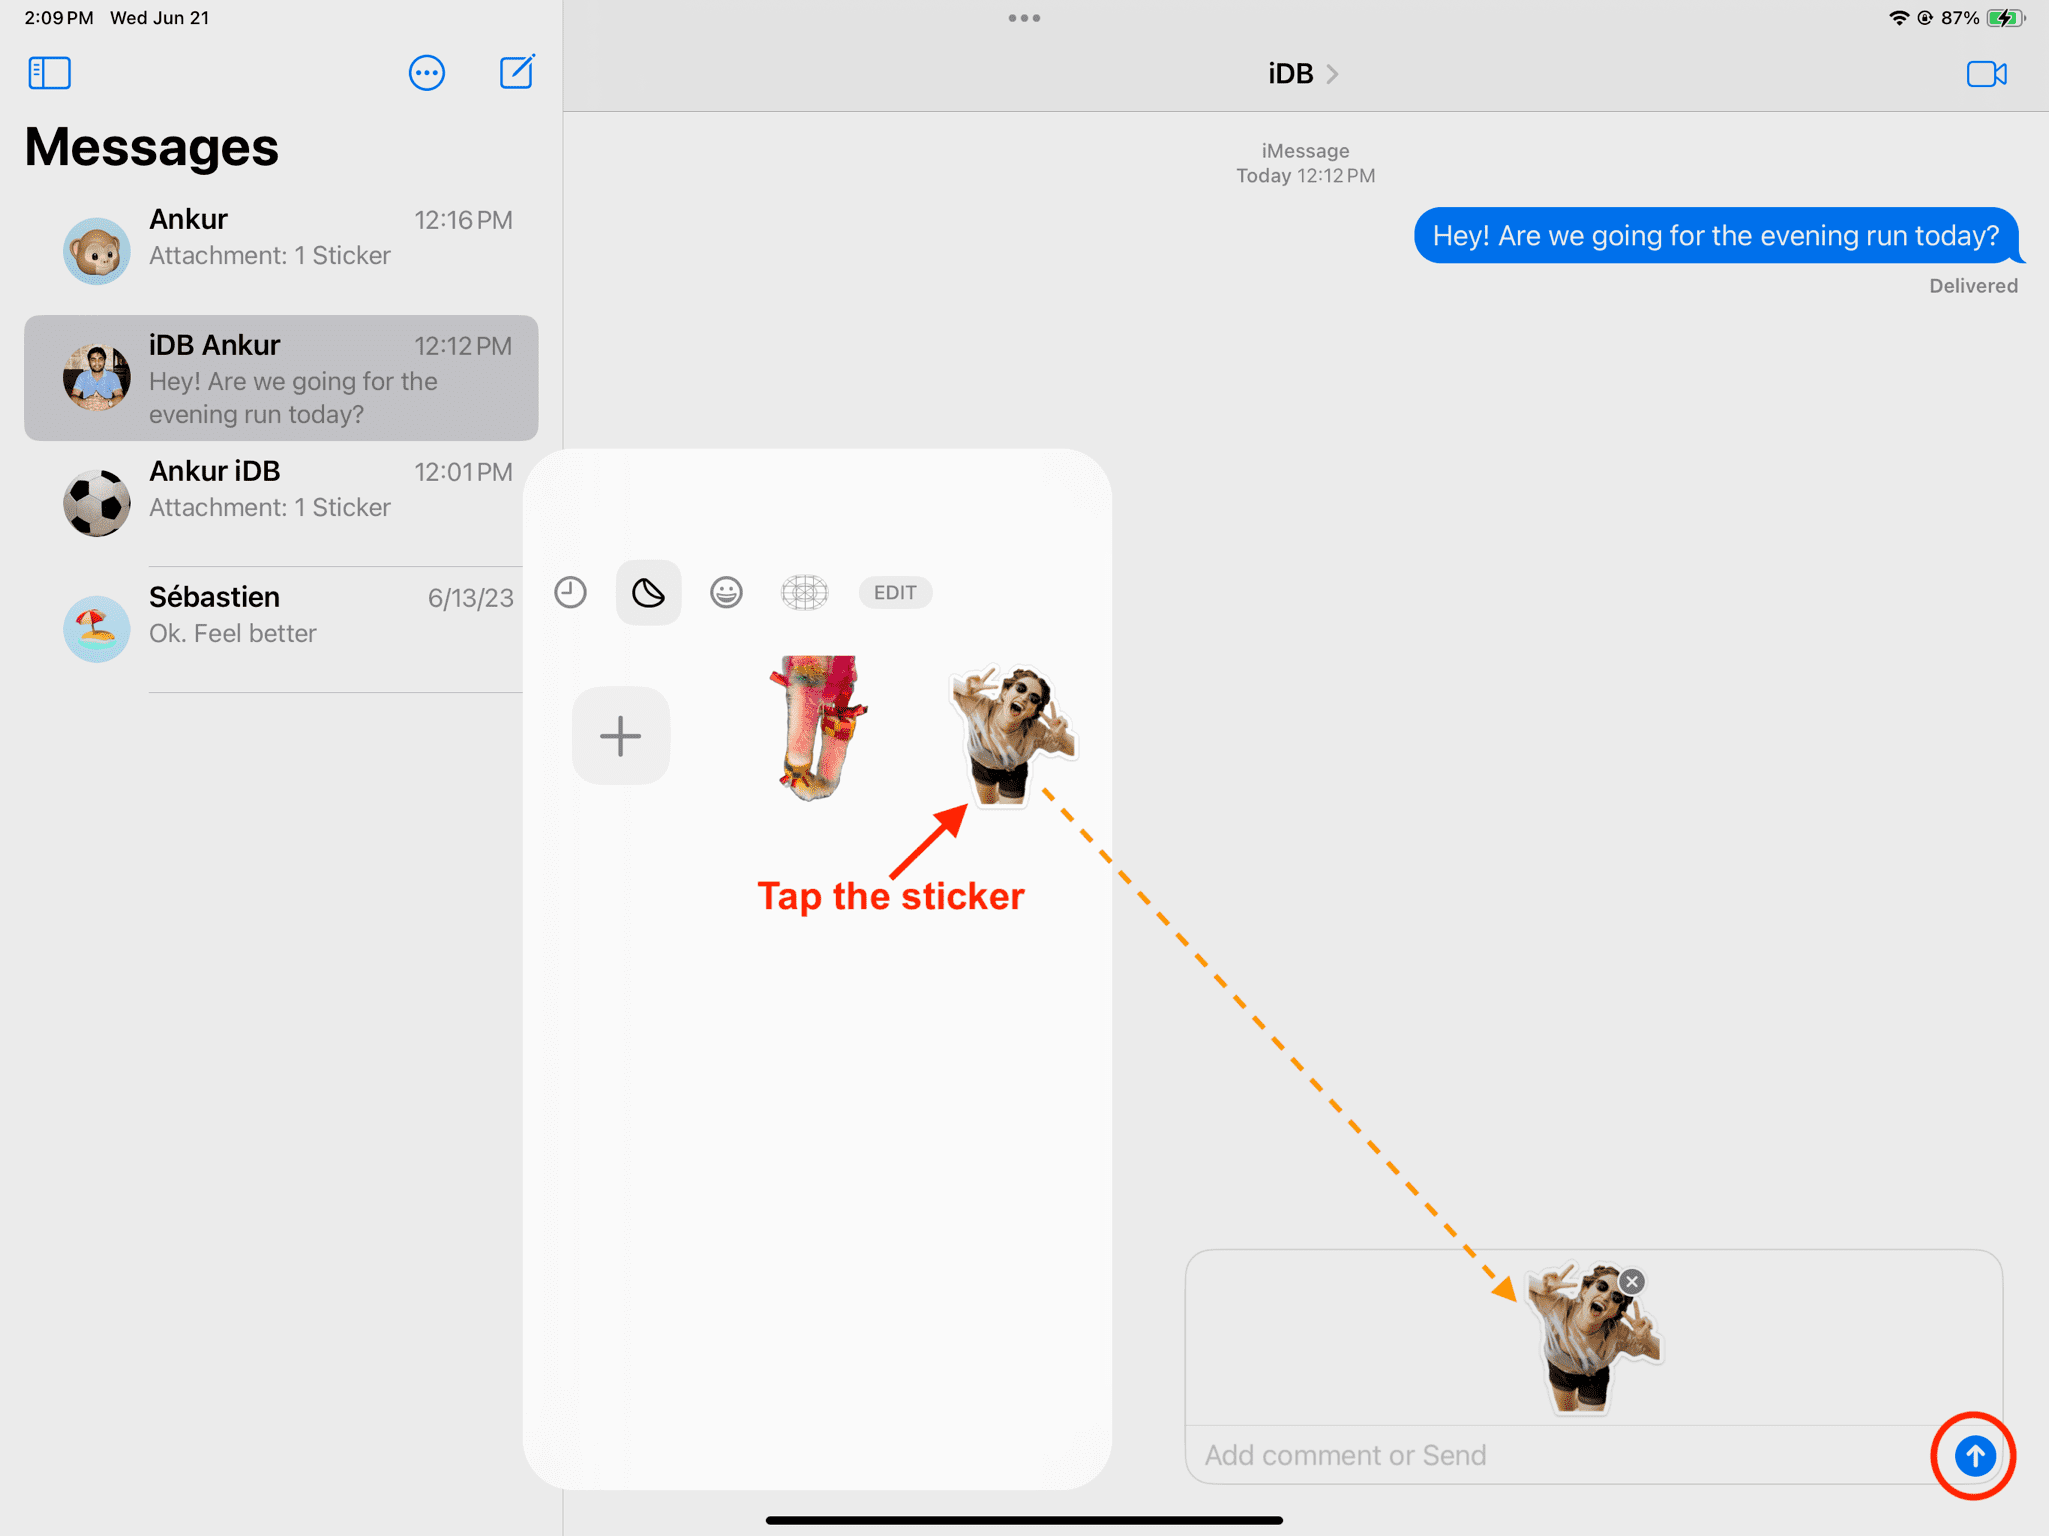
4) Tap a custom-created sticker from the Stickers section, and it will pop right into the message typing box. Return to the message typing box and hit the blue arrow button to send it as a normal message.
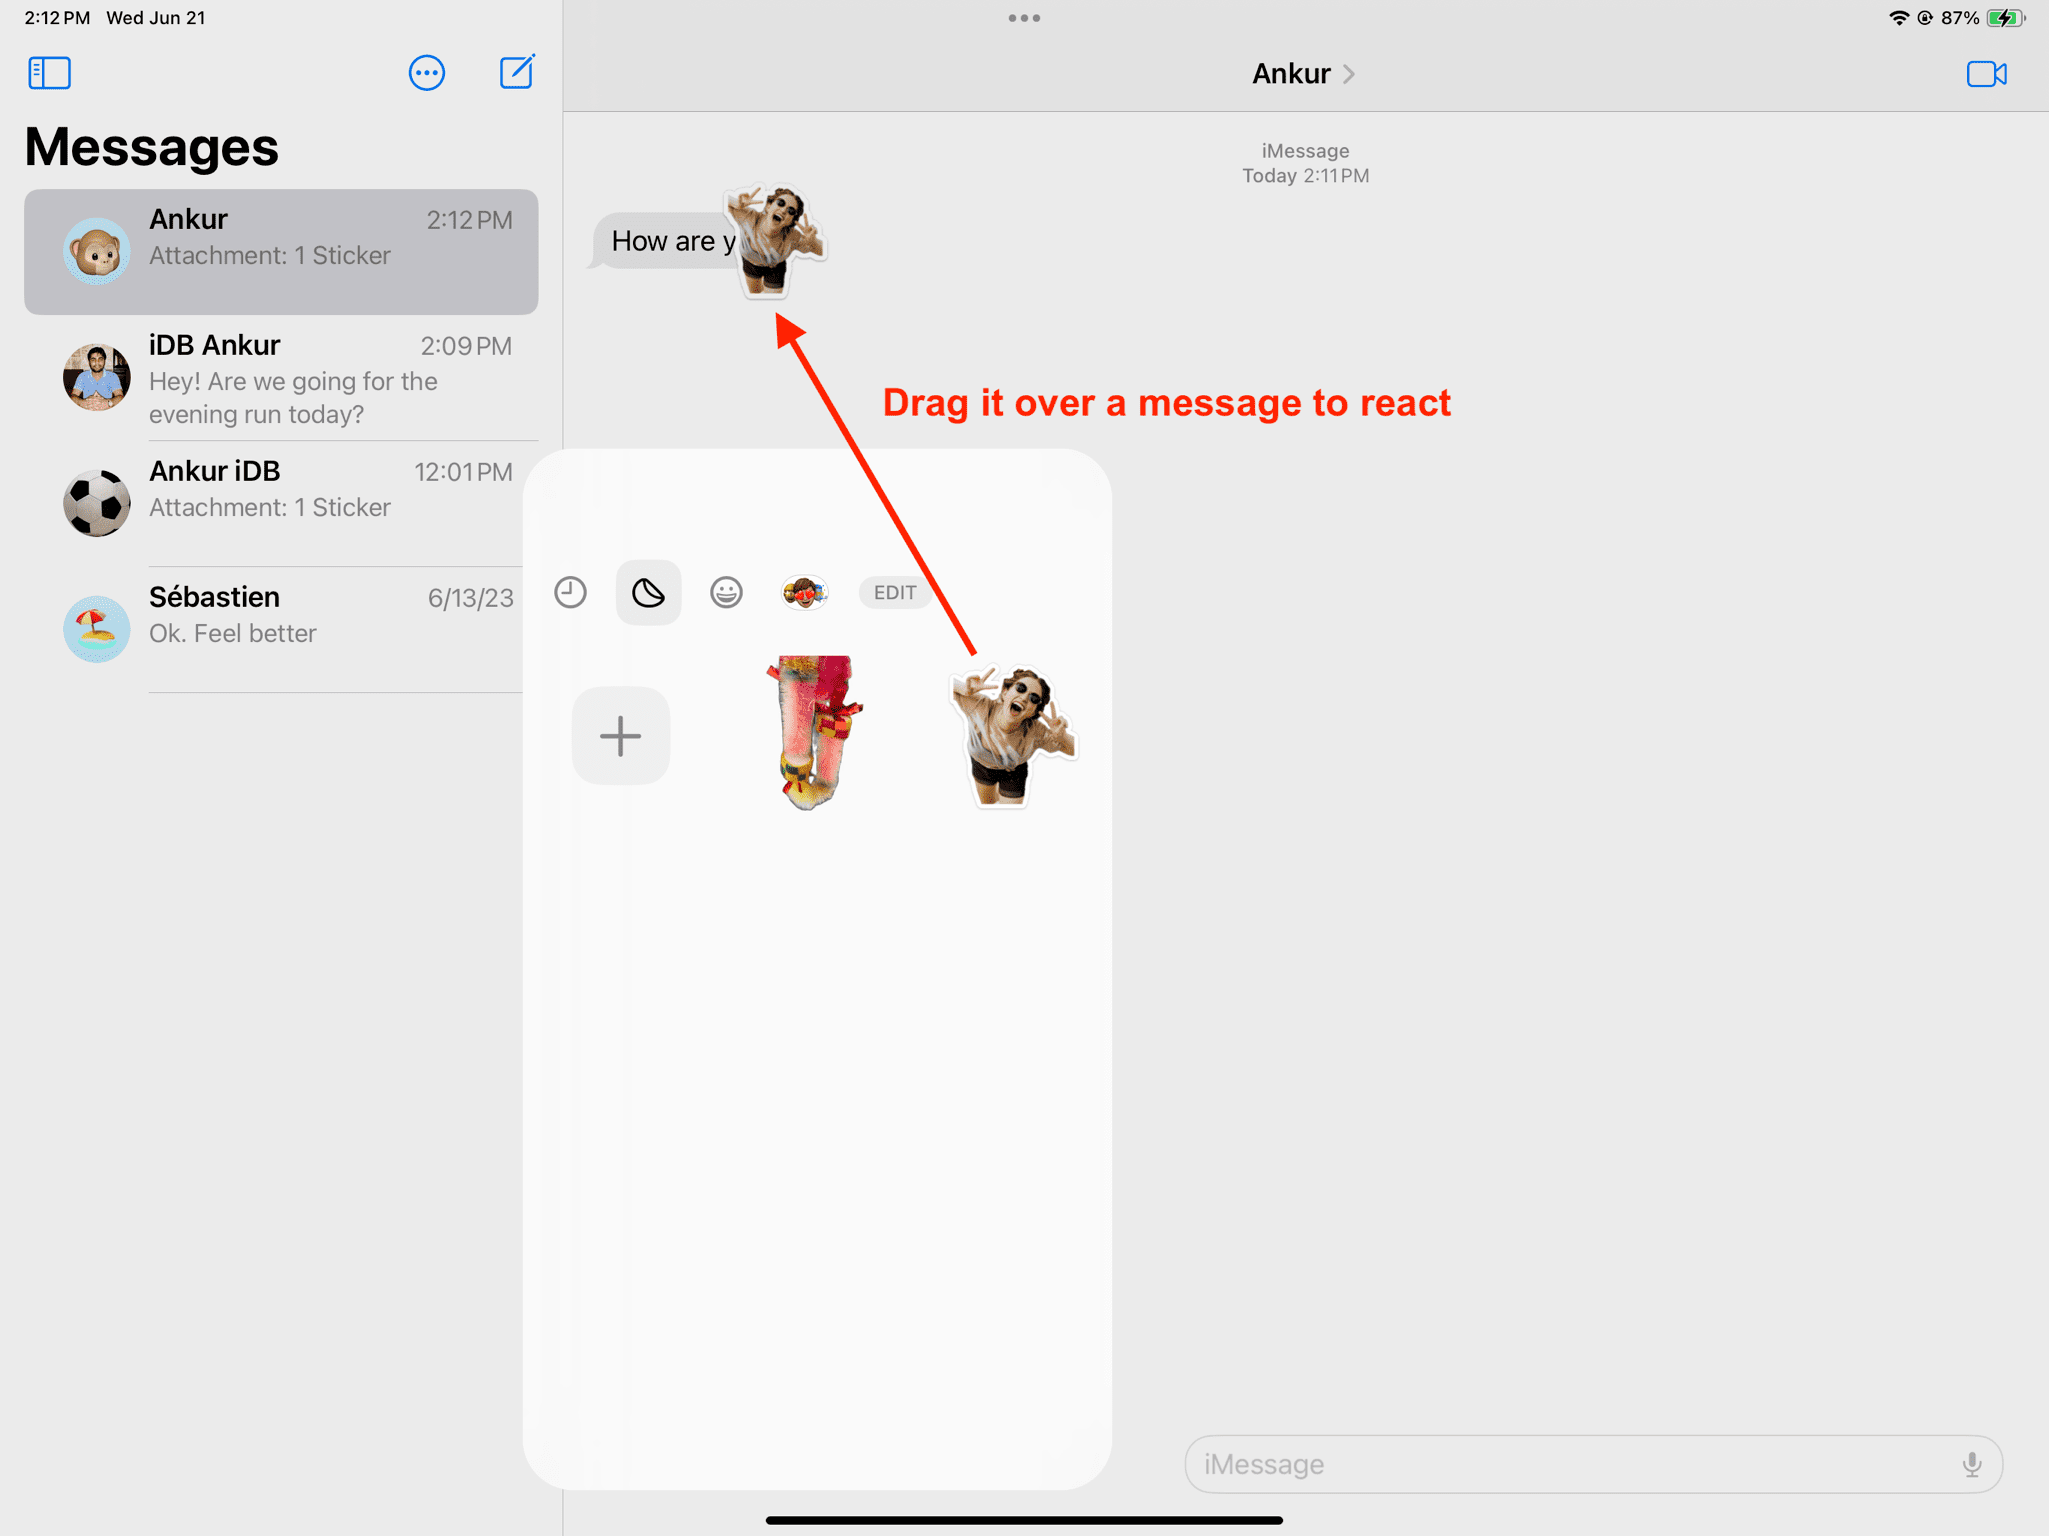
5) In addition to sending a sticker as a standard text, you can also use it to react to a specific message. All you need to do is touch & hold the sticker and drag & drop it over a message (text bubble, image, video, etc.) you sent or received. This sticker will float over that message. It’s pretty cool, and you should give it a try.
On Mac
As mentioned, you can’t turn your photos into stickers on your Mac. But you can use the ones you create on your iPhone or iPad, as they sync via iCloud and appear on your computer.
1) Launch the Messages app and open a chat or start a new one.
2) Click the App Store icon and select Stickers.
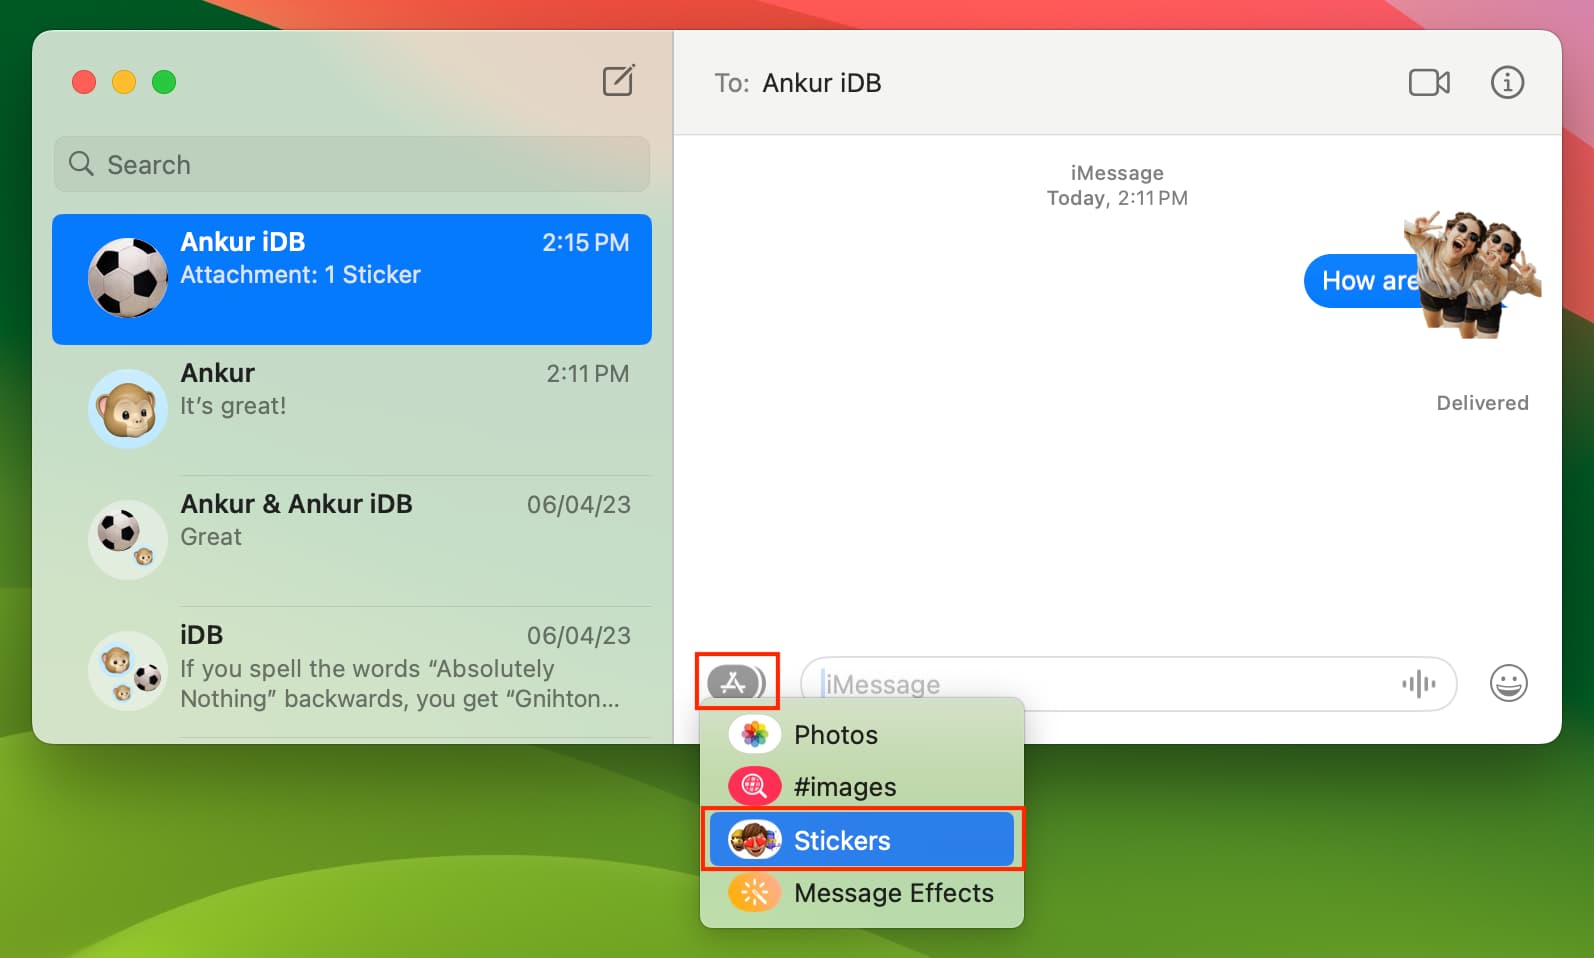
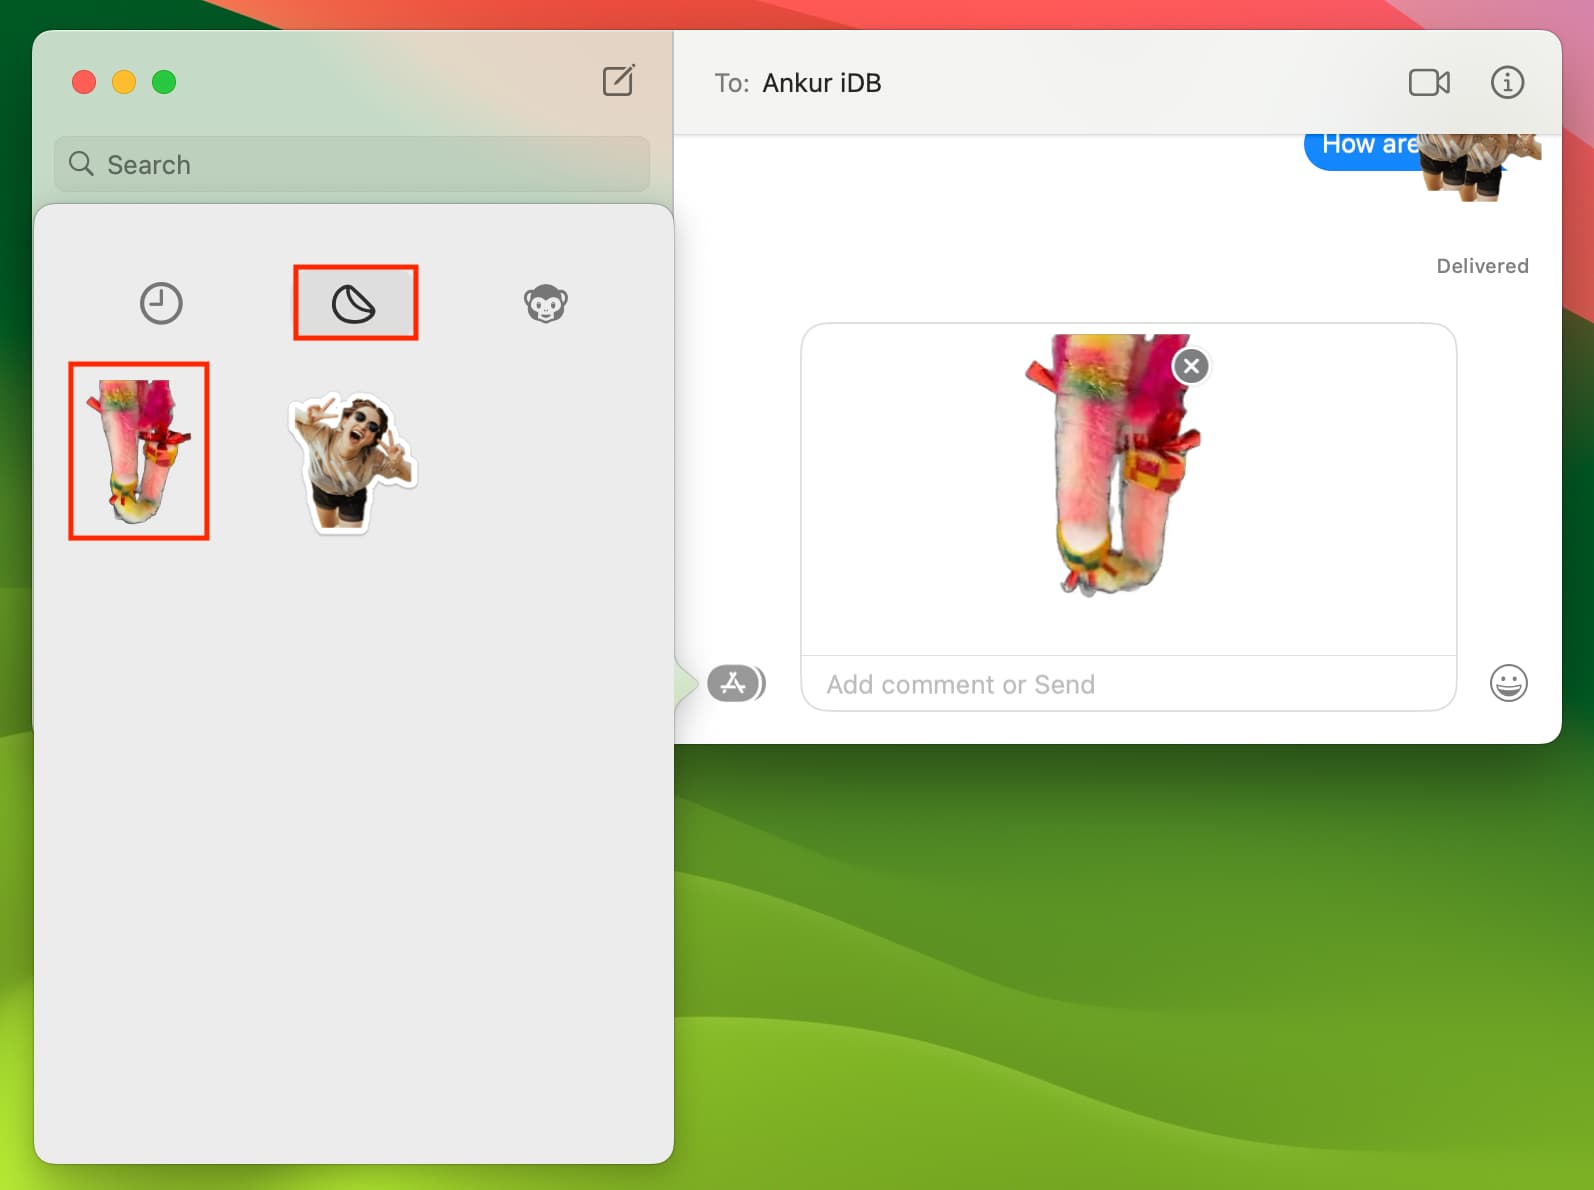
3) Go to the Stickers section and click one.
4) Now, click the message typing box, add a comment if you want to, and hit the enter/return key to send it.
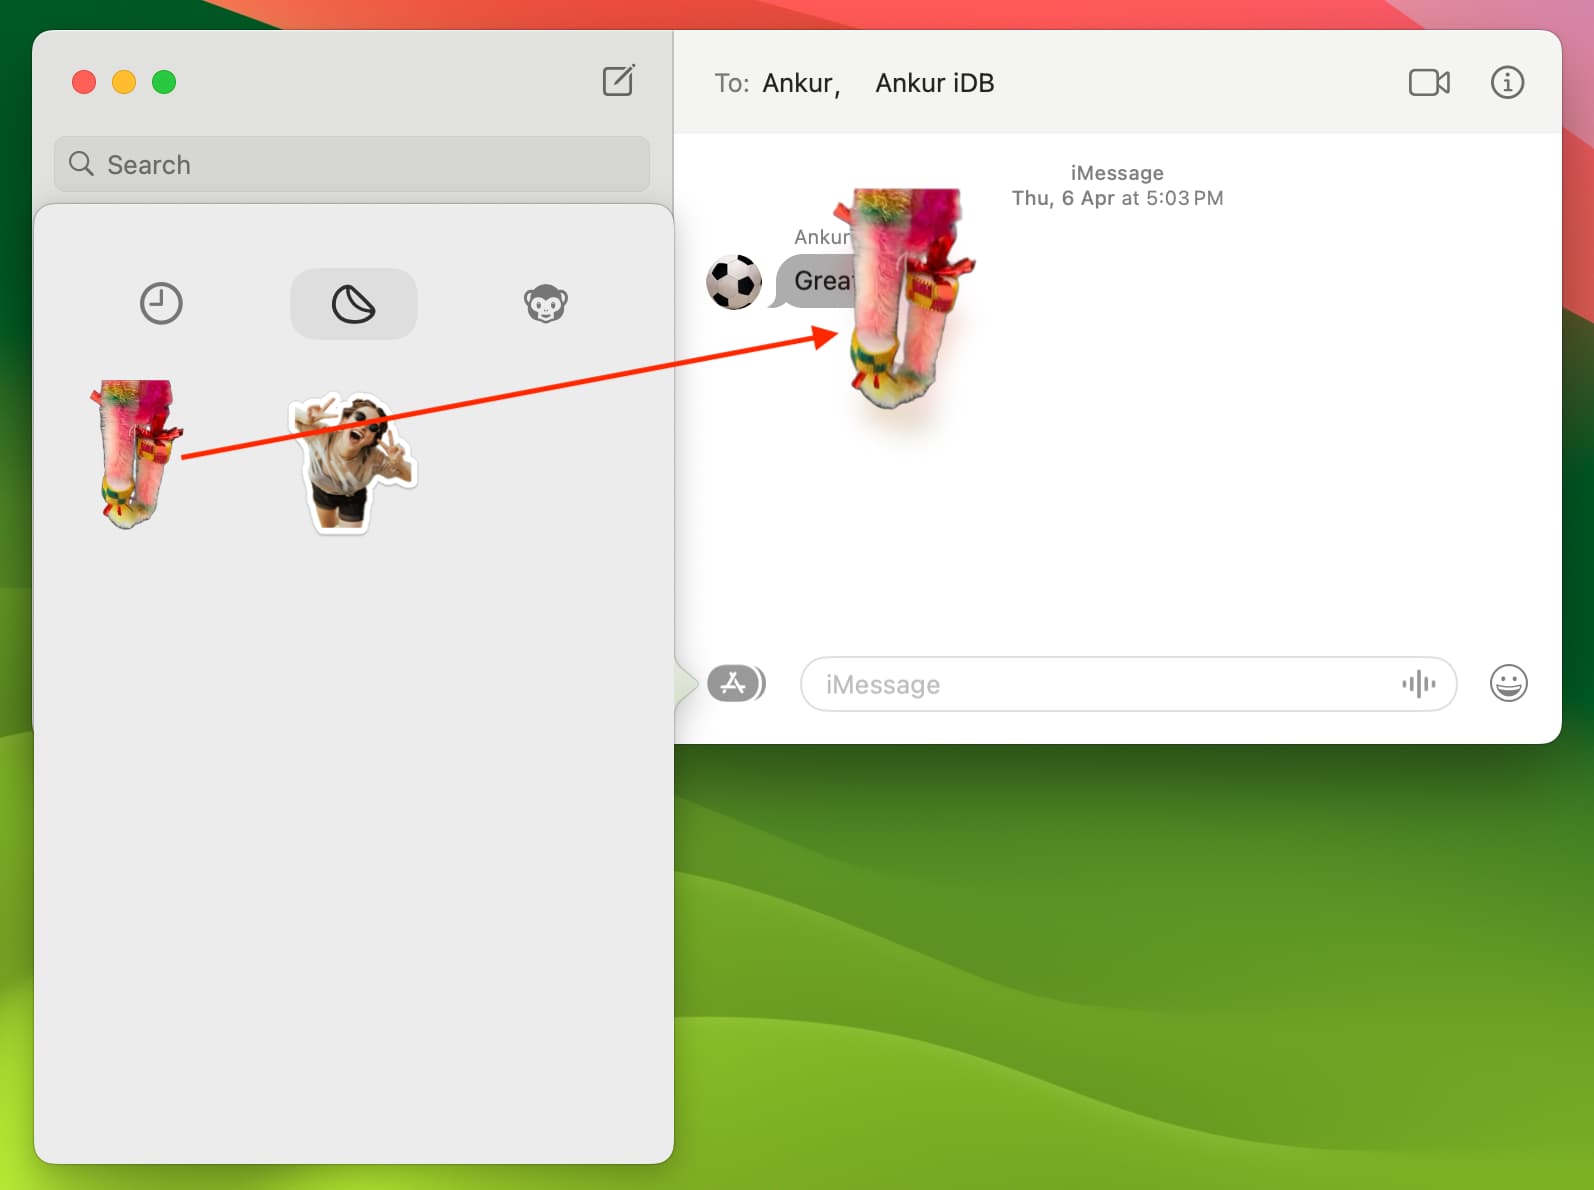
5) You can also drag a sticker and place it over a text to use it as a reaction.
Remove added custom sticker reaction from a message
After you have reacted to a message using a custom sticker, you can remove it by following these steps.
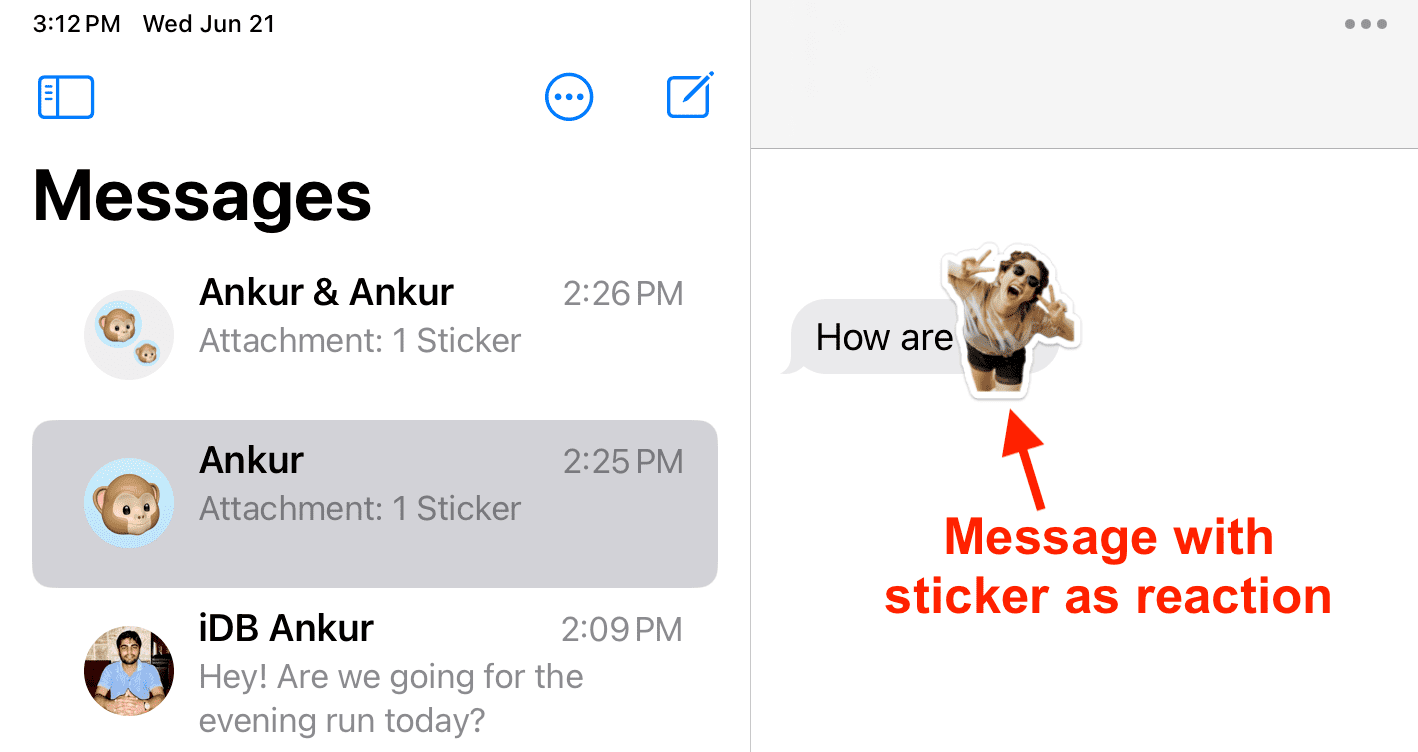
1) Touch & hold the message with a custom sticker as a reaction and choose Sticker Details. On Mac, right-click on the reaction sticker and pick Sticker Details.
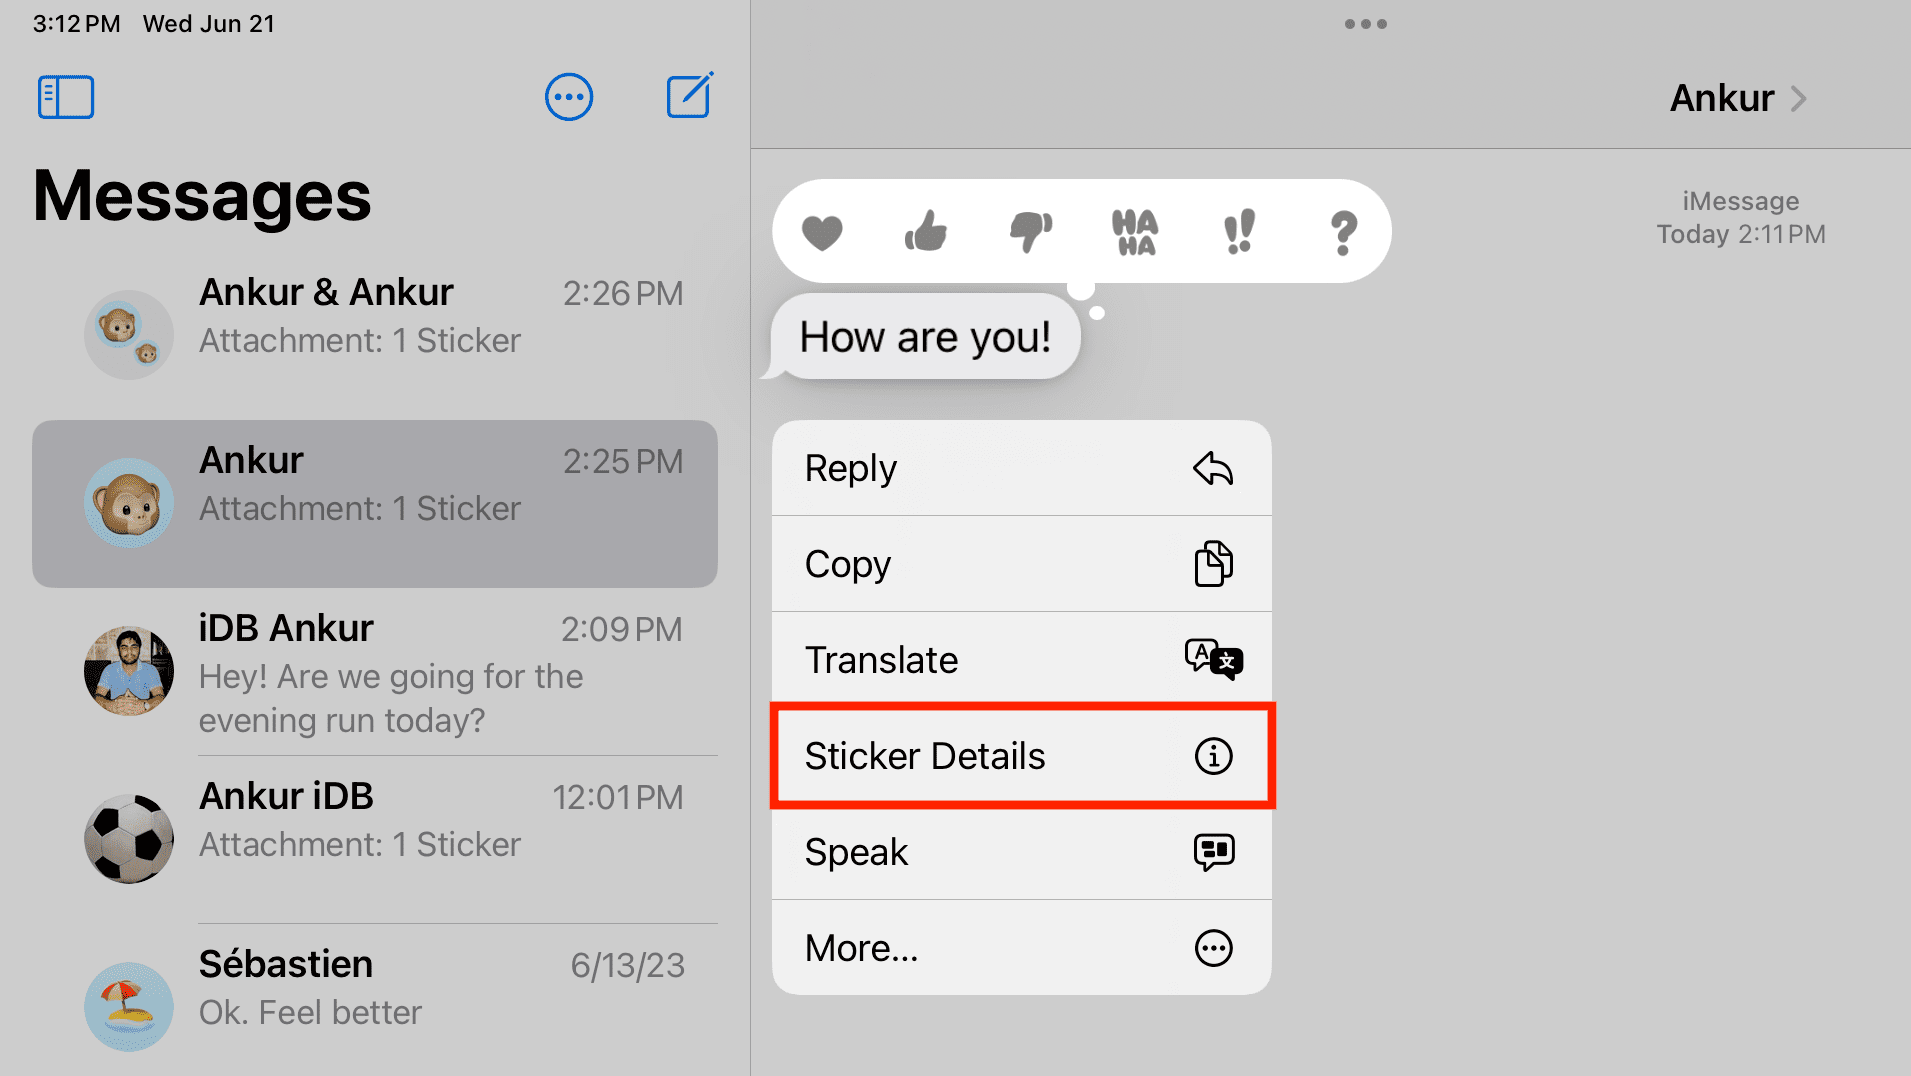
2) Swipe left on the sticker and tap the delete icon. On Mac, simply click the X button.

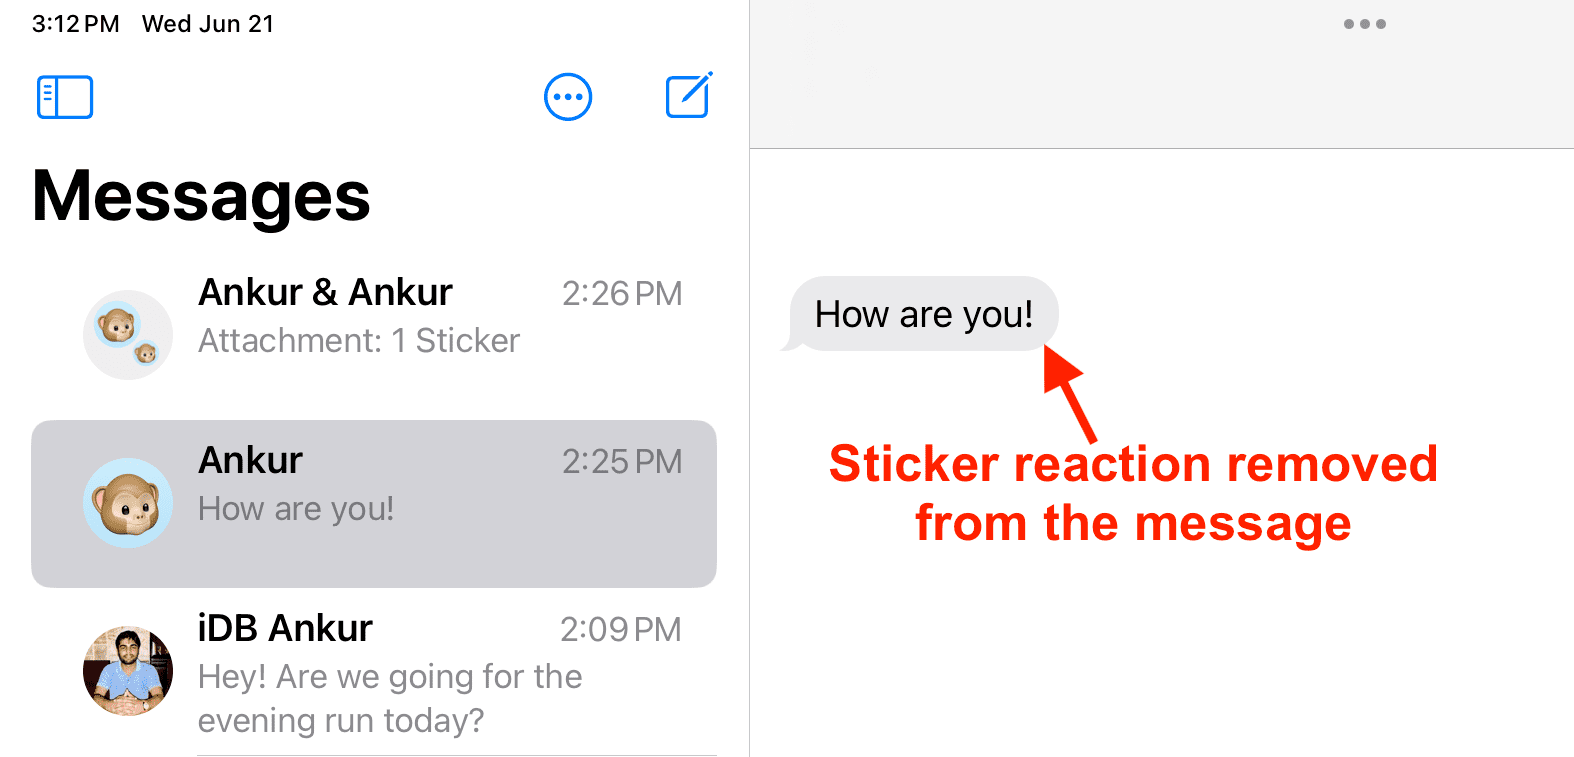
The sticker will no longer appear as the reaction.
Use custom stickers in Markup
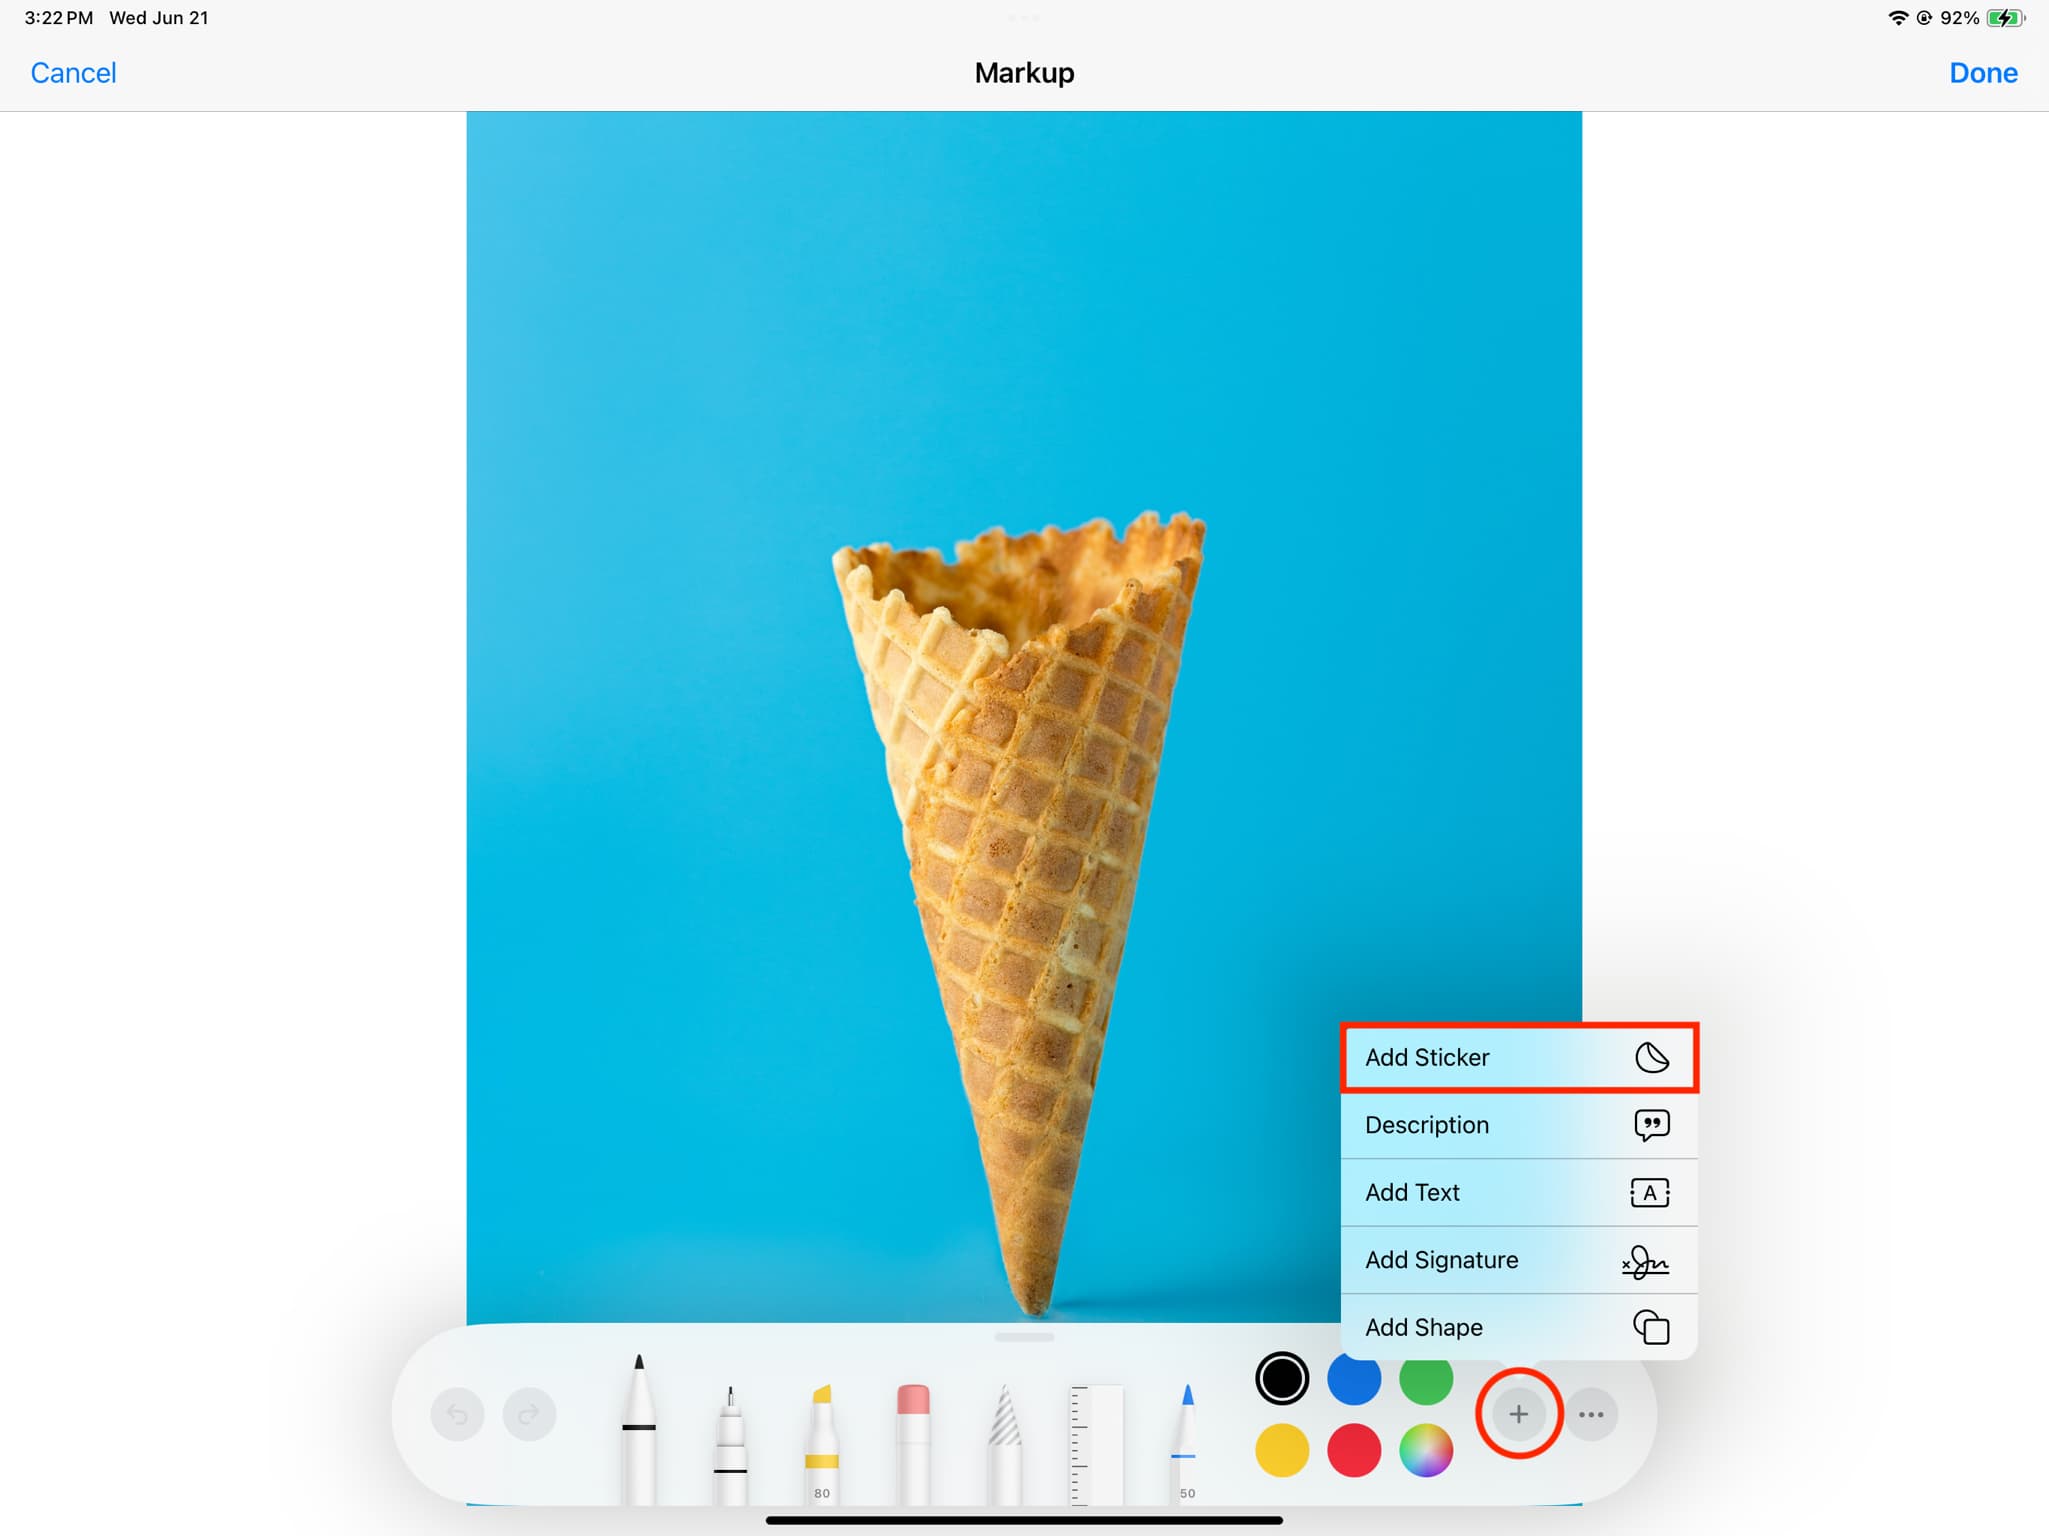
In addition to adding shapes, lines, text, and signature to your photo using Markup, you can tap the Add Stickers option and put a sticker over your image.
Use your photo stickers in other apps
The stickers you create from your photos are not confined to Apple’s Messages app only. You’re free to liven up your chats using these custom stickers inside other apps from the App Store like WhatsApp, Twitter, Messenger, and more.
Let me demonstrate it using FB Messenger:
1) Open Messenger and go to a chat.
2) Tap the emoji key on your iPhone or iPad keyboard.
3) Pick a custom sticker from the recently used section or tap the stickers icon to open it in an enlarged view.
4) Select a sticker and hit Send.
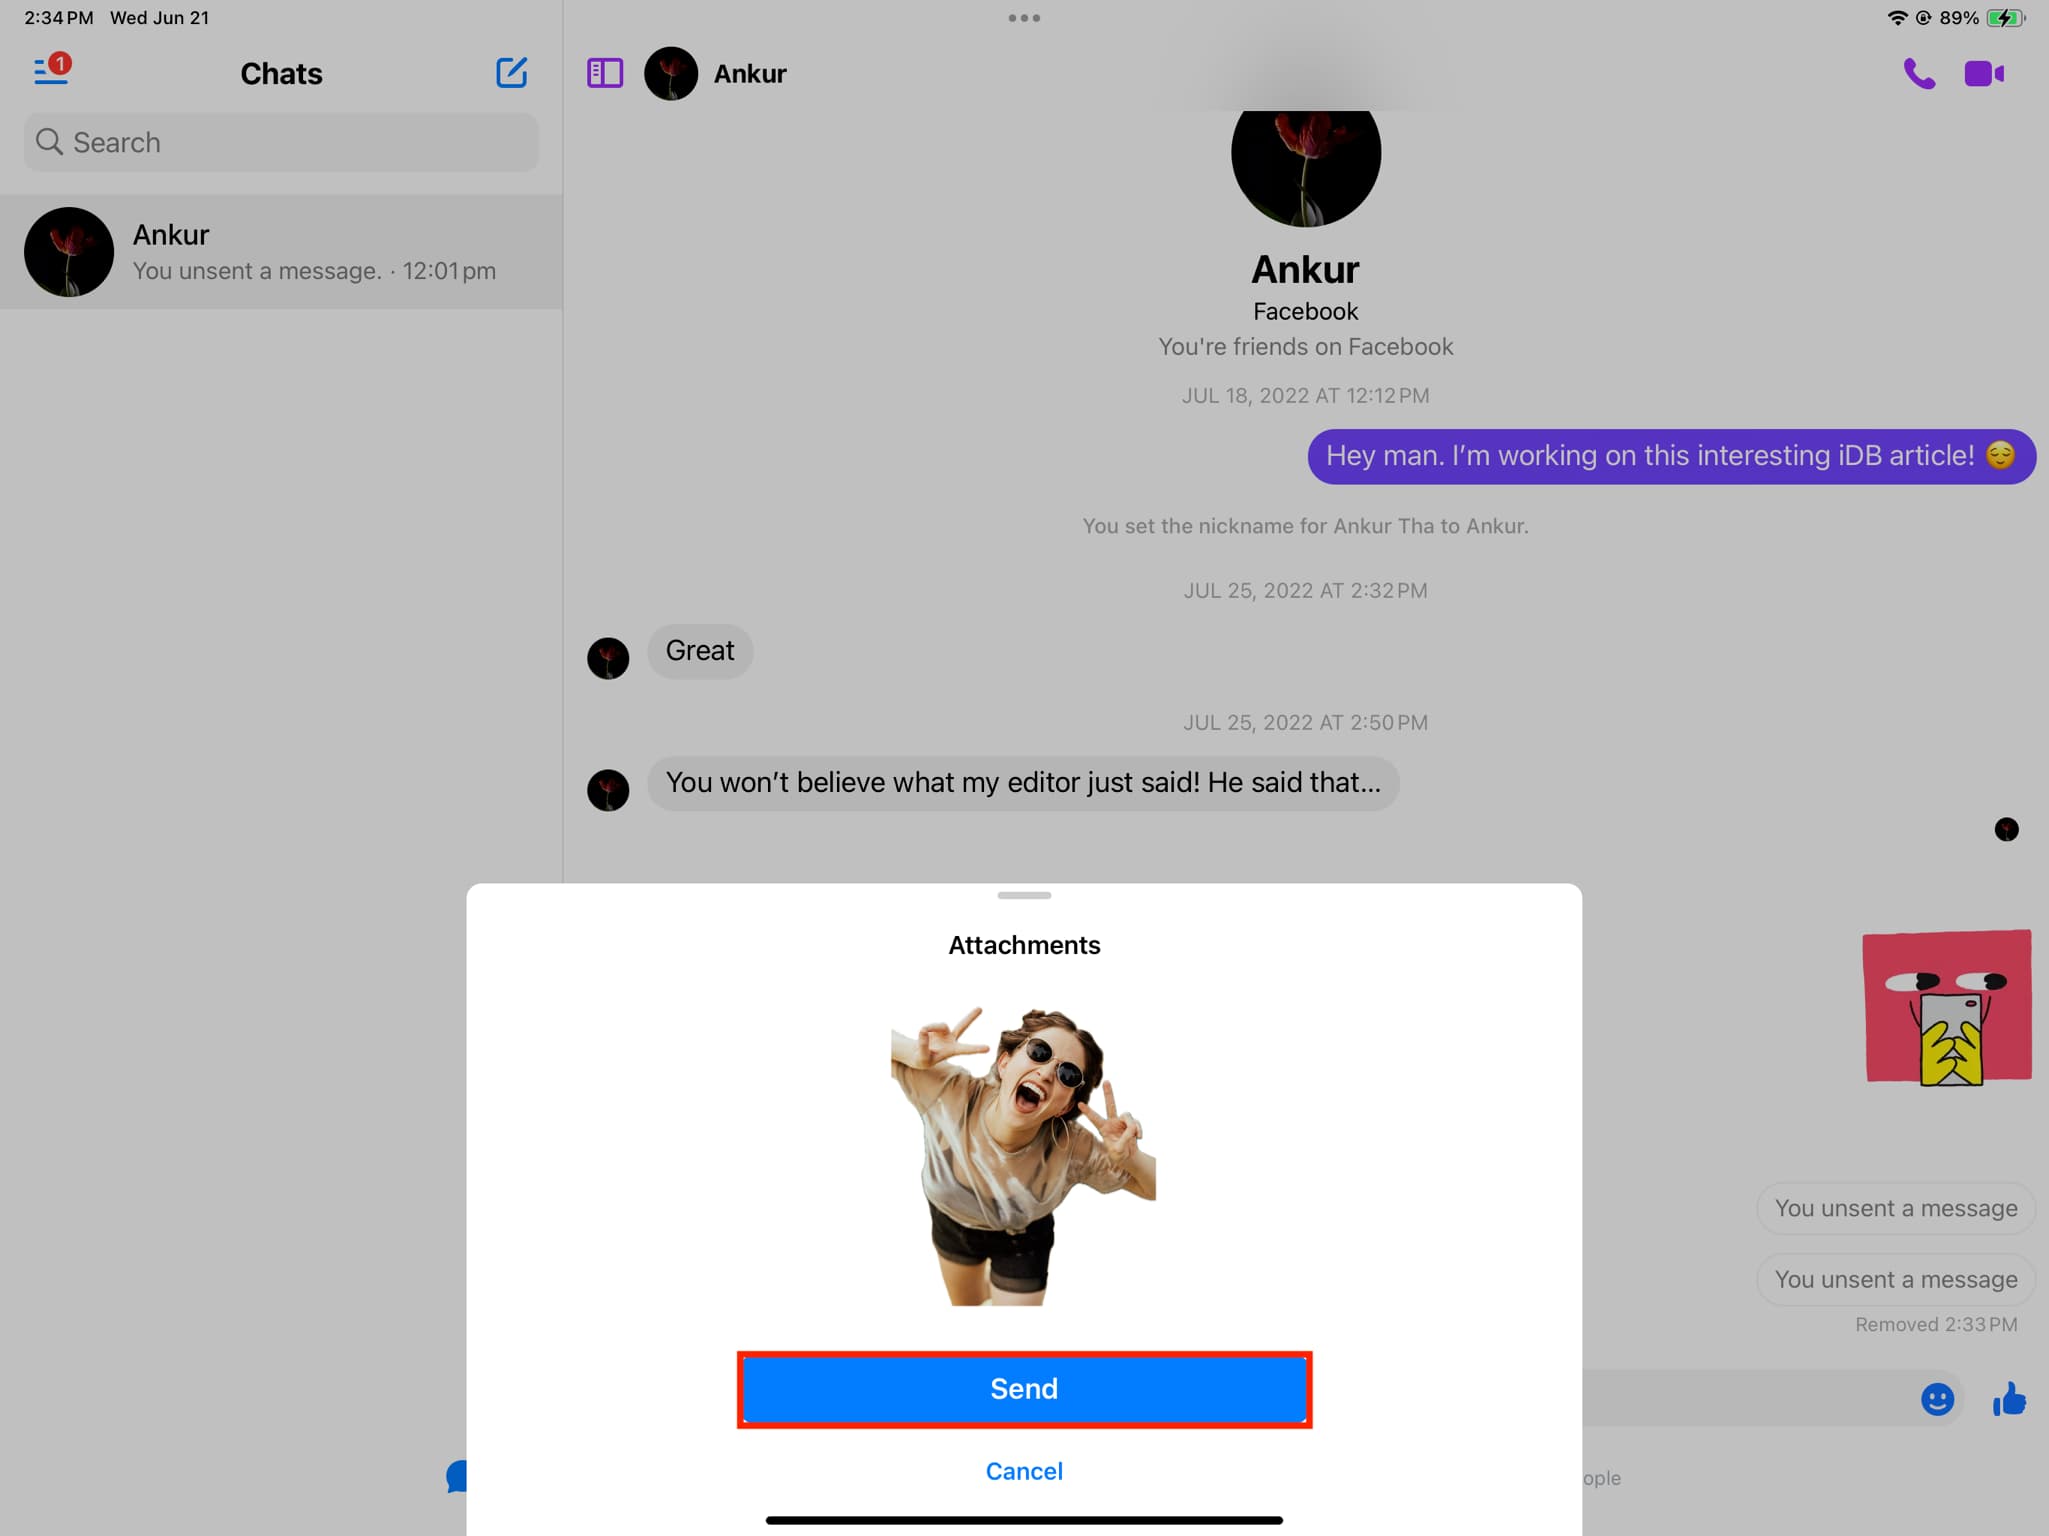
Important: As a rule of thumb, you can use these custom stickers anywhere you can access your emojis from Apple’s iOS keyboard. But some apps may not be optimized for it. For example, you can use these stickers from the recently used section of the emoji keyboard on Instagram chats and while creating Stories, but if you tap the stickers icon, nothing happens.
Add another effect to your custom emoji
You can add a different effect to your sticker or change the existing effect by following these steps. These changes will also sync to your other Apple devices via iCloud.
1) Open an app like Messages or Messenger where you can use these stickers. I’m using the Messages app for the steps below.
2) Tap the plus icon and choose Stickers.
3) Touch & hold the sticker you want to edit and choose Add Effect or Edit Effect (if it has an existing effect).
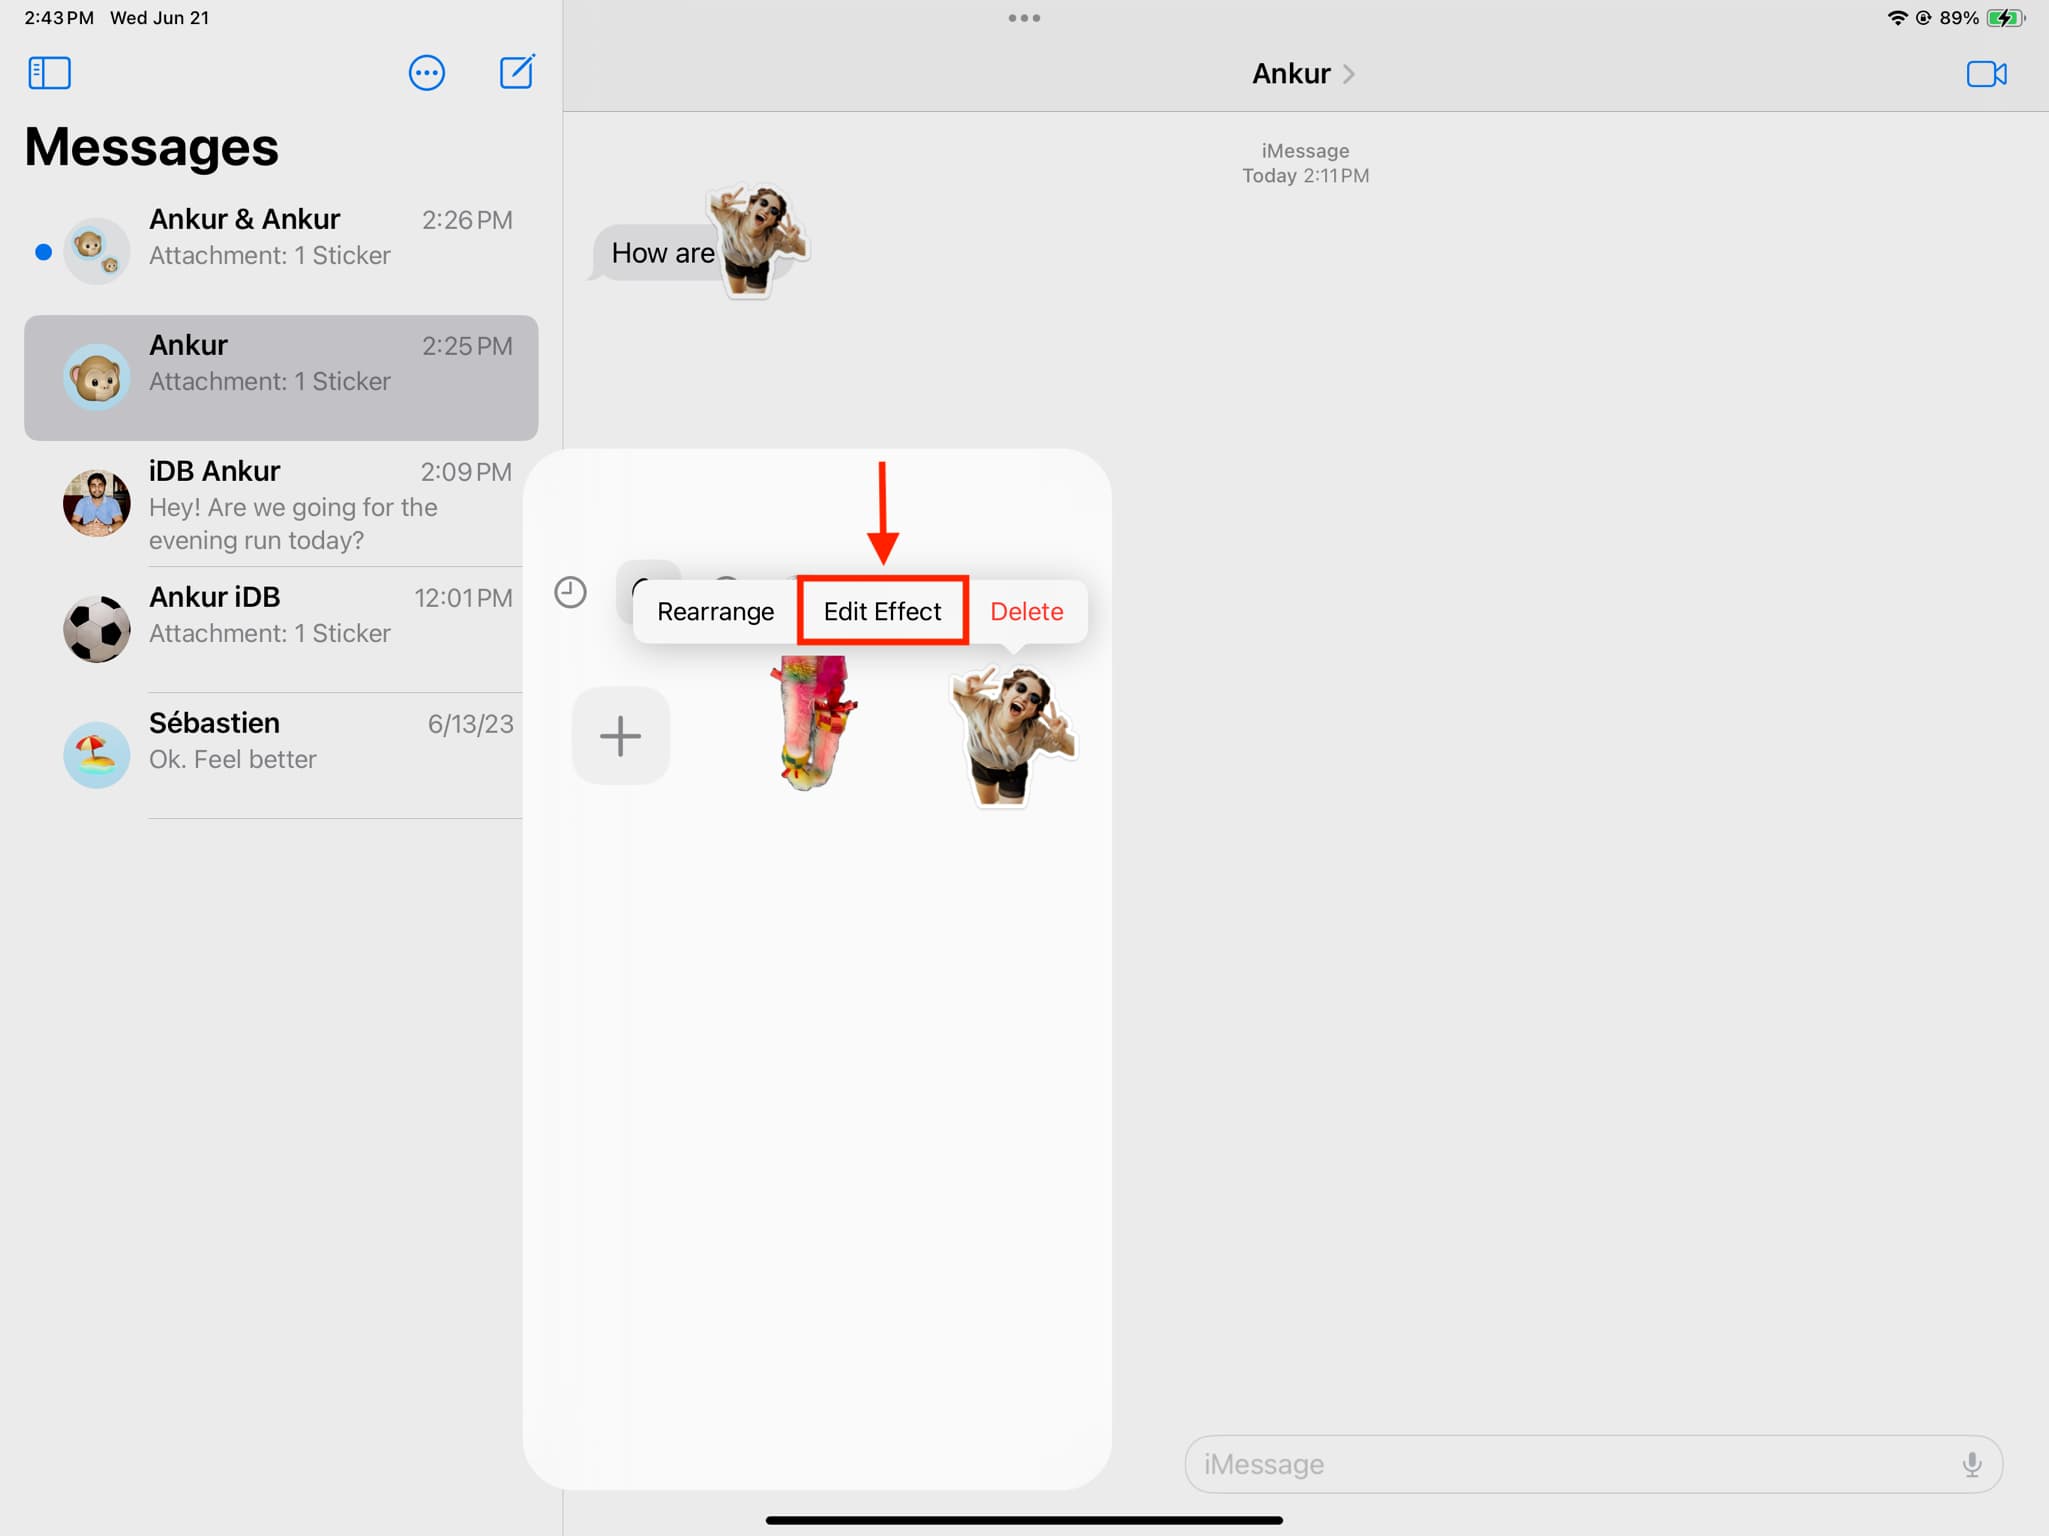
4) Select from Original, Outline, Comic, Puffy, and Shiny.
5) Finally, tap Done.
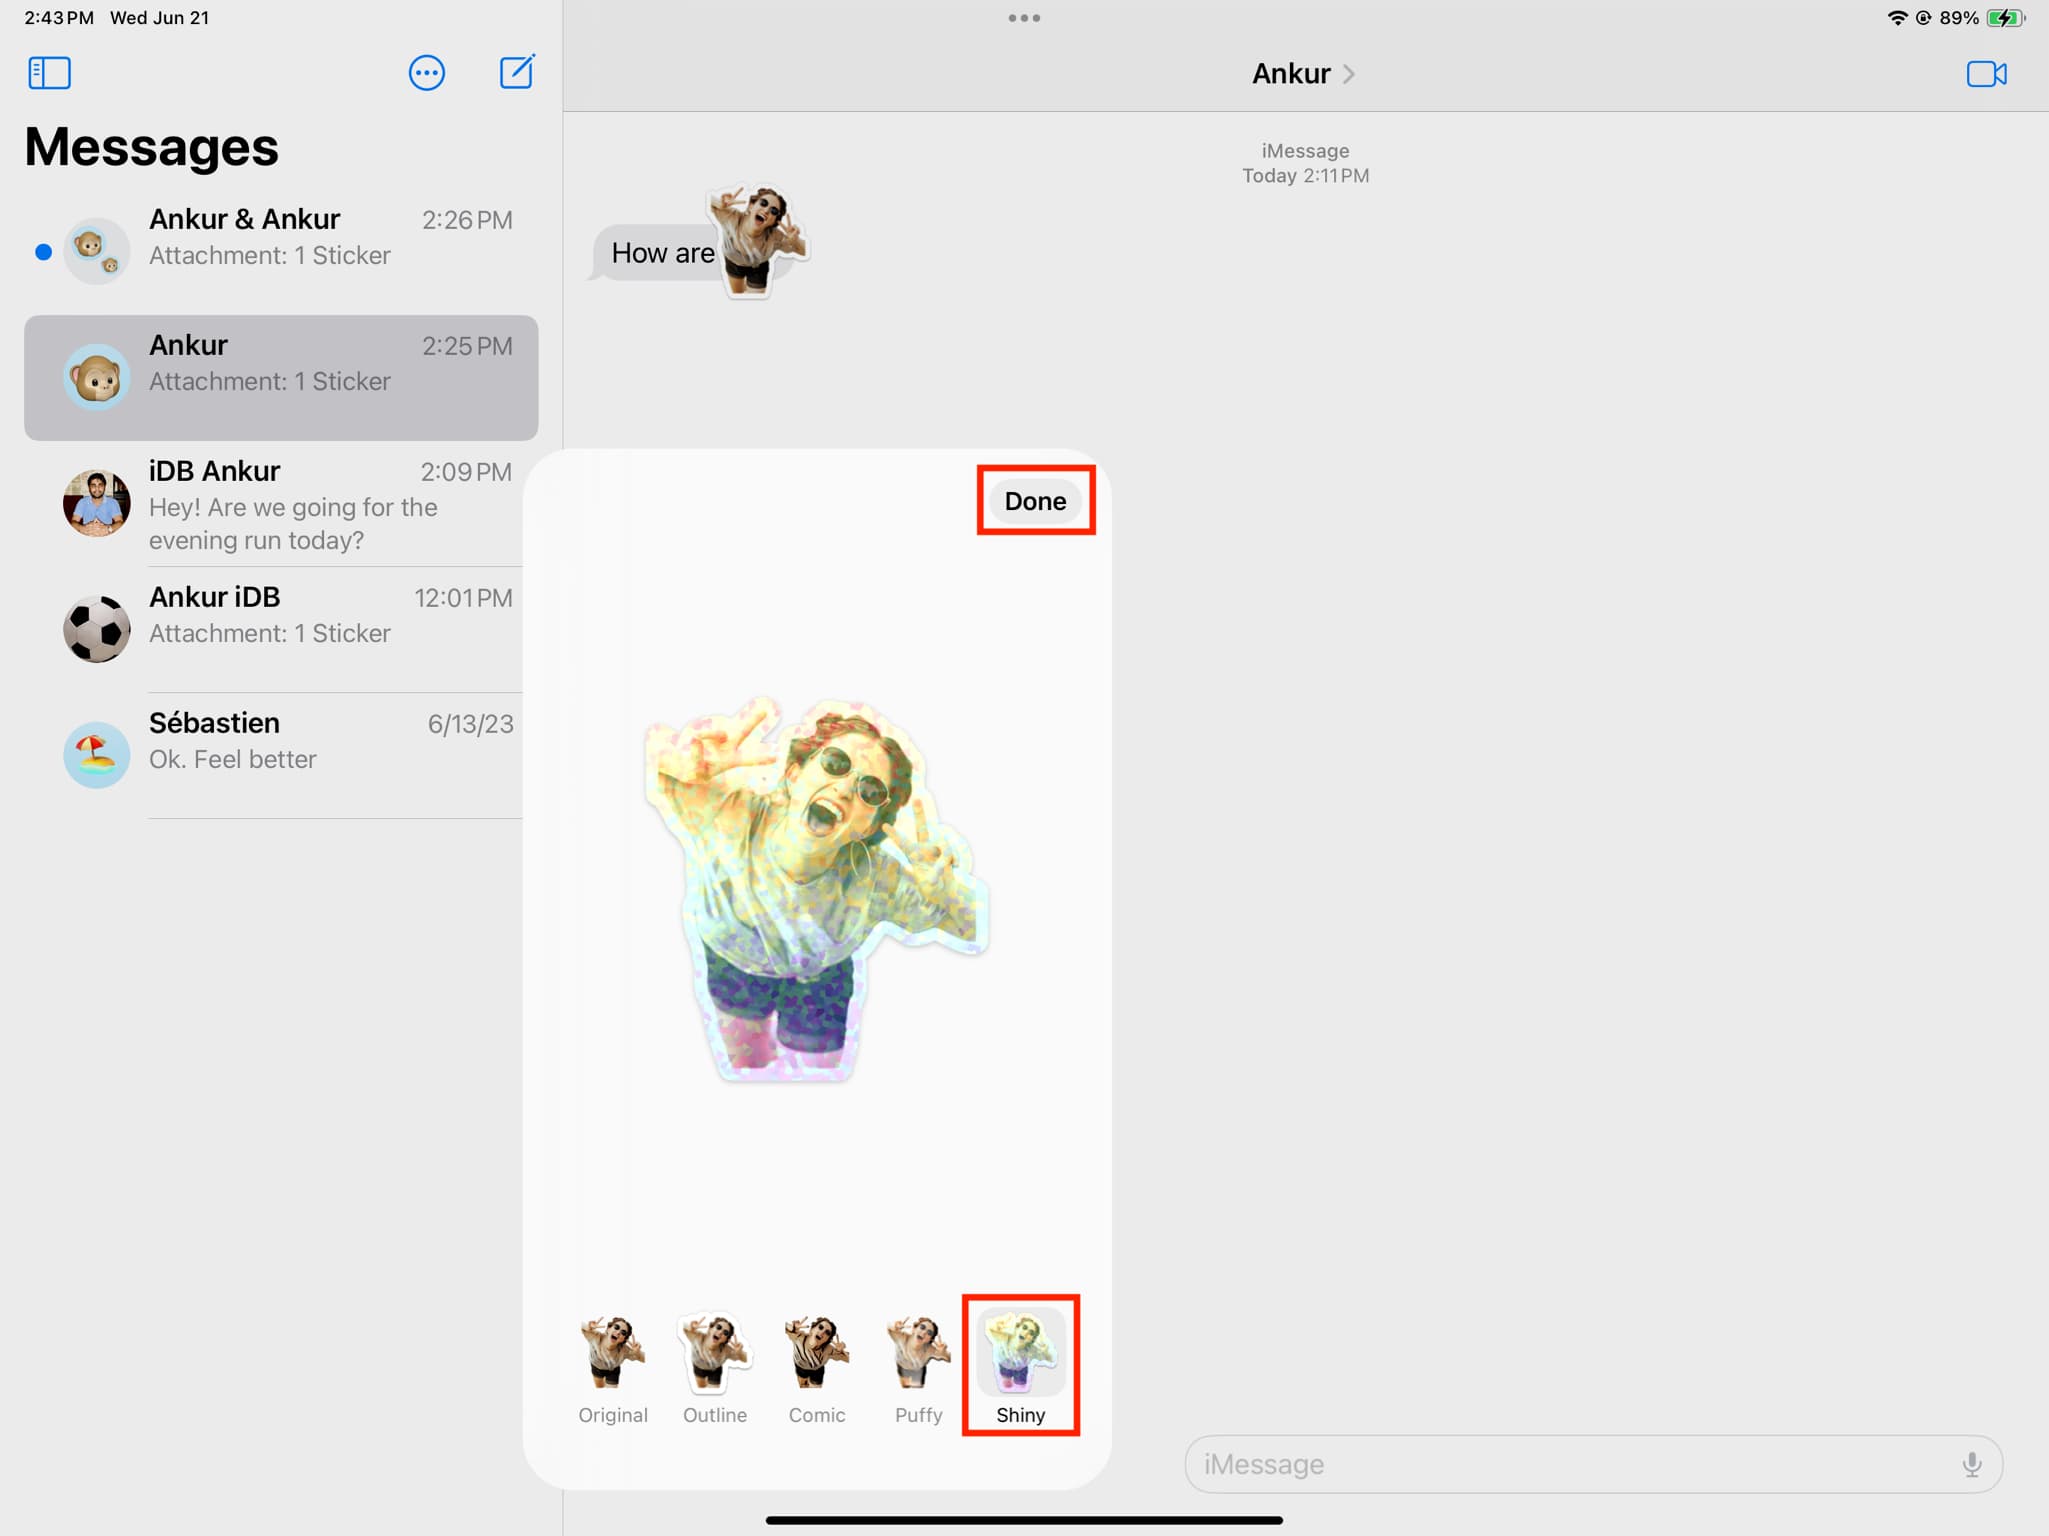
Important: Adding an effect (other than Original) will turn your animated stickers (created using Live Photo) into a still, non-animated sticker!
Rearrange or delete your custom stickers
1) Go to the stickers screen. You can follow steps 1 and 2 mentioned in the previous heading.
2) Touching & holding a sticker and choosing Delete will remove it without confirmation.
3) And if you choose Rearrange, you can drag one sticker away from its original spot to the new one.
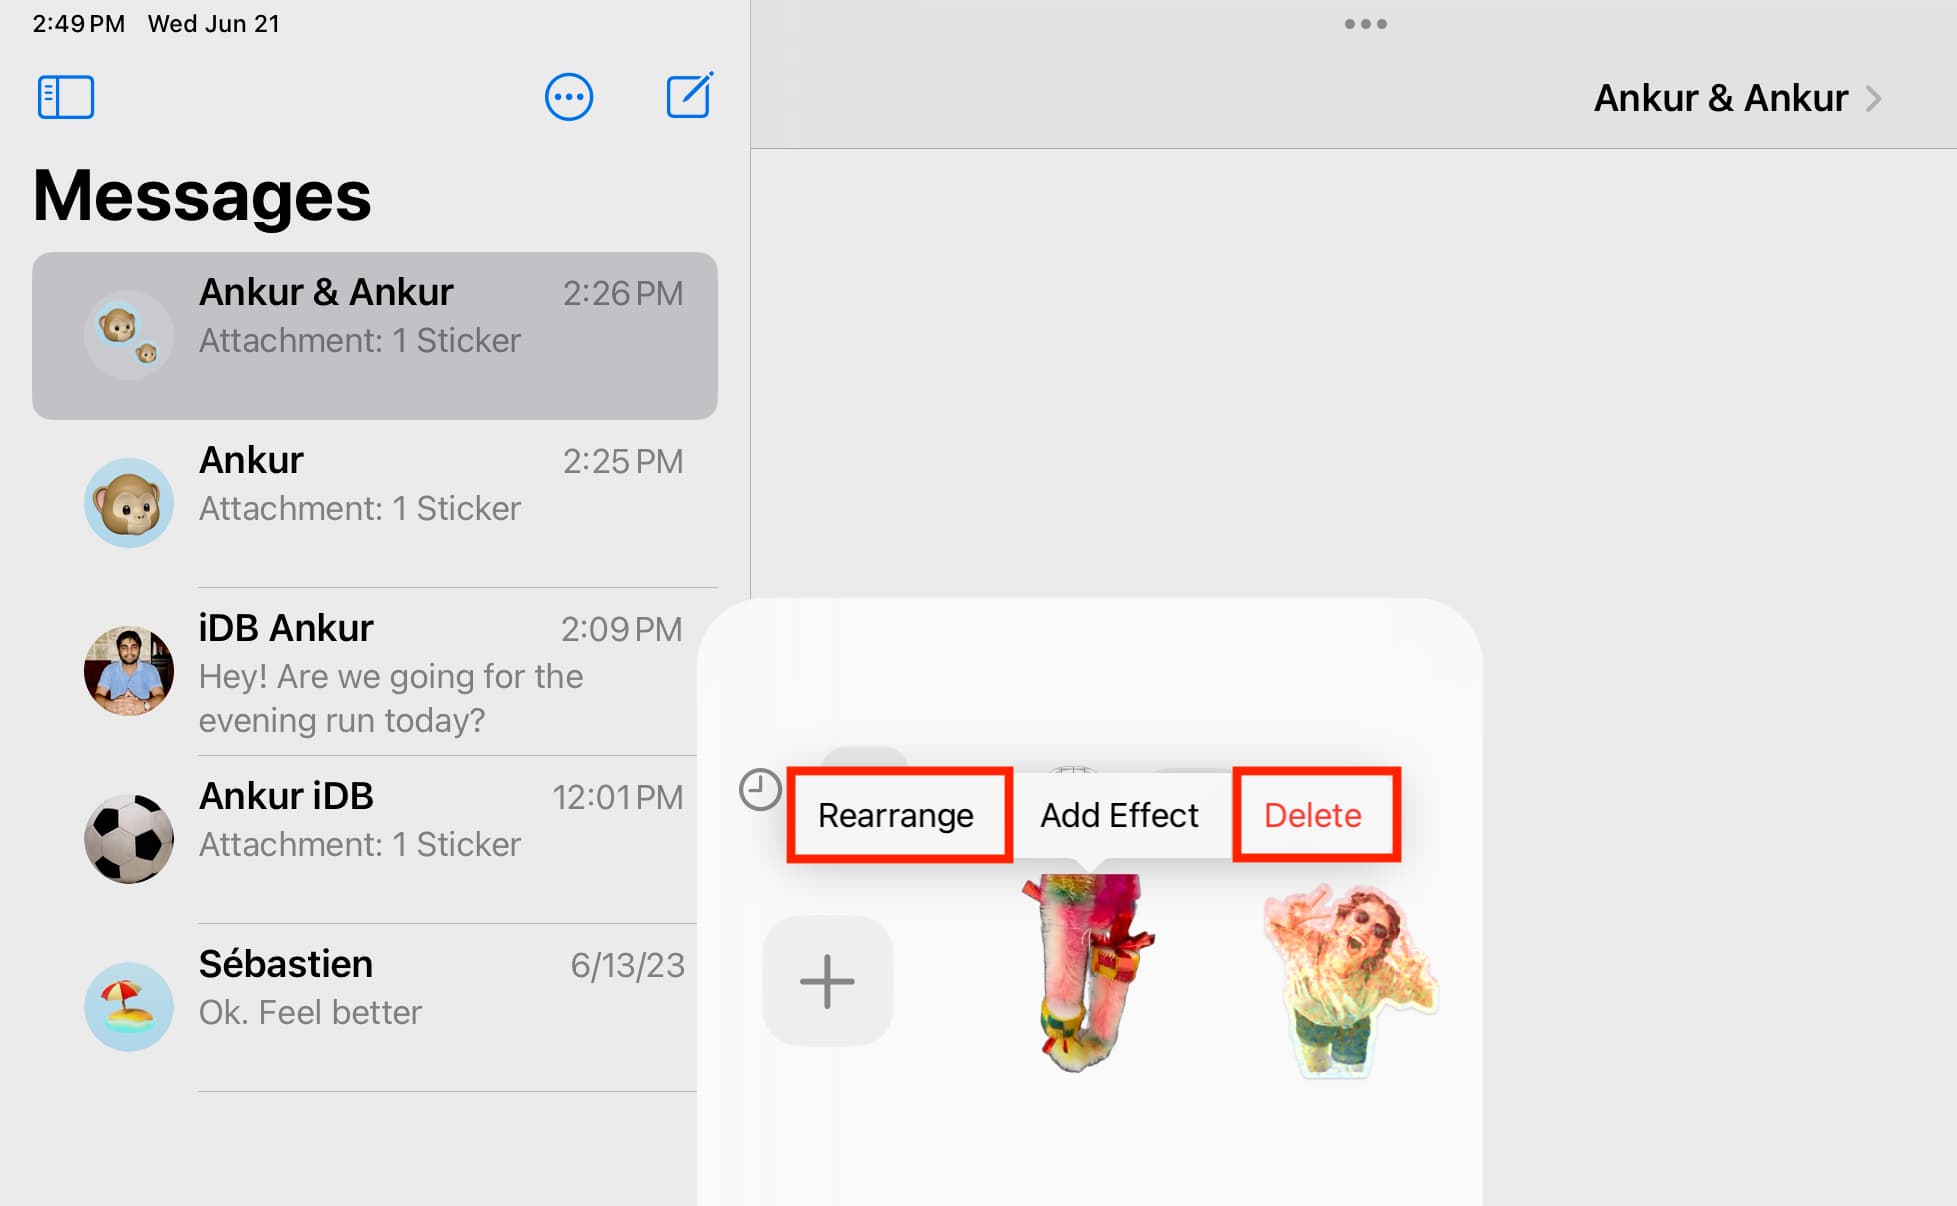
Additionally, you can tap the minus icon (-) when you’re in Rearrange mode to delete a sticker. This method is easier if you have to get rid of several stickers quickly, as you can just tap the minus button instead of having to touch & hold each of them individually.
Can iOS 17 stickers show up and work on iOS 16?
No. Your devices must be updated to iOS 17, iPadOS 17, and macOS Sonoma to send and receive stickers.
I sent a sticker from my iPad running iPadOS 17 to my iPhone running iOS 16, and it was never delivered, not even as a standard image! Similarly, using a sticker to react also doesn’t show up on the iOS 16 device.
Useful tips for Messages:
- How to use iMessage effects like Memoji, stickers, filters, and shapes on your photos
- How to use bubble and screen effects in Messages on iPhone and iPad
- How to export your text messages as a PDF from iPhone, iPad, and Mac
All images in this post are from Unsplash.