Learn how to use the Safety Check feature on your iPhone to audit what you’re sharing with people and apps so you can take the appropriate actions to keep yourself and your data safe.
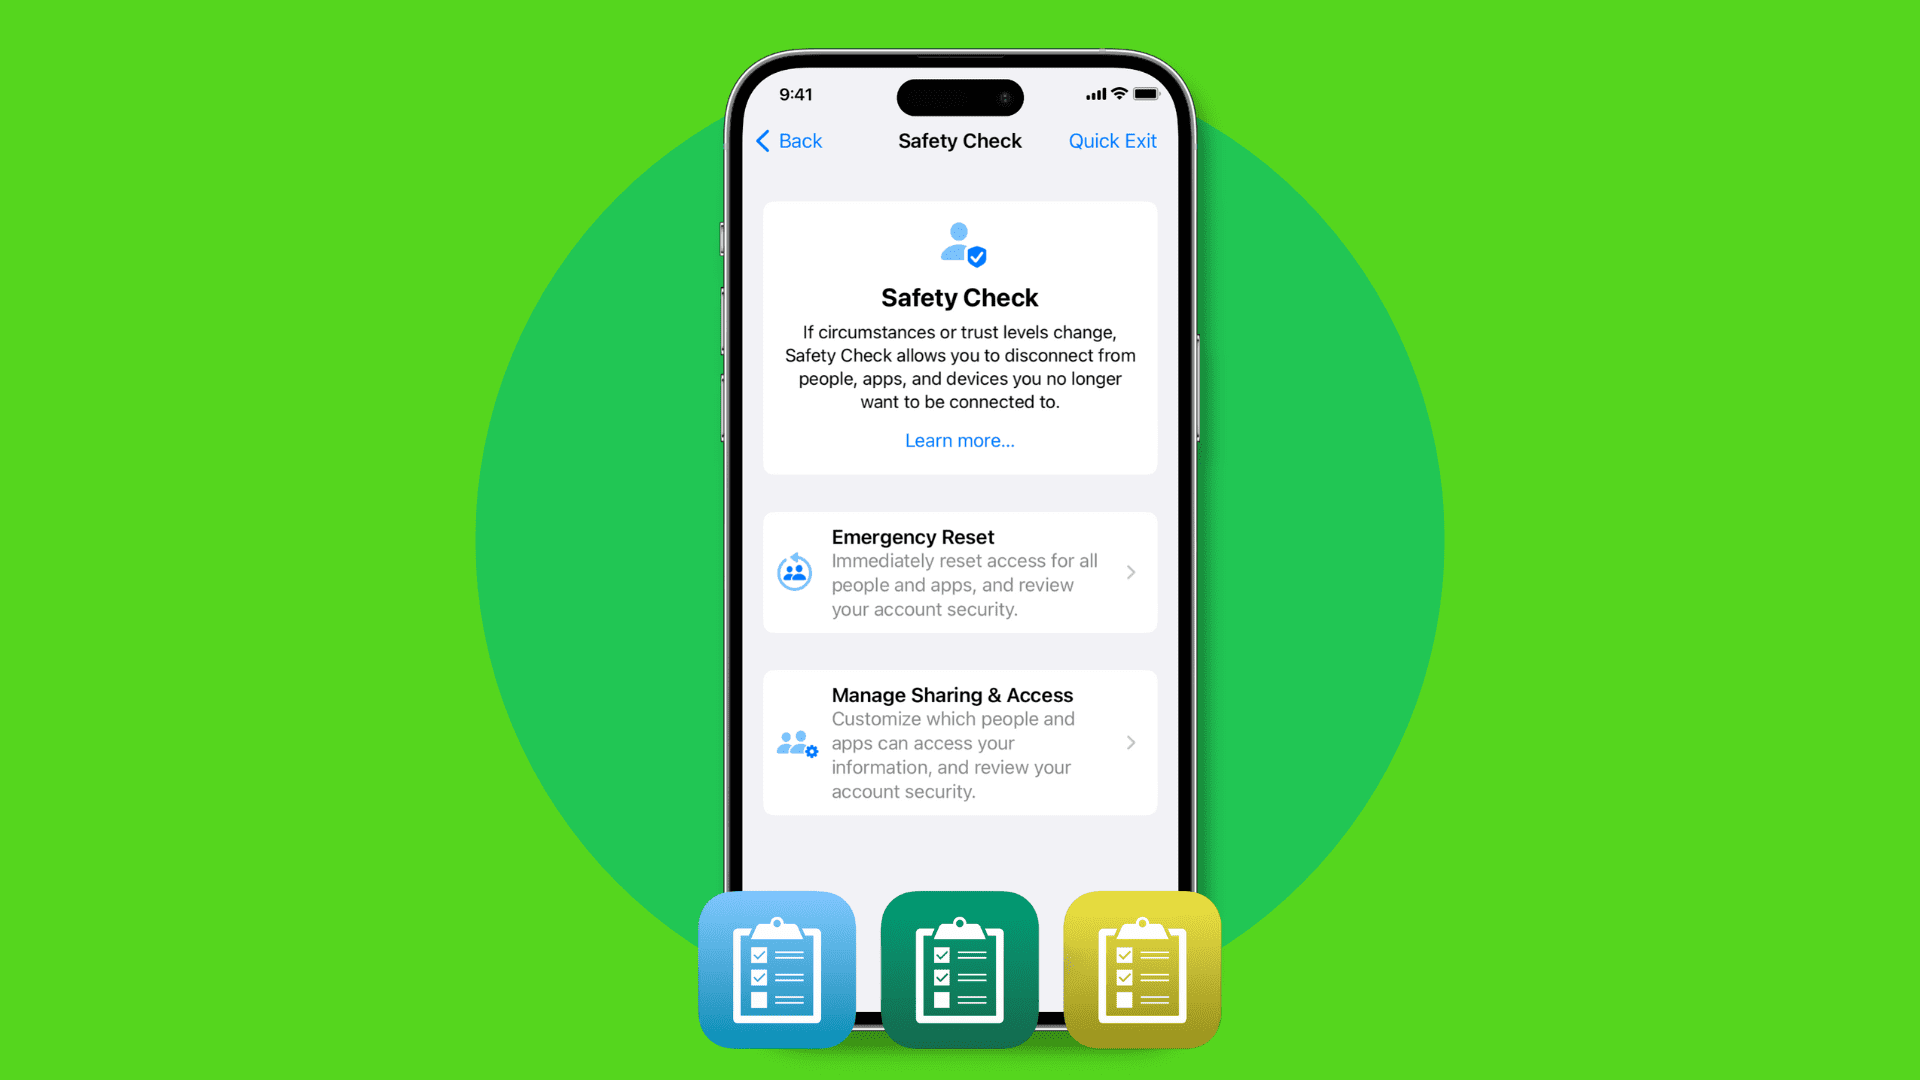
Safety Check is a security feature on your iPhone that allows you to quickly see what information you’re sharing with people and what permissions you have given to applications. From here, you can instantly revoke all permissions or review them on a per-person, per-app, or per-information-type basis.
Note: Safety Check isn’t available on iPad and Mac.
Reasons to use Safety Check
During a relationship, you may choose to share things like location and iCloud photos with your significant other. It’s also possible that your partner’s Face ID or Touch ID is added to your iPhone, and they may even know information like your Apple Account password or iPhone passcode.
If at some point this relationship ends, you should be aware that your iPhone allows you to instantly revoke all of these shared permissions. You can do it all in one go with just a few taps, or, if you have time, you can slowly audit all the permissions and go through them one by one.
In addition to securing your devices after a bad breakup, Safety Check can also be used to review and manage all your app permissions. Additionally, you can use it to strengthen your device security by changing your Apple ID password, resetting the Face ID, updating Emergency Contacts, and more.
Overall, it’s one of the important features every iPhone user must know about.
Use Safety Check on iPhone
1) Open the Settings app and tap Privacy & Security.
2) Scroll down and tap Safety Check.
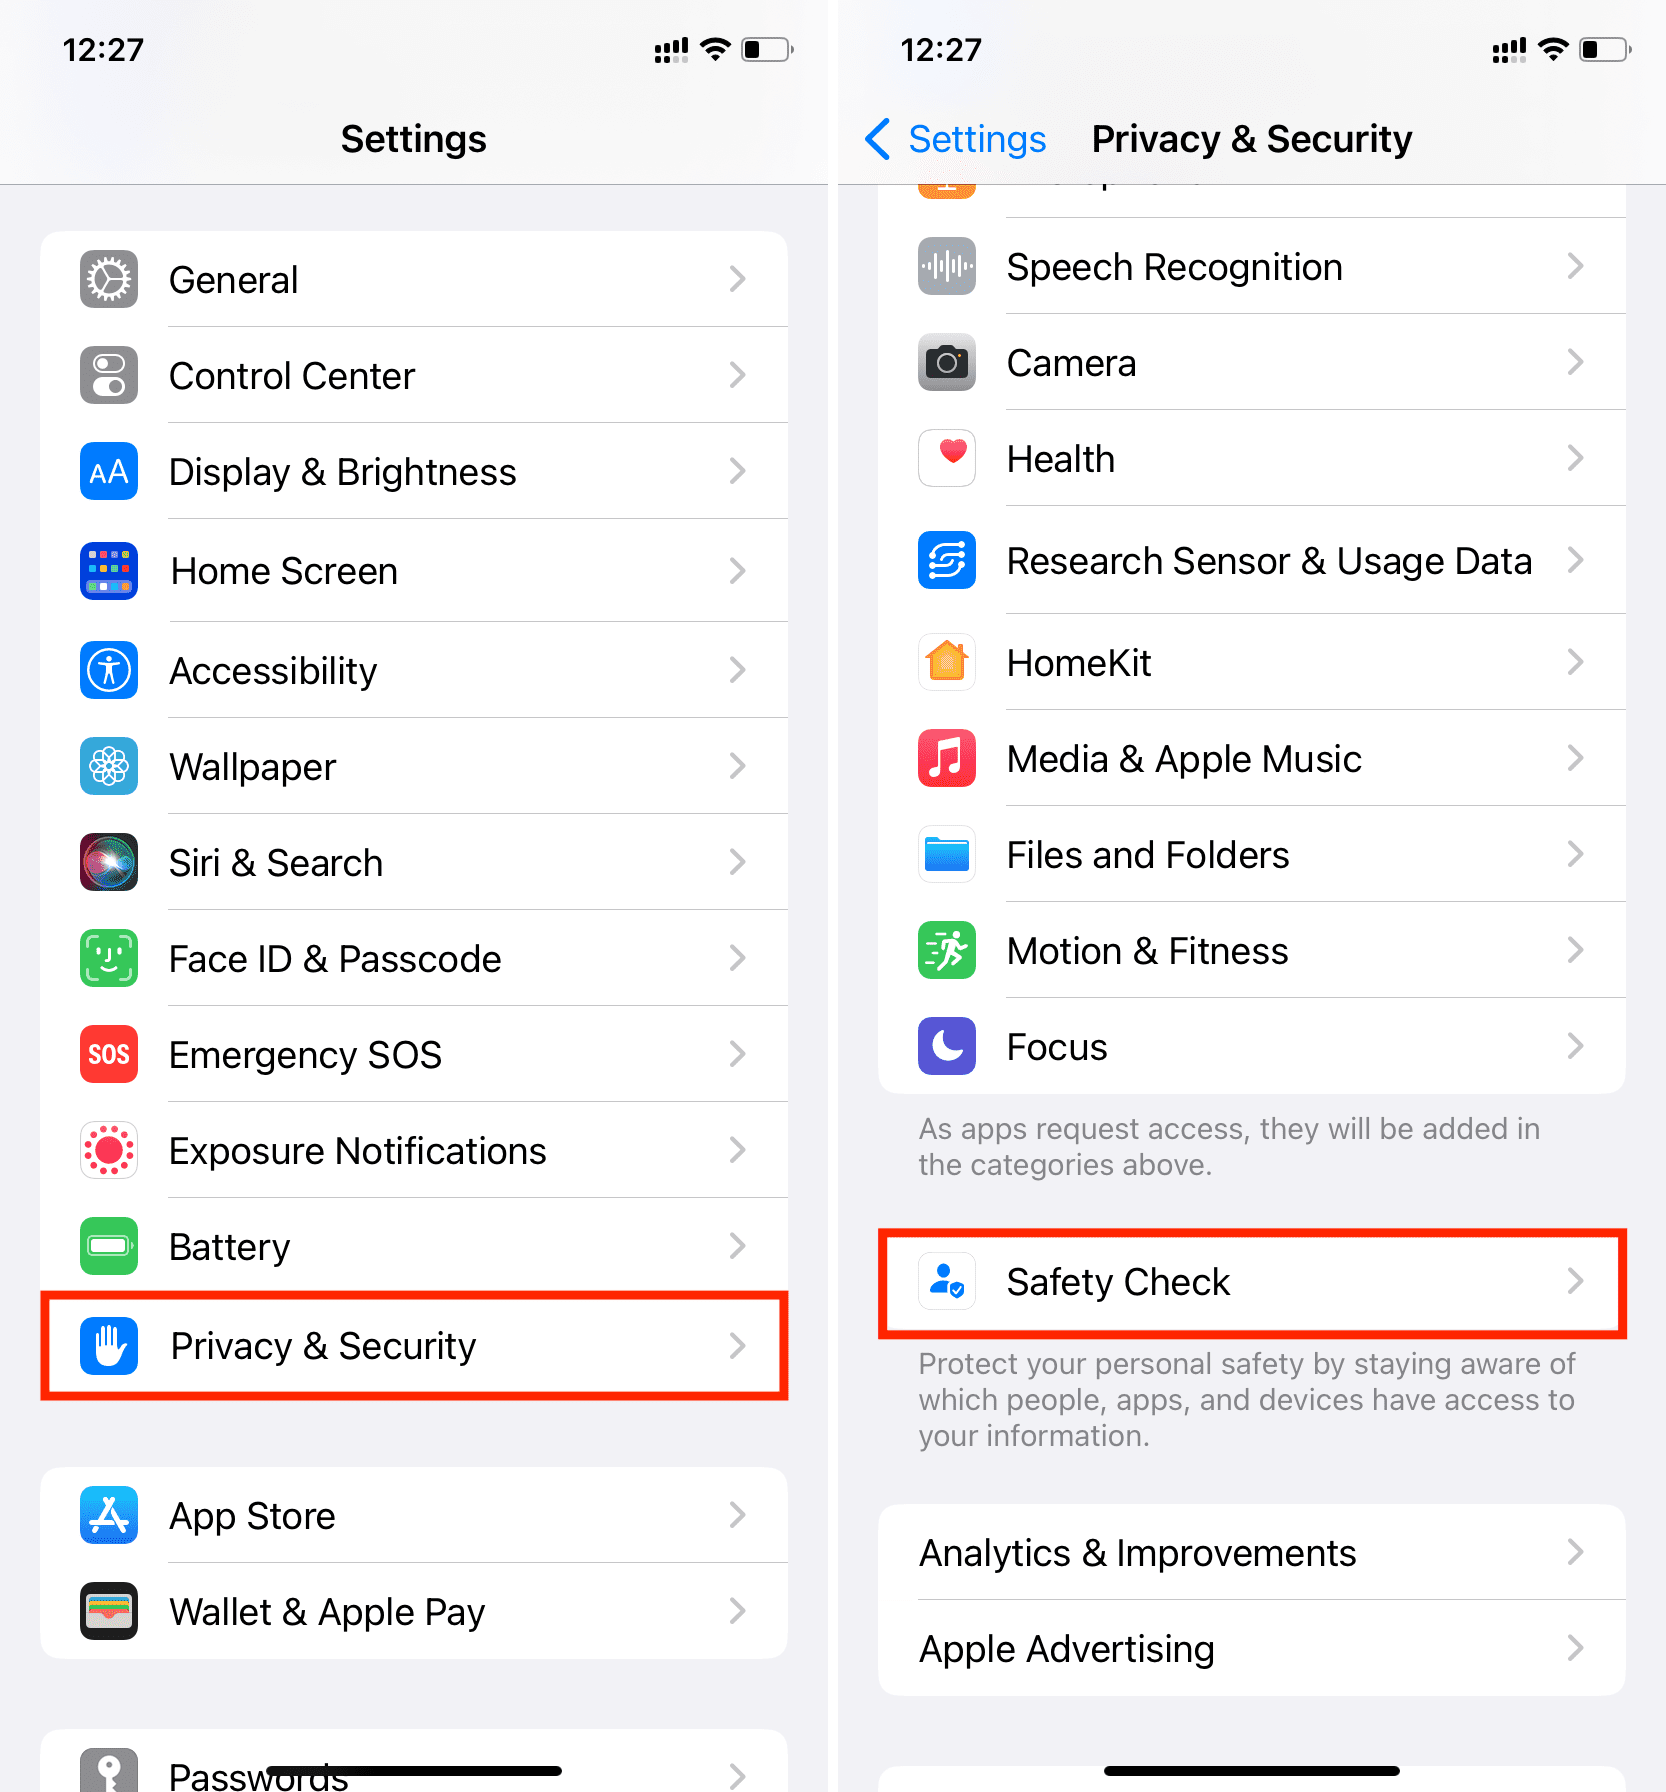
3) You have three options here and we’ll cover them all in detail.
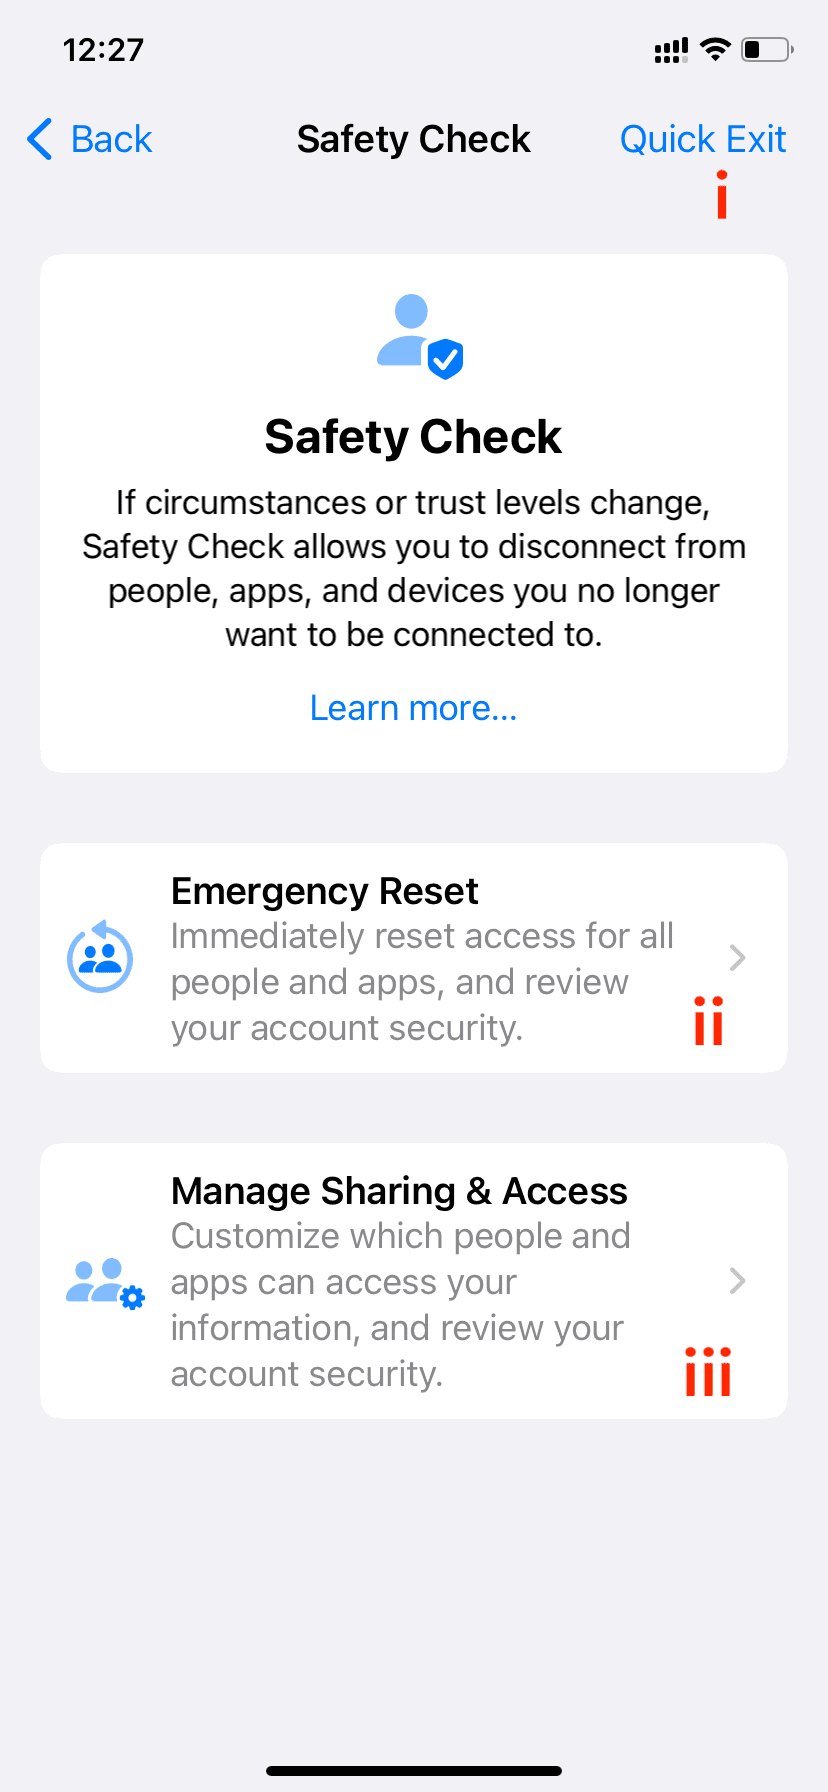
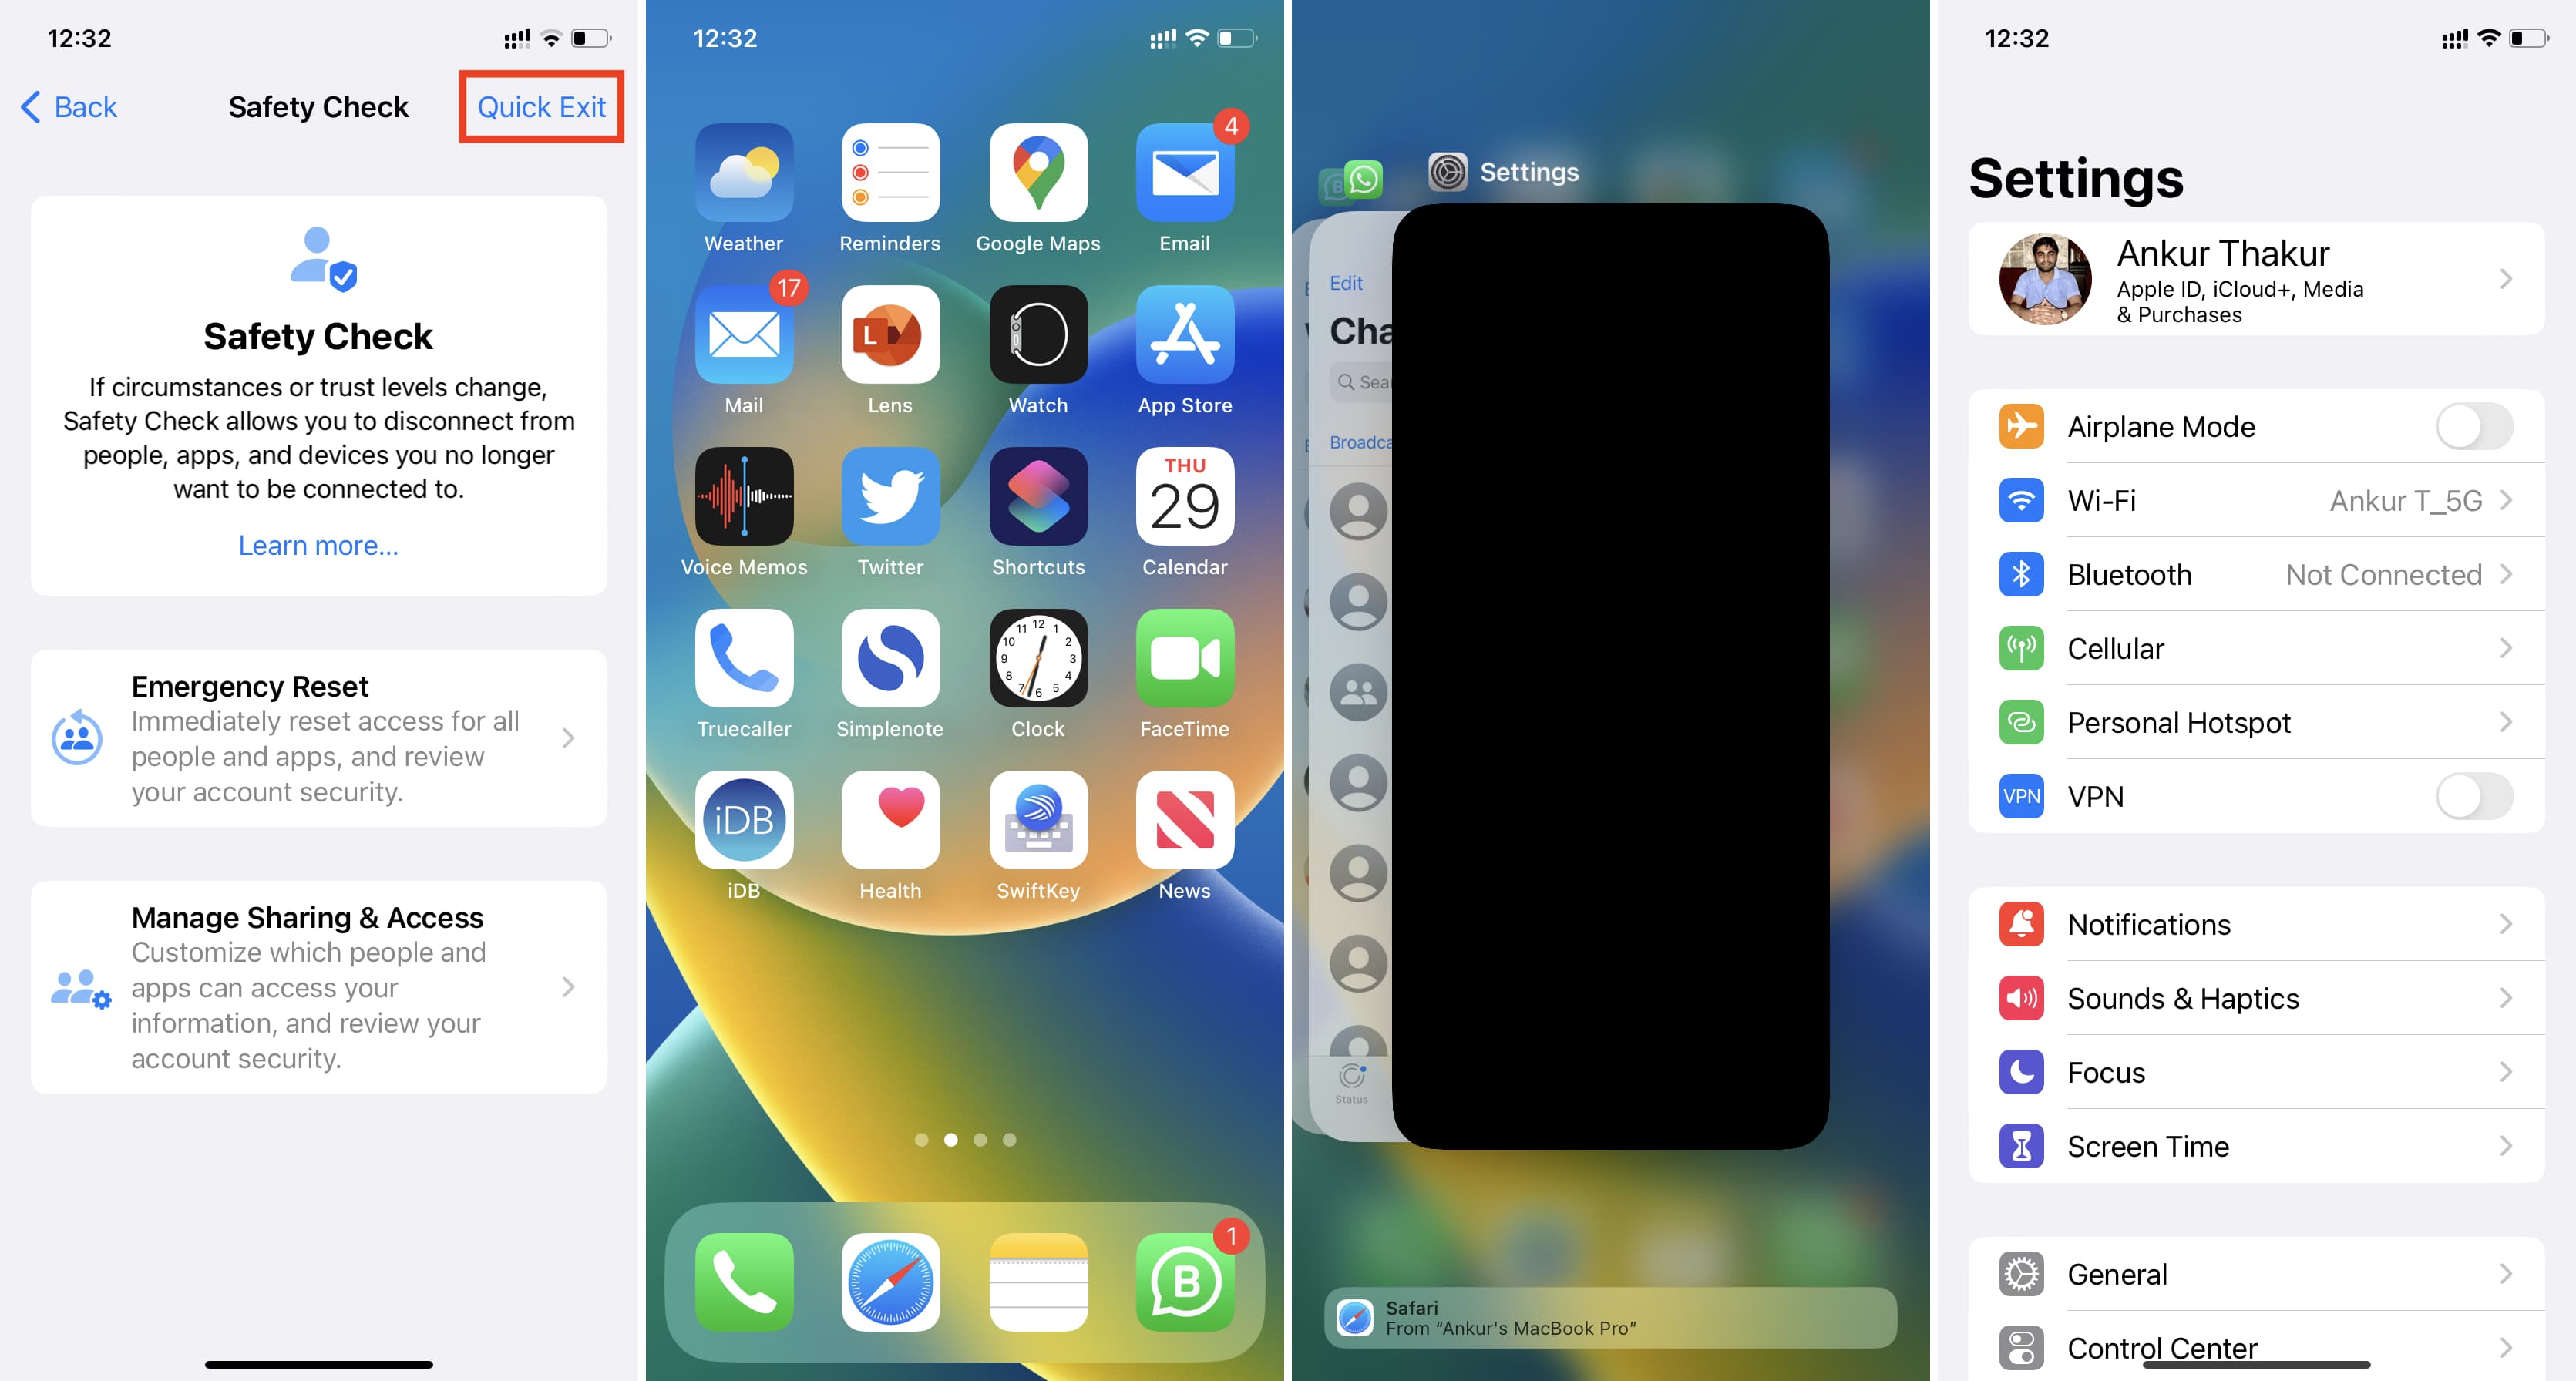
I. Quick Exit
The Quick Exit button sits in the top right corner, and tapping it saves all the changes you’ve made up to that point, takes you back to the Home Screen, and hides the fact that you were tweaking your Safety Check settings.
This is an extremely thoughtful feature from Apple, as it means that if you are ever in a situation where someone forcefully takes your iPhone away from you and reopens the Settings app via the App Switcher, they won’t be able to tell that you were accessing the Safety Check page.
II. Emergency Reset
As the name suggests, Emergency Reset should only be used in grave situations when you don’t have time to individually go through people, app, and device permissions.
Start by tapping Emergency Reset and authenticate via Face ID or Touch ID. Next, tap Start Emergency Reset.
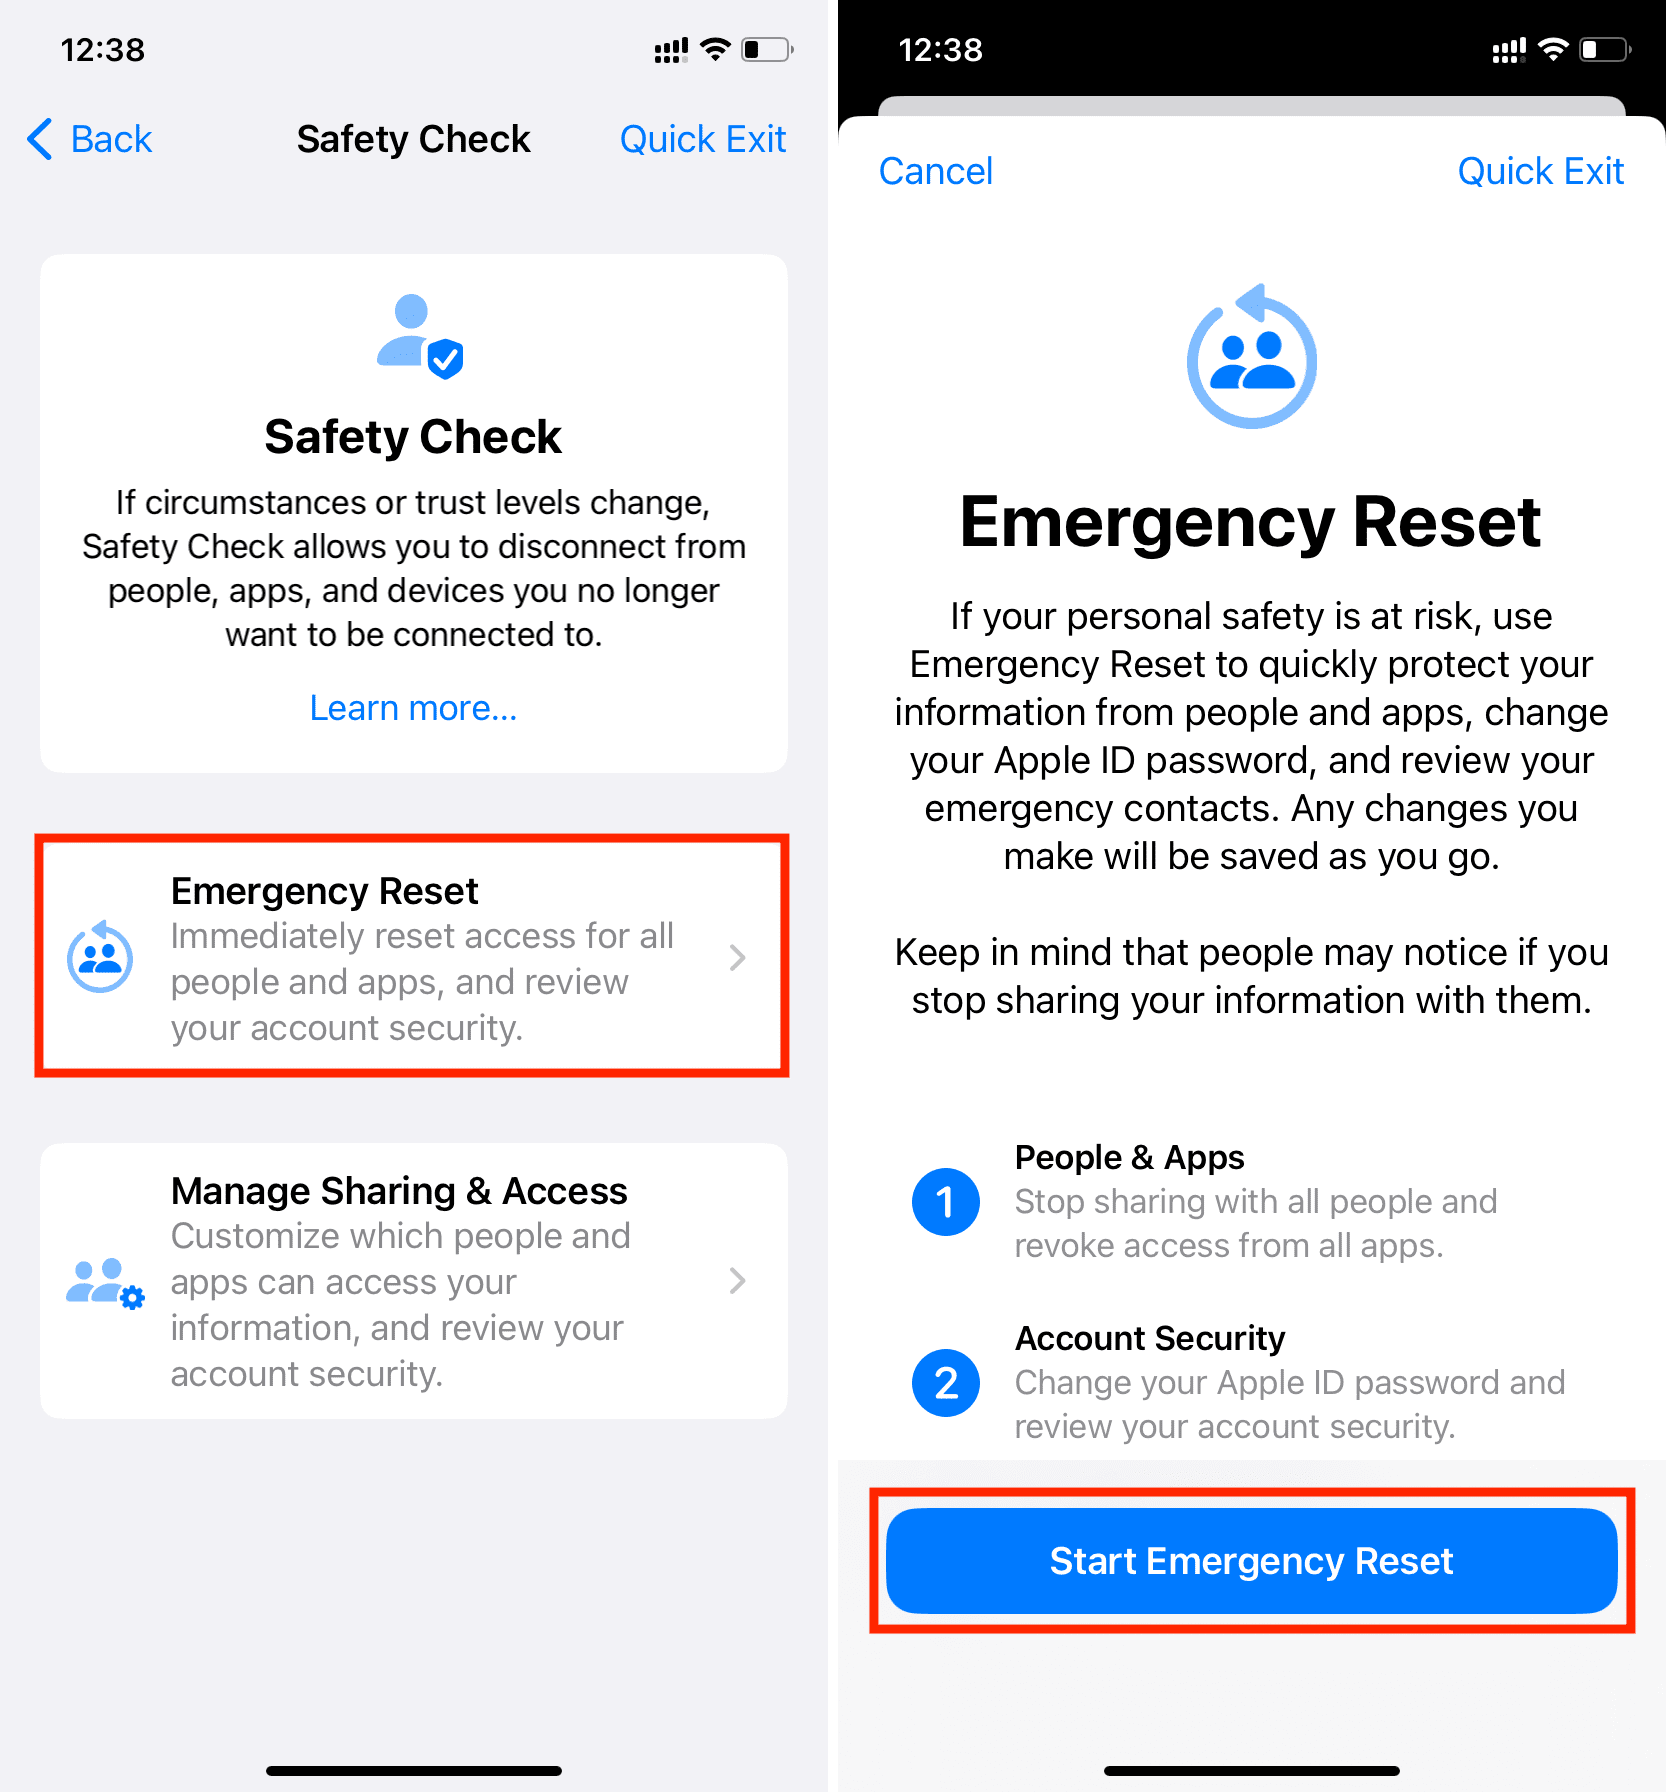
First, you’ll have the option to Reset People & Apps. If you tap the blue Reset People & Apps button, it will stop sharing anything you’re currently sharing with other people, such as your location. All app permissions will also be revoked.
The next step relates to Account Security. With this, you can change your Apple Account password and review your account security. If you have shared your Apple ID password with others, make sure you do this so they can no longer sign in to a device or on iCloud.com using your Apple ID. It will prevent them from accessing your iCloud notes, contacts, passwords, photos, and other data stored in your iCloud and iCloud Drive.
Next, you have the Emergency Contacts screen. This lets you add or remove emergency contacts. Perhaps during a previous relationship, you might have added your partner’s phone number as your emergency contact. But now that the situation has changed, you might want to remove their number and use the phone number of a family member, friend, or other trusted person.
In summary, your iPhone will do the following after you complete the Emergency Reset:
- If you were sharing your location from Find My, it will immediately stop.
- All app privacy permissions like Bluetooth, Contacts, Calendars, Location, Microphone, Camera, etc., will be reset, meaning apps will have to ask for your consent to use them again at the next launch.
- If you use iMessage and FaceTime on other devices (like a Mac, iPad, or another iPhone), they’ll stop working on those devices and will only be available on the iPhone where you initiated the Emergency Reset.
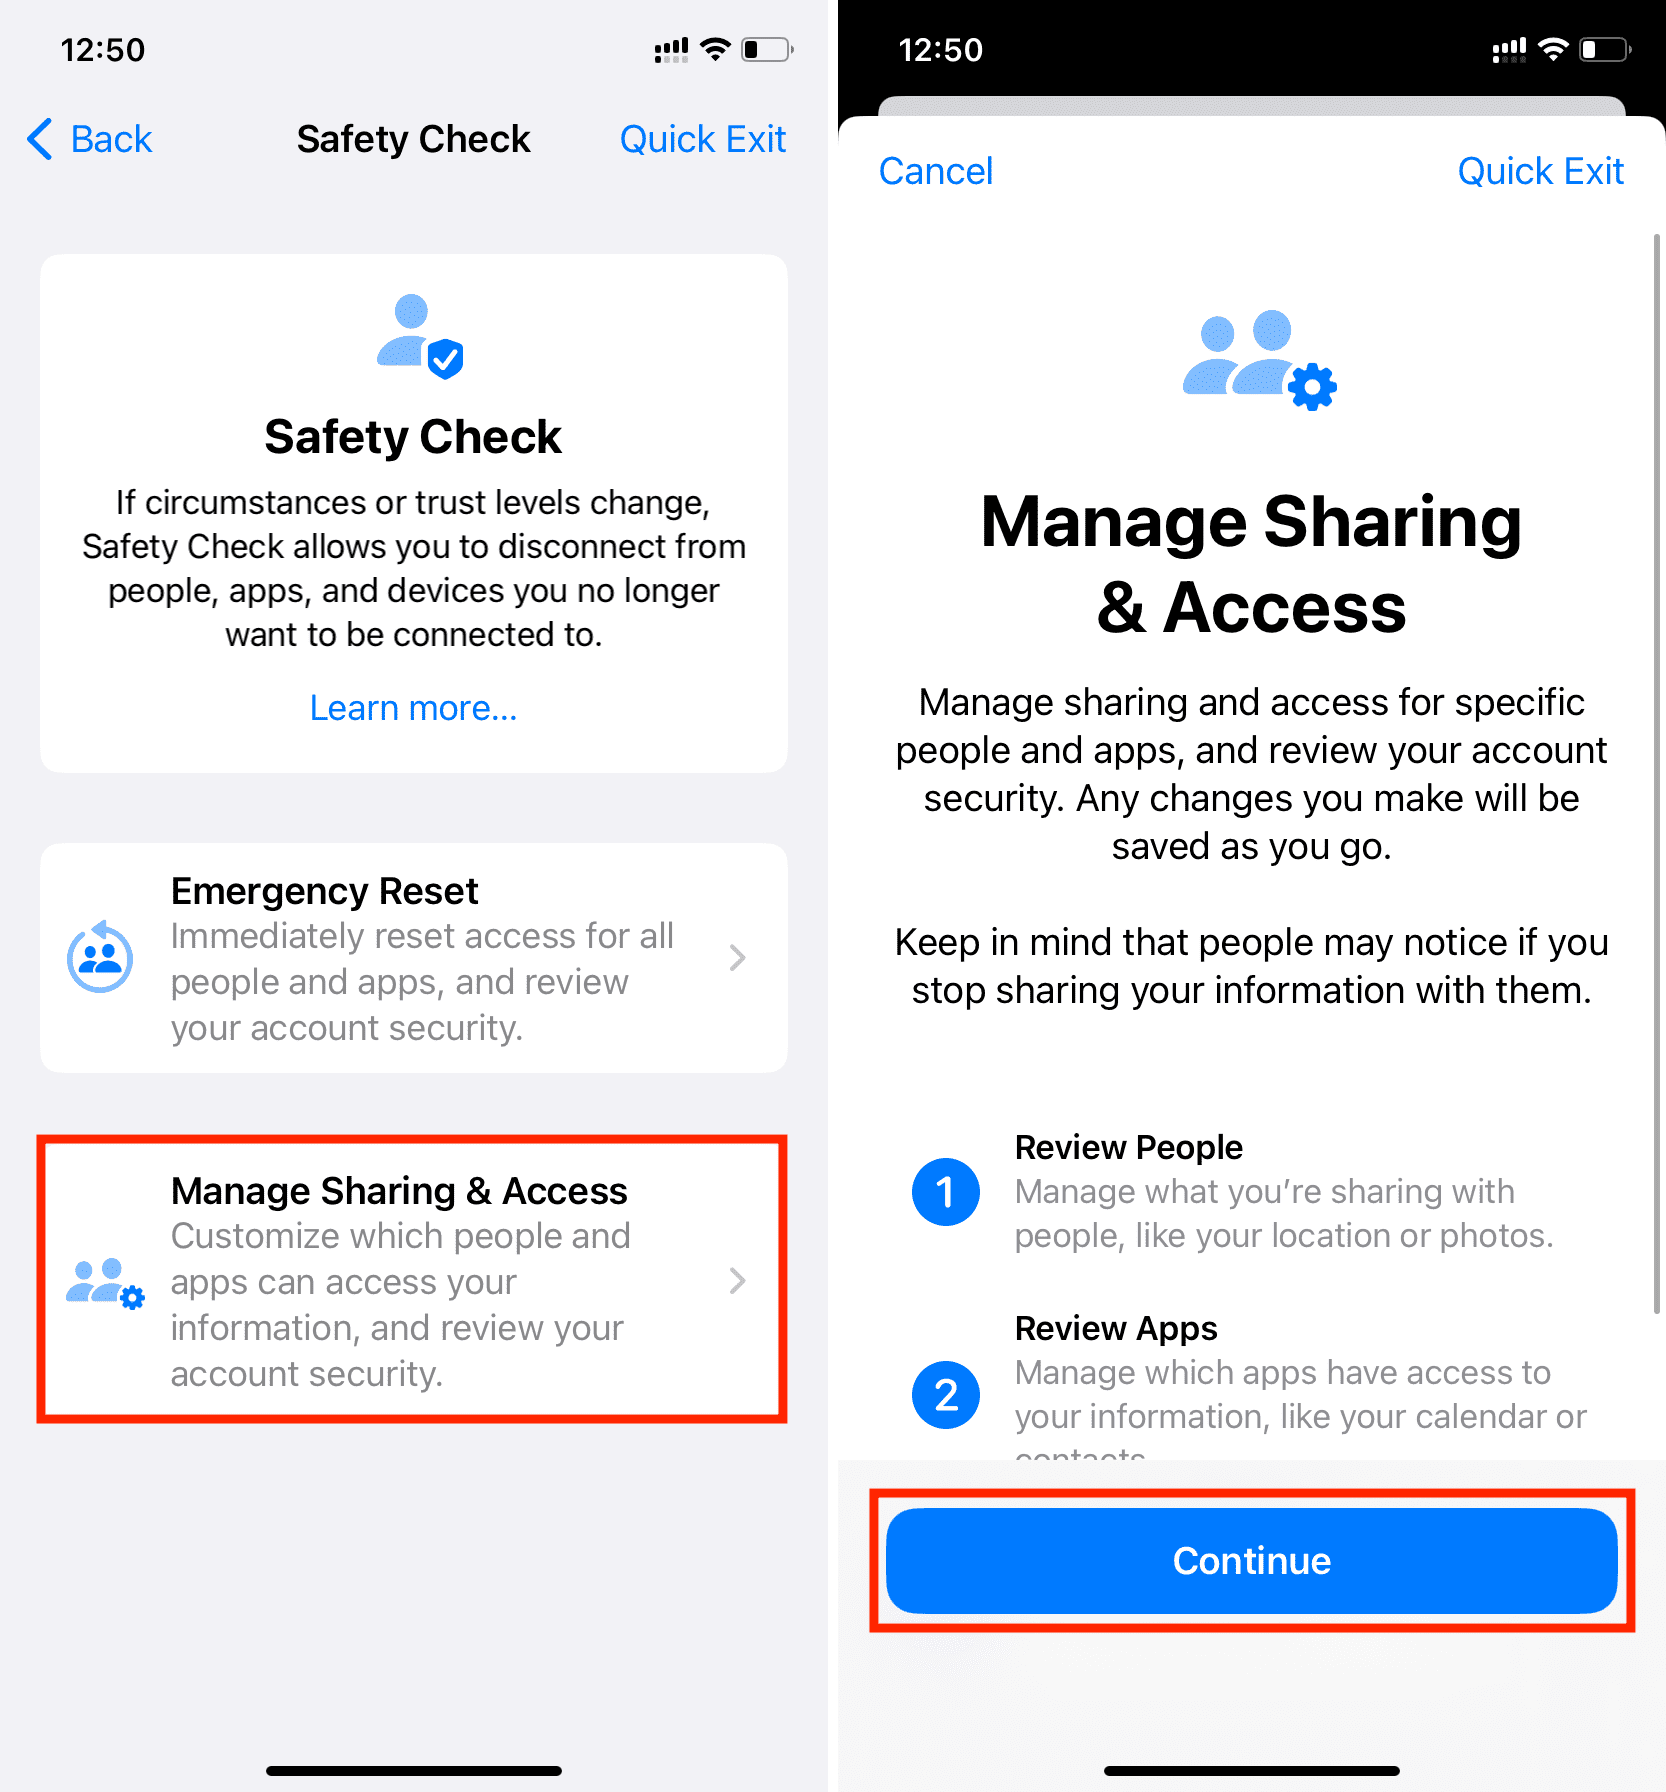
III. Manage Sharing & Access
Finally, you have the option to manually review people and apps and revoke their privileges on a per-case basis. In the end, you can also review your account security and change your device or Apple Account password if required.
Begin by tapping Manage Sharing & Access and authenticate via Face ID or Touch ID. After that, tap Continue.
Step 1: Sharing with other people
People: Tap the name of the person and choose Review Sharing. After that, select what data you want to stop sharing (like Find My location, Health data, notes, photos, calendar) and tap Stop Sharing. You can then choose to continue with your audit or move on to review permissions for other people.
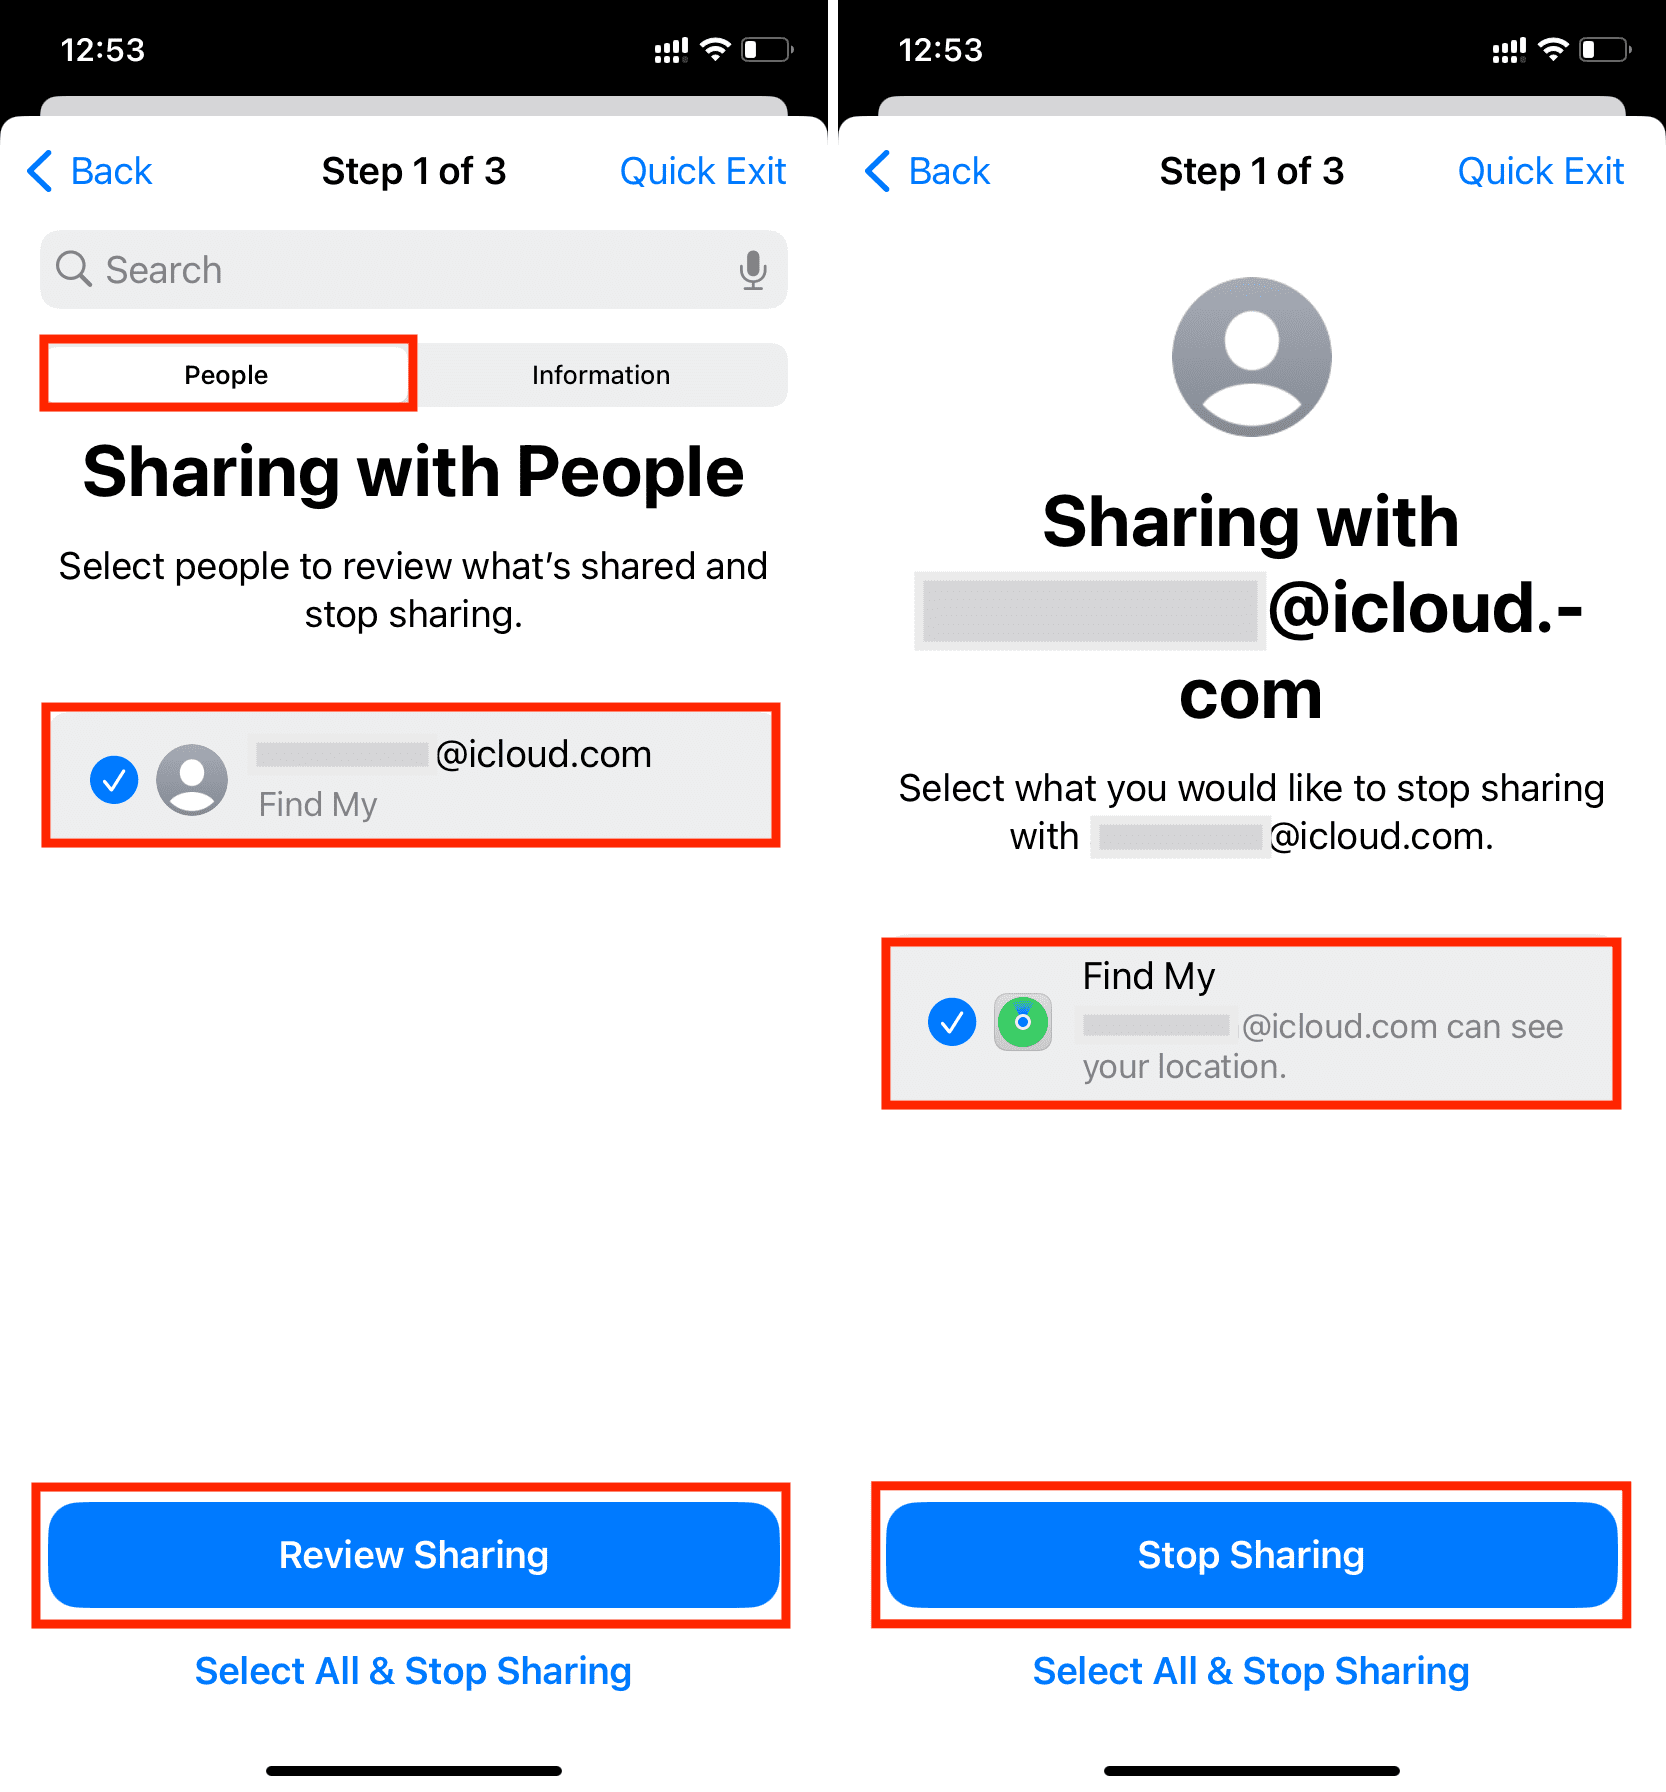
Information: If you don’t want to review and revoke permission based on people but rather the type of information (such as location sharing), tap Information from the top. Here, select the category of data like Fitness Activity, Passwords, Find My location, Health data, shared photo album, shared calendars, shared Notes, and tap Review Sharing. Next, pick the person you want to stop sharing that information with and tap Stop Sharing.

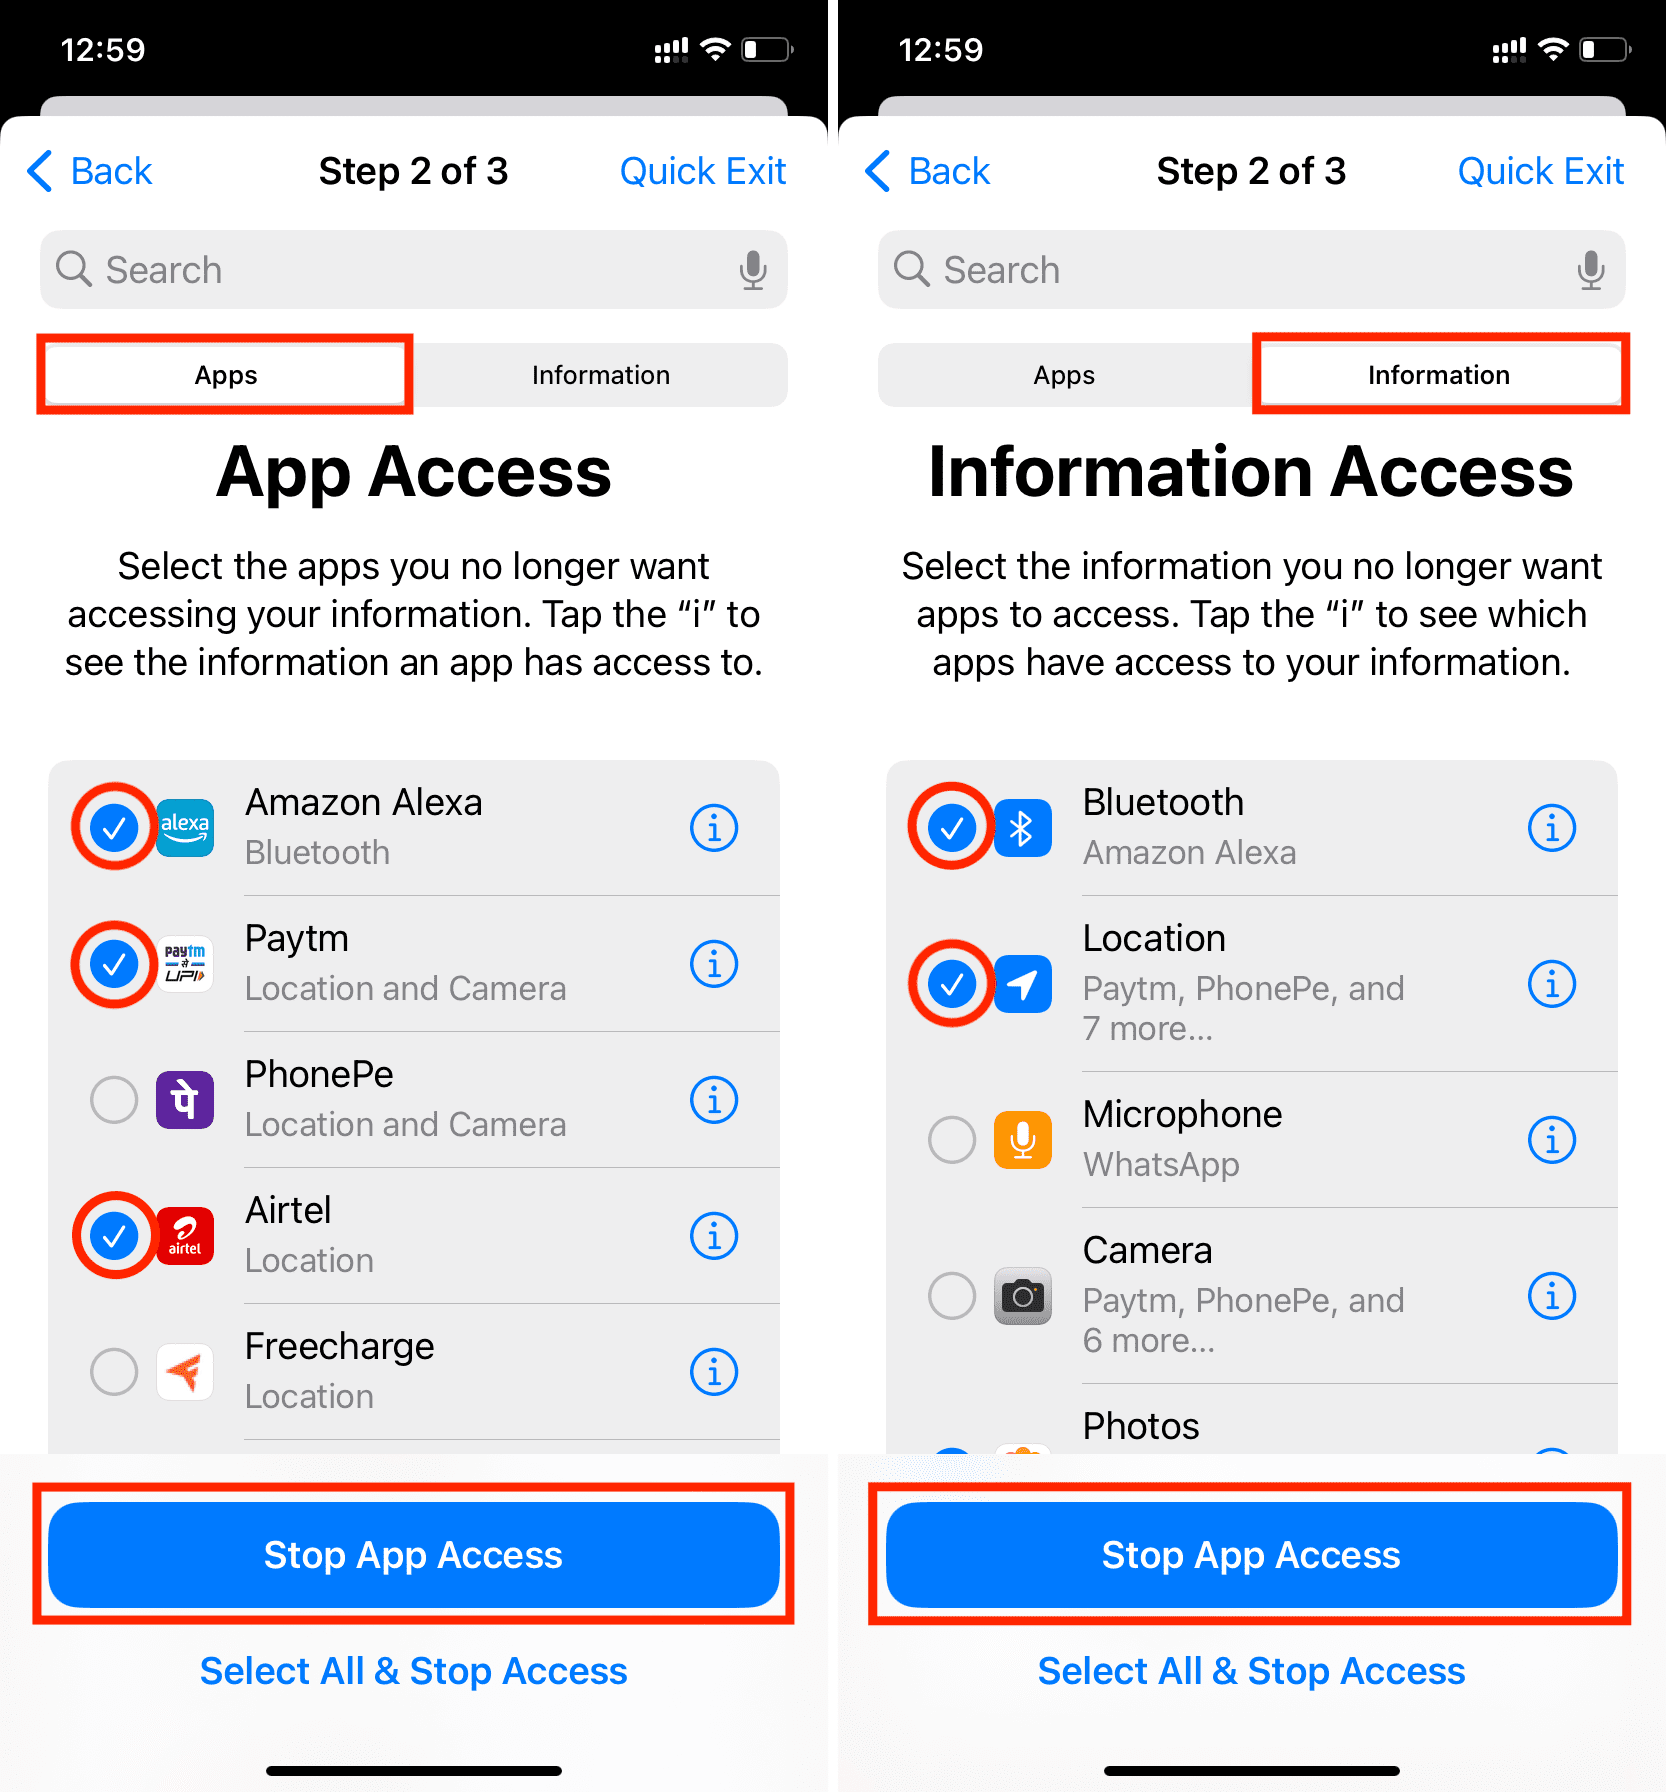
Step 2: App Access
After you finish auditing what information you share with people, the next step lets you see what data you have allowed apps to access.
From here, you can choose to Stop App Access to all of your information (Bluetooth, Location, Camera, Microphone, Photos, Contacts) for one or more apps.
You also have the option, once again, to revoke access based on the type of information. For instance, you can choose Location and tap Stop App Access, and this will terminate the location privileges for all apps that currently have them.
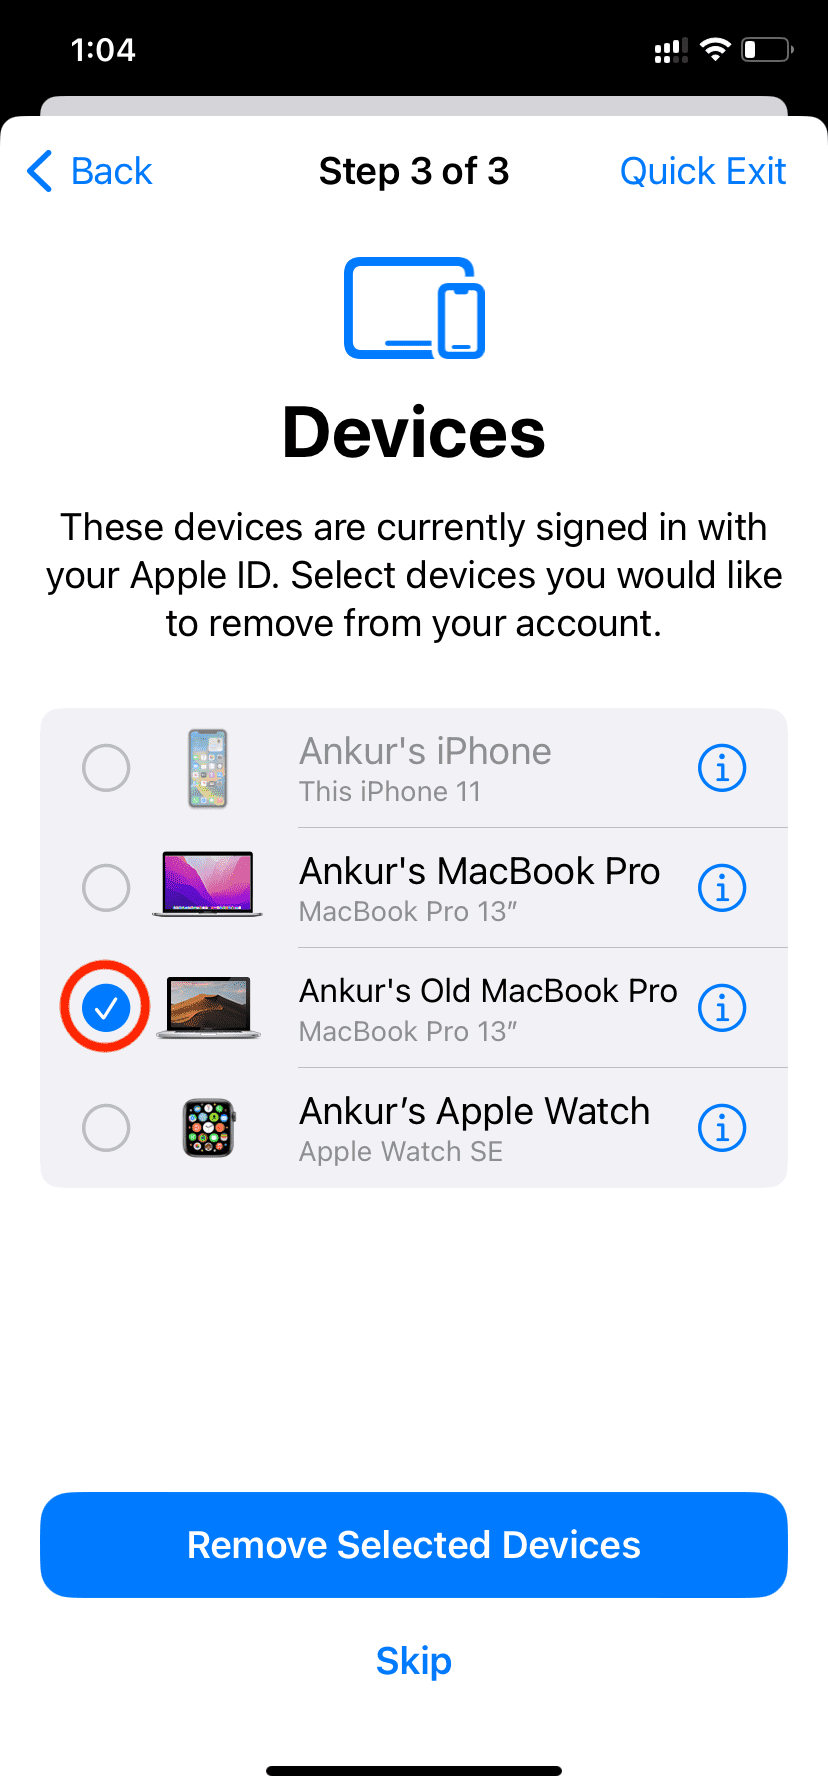
Step 3: Devices
This final step is where you can manage your Apple devices and personal settings.
Here, you will see all the devices you have logged into using your Apple Account. If you think there is a device you no longer have access to or it’s shared by other people (like an iPad with your Apple ID that’s always in your living room), you can select it and tap Remove Selected Devices. This will prevent sign-in codes from being sent to this device, and your iCloud services will also not work on it until you decide to sign in again.
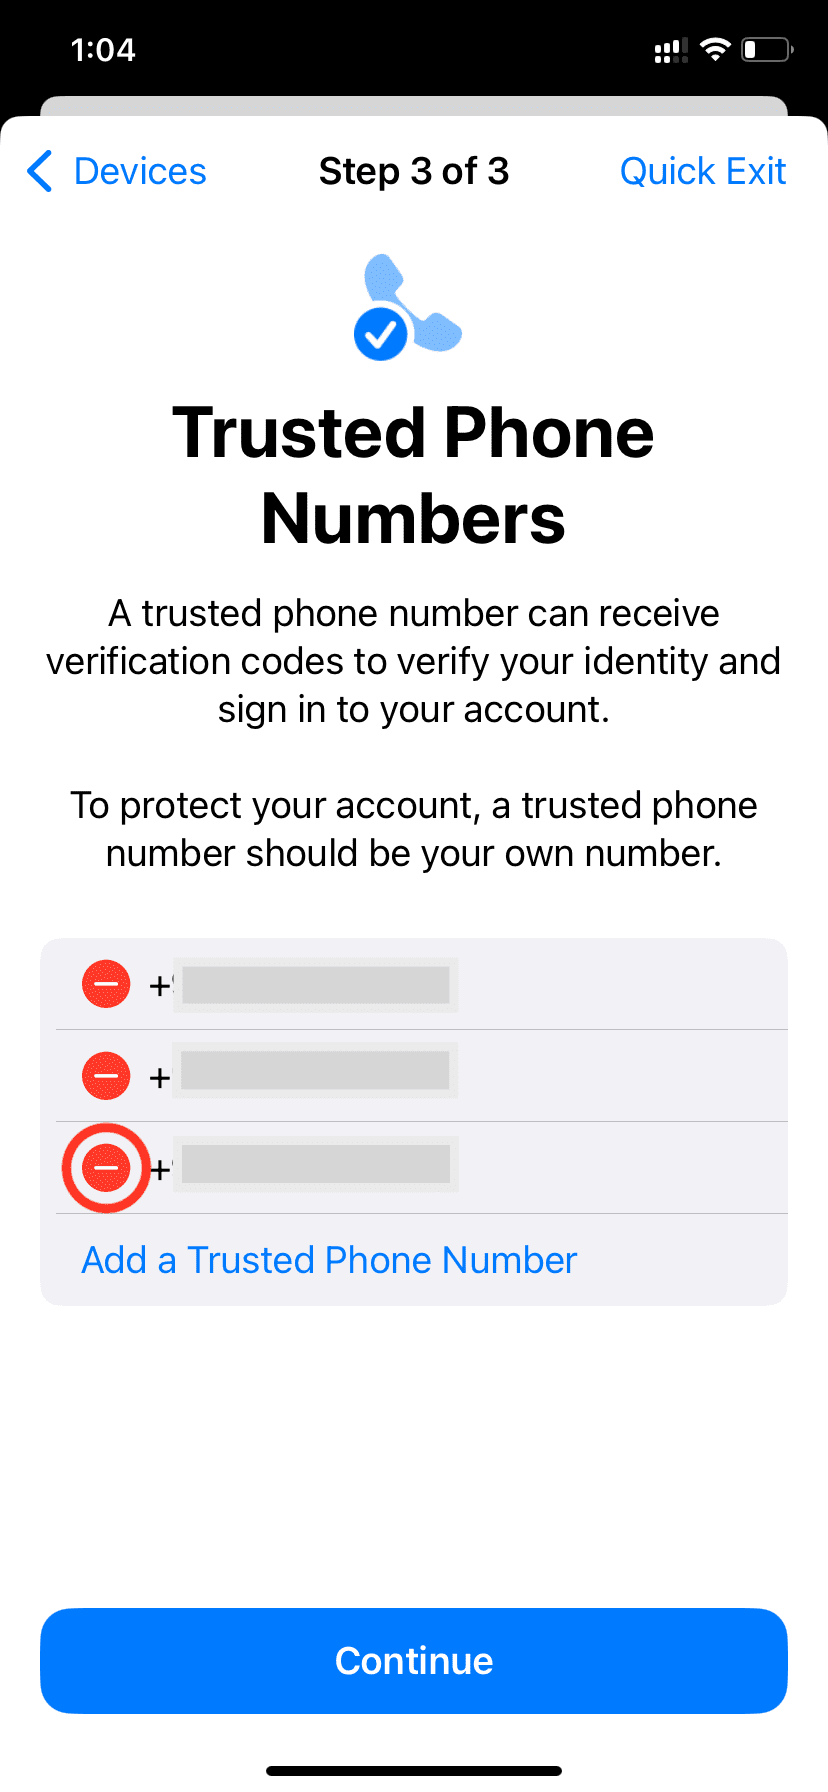
Next is the Trusted Phone Numbers screen. While in a relationship, you might have added your partner’s phone number as a backup to receive 2FA codes. From here, you can remove that by tapping the phone number and selecting Remove from Account. On older versions of iOS, tap the red minus button to remove the number. You can also add a different trusted number from this screen.
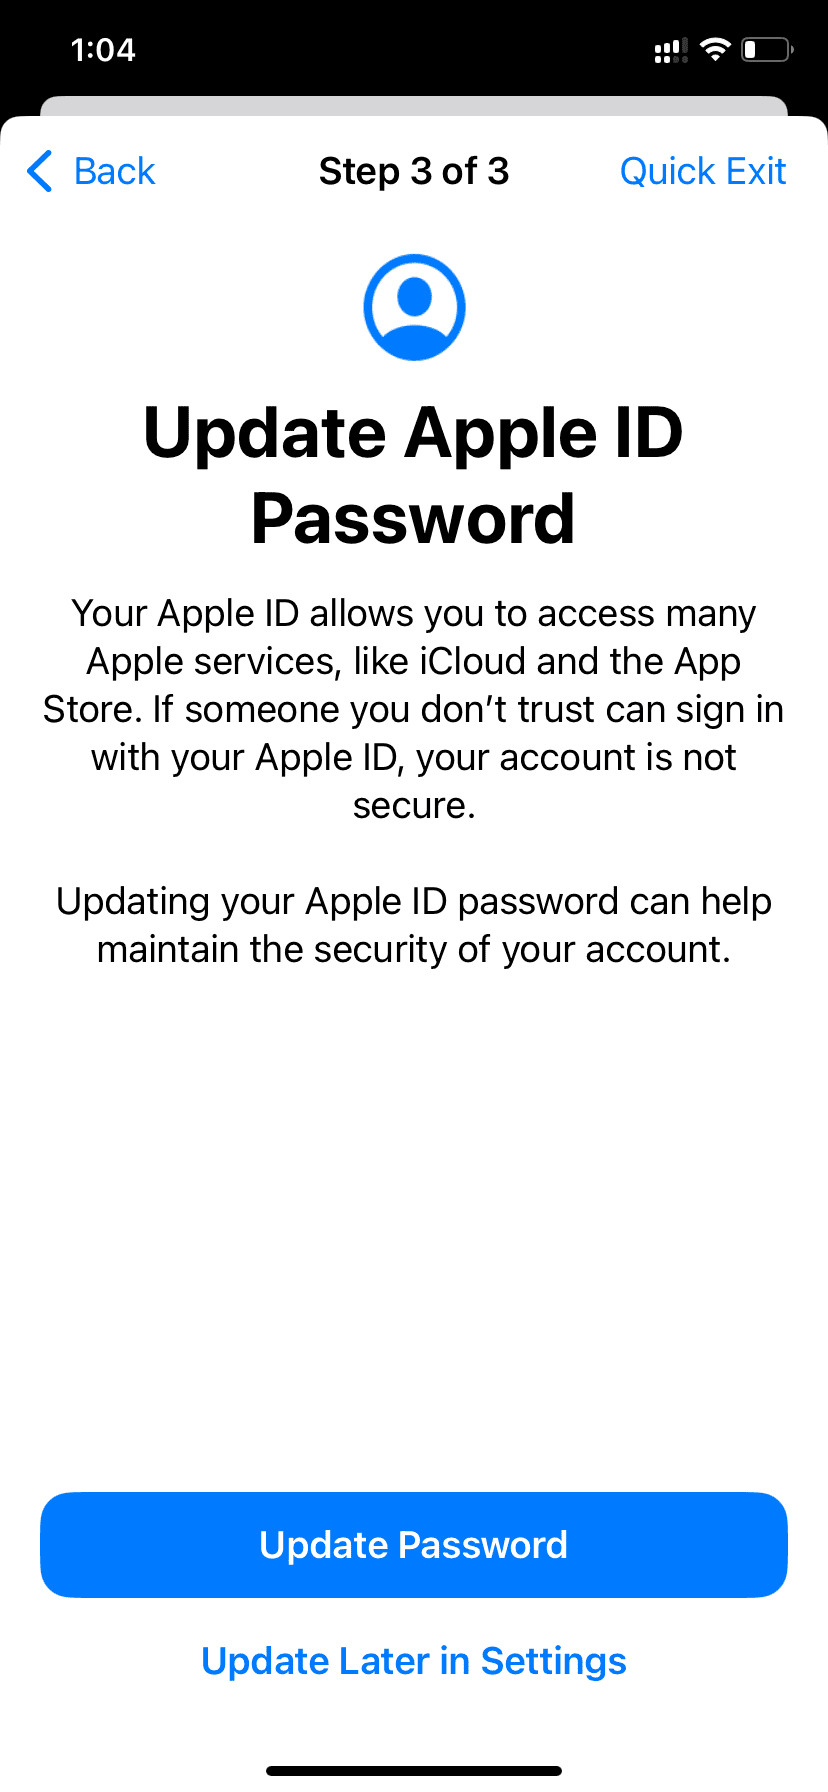
After that, you will see an option to Update Apple Account Password. If you think someone knows your Apple password that shouldn’t, tap Update Password to change it.
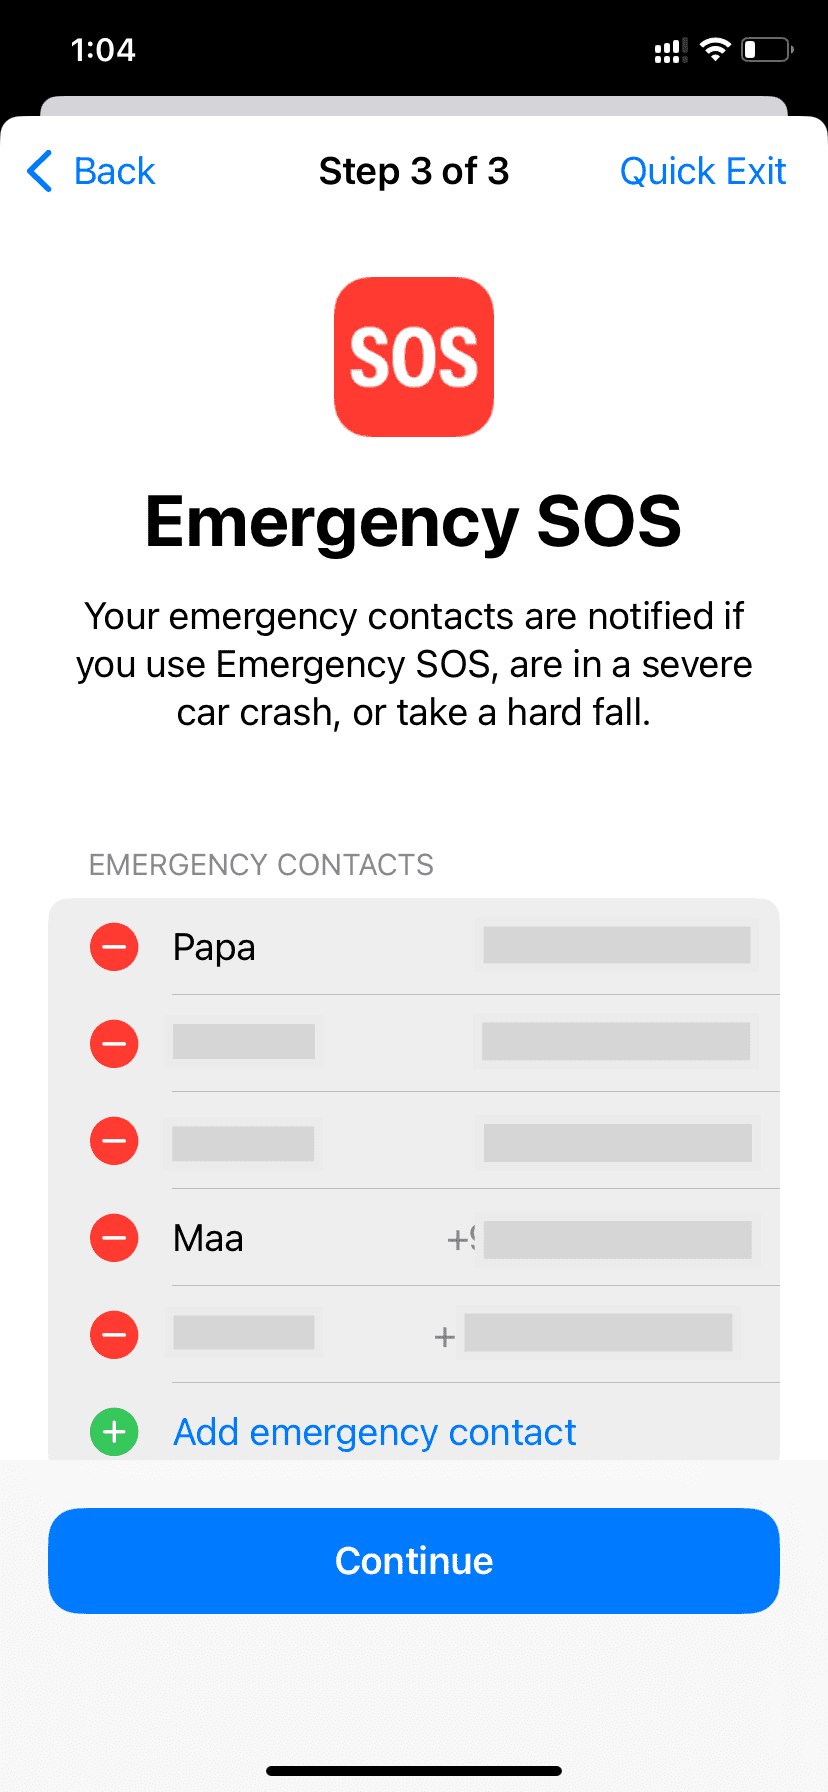
Next, you see the Emergency SOS screen. From here, you can remove and add emergency contacts.
The Synced Computers screen allows you to stop syncing your data via a cable or Wi-Fi to your other Macs or PCs.

Next, you can choose to stop sharing iPhone content with other devices. This ensures your iPhone’s app widgets, camera, microphones, etc., can’t be used with a nearby Mac.

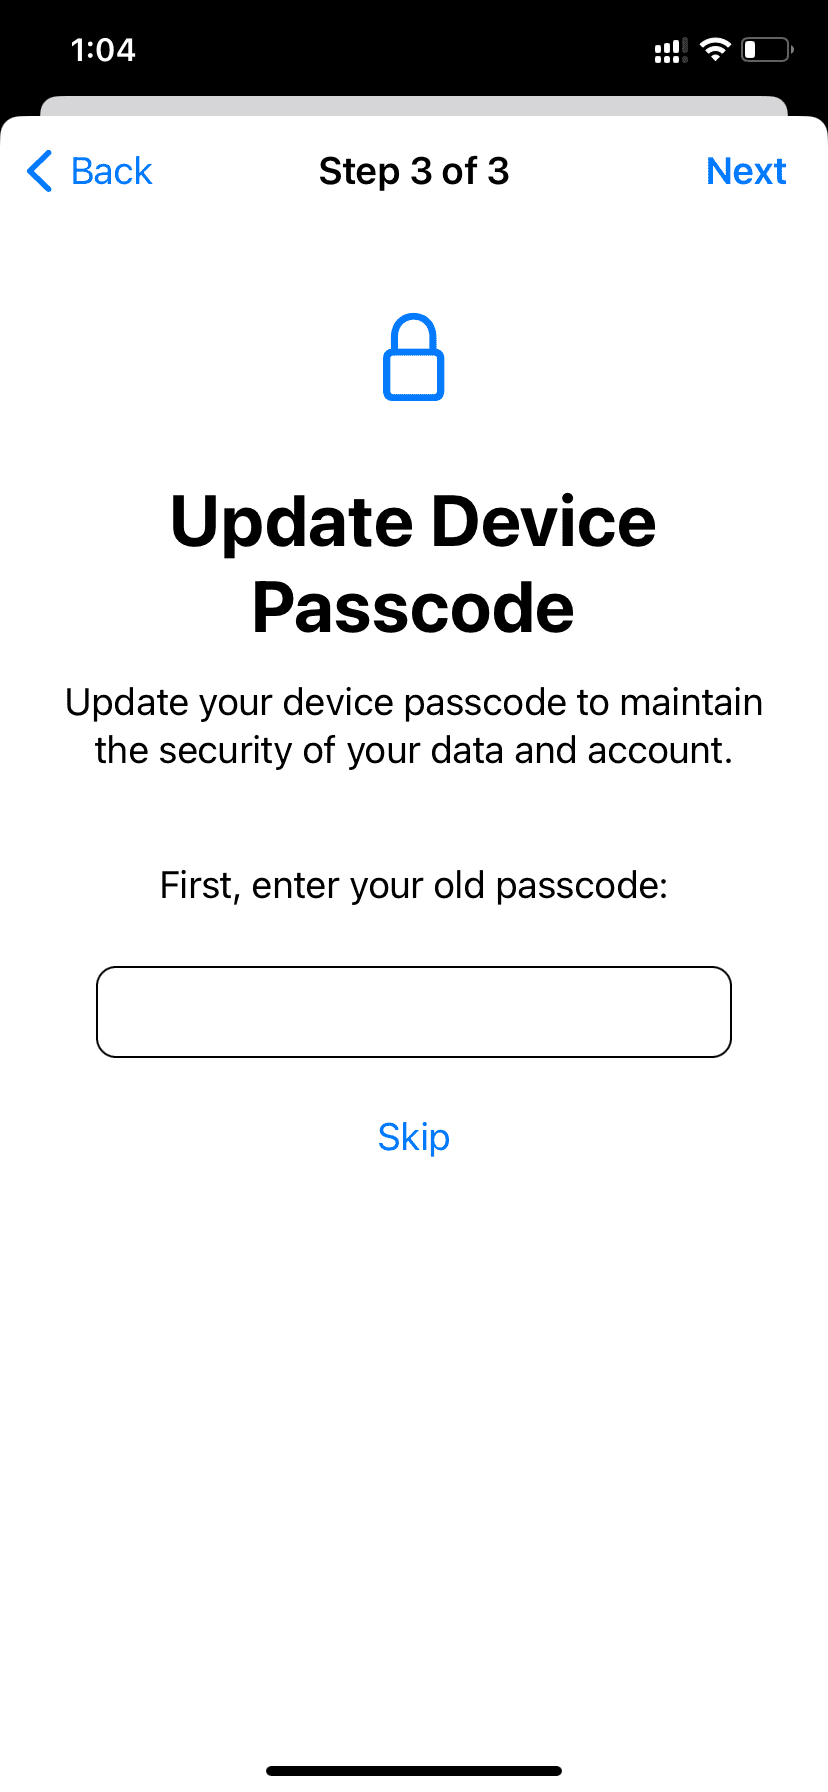
Once that’s done, your iPhone will give you the option to Update Device Passcode. Again, if you believe someone might know your iPhone passcode that shouldn’t, it’s probably a good idea to change it, which you can do here.
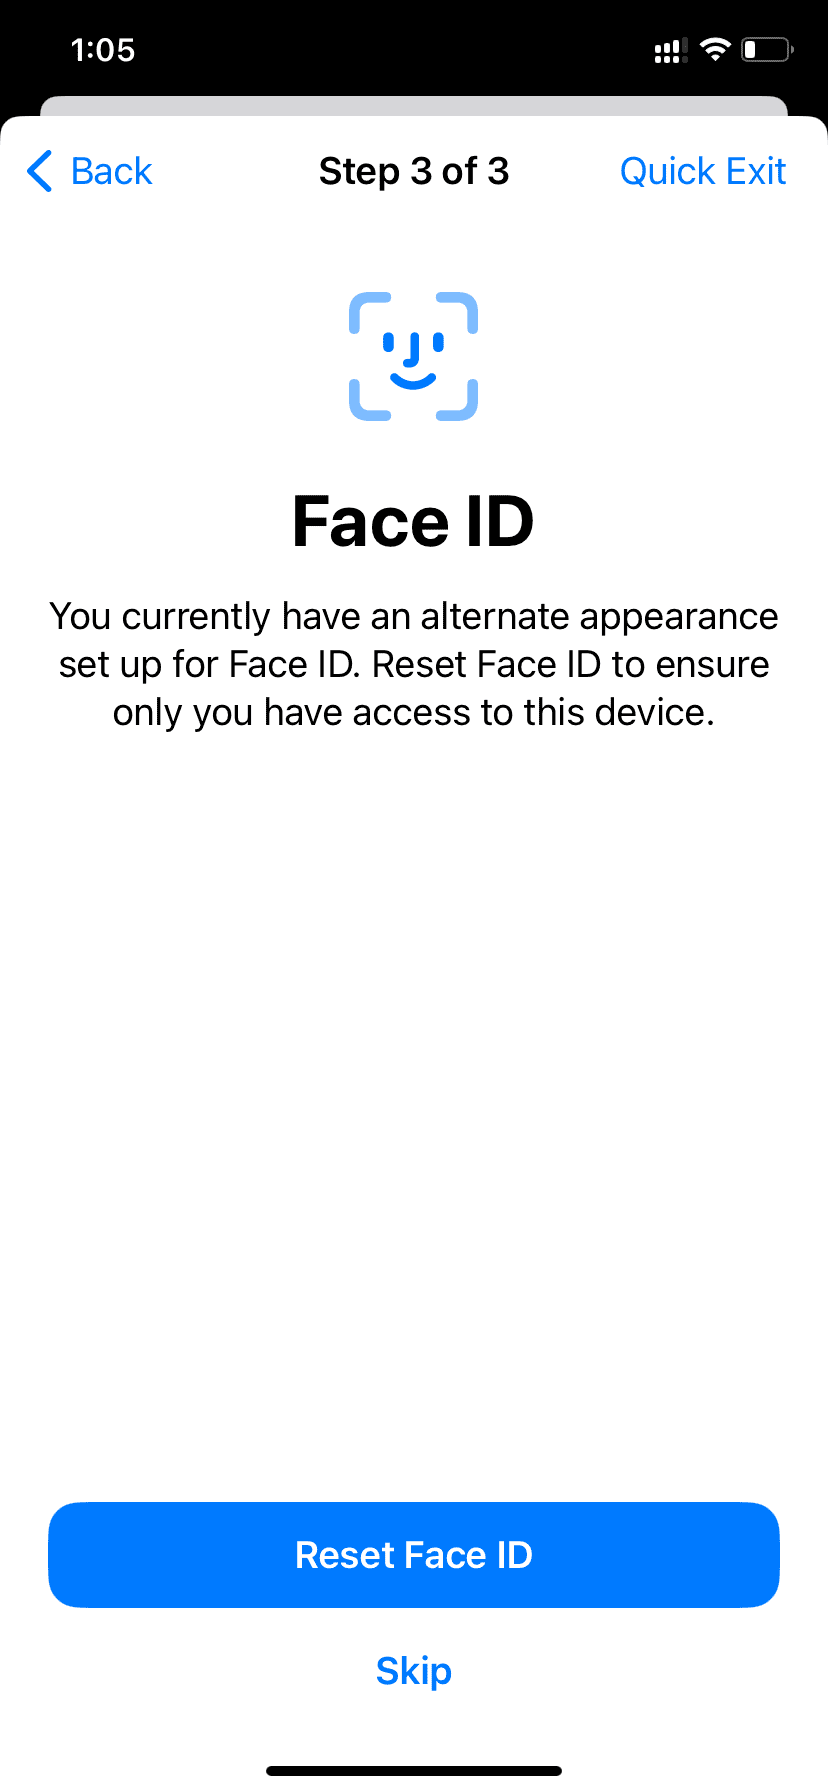
You will also get the option to Reset Face ID, in case you have set another person’s Face ID as an alternate appearance. Once done, that other person can’t get inside your iPhone via Face ID authentication.
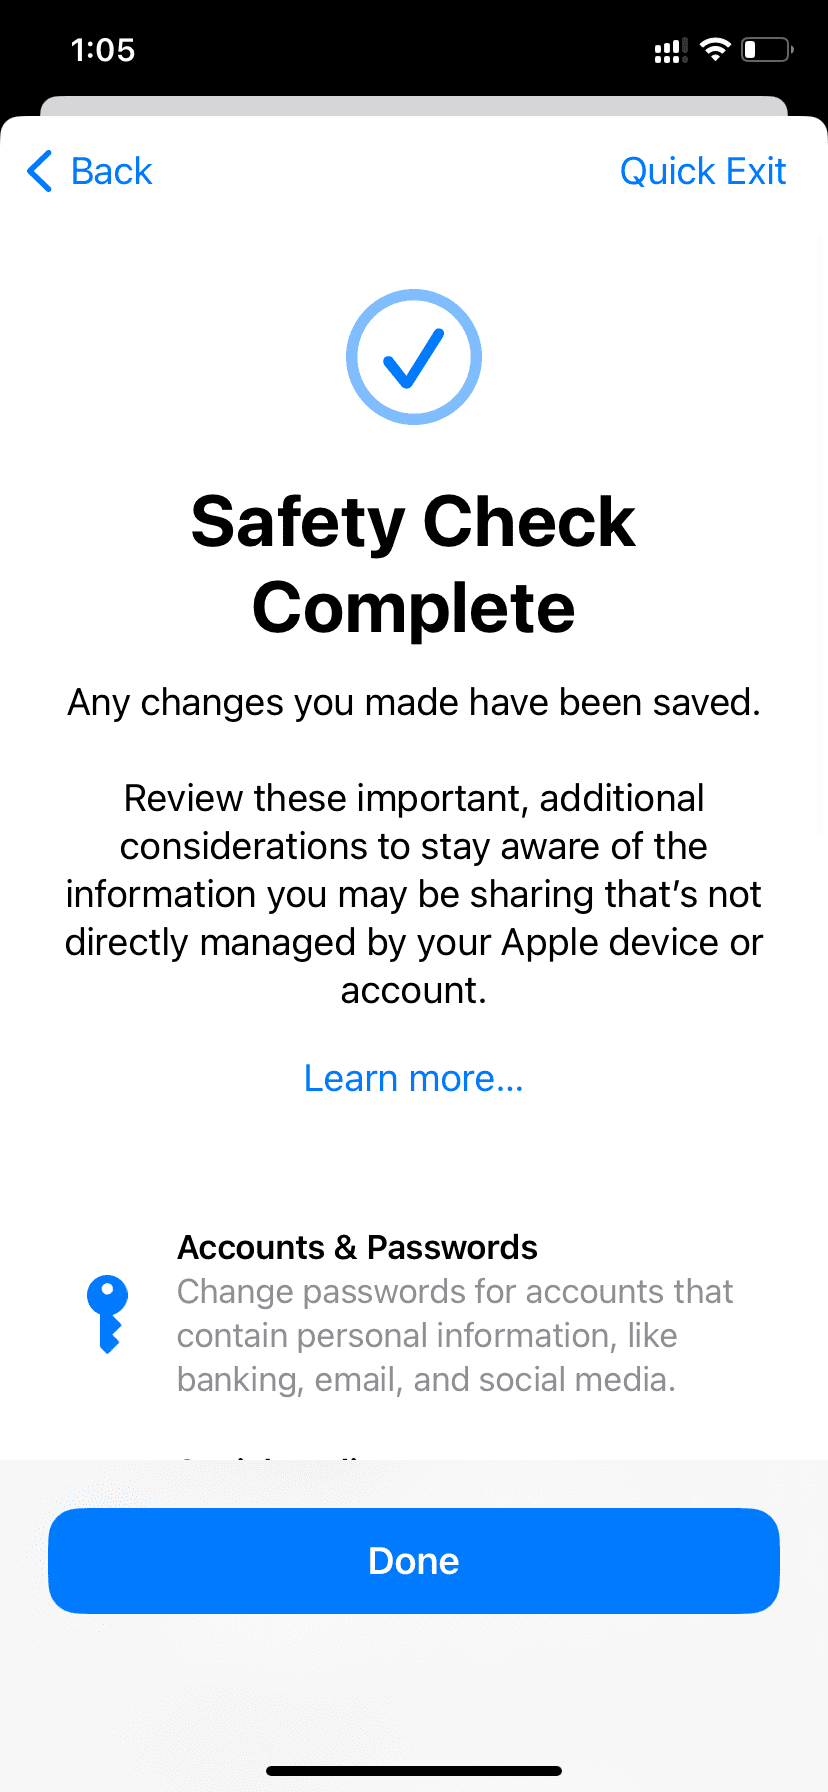
After finishing the above checks, you will be greeted with the Safety Check Complete screen. Any changes you might have made earlier are now in effect. On this screen, you will also see some additional tips to secure your account, data, and devices.
On a related note: