In this tutorial, we will explain how to turn on and use Screen Time on your or your child’s Mac to understand device activity, limit app and website usage, set communication limits, and enable restrictions.
Turn on Screen Time on Mac
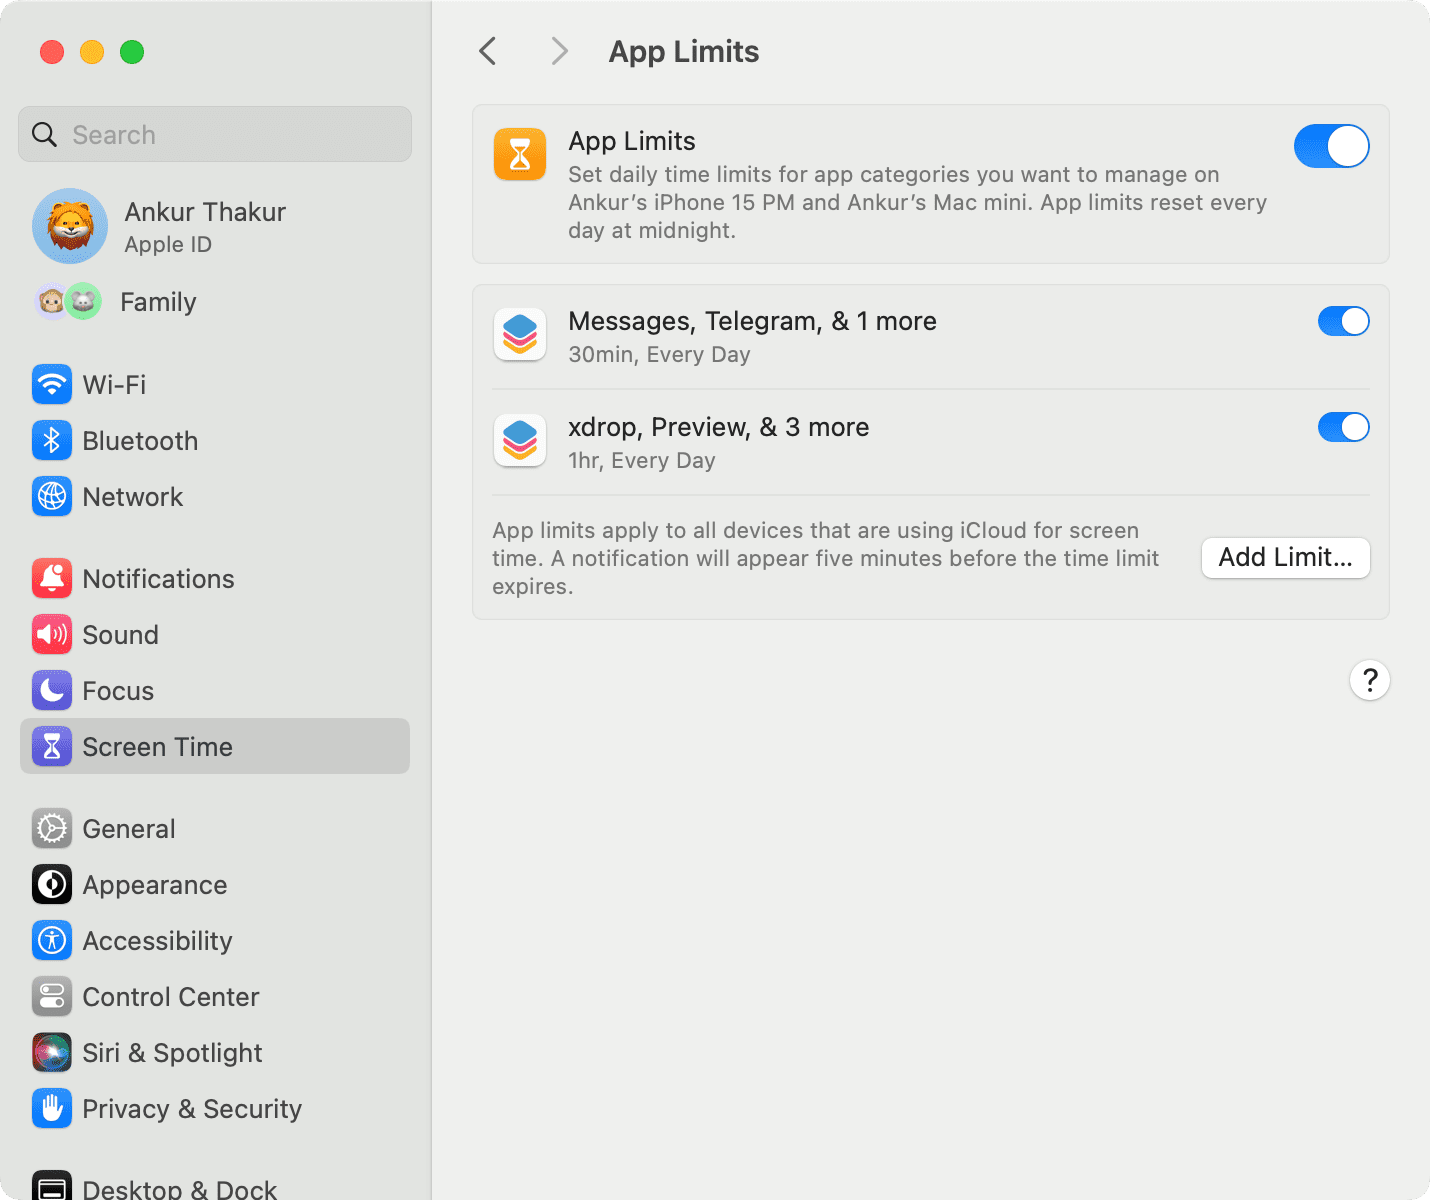
1) Open System Settings and select Screen Time from the sidebar.
Note: If you use Family Sharing, click the drop-down menu next to Family Member, and select your name if you’re setting Screen Time for yourself or your child’s name to set it up for their device.
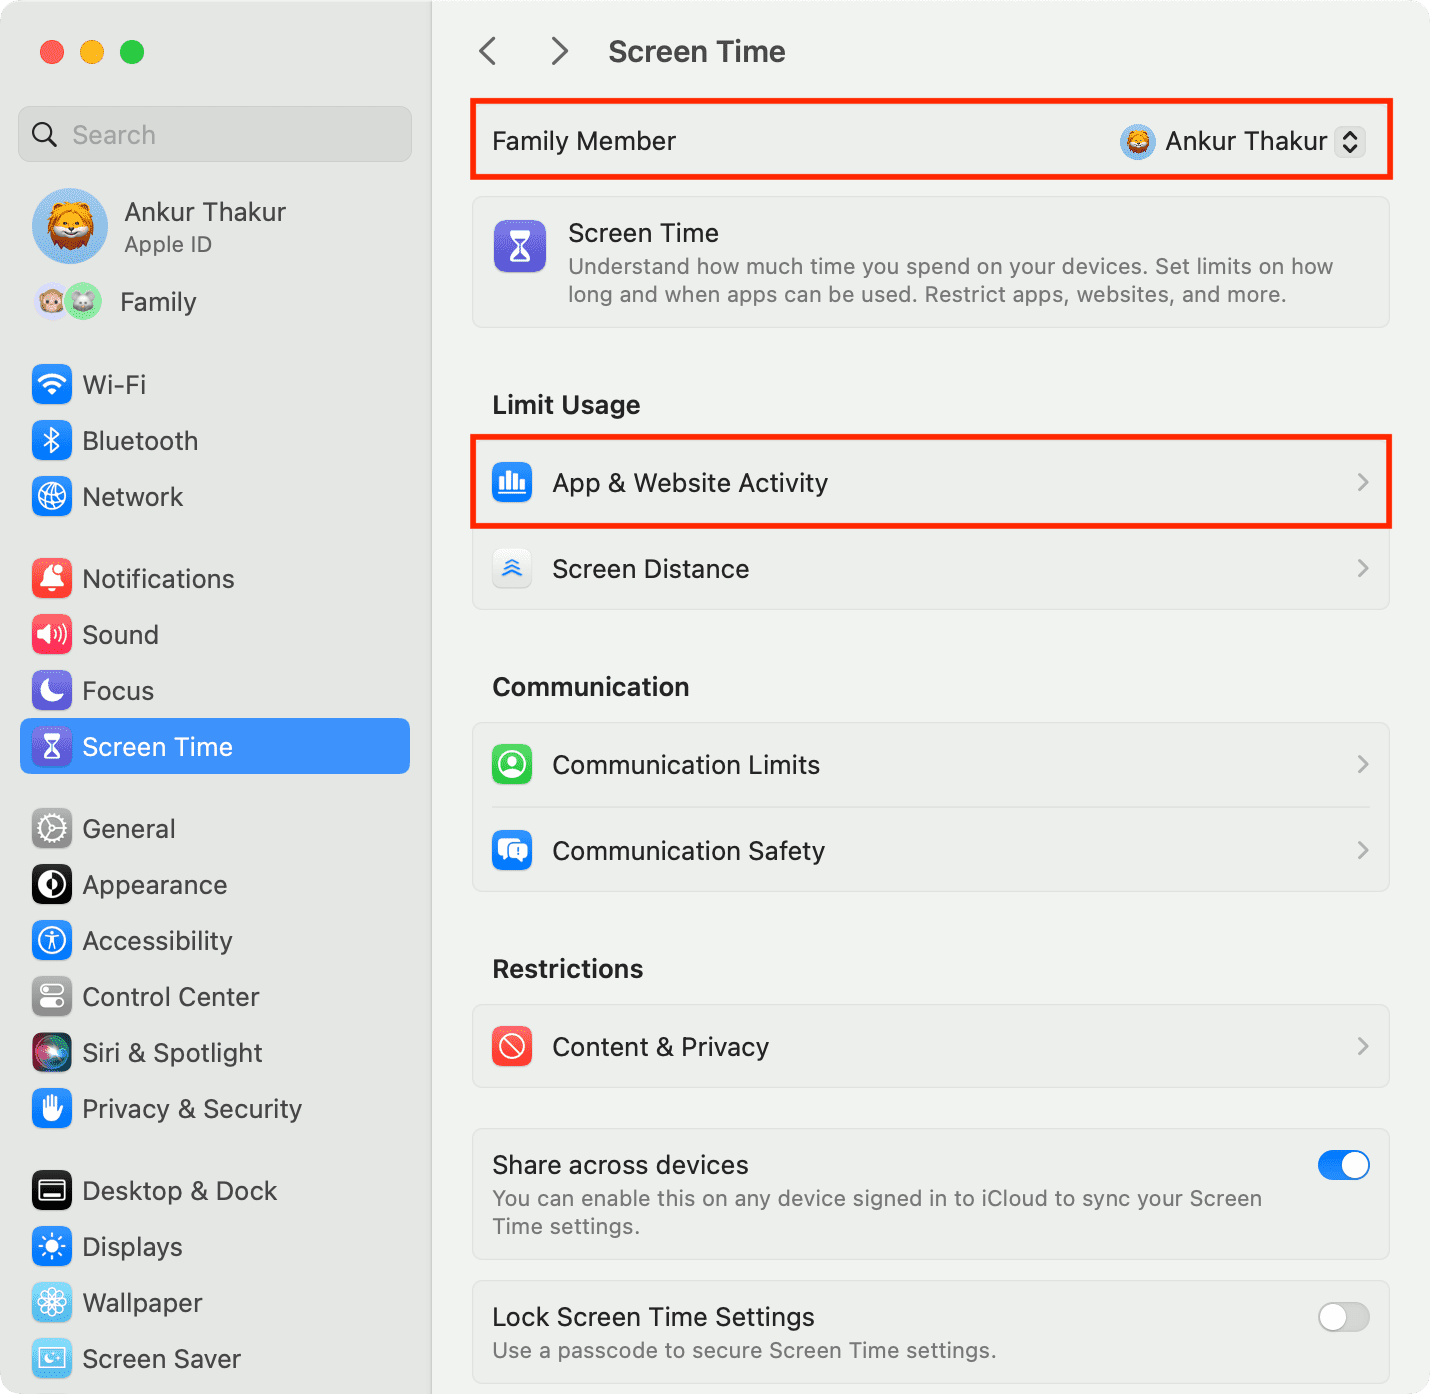
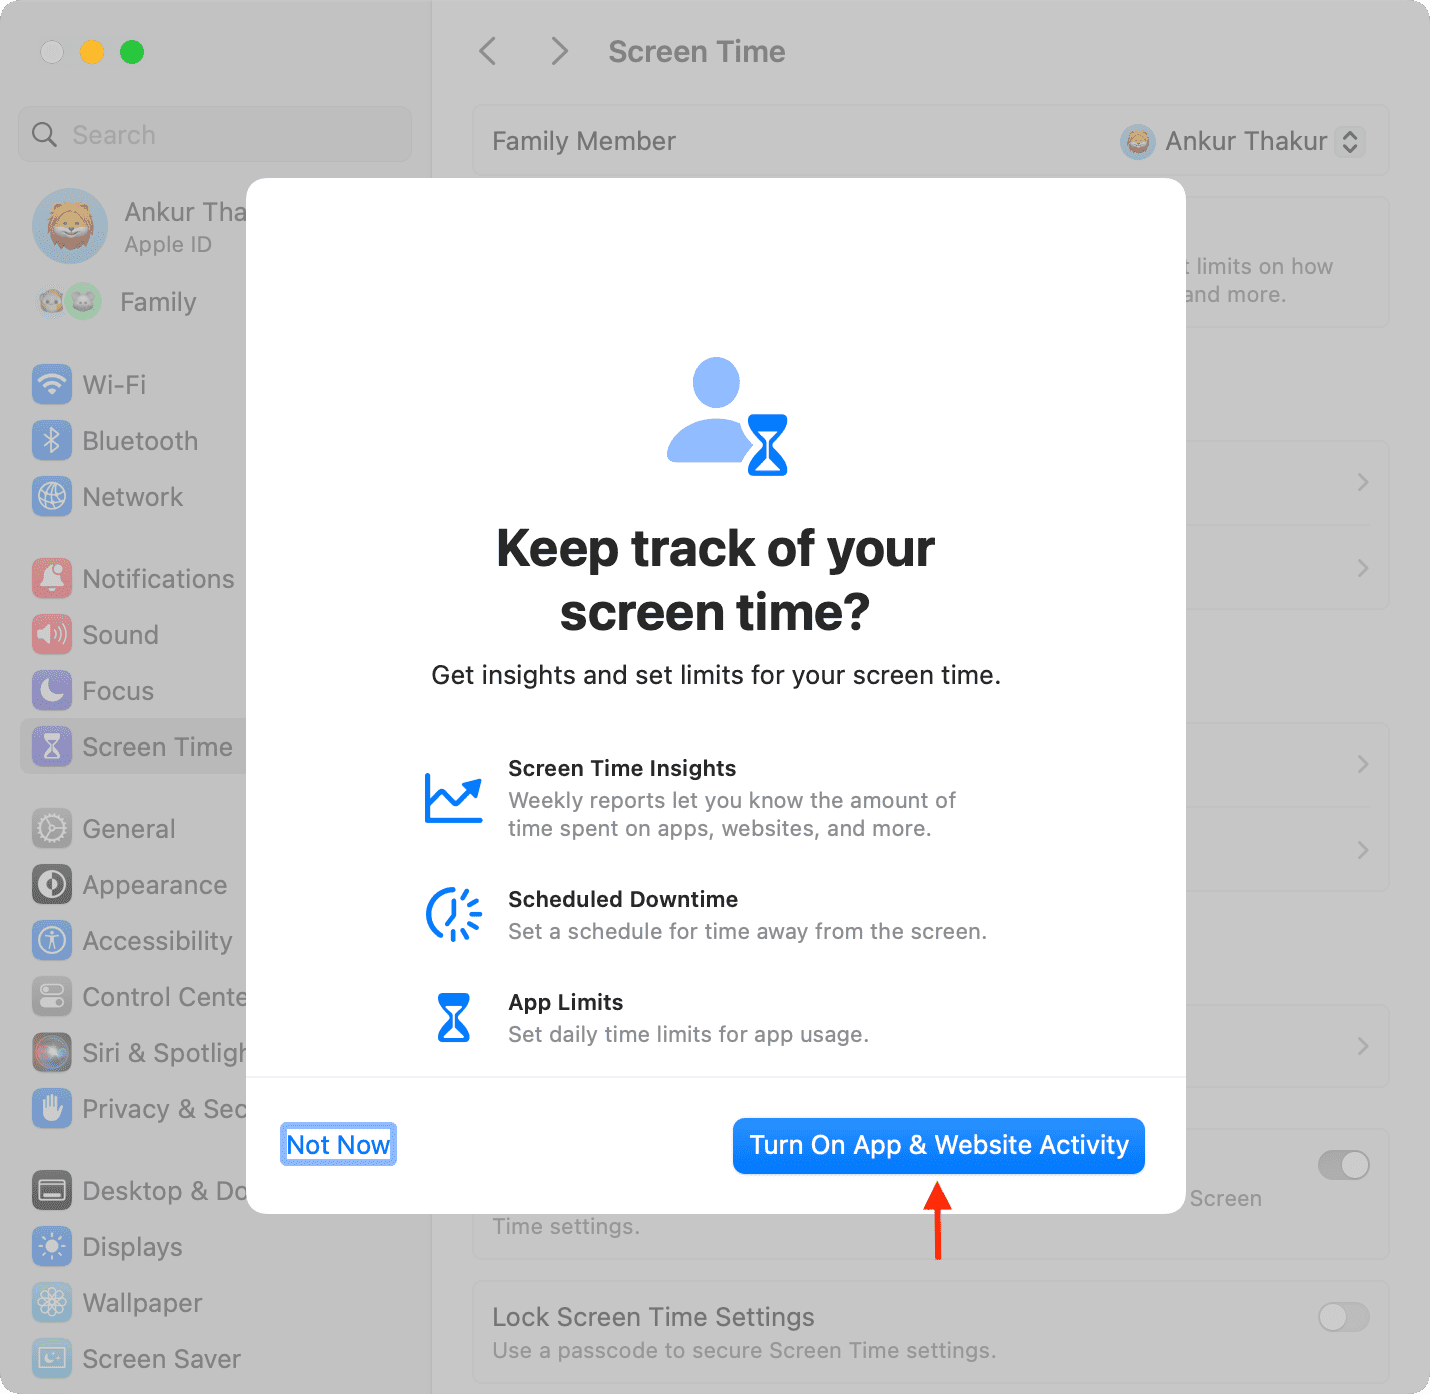
2) Click App & Website Activity > Turn on App & Website Activity.
Set a Screen Time passcode
It’s important to set a Screen Time passcode, especially for your kid’s account. Make sure to pick a passcode different from the device passcode, and don’t share it with them.
1) Go to System Settings > Screen Time.
2) Turn on Lock Screen Time Settings.
3) Set a four-digit Screen Time passcode and re-enter it to confirm.
4) After this, it’s recommended that you enter your Apple ID details which will help you with Screen Time passcode recovery if you forget it. If you don’t want to do that, hit Skip twice.

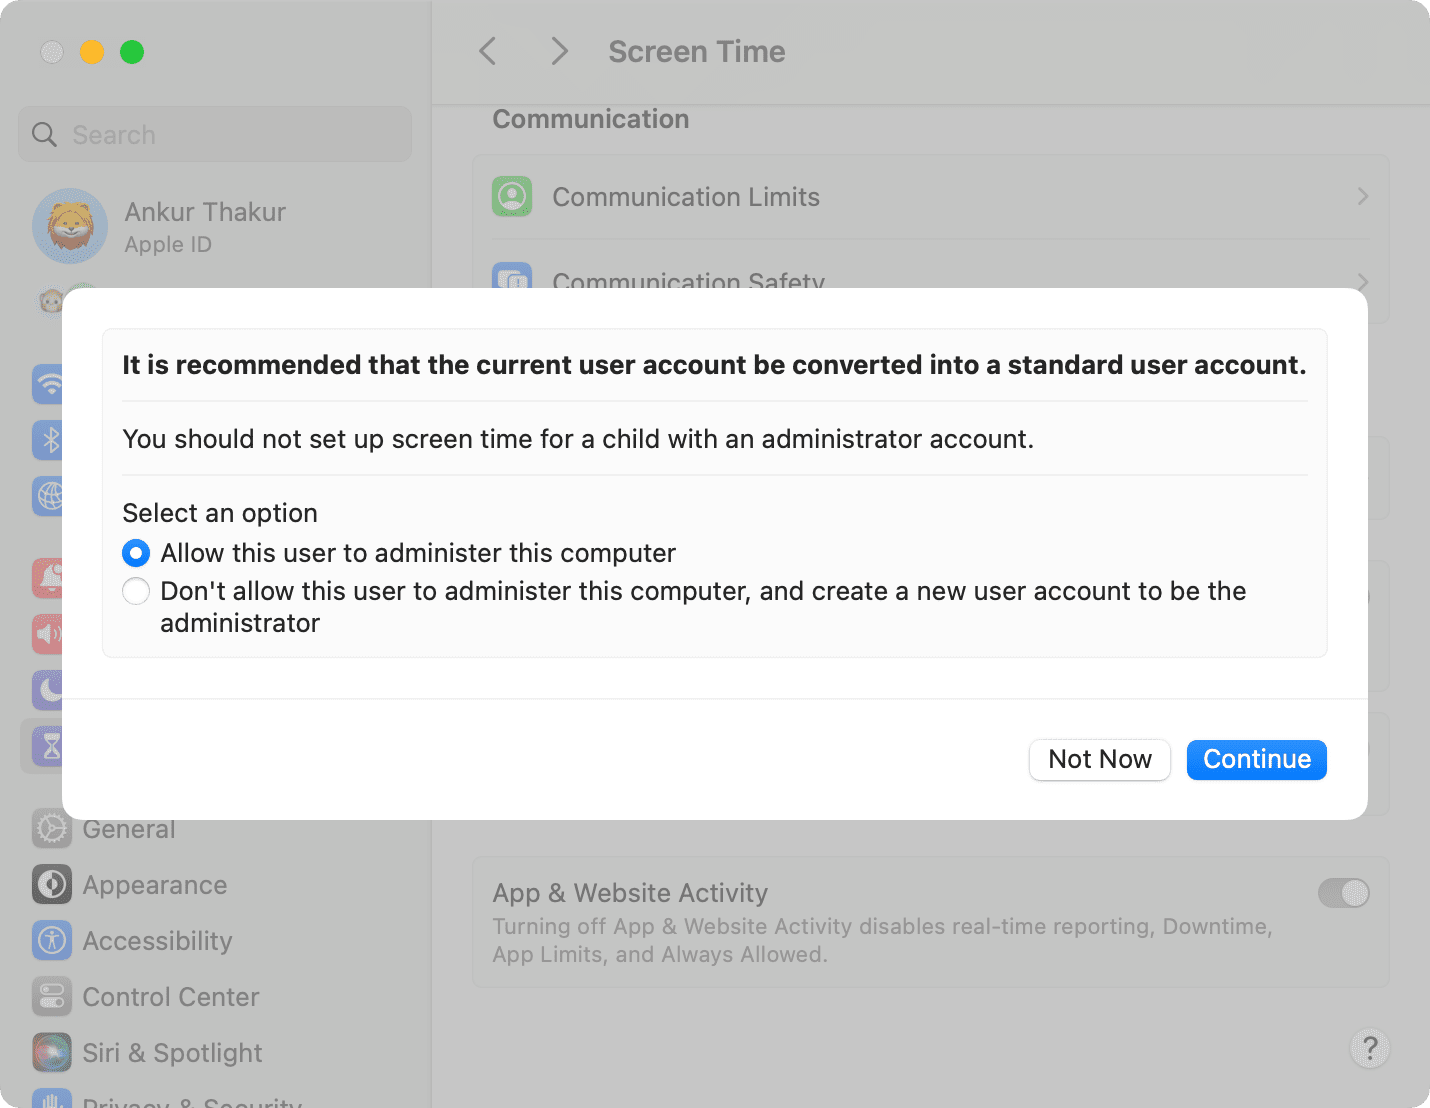
If you use an admin account
Though you can, Apple does not want you to set up Screen Time passcode on admin accounts. So, when you try to do that, it will show this alert asking if you would like to convert this admin account to a standard account and create a new admin account. If you want to continue with the Screen Time passcode on the admin account, select ‘Allow this user to administer this computer‘ and hit Continue. Now, set a Screen Time passcode.
You are off to a good start!
Now, we will show you how to use all the Screen Time options.
Just remember that if you use Family Sharing, choose your name or your child’s name next to Family Member. After that, when you go inside a Screen Time option, it will be for that selected member.
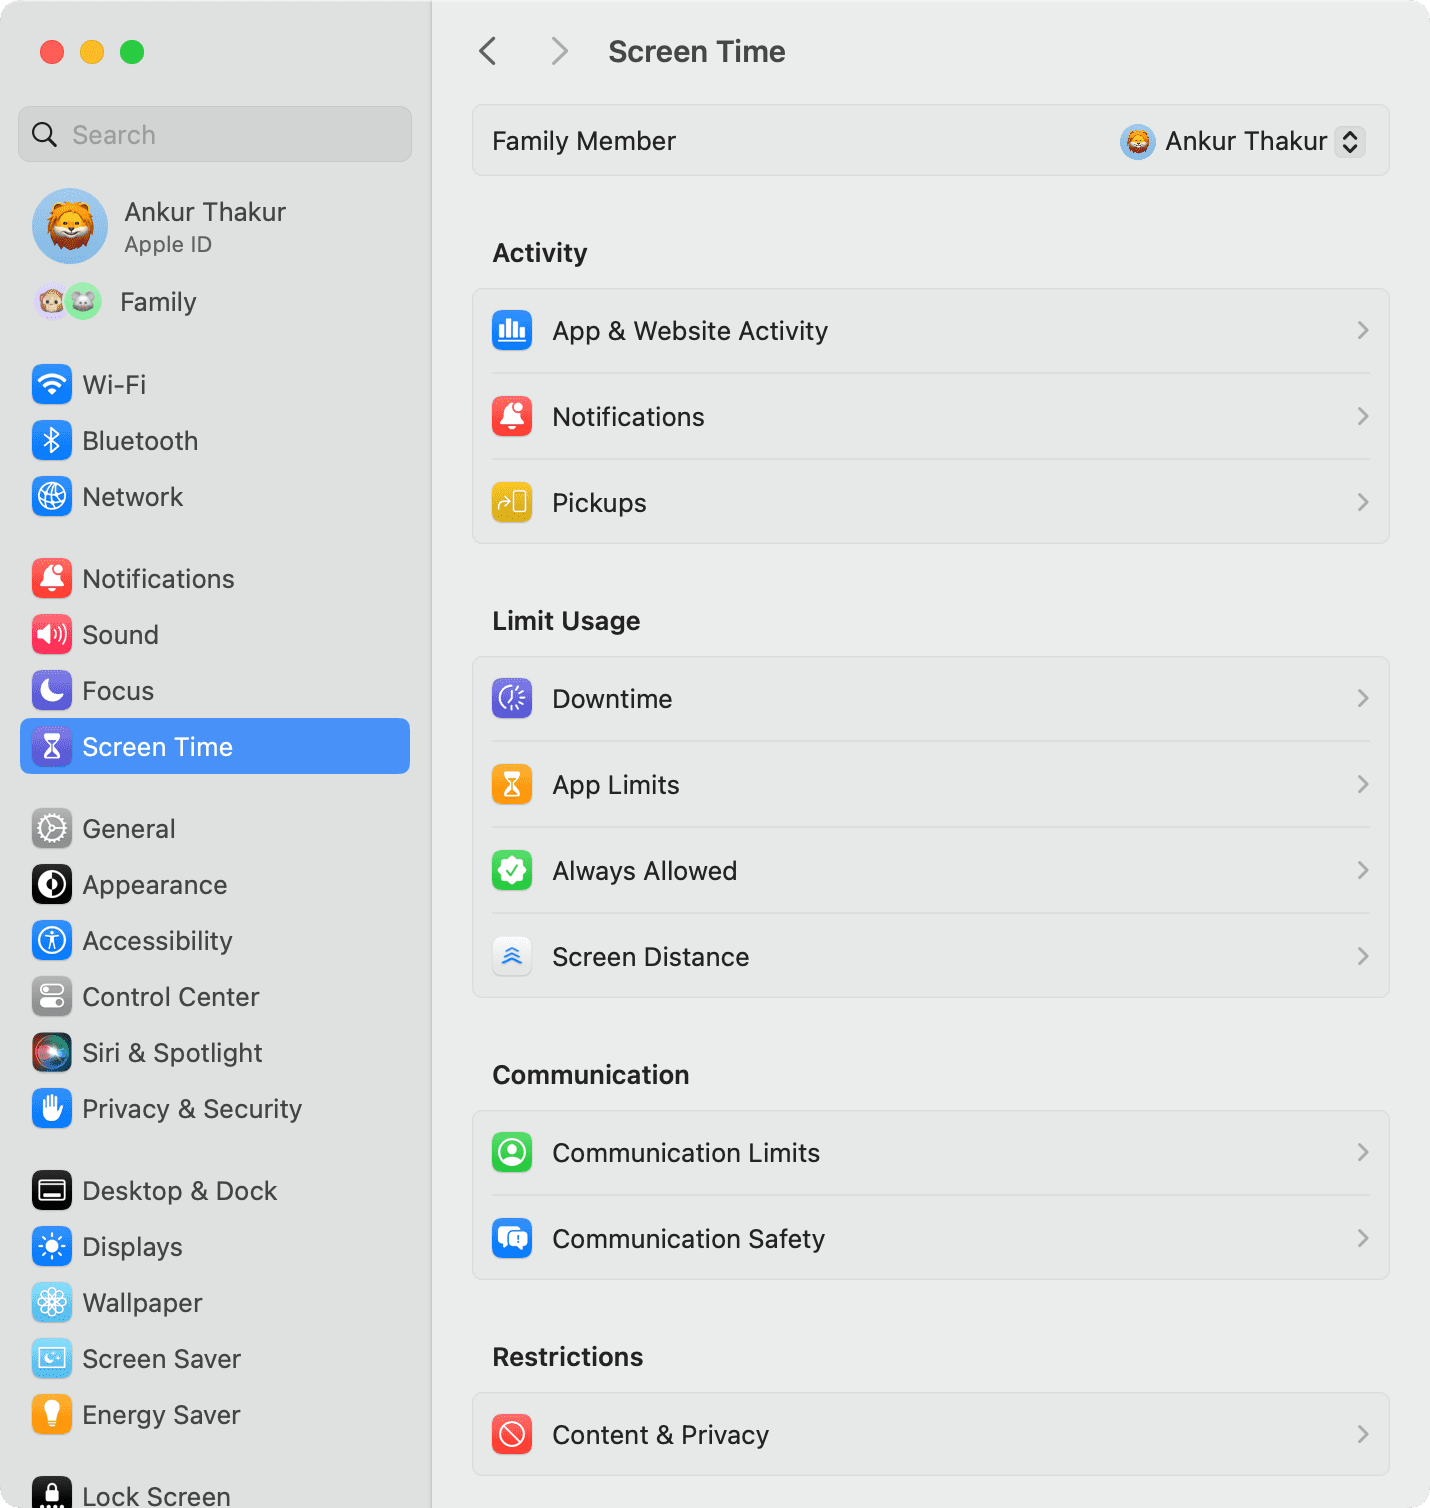
Screen Time Activity
Once you have all of the options enabled in Screen Time that you want to use, you’ll likely want to view the reports. You can view each of the following by time period, app, category, website, or device. Just remember to do this after a day or so.
After you activate Screen Time, you will see an Activity section at the top.
Click App & Website Activity to see the time you or your child spend on the computer.
- It shows today’s usages based on different categories and apps. You can use the date option from the top to change it or switch to the week’s view.
- Next, this screen will show you a combined report for all devices, but you can choose a device from the top.
- You can also click an app to see its usage.
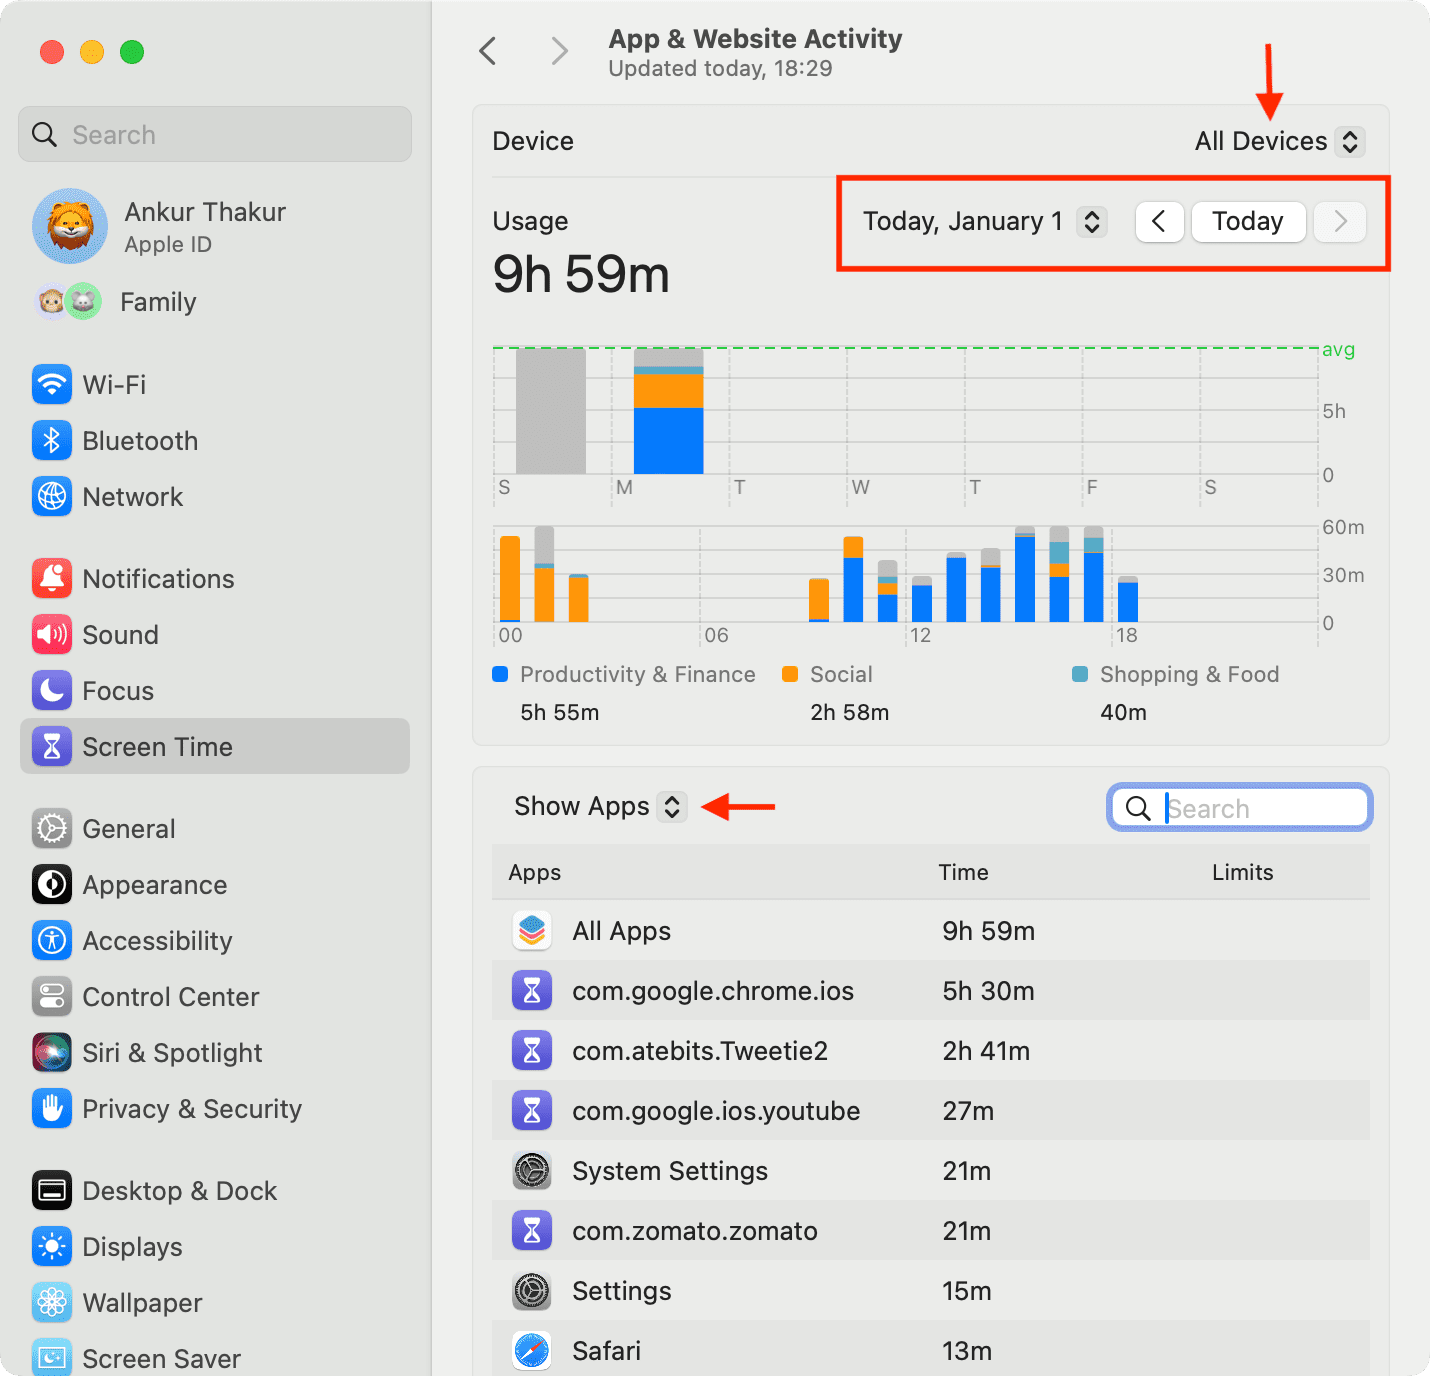
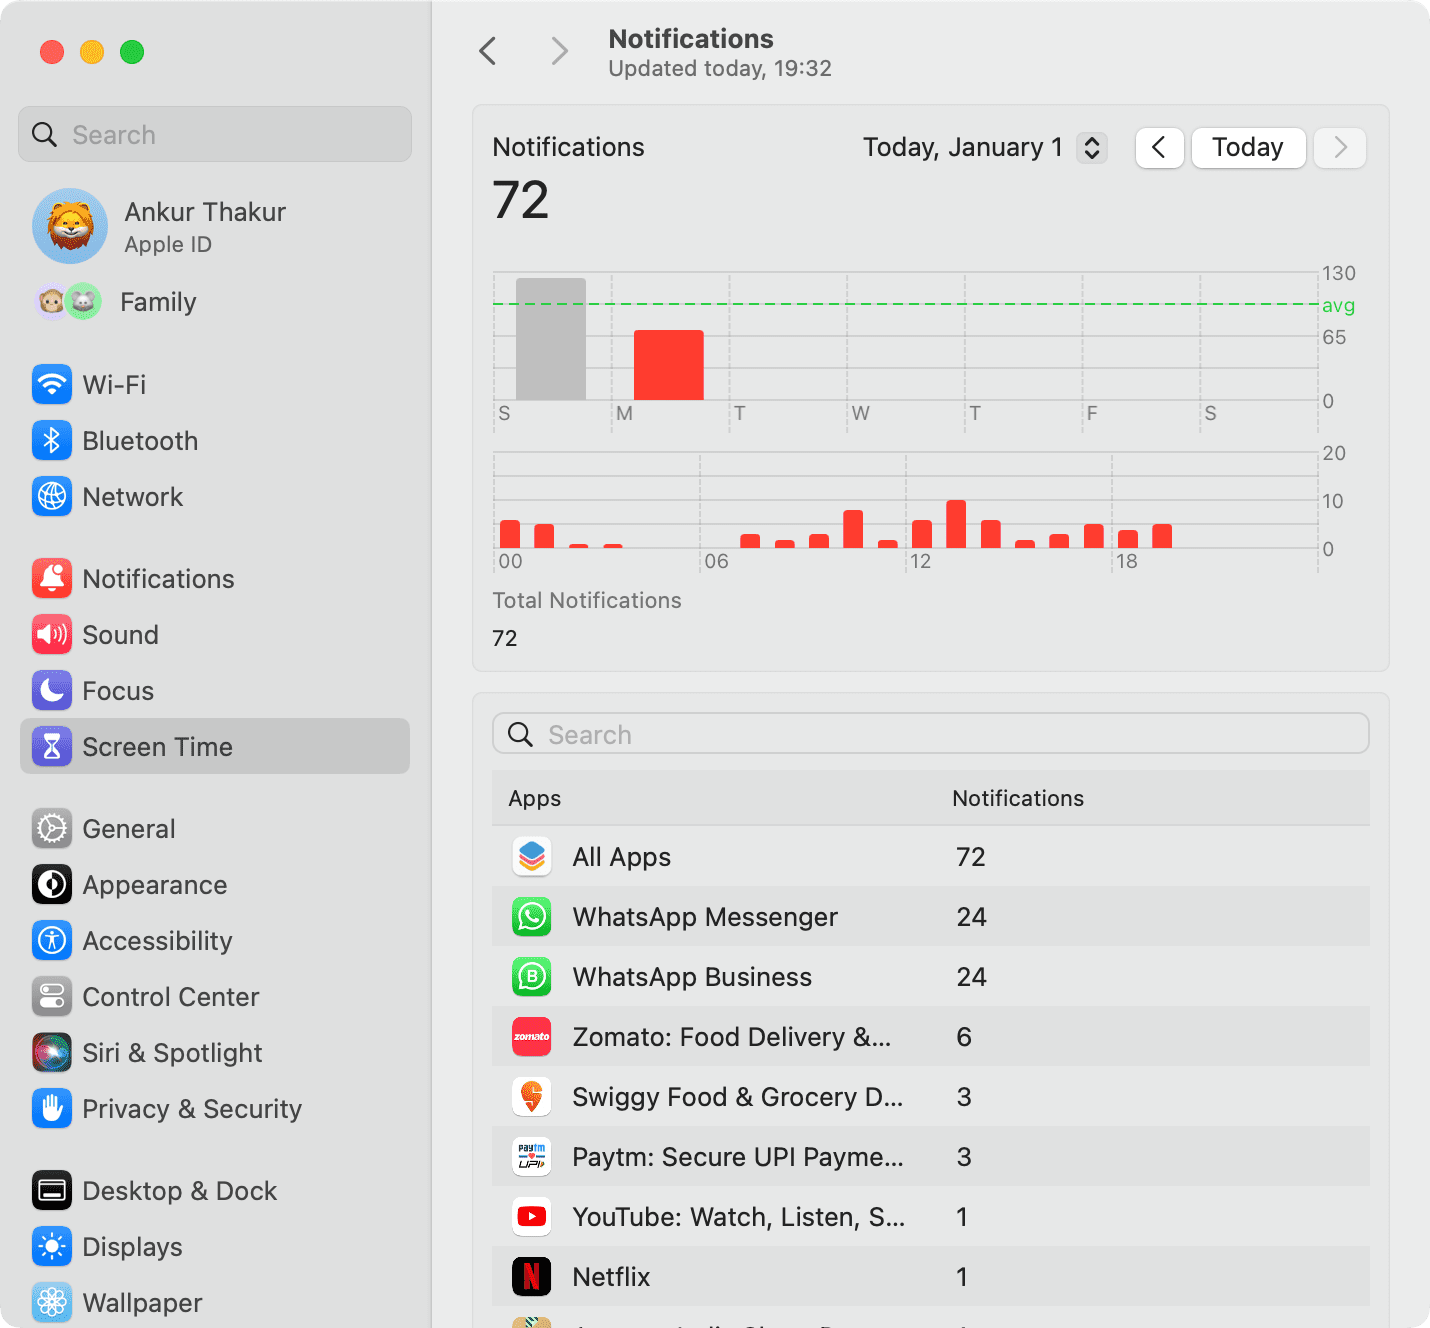
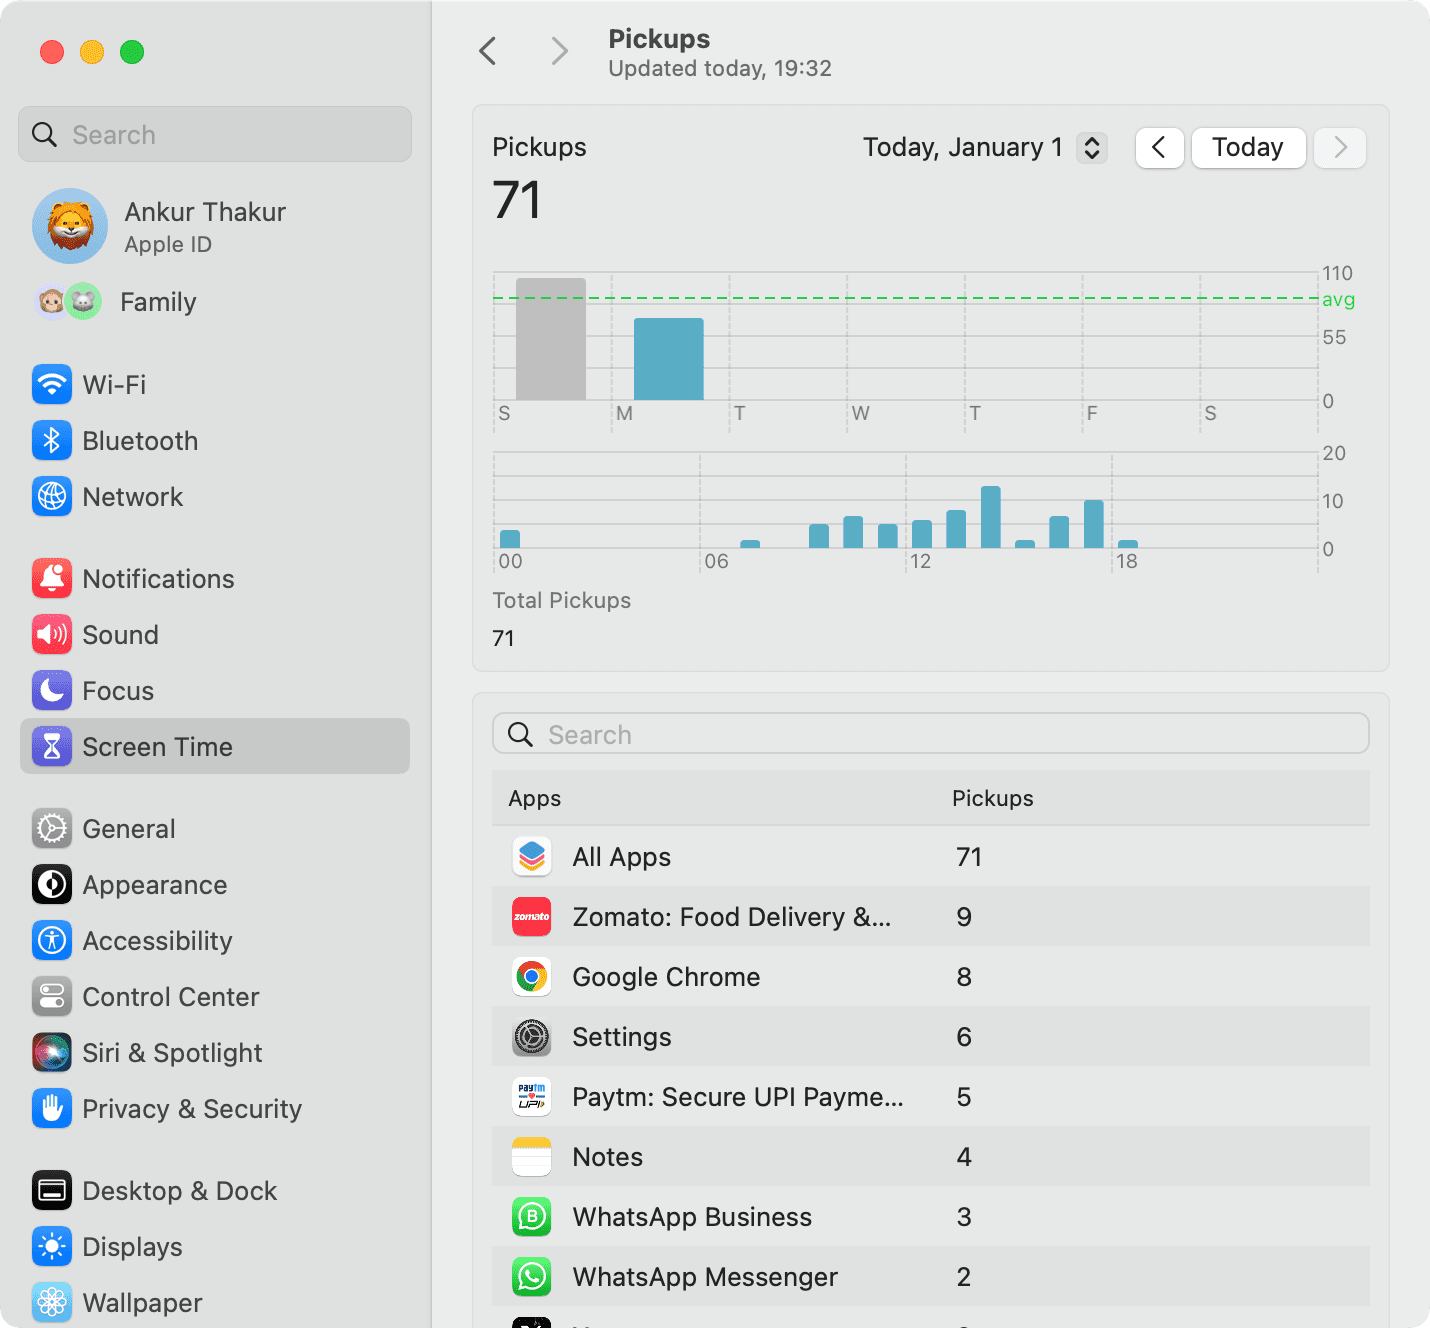
After that, return to the previous screen to see the number of:
- Notifications: See how many times you receive notifications and from where.
- Pickups: View how many times you wake your device and the first app you use when you do.
Screen Time Limit Usage
This section has four options, and here’s what they do.
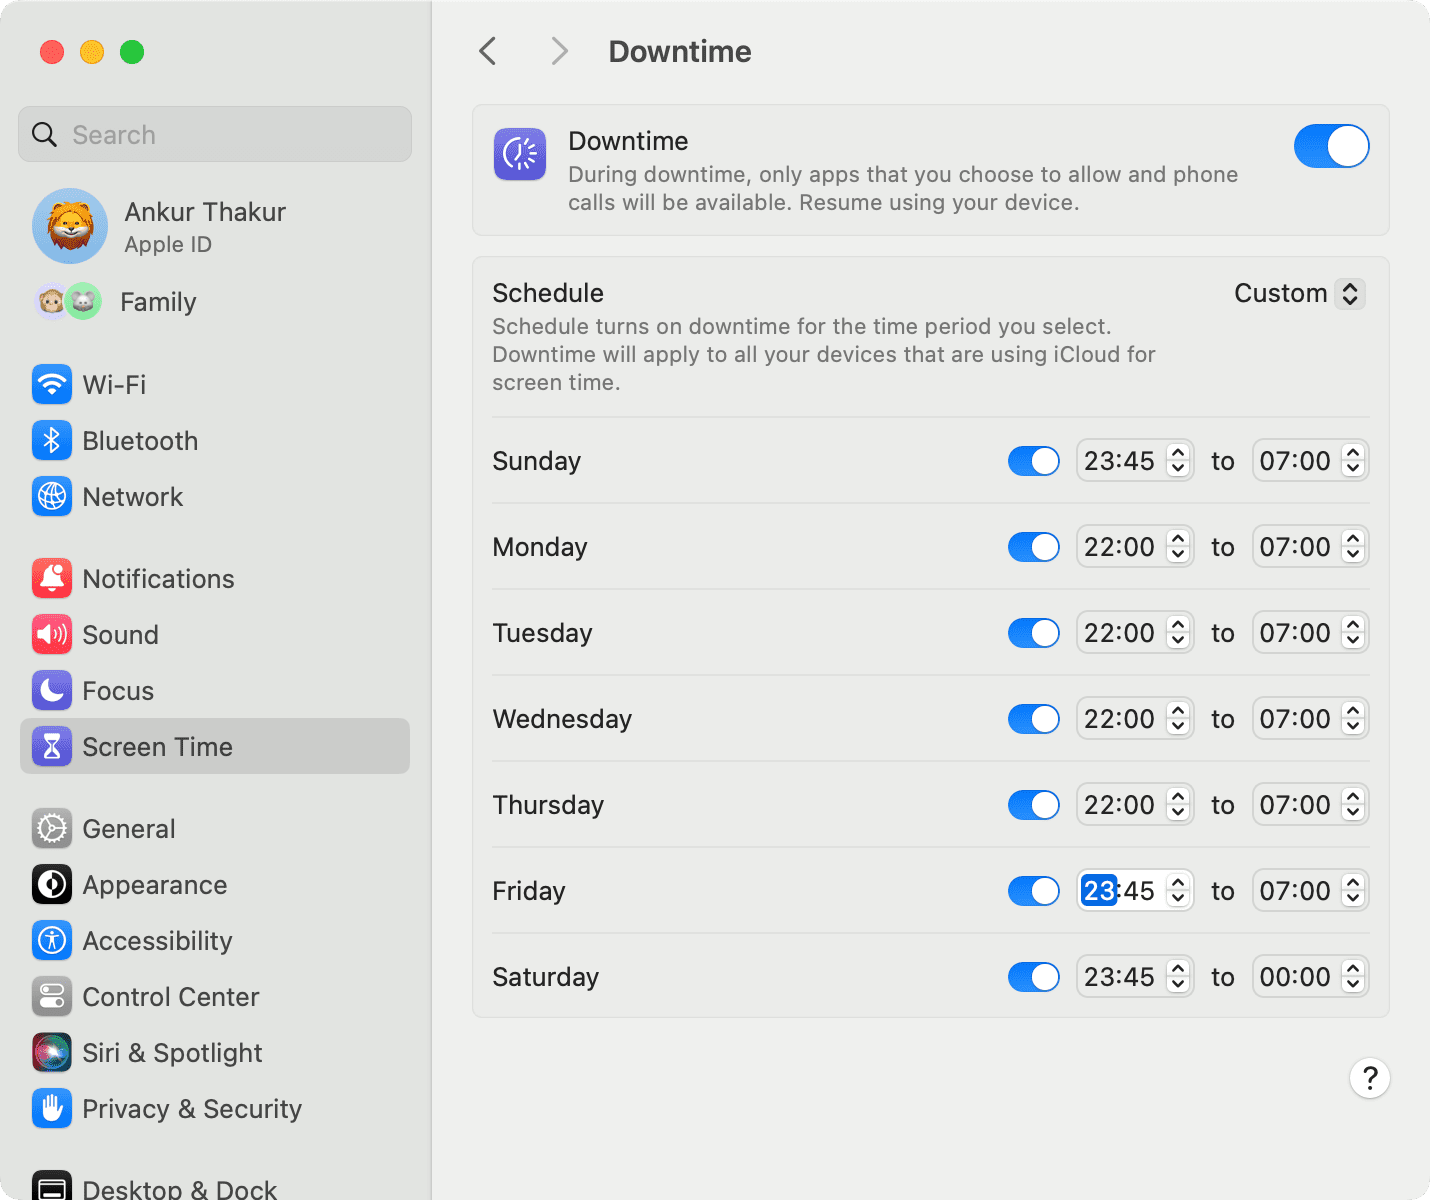
Downtime
With Downtime, you can set a schedule for your device’s usage. For instance, you can set the Downtime schedule from 10 PM to 8 AM. So, after 10 PM, all apps will be blocked and become unusable. This is in place to ensure a proper, healthy schedule for time away from the screen.
Note: Phone calls and some allowed apps you choose (discussed later) are always available.
1) Turn on the switch for Downtime.
2) Click the drop-down menu next to Schedule, and choose Every Day to have the same schedule for all seven days of the week, or click Custom to set it differently for each day.
Here’s how my Mac’s Launchpad looks during Downtime. All apps are blocked except a few essential ones that are always allowed.
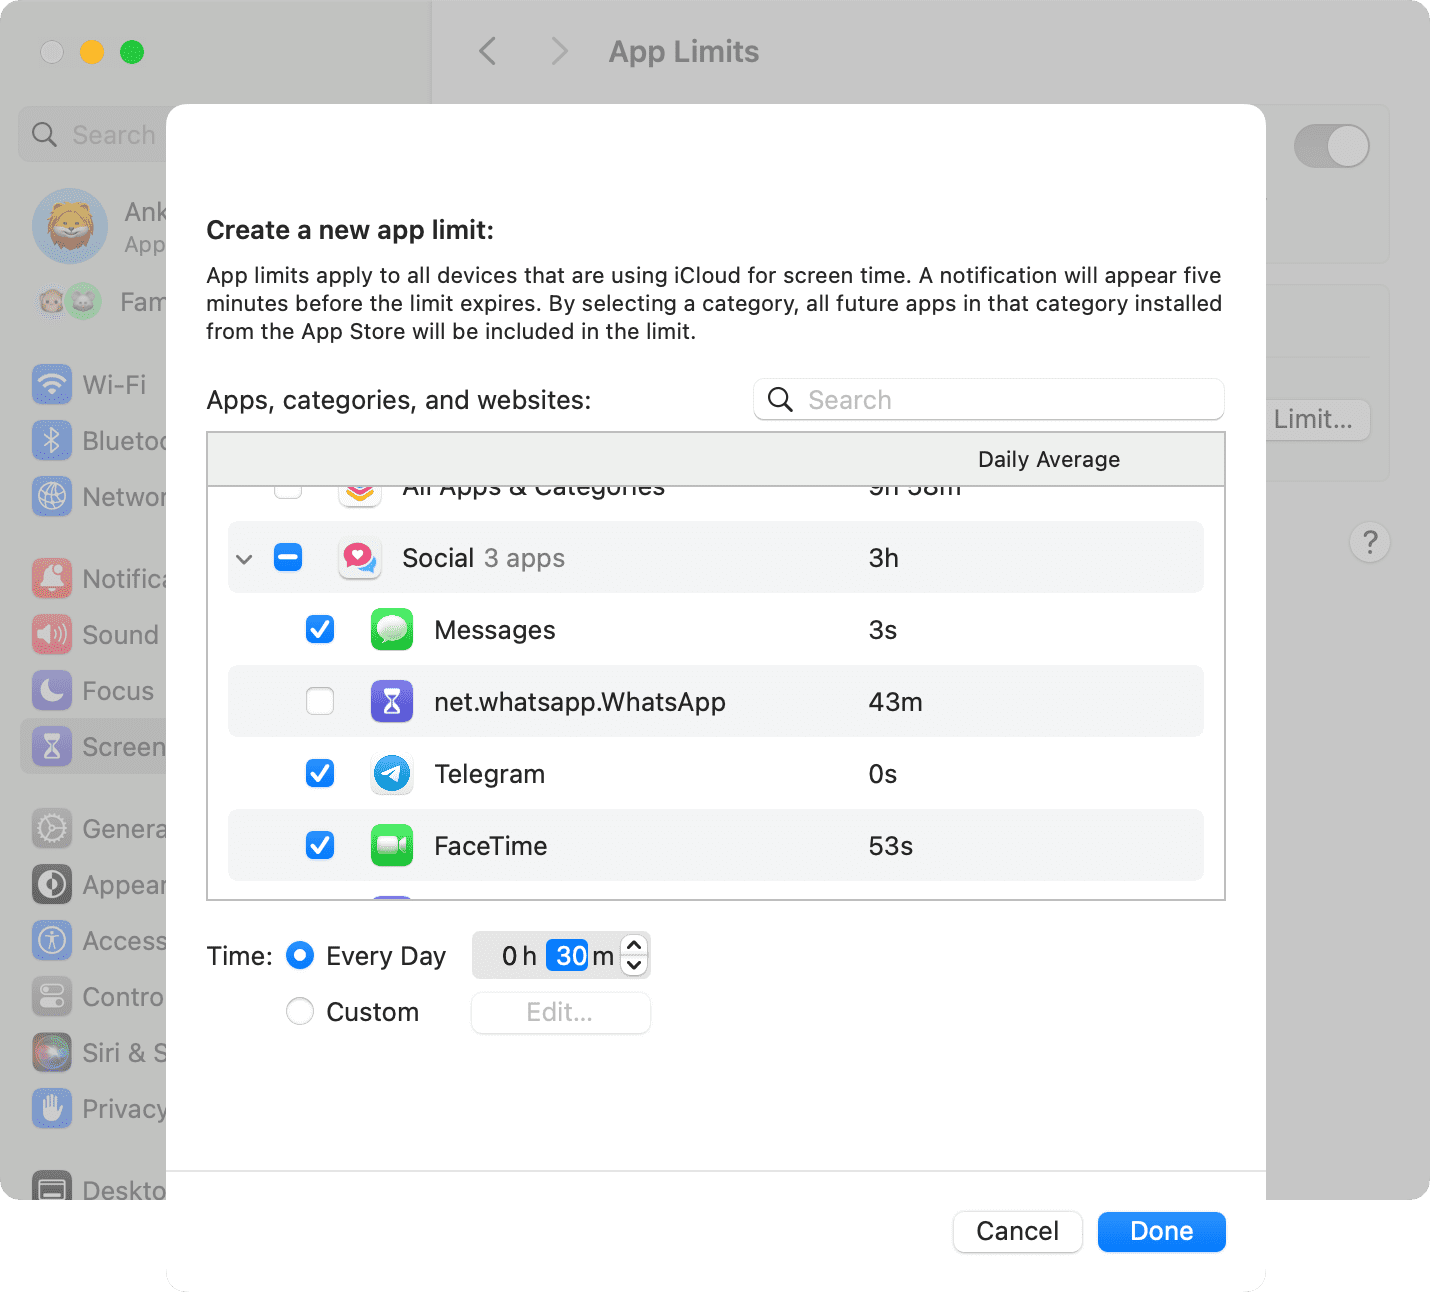
App Limits
The next feature in the Screen Time settings is for App Limits. This lets you set time limits for categories of apps or specific apps within a category. This is helpful if you find yourself spending a little too much time on social networks, for example, or just a certain one like Facebook.
1) Turn on the switch for App Limits.
2) Next, click the Add Limit button to view the categories.
3) You can mark checkboxes next to categories to include all apps within them or expand a category by clicking its arrow (>) and then pick specific apps.
4) Now select the time limit for those categories, apps, and websites that you want to use. You can set up a time limit that applies to Every Day or use a Custom time limit that can change each day. This is flexible so that you can allow more time on weekends, for instance. When you finish, click Done.
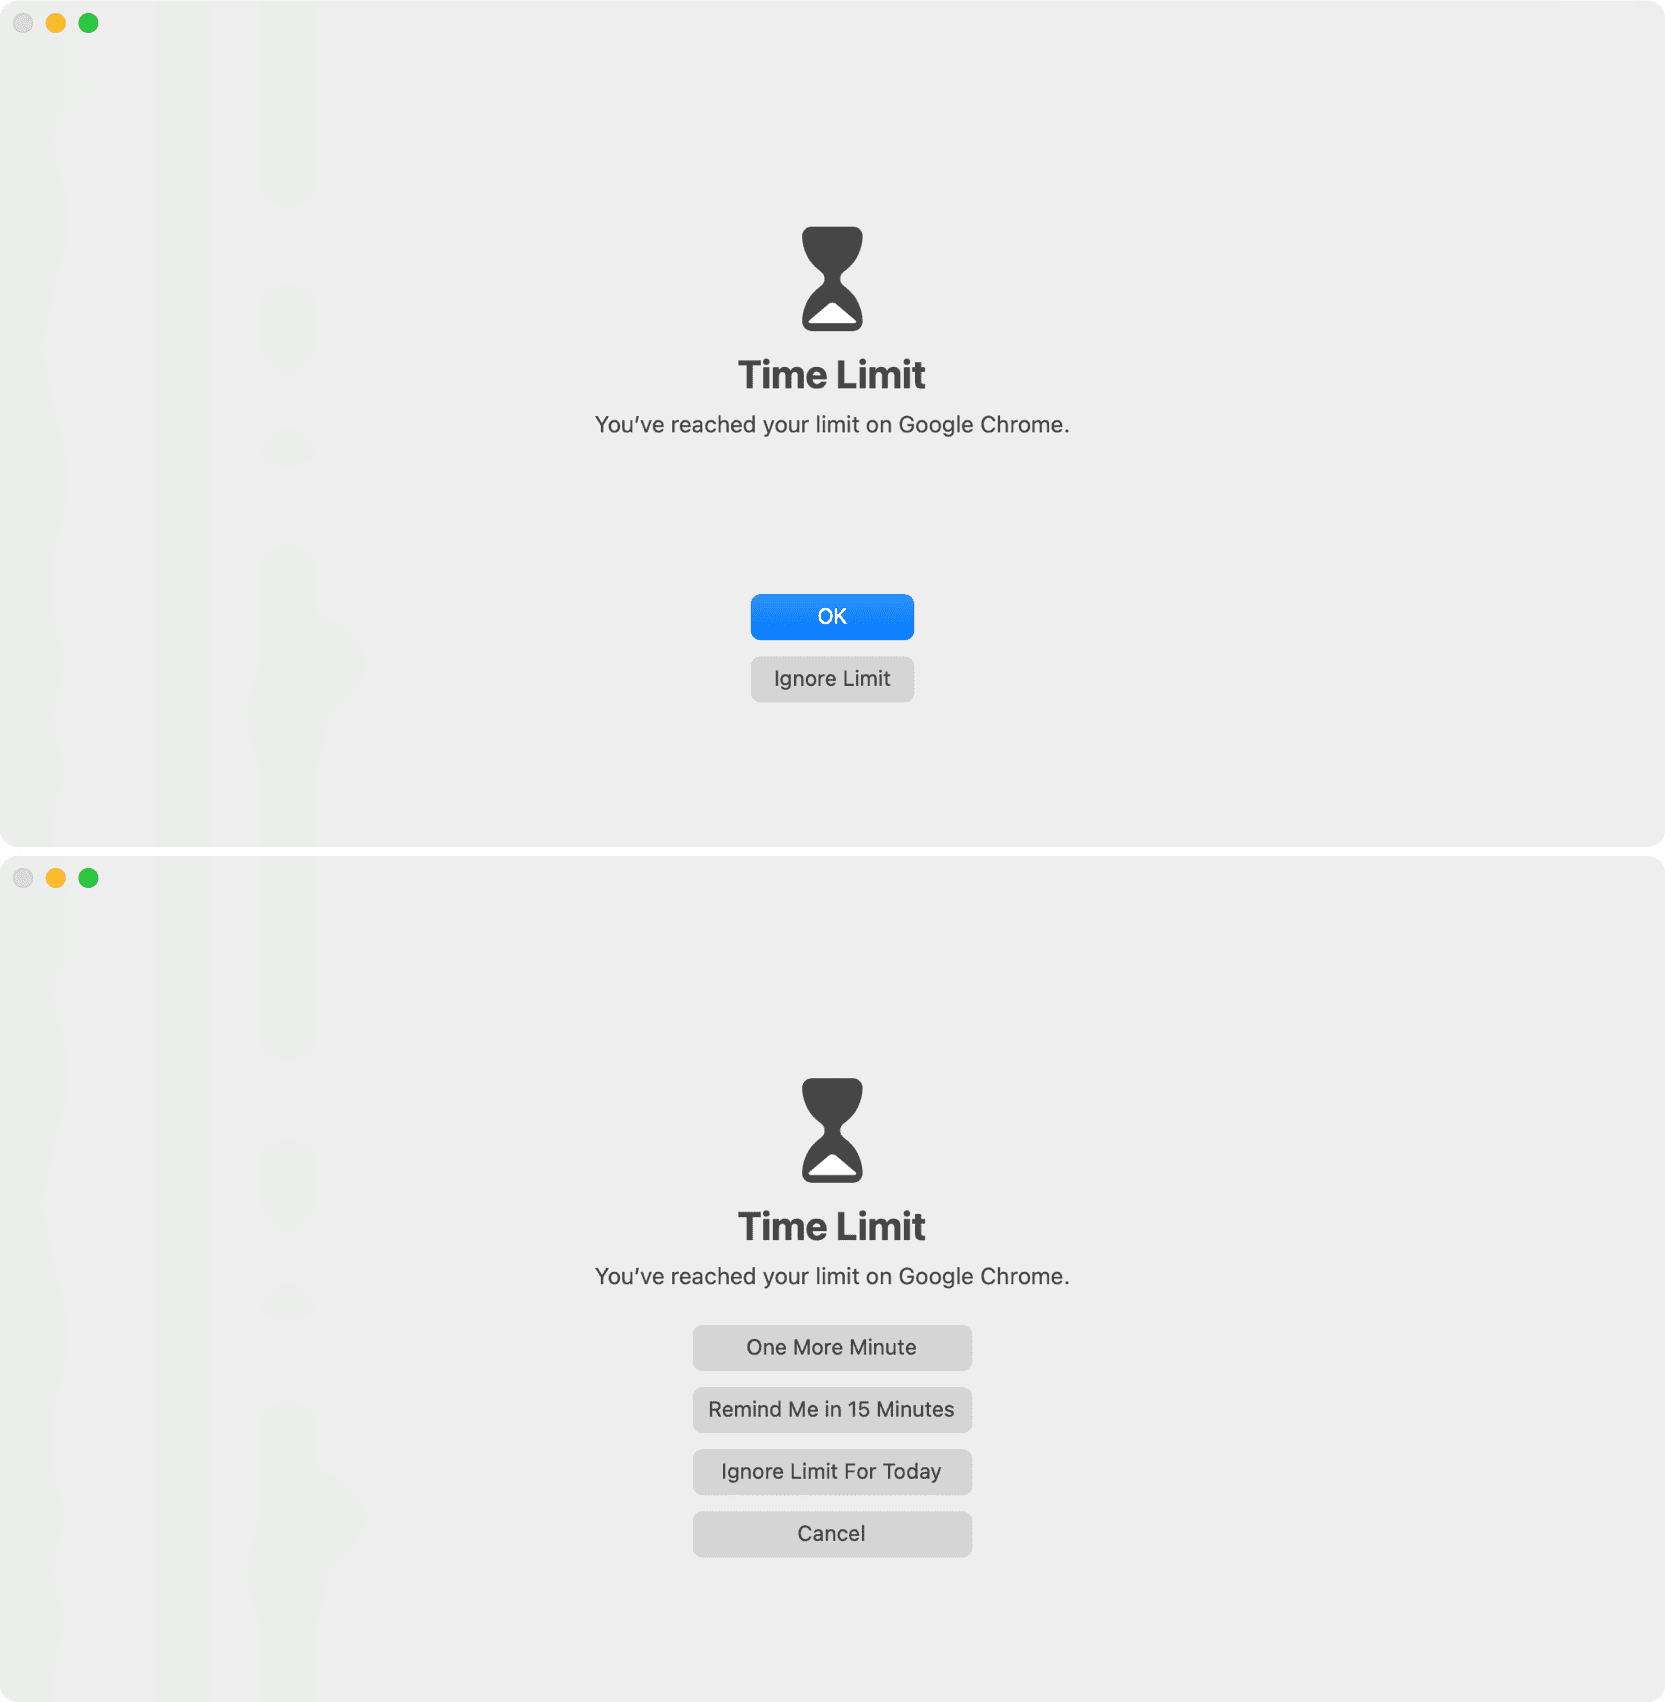
Once the app limit is reached, the app gets blocked. Here’s how it looks:
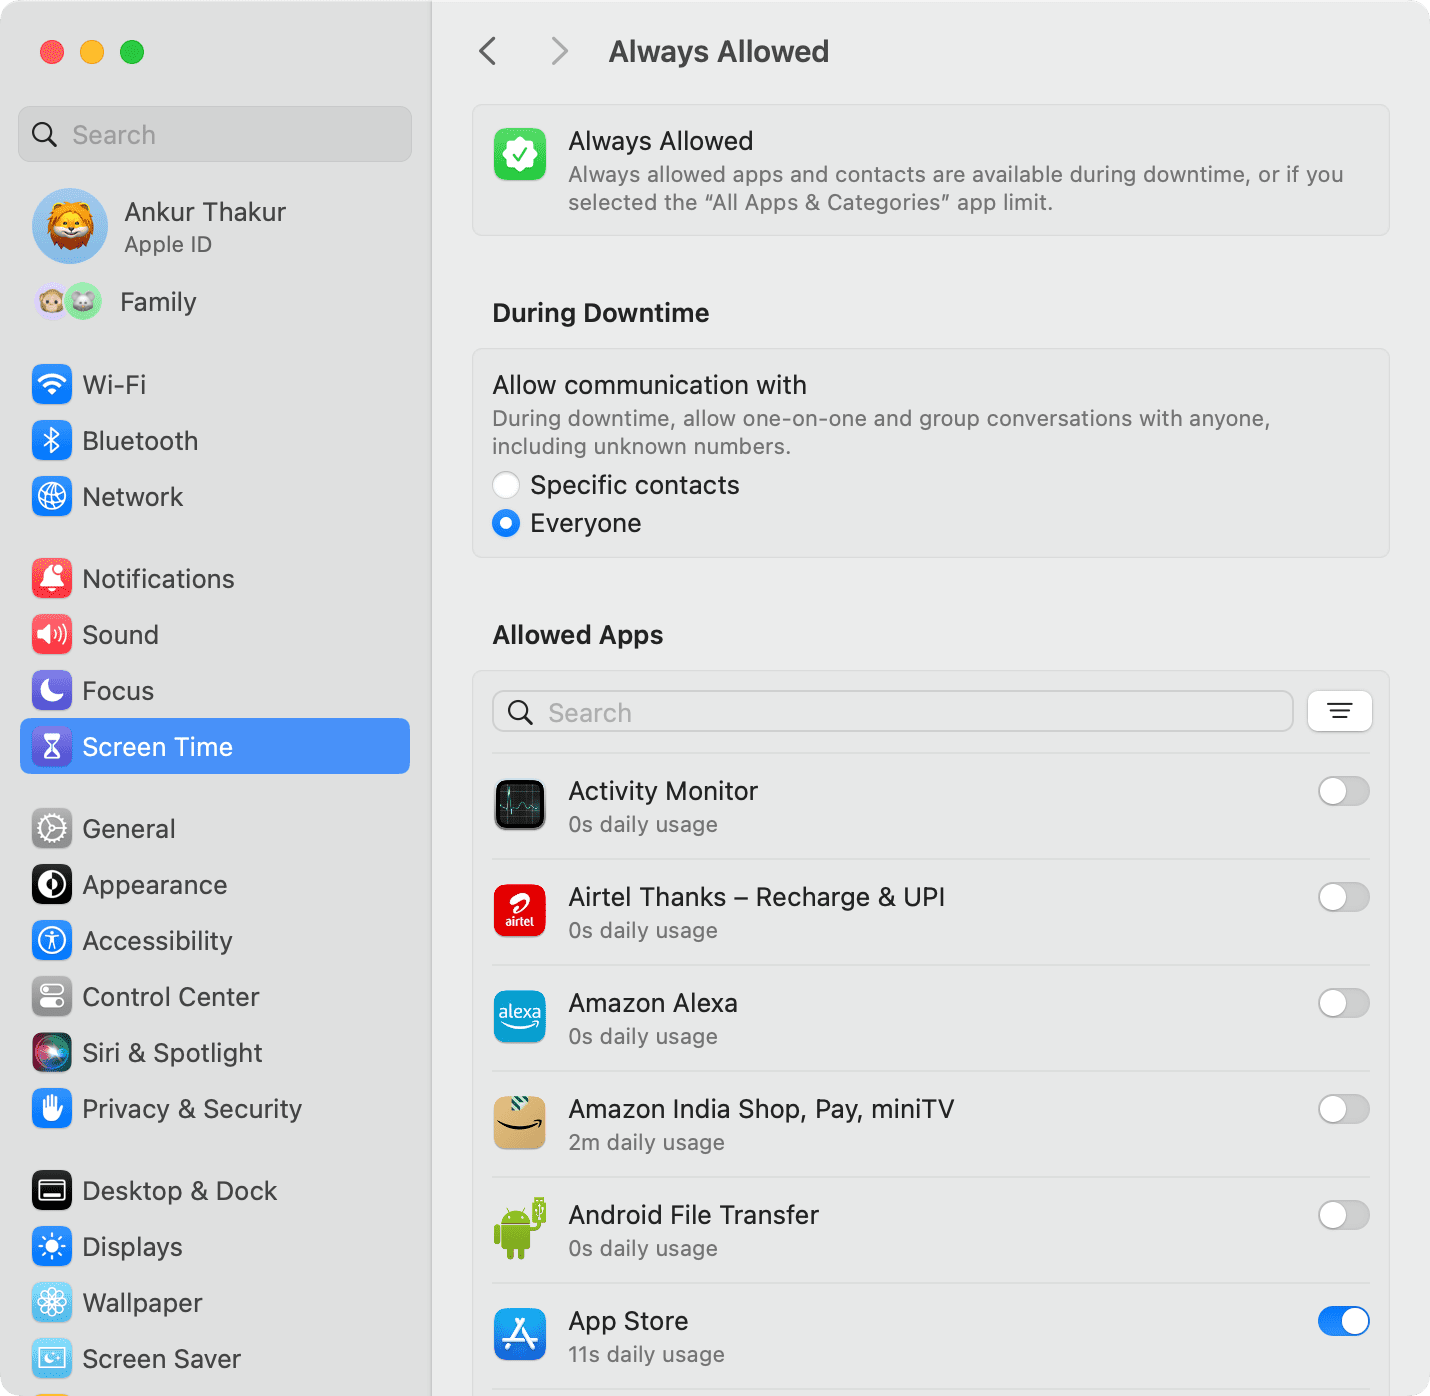
Always Allowed
The Always Allowed section, which we mentioned above for Downtime, lets you pick those apps that you can always use. This means that if you set Apple Limits or Downtime, the apps you pick in this section will not be affected by those limitations. From here, you can also choose to communicate with everyone or just specific contacts.
Screen Distance
This feature does not affect your Mac. But you can turn it on to get informed if you hold your iPhone or iPad too close to your eyes for a while.
Screen Time Communication
This has a couple of important options.
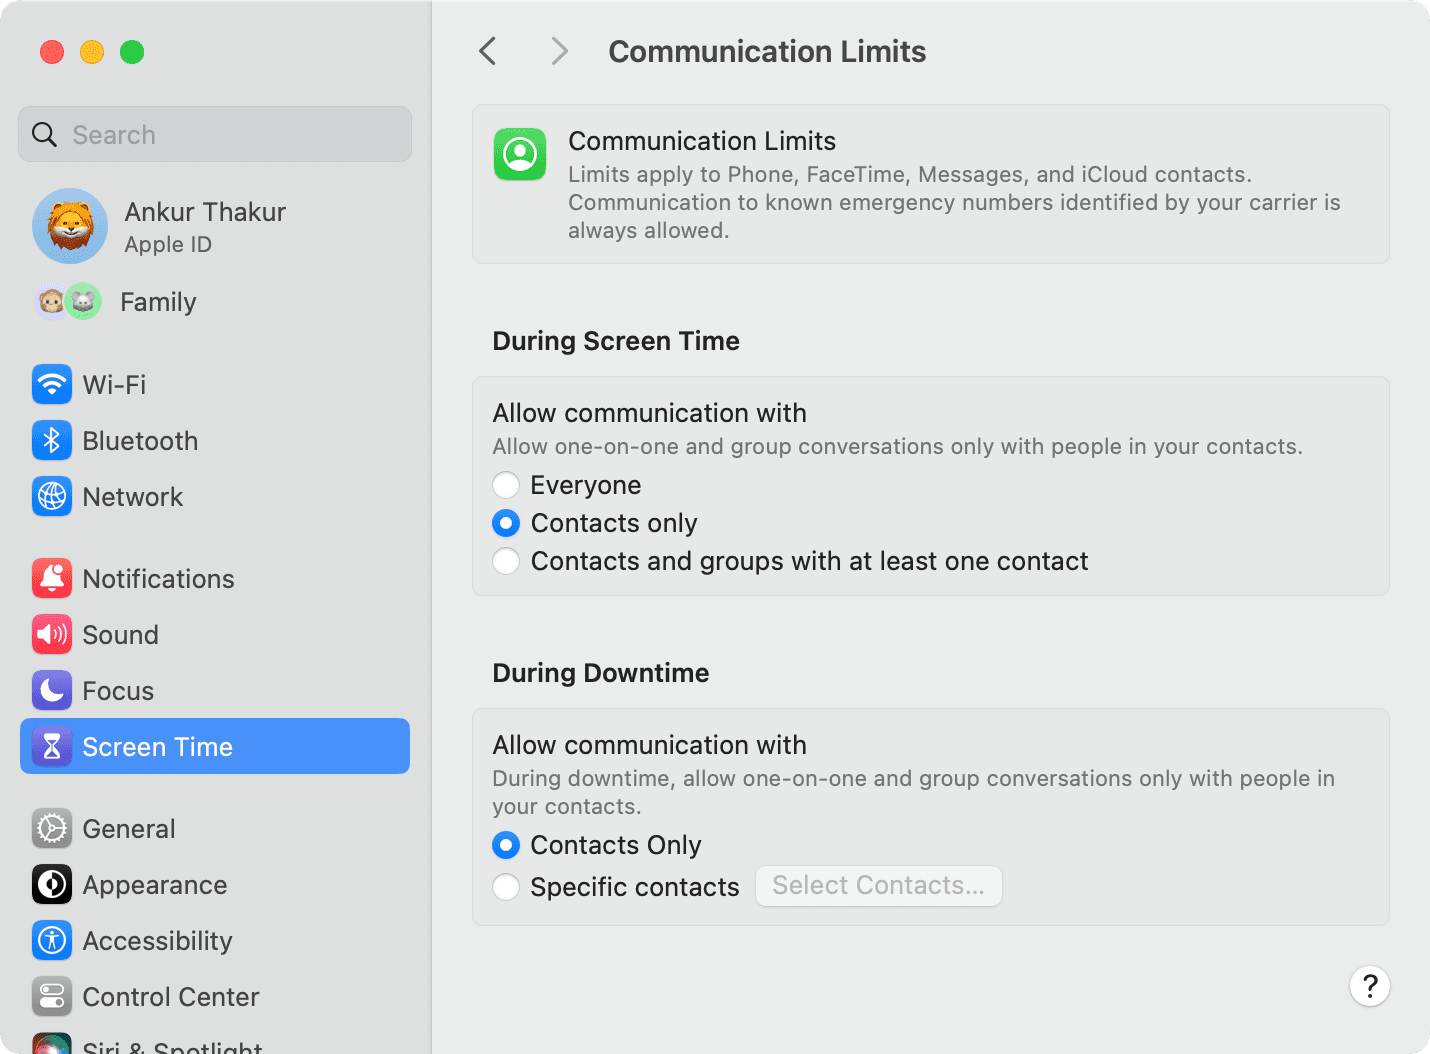
Communication Limits
You can choose with whom you or your child communicate via phone, FaceTime, and Messages during Screen Time and Downtime.
Communication Safety
This section is primarily for your child to protect them from unsolicited adult media. You can learn more about it here: How to automatically blur sensitive photos in Messages, AirDrop, and other apps on your iPhone, iPad, or Mac

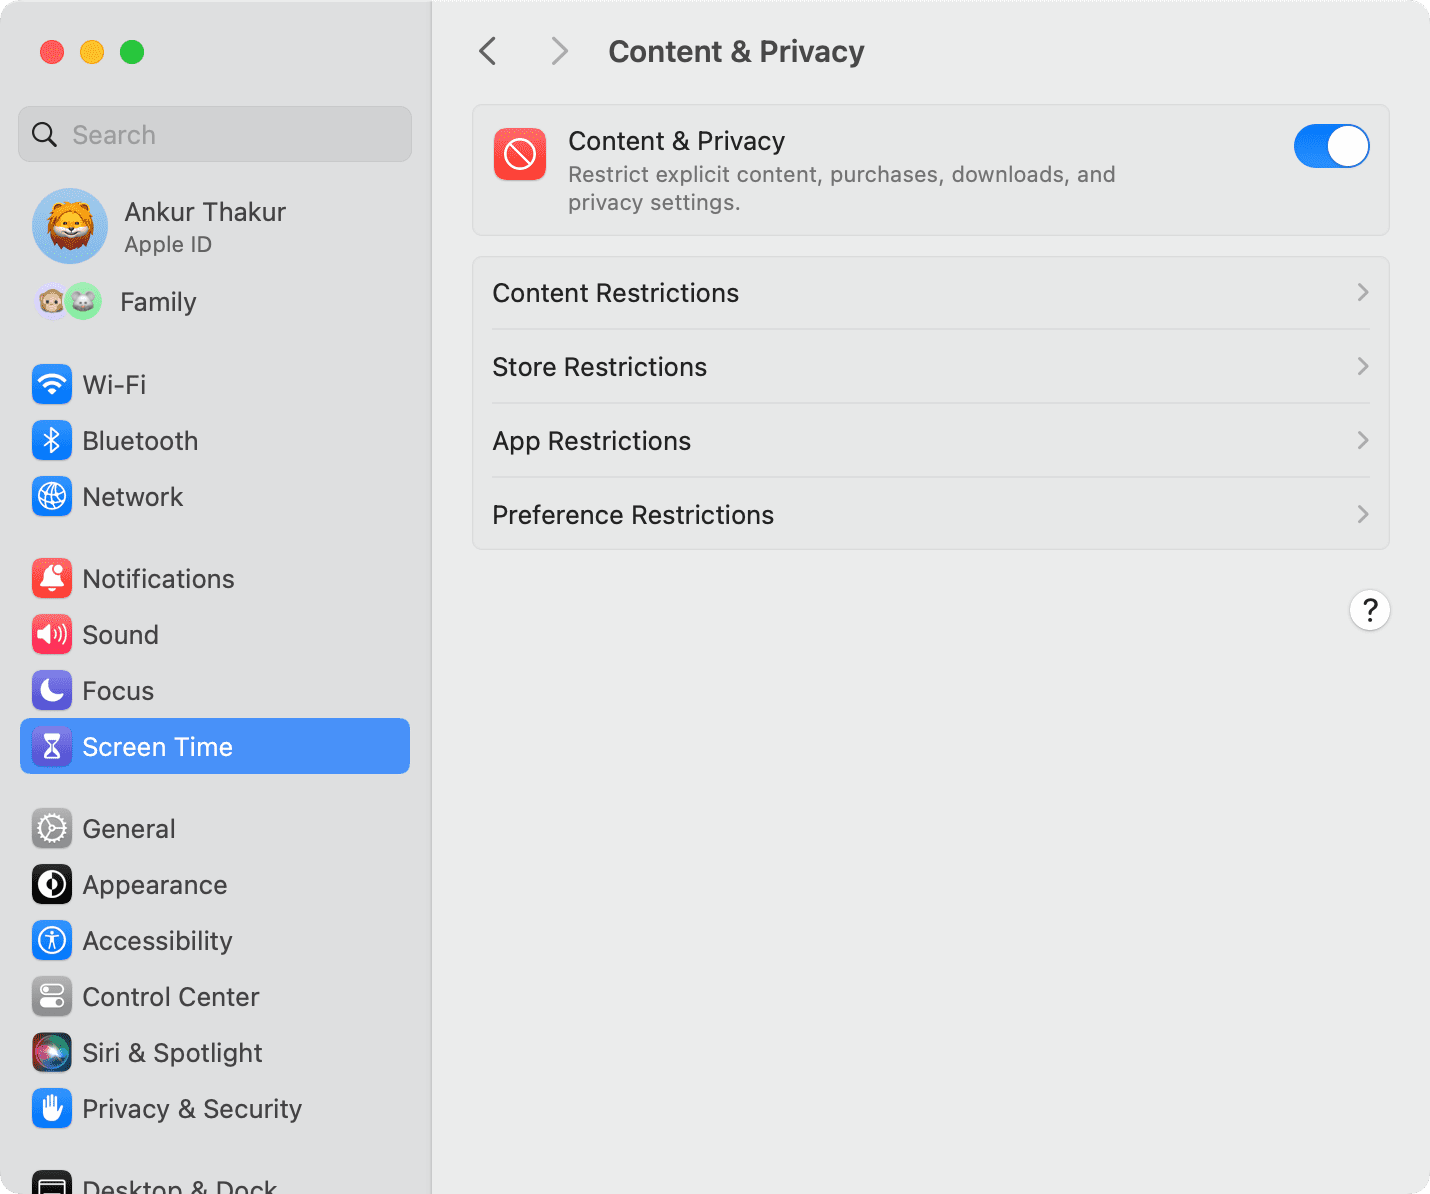
Screen Time Restrictions
You can use the Content & Privacy option to set restrictions or parental controls on your Mac. It lets you restrict web browsing, purchases, downloads, media, and privacy settings if needed. We have explained everything in our dedicated tutorial.
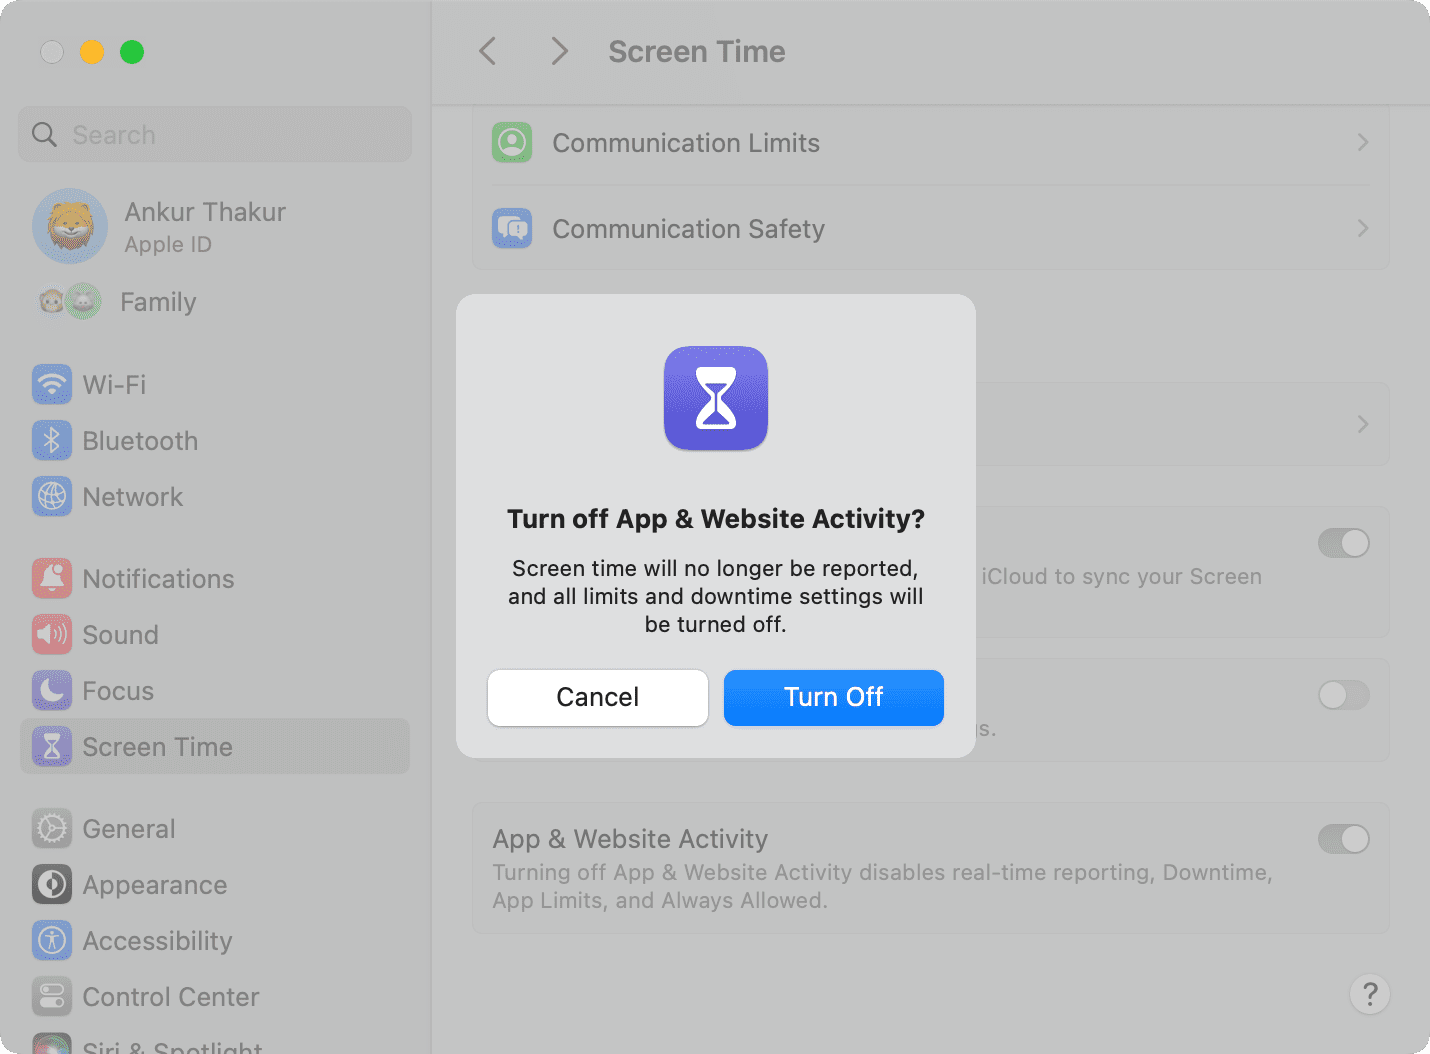
Turn off Screen Time
Overall, the Screen Time feature on Mac simply makes sense. It’s super handy for monitoring your child’s device activity, limiting yourself when you need to, and controlling inappropriate content.
However, if you do not derive value from this feature, turn off the switch for App & Website Activity, enter your Screen Time passcode, and click Turn Off.
Are you going to start using Screen Time on your Mac?