Learn how to add comments, references, extra information, formulas, and hints to your PDF documents using notes and speech bubbles on your Mac, iPhone, and iPad.
Suppose you’re going through an important PDF document and want to add brief notes or information to specific spots. Just place a note and enter your text, and clicking on it will reveal the associated info.
Similarly, speech bubbles, commonly used in images and memes, can be added to PDFs for commenting purposes, with their protruding arrow pointing at the speaker or referenced text.
This quick tutorial shows you how to put notes or speech bubbles in your PDF files using built-in or free apps on macOS and iOS.
Related: How to highlight, underline, and strikethrough text in PDF documents on iPhone, iPad, and Mac
Add notes to PDF on Mac
1) Open the PDF in the built-in Apple Preview app.
2) Click the Markup icon from the top to show the Markup toolbar if it isn’t already visible.
3) Scroll to the PDF page where you want to add the note.
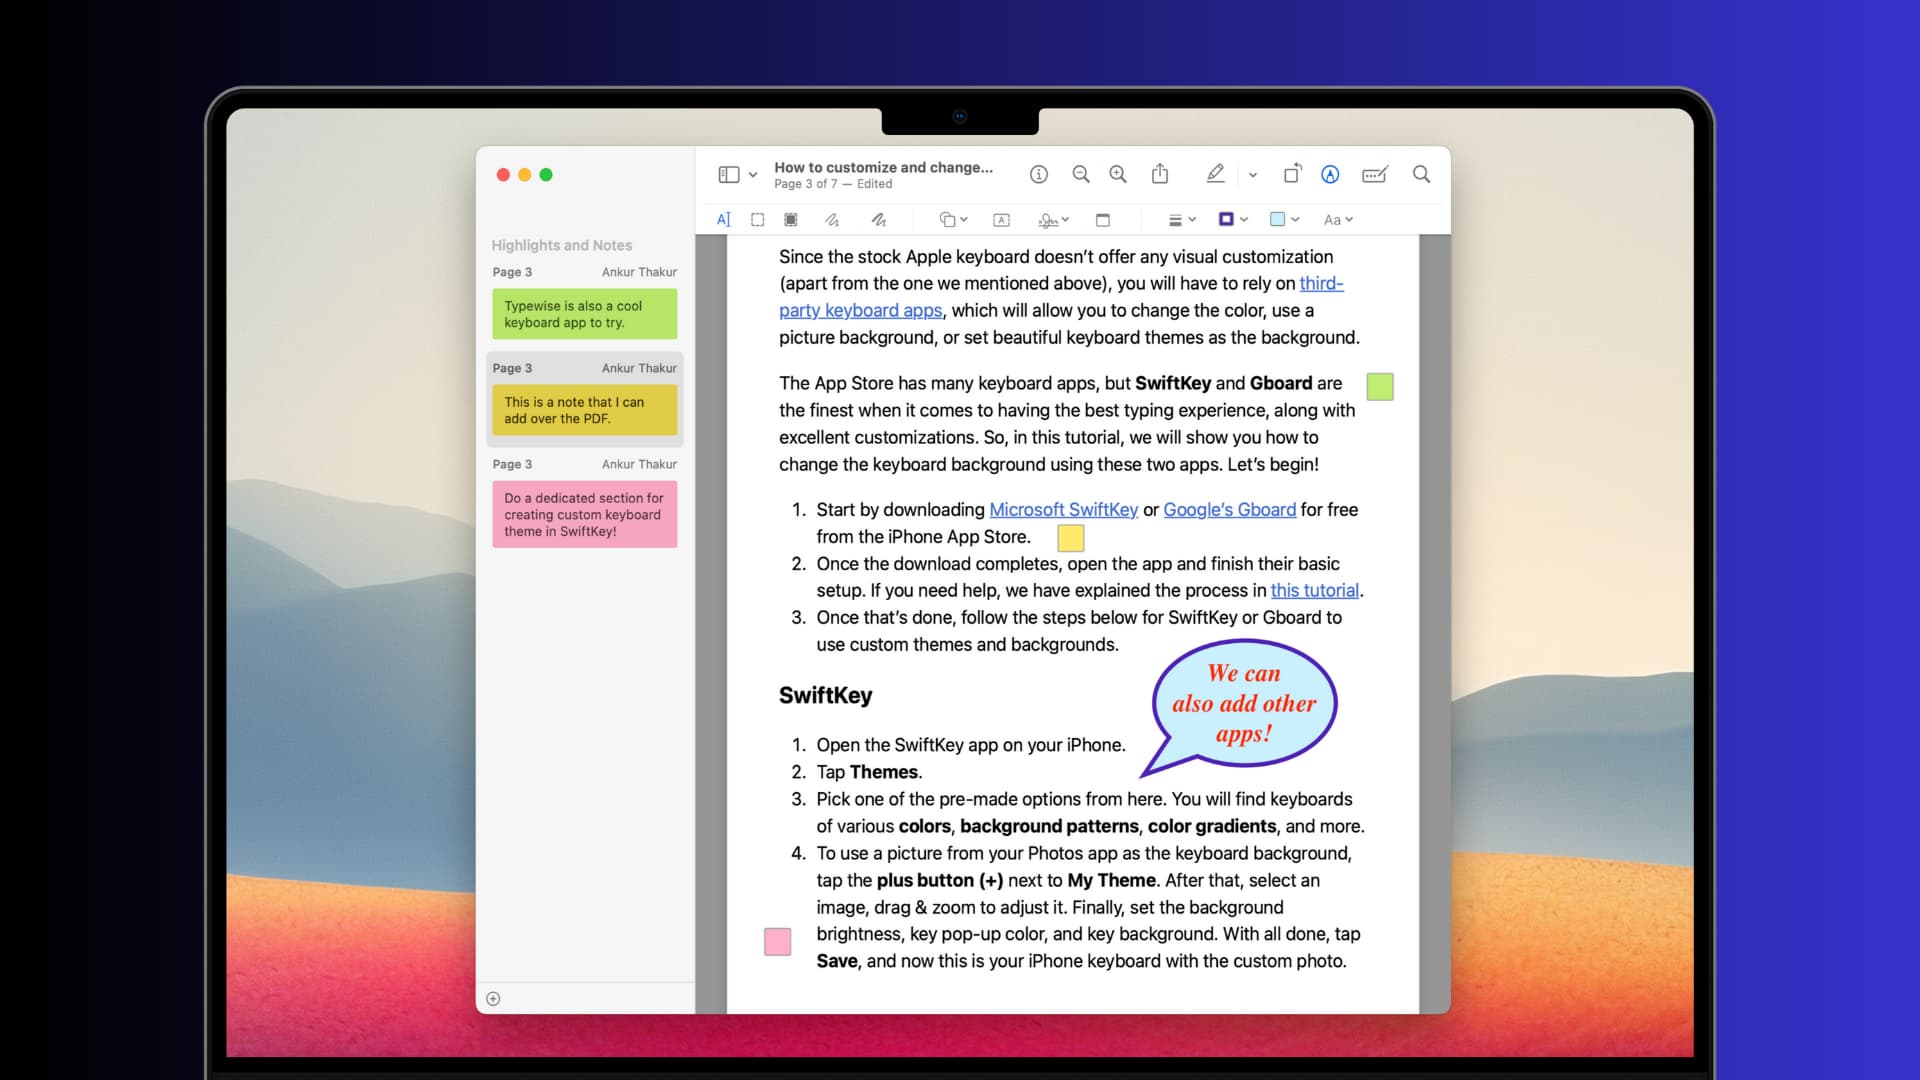
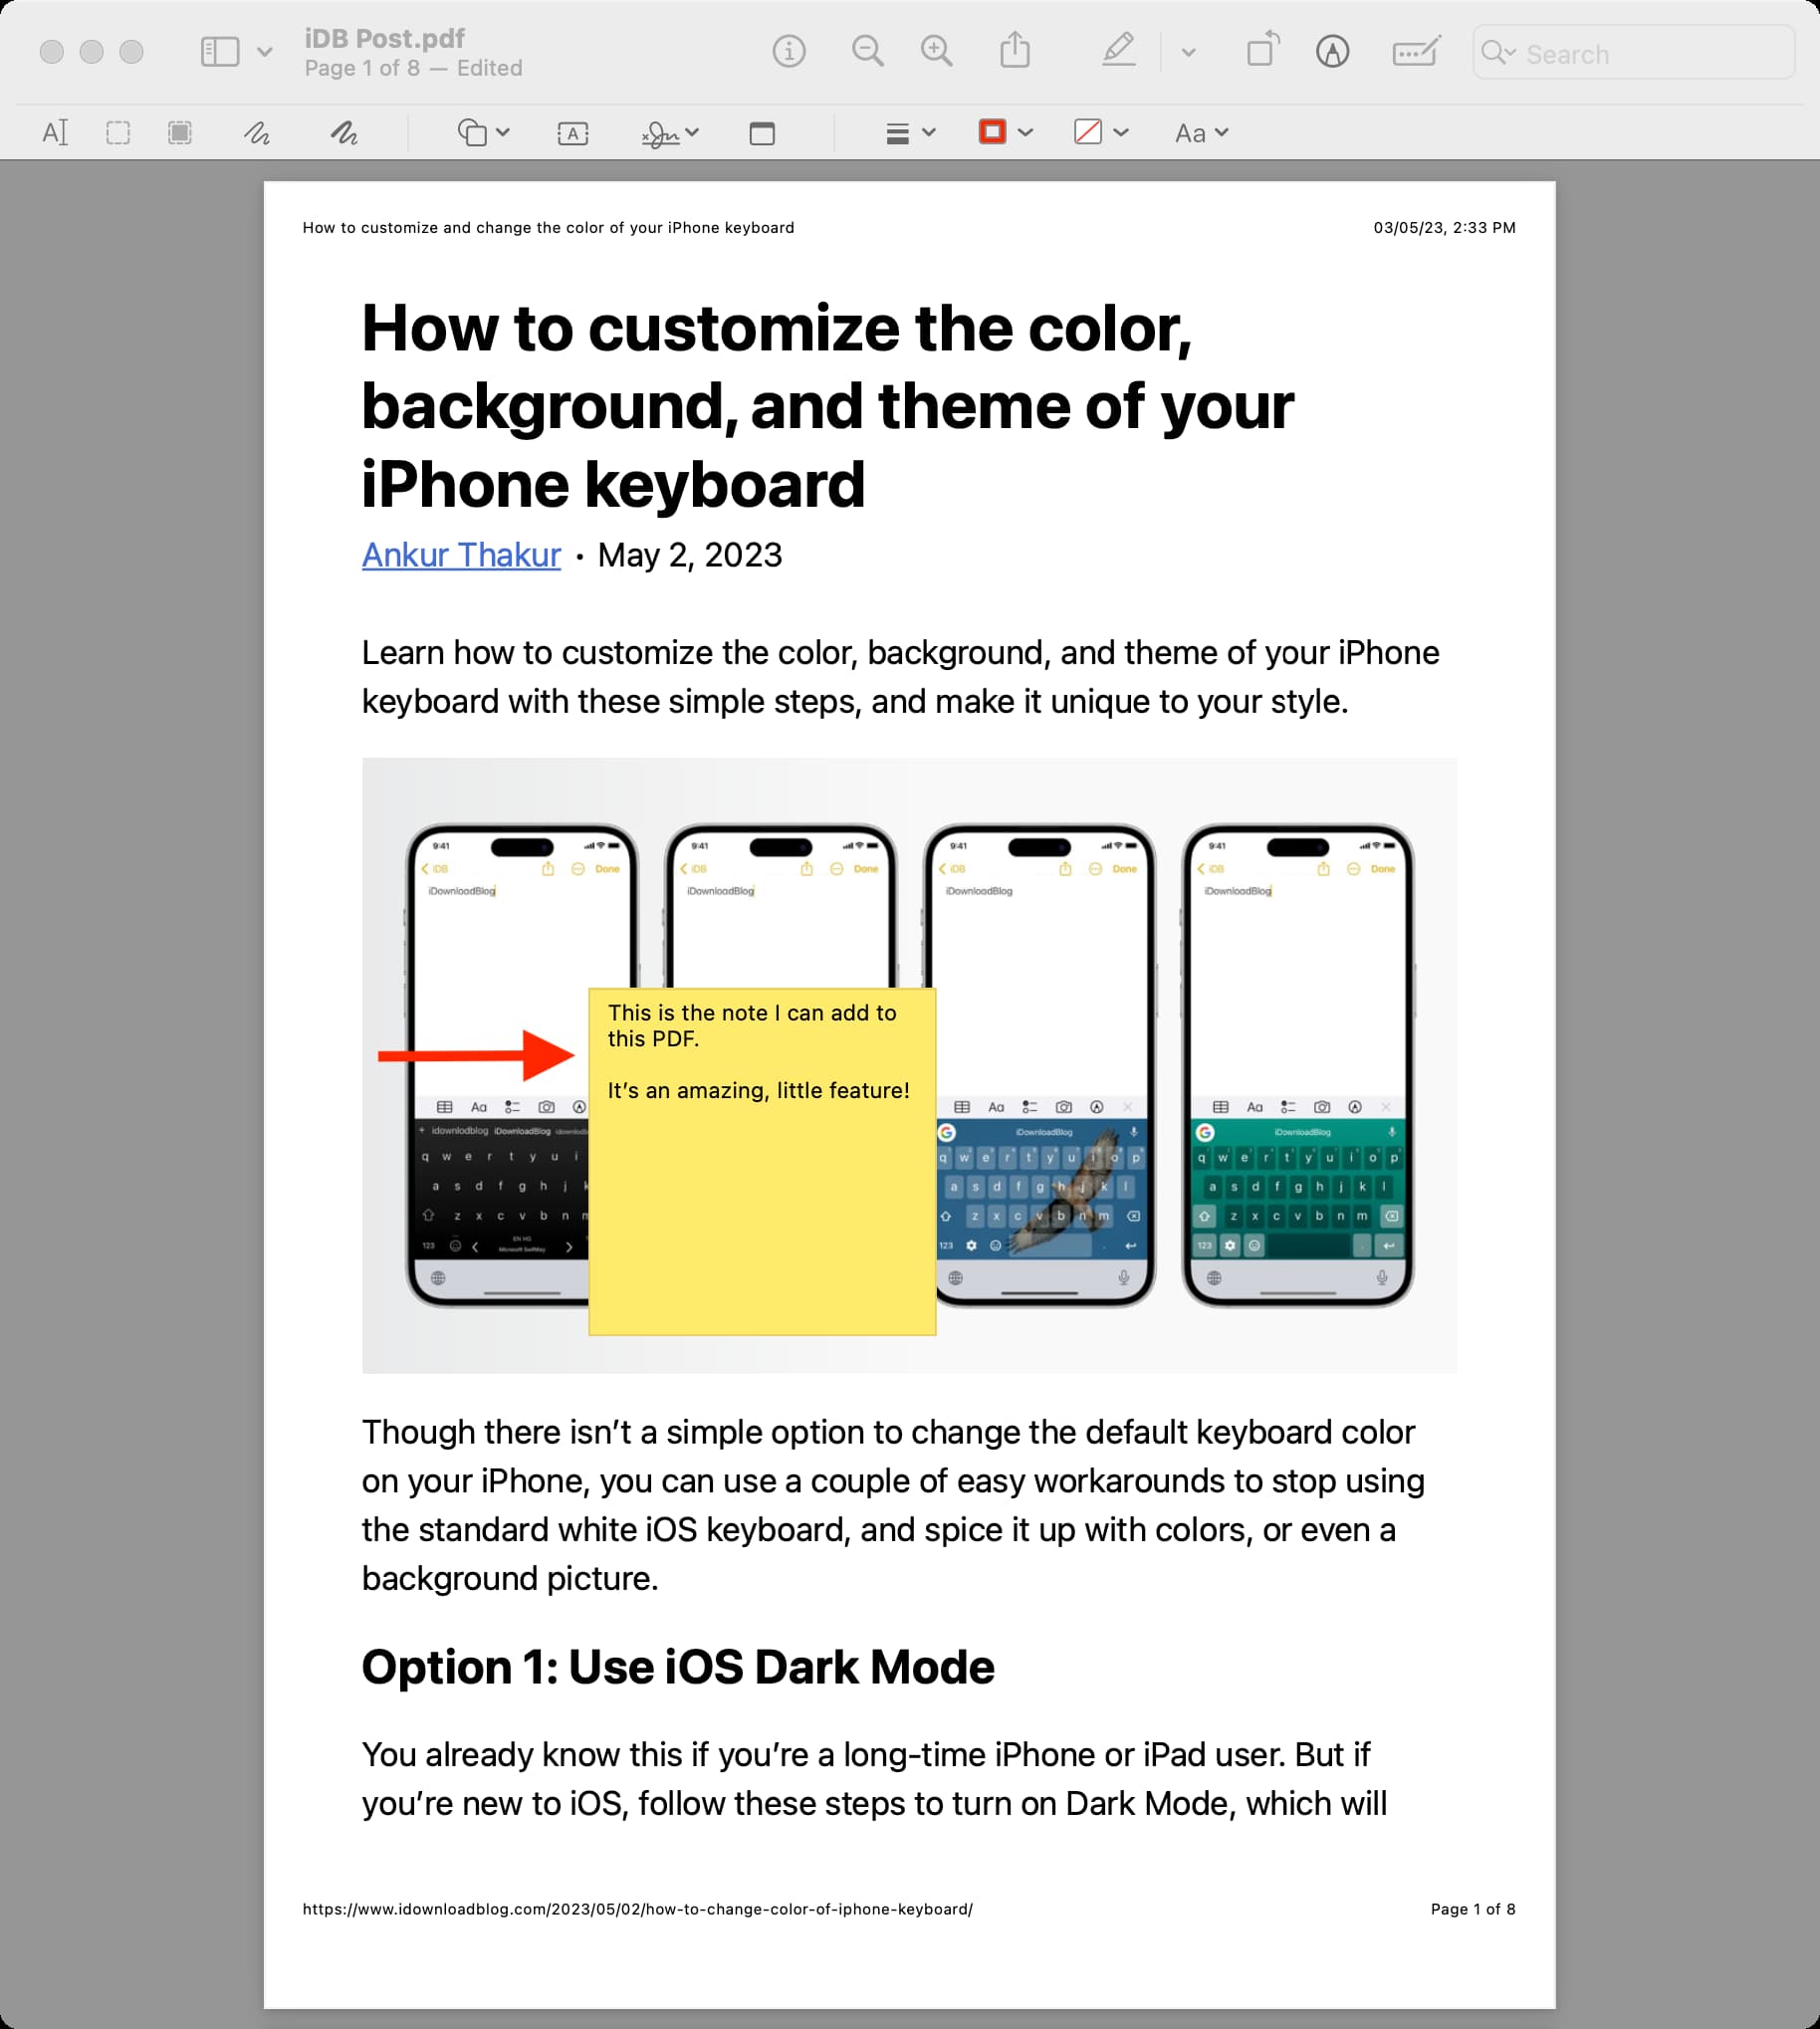
4) Click the Note icon in the toolbar, and it will instantly pop out a small yellow sticky note-like interface on the PDF page.
5) Type your comment or note in this box.
6) When you’re done, click anywhere outside the box to minimize the note.
Other ways to add a note
- From the top menu bar: Open the PDF in Preview and click Tools > Annotate > Note.
- Use the keyboard shortcut: Open the PDF in Preview and go to the PDF page where you want to add the note. Now press the Command + Control + N keys together to add a note.
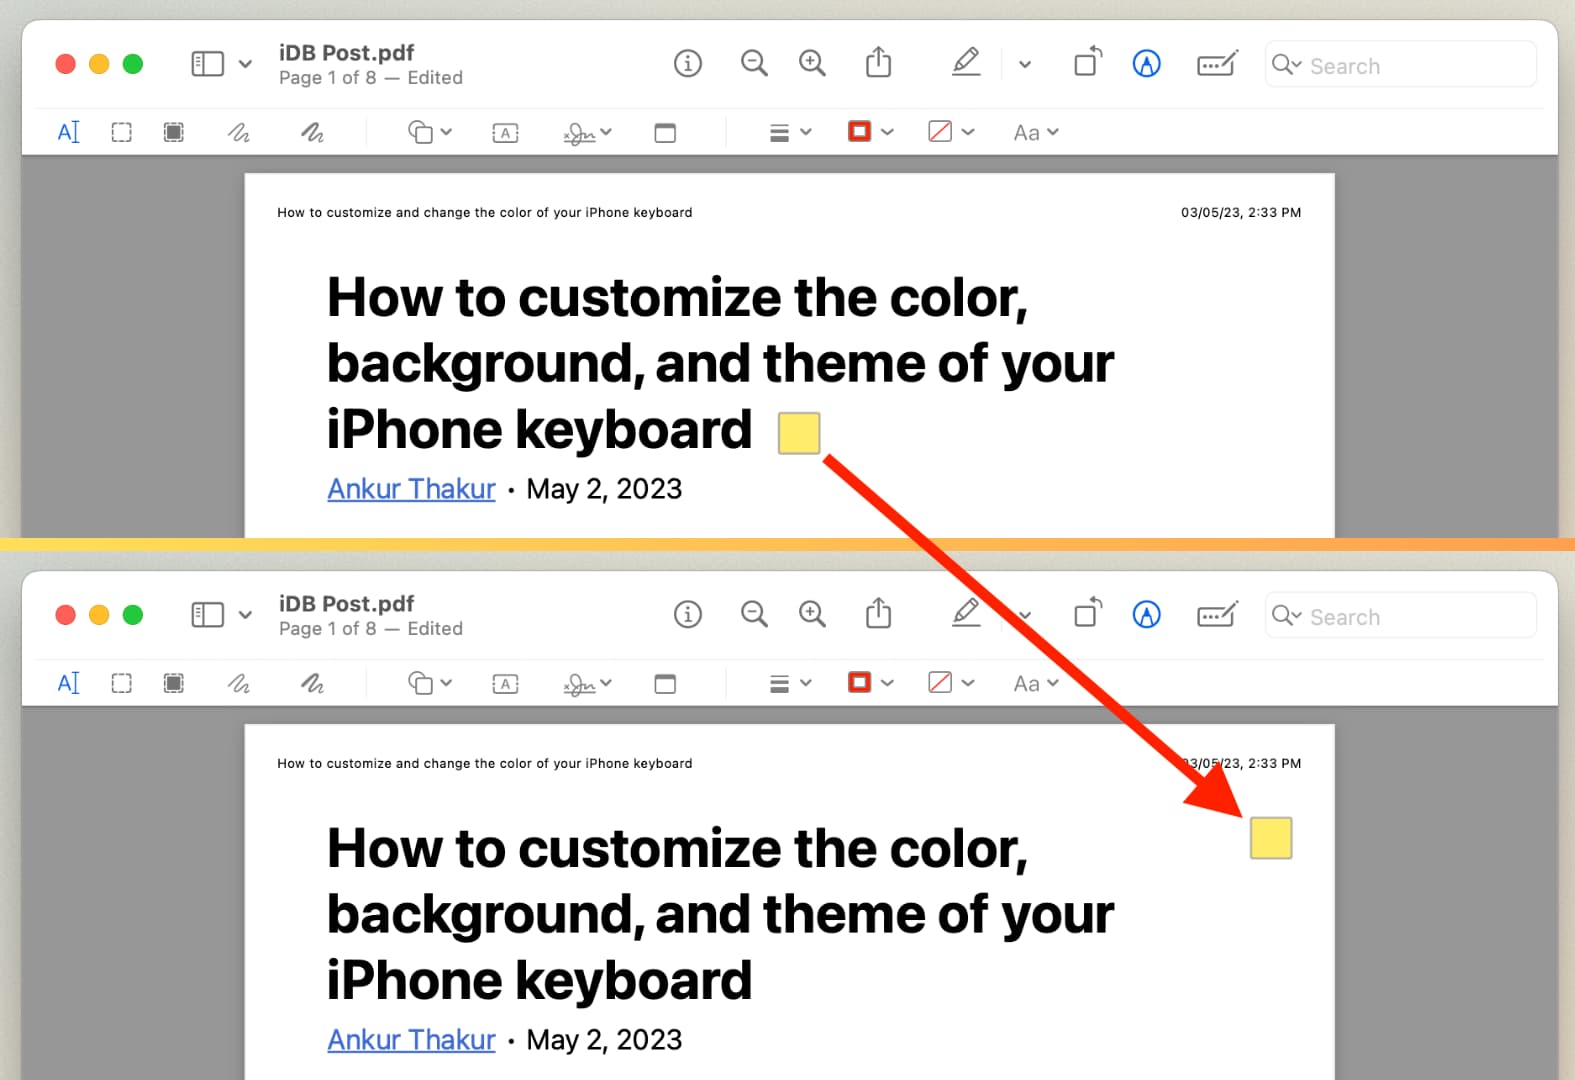
Change the position of the note
Put your mouse pointer over the minimized note box and drag it anywhere on that PDF page where you need that note. Note: You can’t move the note to a new PDF page.
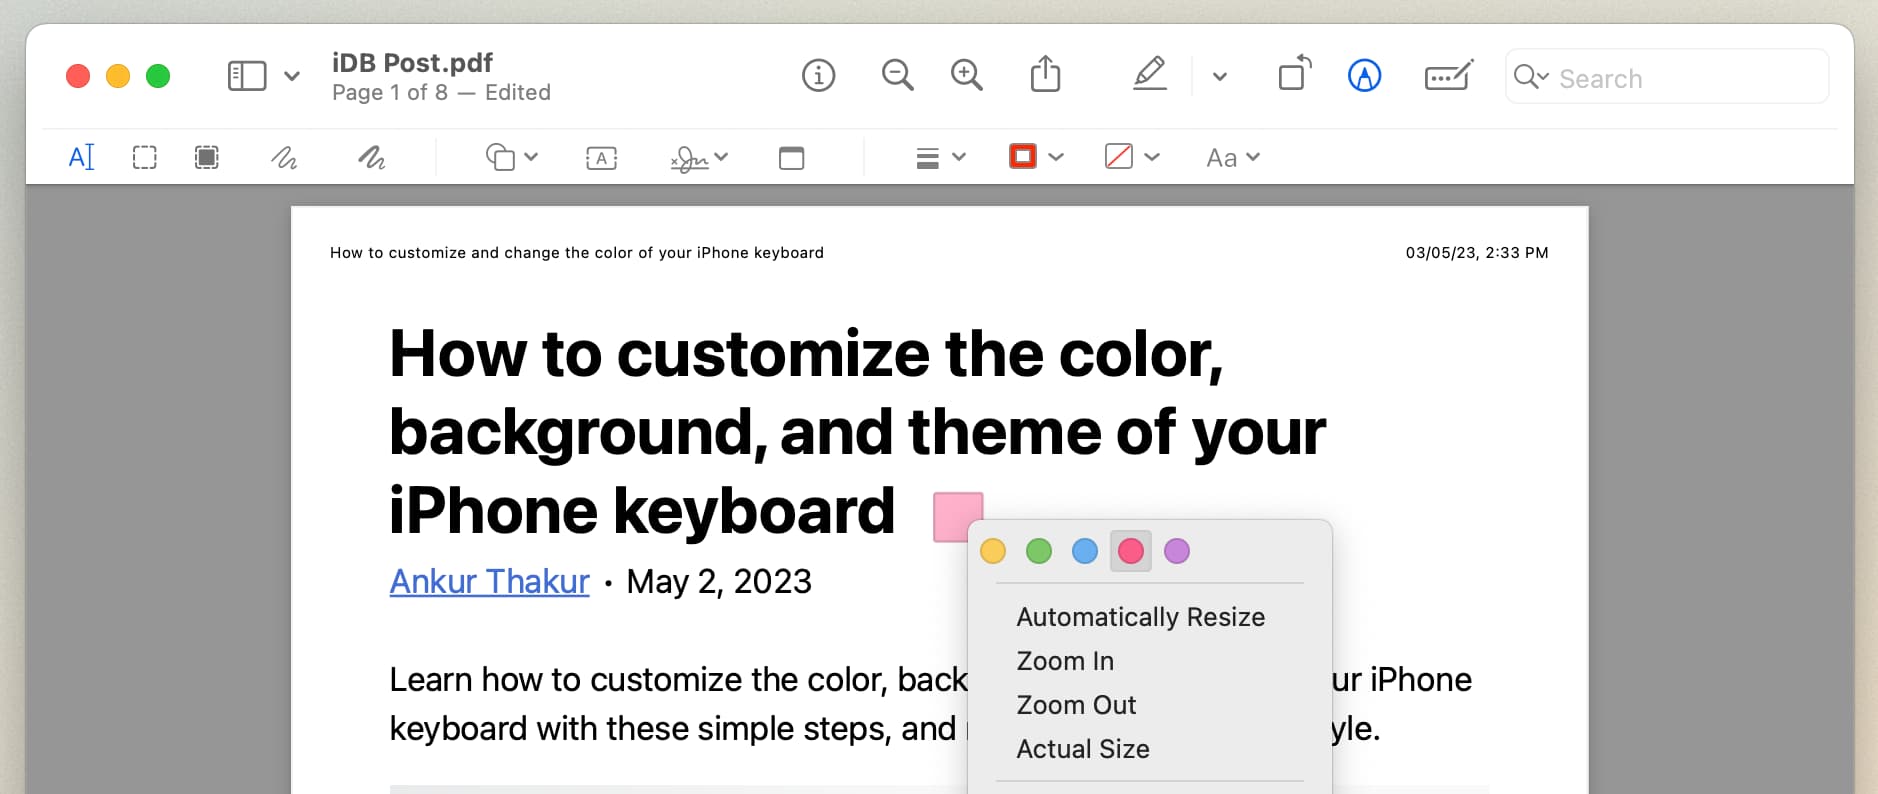
Change the note color
- Make sure your note is minimized as a little square.
- Now, place your pointer over that note square and right-click or Control-click.
- Choose yellow, green, blue, pink, or purple.
Edit a note
Click the note square to view it and edit it by adding new text or removing what’s currently there.
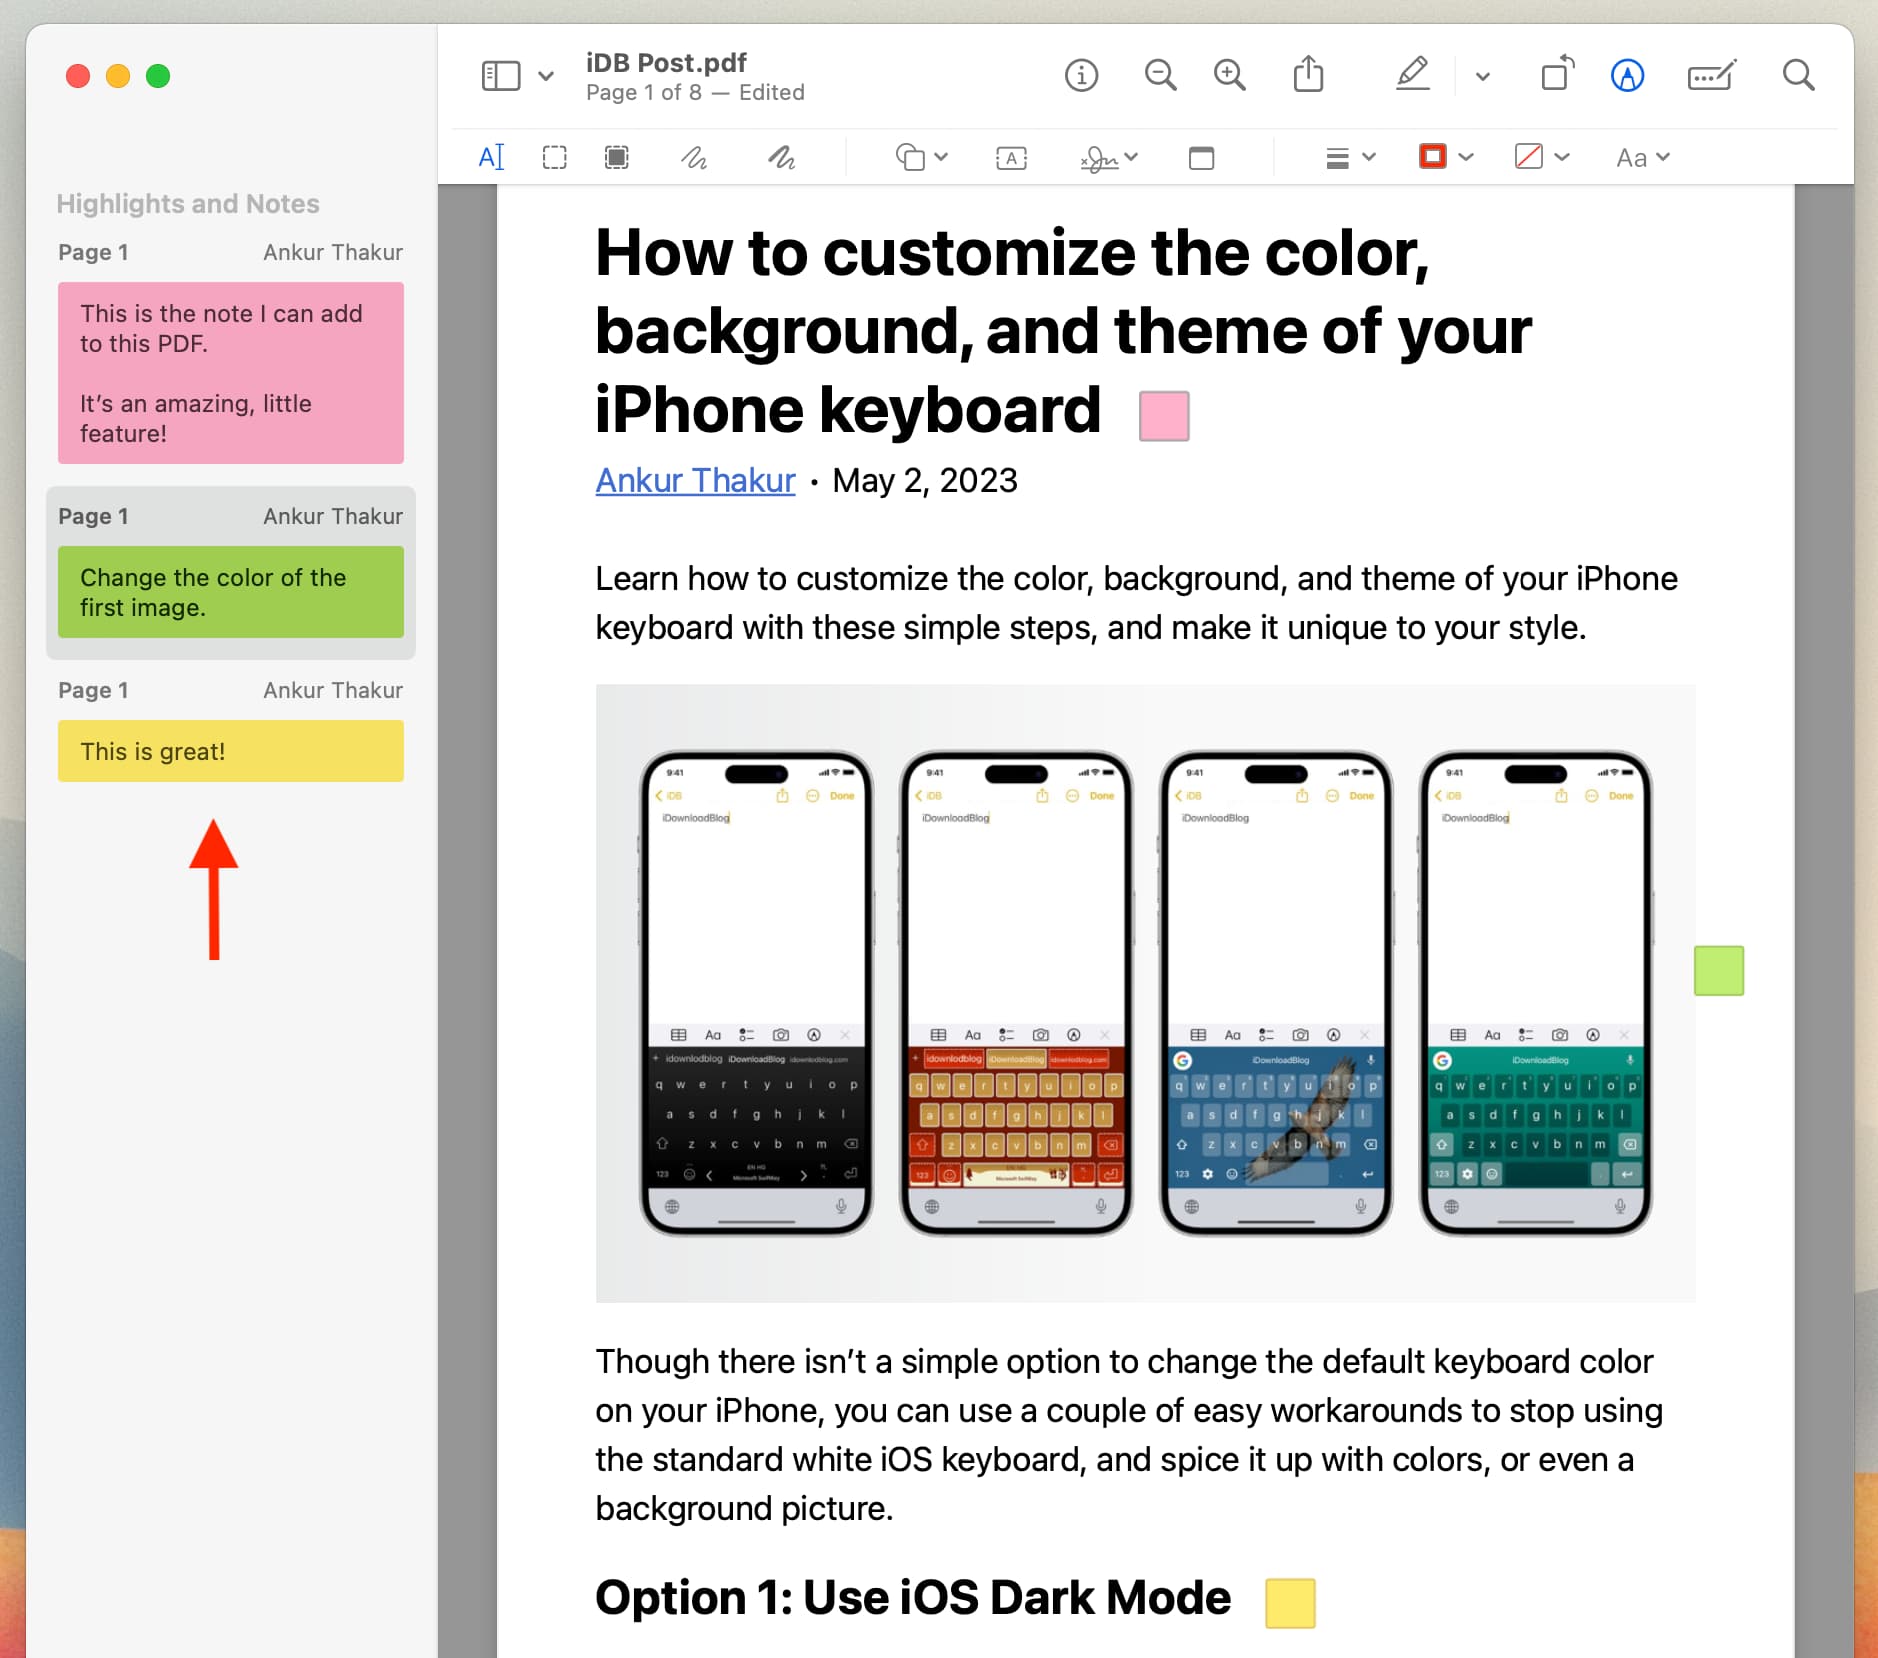
See all added notes
- Make sure the PDF is open in Preview.
- From the top menu bar, click View > Highlights and Notes, which will show the left sidebar with all your added notes.
Delete a note
Select the note in the left sidebar and press the delete key on your keyboard.
Alternatively, make sure the note is minimized into a little square. Now, place the mouse pointer over the little square and hit the delete key to remove it.
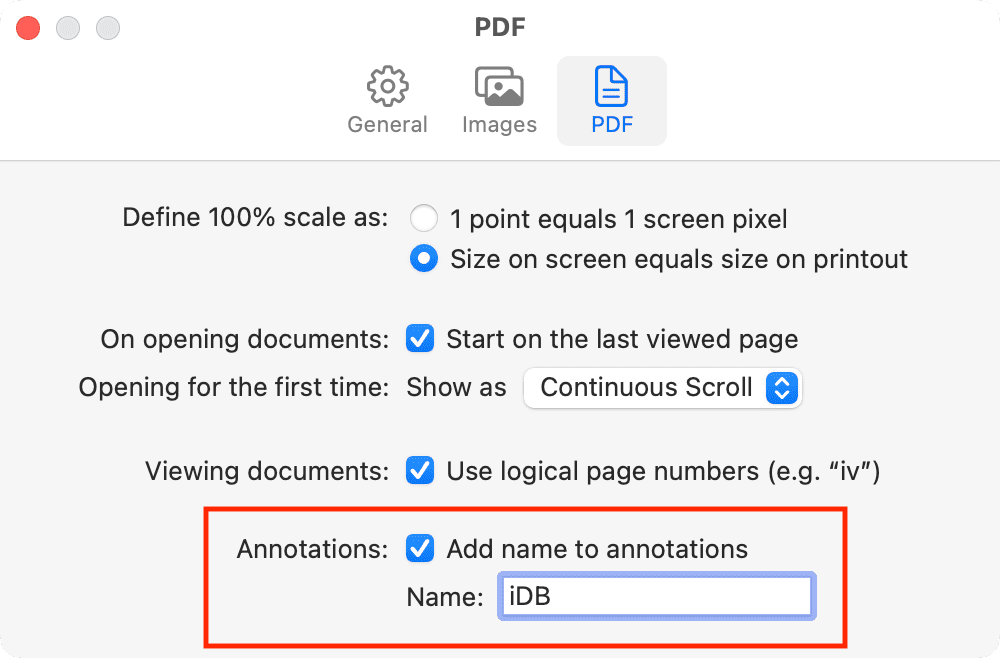
After you choose View > Highlights and Notes, you will most likely see your name as the author of every note. This is because, by default, the Mac uses your user login name as the author. But you can easily change it or remove the author’s name from the Preview settings. Here’s how:
- Click Preview next to the top Apple icon and choose Settings or Preferences.
- Go to the PDF section.
- Uncheck ‘Add name to annotations‘ to remove the author name.
- Or, to change the author name, type the new name in the Name box.
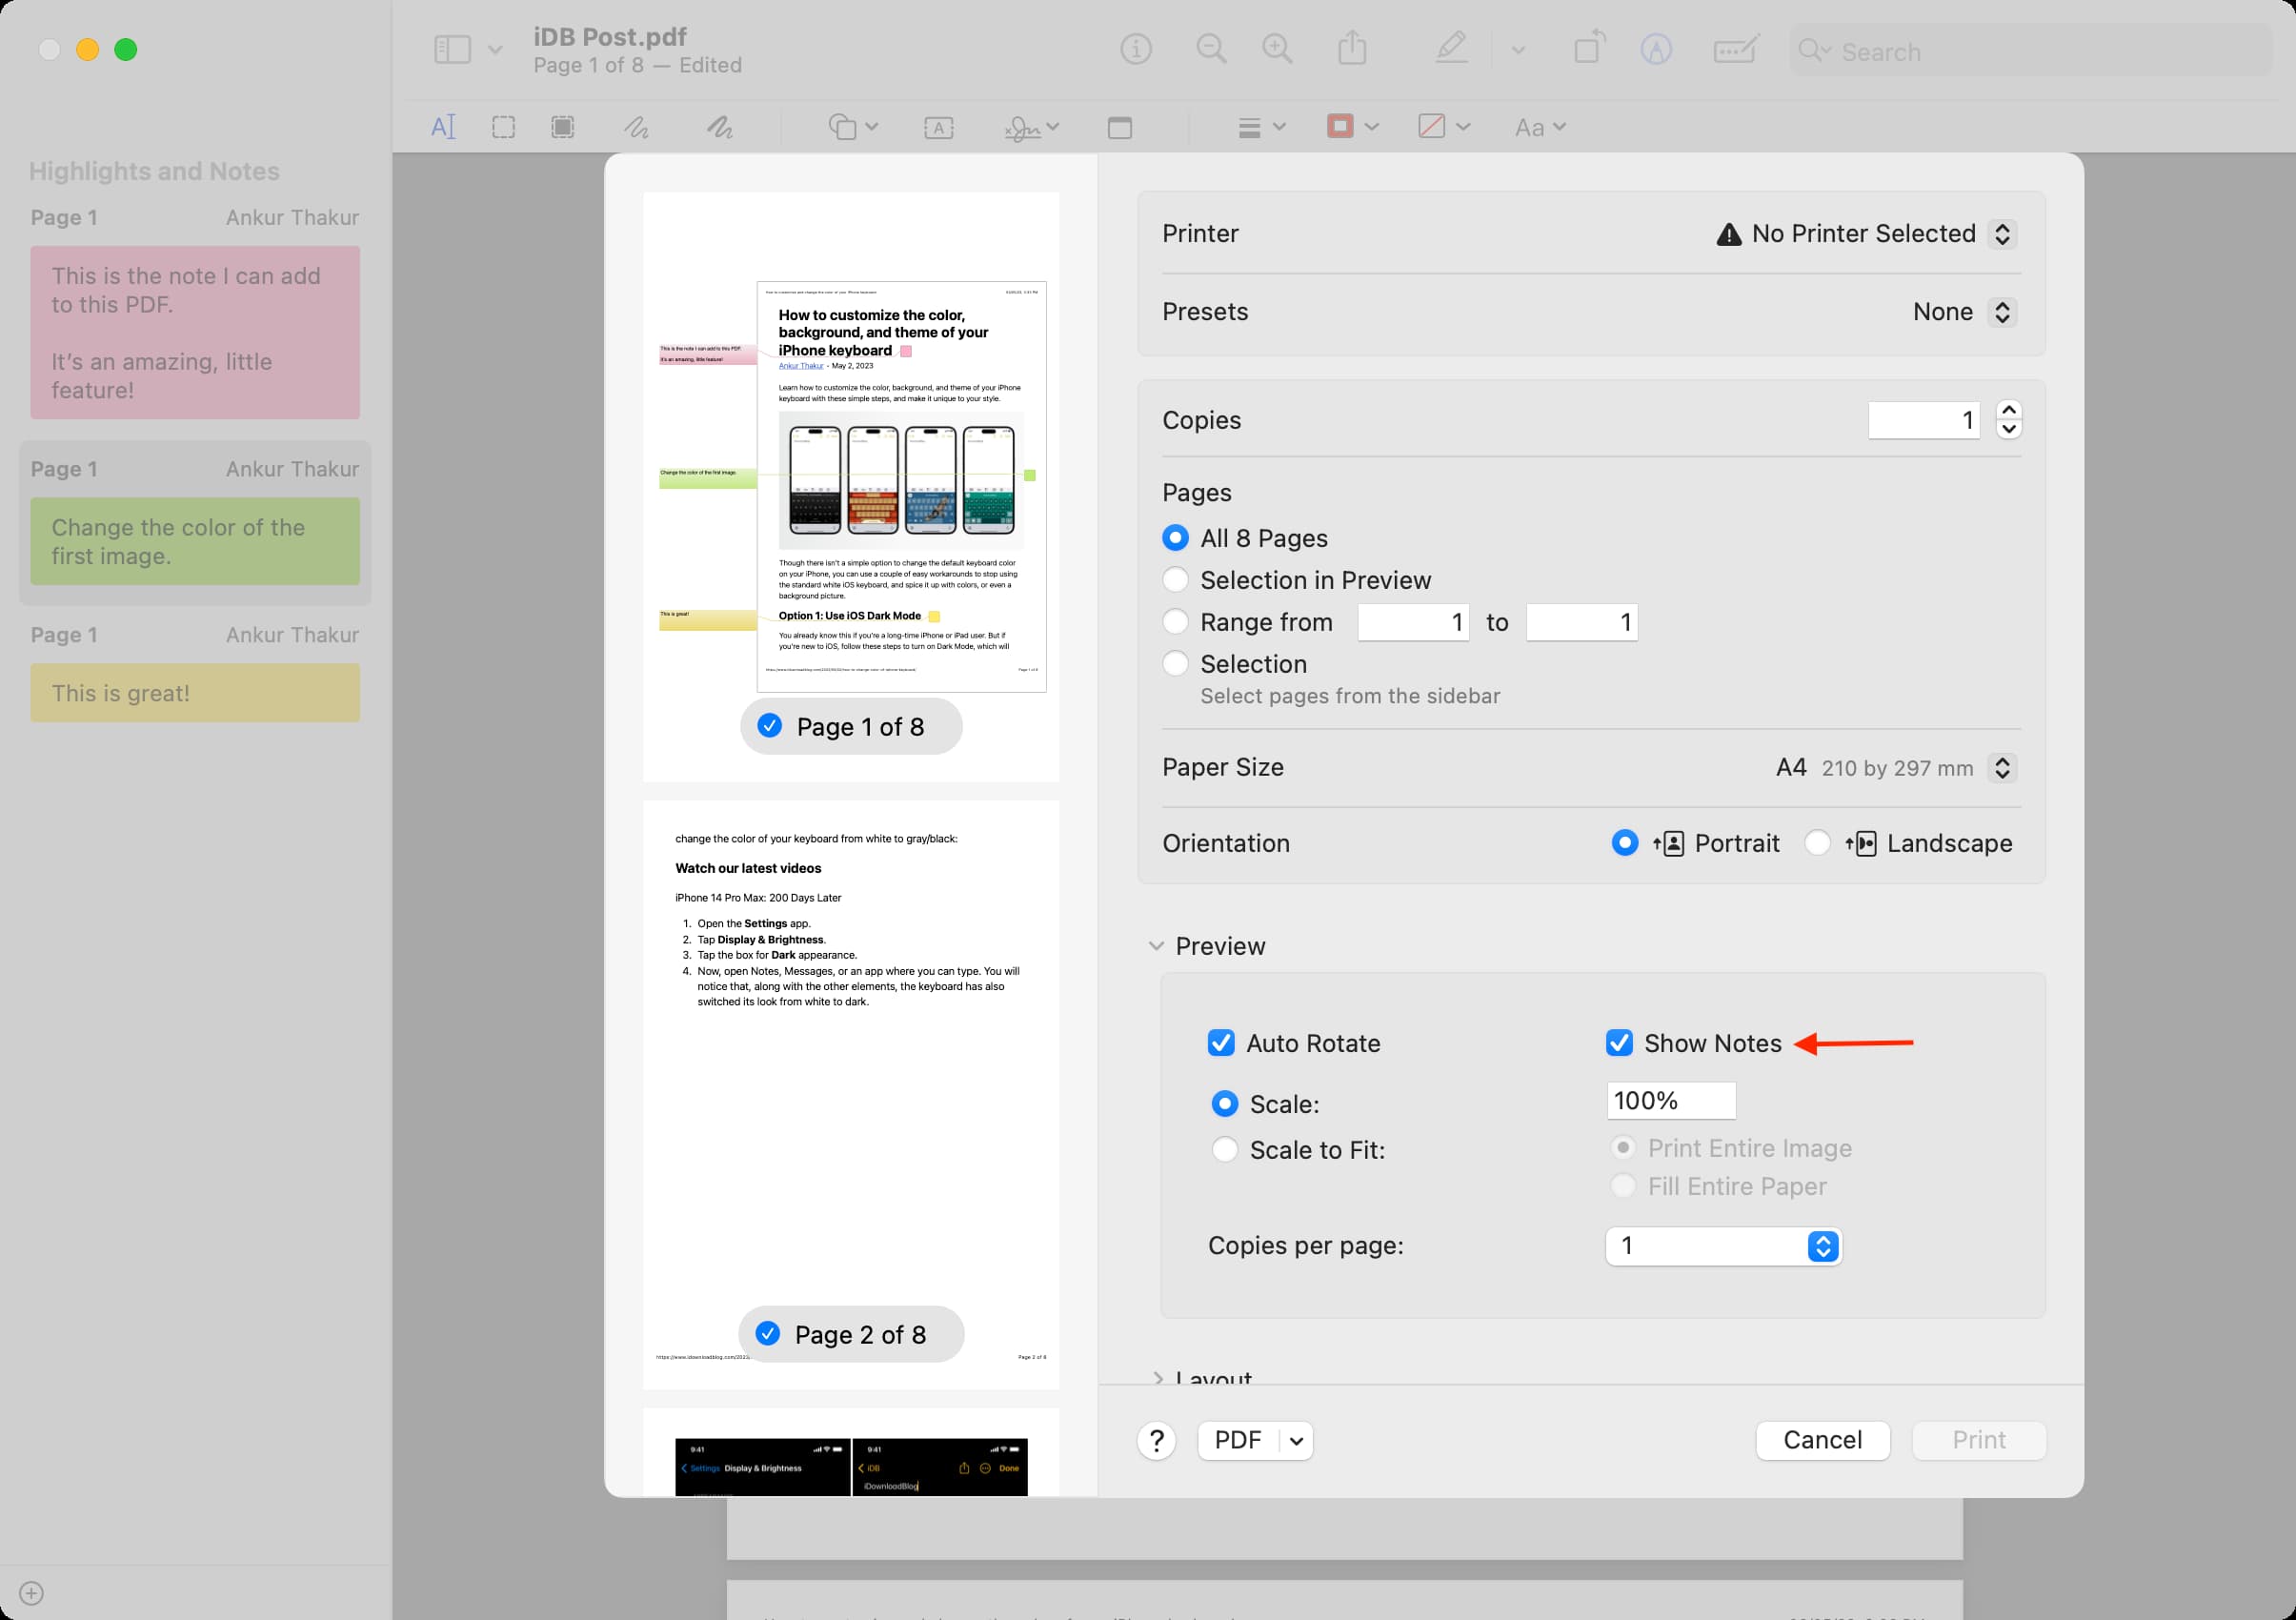
Print your PDF with added notes
- With PDF open in Preview, click File > Print from the top menu bar.
- On the print preview screen, check the box for Show Notes to include the added notes in the printout.
- Finally, hit Print or click the arrow next to PDF and choose Save as PDF.
Related: How to add a text or image watermark to your PDF
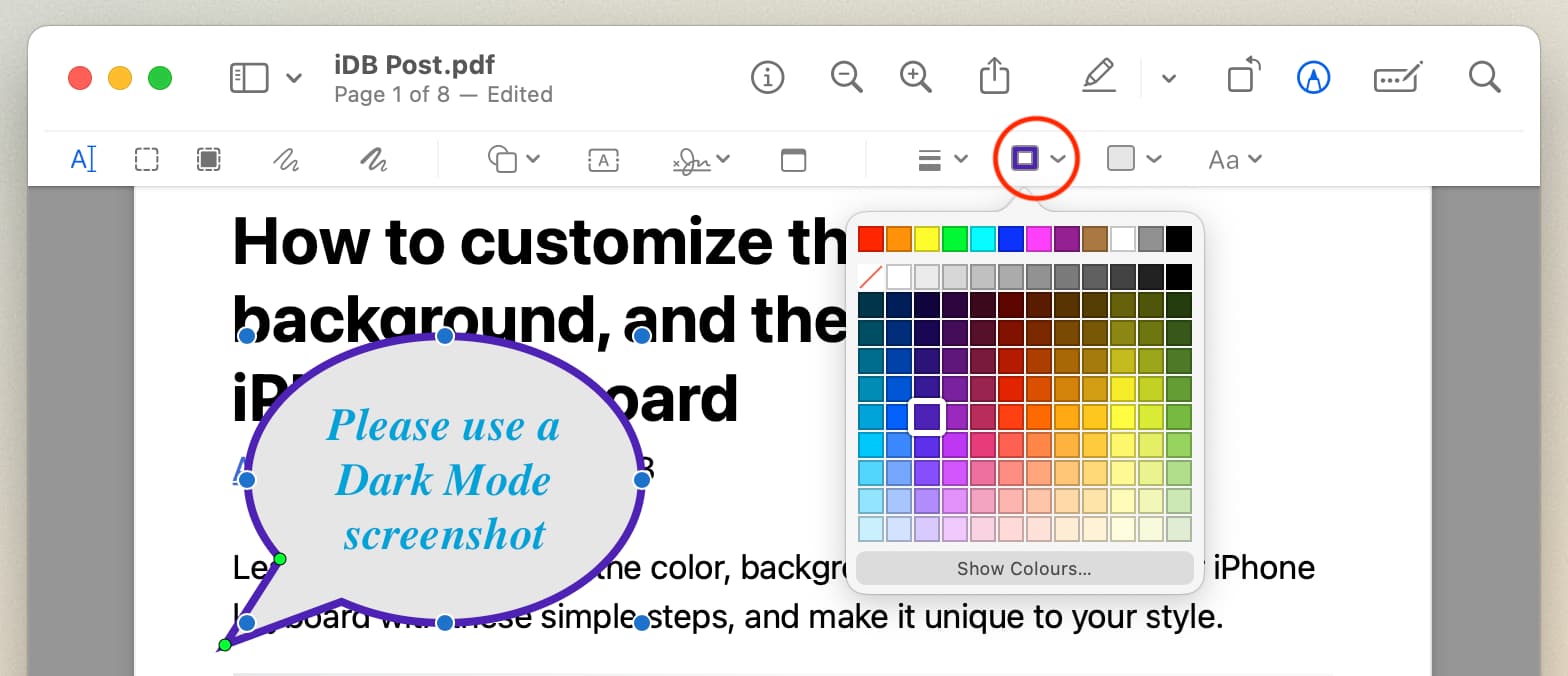
Add speech bubble to PDF on Mac
1) Open the PDF in Preview on Mac.
2) Click Tools > Annotate > Speech Bubble from the top menu bar. Alternatively, you can click the Markup button to see the toolbar, then click the Shapes icon and choose the speech bubble.
3) You will see a speech bubble on the PDF. Click OK if you see a popup.
4) Now, click inside the bubble and type what you want the text inside the speech bubble to say.

Move the speech bubble
- Select the speech bubble. When you do that, you will see blue and green dots on the border.
- Make sure the pointer is on the border of the bubble and drag it to a new position on the PDF page. The bubble, along with the text inside it, will move to the new spot.
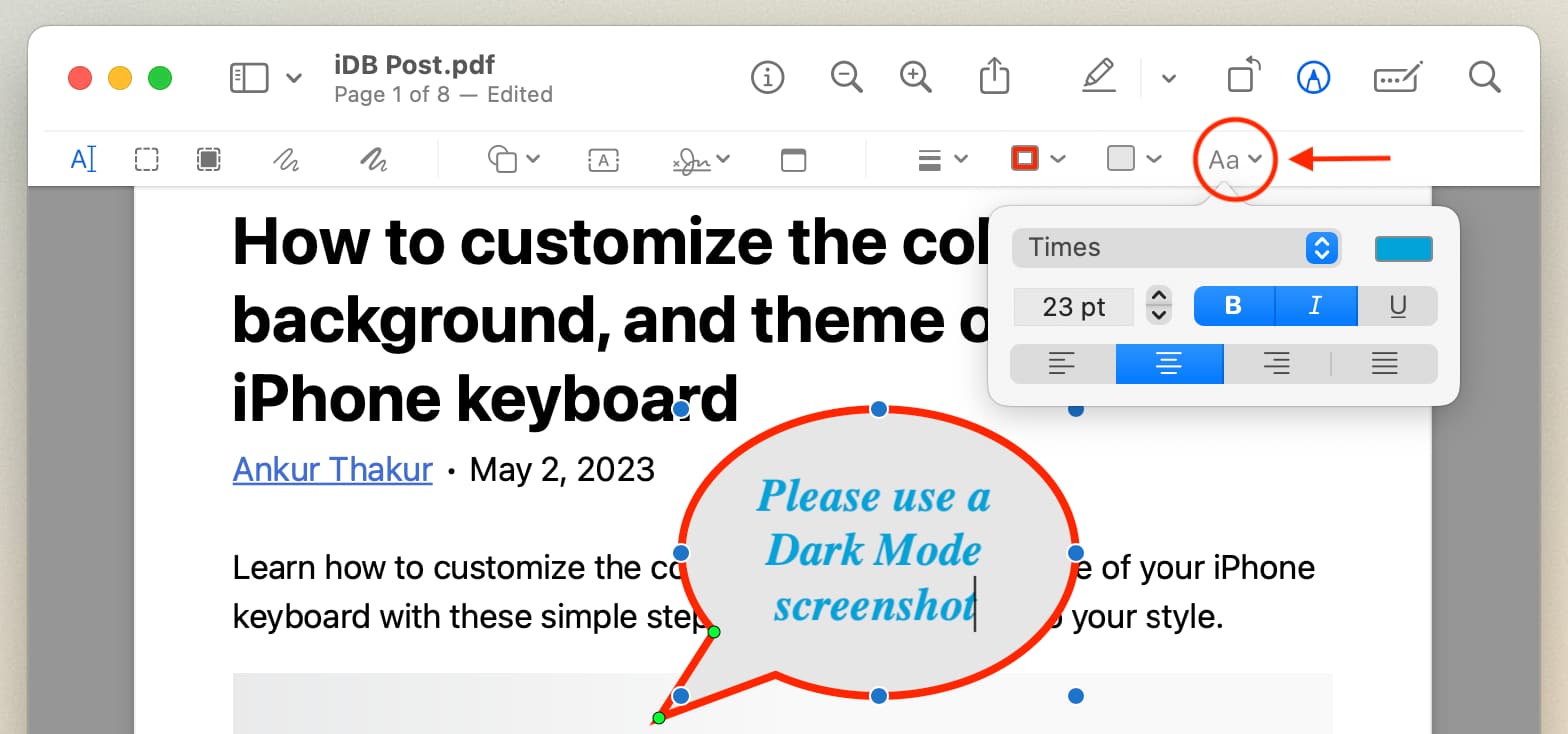
Customize the text in the speech bubble
- Select the speech bubble.
- Click the Aa Text Style icon from the top right of the Preview toolbar.
- From here, you can choose the desired text font, color, size, format (bold, italic, underline), and text alignment.
Change the speech bubble’s border color
- Select the speech bubble.
- Click the Border Color icon in the Preview toolbar and choose a different one.
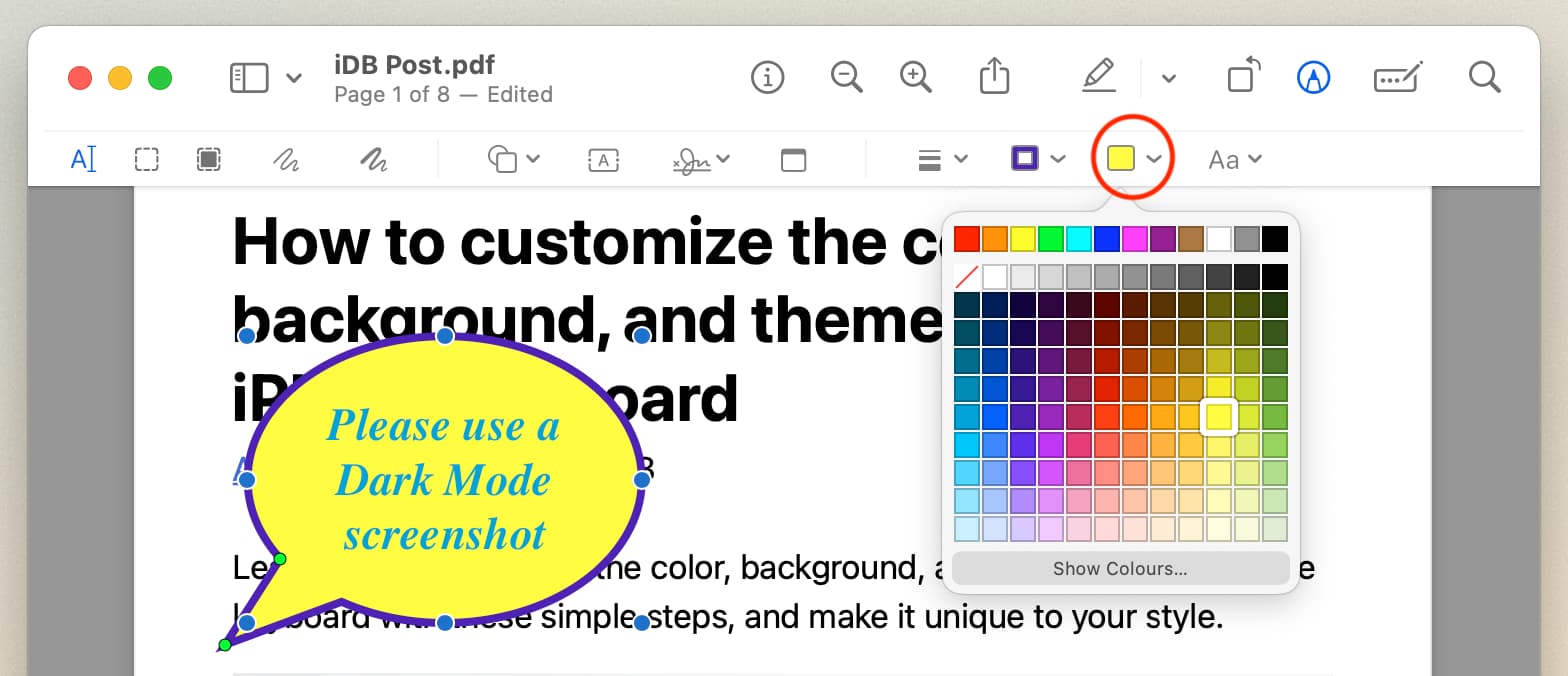
Change the bubble background or make it transparent
- Select the speech bubble.
- Click the Fill Color icon and pick a different color. To make the background transparent, choose the first white icon with a red slash (/).
Change the shape and size of the speech bubble
- Select the speech bubble.
- Put the pointer over one of the blue dots and drag to change the shape and size. It would be best to use more than one blue dot to get the perfect shape (circular, oval, elongated, tall, etc.) and size.
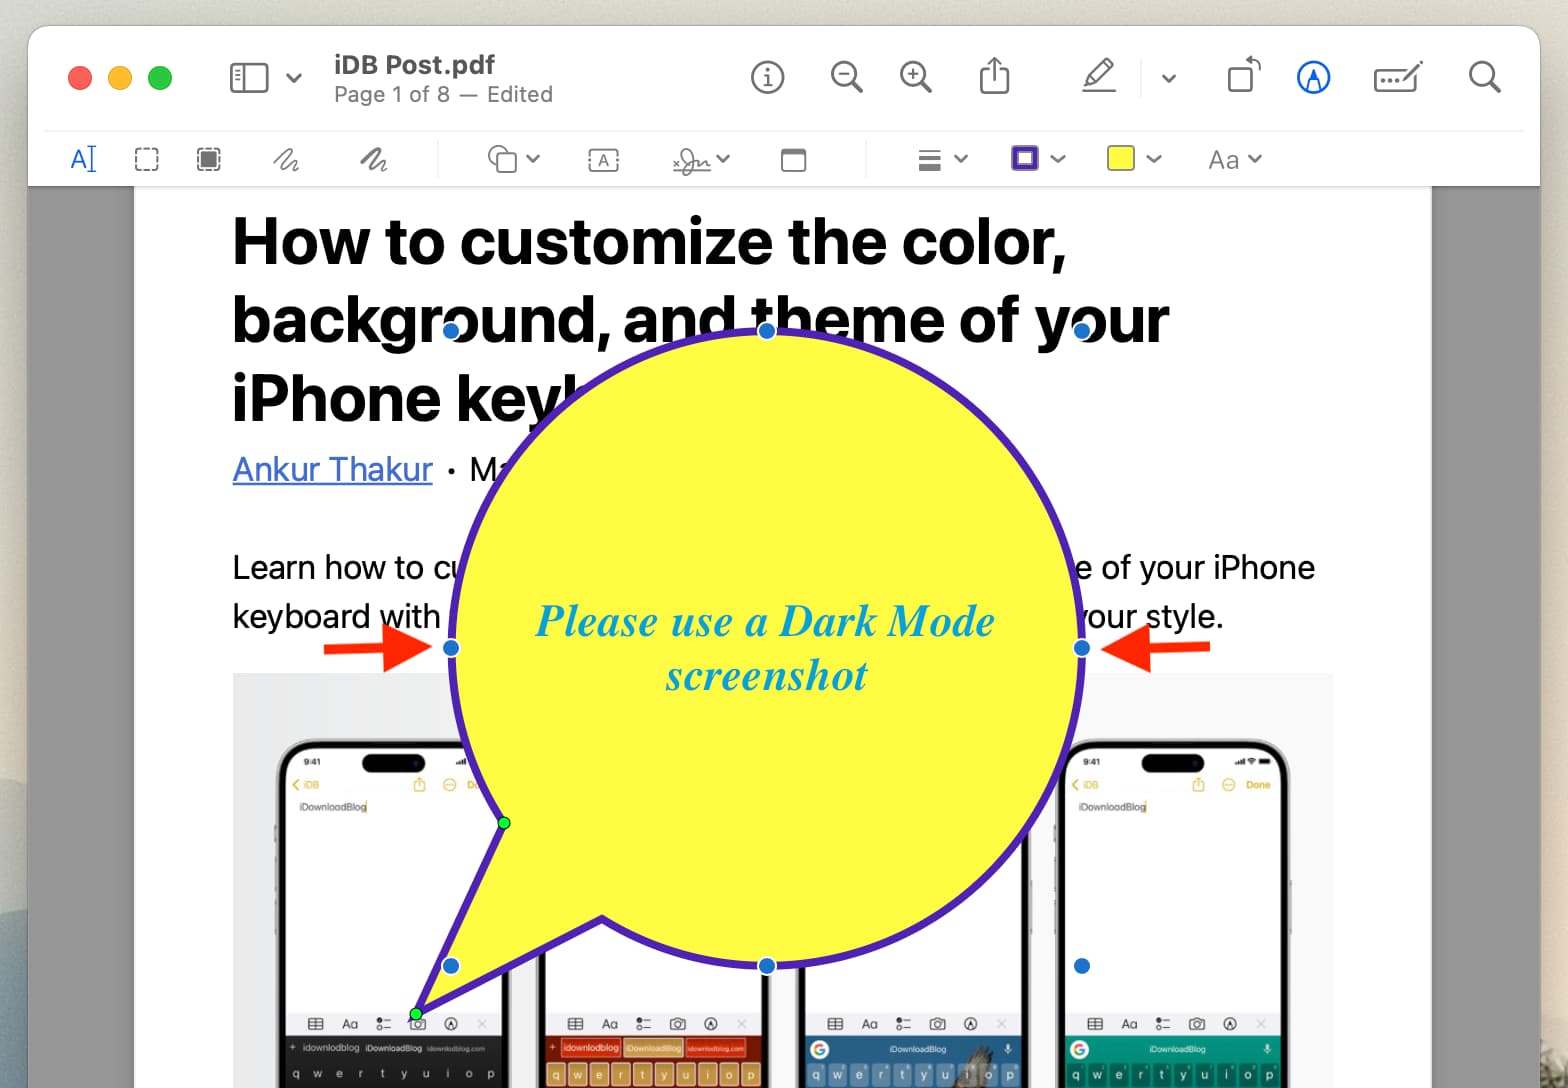
Customize the beak/arrow of the speech bubble
- Click once on the speech bubble to select it.
- Now, put the mouse pointer over the green dot that’s on the fatter side of the arrow and drag it to make the beak wider or narrower.
- Next, drag the other green dot to make the arrow longer or shorter, as well as change its position on the speech border. For example, if the arrow is on the left side, you can drag it to the right.
Add notes to PDF on iPhone
The Markup feature in iOS can be used to add a speech bubble (explained later in this post), but you can’t add notes using it. You will have to use a third-party app to do that.
1) Download and open the Highlights app on your iPhone or iPad.
2) Pick the PDF from the Files app interface.
3) Select text in the PDF, and it will show a thin menu strip. Tap the speech bubble icon.
4) Type the text you want to add.
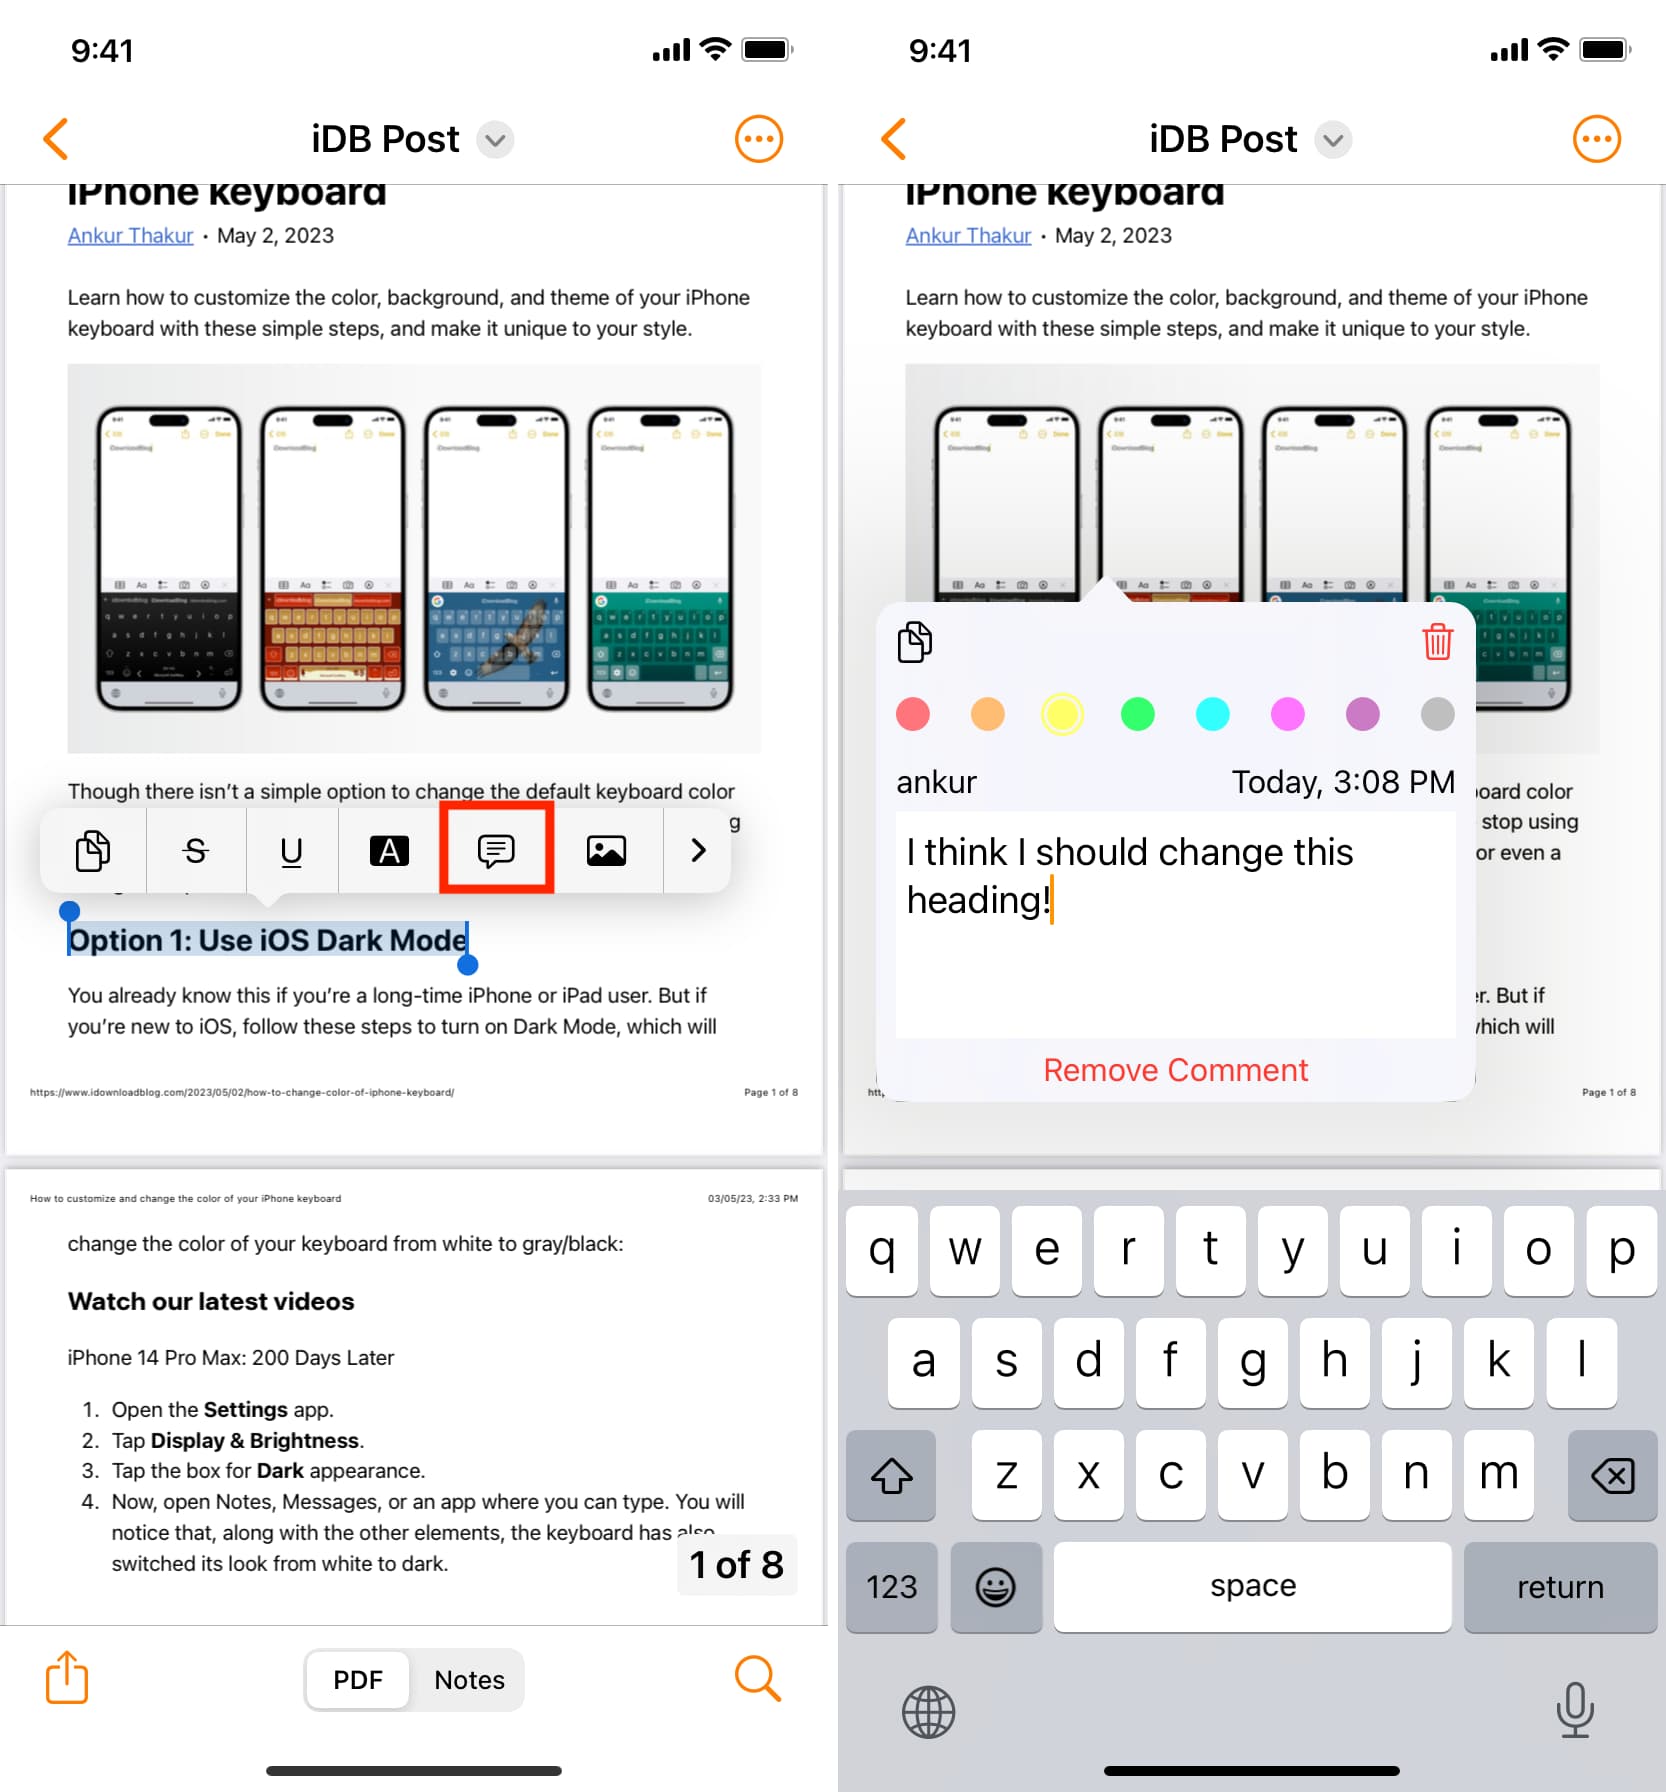
5) Once you finish, tap anywhere outside the note box.
6) To edit text, change color, or remove the note, tap the note icon on the PDF and make the necessary changes.
7) To save the PDF, tap the share icon > PDF (under the Share Document heading) > Save to Files > Save.
You can open this saved PDF inside the Highlights app and tap the note icon to see the added comment. You can also tap that PDF in the iOS Files app and tap the note icon, which should show the added comment (though it may not be as nice as the Highlights app).
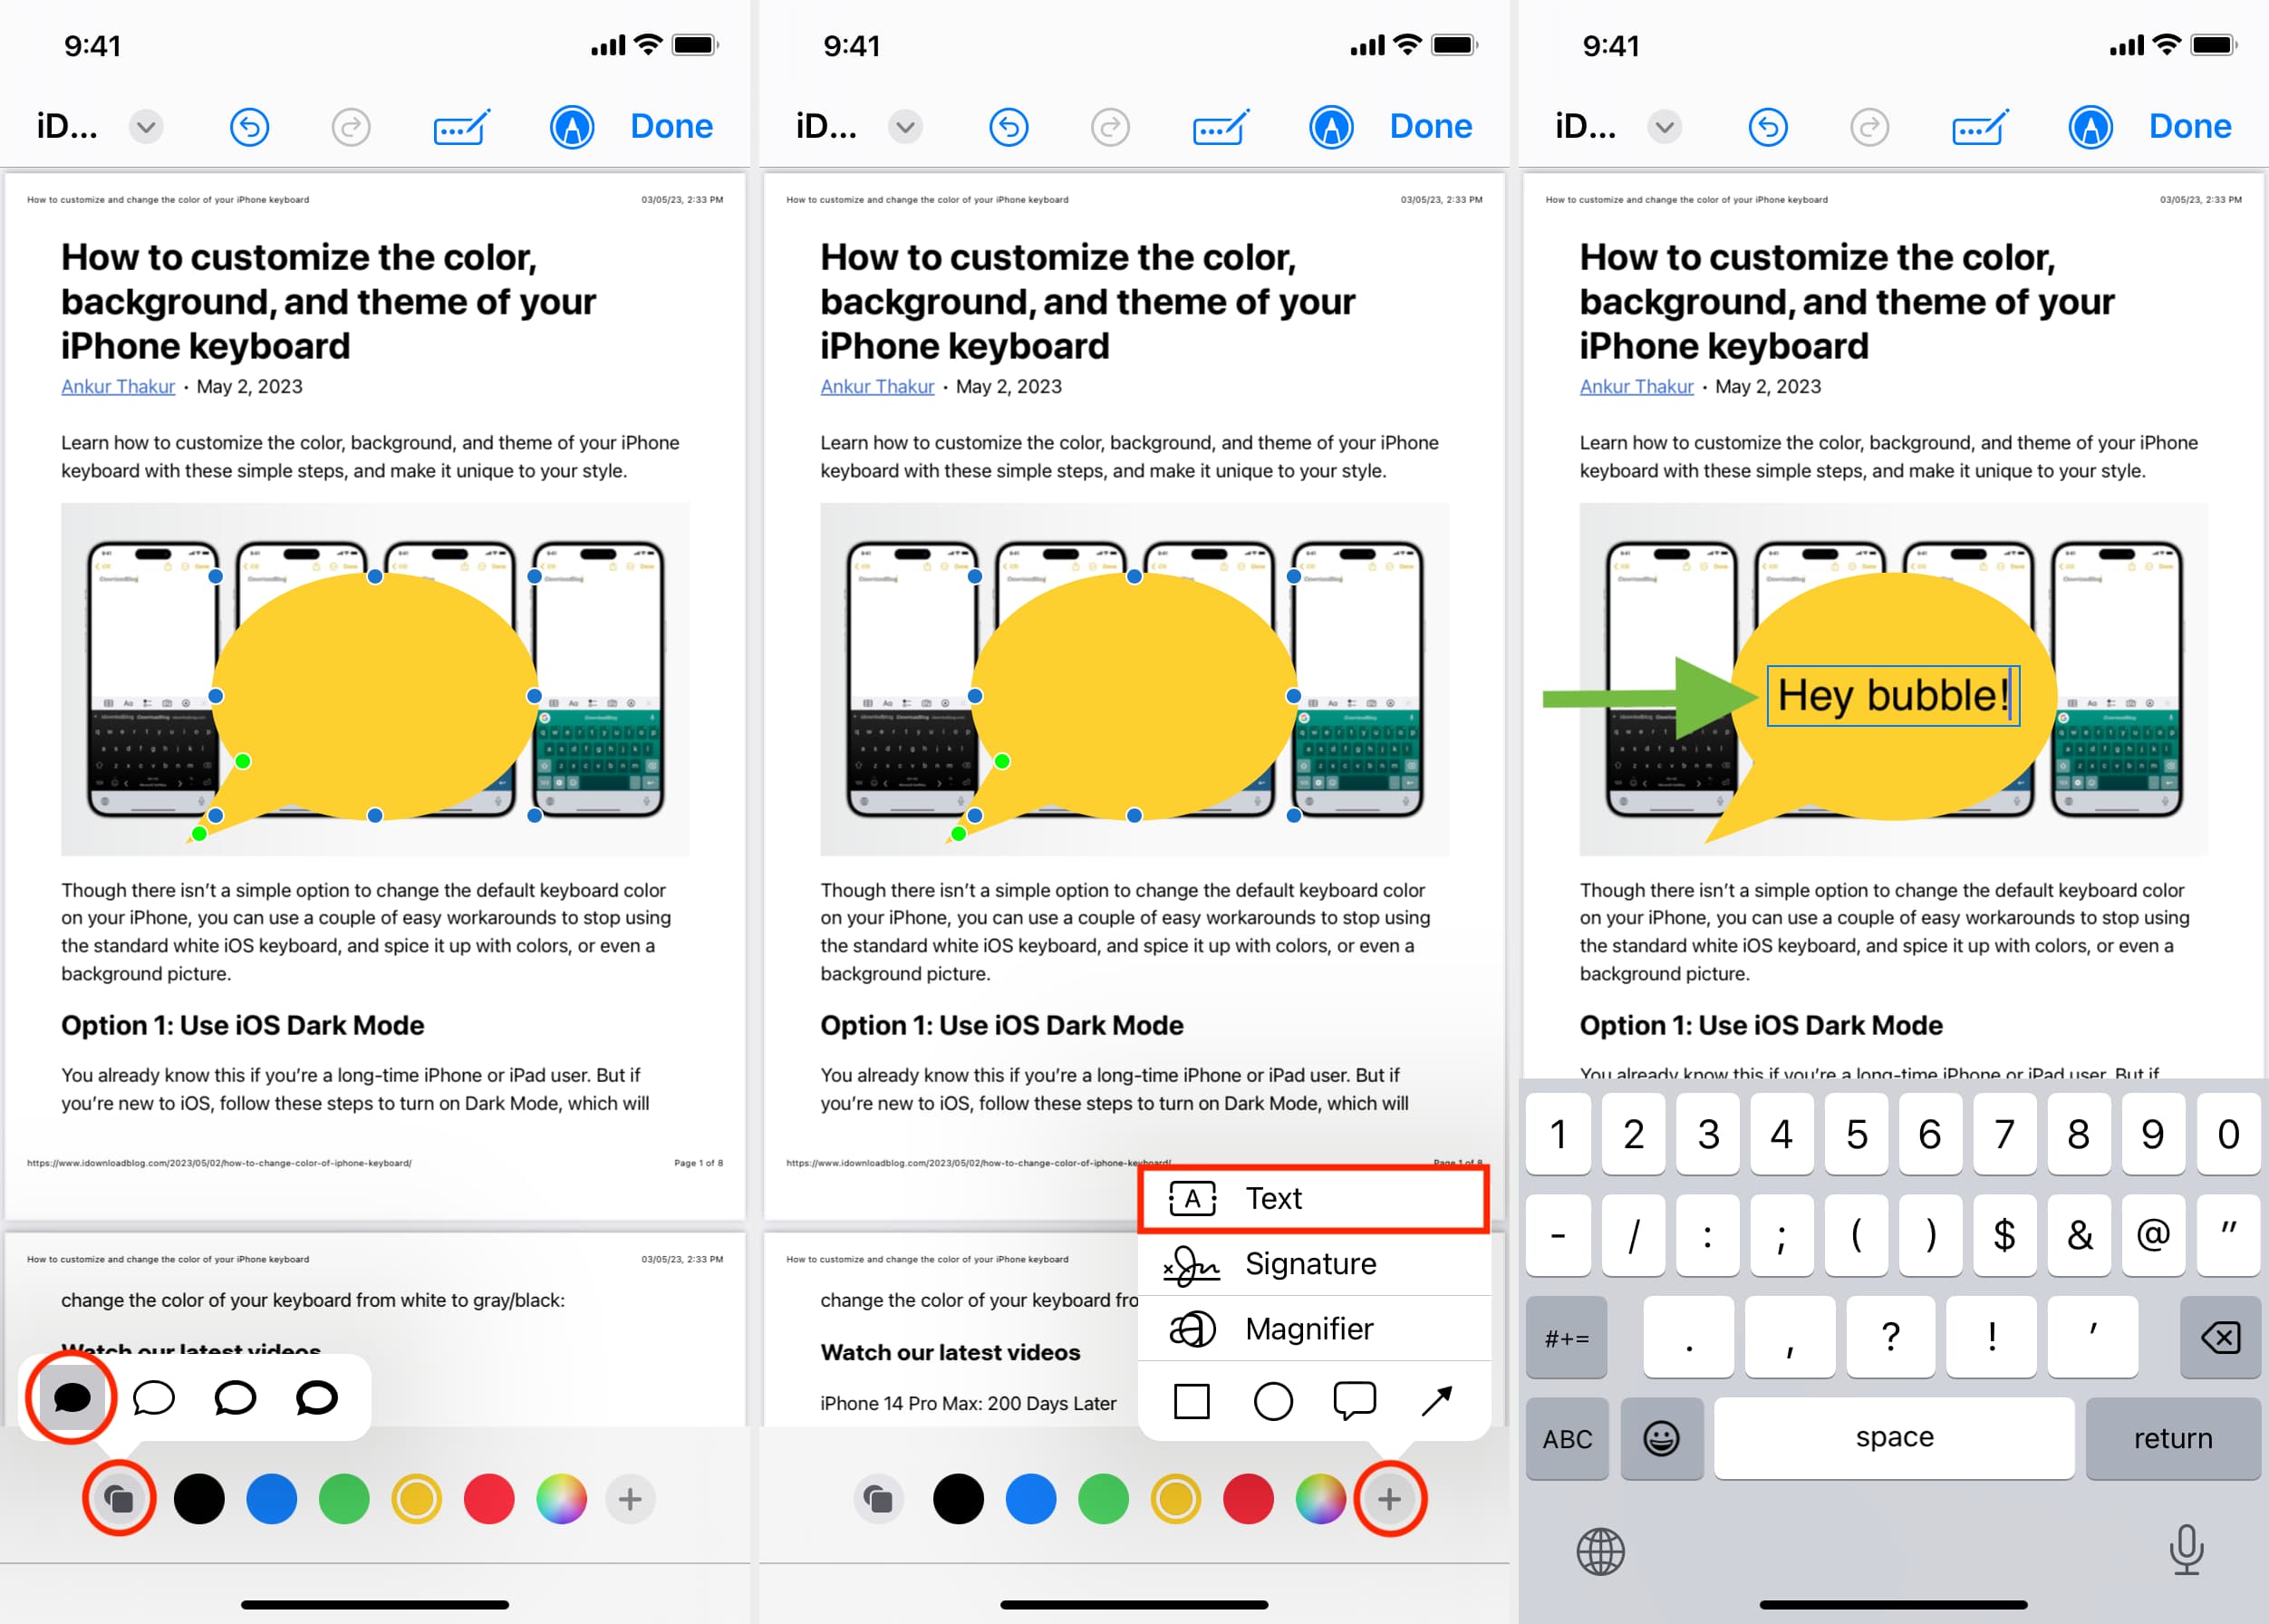
Add a speech bubble to PDFs on iPhone
1) Open the Apple Files app and tap a PDF to open it.
2) Tap the Markup button.
3) Tap the plus icon (+) and choose the Comment icon.
4) Next, tap the Fill Shape icon and pick the first option to make the bubble solid. You can also use the colored dots to change the bubble color.
5) Tap the plus icon (+) again and pick Text.
6) Drag the text inside the bubble and double-tap the word ‘Text‘ to replace it with anything else you want to say.
7) Finally, tap Done.
Check out next: