Learn how to make your iPhone, iPad, Mac, or Apple Watch join the faster Wi-Fi network and ignore the slower ones, so you get the best internet speeds.
You can easily forget a specific Wi-Fi network to stop your iPhone, iPad, or Mac from automatically connecting to it. But wouldn’t it be great if your devices could remember a specific Wi-Fi network without automatically hopping on it every time you’re nearby?
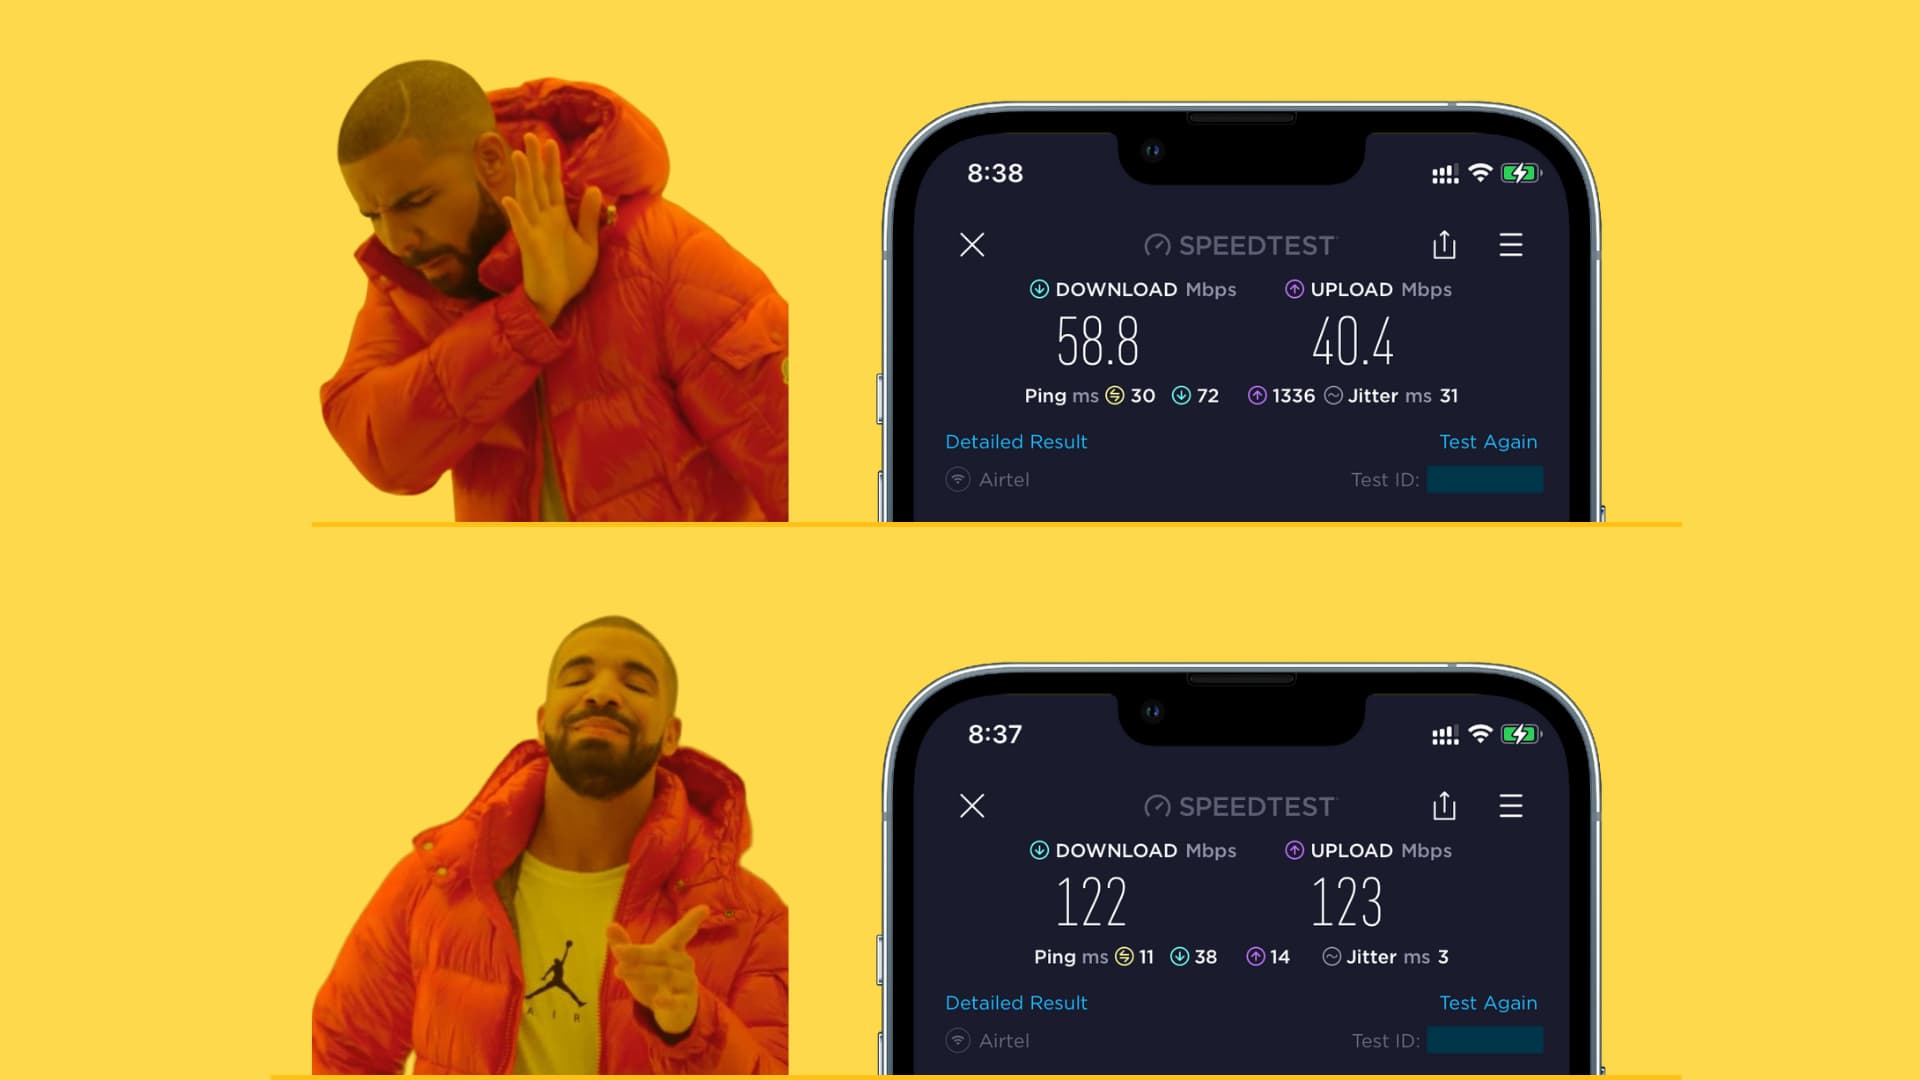
Backstory: I recently got a new internet connection and a dual-band router that works across the 2.4 GHz and 5 GHz frequency bands. As a result, I (and my devices) see two Wi-Fi networks: Ankur T and Ankur T_5G.”
2.4 GHz Wi-Fi uses longer waves for an extended range and better transmission. While slower than 5 GHz, the 2.4 GHz signal works through multiple obstructions like concrete walls. On the downside, many accessories, smart home appliances, garage doors, and the like only work on the 2.4 GHz band, contributing to congestion and connection drops.
5 GHz Wi-Fi, on the other hand, leverages shorter waves that have a smaller range and don’t penetrate walls as efficiently as 2.4 GHz. But as far as speeds go, 5 GHz Wi-Fi is far superior to its 2.4 GHz counterpart. And because many (cheaper and older) accessories don’t support the 5 GHz band at all, your 2.4 GHz Wi-Fi will be less congested and have much less frequent connection drops.
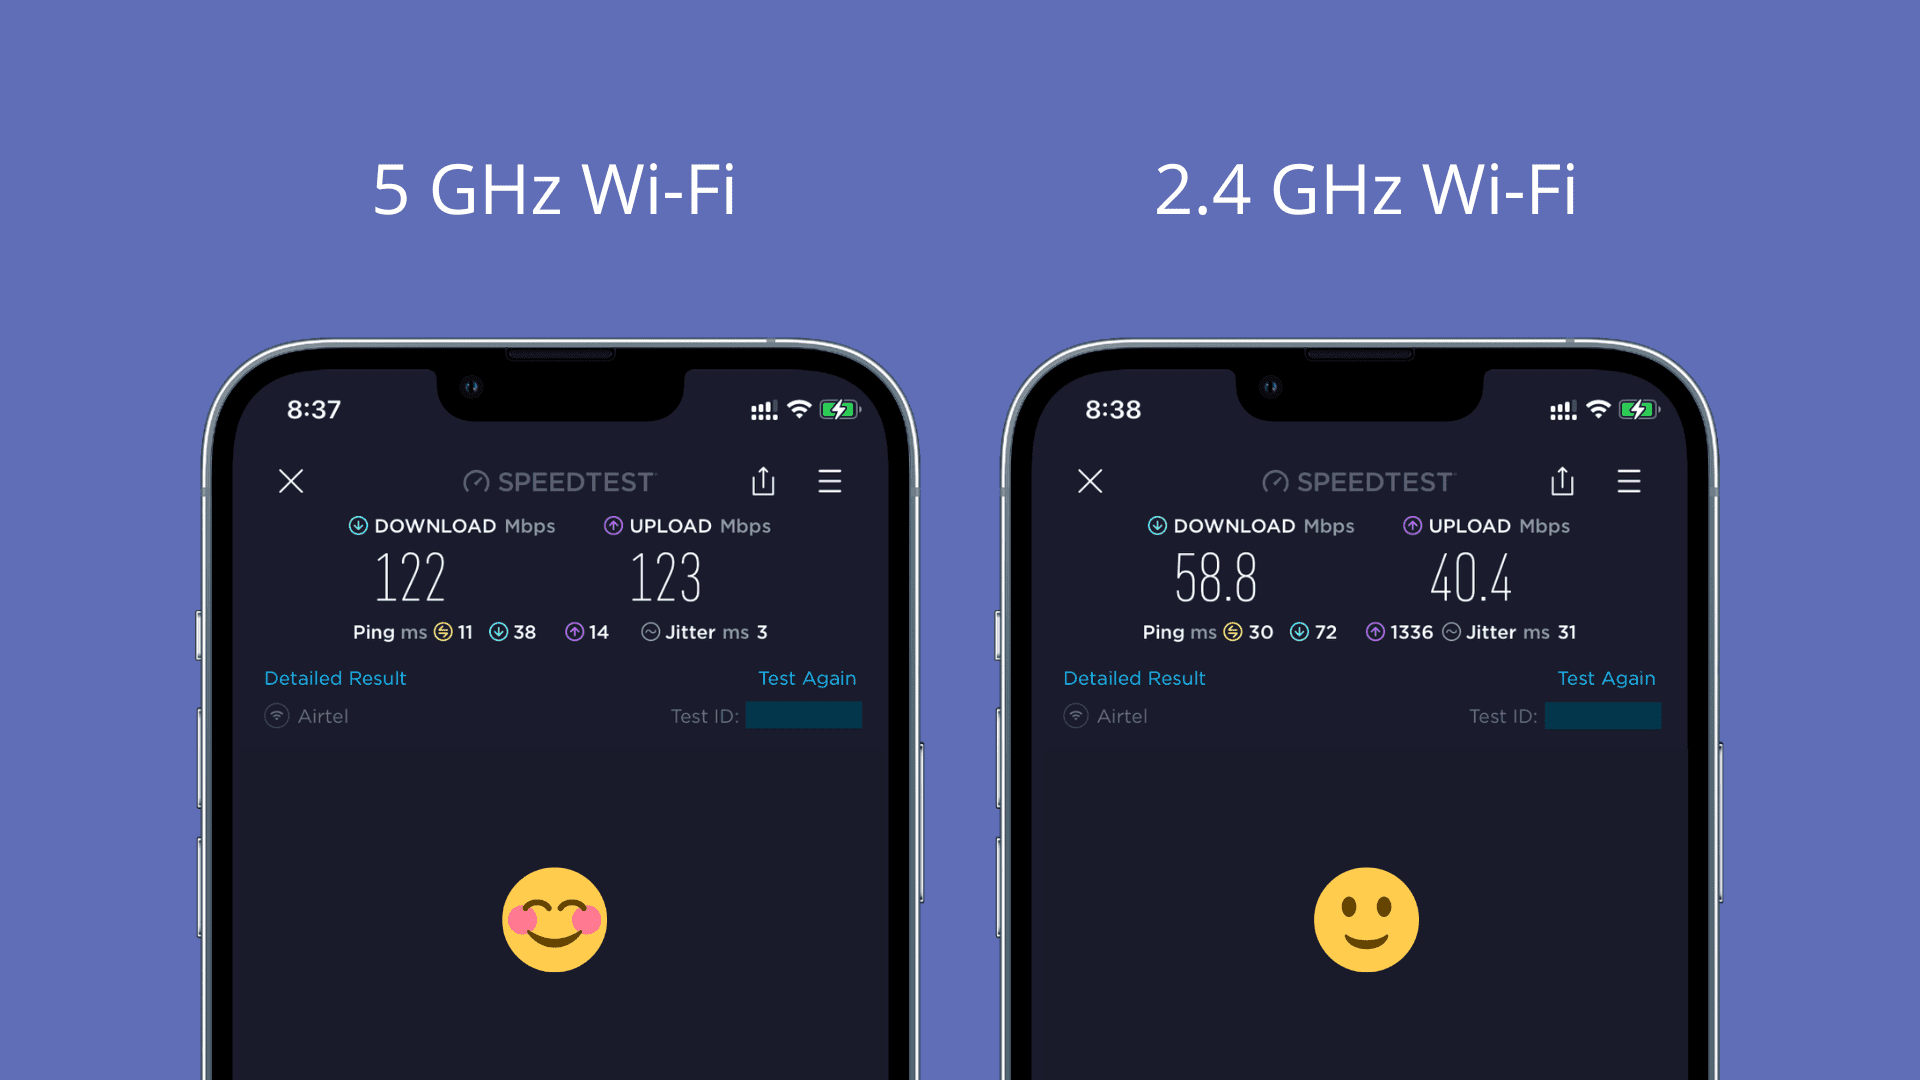
Download and upload speeds of my 5 GHz Wi-Fi are at least two times faster than the 2.4 GHz Wi-Fi, as evidenced by my SpeedTest results shared below. And since it’s a small apartment, I don’t have to worry about range. Thus, I want my iPhone and Mac to always connect to the 5 GHz band and ignore the other.
If you don’t want to manually switch to 5 GHz Wi-Fi every time your Apple device reboots or your router restarts after a power outage, the steps below will fix this forever!
Auto-join a better Wi-Fi network over another
Follow the steps below to set your iPhone, iPad, Mac, and Apple Watch to automatically prefer a faster Wi-Fi network over a slower one.
On iPhone and iPad
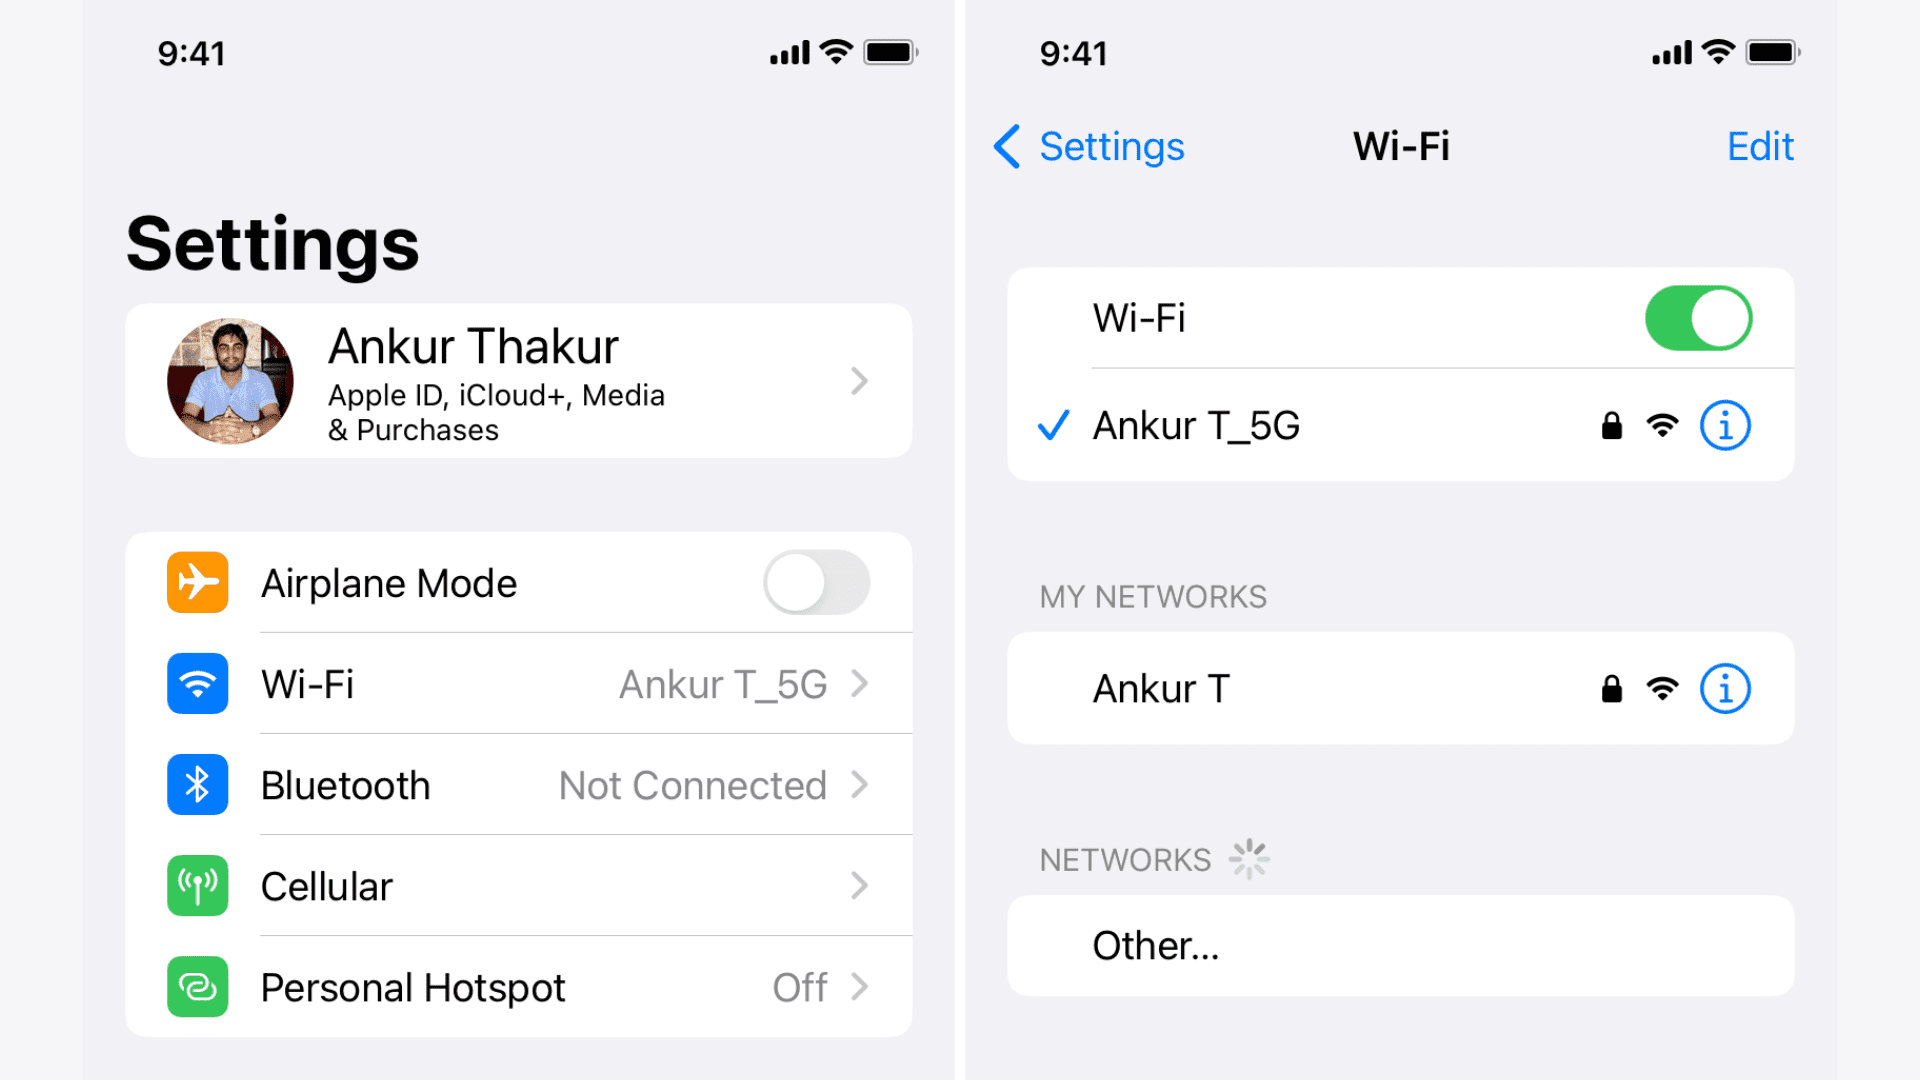
1) Open the Settings app and tap Wi-Fi.
2) Tap the info button ⓘ next to the name of the slower Wi-Fi network, then turn off the Auto-Join switch on the next screen.
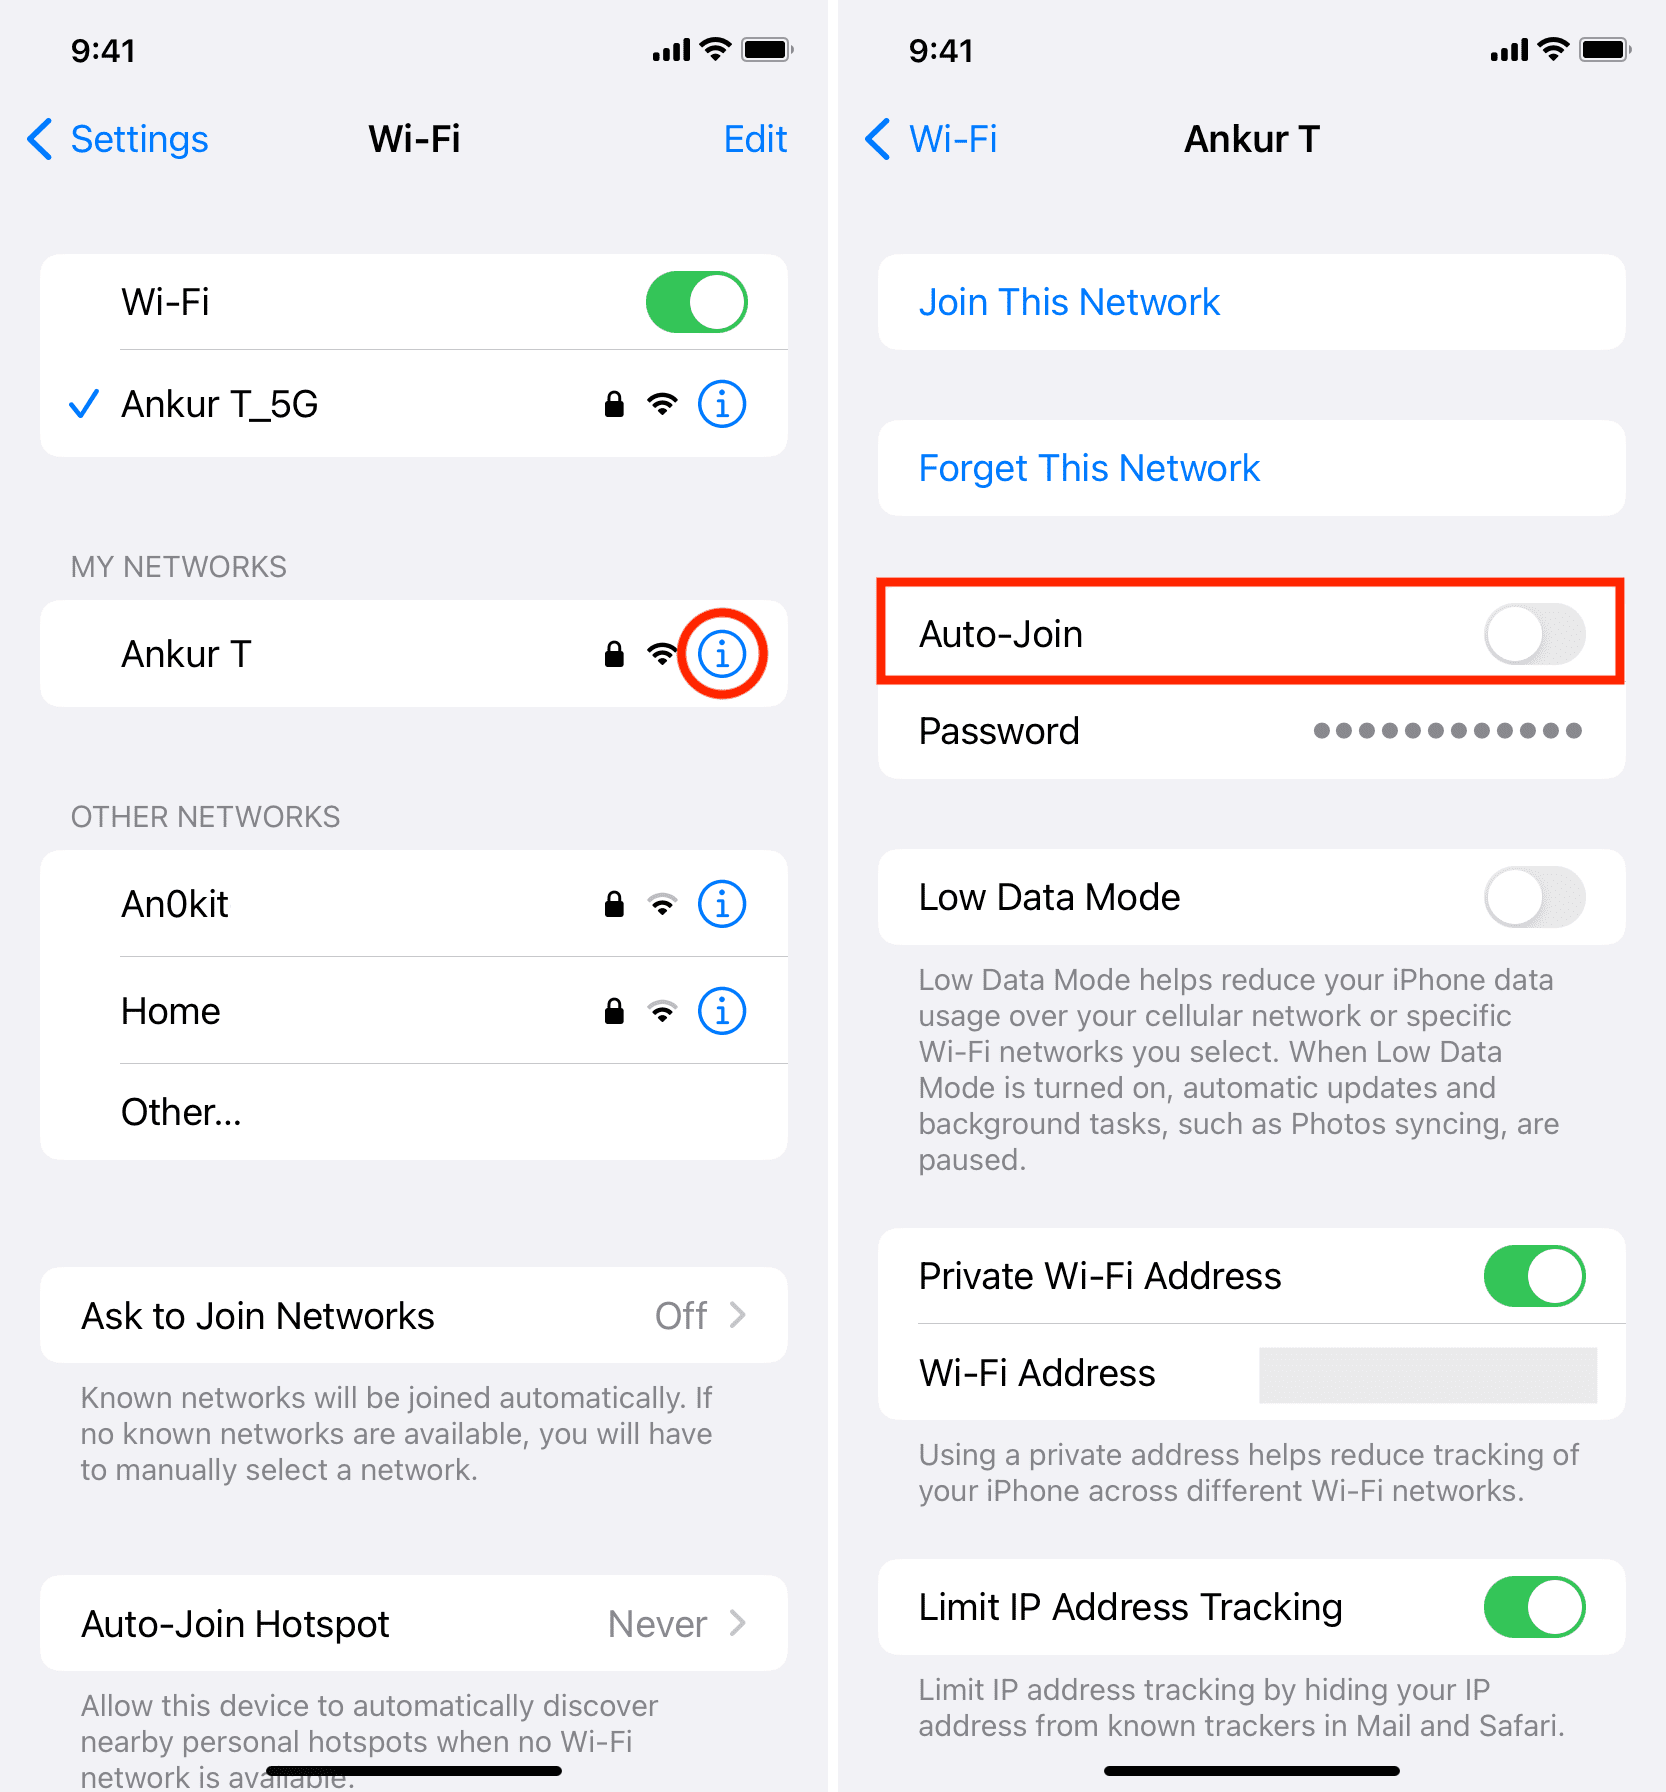
3) Go back to the previous screen and tap the info button ⓘ next to the name of the faster Wi-Fi network, then make sure Auto-Join is enabled.
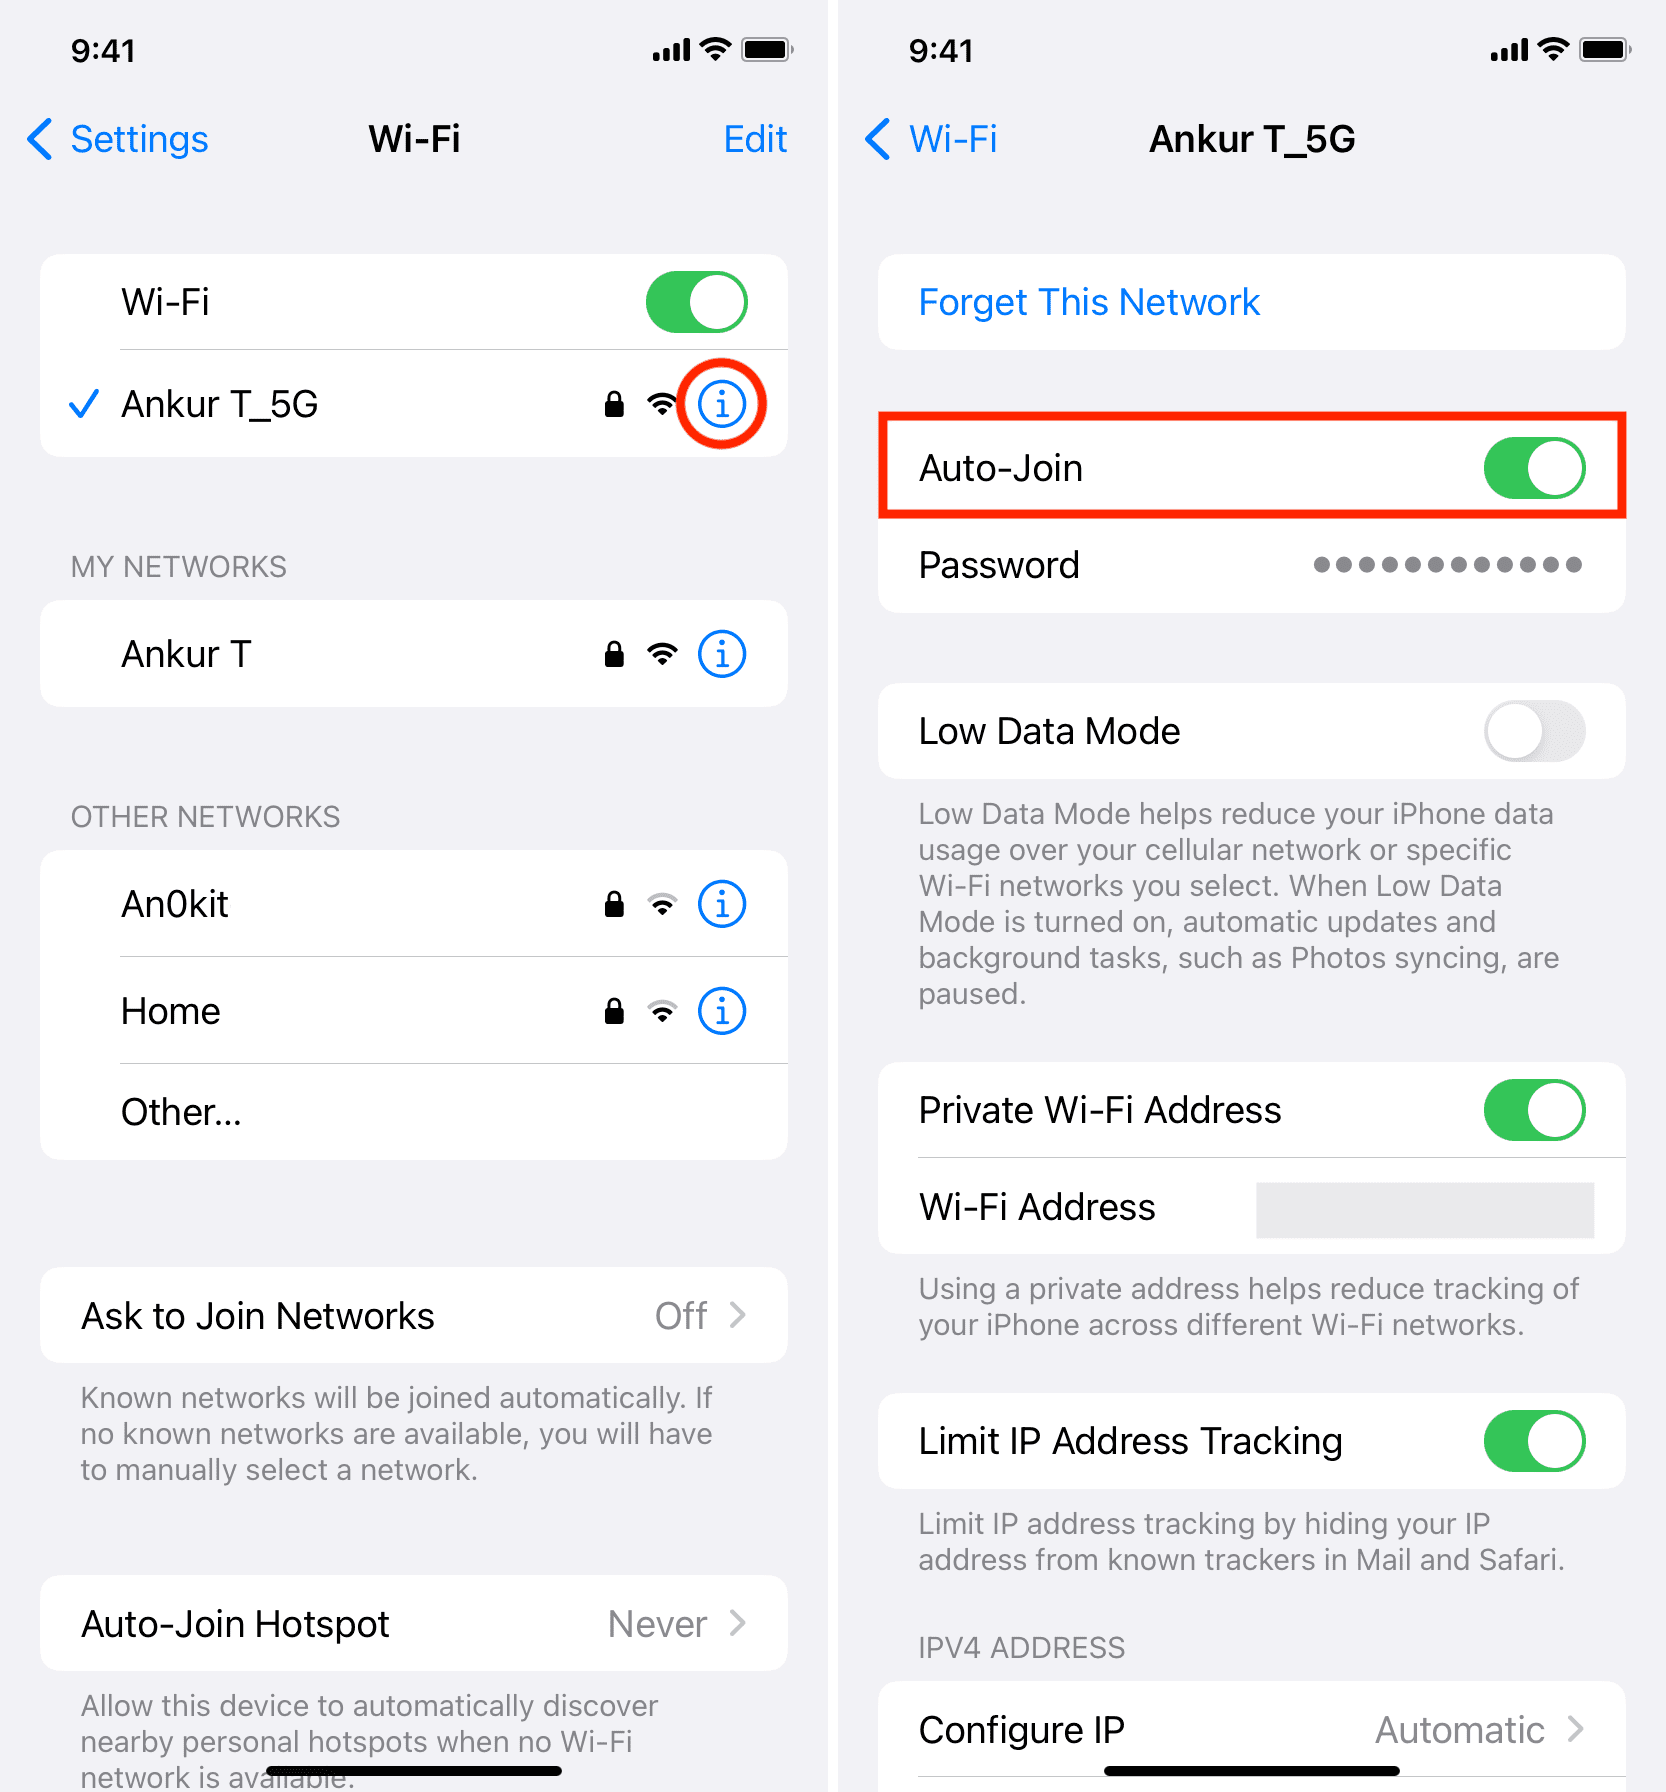
Going forward, your iPhone will always automatically join the faster Wi-Fi whenever you’re near these networks. Goodbye, slow speeds and connection drops!
And if the faster Wi-Fi is currently unavailable, just tap the other network name in Settings > Wi-Fi or Control Center to join it without having to type the password.
Mac
1) Open System Settings and select Wi-Fi.
2) Click the three-dotted button next to the name of the slower network and uncheck Auto-Join from the menu. You can also choose the Network Settings option and then turn off the switch next to “Automatically join this network.”
3) Now open network details for the faster network by clicking the Details button or the three-dotted menu, and make sure your Mac is set to automatically join this network.

On older macOS versions, go to System Preferences > Network > Wi-Fi > Advanced and untick the Auto-Join box next to the inferior Wi-Fi network. After that, make sure the superior network has its Auto-Join option enabled, then click OK, followed by Apply.
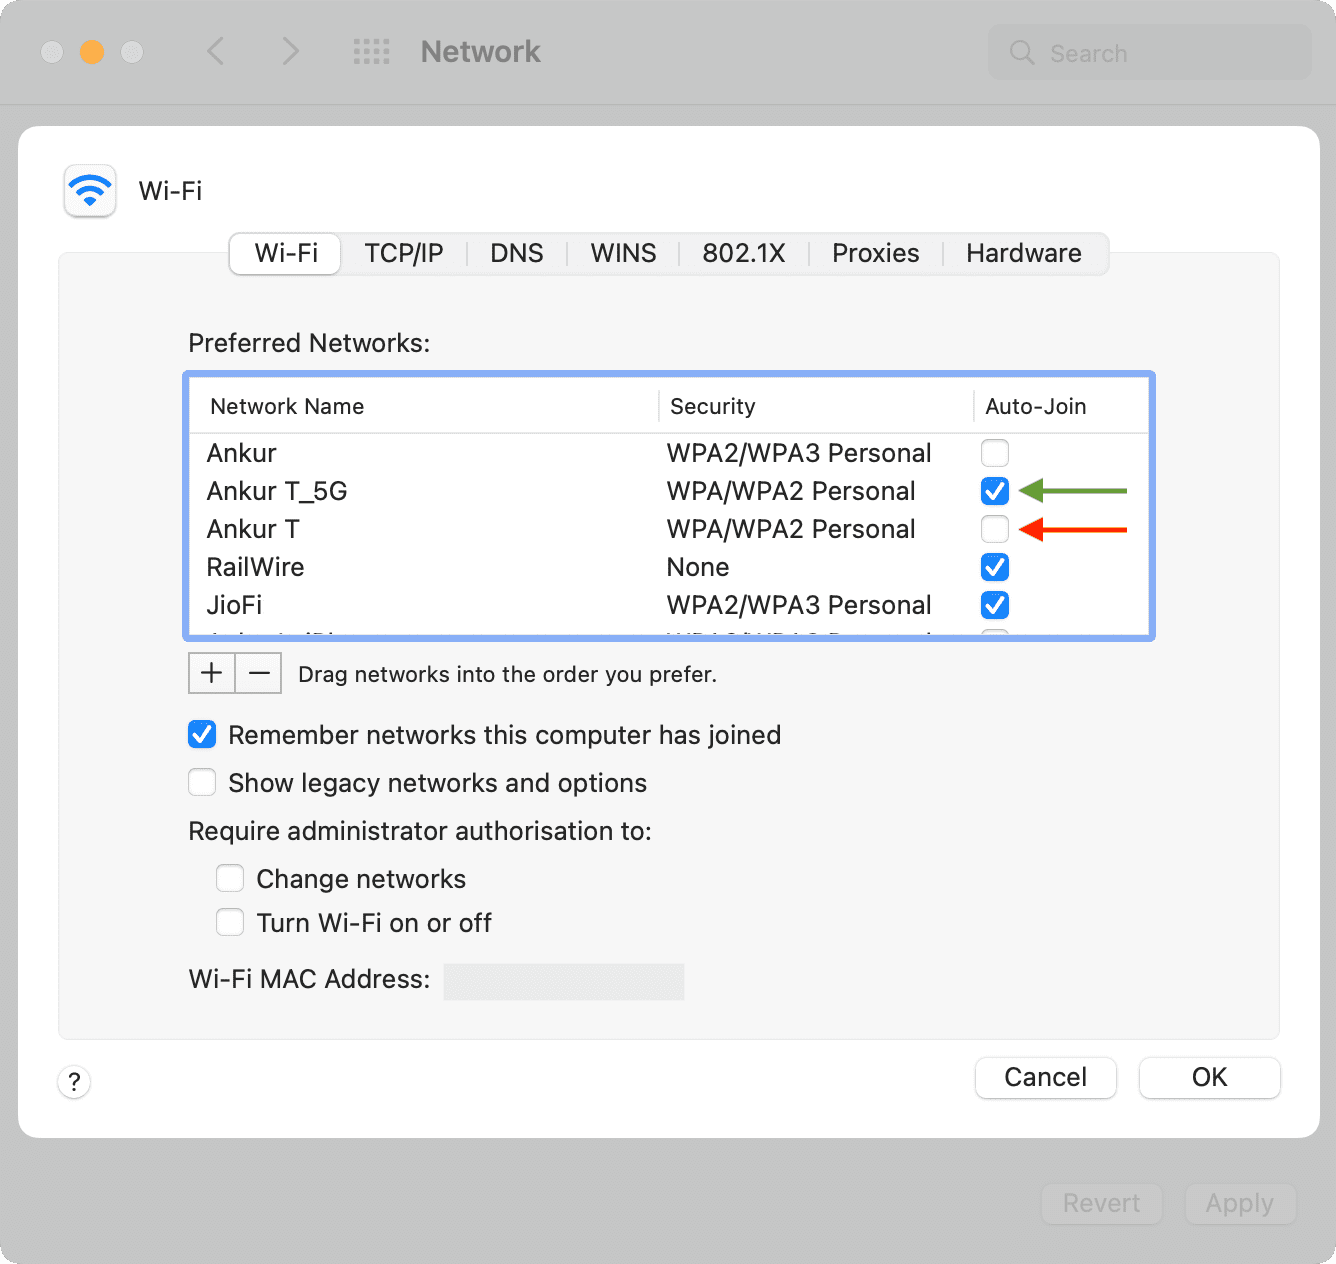
Tip: You can prioritize networks by dragging. Simply drag the Wi-Fi network you want to give the highest priority to at the top of the list. Your Mac will always prefer this network and try to join it first before trying to connect to the next one, and so on.
Apple Watch
Apple Watch Series 6 and newer and all Apple Watch Ultra models support both 2.4 GHz and 5 GHz bands. Older models like Apple Watch Series 5 and earlier, and Apple Watch SE (all models) can only connect to 2.4 GHz Wi-Fi. Follow these steps to set your Apple Watch to prefer a specific Wi-Fi network.
1) Open the Settings app on your Apple Watch and tap Wi-Fi.
2) Tap the name of the Wi-Fi network that you don’t want to join automatically, and be sure to turn off the Auto-Join setting.
3) Now go back and tap the name of your preferred Wi-Fi network and make sure the Auto-Join switch is turned on.
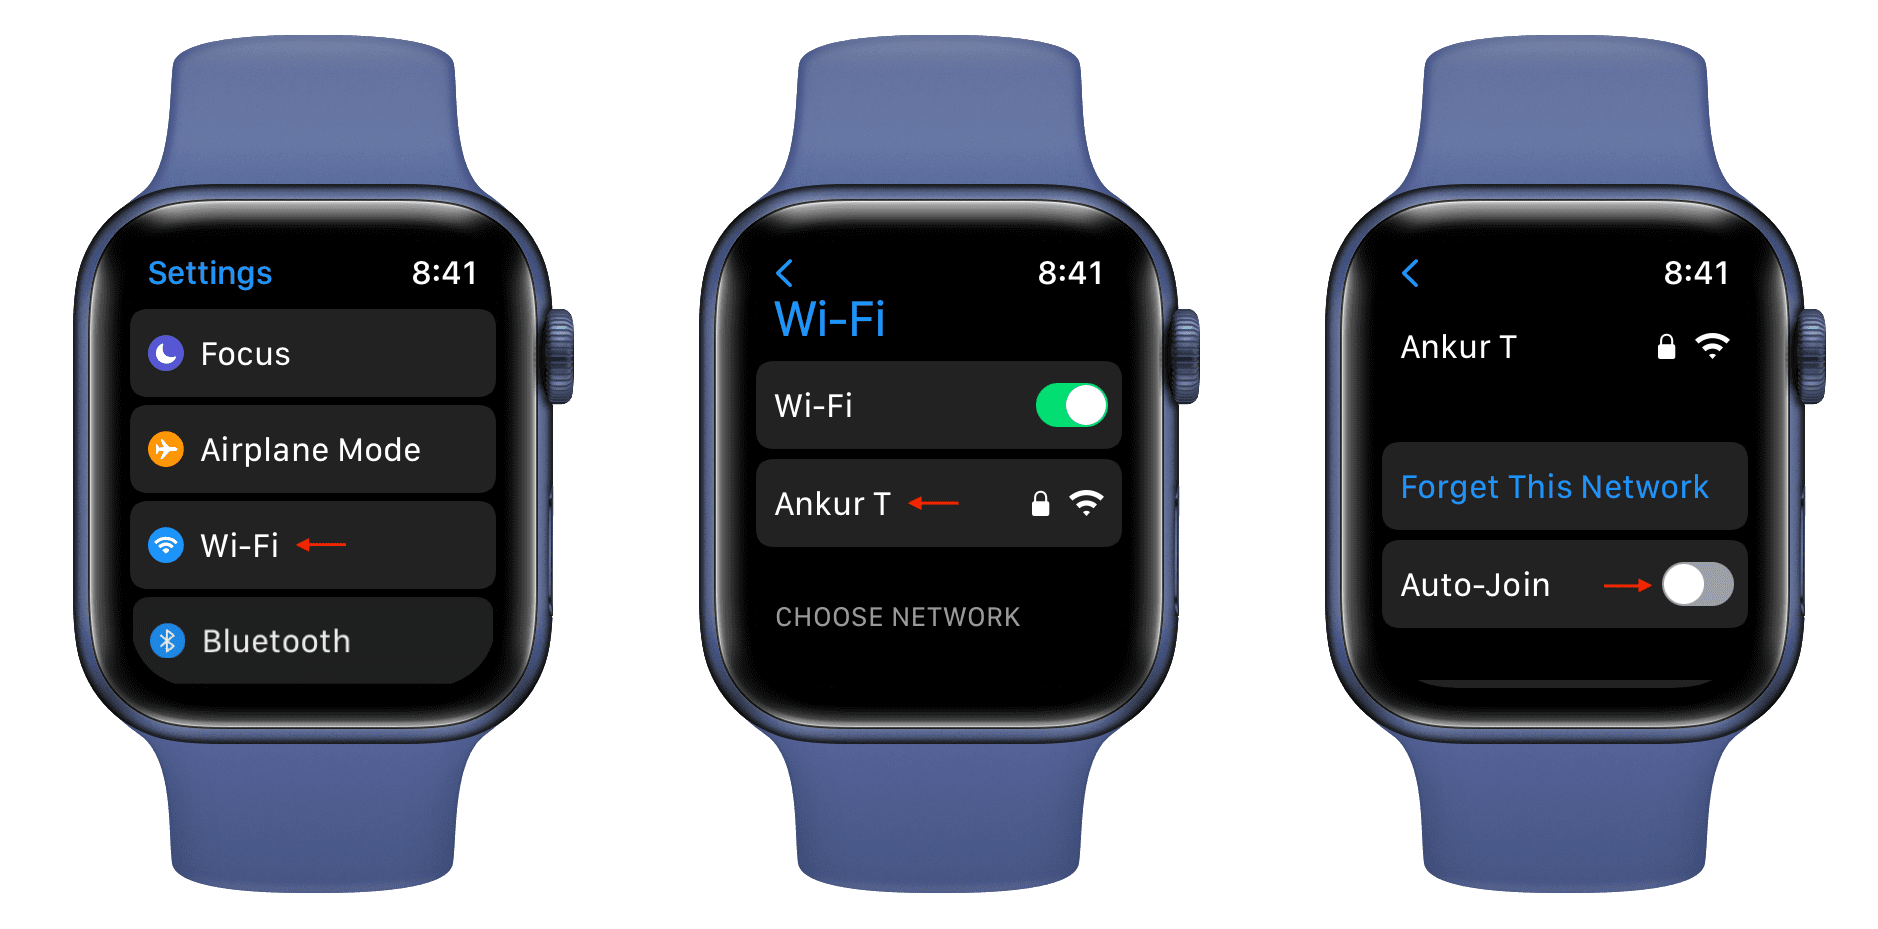
From now on, your Apple Watch will automatically connect to this Wi-Fi network and ignore the poorer one.
Wi-Fi auto-join preferences
This is how you can set your iPhone, iPad, Apple Watch, or Mac to prefer a faster Wi-Fi network over slower ones. You can also use the steps in this tutorial to ensure that your iPhone always connects to the same network as smart appliances, like smart bulbs.
We taught you how to prefer one Wi-Fi over the other when you have two saved networks. If your house, school, dorm, office, coffee place, or another frequently visited area is blanketed by several Wi-Fi networks, following the same steps will ensure only the fastest Wi-Fi has the Auto-Join setting turned on.
I should remind you once again that turning off the Auto-Join setting for a known Wi-Fi doesn’t remove its saved password. This is by design, so that you can manually connect to this network in the future without entering the password.
On a related note: