With just a few adjustments, you can have your Mac announce alerts and speak text. Spoken alerts are super handy for grabbing your attention when you’re hard at work, and spoken text can help you spot errors or get pronunciations.
You may not have a reason to browse through the accessibility features on your Mac, but this means you’re missing out on some great features that can be helpful to anyone.
A few of these useful features are in the Speech area of the accessibility settings. If you want to give these accessibility features a try, here’s how to have your Mac announce alerts and speak text.
Enable and customize Spoken Content accessibility settings
- Open System Settings on your Mac.
- Select Accessibility.
- Click Read & Speak or Spoken Content.

Note: On older versions of macOS, go to System Preferences > Accessibility and select Speech from the left sidebar.
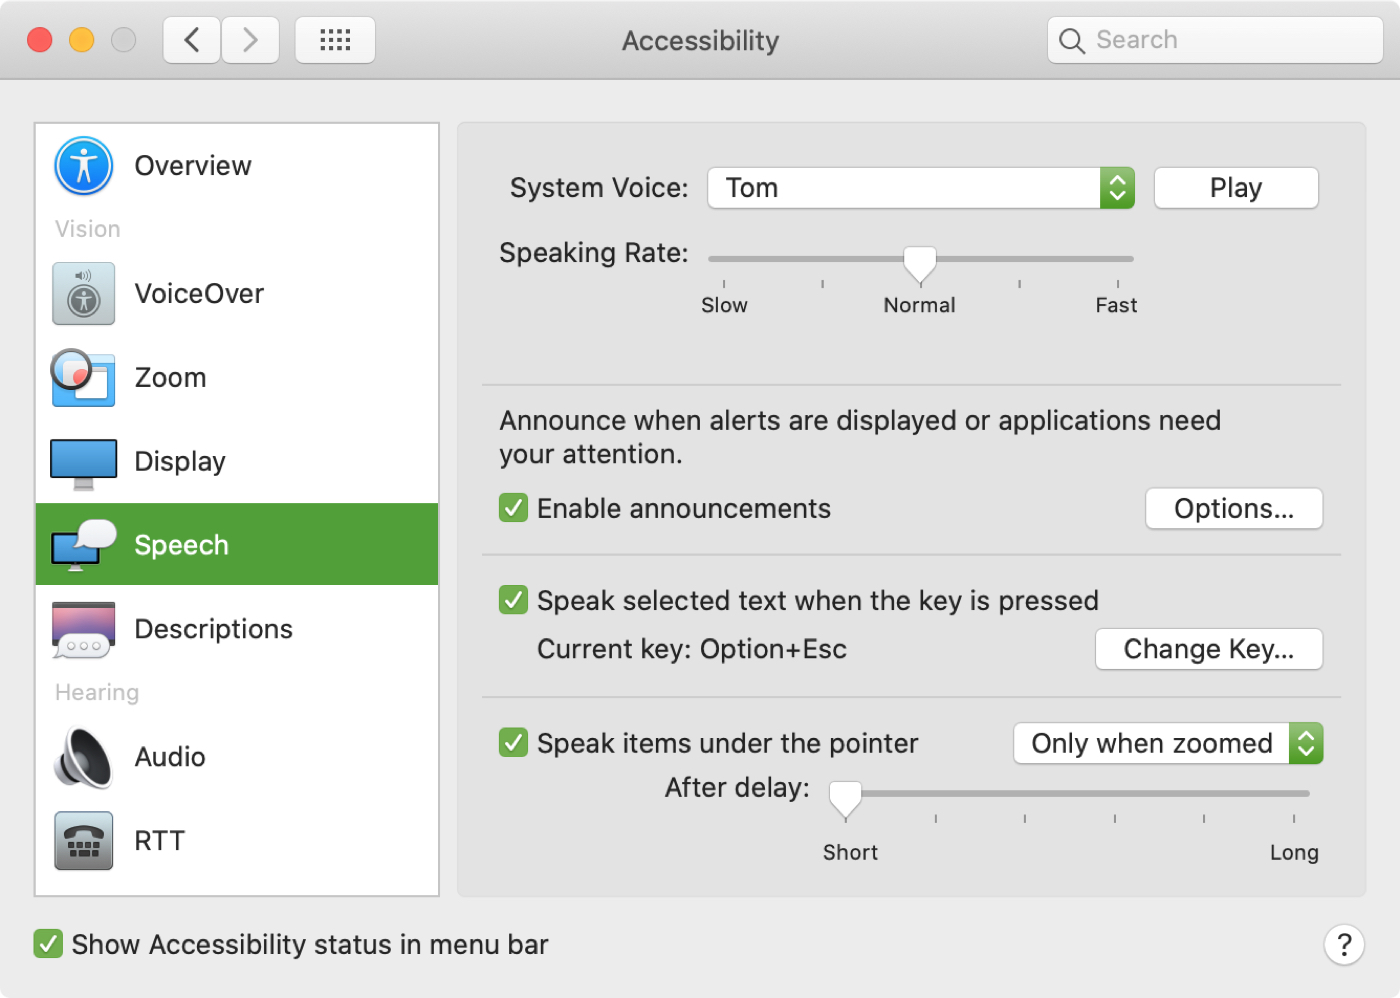
Here’s what you can do after you’re inside the Read & Speak (or Spoken Content or Speech) screen of System Settings.
1. Speak announcements
Whether an alert from apps like Mail or Calendar or from a service or app that needs your attention, turn on this feature by enabling the Speak announcements switch.

You can click the info icon ⓘ next to the Speak announcement switch and customize the following:
- Voice: Select the voice you want to hear. You can also choose your own Personal Voice.
- Phrase: Select the phrase you want to hear preceding the announcement. You can also choose to hear the application name or a different phrase each time. To customize the phrase list, click Edit Phrase List. You can then click the plus button (+) to add phrases like your name or something fun. You can also remove phrases you don’t want to use at all by selecting one and hitting the minus button (-).
- Delay: Select the number of seconds you want the system to wait before announcing the alert.

Click the Play Sample button to hear the voice and phrase you choose, and click OK when you’re done.
2. Speak selection
Another great feature to check out is having your Mac speak the text you select. Maybe you want to hear what you’re writing spoken out loud, or perhaps you just want to hear how something is pronounced. To do this, enable the switch for Speak selection.

By default, the key combination is Option + esc. If you prefer a different shortcut, click the info icon ⓘ next to Speak Selection, enter the new combination, and click OK. You can also customize other settings here.

To use this feature, select the text you want to hear by double-clicking a word or dragging through a phrase and hitting the keyboard shortcut (Option + esc keys). To hear an entire page out loud, click Control + A to select it all, and then use the key combination you’ve assigned.
3. Speak items under the pointer
One more handy way to hear the text spoken out loud is for items under your cursor. And to do this, enable the switch for Speak items under the pointer.

By default, your Mac will only speak those words under the cursor when your screen is zoomed (System Settings > Accessibility > Zoom). But you can click the info icon ⓘ and set Speak item under the pointer to Always. Now, when you move your pointer over any text on your Mac, you’ll hear it spoken out loud automatically.

This is a good alternative to the option above for speaking selected text if you are unable to read items on your screen.
4. Speak typing feedback
After you turn on Speak typing feedback, your Mac will speak all the characters you type.

By default, it speaks all single alphabets and numbers you type. But you can click the info icon ⓘ next to its name and turn off Echo characters to stop it from speaking each character you type. And if you enable Echo words, your Mac will not speak all characters, but only speak the full words that you type. Similarly, you can enable Echo selection changes and Echo modifier keys.

Adjust the System Voice
From this same System Settings window, you can choose a new System voice by clicking the drop-down box. The options here depend on the language you have selected in System speech language.

You can also click the info icon ⓘ next to System voice to adjust the speaking rate, speaking volume, etc. And click the triangle play button or the Play Sample button to hear how your Mac will sound.

Note: The voice for Speak announcements can be different from this System Voice. However, the Speaking Rate you choose will apply to both.
Hopefully, these useful accessibility features on your Mac will be something you check out. From personal experience, the Enable announcements feature is really helpful. Are you going to give one or all of these a try?
Also, check out: