iOS 15.3 helps resolve iCloud Private Relay error messages by no longer blaming cell carriers when the feature gets inadvertently turned off due to a network issue.
- Updated wording in iOS 15.3 clarifies iCloud Private Relay error messages
- It now explains why Private Relay is disabled for a cellular plan
- In iOS 15.2, the message placed all the blame on cell carriers
iOS 15.3: How to fix iCloud Private Relay error messages
The second beta of iOS 15.3 comes with an updated message that the user sees when iCloud Private Relay is turned off for a cellular plan. Updated wording now explains why the feature may be inadvertently switched off, suggesting possible fixes instead of putting the blame for the issue squarely on the shoulders of wireless carriers like iOS 15.2.
As first spotted by MacRumors, the updated message on iOS 15.3 now makes it much clearer when iCloud Private Relay is disabled due to a network error rather than go suggest that the feature isn’t working because of a lack of carrier support.
iCloud Private Relay error message on iOS 15.2
Private Relay is turned off for your cellular plan. Your cellular plan doesn’t support iCloud Private Relay. With iCloud Private Relay turned off, this network can monitor your internet activity, and your IP address is not hidden from known trackers or websites.
iCloud Private Relay error message on iOS 15.3
Private Relay is turned off for your cellular plan. Private Relay is either not supported by your cellular plan or has been turned off in Cellular Settings. With Private Relay turned off, this network can monitor your internet activity, and your IP address is not hidden from known trackers or websites.
To help resolve any iCloud Private Relay error messages you may encounter, an updated support document on Apple’s website provides possible fixes for when iCloud Private Relay is not working. It also clarifies that iCloud Private Relay may be unavailable when the “Limit IP Address Tracking” toggle for specific Wi-Fi or cellular networks is turned off.
iCloud Private Relay: Carriers vs. Apple
This is in response to confusion with iCloud Private Relay on iOS 15.2 that some iPhone owners have faced trying to get the feature working on cellular networks. At first, T-Mobile blamed Apple’s update for the bug, suggesting it toggled off iCloud Private Relay for cellular data by accident. Read: How to use private Wi-Fi addresses on Apple devices
But soon after, Apple, T-Mobile, Verizon and AT&T said that iOS 15.2 didn’t switch off iCloud Private Relay, nor did the carriers disable the feature on their end. And now iOS 15.3’s updated wording no longer suggests that the user should always blame their cell carrier if iCloud Private Relay cannot be enabled for their cellular connection.
It’s important to remember that T-Mobile customers who use the carrier’s own parental controls and other content filtering features cannot use iCloud Private Relay. This is by design: Your carrier must see your network traffic to filter it.
T-Mobile clarifies:
Customers who chose plans and features with content filtering (e.g. parent controls) do not have access to the iCloud Private Relay to allow these services to work as designed. All other customers have no restrictions.
Keep in mind that iCloud Private Relay is currently in beta.
How to use iCloud Private Relay
You can use iCloud Private Relay on your iPhone, iPad or iPod touch with iOS 15.0 or later. On the Mac computers, iCloud Private Relay requires macOS Monterey 12.0 or later.
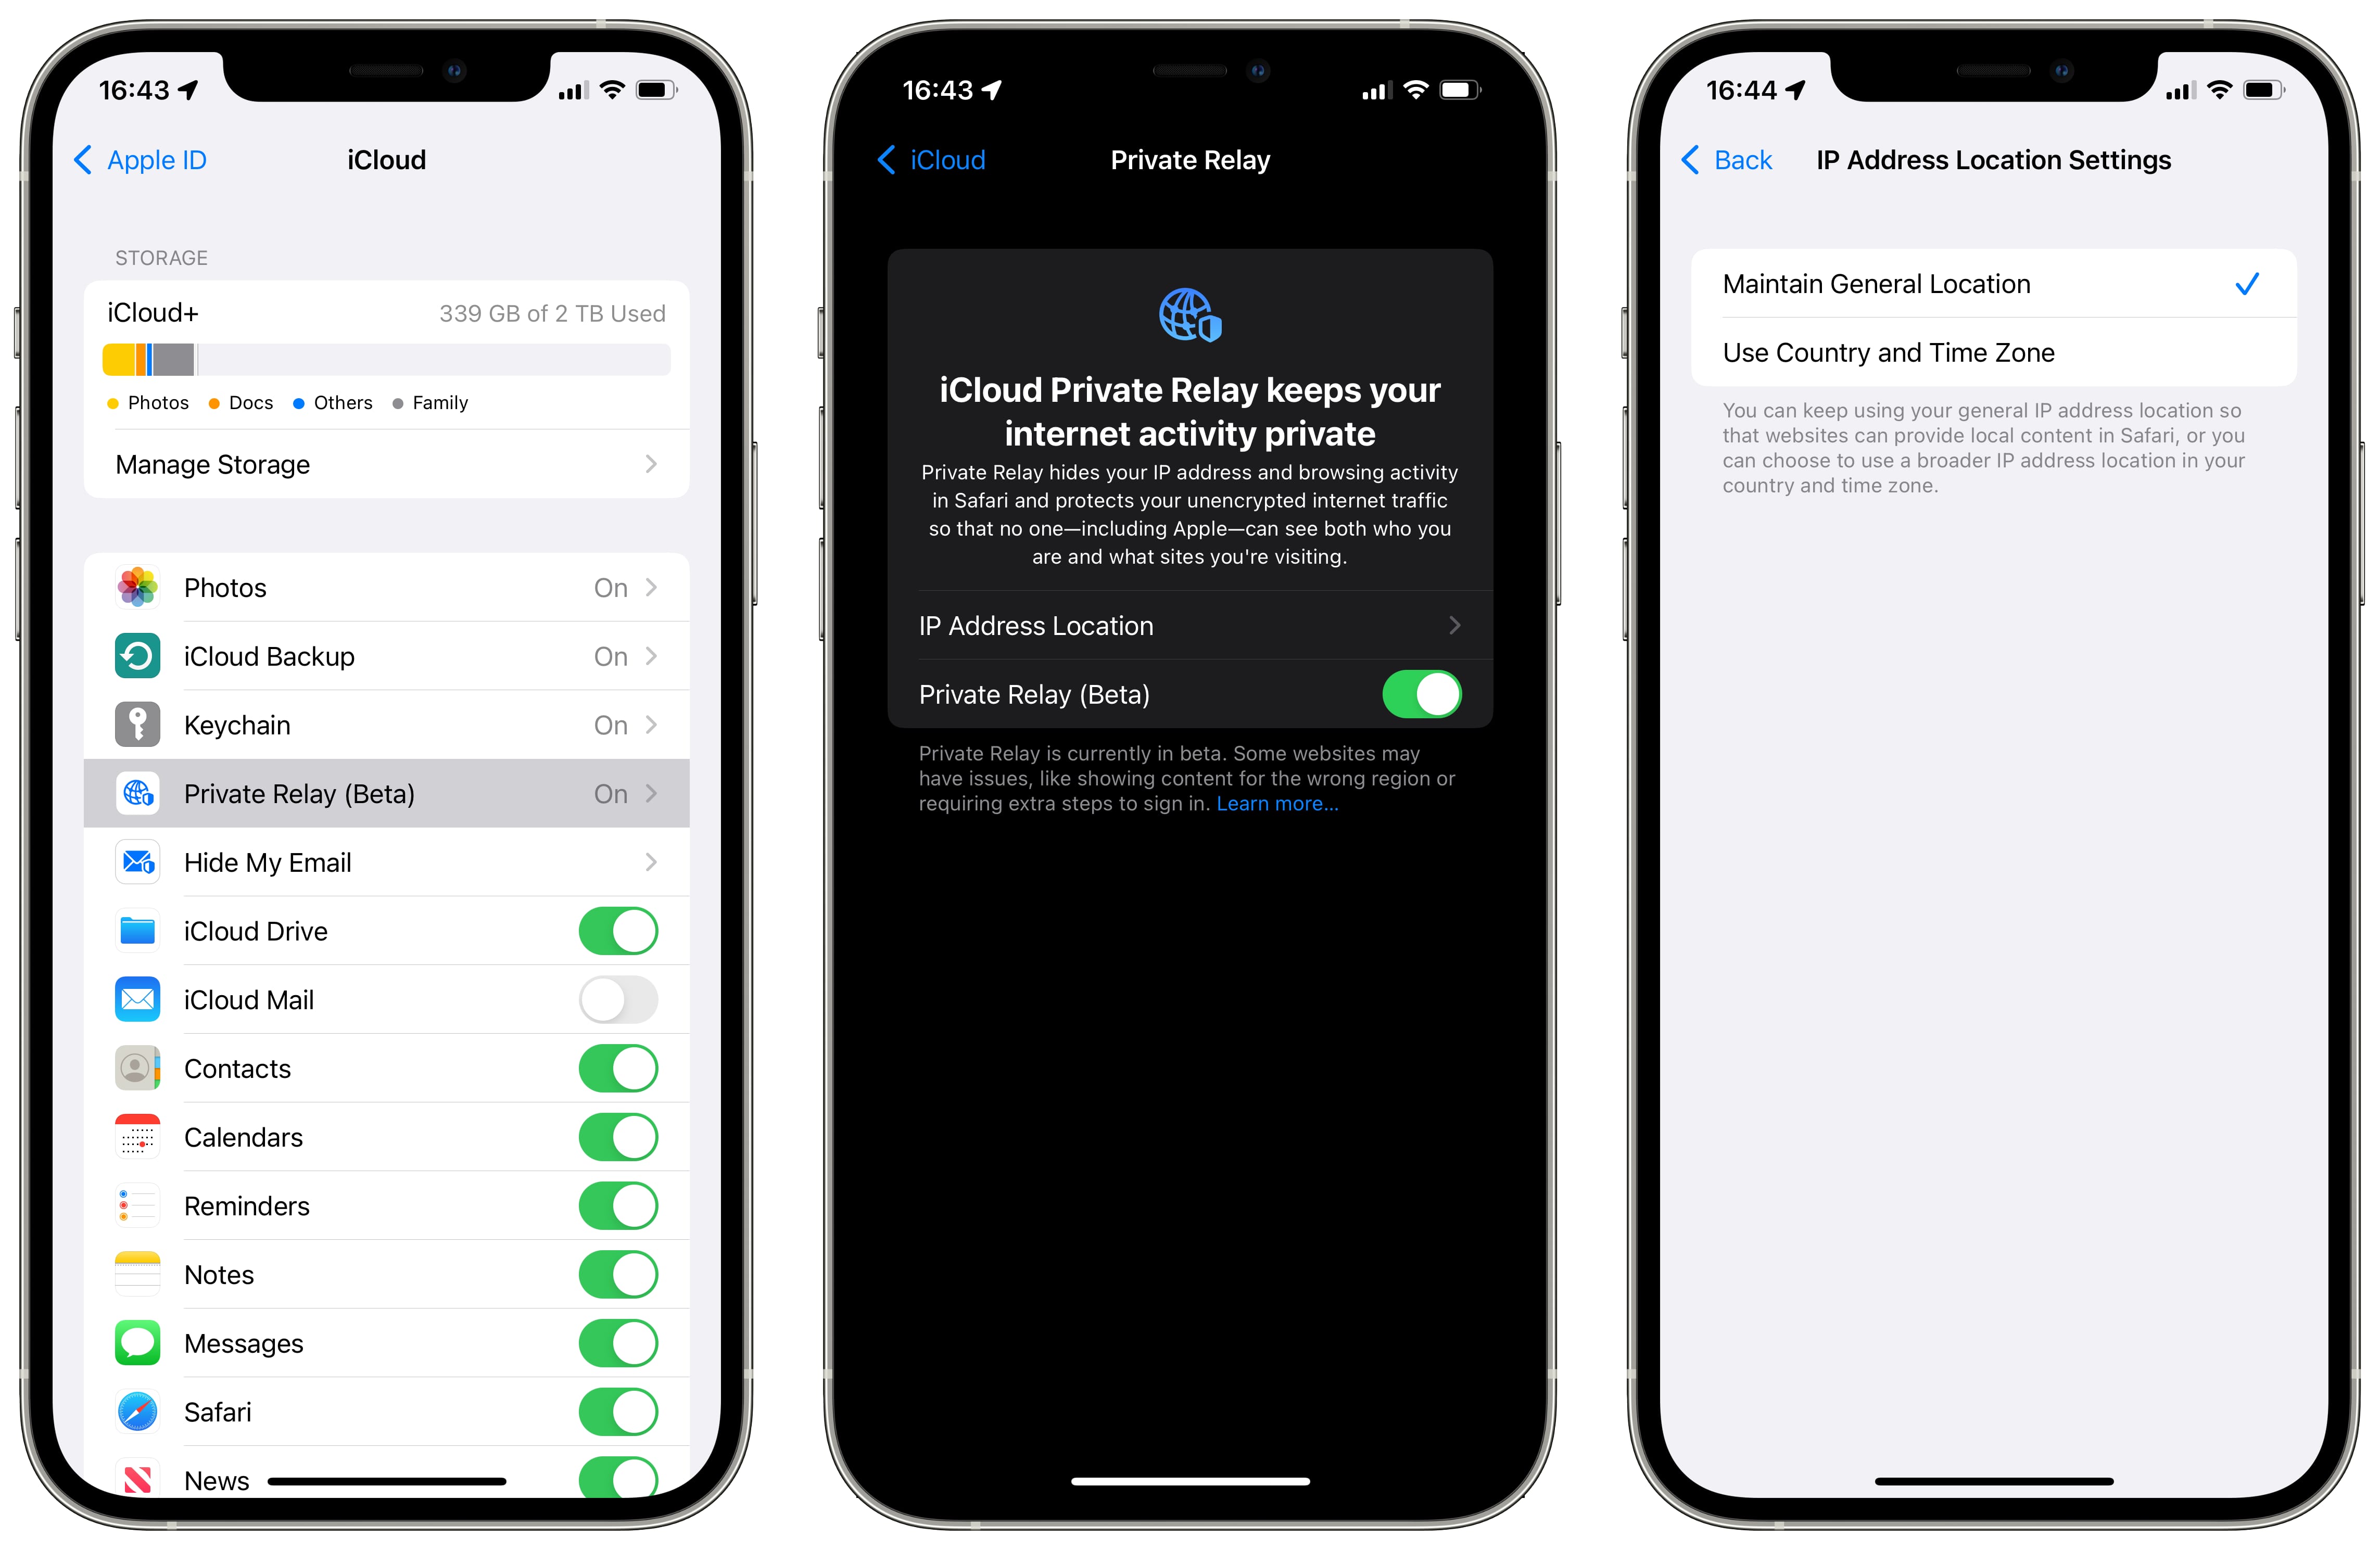
How to set up iCloud Private Relay on iPhone and iPad
If your iPhone or iPod touch is powered by iOS 15.0+, or you have an iPad with the iPadOS 15.0 software or later, follow these steps to set up iCloud Private Relay on your device:
- Open the Settings app on your iPhone or iPad
- Hit your Apple ID profile picture and name at the top of the Settings app
- Choose “iCloud” from the list
- Hit “Private Relay”
- Slide the switch labeled “Private Relay” to the ON position
Doing so will turn on iCloud Private Relay for all networks you join.
You can also manually turn the feature off for any Wi-Fi or cellular network.
How to enable iCloud Private Relay for your cellular network
To ensure iCloud Private Relay is active for your cellular network, turn on the feature that limits IP address tracking in the cellular data settings on your device.
- Open the Settings app on your iPhone or iPad
- Choose “Cellular” from the root list
- Hit “Cellular Data Options”
- Slide the “Limit IP Address Tracking” switch to the ON position.
Doing so will turn on iCloud Private Relay for your carrier’s cellular data network.
How to enable iCloud Private Relay for a Wi-Fi network
To make sure that iCloud Private Relay is active for a specific Wi-Fi network, toggle on the feature that limits IP address tracking in the settings for your Wi-Fi network.
- Open the Settings app on your iPhone or iPad
- Choose “Wi-Fi” from the root list
- Hit the “i” button next to your network
- Slide the “Limit IP Address Tracking” switch to the ON position.
Doing so will turn on iCloud Private Relay for that specific Wi-Fi network.
“If you disable iCloud Private Relay for a network, it’s disabled on all your devices with Private Relay turned on,” Apple clarifies in the feature’s description.
How to set up iCloud Private Relay on Mac
- Choose “System Preferences” from the Apple menu
- In the System Preferences window, click the icon labeled “Apple ID”
- Now click “iCloud”
- Select the “Private Relay” option to turn the feature on
Like with iPhone, you can disable iCloud Private Relay for any Wi-Fi or Ethernet network your Mac joins. For further information, check out Apple’s instructions for using iCloud Private Relay on macOS.
iCloud+ plans and pricing
iCloud Private Relay requires an iCloud+ subscription:
- 50GB: $1/month
- 200GB: $3/month
- 2TB: $10/month
If you’re not subscribed to iCloud+, you won’t be able to set up iCloud Private Relay on any of your devices. You can also sign up for the regular iCloud service to get five gigabytes of free storage, but doing so won’t get you iCloud Private Relay.
To access premium features like iCloud Private Relay, you must upgrade to iCloud+. You can check out all the iCloud+ plans and international pricing on Apple’s website.