Learn the easy way to schedule emails to be sent automatically at a later date and time on your iPhone, iPad, and Mac.
Why would you want to schedule emails?
There are plenty of reasons why you’d want to set an email to be sent at a future date rather than now. For example, you might want to schedule a “happy birthday” email for one of your friends now, so you don’t forget when their actual birthday arrives.
For professionals, you might want to schedule an email to your boss at 5:30 AM to make it look like you’re up and working early. Or maybe you work with someone in a different time zone and want to make sure this person receives your email at a specific time rather than in the middle of the night. Delaying the delivery of the email can ensure the recipient is at their desk when the message is sent.
Either way, if you want an email to be delivered on a future date, this tutorial has you covered.
iOS Mail app
You can schedule emails for iCloud and other email services you’ve added inside the Apple Mail app.
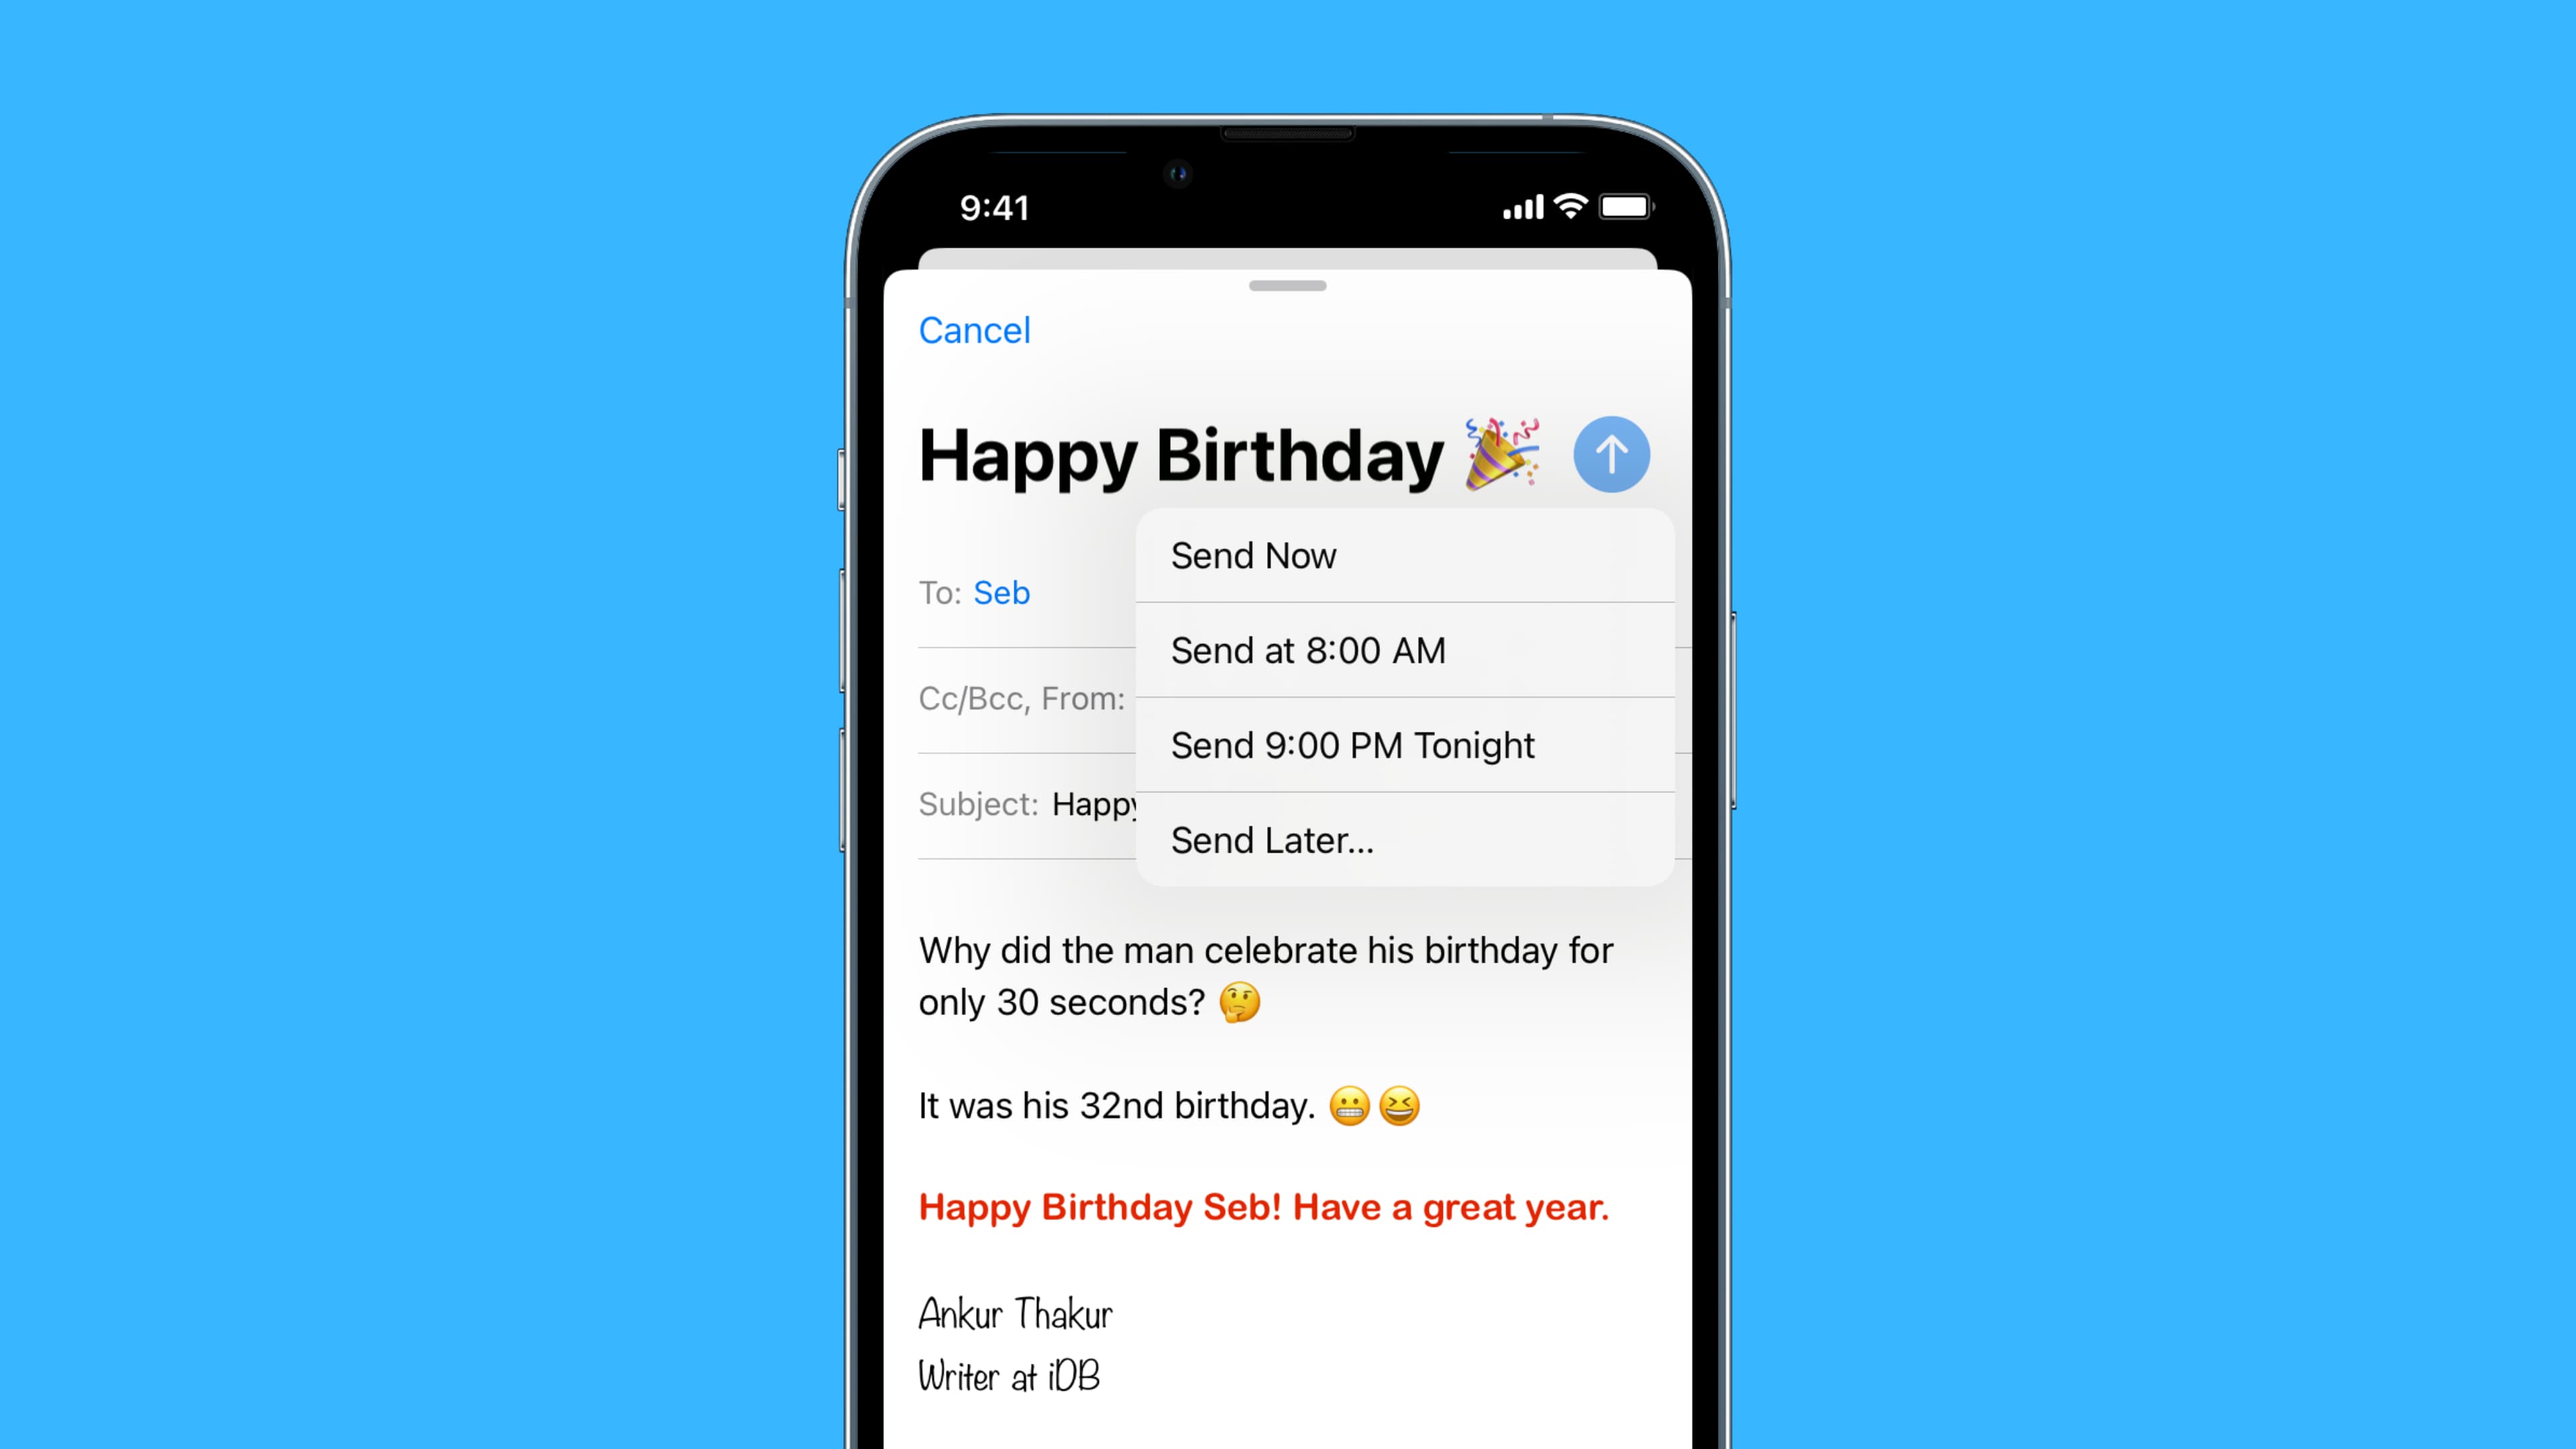
- Open the Mail app and compose your email.
- Touch and hold the blue send arrow button.
- Pick a suggested time, and the email is scheduled. Or, tap Send Later to choose a custom date, time, and even time zone! Once everything is set, tap Done to schedule this email. It will be sent automatically at the designated time.

Important: You must keep your iPhone switched on for the scheduled email to go through, as the Mail app can work automatically at the scheduled time only when your device is powered on. Secondly, make sure the device is online (i.e., connected to Wi-Fi or cellular data). This approach is different than scheduling emails in Gmail (explained below), which works on the server level, and thus there is no need to keep your device switched on after scheduling an email in Gmail.
If you change your mind and want to tweak the scheduled email time or abort the operation, go to the Mailboxes screen and tap Send Later to see all your scheduled emails. Then, select a scheduled email, tap Edit, and make the changes to the scheduled time or cancel it. As of now, you can only change the Send time of the email. You can’t edit the contents (body, subject line, receiver’s address, etc.) of the scheduled email.

iOS Gmail app
- Open the Gmail app on your iPhone or iPad and tap Compose. Enter the recipient’s email address, subject line, and compose your email body.
- Tap the three dots icon and tap Schedule send.
- Choose an option like Tomorrow morning, Tomorrow afternoon, Monday morning, etc. To set a custom date and time, tap Pick date & time.

You’ve successfully scheduled your email. It will automatically send at the set time. Since this action is on the server level, keeping the Gmail app open or your iPhone switched on isn’t necessary for the scheduled email(s) to be sent. You can see this scheduled email even on a desktop.
If you change your mind, open the Gmail app, tap the hamburger icon in the top left corner, and choose Scheduled. Select the email to open it and tap Cancel send.

If you cancel a scheduled email, it will be automatically moved to your Drafts folder, where you can delete it from there. Or, if you canceled the scheduled email because of an error, you can fix it in drafts and reschedule it. The steps are the same if you choose to reschedule.
macOS Mail app
1) Open the Mail app on your Mac and compose your email.
2) Click the schedule icon and choose a suggested time. Or, click Send Later to set a custom date and time. Once done, click Schedule, and you’re all set.

For the scheduled email to work, keep your Mac switched on, and don’t quit the Mail app. Let it stay open in the background. If you no longer need to work in the Mail app, just minimize it.
Gmail on a computer
1) Visit Gmail in a web browser and compose a new email or open a draft.
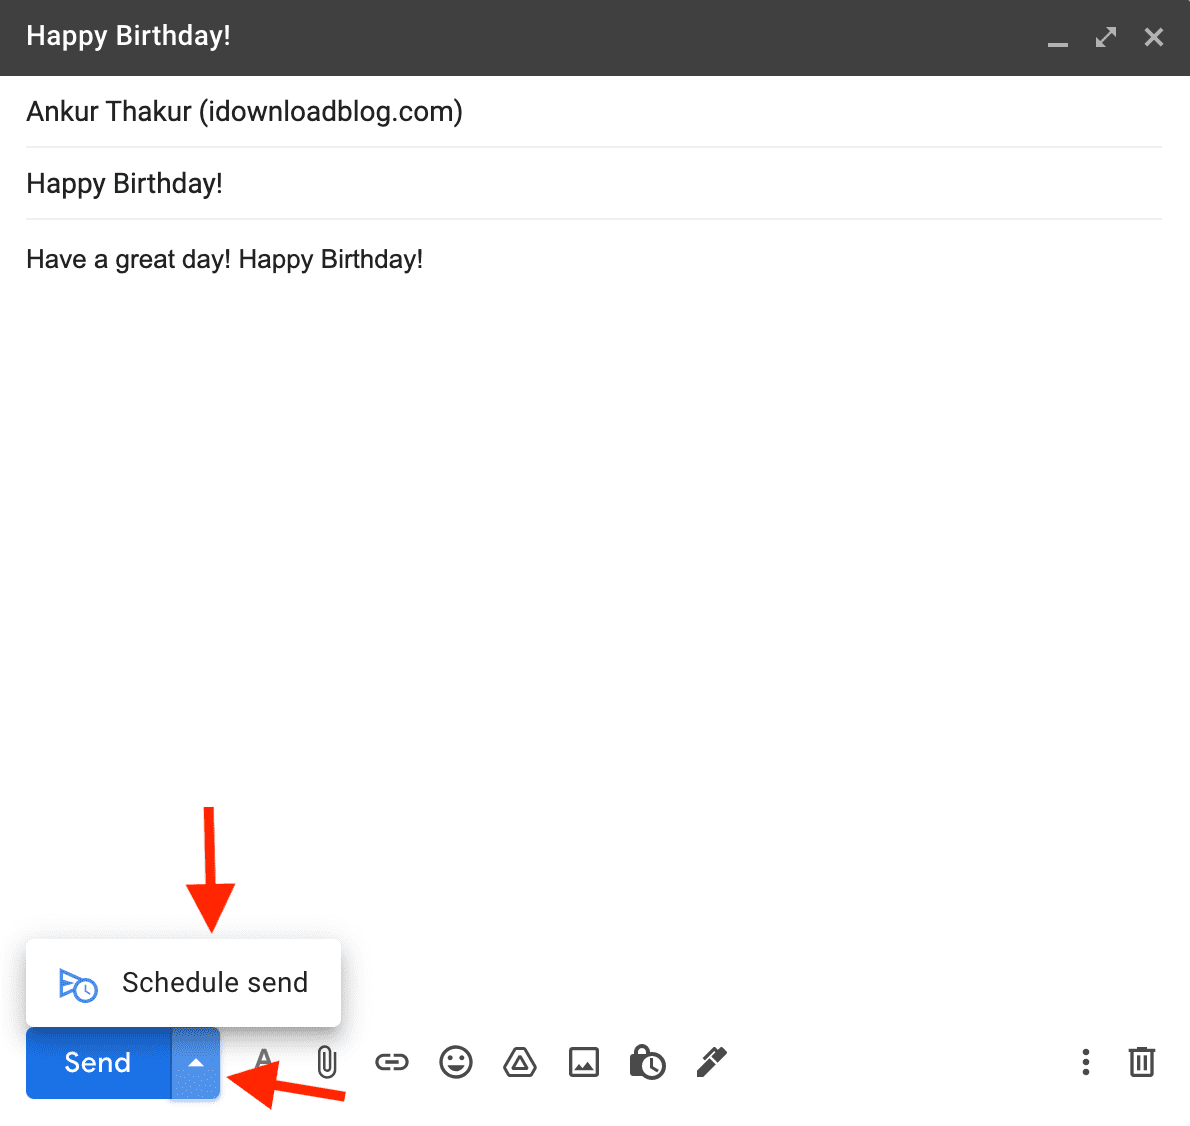
2) After filling in all the details and email body, click the tiny arrow next to the Send button, and select Schedule send.
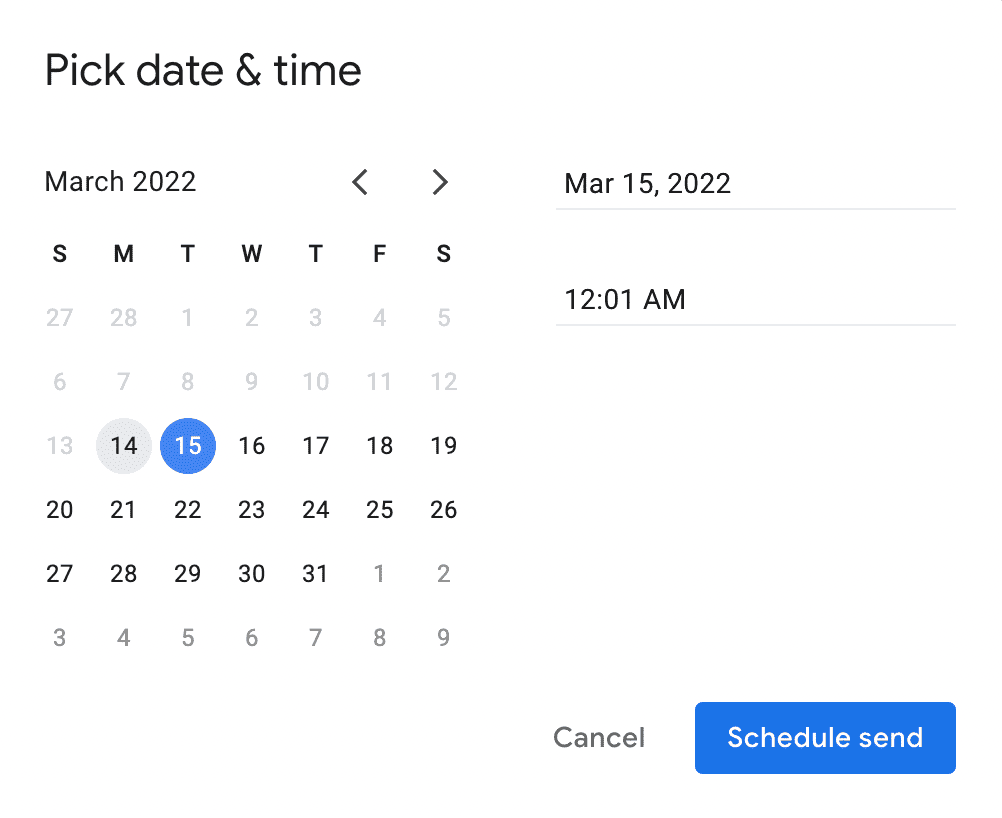
3) Choose a time. If you’ve scheduled an email in the past, you’ll also see a handy “Last scheduled time” option. To set a custom date and time, click Pick date & time > set it accordingly > Schedule send.
You’ve now successfully scheduled this email. It will move to the Scheduled category in the left sidebar and be automatically sent at the desired time. You don’t have to keep the Gmail browser tab open or the Mac switched on. This scheduled email will also appear inside your Gmail app on a smartphone.
Use Automator and Calendar
You can use two built-in Mac apps, namely Automator and Calendar, to send a scheduled email through the Apple Mail app. The process is lengthy compared to the above options, but you can try it out. It’s useful when you want to match your calendar event timing with the email.
1) Open Automator on your Mac from the Applications Finder folder, select New Document, and then pick Application for the type.
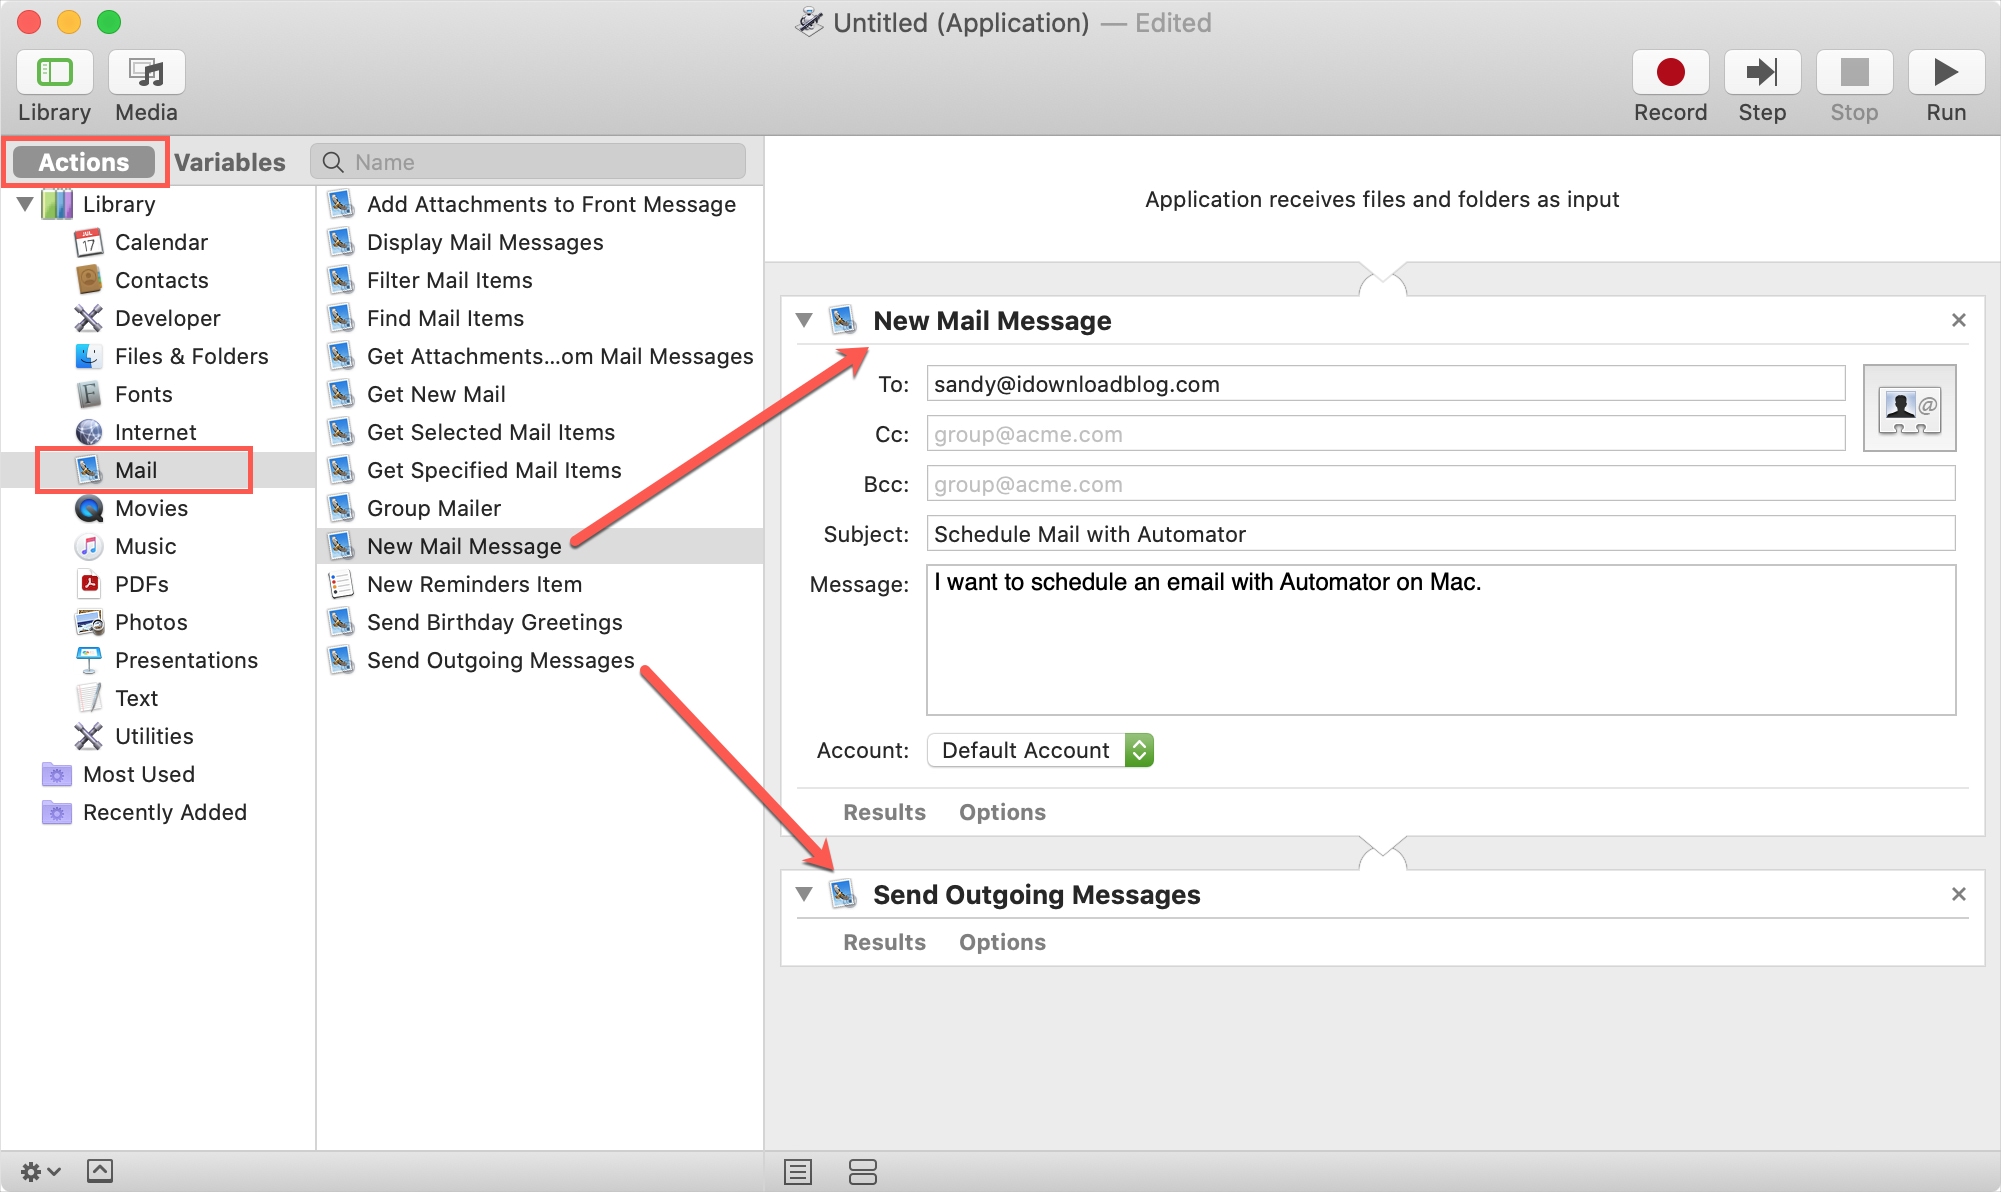
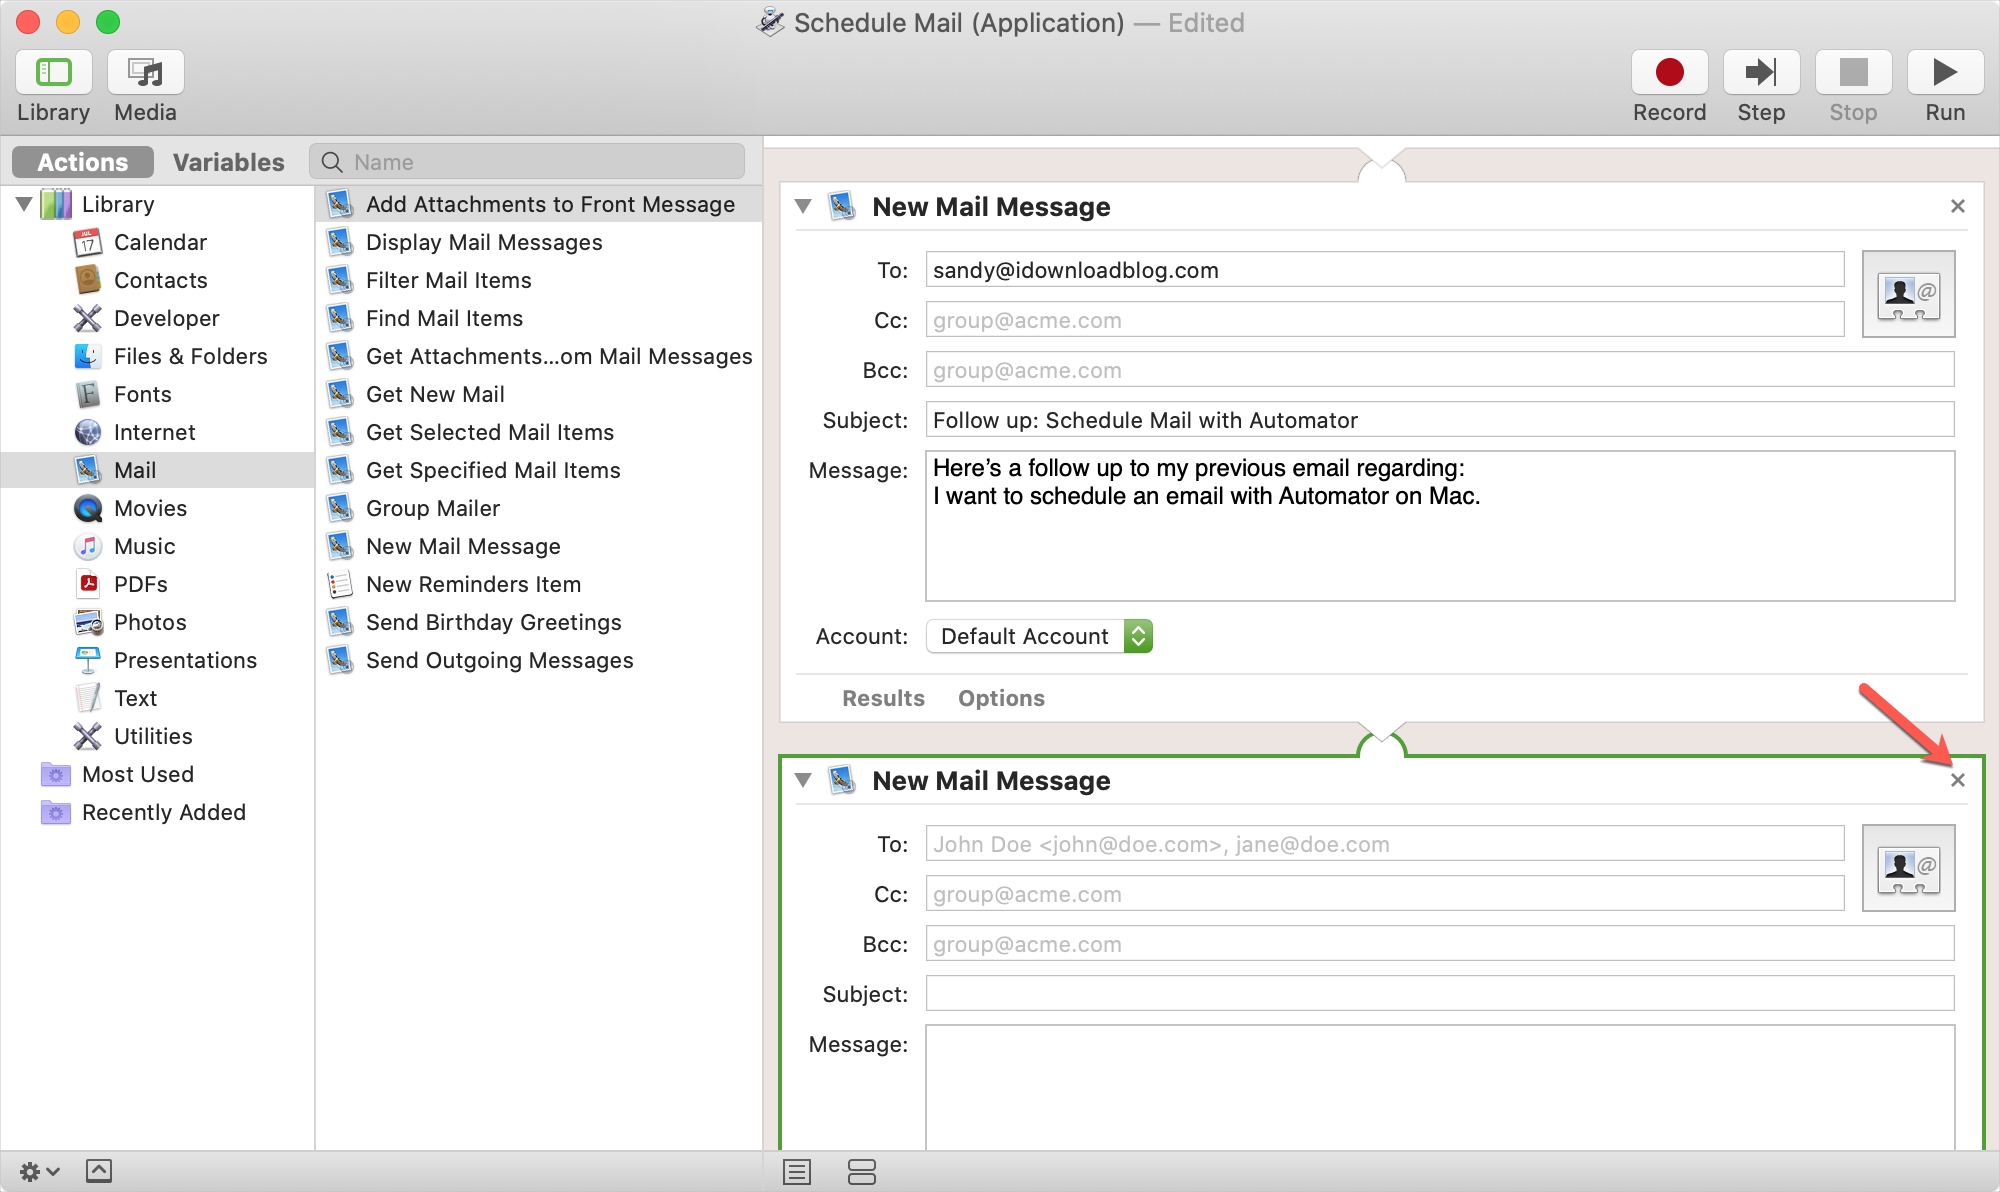
2) In the far left-hand sidebar, make sure Actions is selected and under Library, and pick Mail.
3) To the right, choose New Mail Message and drag it to the workflow space.
4) Compose your message in that New Mail Message box, include all pieces (To, Subject, etc.) and select an Account if necessary.
Follow the same steps to add more messages that you’d like to schedule for the same time.
5) Choose Send Outgoing Messages from the list and drag it to the workflow window below the New Mail Message box (or after the last Message box if you have more than one).
6) Click File > Save, give your Application a name (like Schedule Mail), and hit Save. By default, Automator will save the Application to Automator > iCloud, but you can select a different spot if you like. Just remember where you save it for the next steps.
What you did with the steps above was create an Automator Application that will send the email you composed when it’s triggered. Now it’s time to set up the trigger on a date and at a time you choose in your Calendar.
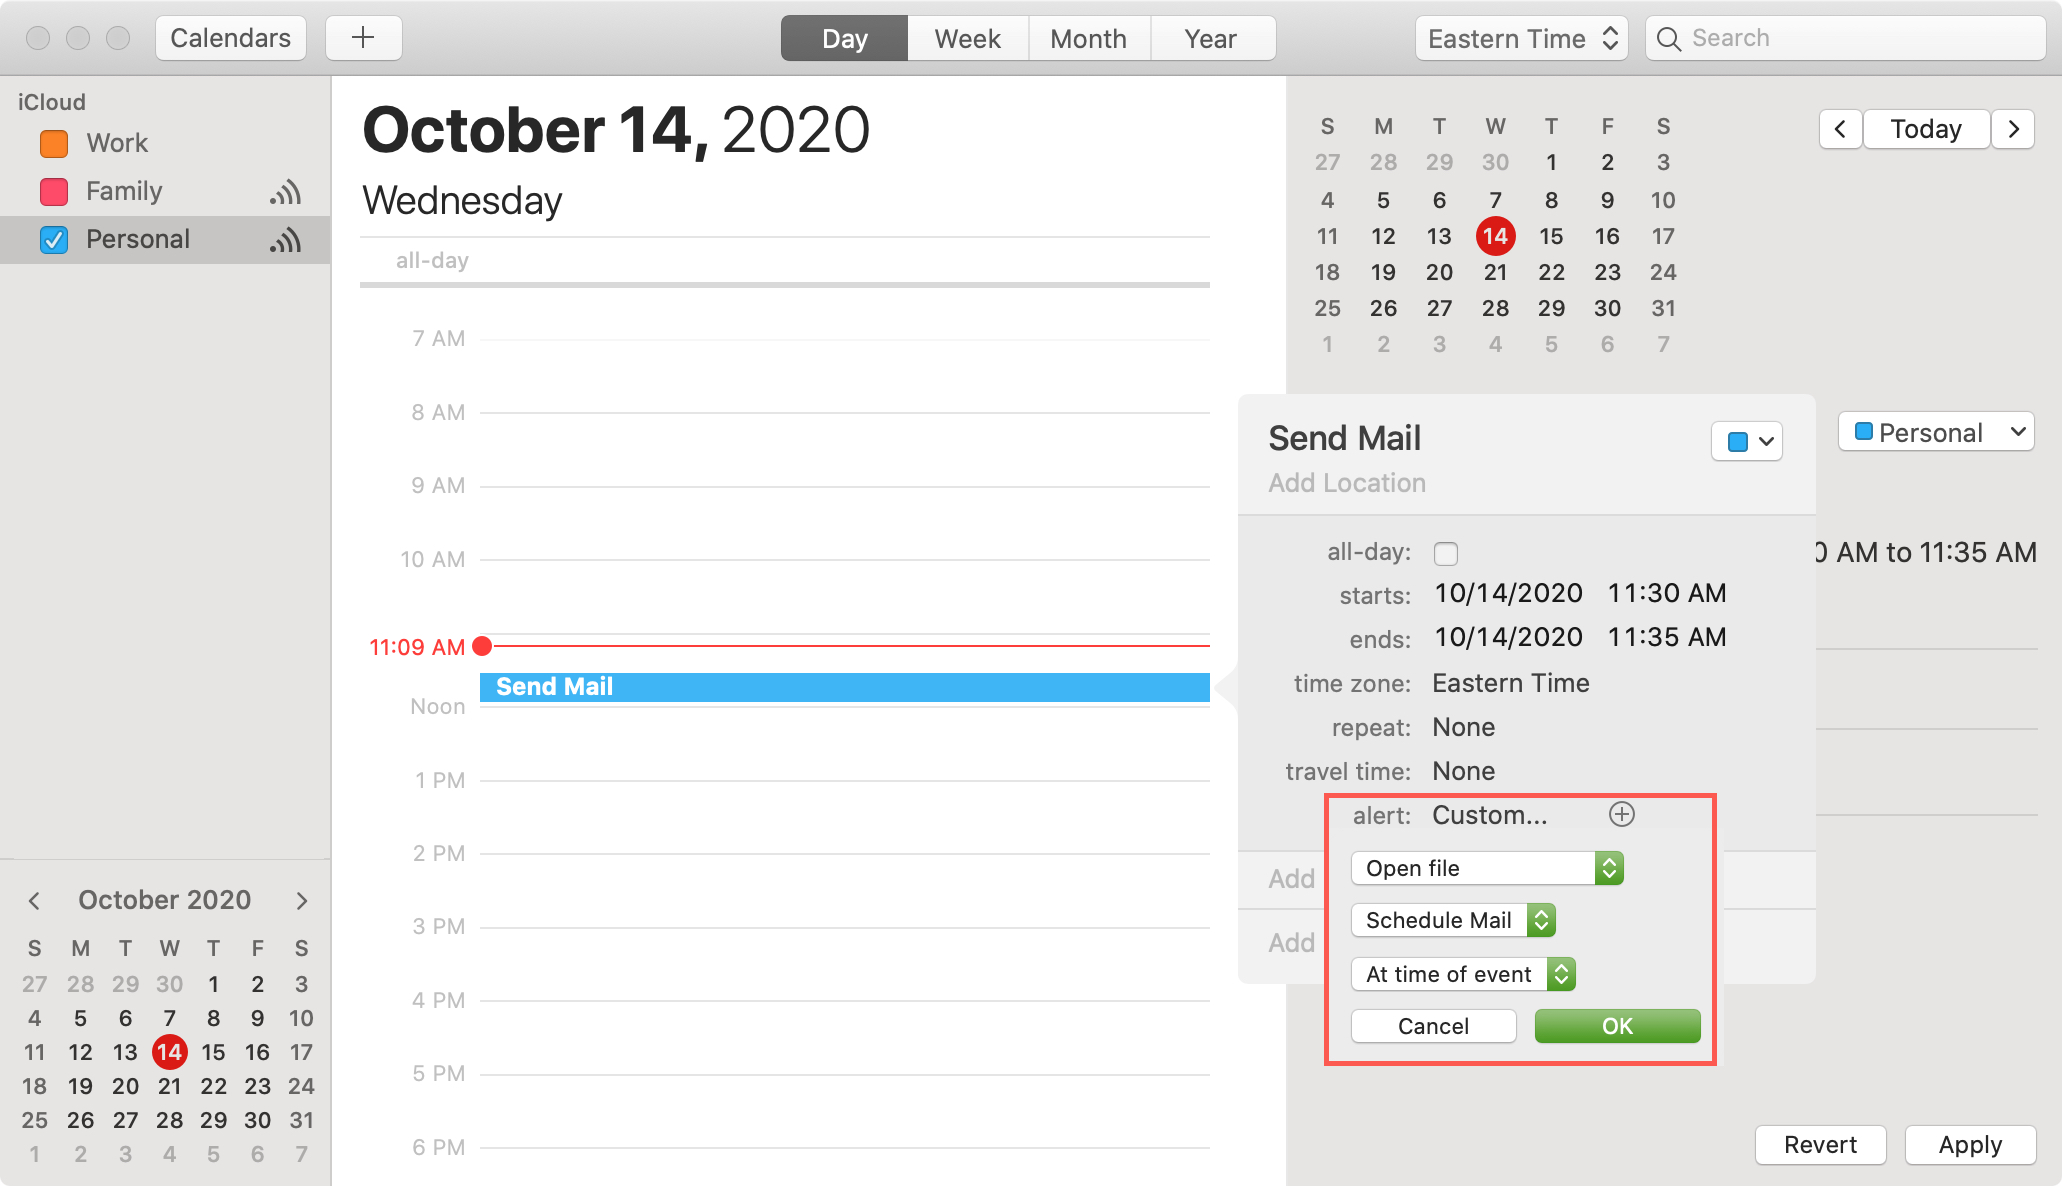
7) Open Calendar on your Mac and head to the date when you want to send the email(s). Create an event on that date and select the time you’d like.
8) Under Alert, pick Custom.
9) In the first drop-down box, choose Open File.
10) In the next drop-down box, select the application you created. You’ll likely need to pick Other and navigate to where you saved it.
11) For the Alert timing, choose At Time of Event in the drop-down box.
12) Click OK.
And there you have it! You’ve created an application to send the email you wrote on the date and at the time you want. After the scheduled time, you can head to your Sent folder in the Mail app to double-check that the email was sent as you intended.
The first time the application runs, you will receive a pop-up message asking for your permission. But if you continue to schedule emails with it, you shouldn’t see that message again.
Continue scheduling emails: You can reuse the Automator Application that you created to keep scheduling emails. So, although it’s a bit of work up front, reusing the application is simple.
1) Open Automator and select Open an Existing Document.
2) Locate the application and click Open.
3) Make your changes to the New Mail Message box in the workflow space. If you have more than one, make sure to either edit those for additional emails or remove them by clicking the X in the top right corner.
4) Click File > Save to save the changes you made.
5) Follow the steps to add an event to your Calendar to run the application and schedule your emails to be sent.
More on scheduling: