In this first entry into our new HomeKit Automation series, we walk you through fixing one of HomeKit’s biggest shortcomings: creating a true toggle button to enable and disable a scene.
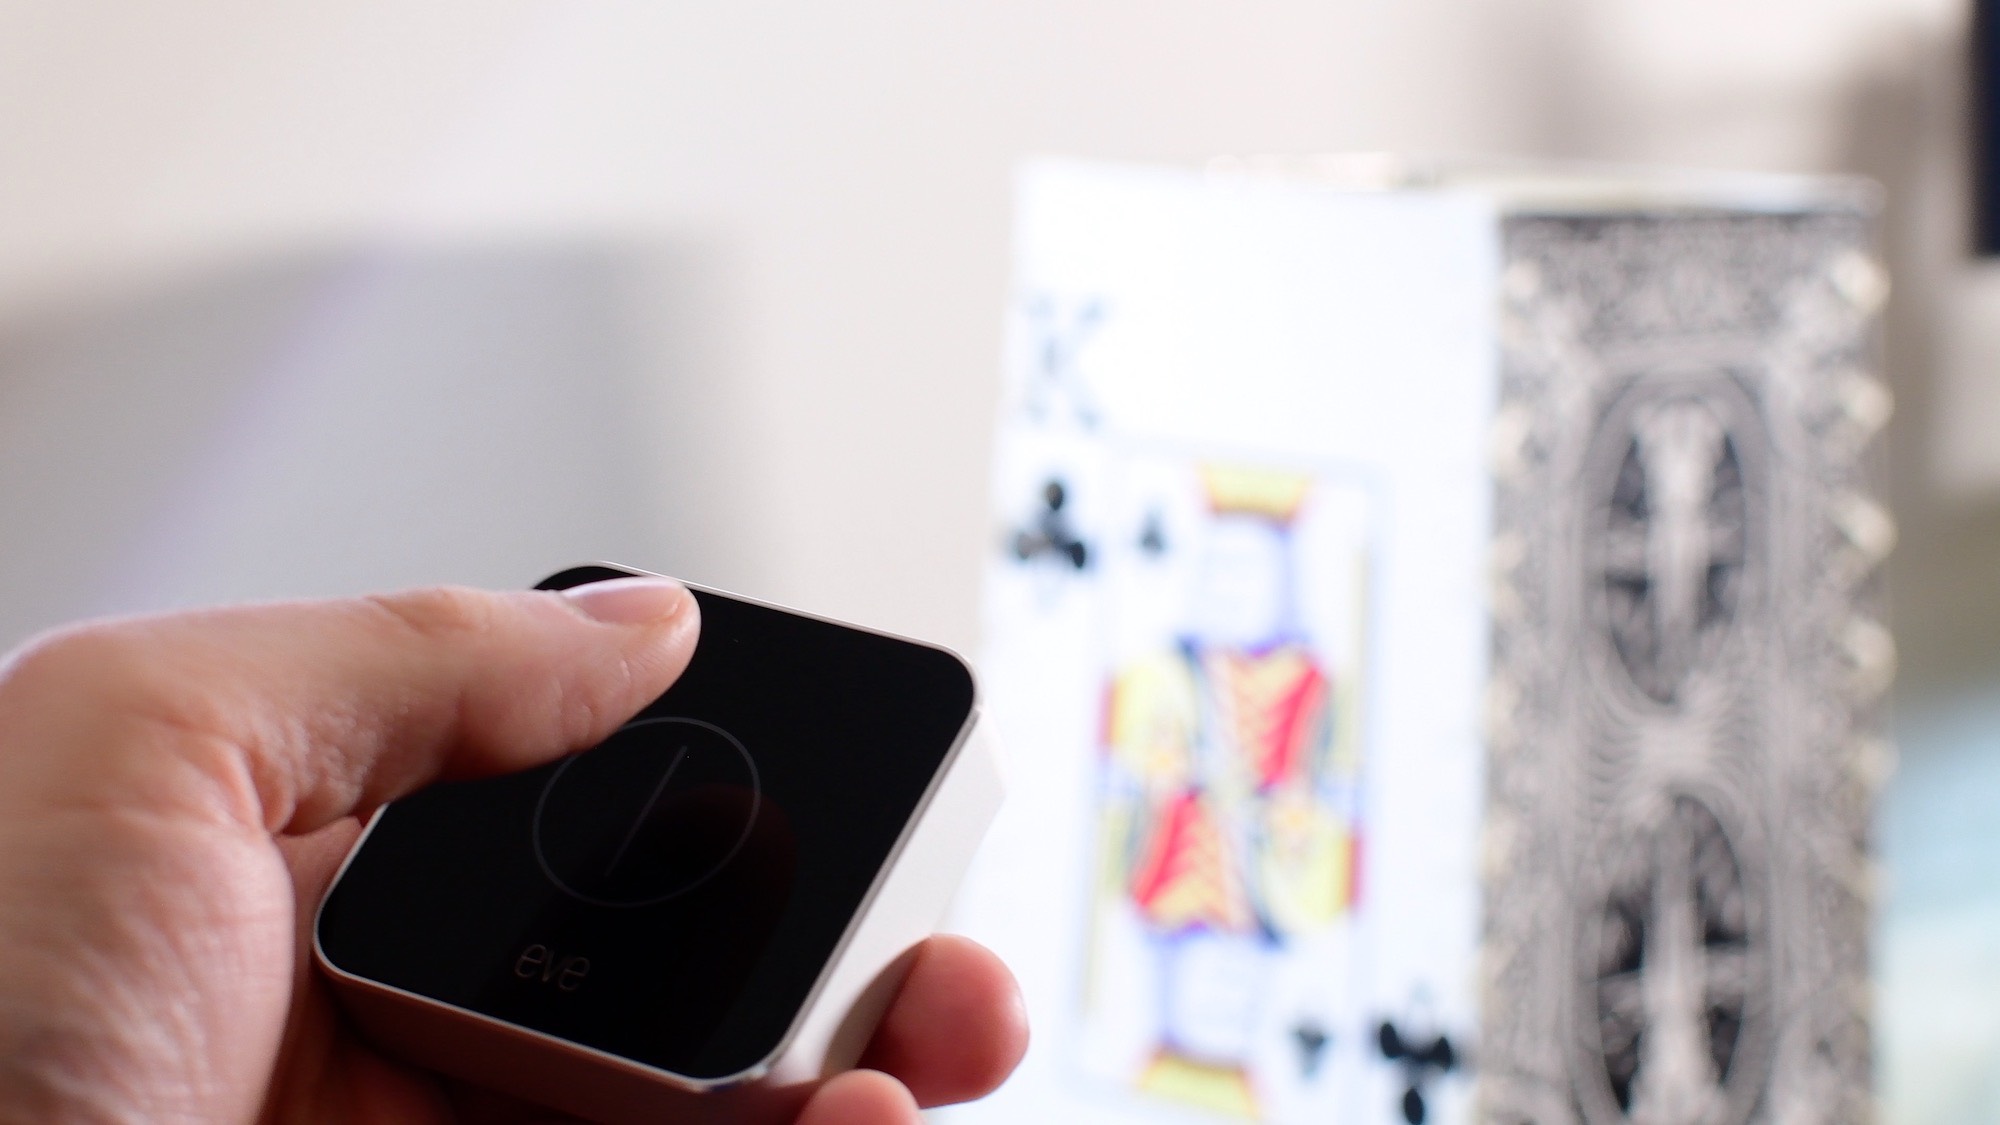
HomeKit buttons have been on the rise, with several new ones announced at CES 2018. So far, we’ve tested out both the Logi Pop and the new Elgato Eve Button. If you haven’t already, I encourage you to read those reviews.
Everyone learns differently, so feel free to check out our embedded video how-to before following along with our detailed written tutorial included further below.
Subscribe to iDownloadBlog on YouTube
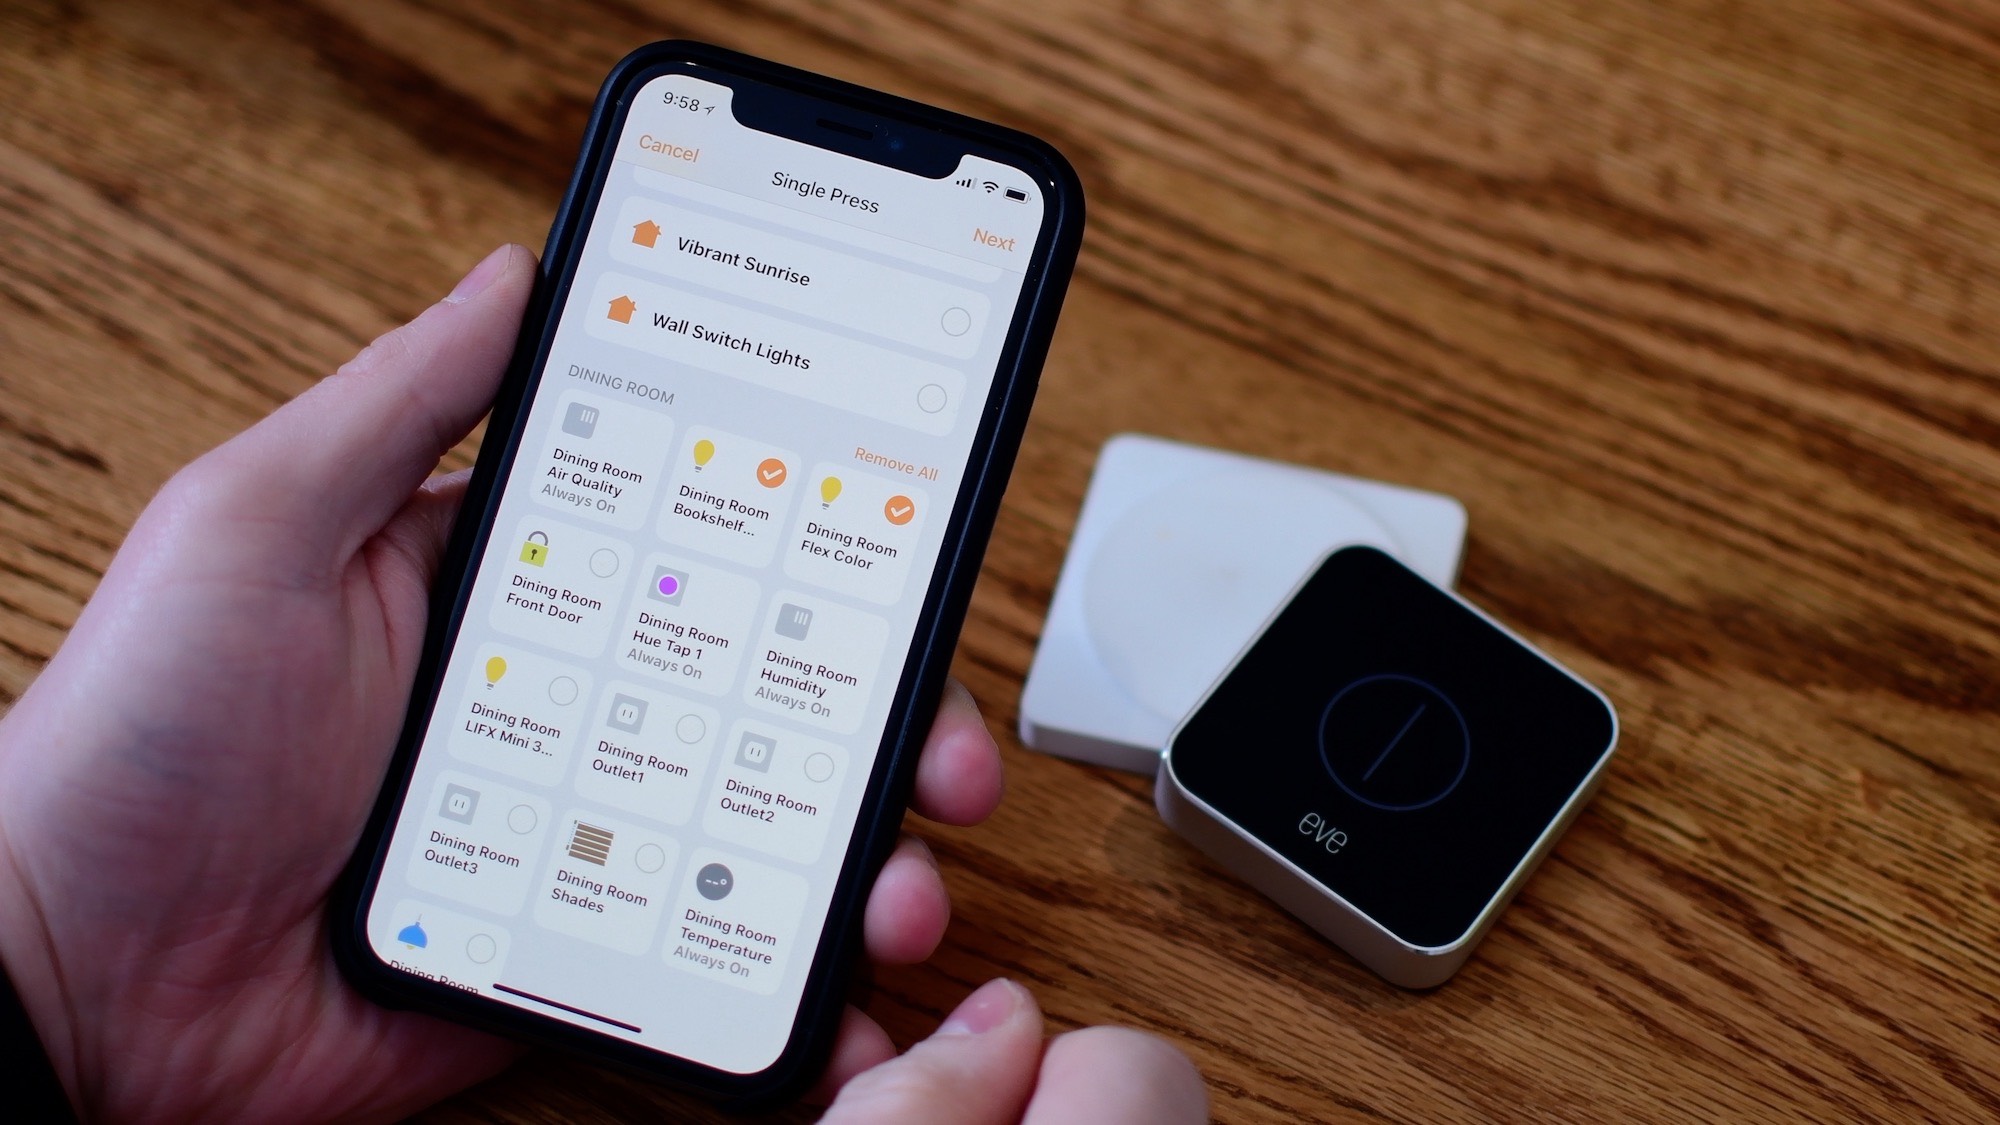
To play along, you need a HomeKit button, some accessories to control, as well as a third-party HomeKit app. In this tutorial, I use Home by Matthias Hochgatterer. This is my app of choice, but there are others that will accomplish similar results, such as the Elgato Eve app.
HomeKit and buttons
As we teased in the intro, we will be looking at a way to make HomeKit buttons more useful.
If you use Apple’s Home app to set up a button, you are quite limited in your abilities. Buttons from both Logitech and Elgato are only allotted three commands; a single press, a double press and a long press.
You can set up each command to a separate action.
Say, a single press turns on my living room lights.
However, if you press once and turn them on, how would you turn the off? You’d have to have a whole separate command just to turn the lights back off. This not only wastes one of your three commands, but it is harder to remember.
Ideally, we want to set this up as a toggle button. So you press once to turn the living room lights on, then press once again to turn them back off. A double-press could turn on the kitchen lights while a second double-press turns them back off. Of course, the long-press would follow the same technique as the first two.
The goal
To make this work isn’t all to complicated.
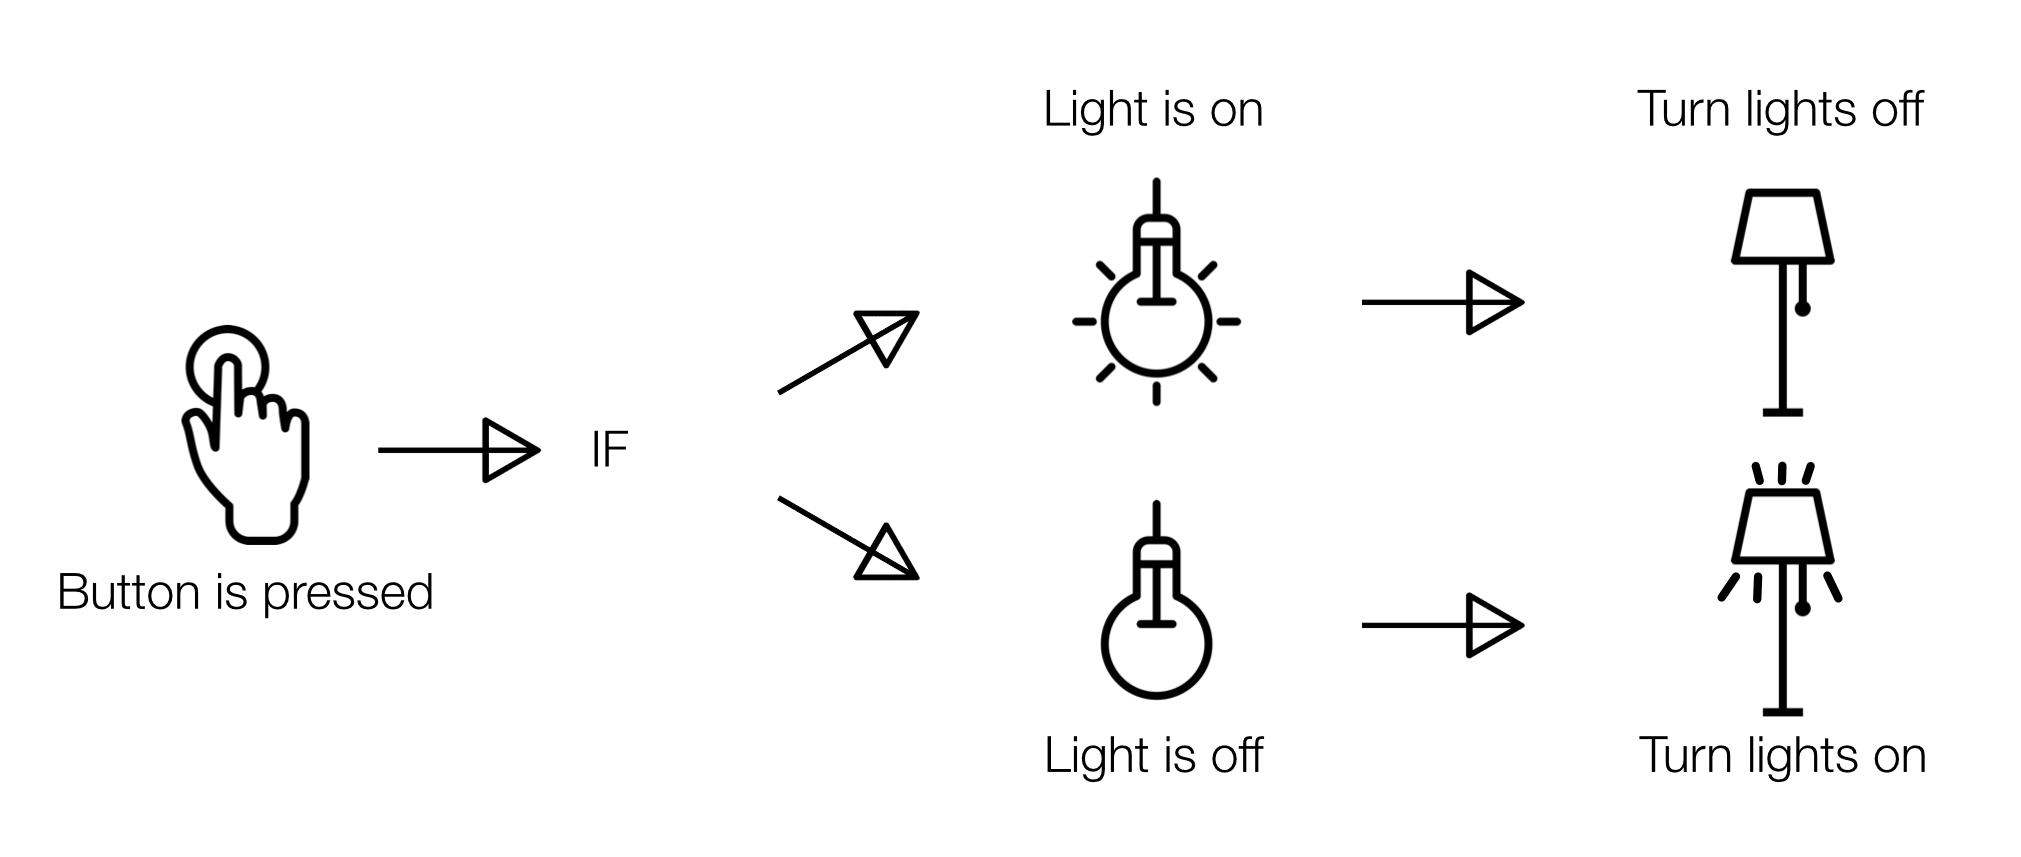
Though at first glance it seems like we only have three toggle commands, we are effectively adding six commands in total. However, to map six commands to the three physical actions, we have to control what they do based on conditional statements.
In practice, it goes like this:
 Now that we’ve outlined the concept, lets take a look at how to do it.
How to create a toggle button for HomeKit
1) Open the Home app and choose the automation tab.
2) Tap on the + icon in the top-right corner to create a new automation.
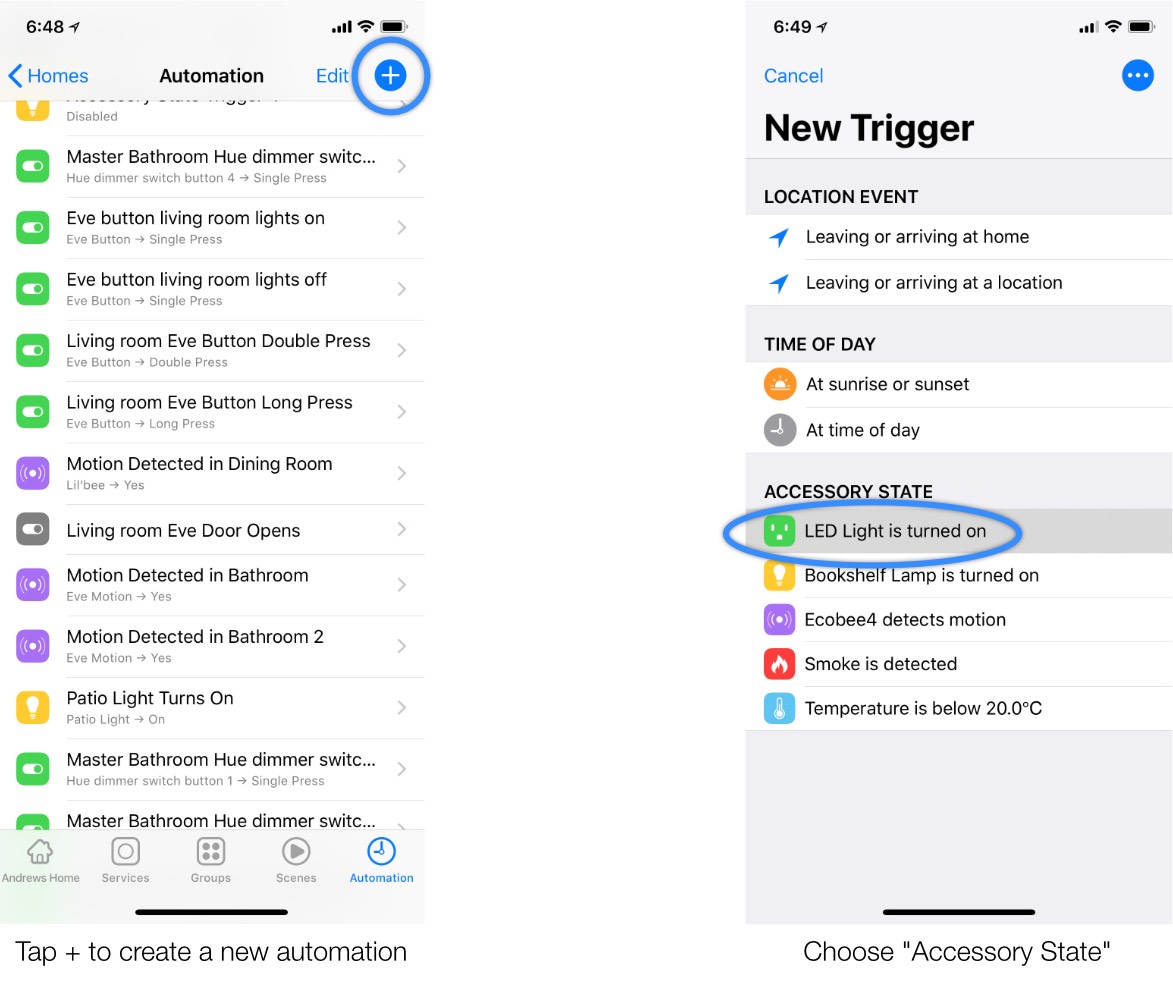
3) You will have several different options including Location, Time of Day and the Accessory State. Select any option under Accessory State.
4) After choosing an option from the list, the “When this happens” section of the automation will automatically pre-populate. Go ahead and remove the accessory that is listed there, then add your button instead.
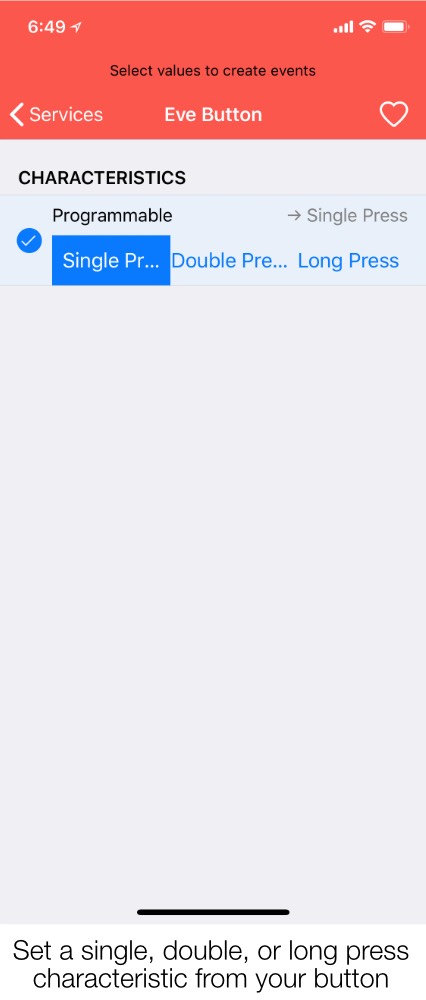
When doing so, make sure to choose whether this will be for a single, double, or long-press.
5) After this, we need to add a condition.
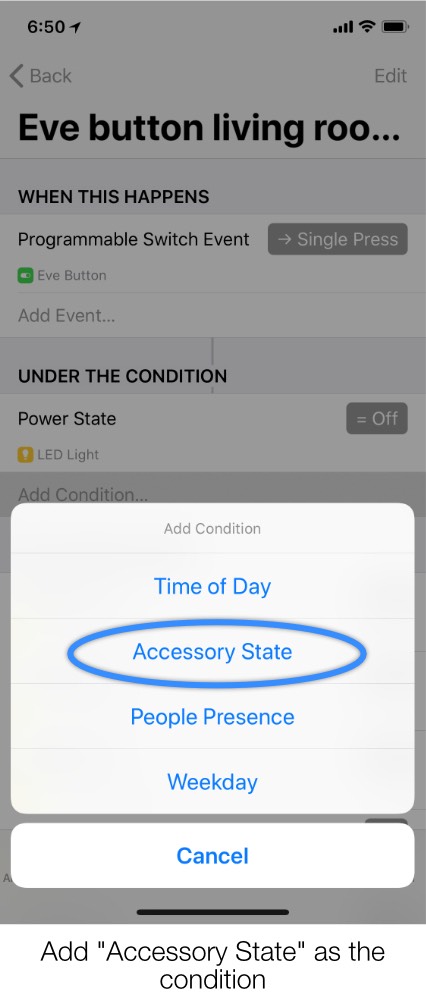
Our condition will be based on whether the lights in the room are on or off, which qualifies as an accessory state, so choose the Accessory State option this from the list.
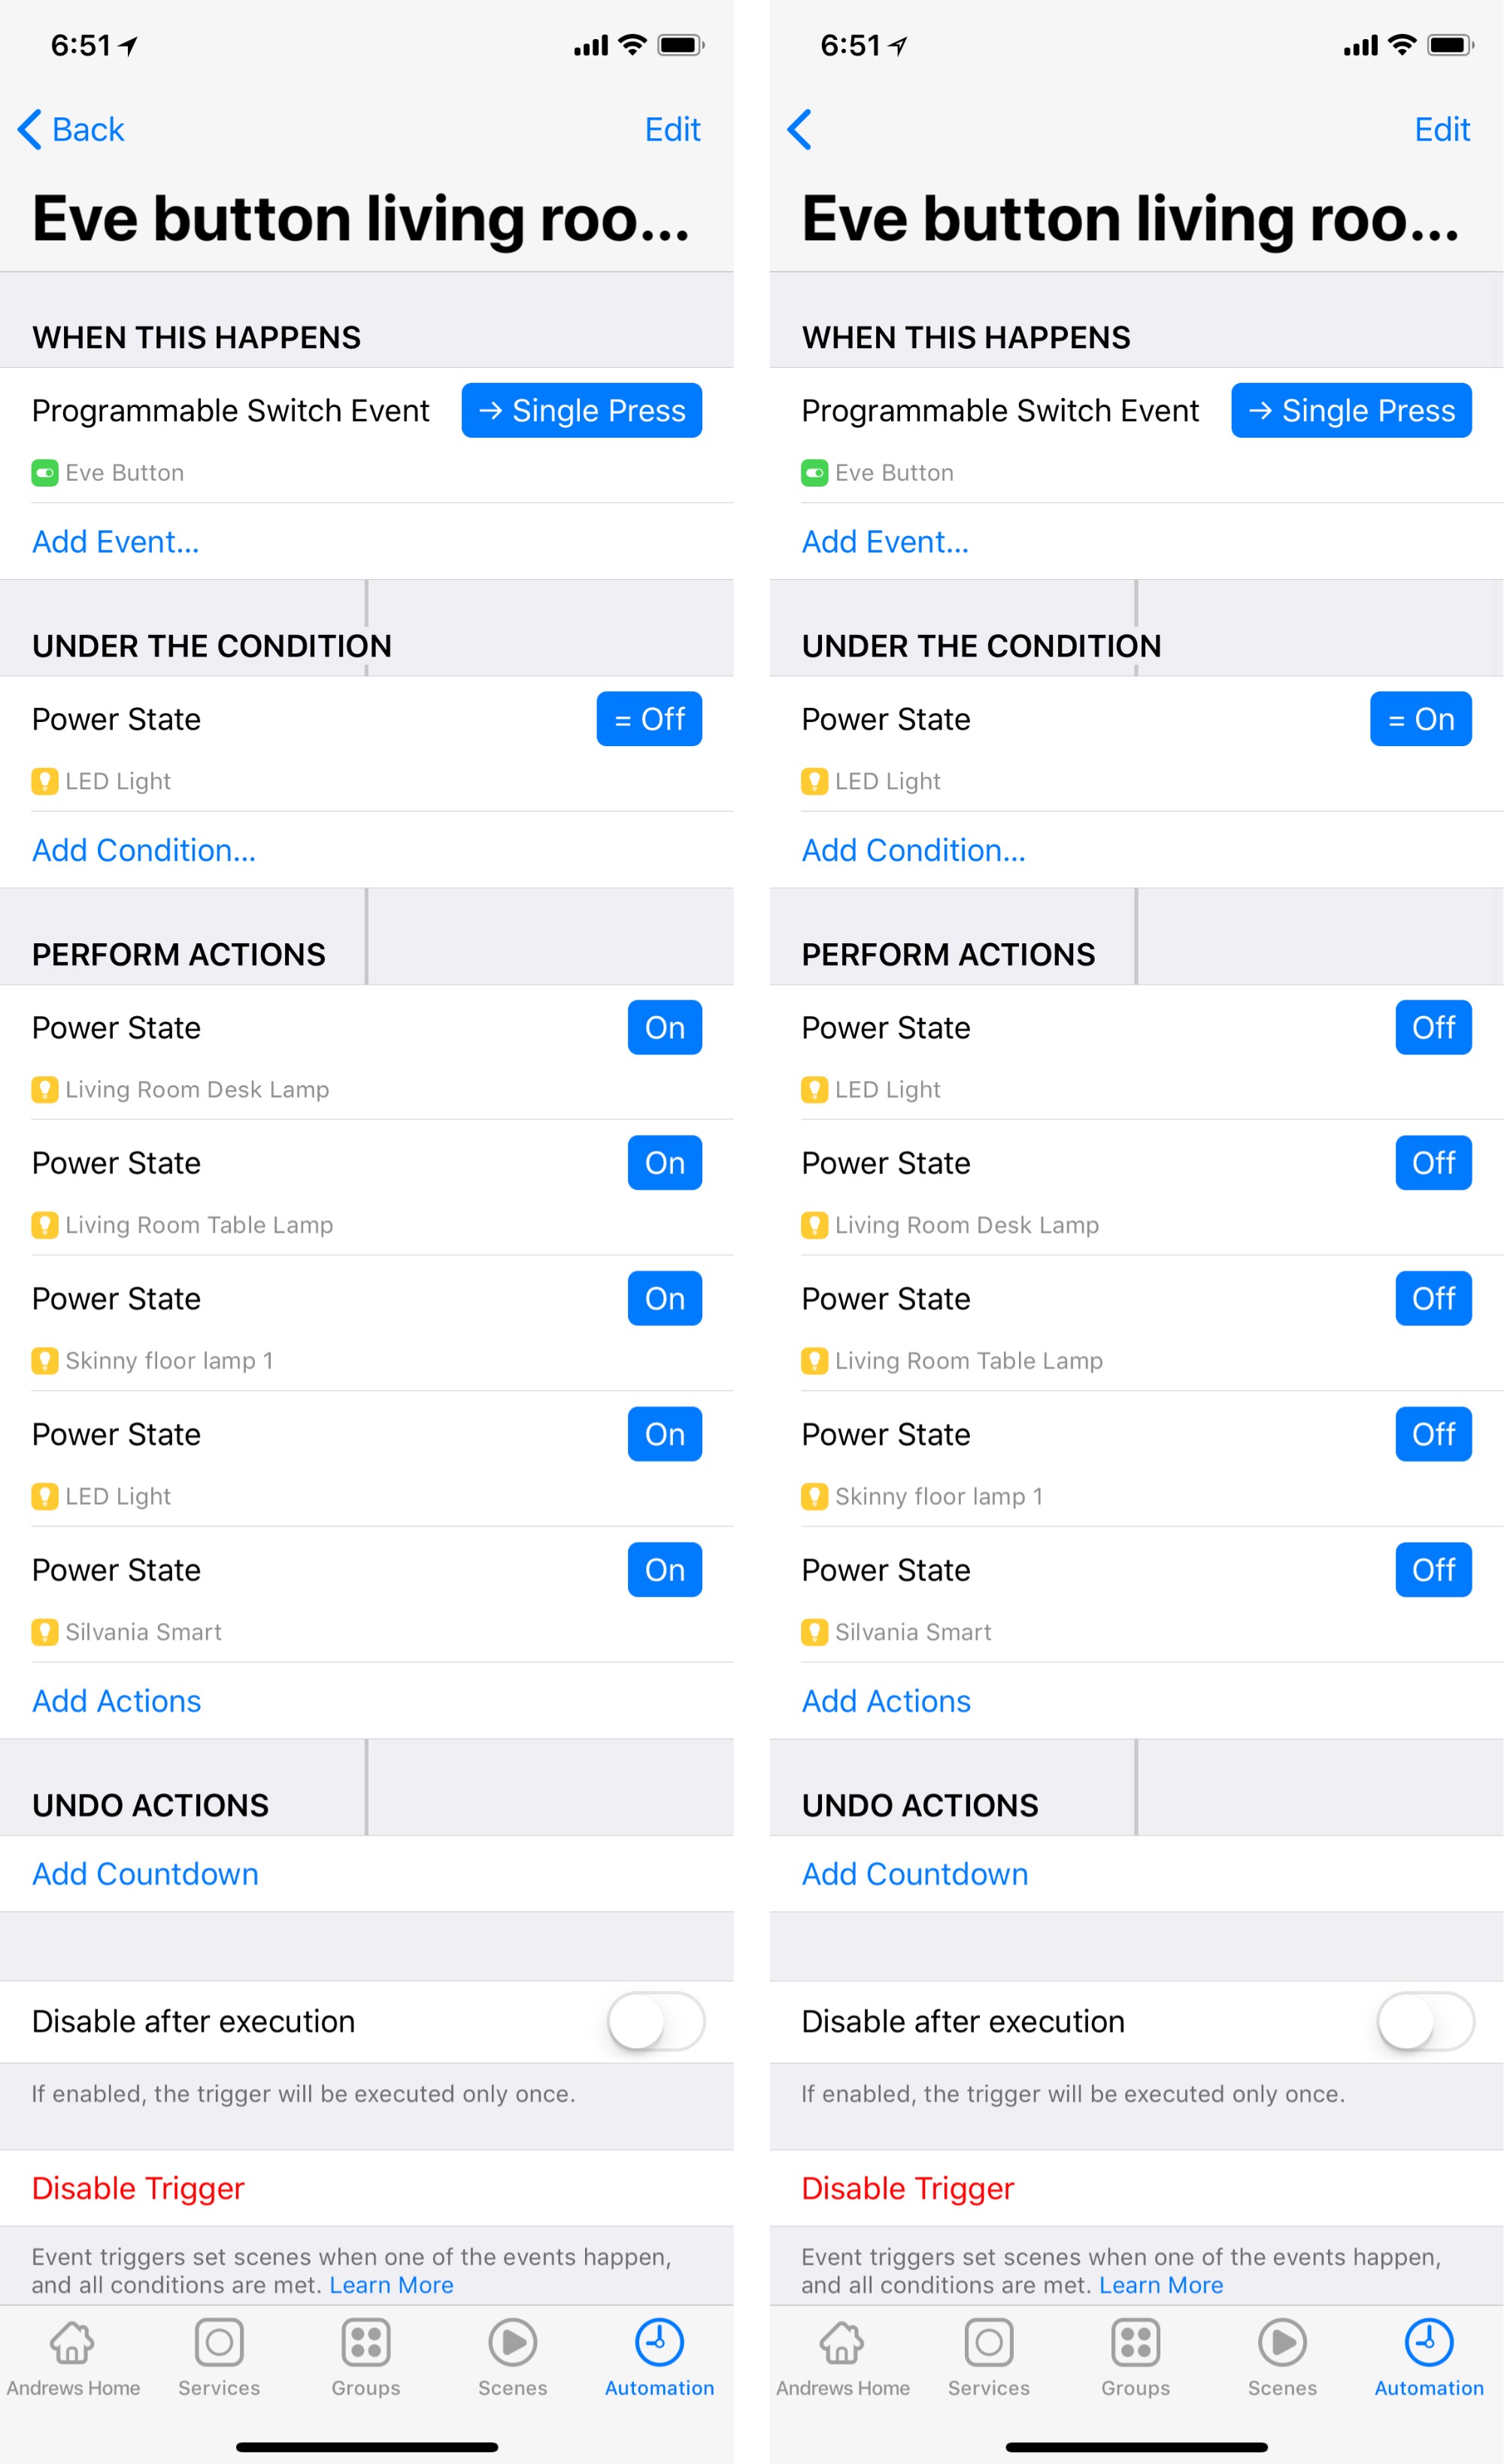
6) To make our automation work, we basically have to check if the lights are on. In my example, I want the button press to turn on all my living room lights so I’m going to choose my primary light in the living room, named “LED Light”.
I could add all of my living room lights to the conditional statement, but in reality—that’s more effort than you need. Since I primarily control them with this button, if this light is on, they should all be on. Therefore, you really only need to choose one to base the conditional off of.

7) Once you choose the light, be sure to select the Power State characteristic and toggle it to the OFF position.
8) So far, when the button is pressed it checks if the lights are off. Which means, the last thing we need to do is decide what the button press will actually do. In my case, I simply chose all of the lights in my living room and marked them as “On”.
9) Once you get through the first automation, you need to repeat the steps. This time, however, the condition will check if the lights are on. If the lights are on, our automation will switch the lights on—essentially, the inverse of the original automation.
As a summary, here are my automations for a single button press so you can see how they both look.
Congrats, you’ve now successfully set up your first automation for the HomeKit button!
TIP: While that takes care of our command for a single press, you’ll need to repeat the steps twice more for a double press and a long-press, if you so choose.
Additional notes
There are a few other tips I wanted to share with you as well. First, don’t feel limited to just turning lights on and off. You can set complete scenes this way as well. A button press could lock and unlock a door, turn a fan on or off and so forth.
And don’t be discouraged if the button commands don’t work immediately after setup. Personally, after setting them up I had to wait 5-10 minutes before the button was working reliably (presumably, as the command was getting sent to HomeKit and my home hub).

While we set up a total of six automations, you could theoretically set up many more based on other factors such as time of day or other accessories. For instance, if you wanted to get extra fancy, you’d be able to have the hue of the lights alter based on the time of day. If you press the button in the morning or evening, it could be a warm white whereas during the day it would be a cooler hue.
Wrapping it up
Home automation is a very personal thing.
What works for one person, may not work for another. It is entirely based on you, your family, your schedule and your home. That said, this basic principle of the toggle button can be customized for any home and work with any HomeKit enabled button.
Did you try this button automation?
Let me know how it went, or any modifications you made, down in the comments!
Be sure to stay tuned to iDownloadBlog for our next installment in the HomeKit Automation series. If you’ve got any HomeKit questions or ideas for automation, please reach out to me on Twitter @Andrew_OSU.