
So you’ve grown sick and tired of Facebook and will be no longer using the service in the foreseeable future, eh? You’d be making a mistake assuming you could wipe your data and close the account by flipping a switch.
Facebook makes it fairly easy to temporarily deactivate your account, but the company’s surely gone to great lengths to make the account deletion process overly complicated, no doubt in an attempt to discourage users from leaving the service en masse.
But don’t your worry, iDownloadBlog has you covered, In this tutorial, we’re going to lay out how you can permanently delete your Facebook account and guide you step-by-step along the way.
Deleting vs deactivating your Facebook account
Deactivating the account will make all your content temporarily inaccessible to other Facebook users. That means that your photos, posts, friends, interests and other data stays intact on Facebook’s servers, in case you want to reactivate the account at any time.
Specifically, deactivating a Facebook account has the following effects:
- People won’t be able to see the information on your Timeline.
- Others on Facebook will not be able to search for you.
- Some information, like messages you sent, may still be visible to others.
By contrast, deleting an account nukes your data and you won’t be able to regain access to your account after it’s gone for good. For a clearer picture of the data that remains with Facebook after permanently deleting your account, check out a section at the end of this post.
Things to do before deleting your Facebook account
Here are the steps you should take before attempting to delete your account.
Let your friends know you’ll be leaving Facebook
It certainly doesn’t hurt to send your friends a polite message letting them know that you will no longer be available through the service.
Disable all Facebook notifications
Go to Facebook’s notification settings on a computer, click Edit next to the notification types you want to receive (Email, Mobile, SMS, Facebook and so forth) and disable all listed alerts.
Opt out of receiving emails from Facebook
To opt out of receiving emails after you have already deleted your account, follow the unsubscribe link instructions located at the bottom of any email message from Facebook. Doing so will put your email address on Facebook’s “Do not Email” list.
Remove apps that keep you logged into Facebook
It takes two weeks for your pending account deletion request to be fulfilled. Should you log into your Facebook within this timeframe, it’ll be automatically reinstated. It’s advisable that you log out on all your devices and apps that use Facebook in order to prevent them from unintentionally reactivating your account.
Start by accessing Facebook’s Security section on your computer here, and then click the Where You’re Logged In section.

You should see a list of locations, apps and devices that currently use your Facebook account, divided into various sub-sections. Open individual sub-sections and then click End Activity next to each item to end the session.
Now uninstall any mobile or desktop apps that keep you logged in to Facebook, like Facebook’s own apps like Paper, Messenger and Instagram and third-party ones such as Spotify. Lastly, log out from Facebook on your iOS devices in Settings → Facebook.

Tap on your account name and then hit the Delete Account button at the bottom. This will remove your Facebook account credentials from an iOS device and not the actual account as the wording suggests.
Download your content from Facebook
Before submitting your account deletion request, you’re highly recommended to download a copy of your information from Facebook. To download an archive containing your Facebook data to a computer, do the following:
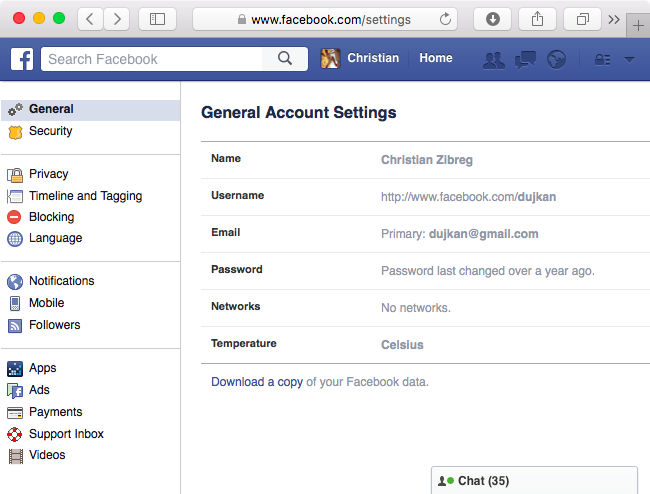
Step 1: Access Facebook account settings by logging into Facebook on your computer. Now click at the top right of any Facebook page and select Settings.
Step 2: Click the General sub-section in the lefthand column.
Step 3: There’s a “Download a copy of your Facebook data” link below your General Account Settings. Click it and you’ll be taken to a confirmation webpage.
Step 4: Here, click the button labeled Start My Archive to proceed.
Once your download is ready, you’ll receive a message to the email address on file containing a download link, which is set to expire in a few days for security purposes. Before you can download the archive, you’ll have to enter your password.
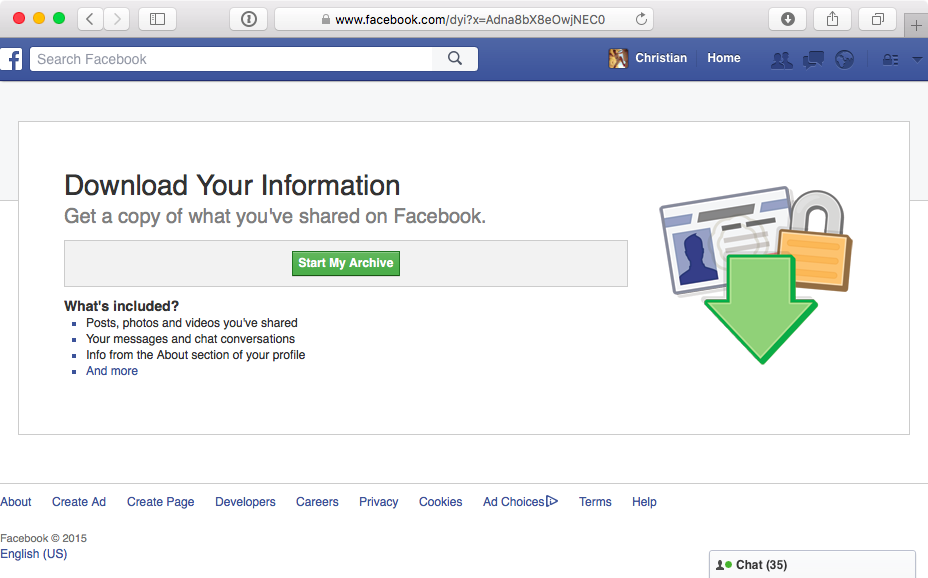
You cannot cherry-pick specific data to include in the archive. Detailed information about the contents of your Facebook archive can be found further below.
How to permanently delete your Facebook account
Facebook lacks a kill switch for instant account deletion.
Instead, you must go through a tedious process of submitting an account deletion request via a web form. Once your submission has been confirmed and 14 days have passed, your account will be permanently deleted from Facebook’s servers with no option for recovery.
After deleting your account, no one will be able to see it on Facebook.
Step 1: Log in to Facebook’s desktop interface on your computer.
Step 2: Follow this link to delete your account. A prompt pops up, warning you that Facebook won’t be able to reactivate the account or retrieve any of the content or information you have added.
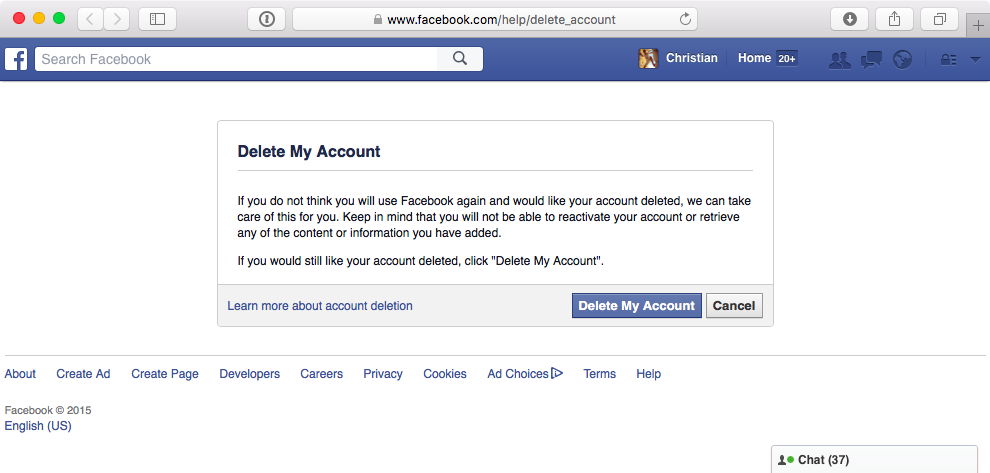
Step 3: Click the blue button labeled Delete My Account to proceed.
Step 4: A new pop-up offers you a chance to change your mind, asking “You are about to permanently delete your account. Are you sure?”.
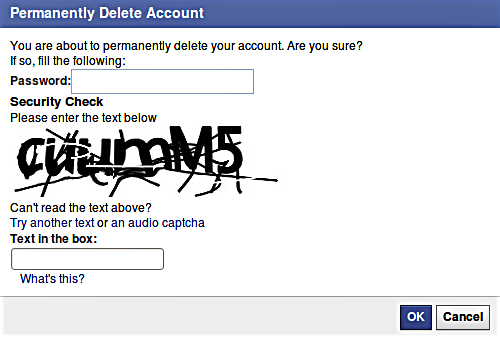
If you’re absolutely sure that you won’t be needing your Facebook account again, enter your password and security check, then click OK.
Step 5: A message appears confirming the account deletion is pending, giving you another chance to revert your decision should you change your mind.
“Your account has been deactivated from the site and will be permanently deleted within 14 days,” the message reads. Check your email for a message with the subject “Account Scheduled for Deletion” and a link to cancel the pending deletion request, if you want.
Step 6: Don’t forget to delete cache and cookies for each browser that logged into Facebook, on all devices, because saved login credentials might unintentionally trigger account reactivation.
If you’re using iCloud Keychain, remove saved Facebook passwords from in Settings → Safari → Passwords. If you’re using other browsers, make sure to remove any saved Facebook credentials, too.
IMPORTANT: As mentioned, logging back into your account during the 14-day deletion window automatically cancels your request and reactivates the account, asking you to either Cancel Deletion or Confirm Deletion.
Once Facebook permanently deletes your account, you won’t be able to bring it back or retrieve anything you’ve added to it. Past the 14-day window, it takes up to 90 days to delete everything you posted on the service and remove other data stored in Facebook’s backup systems.
“While we are deleting this information, it is inaccessible to other people using Facebook,” the company acknowledges.
What data remains with Facebook after deleting my account?
Any information that isn’t stored in your account remains on servers. For example, your friends may still have messages from you even after your account is wiped. In addition, some of the things you do on Facebook which aren’t stored in your account, like log records, will remain in Facebook’s database for technical reasons.
“When you delete your account, this material is disassociated from any personal identifiers,“ explains the firm.
What does my Facebook archive contain?
Your Facebook archive contains copies of your data, including:
- Timeline information
- Messages you have exchanged in chats
- Posts, photos and videos you have shared
- Anything from the Info section of your profile
- Other data
It also includes other information available to you in your Facebook account and activity log, including data you did not create yourself such as the ads you have clicked on, logged IP addresses and more.
Any piece of content you have previously deleted from Facebook won’t be included in the archive. To learn more which data categories are available to you upon downloading an archive of your account, check out this Facebook support document.

A server room at Facebook’s Prineville data center
“We store different categories of data for different time periods, so you may not find all of your data since you joined Facebook,” cautions the company.
Last but not least, you can also fill out this form from a computer to request detailed information about personal data that Facebook stores on its servers.
Recommended tutorials
You might appreciate these tutorials and resources from our archives:
- How to remove a phone number from iMessage
- How to delete apps from iPhone, iPod touch and iPad
- How to erase settings and data on your iOS device
- How to delete iPhone backups from iTunes and iCloud
Submit your feedback and ideas for future tutorials at tips@iDownloadBlog.com.