Learn how to preview several selected photos or files at once in Mac’s Quick Look so you can see them all at the same time and supercharge your workflow.
How to preview multiple photos at once in Quick Look on Mac

Learn how to preview several selected photos or files at once in Mac’s Quick Look so you can see them all at the same time and supercharge your workflow.
Since last year's iOS 8.3 software update iOS devices have had the ability to stop asking for a password when downloading free applications from the App Store. Soon after, that feature found its way into iTunes and iBooks for Mac.
As electronic books are no longer managed through iTunes, disabling password prompts for iBooks Store downloads is now handled in iBooks for Mac. In this post, you will learn how to disable Apple ID password prompts when downloading free electronic books from Apple's iBooks Store, and we'll also show you how you can manage password settings for paid items.

Learn how to turn off Siri-suggested events in Apple's built-in Mail and Calendar apps on an iPhone, iPad, and Mac to remove unwanted entries from your schedule.
macOS has a nifty little productivity boost that makes it both easy and fun to run two apps side-by-side in your Mac's native full-screen mode.
This can be indispensable when focusing on specific tasks at hand while disregarding everything else, like online research and taking notes, or blogging and writing, or reading news while keeping tabs on your Twitter feed and so forth.
This mode, called Split View, is normally activated by dragging an app to either side of the screen by its window's upper left green button, and then choosing another app to fit the other half of the screen.
But the multi-step process is often a tad confusing for novice users, especially those accustomed to Windows 7's effortless window snapping. Thankfully, your Mac supports creating Split Views right within Mission Control, which in macOS has been tidied up and made clearer and more obvious.
In this tutorial, you'll learn how to go, and exit, Split View just by dragging app windows inside your Mac's Mission Control.

Although not apparently obvious, Apple's Reminders app on iPhone, iPod touch, iPad, Mac and iCloud.com lets you share to-dos and checklists with friends and family.
Sharing a reminder list with, say, your girlfriend (or wife) is particularly convenient as you’ll both be able to add, delete and check off items as completed, and all changes will instantly appearing on everyone's devices thanks to seamless iCloud syncing.
This isn't just great for grocery lists, shared to-dos and interactive lists among family members, but for business, too. For example, you could share a to-do list with team members to keep everyone apprised of what needs to be done on any particular day.
In this post, we're going to show how easy it is to create a list in Reminders and invite others to participate across iOS, macOS, and the web.
Just like the familiar Settings application on an iPhone, iPod touch and iPad, the macOS System Preferences is probably the most frequently used application on your Mac.
If you're new to the Mac, System Preferences—much like the Control Panel on Windows—is a one-stop shop for adjusting various settings on your computer. Various settings are categorized into logical sections and laid out as a grid of preference pane icons.
In this post, we're going to outline five different time-saving ways to jump quickly into any specific setting nested within System Preferences.

Those funky headphones that came with your iPhone—EarPods with Remote and Mic they're called—only have 3 buttons but boy do they perform a surprising number of functions beyond volume control. And with built-in mic, your EarPods can make and receive phone calls and control media playback.
Moreover, you can use them for recording voice memos, interacting with Siri hands-free, VoIP calling in apps like Skype and more, all with a pinch of the cord. Wait, I need this article to tell me how to plug my EarPods and listen to music?
We're not saying you're not familiar with your EarPods. But as with other things in life, there are always new tricks to be learned. This post will hopefully help you master your EarPods like a pro.
In this article, we'll tell you all the cool things your EarPods can do, from rich playback control and controlling Siri to switching calls on the fly, using VoiceOver and so forth. We'll also discuss EarPods compatibility, talk about keeping your headset in pristine condition and lay out sound advice for using your headset responsibly.
Like iOS's built-in Settings app, the System Preferences application on OS X lets you customize the various aspects of your Mac to your liking.
For instance, you can adjust the size and location of the Dock, select a desktop background, set your computer’s clock to a different time zone, customize how your keyboard, mouse and trackpad work and much more.
With System Preferences, changing your computer's settings happens in one easily accessible central place. Our recent tutorial has shown you how to manually remove a third-party pane from System Preferences if it stays intact after uninstalling its container app.
Today, we're going to discuss customizing your view of System Preferences and teach you to organize System Preferences icons and show and hide individual icons from the view.
Some third-party apps you install on your Mac might nest custom panes within OS X's System Preferences, mostly those distributed outside the Mac App Store due to sandboxing requirements. Uninstalling such an app automatically removes the underlying pane from System Preferences but not always, leaving you scratching your head.
Case in point: Tuxera's MacFUSE, a dynamically loadable kernel extension.
I needed to mount files to an NTFS-formatted drive the other day so I installed MacFUSE. After removing the app a few days later using its own uninstaller, I noticed its pane in System Preferences was left intact. Should that happen to you, here's how you can safely remove stubborn System Preferences panes from your Mac.
If you've ever accidentally closed a Safari window loaded with dozens of tabs, you know how daunting a task recreating them from your browsing history can be. Like many people, I used to be a huge fan of Google's Chrome before I eventually made a switch to Safari.
One of Chrome's simple yet tremendously useful features that I've always valued is a switch in settings telling the app to open with all the windows from your last browsing session.
Apple's desktop Safari, too, has had that feature for a while now but did you know of a hidden option for reopening all windows from the last session?
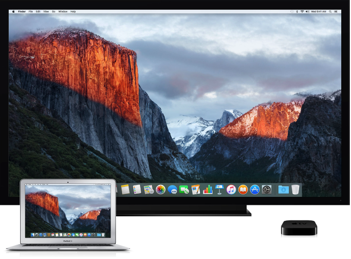
Since OS X 10.9 Mavericks owners of the Apple TV have been able to wirelessly mirror their Mac screen to the big screen TV with an AirPlay feature called AirDisplay. There was just one slight problem: you couldn't stream individual videos without mirroring the whole screen.
Apple has solved this annoyance with OS X 10.11 El Capitan, which introduced richer AirPlay support permitting you to send video from Safari and other apps to the Apple TV.

Have you ever woken your Mac up from sleep, and couldn't find the mouse pointer among the mess of windows and desktop icons. We've all been there before.
Starting with El Capitan, macOS is hoping to help out with that, courtesy of a brand new addition to the operating system. It's certainly not a headline feature, but macOS can help you quickly locate your mouse or trackpad pointer by simply shaking your mouse or swiping your finger back and forth on the trackpad in quick succession.
Watch our video inside to see how it works. We'll also show you where to go to disable the feature in System Preferences.