Learn how to use your Apple Vision Pro and work your way around visionOS apps and interfaces using your eyes, fingers, and hands.
1. Look
This is the equivalent of moving your computer mouse cursor onto elements of the screen.
You can look at menu items and objects when using Vision Pro to highlight them. For instance, you can look at the speaker icon and then turn the Digital Crown to adjust the volume.
Similarly, to open Control Center, look up and tap the tiny arrow at the top of your virtual view to highlight it, then tap your thumb and index fingers to select it.
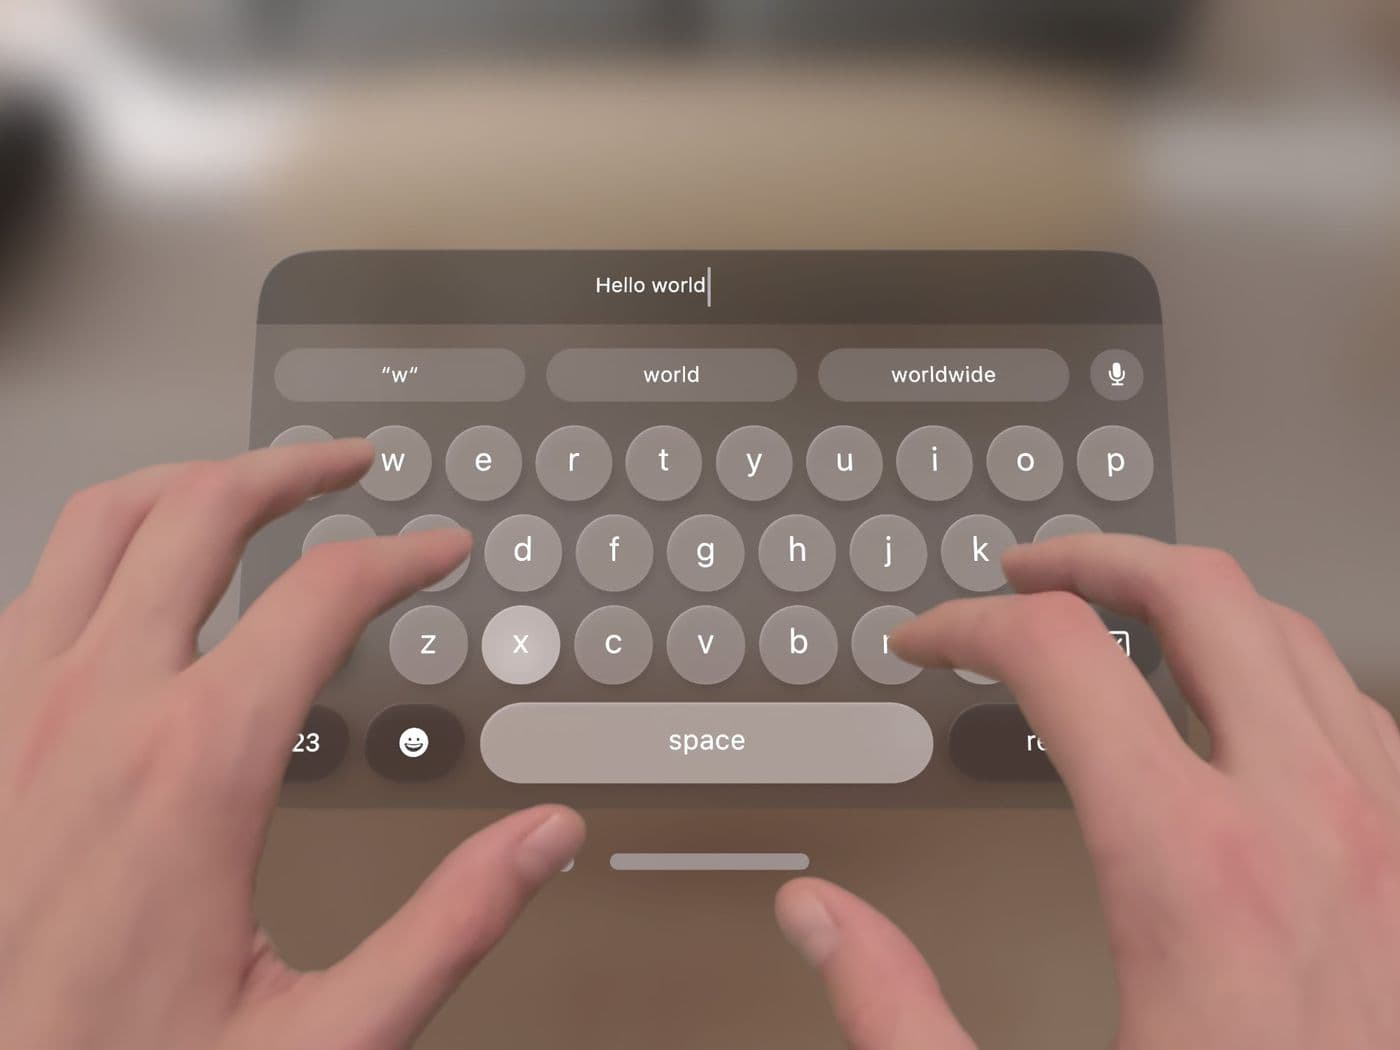
Another solid use of your eyes is when you want to enter text on your Vision Pro. You can simply look at the individual keys on the virtual floating keyboard and then tap your thumb and index fingers to enter text one key at a time.
Since Vision Pro is strapped to your face, your eyes play an important part in the overall experience, right from unlocking the device using Optic ID to navigating around your view.
2. Touch
If they are close enough, you can reach out to the virtual elements in your view and interact with them directly with your fingers.
As an example, you can tap the X close button in the window bar to close an app.
You can also tap the individual keys of the virtual keyboard with your finger to enter them in the text field.
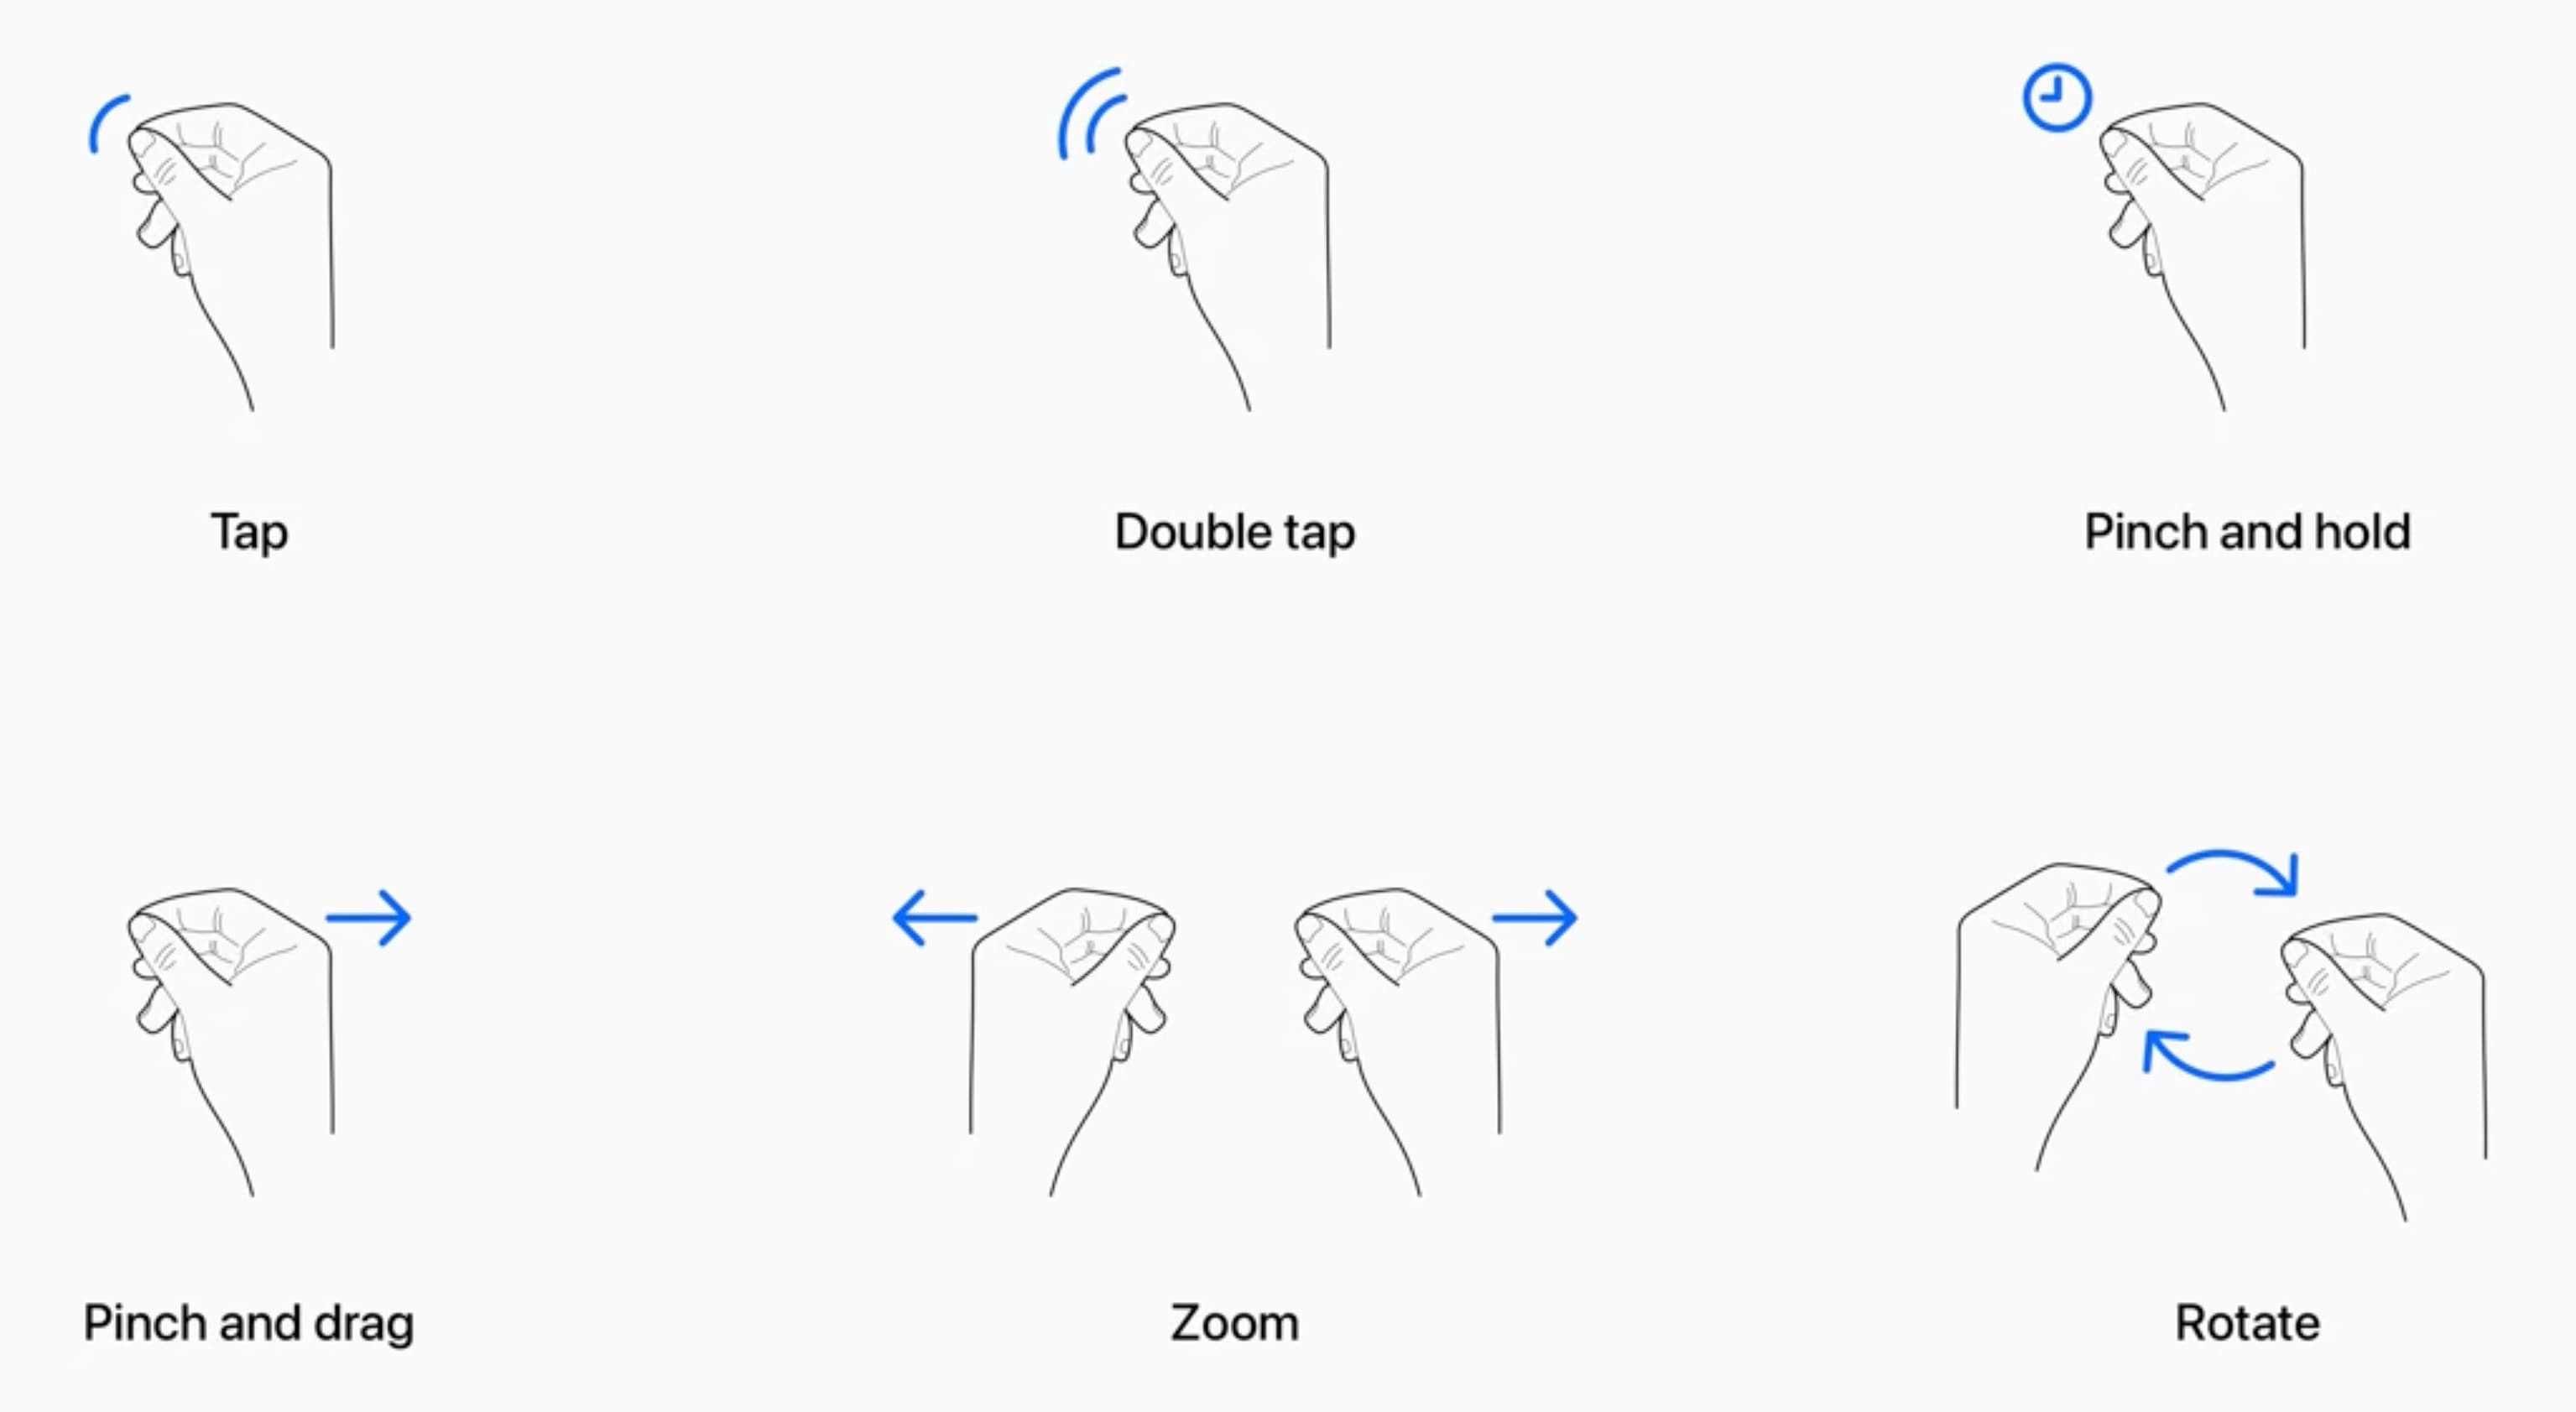
3. Tap

Tapping in visionOS is similar to a tap on your iPhone, or a click with the mouse of your computer.
On Apple Vision Pro, you can perform the so-called “tap” action by looking at the content and then tapping your thumb and index finger together. After tapping them, move your fingers apart.
You can use the tap action to select options floating around you, open apps, and more.
When needed, you can also repeat the tap action quickly to perform a double tap.
4. Pinch and hold

This is the equivalent of a tap and hold gesture on your iPhone, or a right click on your Mac.
Bring your index finger and thumb together and continue to hold them in that position for an extended duration.
For instance, if you pinch and hold the X button in the bottom window bar, you will see the option to close the selected app or hide all other apps.
5. Zoom in and zoom out

This is the equivalent of the pinch to zoom gesture on your iPhone.
You can zoom in and out by performing the pinch and hold action with both your hands and then pulling both hands apart to zoom in and moving both hands closer to zoom out.
6. Rotate
Pinch and hold with both hands, and then make a rotate action.
7. Pinch and drag
This is the equivalent of the tap and drag gesture on your iPhone, or the click and drag gesture on a Mac.
Bring your thumb and index fingers together, keep them touched, and then drag your hand side-to-side to move items or objects.
You can also use this move an app window, the virtual keyboard, or an in-app shape in productivity apps.
8. Scroll and Swipe

This is the equivalent of scrolling on your iPhone or using your computer mouse.
You can use the pinch and drag action to swipe up and down in apps like Safari, Photos, etc. You can also pinch and then quickly flick your wrist to scroll quickly.
Redo eye and hand setup

You are asked to do an eye and hand setup when setting up Apple Vision Pro for the first time.
You can perform the training again if you think you’re not able to use your eyes and hands precisely when using your Vision Pro headset.
- To redo the eye setup: Go to Vision Pro Settings > Eyes & Hands > Redo Eye Setup.
- To redo the hand setup: Go to Vision Pro Settings > Eyes & Hands > Redo Hand Setup.

- Ask Siri: You can also redo the eyes and hands setup by speaking, “Siri, set up eyes” or “Siri, set up hands.”
- Redo both: Press the top button four times to quickly redo both the eye and hand setups.

Select a desired pointer
visionOS has handy Accessibility settings. Apple says that “you can use your eyes, head, wrist, or finger as a pointer with Vision Pro.”
To adjust this, go to the Vision Pro Settings app > Accessibility > Interaction > Pointer Control. From here, turn on the Pointer Control option and choose what you want to use as the pointer. For instance, if, for some health reasons, you cannot navigate with your eyes, you can choose your wrist, hand, or head as the pointer.
If you can’t navigate with both eyes
In case you cannot use both eyes to navigate around, go to Vision Pro Settings app > Accessibility > Eye Input and then choose to navigate with either your left or right eye only.
Add gestures to the AssistiveTouch menu
You can also add favorite gestures like pinch & hold to the AssistiveTouch menu. To do that, go to Vision Pro Settings > Accessibility > Interaction > AssistiveTouch > Create New Gesture.
More on Apple’s headset:
Images in this post are taken from Apple.