
I’ve always loved the simplified iOS approach to screenshot taking just by pressing the power and home button simultaneously. This oft-used feature works in absolutely any app and, as an added bonus, iOS stores my screenies in the Camera Roll as crisp, lossless PNG files.
An indispensable part of my daily blogging workflow, I grab app graphics on a daily basis for use in reviews, news articles and guides such as this one. The old-school approach to syncing iOS screenshots (along with your photos) entails connecting your device to a Mac or PC via USB. But if you’re anything like me, you’ve long cut the cord to enjoy the benefits of wireless sync.
Now, iCloud makes photo sync a no-brainer: that is, unless the very thought of firing up iPhoto or Aperture on your Mac just to access your Photo Stream drives you nuts.
There must be a better way to bypass these resource-intensive apps and have the screenshots taken on your iPhone, iPad or iPod touch automagically appear just a mouse click away in your Mac’s Finder. Read on for the full breakdown…
Note: this guide was last updated on Sunday, January 27, 2013 at 3pm Pacific, 6pm Eastern.
The trick involves using the Photo Stream feature on the iOS end to get those screenies automatically uploaded to iCloud and pushed to a Mac. From there, we turn to Spotlight and Smart Folder features on our Mac to create a custom search query and pin it to Finder.
As a result, just by clicking this Smart Folder you’ll be able to access a list of files collected from a special folder OS X uses to sync all your iCloud stuff.
Of course, to use Photo Stream, you need an iCloud account, compatible devices and up-to-date software.
Let’s get started…
What you need
• an iOS device with iOS 5.1 or later, connected to Wi-Fi
• a Mac with OS X Lion v10.7.5 or later and iPhoto 9.2.2 or Aperture 3.2.3 or later
• an iCloud account (set up instructions here)
Steps required
• enable Photo Stream on your Mac and iOS devices
• navigate to the iCloud Photo Stream folder on your Mac
• create a Smart Folder listing only iOS screenies and pin it to the Finder’s sidebar
Step 1 – Enabling Photo Stream on your devices
You must first set up Photo Stream on each computer and iOS device that you want to be part of your Photo Stream, here’s how.
Enabling Photo Stream on your iOS devices
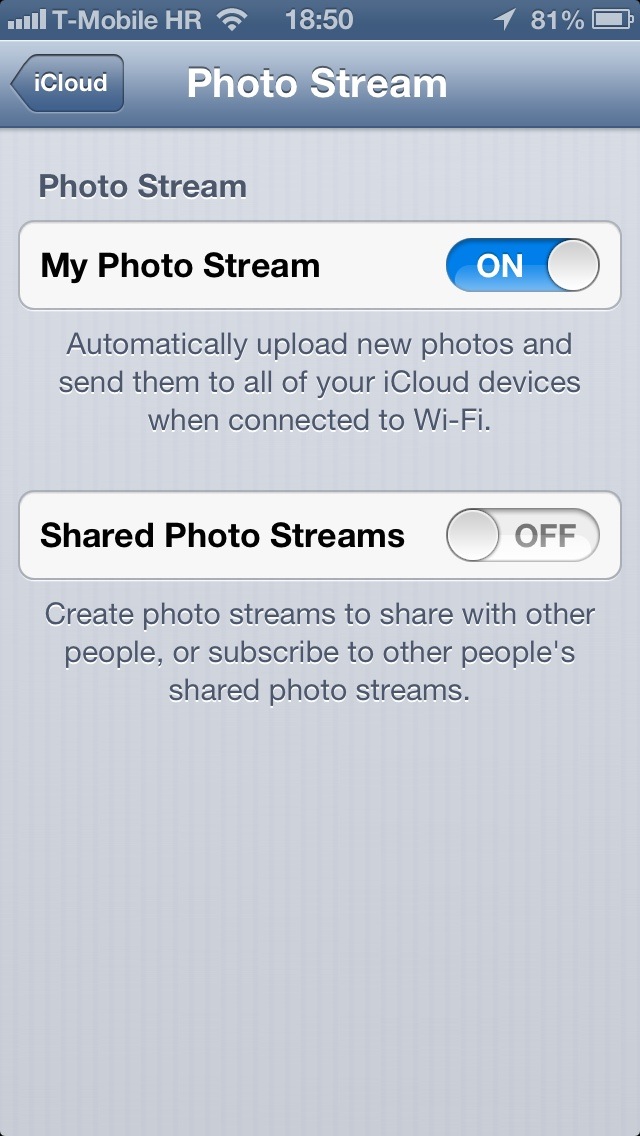
On your iOS device, go to Settings then tap iCloud > Photo Stream. Turn on My Photo Stream and you’re done.
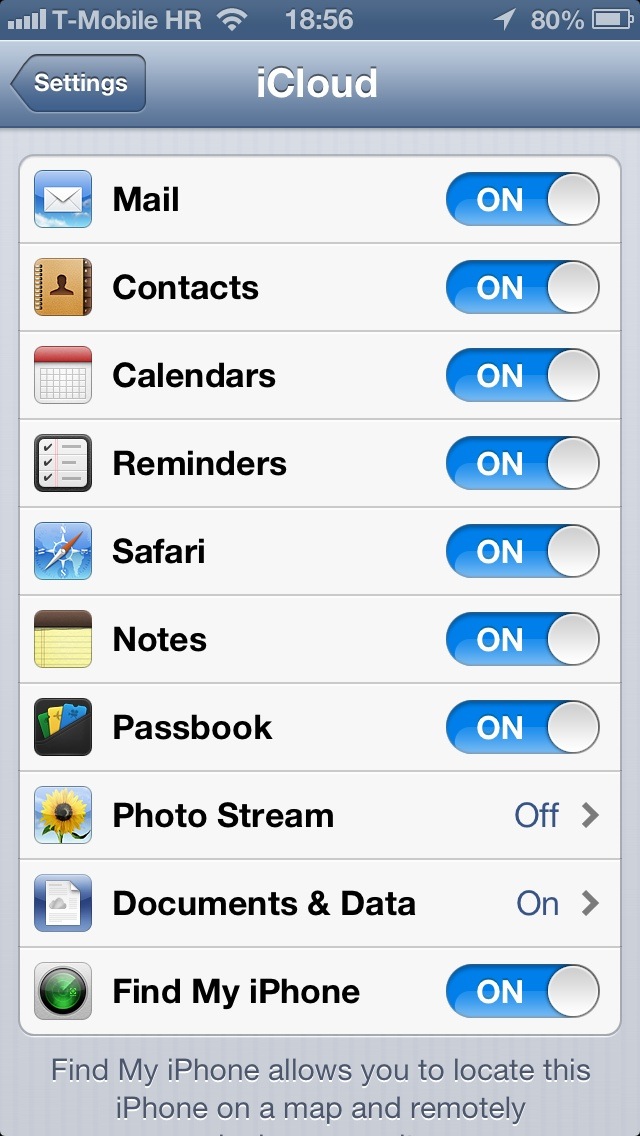
Doing so tells your iOS device to automatically upload new photos added to the Camera Roll, which includes screenshots, to all your iCloud-authorized iOS devices and Macs.
Enabling Photo Stream on your Macs
On your Mac, go to System Preferences. Click the iCloud preference pane and hit the Options button.
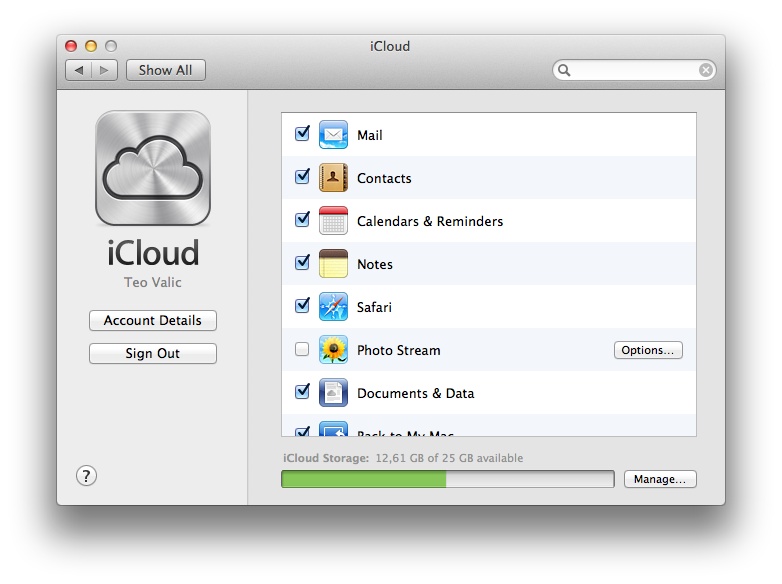
Select the Photo Stream checkbox.

If your have iOS 6 and OS X Mountain Lion v10.8.2 or later, you can optionally enable Shared Photo Streams to share individual photos with other people, though this isn’t required for this guide.
Also important, even though Shared Photo Streams work over both Wi-Fi and cellular data connections, your own Photo Stream does not push photos and screenshots over cellular connections.
Step 2 – navigate to the iCloud Photo Stream folder
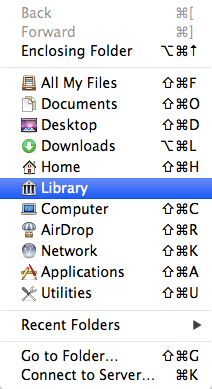
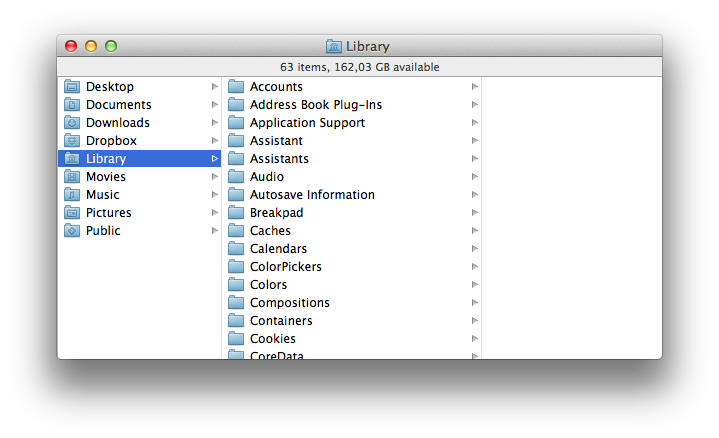
The iCloud sync assets are buried deep inside the Library folder of your user account. However, Apple with OS X Lion hid the Library folder to prevent tampering, but you can still access it with a keystroke.
Click the desktop or any Finder window, hold down the Option key and select the Go menu. Choose Library from the menu.
A Finder window will open showing the contents of the Library folder, just like this.
Navigate to Application Support > iLifeAssetManagement > assets > sub. You should see a list of hashed folders, each containing a single image downloaded from iCloud Photo Stream.
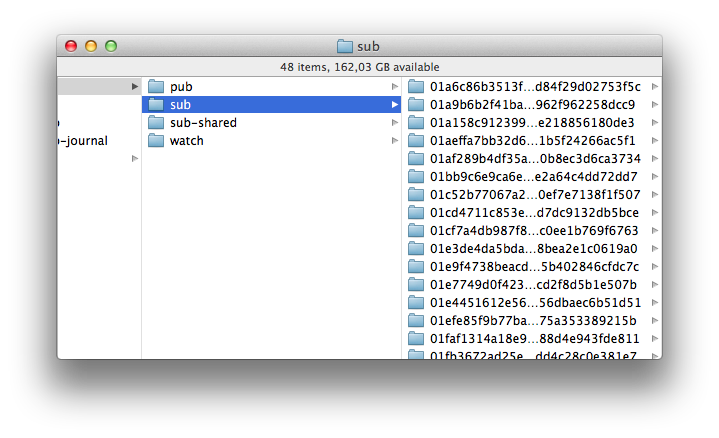
Your Mac automatically creates these for any new photo or screenshot taken on an iOS device with Photo Stream enabled.
If you’ve just set up Photo Stream on your devices, the ‘sub’ folder may not exist yet. Just take a screenshot on an iOS device by holding down the Power and Home button simultaneously and wait until iCloud pushes the image to your Mac: the ‘sub’ folder should then appear.
Step 3 – Create a Smart Folder
Smart Folders in OS X behave just like Smart Playlists in iTunes in that your Mac will automatically gather files and folders depending on set criteria. Smart Folders are also updated in real-time, as files on your Mac get changed, added and removed.
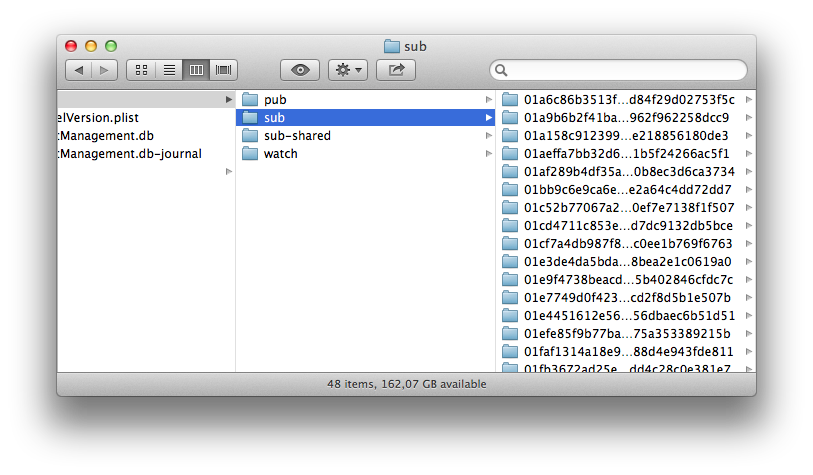
Show the Toolbar
With the Finder window containing the ‘sub’ folder active, choose Show Toolbar from the View menu or hit the Option-Command-T combo on the keyboard. This will give you access to the window’s Search field in the upper right.
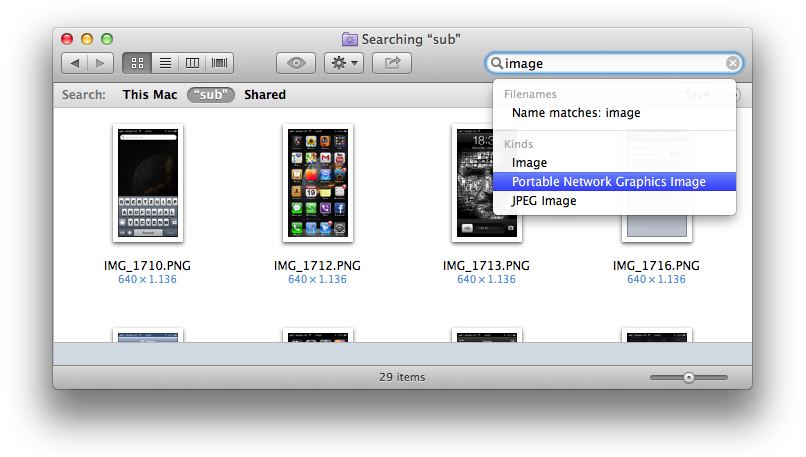
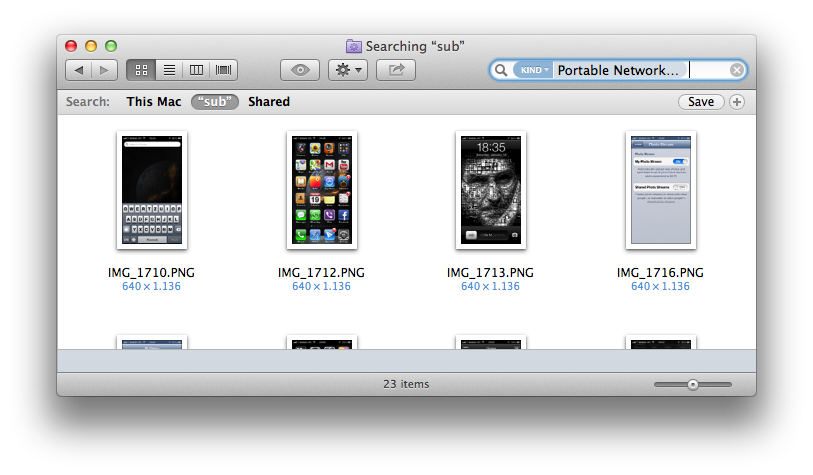
Search for PNG files
In the Search filed, in the field, type ‘image’ and select Portable Network Graphic Image from the popup. You will notice that the contents of the window has changed to list only image files nested inside the ‘sub’ folder.
Make sure that the ‘sub’ folder is selected before searching, like in the previous screenshot.
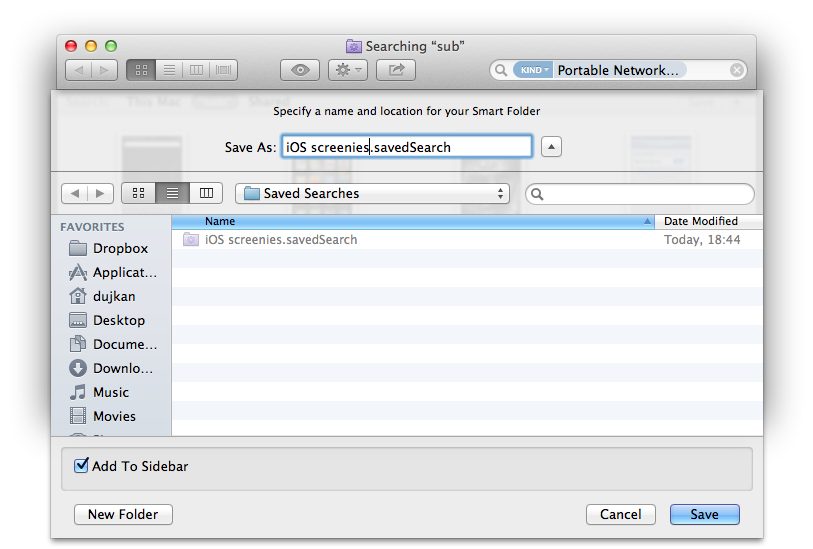
Save your Smart Folder
Hit Enter on your keyboard.
Portable Network Graphics will appear as a blue token inside the search field. Click the Save button to save your newly created Smart Folder.
Before hitting Save, double check that the “sub” button is selected in the search scope section and not This Mac or Shared (this is a common mistake).
In the Save popup, name this Smart Folder anything you want. I gave it the descriptive name “iOS screenies”. Leave the Add To Sidebar option checked and click the Save button.
You’re done!
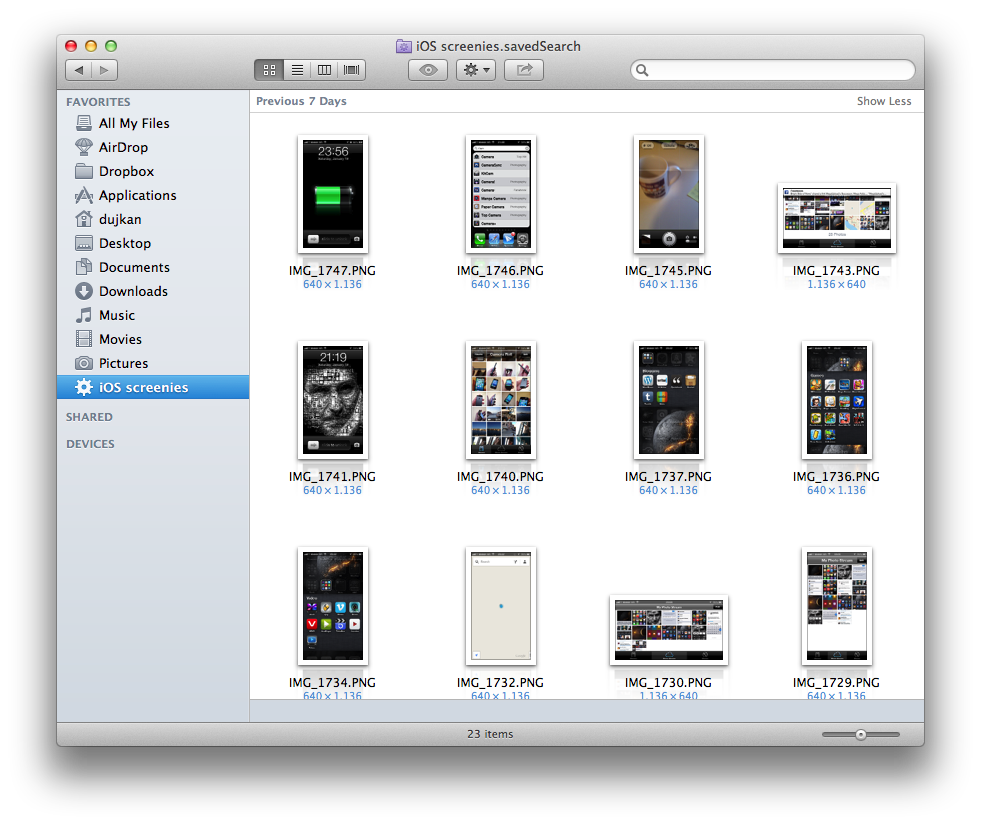
Now, your Finder windows will have a new Smart Folder in the sidebar, just like in the below screenshot.

This gives you a convenient one-click access to a special folder which gathers all the iOS device screenshots (PNG files) your Mac retrieved from iCloud Photo Stream.
Handy, no?
While the trick works most of the time, this is an undocumented solution so you may run into some issues.
Issues and possible solutions
Some people make a common mistake of messing up their Smart Folder search criteria by not checking that the ‘sub’ folder is selected before searching. Others forget to double check that the “sub” button is selected as the search scope before saving their Smart Folder.
If you’re having problems with the Photo Stream feature on your Mac, try resetting Photo Stream following Cody’s tutorial. You basically just log in to iCloud.com and hit Advanced > Reset Photo Stream.

Another thing: you may need to have either iPhoto 9.2 or Aperture 3.2 or later installed on your system.
But even if that’s the case, you are not required to set up Photo Stream in neither app as the whole point of this tutorial is to give you a direct access to iOS screenies right from the Finder, bypassing dragging Photo Stream images from iPhoto or Aperture to your desktop.
I can confirm this trick works without either iPhoto or Aperture on my Mac Book Air running Mountain Lion 10.8.2.
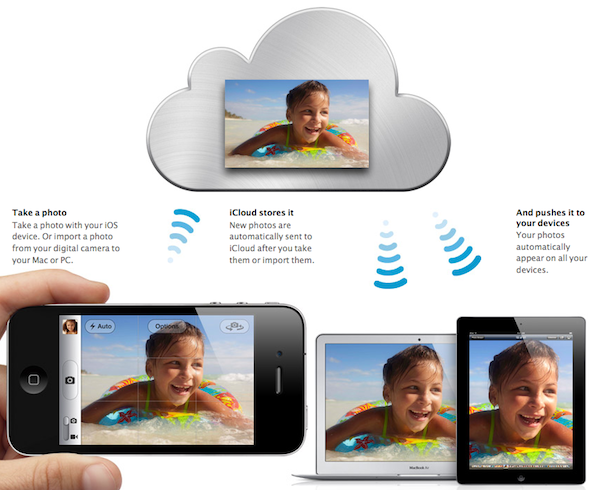
I love how Apple’s commercial says that with iCloud, you can “take a picture here and it shows up there”.
http://www.youtube.com/watch?v=DCjeSNomXrU
Your mileage may vary.
One of the known issues involves Macs running Mountain Lion 10.8.2.
I’ve heard from several people who confirmed that this Smart Folder trick produces random results: sometimes it would work flawlessly, but other times their Smart Folder just wouldn’t gather all of the iOS screenshots, even though they were nested in sub-folders inside the ‘sub’ folder.
Spending countless hours hunting for a solution, I was able to narrow down the issue to Spotlight. For reasons unknown, Spotlight just wouldn’t list some of the synced PNG files although they were there.
Rebuilding the Spotlight index didn’t help fix the issue, but opening the misbehaving screenshot in an image editing program like Pixelmator or Preview instantly made it recognizable by Spotlight.
Go figure.
Granted, that ain’t a practical workaround.
I’m only mentioning it here in the hope that somebody may take this piece of information to pinpoint exactly what Mountain Lion 10.8.2 broke and help us solve this unusual behavior. This issue seems to manifest itself only on some Mountain Lion 10.8.2 installations.
No information points to the problem occurring on prior OS X Mountaion Lion or Lion releases.
Last, but certainly not the least: whatever you do, please don’t mess with the iCloud sync folder on your Mac.
Not ever.
Or else…

Again, avoid renaming synced iCloud files, messing with folders or sub-folders and tampering their contents. Never, ever edit the originals in other applications.
Nothing bad will happen if you just view iOS screenshots in Finder. But should you need to touch up synced iOS screenies, don’t do it directly inside the ‘sub’ folder. Instead, make a copy on your desktop and edit that file instead.
This tutorial is provided as is and iDB cannot be held responsible for iCloud syncing issues that may occur if you choose to ignore our advice.
If you have any questions or just want to clarify something, we’re down in comments. Also, if you have a better idea to sync iOS screenies to Finder without going through iPhoto or Aperture, we’re all ears.