Learn how to downgrade your iPhone from iOS 26 to iOS 18 or your iPad from iPadOS 26 to iPadOS 18 with this easy step-by-step guide.

If you installed the iOS 26 developer beta, public beta, or the general release but don’t like the new Liquid Glass design language or can’t tolerate frequent Wi-Fi disconnections, excessive heating issues, app crashes, poor battery, or other similar issues, you can restore your iPhone or iPad and return it to iOS 18 or iPadOS 18.
Just note that Apple may soon stop signing iOS 18, in which case, you’ll have no choice but to stay on iOS 26 and get used to it.
Update September 22, 2025: Apple has stopped signing iOS 18.6.2, which means you can no longer downgrade your iPhone from iOS 26 to iOS 18. However, if you’re still on iOS 18, you can continue to stay on it without updating to the new iOS 26.
First, what happens to your existing iPhone data?
Scenario 1: If you had backed up your iOS 18 iPhone to a Mac or Windows PC and then archived that backup, you can restore it, essentially getting back all the data that was on your device before updating to iOS 26.
Scenario 2: Regardless of whether you have a previous device backup or not, if you use iCloud to store your contacts, notes, reminders, calendars, photos & videos, files, etc., then all that data will sync right back after you set up your restored iPhone. Similarly, data stored in your other cloud accounts, like Google Drive and Dropbox, will stay safe. You can learn all about it in our separate guide: How to back up important iPhone data without a full device backup

Tip: You can also manually move photos, videos, documents, etc., to an external drive and transfer them back to your iPhone after it’s downgraded to iOS 18.
What you need to downgrade from iOS 26 to iOS 18
You need a Mac or Windows PC and a reliable Internet connection to downgrade your iPhone or iPad from iOS 26 to iOS 18. Make sure your Mac or the Apple Devices app on your Windows PC is up to date.
Downgrade your iPhone from iOS 26 back to iOS 18
1) Connect your iPhone or iPad to a Mac or Windows PC using a USB cable and allow any pop-ups that show up. Then, open Finder on Mac or the Apple Devices app on PC and select your connected iOS device if it appears there. We’re using a Mac for these steps.

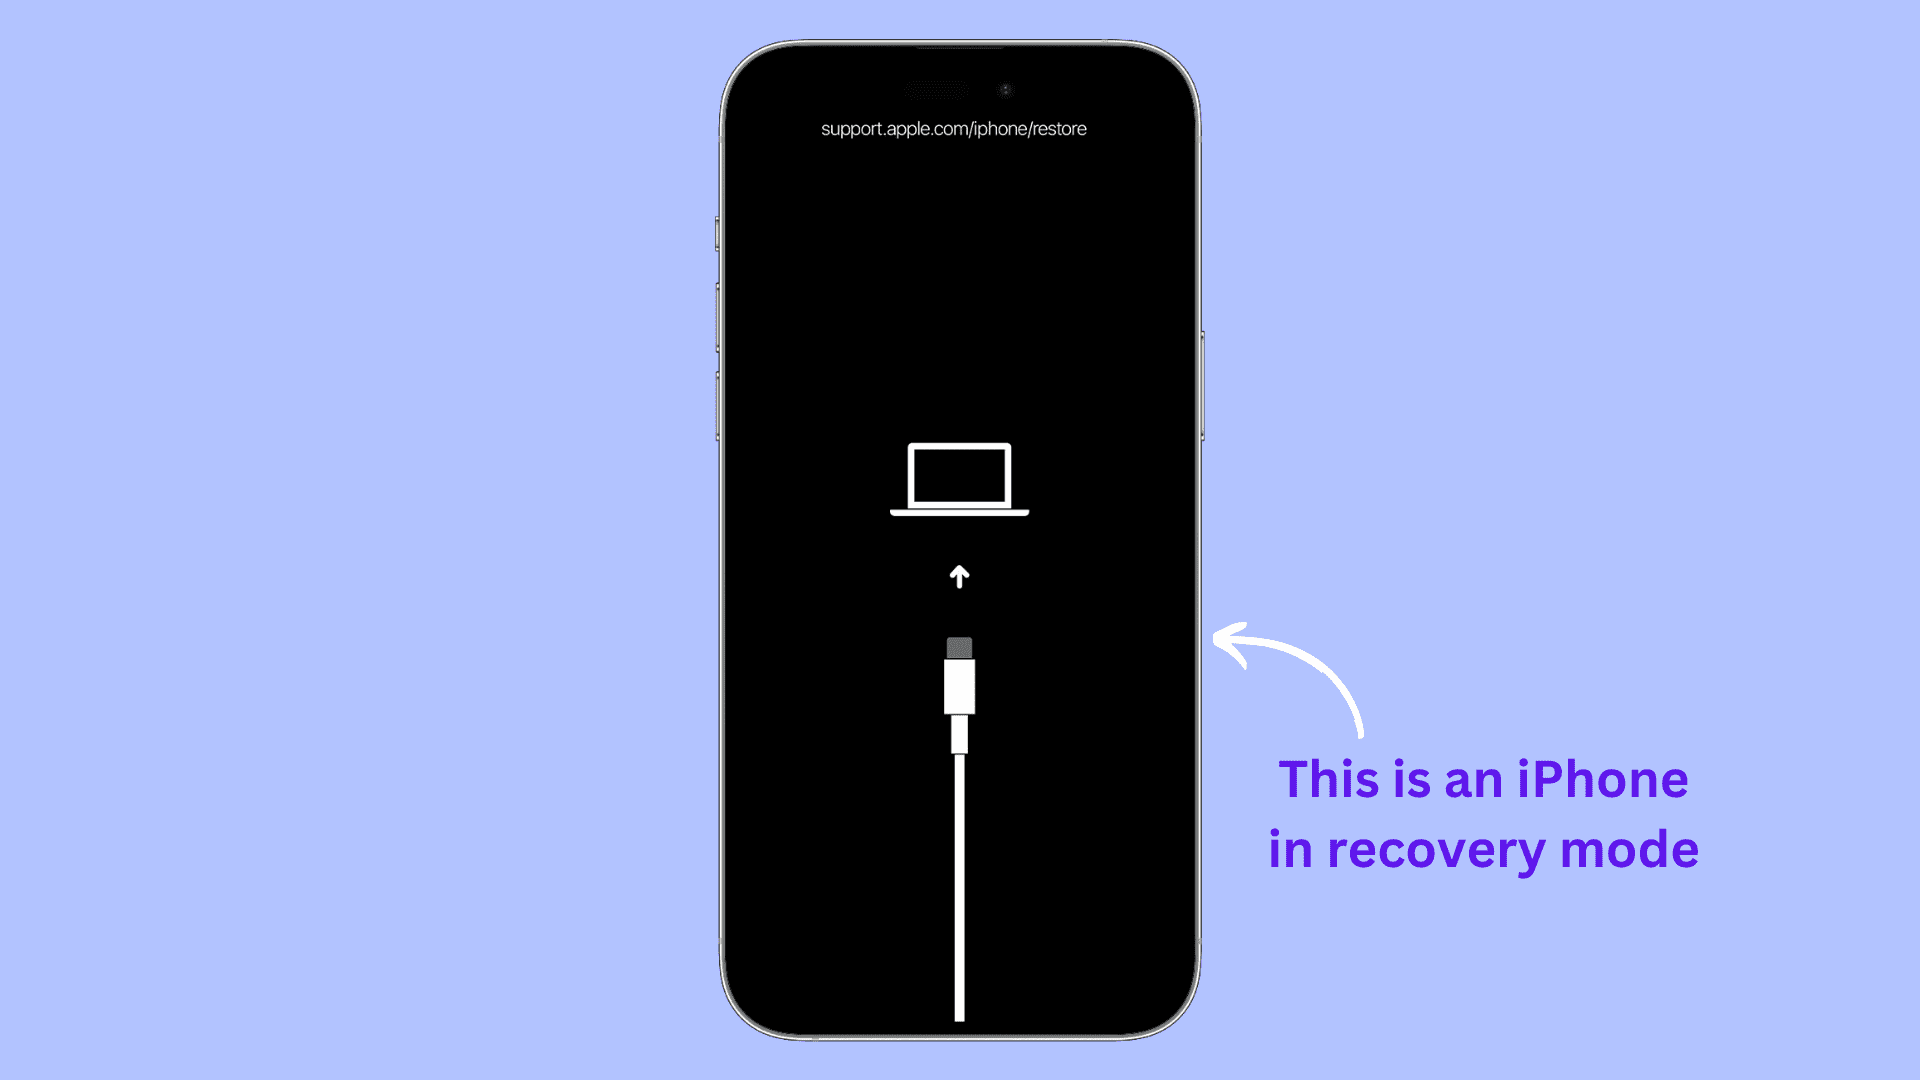
2) Now, put your iPhone or iPad in recovery mode, as shown below. Remember to keep the side or top power button pressed even when you see the Apple logo on your iPhone or iPad; stop pressing only after you get the recovery mode screen (a cable pointing to a laptop).
To put your iPhone in recovery mode:
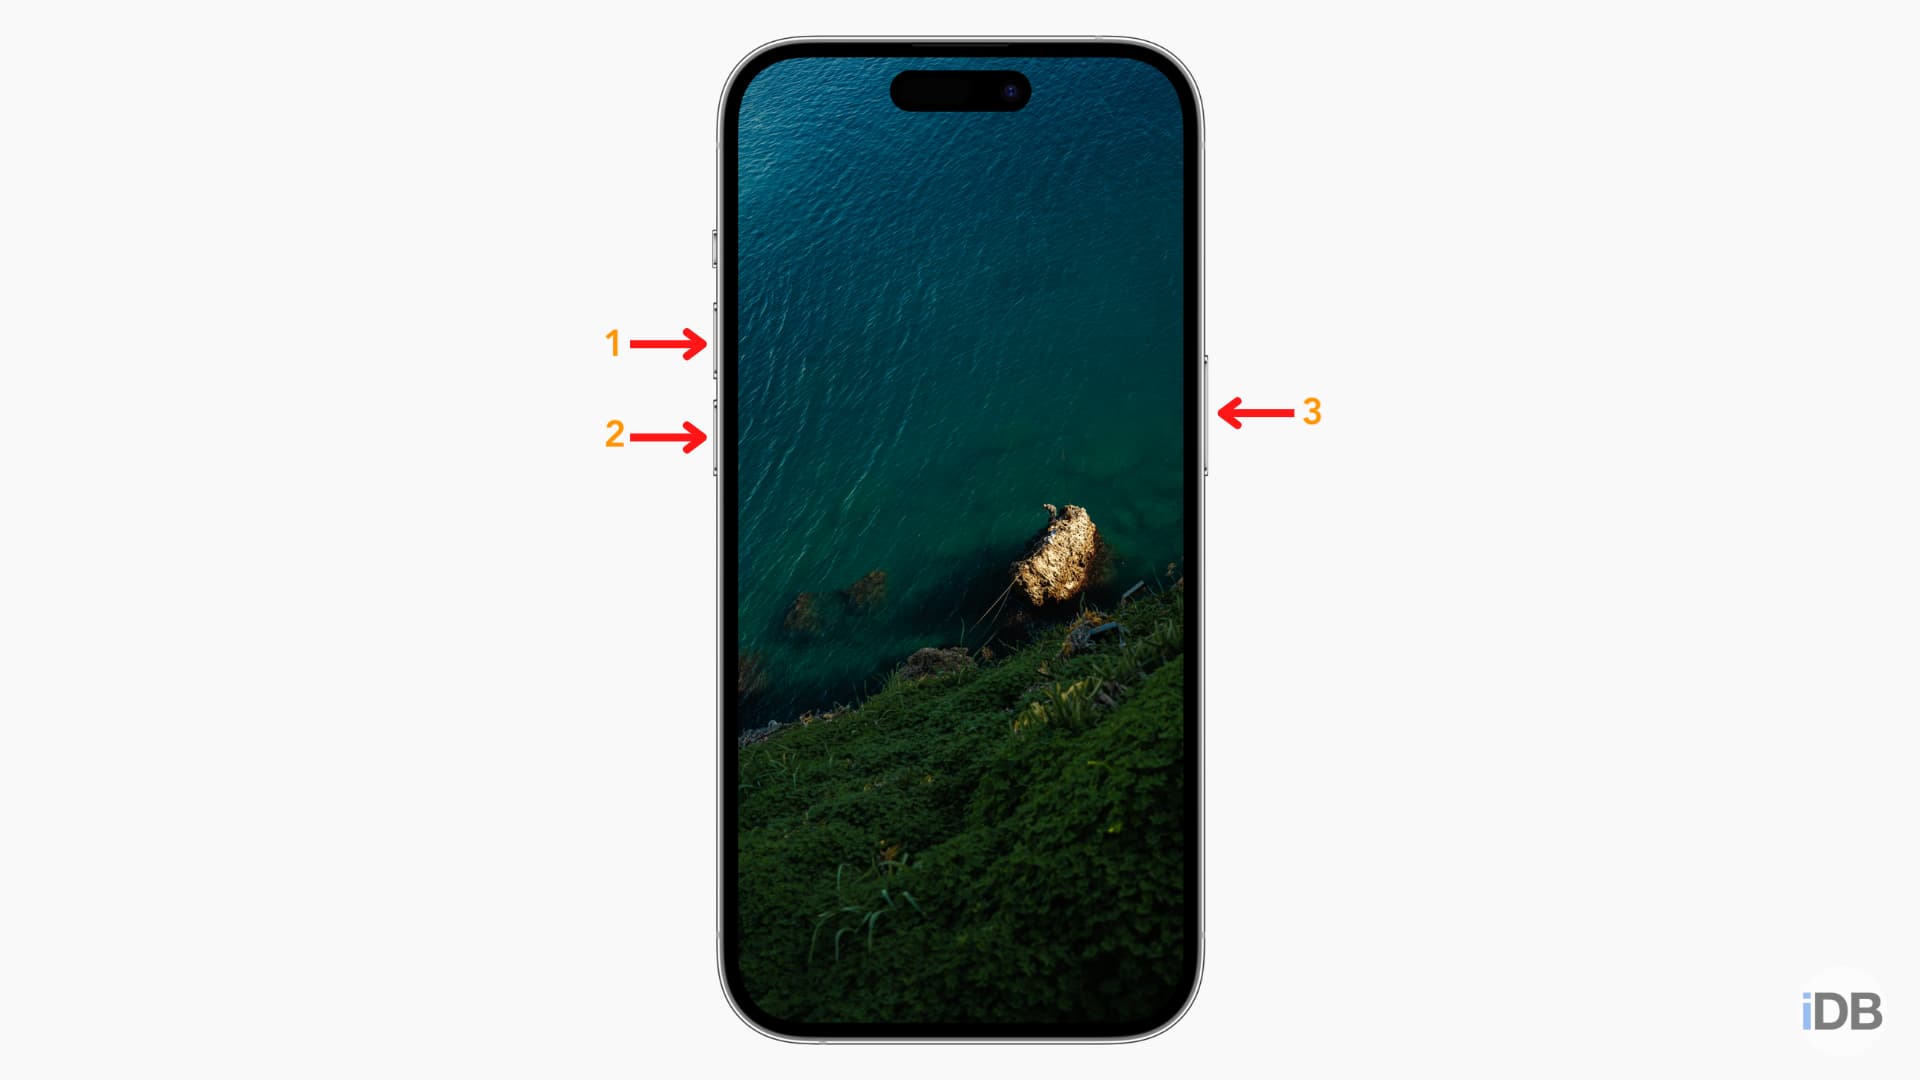
- Press the volume up button and quickly release it.
- Press the volume down button and quickly release it.
- Immediately press & hold the Side power button until you see the black recovery mode screen with a cable pointing towards a MacBook.
To put an iPad without a Home button in recovery mode:
- Press the volume button closest to the top power button and release it.
- Press the volume button farthest from the top power button and release it.
- Now, press & hold the top power button until you see the recovery mode screen.

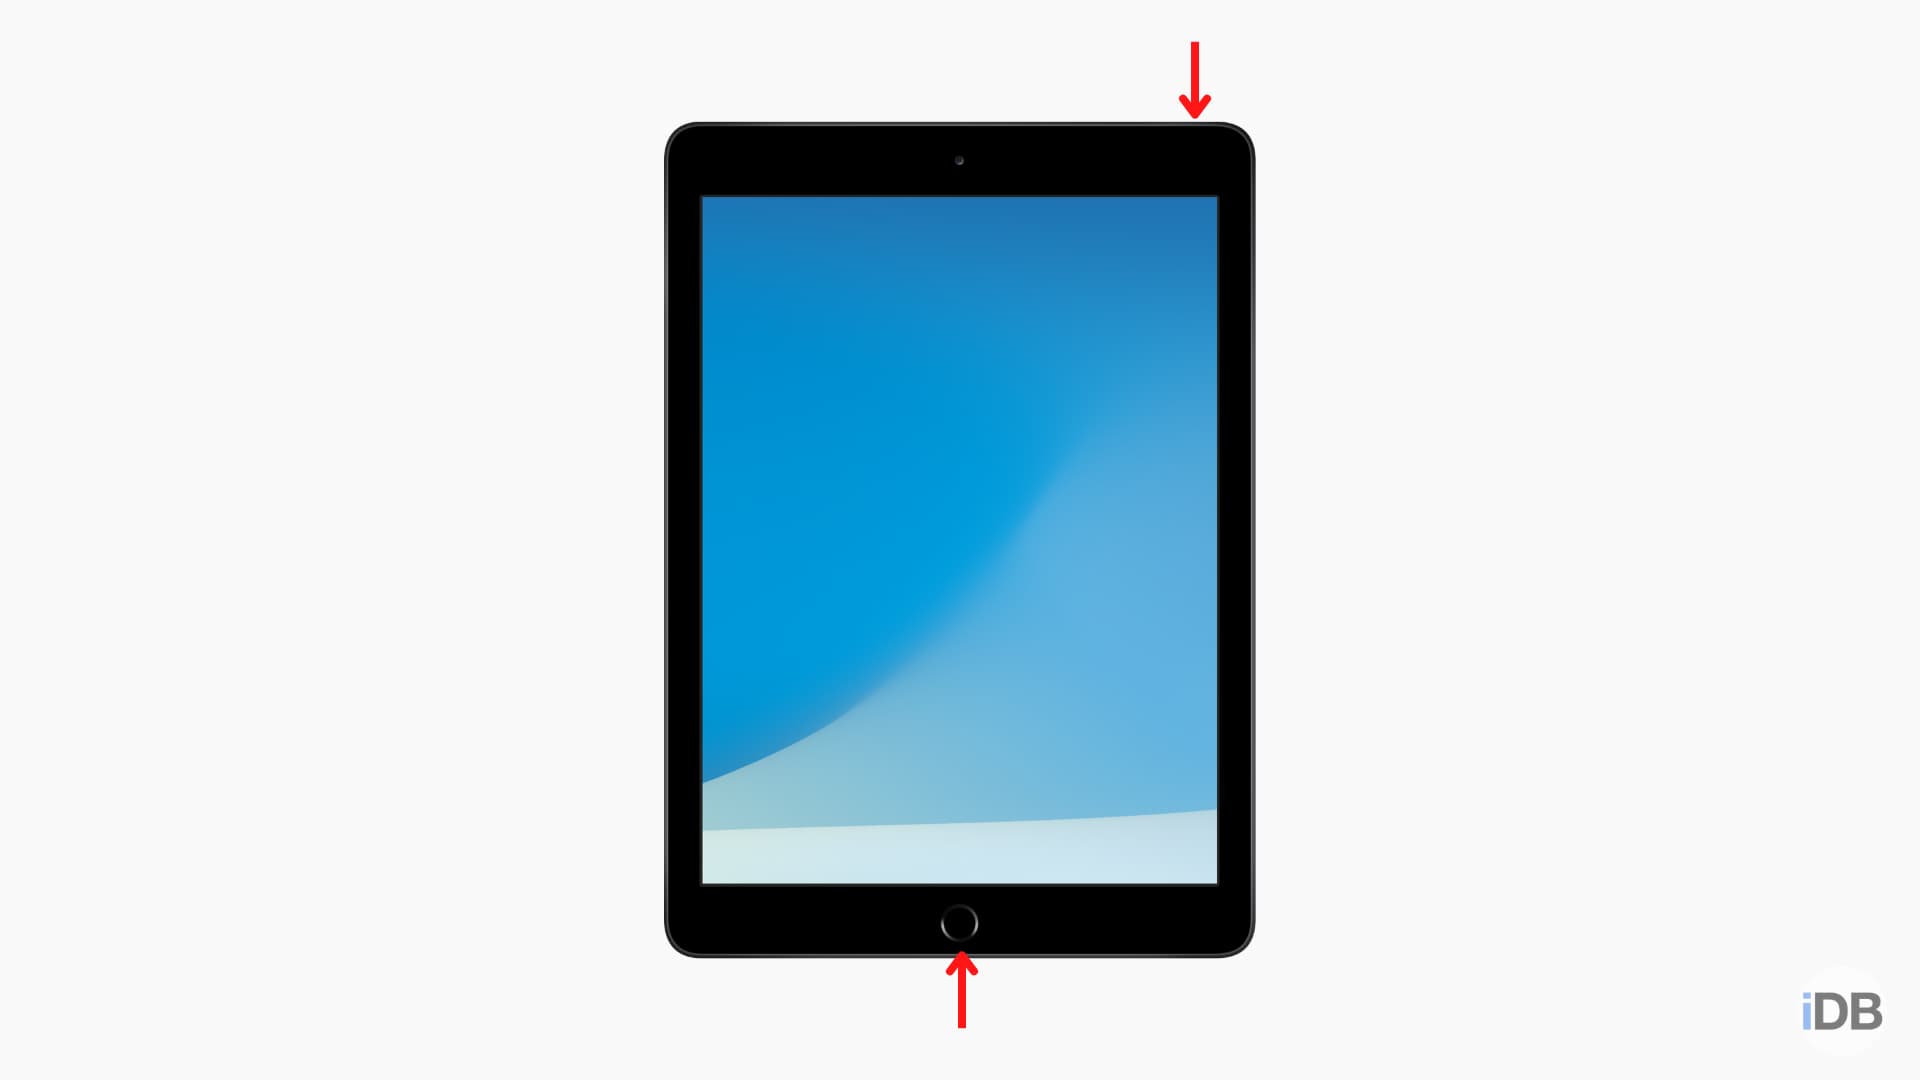
To put an iPad with a Home button in recovery mode:
- Press and hold the top power button and the Home button together and keep pressing them until you go past the Apple logo and get to the recovery mode screen.
3) Once your iPhone or iPad is in recovery mode, you may see a pop-up on your Mac asking permission to connect to the device. Click Allow here.

4) Then, you’ll see another important pop-up saying, “There is a problem with the iPhone/iPad that requires it to be updated or restored.” Click the Restore button, followed by Restore and Update.

5) Then click Next > Agree, and your computer will start downloading the public iPhone Software Update file for iOS 18.6.2, which is the latest stable iOS version at the time of writing.

6) Depending on your Wi-Fi or Ethernet speed, it may take a while for the massive 8.5+ GB iOS 18 file to download. Once downloaded, Finder on Mac or the Apple Devices app on Windows PC will do the following, without your intervention:
- Extract the software
- Prepare your iPhone or iPad for restore
- Restore your iPhone or iPad’s software back to iOS 18
- Verify iPhone or iPad software
- Restore iPhone or iPad firmware
Once everything is done, you’ll see a confirmation pop-up saying, “Your iPhone/iPad has been restored to factory settings, and is restarting. Please leave your iPhone/iPad connected. It will appear in the sidebar after it restarts.” Click OK.
Important: If your computer takes a lot of time to download and prepare the iOS file, the connected iPhone or iPad may automatically exit recovery mode. In this case, put it in recovery mode again, and the process should continue right from that point.
7) After your iPhone or iPad boots up, go through the setup process and enter your Apple ID password to bypass the Activation Lock. Your device is now running iOS 18 or iPadOS 18 instead of iOS 26 or iPadOS 26.
To prevent iOS 26 beta or the general update from downloading and installing automatically, go to your iPhone or iPad Settings > General > Software Update. Now turn off Beta Updates and Automatic Updates.
If you face problems restoring your iPhone or iPad from iOS 26 to iOS 18, use the comments box below to reach us.