Learn how to turn your Mac into a wireless Wi-Fi router and share its Internet connection with other devices, or to share your Mac’s Wi-Fi with an iPhone or iPad via a USB cable or Bluetooth.
You’re already familiar with Personal Hotspot, which lets you share your iPhone’s mobile data with other devices.
The good news is, your Mac also allows you to share its own Internet connection with an iPhone, iPad, MacBook, Android phone, or anything that can connect to Wi-Fi.
- If your Mac has Internet connectivity via Ethernet, it can distribute the connection wirelessly to other Wi-Fi-capable devices.
- If your Mac is connected to the Internet via Wi-Fi, you can share this Internet connection with your iPhone or iPad via a cable or Bluetooth.
Note: There are additional sharing combinations to explore in System Settings, but the ones mentioned above are the most common.
- You can’t directly share your Mac’s Wi-Fi connection as a wireless hotspot that other devices can connect to. To share a Mac’s Wi-Fi as a Wi-Fi network, however, you need additional accessories, such as Wi-Fi network adapters.
Why would you need to do this
1) My Wi-Fi router stopped working recently. Unfortunately, I didn’t have a spare one, and my Internet provider promised to replace my router after the weekend. What I did instead was plug an Ethernet cable into my Mac and set it up as a wireless Wi-Fi router. Then, I connected my iPhone and iPad to this Wi-Fi network.
2) When I lived in a hostel a few years ago, the management was reluctant to let us use Wi-Fi. After a bit of nudging, they permitted me to connect my MacBook to their Wi-Fi for “work” purposes. I was then able to share my Mac’s Internet connection with my iPhone via a cable, which proved really helpful.
3) A while back, I spent the holidays in a Mexican resort without free Wi-Fi. Getting online meant paying exorbitant prices for a Wi-Fi plan that would only allow me to connect one device, such as my MacBook Air. Signing out of a laptop to sign in from an iPad wouldn’t work either. At the end of the day, I purchased a pricey Wi-Fi plan for my Mac and was able to share it with my iPad.
My experience gives you a good idea of how sharing a Mac’s Wi-Fi or Ethernet connection as a hotspot could come in handy. You won’t do this every day, but at least you’ll have options when the need arises.
1) Make sure an Ethernet cable is plugged into your Mac running a recent version of macOS.
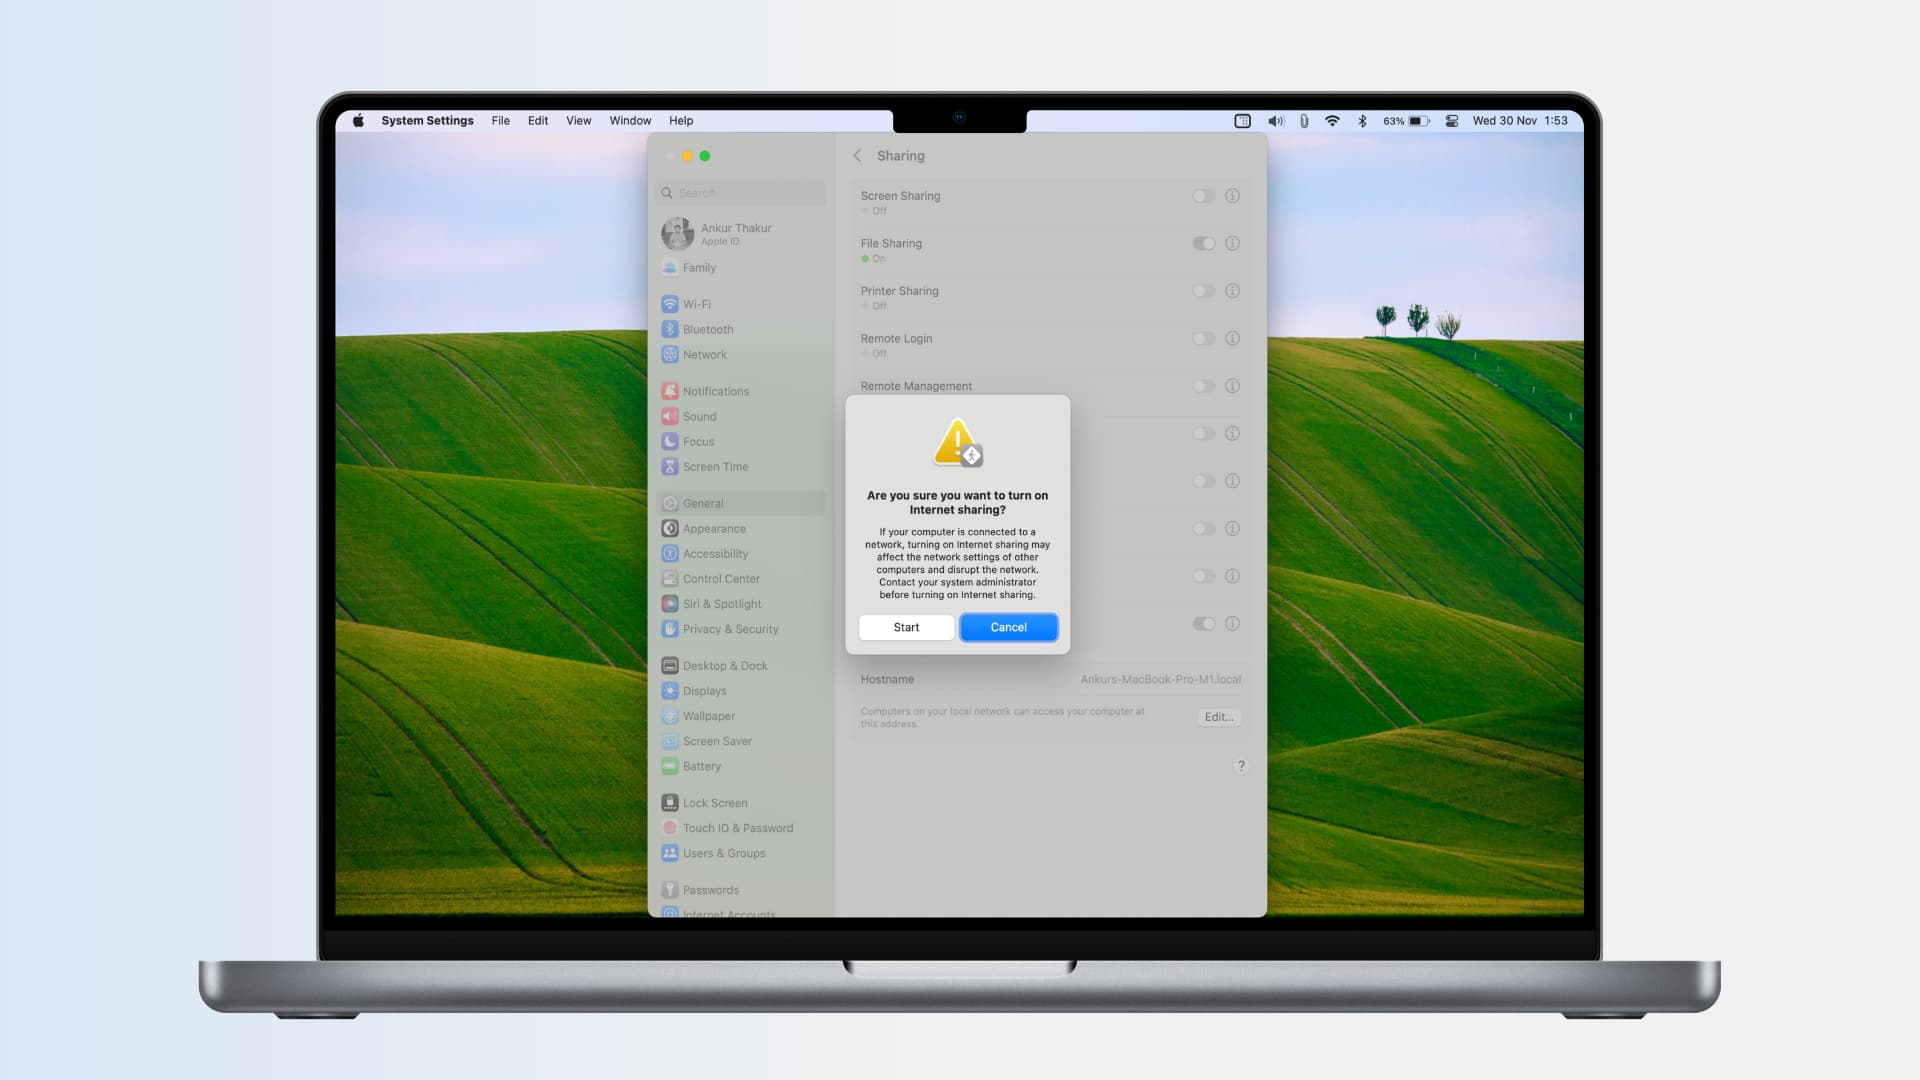
2) Open System Settings and go to General > Sharing.
3) Click the info icon ⓘ next to Internet Sharing. Don’t turn this switch on yet!

4) Click the menu next to ‘Share your connection from’ and choose Ethernet or Ethernet Adapter.
5) In the ‘To devices/computer using’ section, turn on the switch for Wi-Fi, and then enter your computer’s username and login password if prompted. The configuration screen will appear (explained in Step 6 below). On older macOS versions, check the box for Wi-Fi and click the Wi-Fi Options button.

6) Set the following features:
- Network Name: This is your Mac’s name, and you can leave it as is. This will also be the name of your Mac’s Wi-Fi network on your iPhone, iPad, Android phone, and other devices.
- Channel: By default, channel 11 or 40 will be selected, but you can change it. Channels 1, 6, and 11 offer 2.4GHz connections, which is ideal for older and smaller devices, such as the Apple Watch SE and many smart home accessories. Channels 36, 40, 44, and 48 use the 5GHz band, which gives you better speed. Pick a higher channel number if you only need to connect your iPhone, iPad, and similar devices.
- Security: For security, the default WPA2/WPA3 Personal is fine.
- Password: This is the most crucial step. Setting a password ensures that only you can access your Mac’s Wi-Fi hotspot.
With everything in order, click OK to save the changes.

7) Turn on the switch for Internet Sharing from the top or from the first screen of the Sharing menu in System Settings, then confirm by hitting Turn On or Start.

The Wi-Fi icon will turn solid and show an arrow instead to signify the connection is being shared. You can now connect another device, such as your iPhone, iPad, Android phone, tablet, Mac, Windows PC, or similar devices, to the wireless network hosted by your Mac. (steps below)
If your old Mac is on macOS Monterey or older
In case you’re repurposing your old Mac as a Wi-Fi router, follow these steps instead:
1) Plug an Ethernet cable into your Mac.
2) Open System Preferences and choose Sharing.
3) Click Internet Sharing from the menu on the left. Don’t check the box yet!
4) Hit the dropdown menu next to ‘Share your connection from’ and choose Ethernet.
5) Check Wi-Fi next to ‘To computers using.’
6) After that, click Wi-Fi Options, set a password, and hit OK. For more on this, see the above section.
7) Finally, check the box for Internet Sharing and confirm by clicking Start.
How to connect to your Mac’s Wi-Fi hotspot
The steps differ from one device to another, but the basics are the same:
- Go to the Wi-Fi settings on your iPhone, iPad, Android phone, PC, or other device.
- Select the name of the Wi-Fi hotspot hosted on your Mac.
- Enter the passcode you’ve set in step 6 above.
- Join the Wi-Fi network.
As mentioned, macOS doesn’t support sharing its Wi-Fi without a special adapter. However, you can share your Mac’s Wi-Fi via a USB-C or Lightning cable or via Bluetooth.
1) Open System Settings and go to General > Sharing.
2) Click the info icon ⓘ next to Internet Sharing.
3) Choose Wi-Fi next to ‘Share your connection from.’
4) Enable iPhone USB under the ‘To devices/computers using’ heading and click Done.
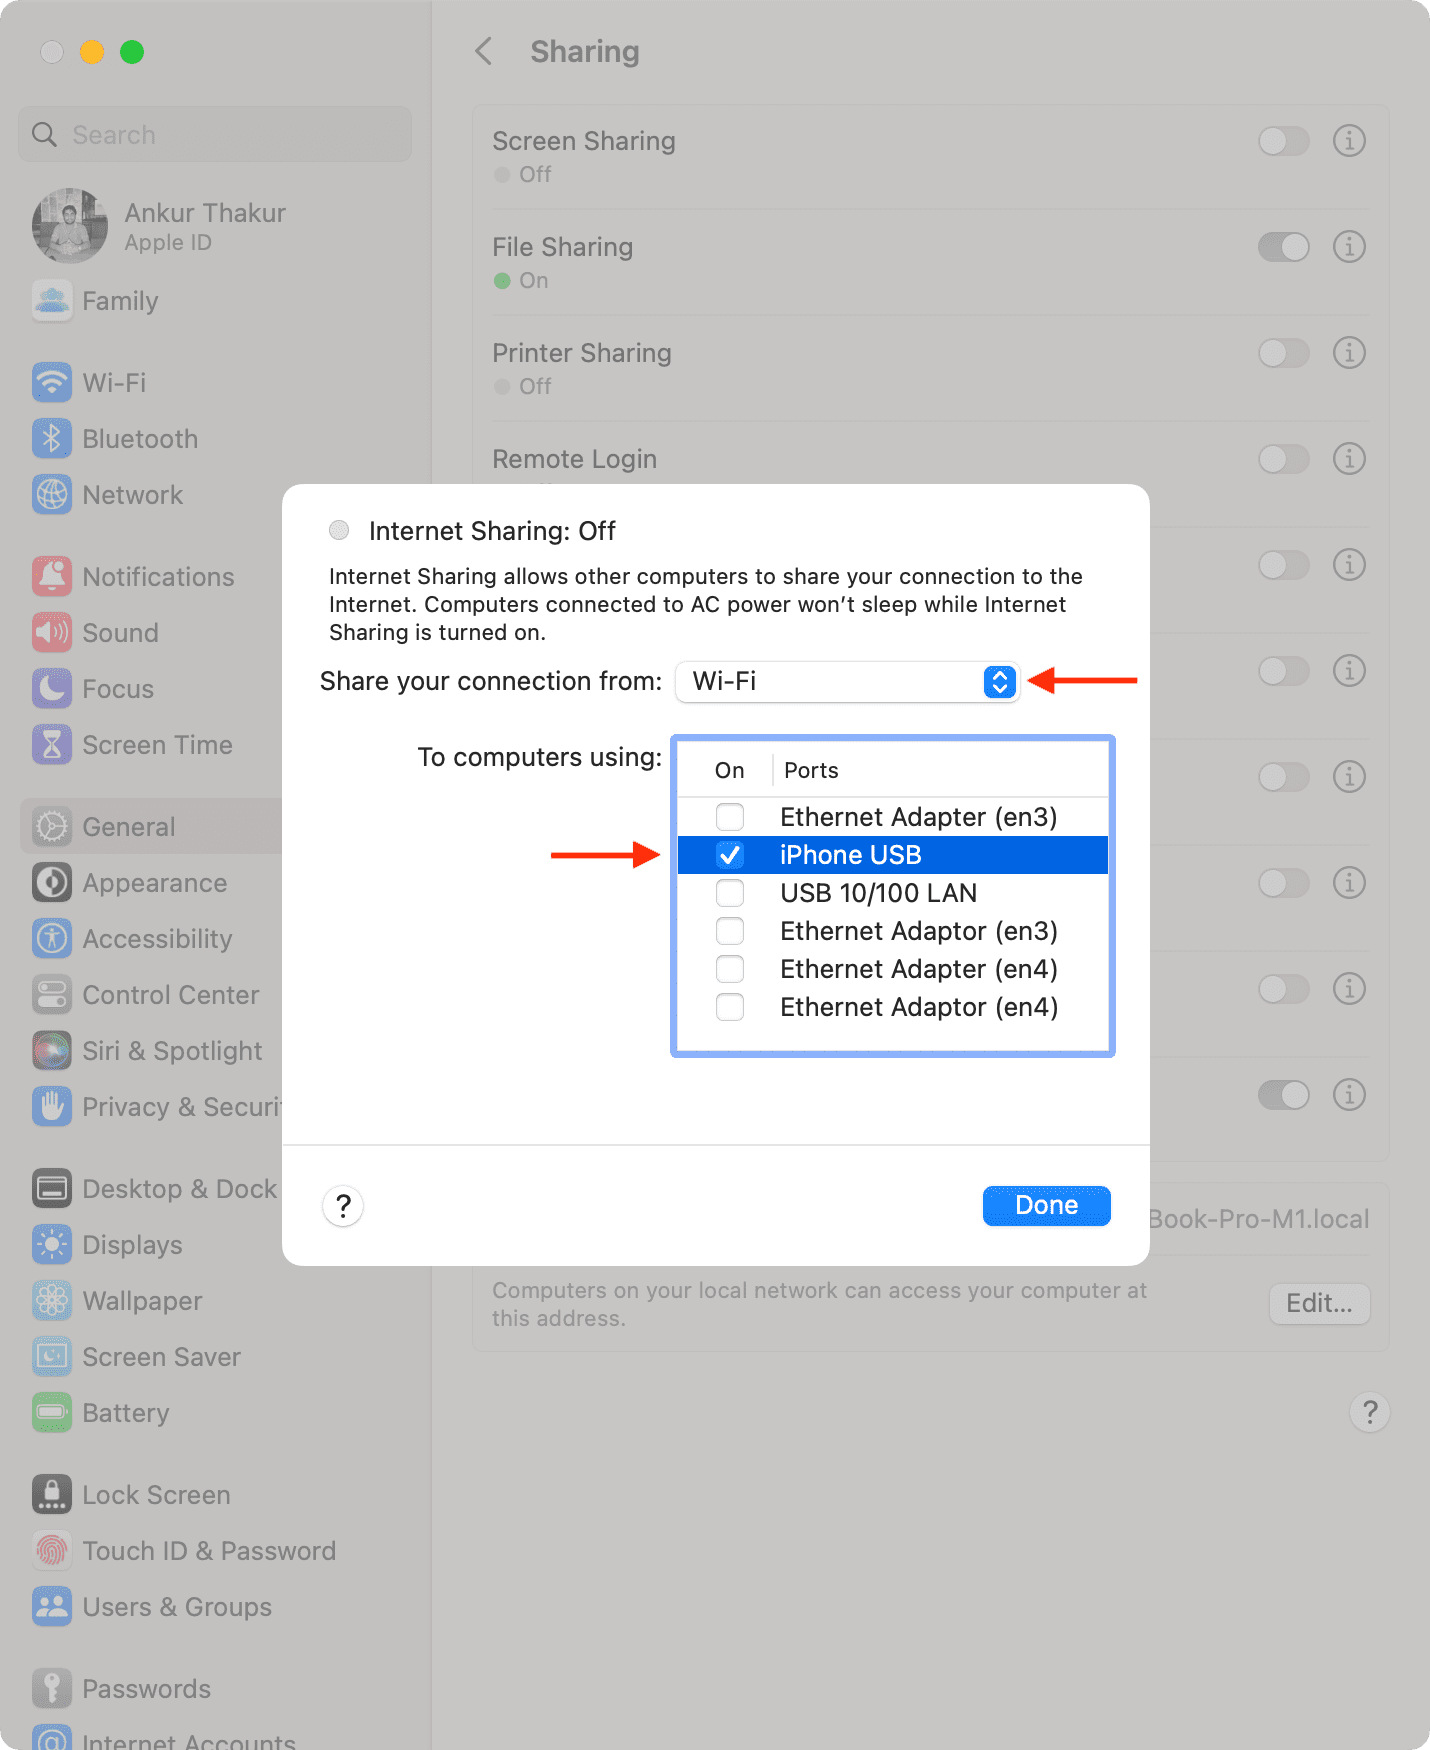
5) Now, turn on the switch for Internet Sharing.
6) Connect your iPhone or iPad to the Mac using a Lightning or USB-C cable. You can now turn off Wi-Fi and cellular data on your iPhone or iPad to access the Internet using the Mac’s Wi-Fi, which is shared via the cable.
In this screen recording, you can see that I’ve turned off Wi-Fi and cellular data on my iPhone, but I can still use the Internet.
Important: You can’t share a Mac’s Wi-Fi via Bluetooth on macOS Monterey and later. However, this feature works on older versions. That said, here’s how to share your Mac’s Internet connection with your iPhone or iPad via Bluetooth.
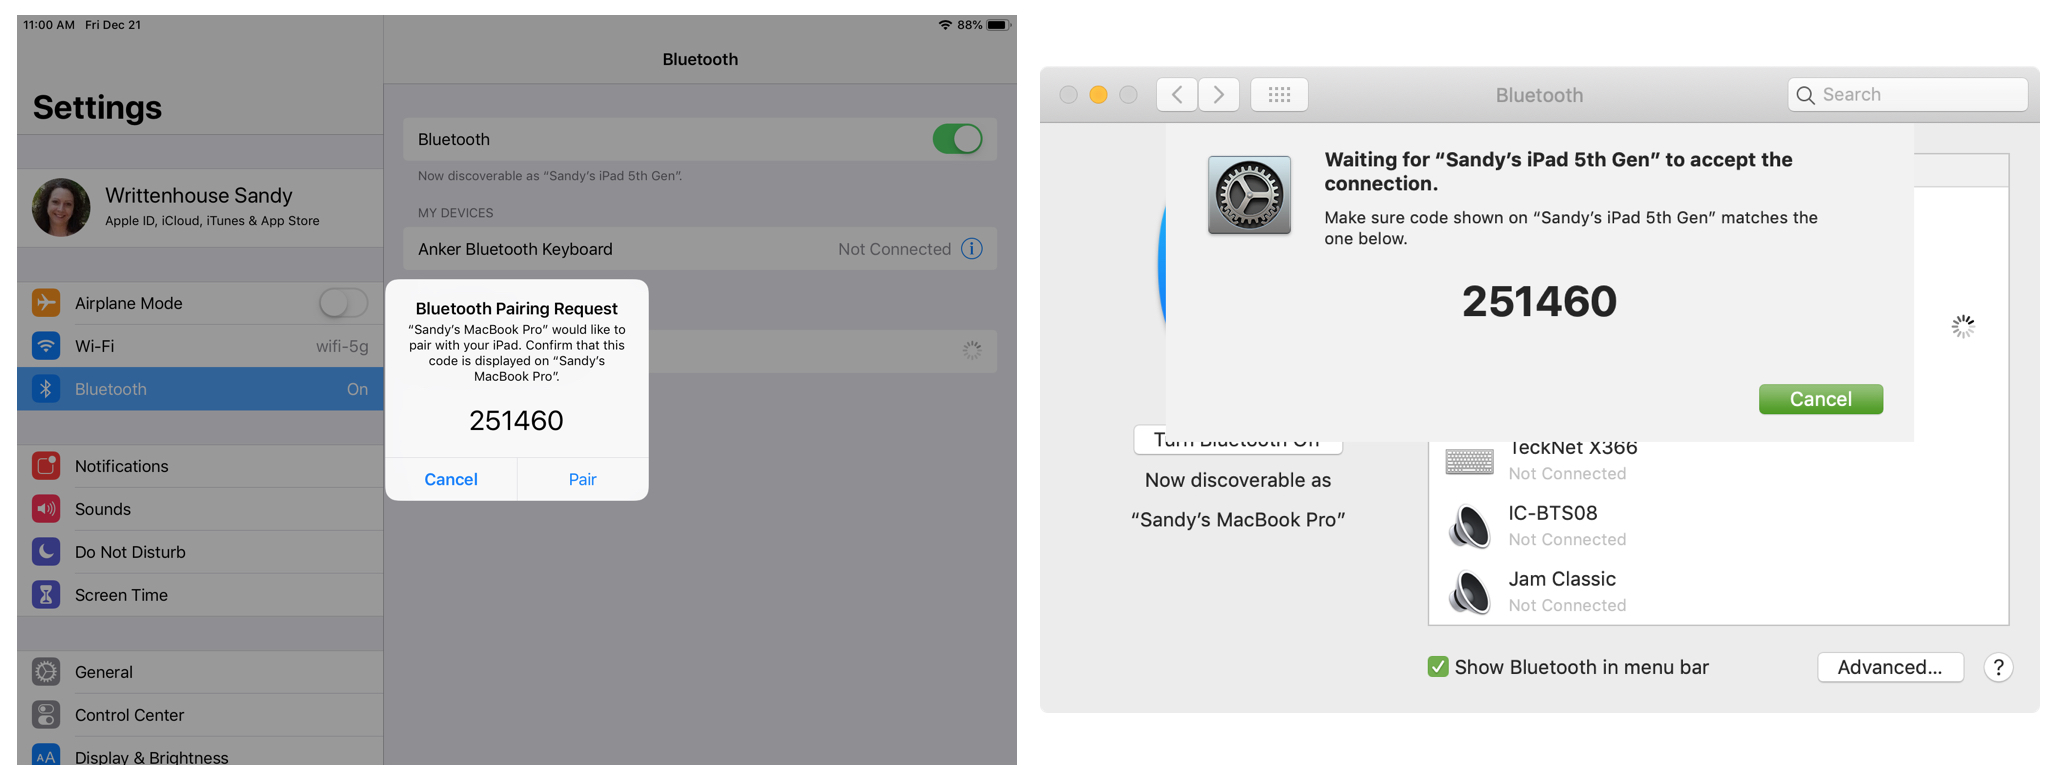
1) Go to System Preferences on your Mac and turn on Bluetooth. Stay on this screen.
2) On your iPhone or iPad, go to Settings > Bluetooth and enable Bluetooth. Next, tap Allow New Connections. Make sure to keep this screen open.
3) Your iPhone or iPad should show up as a new device in the Bluetooth preferences screen of your MacBook. Click Pair, and a six-digit number will appear on your MacBook. This same number should show up on your iOS device. Confirm the connection by tapping Pair on your iPhone or iPad.
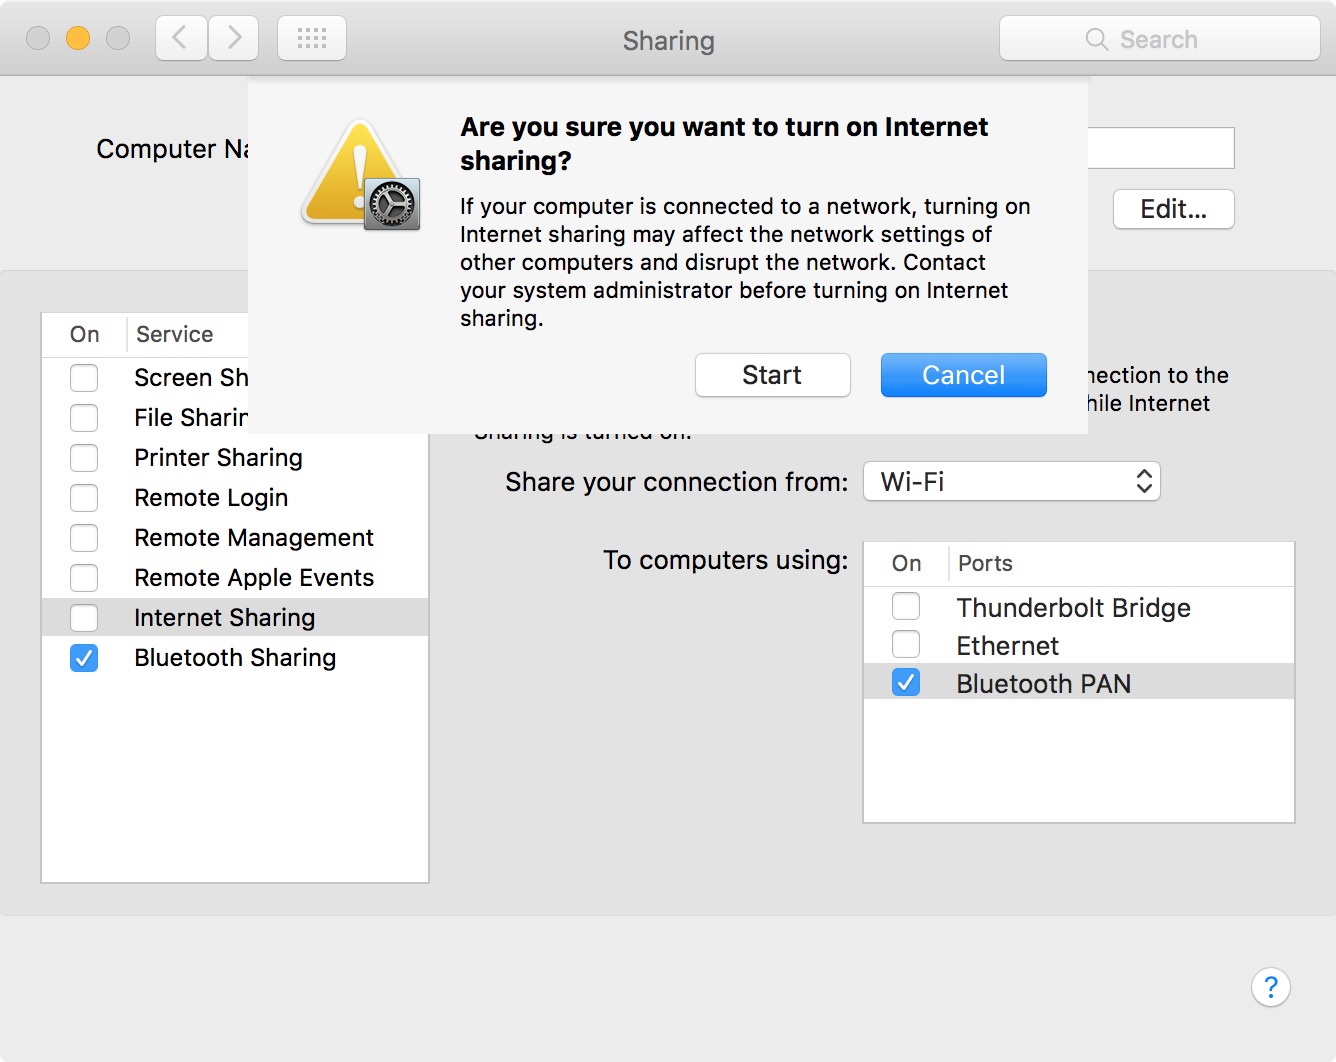
4) Follow the steps above to share your Mac’s Internet connection via System Preferences > Sharing > Internet Sharing (Don’t check this box yet!)
5) For ‘Share your connection,’ select Wi-Fi.
6) For ‘To computers using,’ select Bluetooth PAN.
7) Tick the Internet Sharing box and click Start.
You should now be able to access the Internet on your iPhone or iPad via your Mac.
What do you think of this handy feature?
On a related note: How to share your Wi-Fi password with a QR code on iPhone, iPad, and Mac