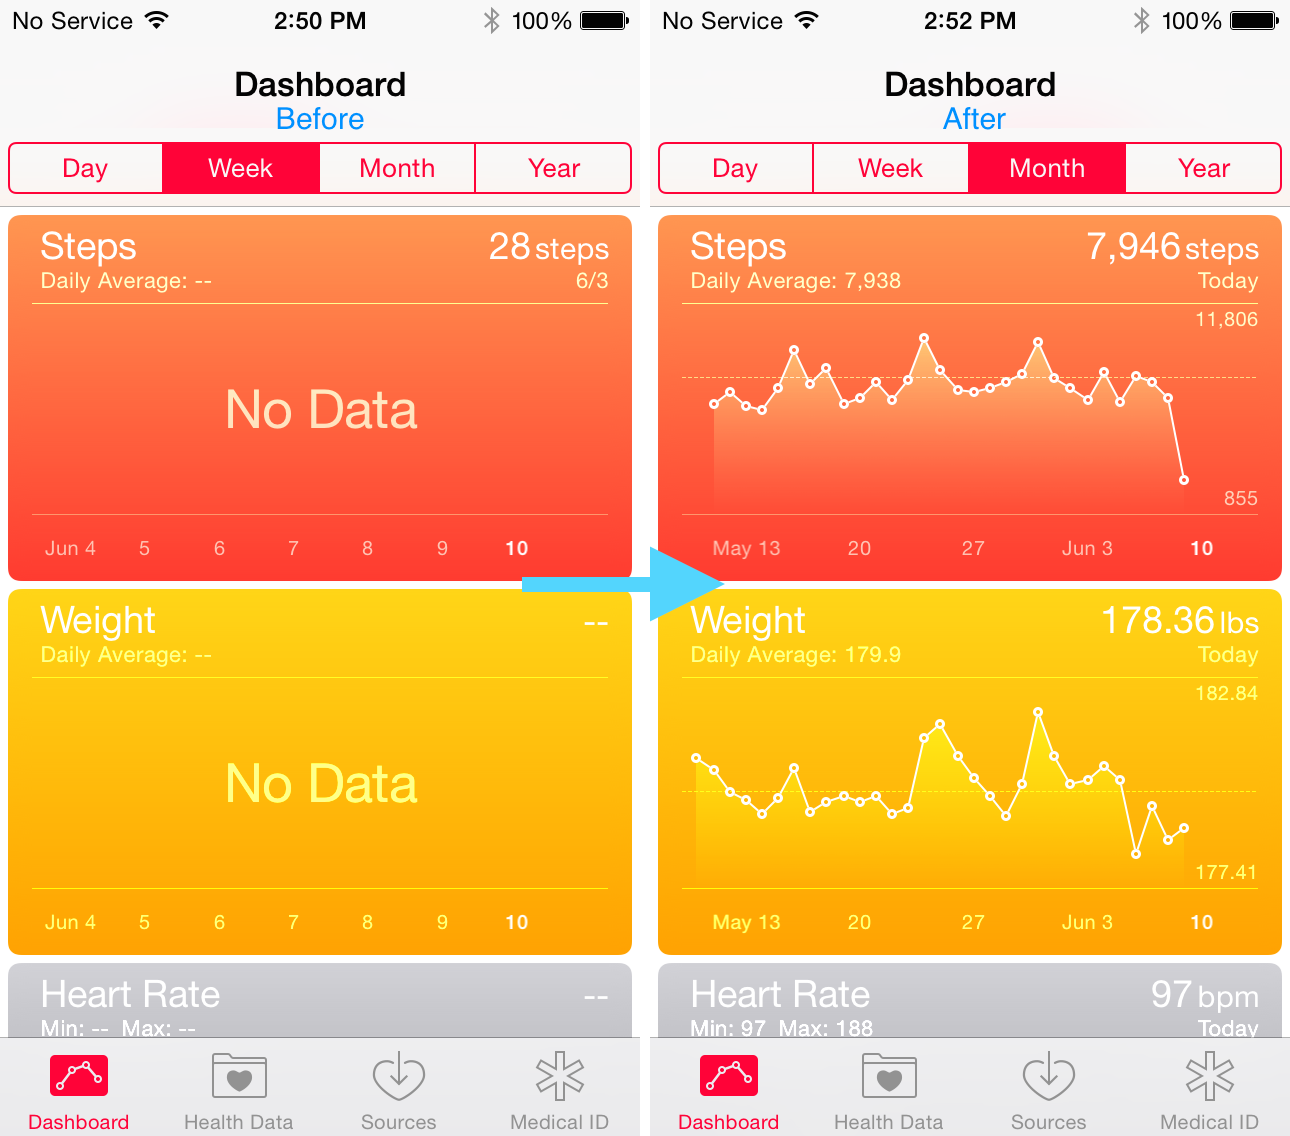
Apple has really changed the way I think about my overall health and fitness, starting with iOS 7 and the M7 motion coprocessor of iPhone 5s. I went from being completely oblivious of my weight and physical fitness, to being obsessed with them. Apple Watch has made that even more obvious, as I now feel accountable for everything I do. At the end of the day, I have the satisfaction of looking at my stats in the Health app and see my progress.
As someone who talks about Apple for a living, I am often restoring devices, moving data from one iPhone to another, and also upgrading hardware every year. This is part of the fun for me. But there is a downside to this behavior: every time I set an iPhone as a new device, I lose all of the data from my Health app.
In this post, I will show you how to export Health app data, and import that same data into a freshly restored device, or a new device, depending on your situation.
UPDATE: A new application has been released in the App Store that makes the Health data import process much easier. While the information contained in this post is still accurate, I must say that Health Data Importer makes moving your Health data from one iPhone to another a breeze and I suggest you read that post instead.
How to export Health data
There are actually two ways to export the data from your Health app. The first way, is one provided by Apple, but it is virtually useless. The other way relies on a third-party application, and is, to my knowledge, the best way to export your Health information.
How to export your Health data using the Health app
As previously mentioned, this way of exporting your data is pretty much useless because the data is then presented in an xml file, making it hard to do anything with the data. It’s not like you can simply open up the file and look at it. Maybe even worse, once you have that exported file type, you can’t import it back in the Health app. I’m actually wondering why Apple would even give the option to export that data in this format to begin with, especially because it doesn’t offer the ability to import it back either on the same device or a new device. Regardless of the reason, this is how you can export all that data.
Step 1: Launch the Health app.
Step 2: Tap your profile from the top right of either the Today or Health Data tabs.
Step 3: Select Export Health Data and confirm the action by tapping Export.
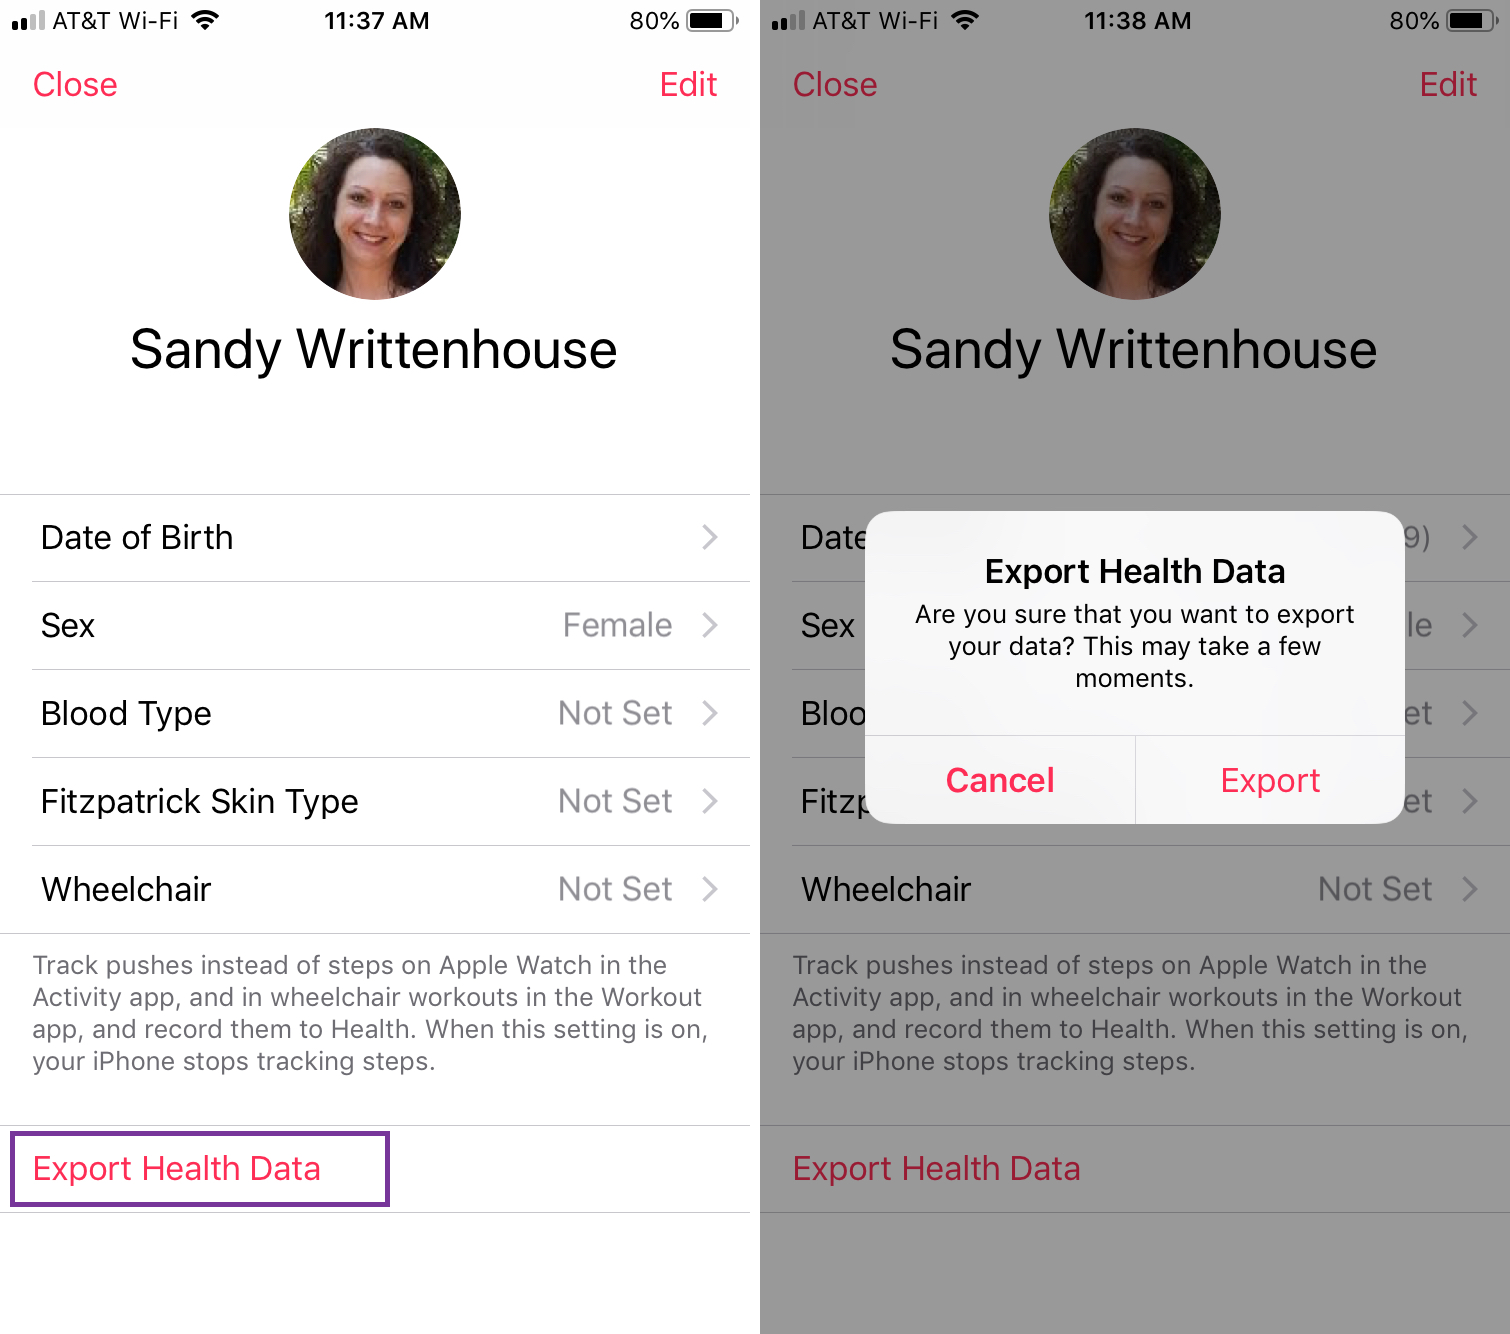
Step 4: You will see the export being prepared and once it finishes, your sharing options will appear.

Step 5: Select your sharing option and a ZIP file will be created with your data and shared with the location you choose.
How to export data from your Health app using a third-party app
This is actually the preferred and recommended way to export your Health data as it will output all the information to a usable CSV file, which you can then open in Numbers or Excel on your Mac, or even use to import back into Health. This is the method we’ll use to export the data and import it back in the next section of this tutorial.
Step 1: Download QS Access from the App Store.
Step 2: Launch QS Access.
Step 3: You can select to export the data in chunks of one hour intervals or 1 day intervals. The one hour option means that each row in your export file will contain the data of one hour worth of health tracking. So you’d have 24 rose for every day. One day intervals means each row will contain the data of one day.
In my experience, I was not able to export all the data containing one hour intervals. I guess there was just way too much data for that to work, and the app crashed every time. However, I didn’t have a problem exporting the data with 1 day intervals.
Try each way and see what works best for you. In this tutorial, I will simply select 1 Day.
Step 4: Now select all the data points you want to export, such as Active Calories, heart Rate, Steps, etc…
Step 5: Once you’re done selecting all the data points, tap the Create Table at the lower right corner of the screen.
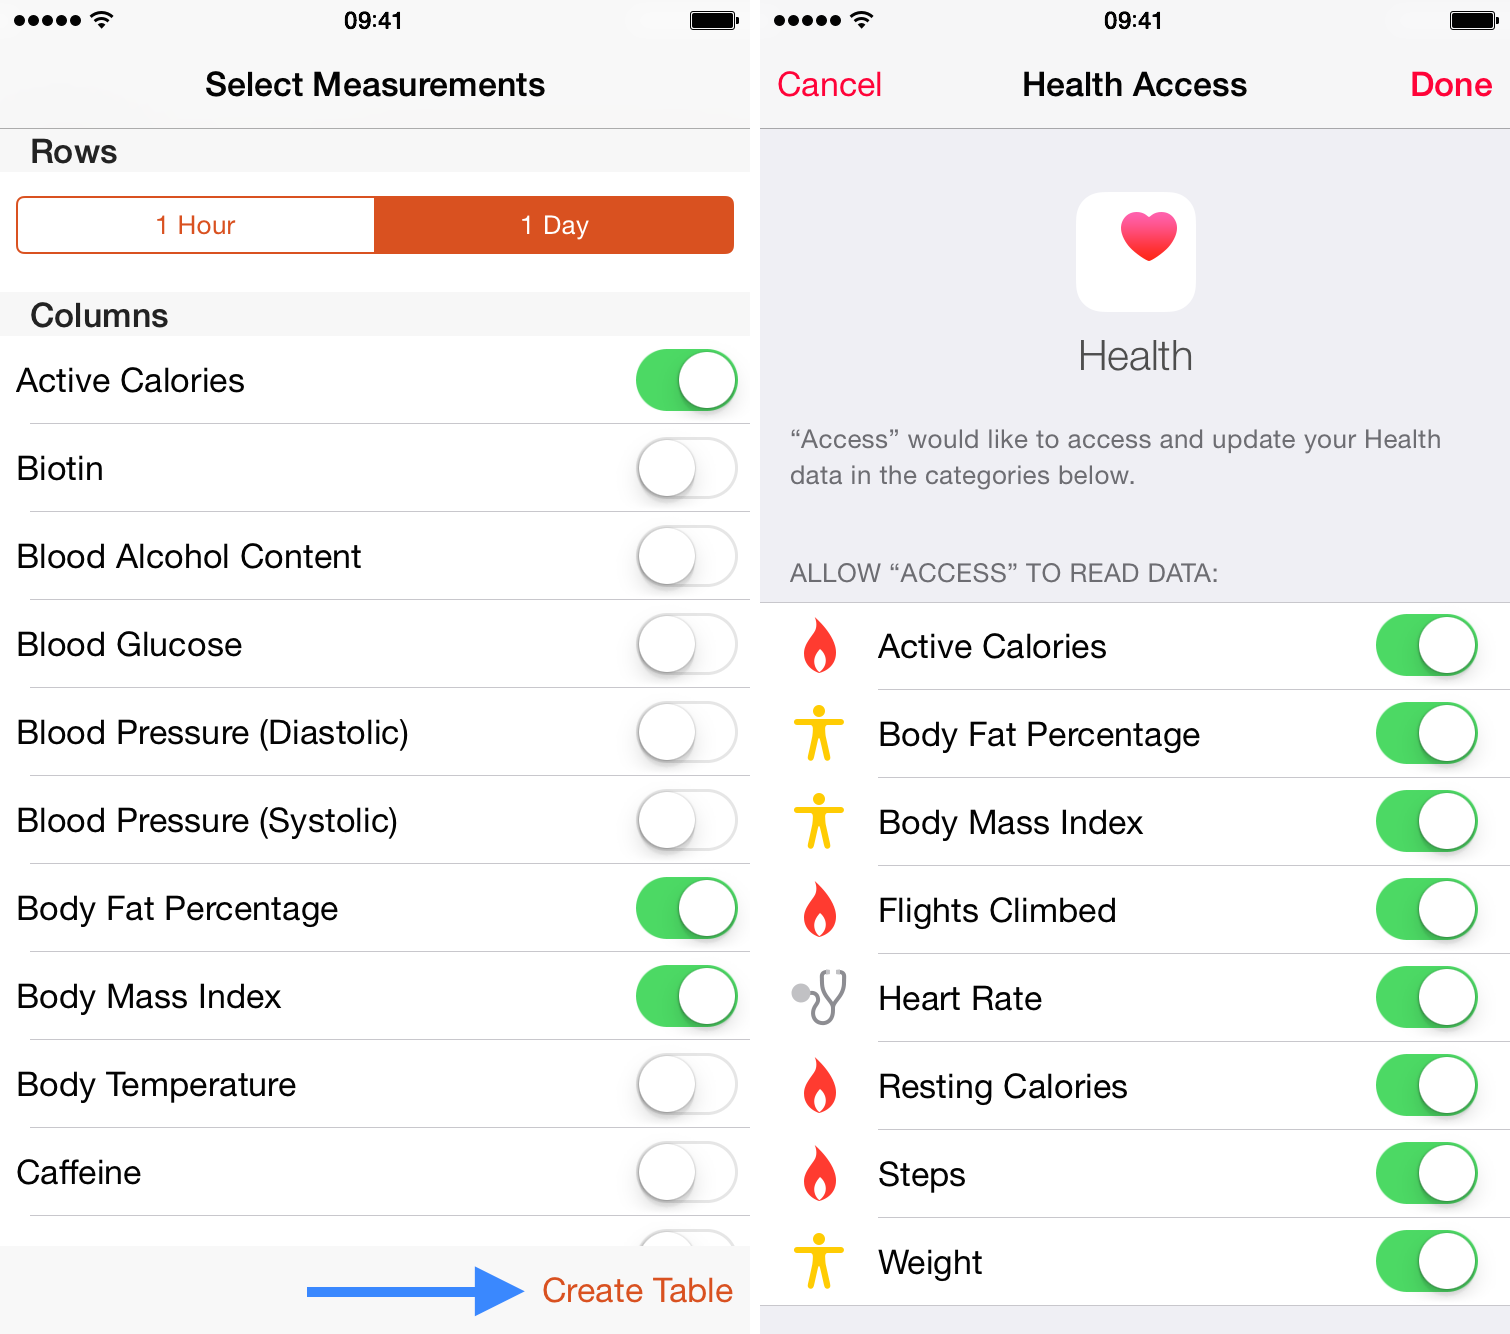
Step 6: You will be asked to grant QS Access permission to access and and use the Health data. Select all categories, then tap Done at the top right corner.
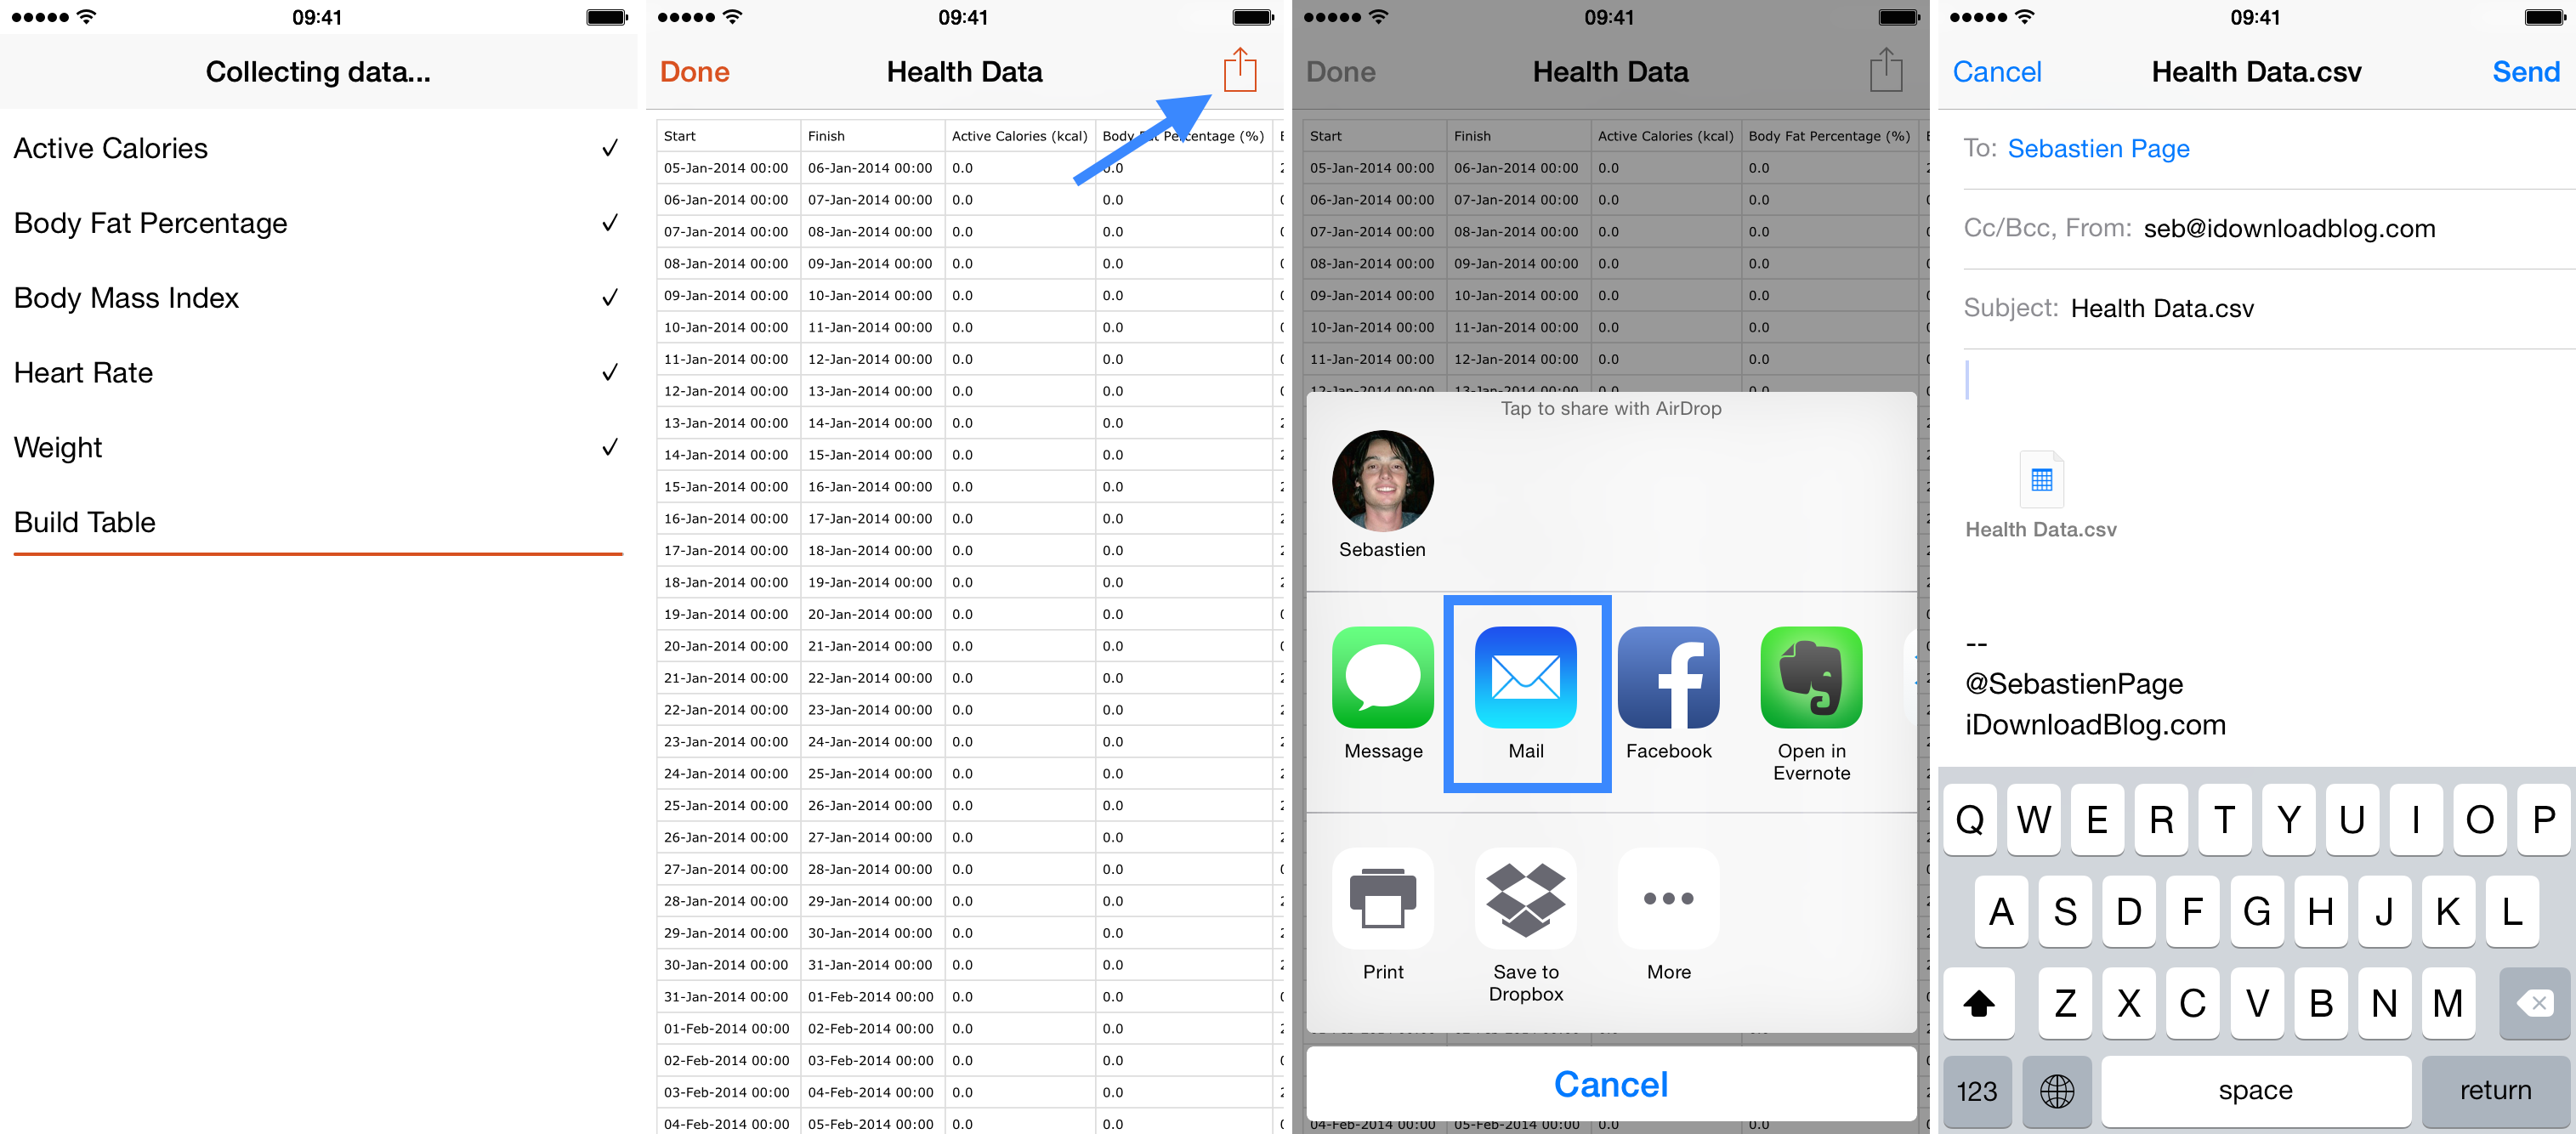
Step 7: The app will automatically create a CSV file and display it on your screen. Tap the Share icon in the upper right corner and email the file to yourself.
You are done exporting the Health data. Now let’s see how to import that data into a new iPhone, or maybe an iPhone that you might have restored and set up as a new device (not from backup).
How to import Health data
As I mentioned above, although Apple lets you export your data from the Health app on your iPhone, it won’t let you import it. To export Health data you can actually import later on, you have to use a third-party application that can be found in the App Store.
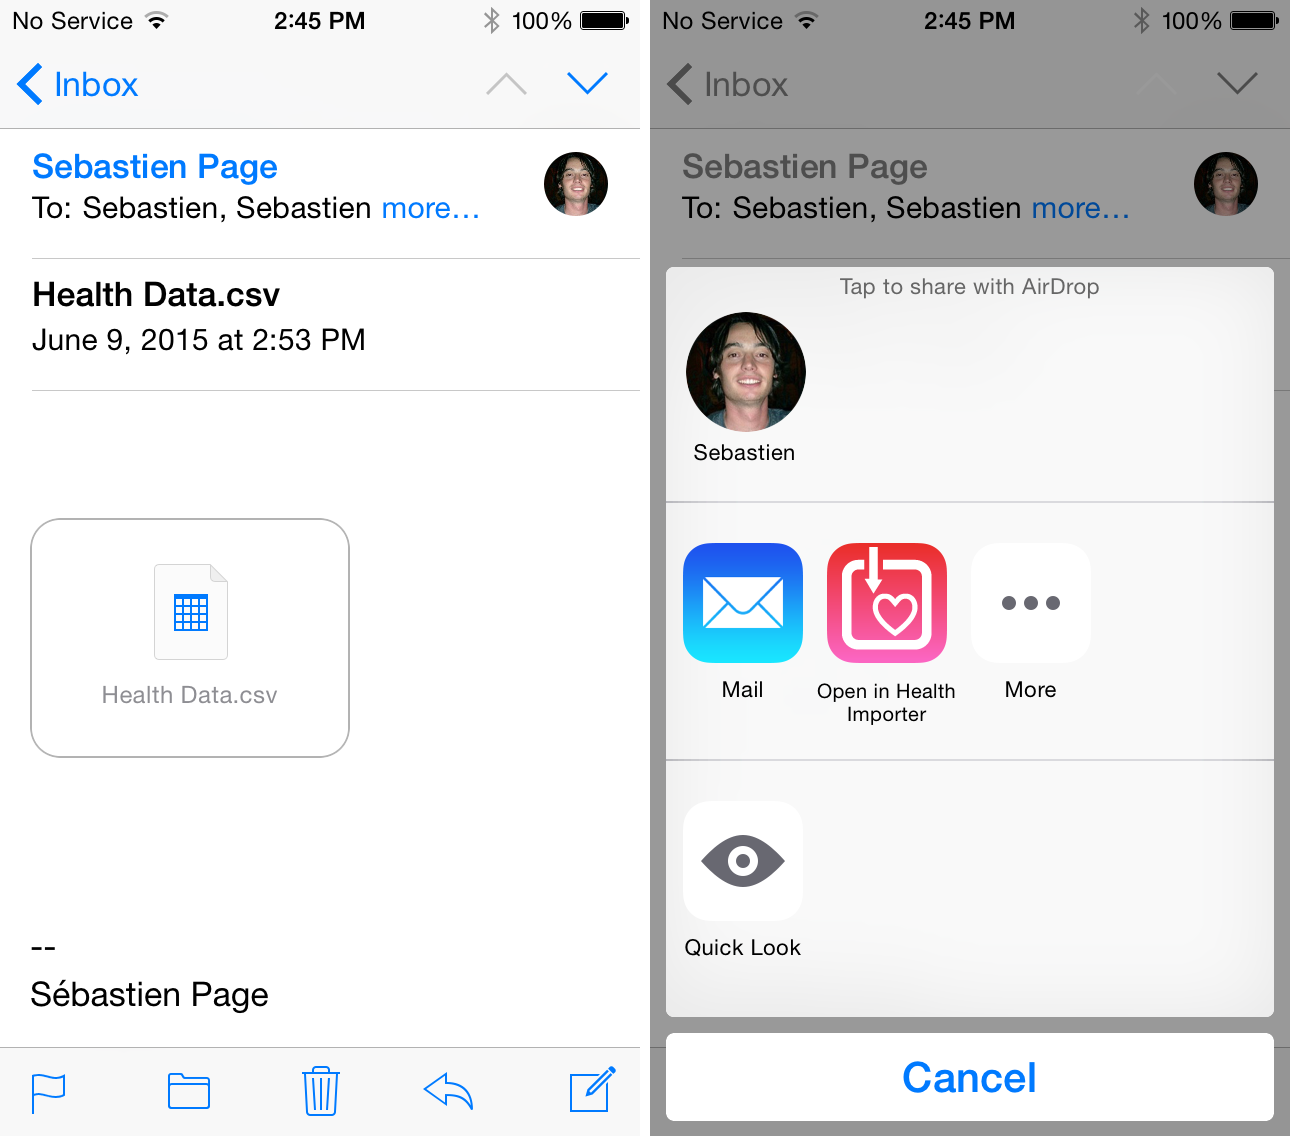
Step 1: Download Health Importer from the App Store and launch the app once to read the instructions.
Step 2: On the iPhone on which you want to import the Health data you exported in previous steps, launch the Mail app and open the email you sent to yourself with the exported CSV file.
Step 3: Tap and hold on the attachment until you see the Share options appear on the screen, the select Open in Health Importer.
Step 4: This will automatically launch Health Importer. From there, you will be able to map the data you have exported with the data points found in Health app. Tap on each data point to be mapped, starting with Start. Map it correctly and tap Save.
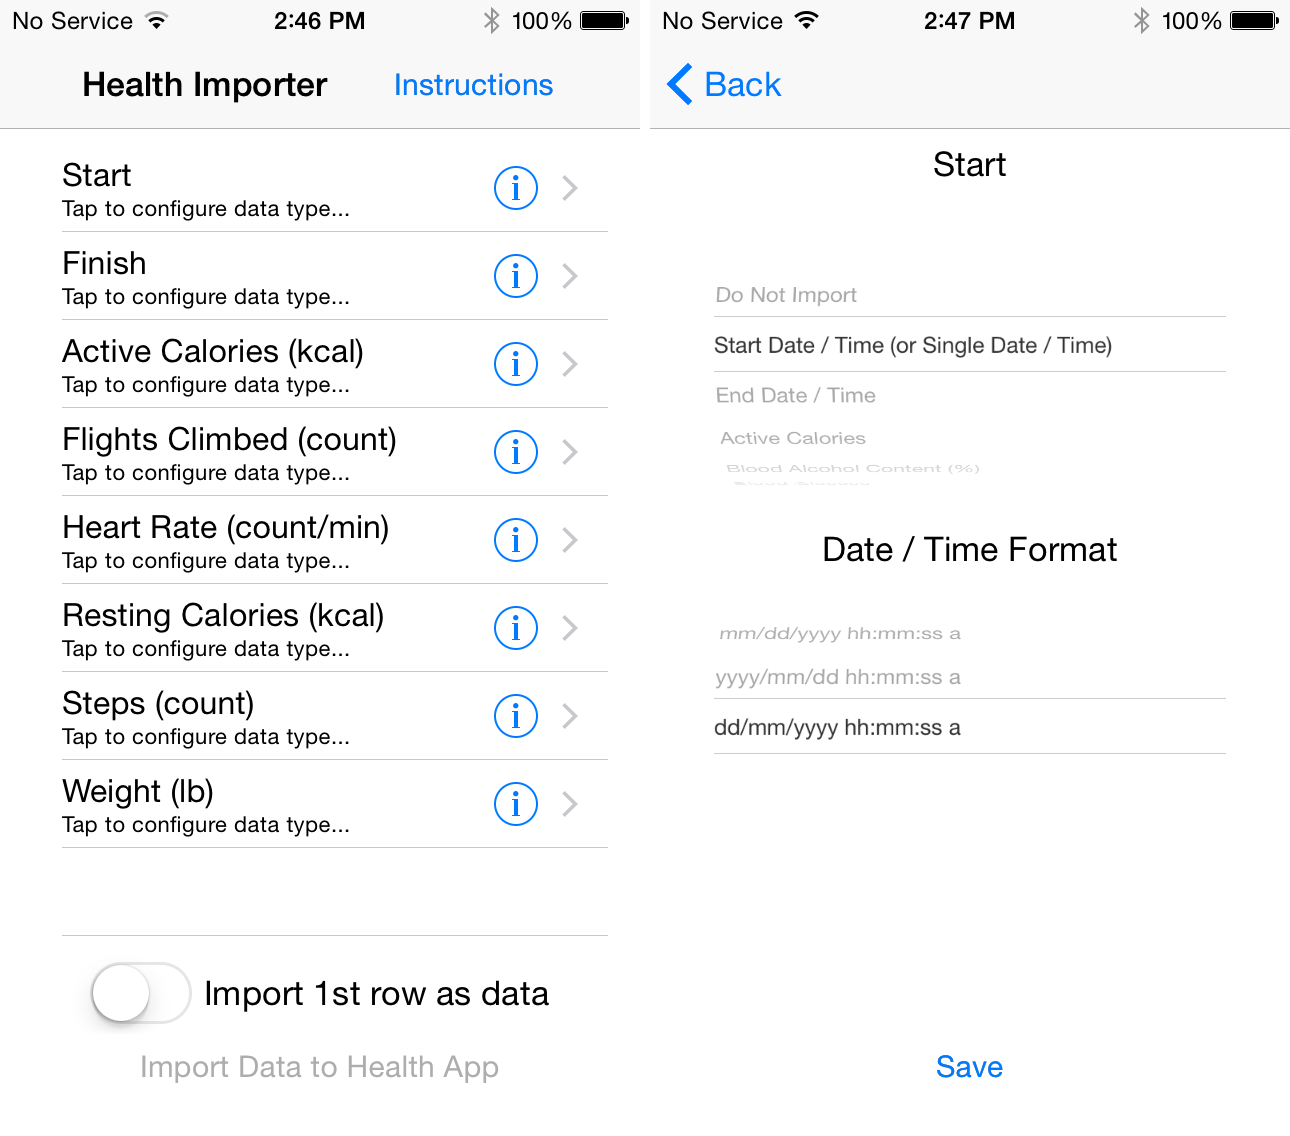
Step 5: Repeat with all the data categories you have exported.

Step 6: When done, tap Import Data to Health App at the bottom of the screen. The app will start the import process, which could take some time if you have lots of data in there. Note that in my experience, the progress bar showed by the app was deceiving as it wasn’t moving. But don’t give up and keep waiting until everything is imported.
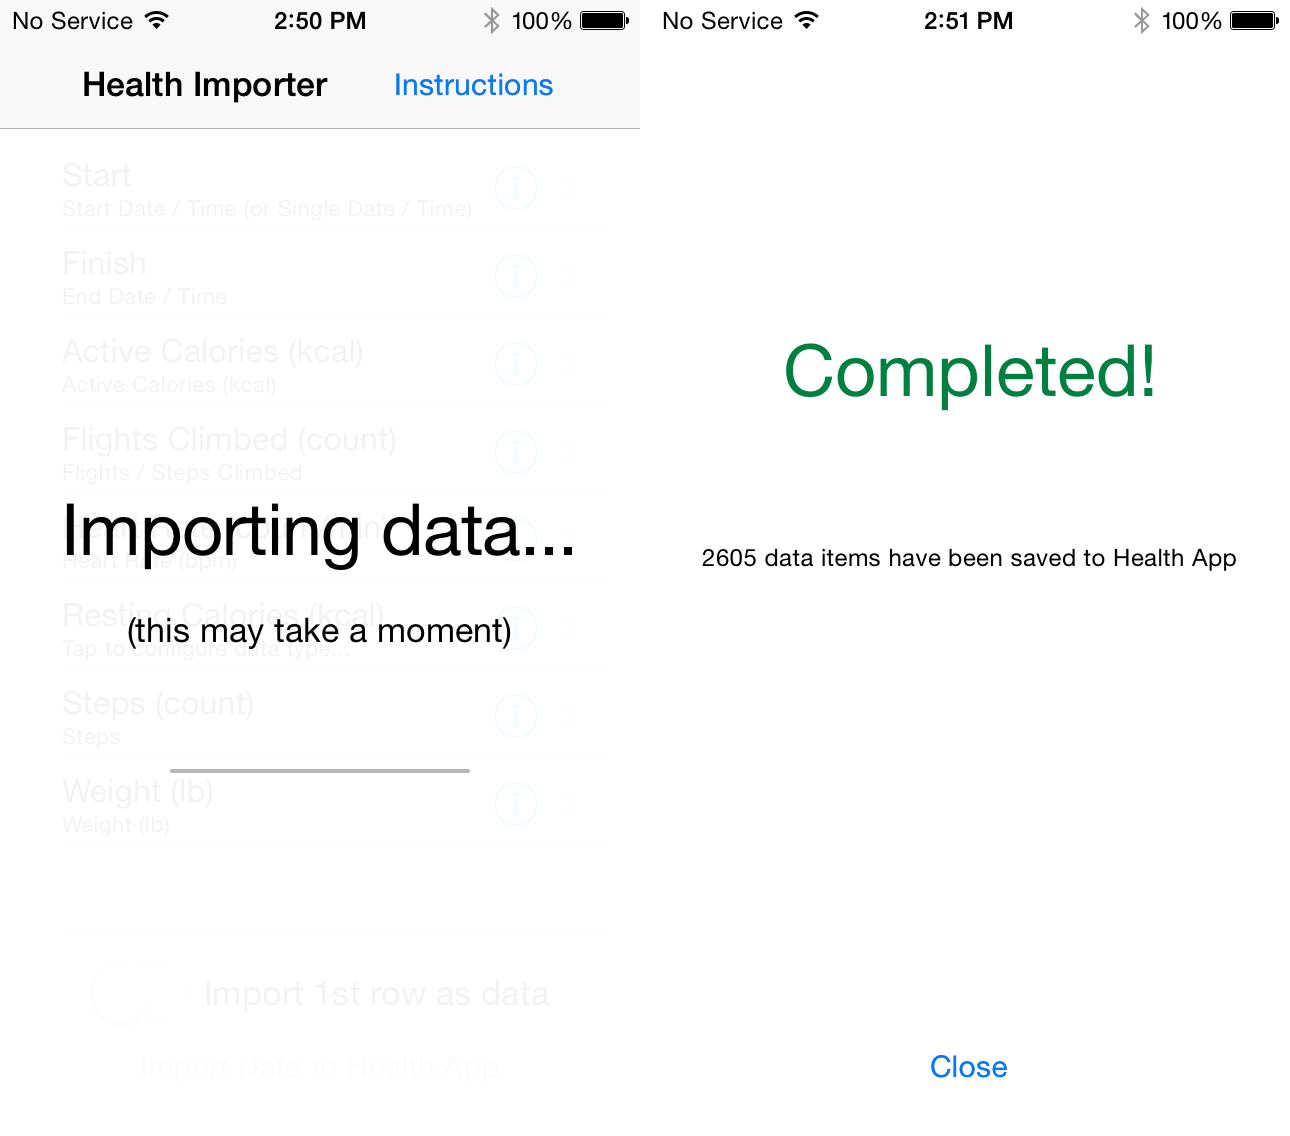
At that point, you can open your Health app and you should see the freshly imported data. If nothing appears yet on the graphs, wait a few second for the to refresh and process all the data you just imported.