Far and away, the most compelling upgrade worthy feature on the new iPhone 5s is the new Touch ID fingerprint sensor. It was a feature that was rumored for many months, and today the general public can finally see what all of the fuss is about.
I’ve been putting the Touch ID sensor, which rests inside of the iPhone 5s’ redesigned Home button, through its paces all morning. I’ve come away extremely impressed — not only with its ease of setup, but with its uncompromising accuracy.
After using it for a while, it’s readily apparent that this is not something that Apple hastily put into the iPhone 5s. This isn’t your father’s fingerprint sensor. Touch ID is a feature that Apple has meticulously meshed into the iPhone to make one transparent and cohesive experience. And it just works.
Setting it all up
To setup Touch ID, you’ll need to venture into the General > Passcode & Fingerprint section of the stock Settings app. There you’ll be requested to setup a passcode, which is a requirement to use Touch ID.
After your passcode is established, you can then venture into the Fingerprints panel and add up to five fingerprints to your device. These fingerprints can be from you, your spouse, friend, cat, dog, whatever. You can only up to five, so choose wisely.
Adding a fingerprint is extremely simple, if not a tad tedious. It requires you to continuously tap the Home button in order to pick up and record all of the nuances of your fingerprint. The actual fingerprints aren’t stored as images or anything on the device, instead a unique key of sorts is generated using an algorithm that can check against your fingerprint.
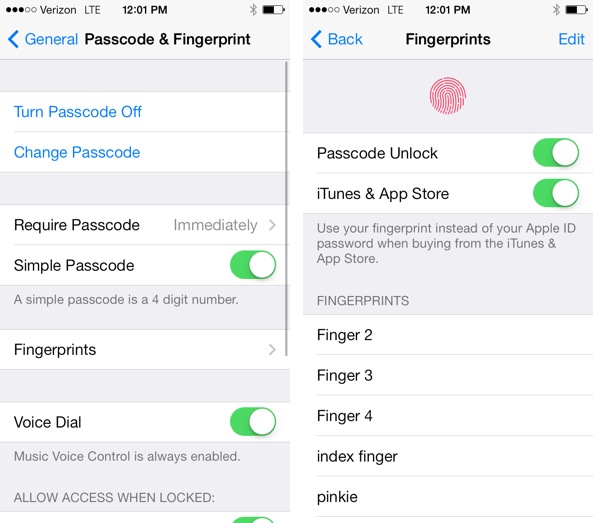
Once you have one or more fingerprints setup and saved, you can choose to rename them, or delete them if you choose to do so. This can be done using the Edit button in the upper right-hand corner of the Fingerprints panel, or you can use a delete swipe gesture as well.
You’ll notice two toggles at the top of the Fingerprints panel — Passcode Unlock and iTunes & App Store. These settings allow you to enable or disable the fingerprint sensor for unlocking your device, and for making iTunes and App Store purchases independently of one another. For the App Store and iTunes, you’ll need to first verify your Apple ID before you can begin to use your prints to make purchases.
Using Touch ID
To use Touch ID to unlock your device, you’ll need to first wake the device using a press on the Home or Sleep buttons. Afterwards, simply rest a valid digit on the Home button, and watch iOS do its thing. In about a second or so, your device will unlock without so much as hinting at a Passcode. It’s really something wonderful to behold.
Of course, if you try to use a fingerprint that hasn’t been previous validated, or some random stranger comes and tries to unlock your device, they’ll be met with with a “try again” message that shakes back and forth, sort of like when you enter an incorrect Passcode.
It’s worth noting that at anytime you can still use your passcode. Apple requires that we use a passcode as a fail safe means of securing your phone.
For purchases
One of my favorite things about Touch ID is its ability to validate purchases on the App Store and iTunes. This makes it possible to make quick purchases without the need to enter in a long password.
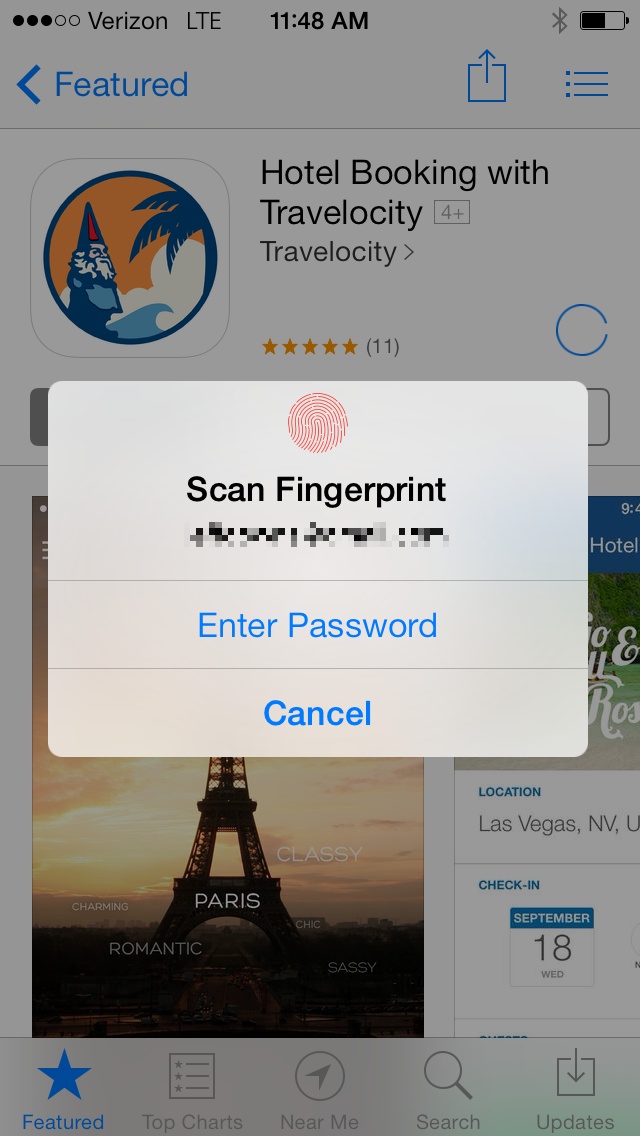
I don’t know how many times I’ve decided against making a purchase, simply because I was too lazy to enter in my gargantuan password. It’s a win/win for developers and for consumers.
Overall
Touch ID is very limited in its scope, but it works wonderful. It’s going to take a few hours of training to reprogram our minds to use our fingers instead of a passcode, but it’s a task that I’ll gladly participate in, because it makes for a much better experience, and a more secure device.
Kudos to Apple for purchasing AuthenTec and getting this right the first time. I know that there will be plenty of hardware developers who will no decide to delve back into the sketchy world of fingerprint authentication. Just remember who had the gumption to go back to the drawing board and try it, and who had the know how to get it right the first time out of the gate.