Unlocking the iPhone 4S, and the iPhone 4 just got a whole lot easier thanks to the SAM package unlock revealed earlier this morning.
After alerting you guys to the news, we went into out labs and started testing this for ourselves. After a few failures, we were finally able to come up with a reliable method for making this work every time.
The good news is that this will likely become even easier as time goes on, and needless steps are eliminated. We’re already to the point where we can switch back and forth between our AT&T SIM card and our T-Mobile SIM card without having to reconfigure anything. It’s pretty awesome.
Check inside for our full tutorial that shows how to unlock any iPhone on iOS 5 or higher (running any baseband) using the SAM jailbreak package…
[tube]http://www.youtube.com/watch?v=C3Me2ZIPJBE[/tube]
This video tutorial is as simple as it gets. Just follow it for an easy iPhone unlock solution.
Your iPhone must be jailbroken on iOS 5 or higher. Baseband is irrelevant. Keep your current SIM in your iPhone until instructed to remove it in step 4.
Step 1: Add the following repo to your Cydia sources: repo.bingner.com and then install SAM.
Step 2: Open SAM, go to Utilities, and tap Deactivate.
Step 3: Go back to the SAM main menu, and tap More Information. Under SIM Details copy your IMSI number.
Step 4: Remove your SIM, and replace it with the SIM you wish to use (i.e. T-Mobile).
Step 5: With SAM enabled, tap Method, and select By Country and Carrier. Go back a menu, and select the correct country and then the correct carrier for your SIM card.
Step 6: Go back to More Information, and tap Spoof Real SIM to SAM. Next under SAM Details, delete the current IMSI number, and replace it with the one you copied in step 3.
Step 7: On the SAM main menu go to Utilities, and tap Attempt Activation. Your device should respring if done correctly.
Step 8: Open SAM and disable SAM. Close SAM.
Step 9: Open iTunes and plug in your device to your computer. You may have to unplug it and plug it in a few times. Be patient. You should receive a message stating that it failed to activate your device, but that’s a good thing, click ok. Be patient, and eventually you will see the carrier logo for your new SIM.
Note: From here on out you can freely switch between your original SIM and your new SIM. All you need to do is plug in the device and repeat step 9 to activate your desired SIM. Please see our video tutorial for more details.
I know that there will likely be variations of this tutorial, or a simpler less step-driven method to come. We will have a more fleshed out comprehensive follow-up on the unlock in the near future.
How to save your Activation Ticket to preserve your unlock
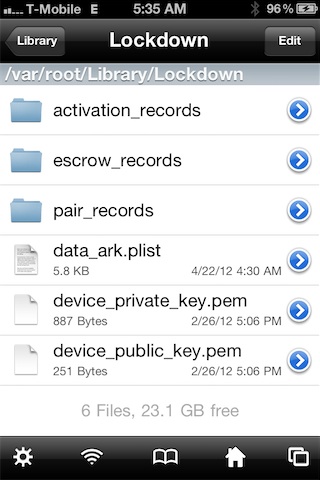
For the record, MuscleNerd has stated that he recommends saving off your Activation Ticket for each SIM that you use, as they might come in handy in the future. These can be found at: /var/Root/ibrary/Lockdown and you can access this easily with iFile or via SSH.
This is perfect for those of you who travel abroad or who need a second SIM card. It’s been working great for me thus far, what about you?

