You can watermark your PDF with text, logo, or image to let people know that the PDF is private, confidential, or created by you or your organization. Though a watermark can’t prevent content theft, it certainly can prevent misuse and help convey that you’re the creator or owner of that PDF.
So, whether it is for school, work, or personal use, this tutorial will show you how to watermark PDFs for free on your iPhone, iPad, and Mac.

Add a watermark to PDF on Mac
1. Use PDF Stamp
Notable features of this app:
- Add text or a logo watermark
- Change opacity
- Use tiled watermark, which adds the text or logo repeatedly all over the PDF page
- Lets you add watermark in batch to several PDFs at once
- Free to use
To use this app:
1) Download the PDF Stamp app from the Mac App Store and open it.
2) Click Add PDFs, select the file, and hit Open.
3) After that, click Proceed.
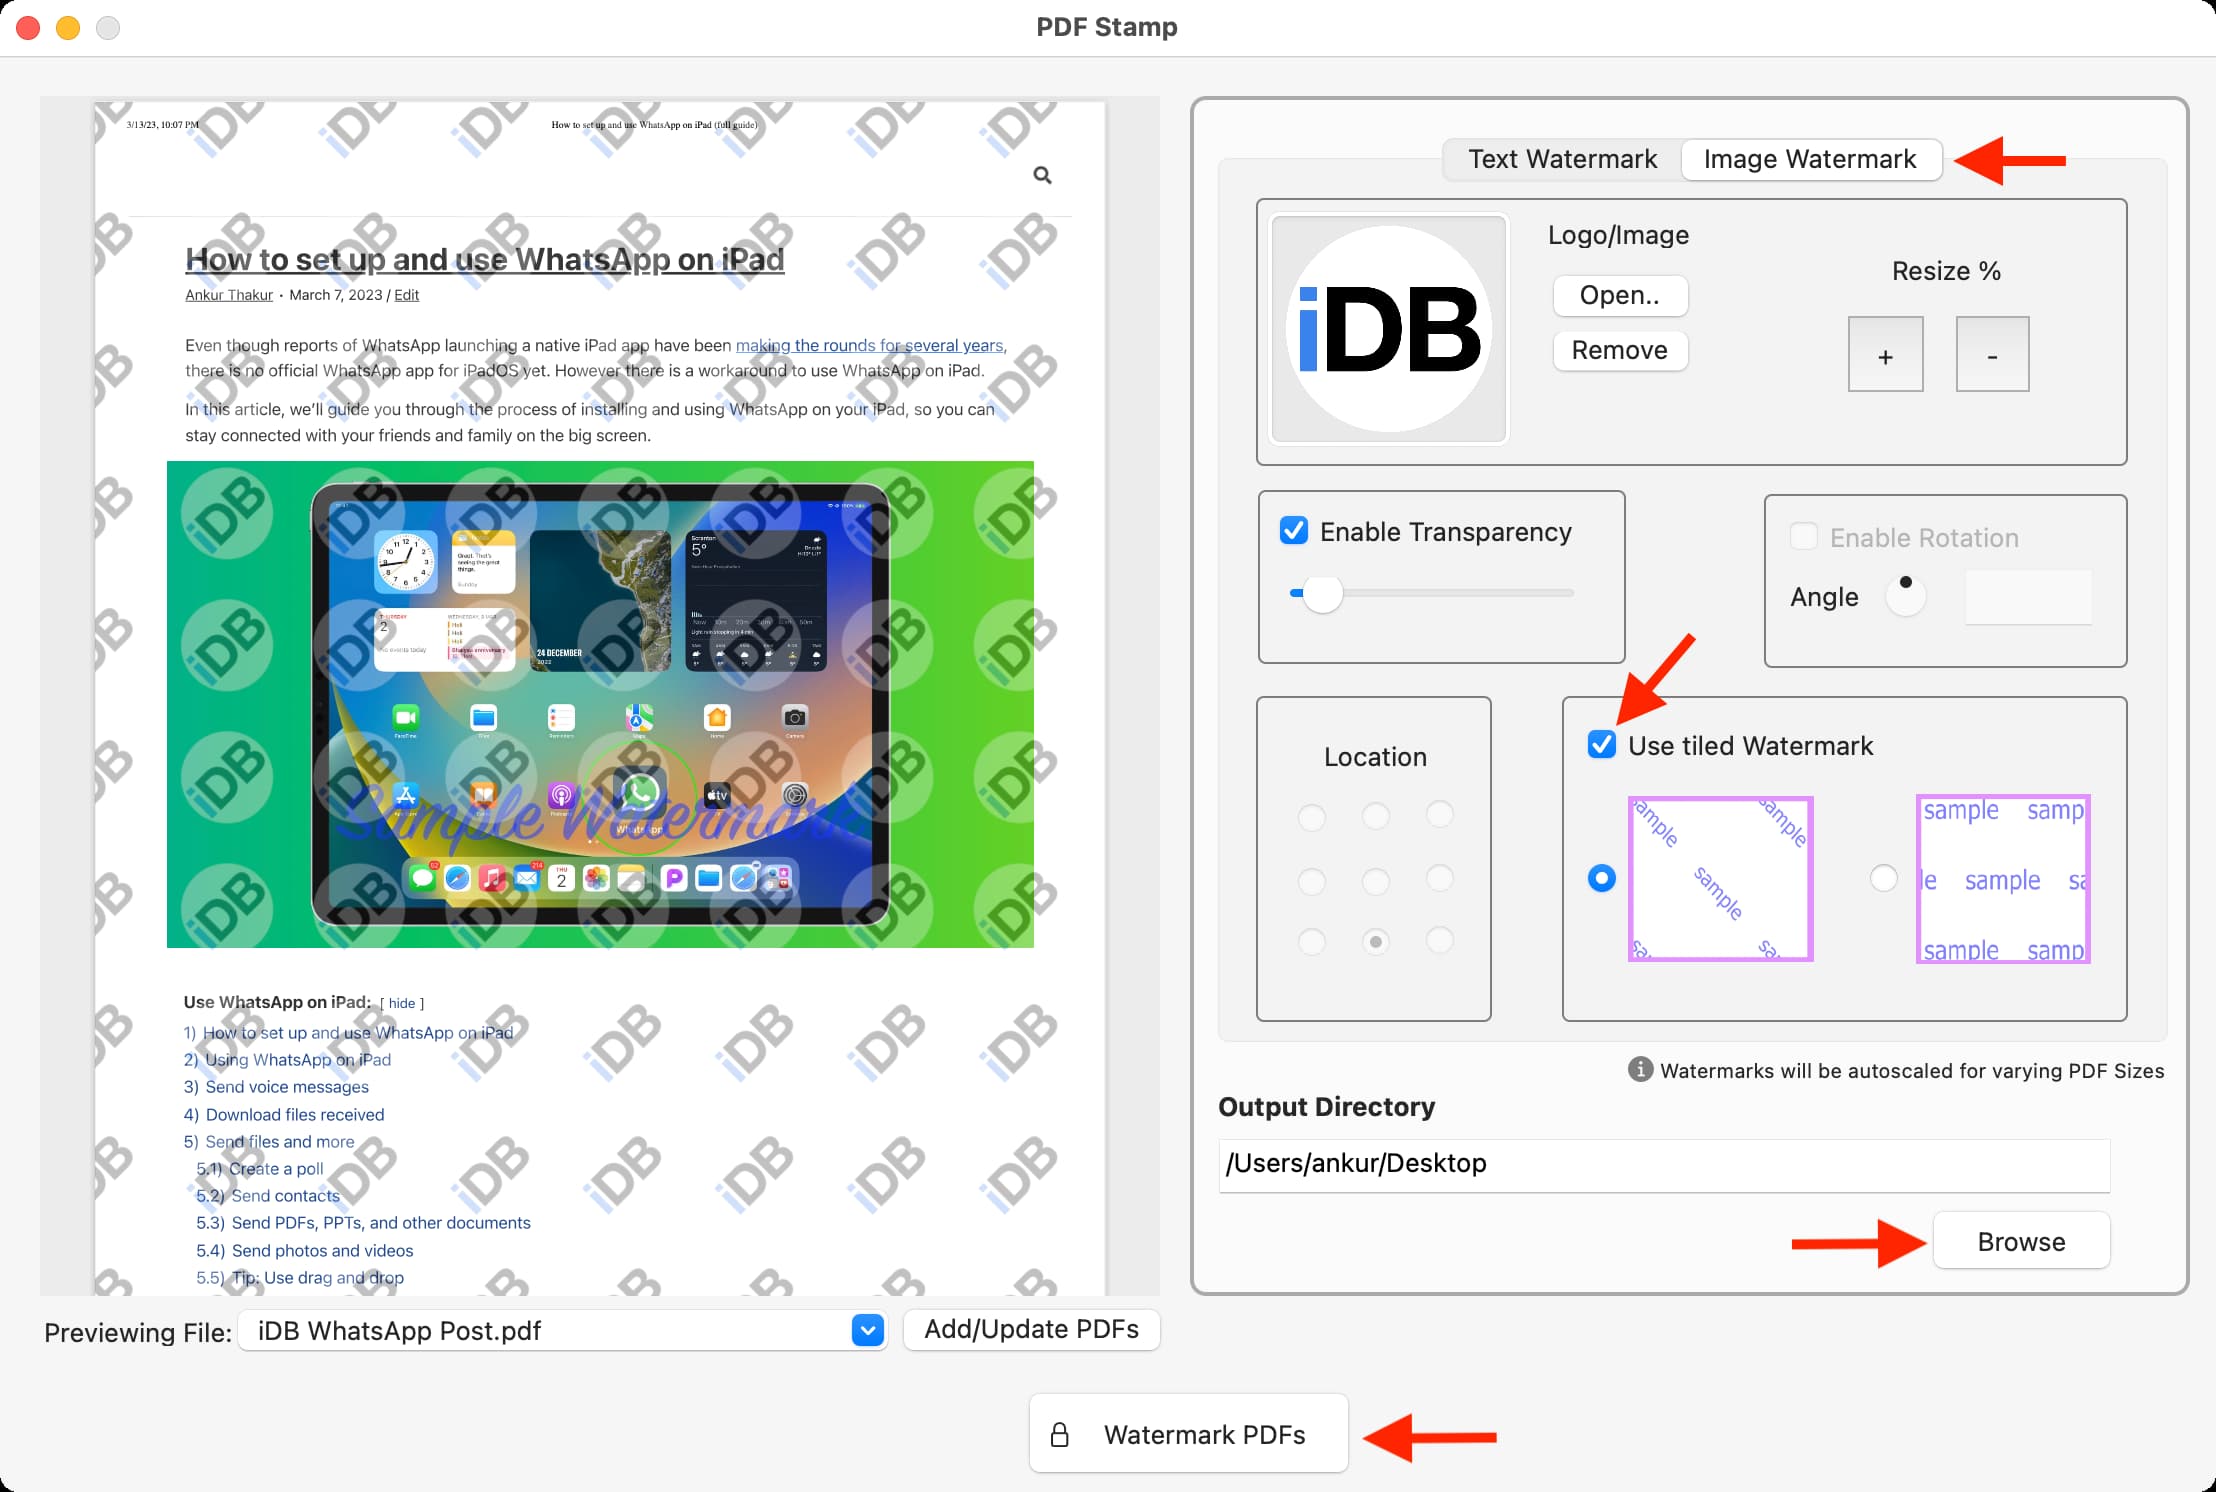
4) From the top right, select Text Watermark or Image Watermark:
Text Watermark:
- Replace Sample Watermark with the text you want to use, like name or words like “Private” or “Confidential.”
- After that, select the font and text color.
- Use the transparency slider to adjust it accordingly.
- Optionally, you can also enable rotation and adjust the angle to make the watermark tilt.
- Choose the location of the watermark.
- Next, decide if you want to use tiled watermark.
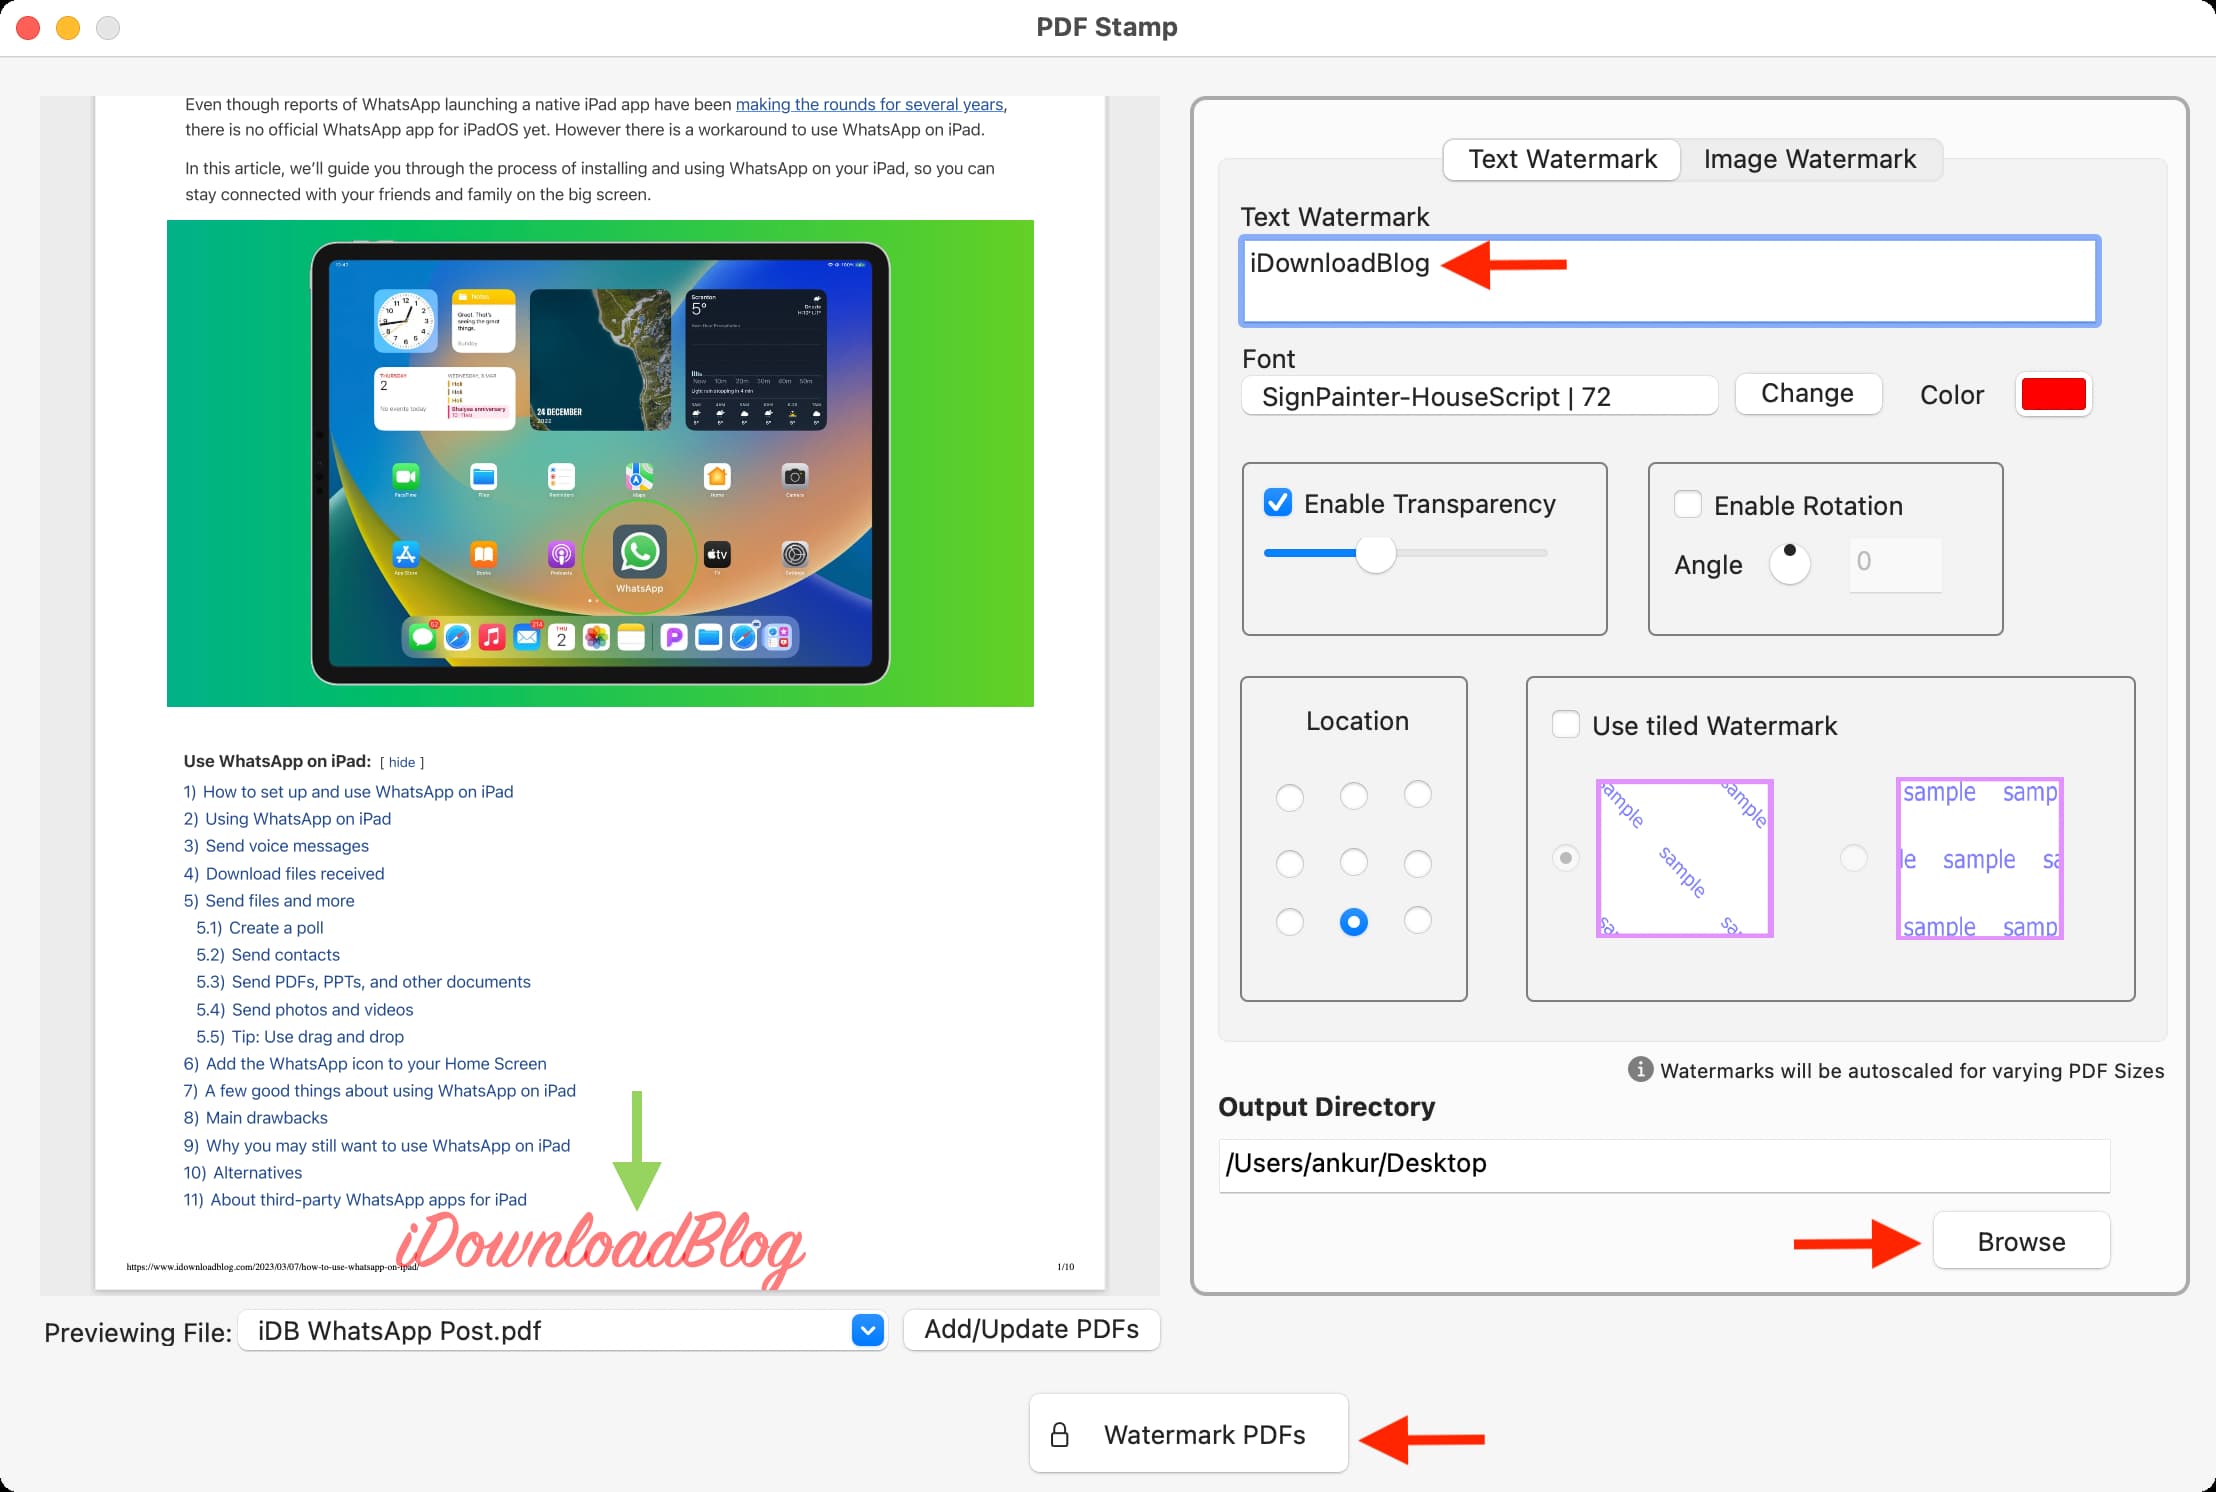
Image Watermark:
- Click Open and pick the image you want to use as the watermark.
- Just like text-based watermark, you can adjust the size, transparency, rotation, location, and style of the logo watermark.
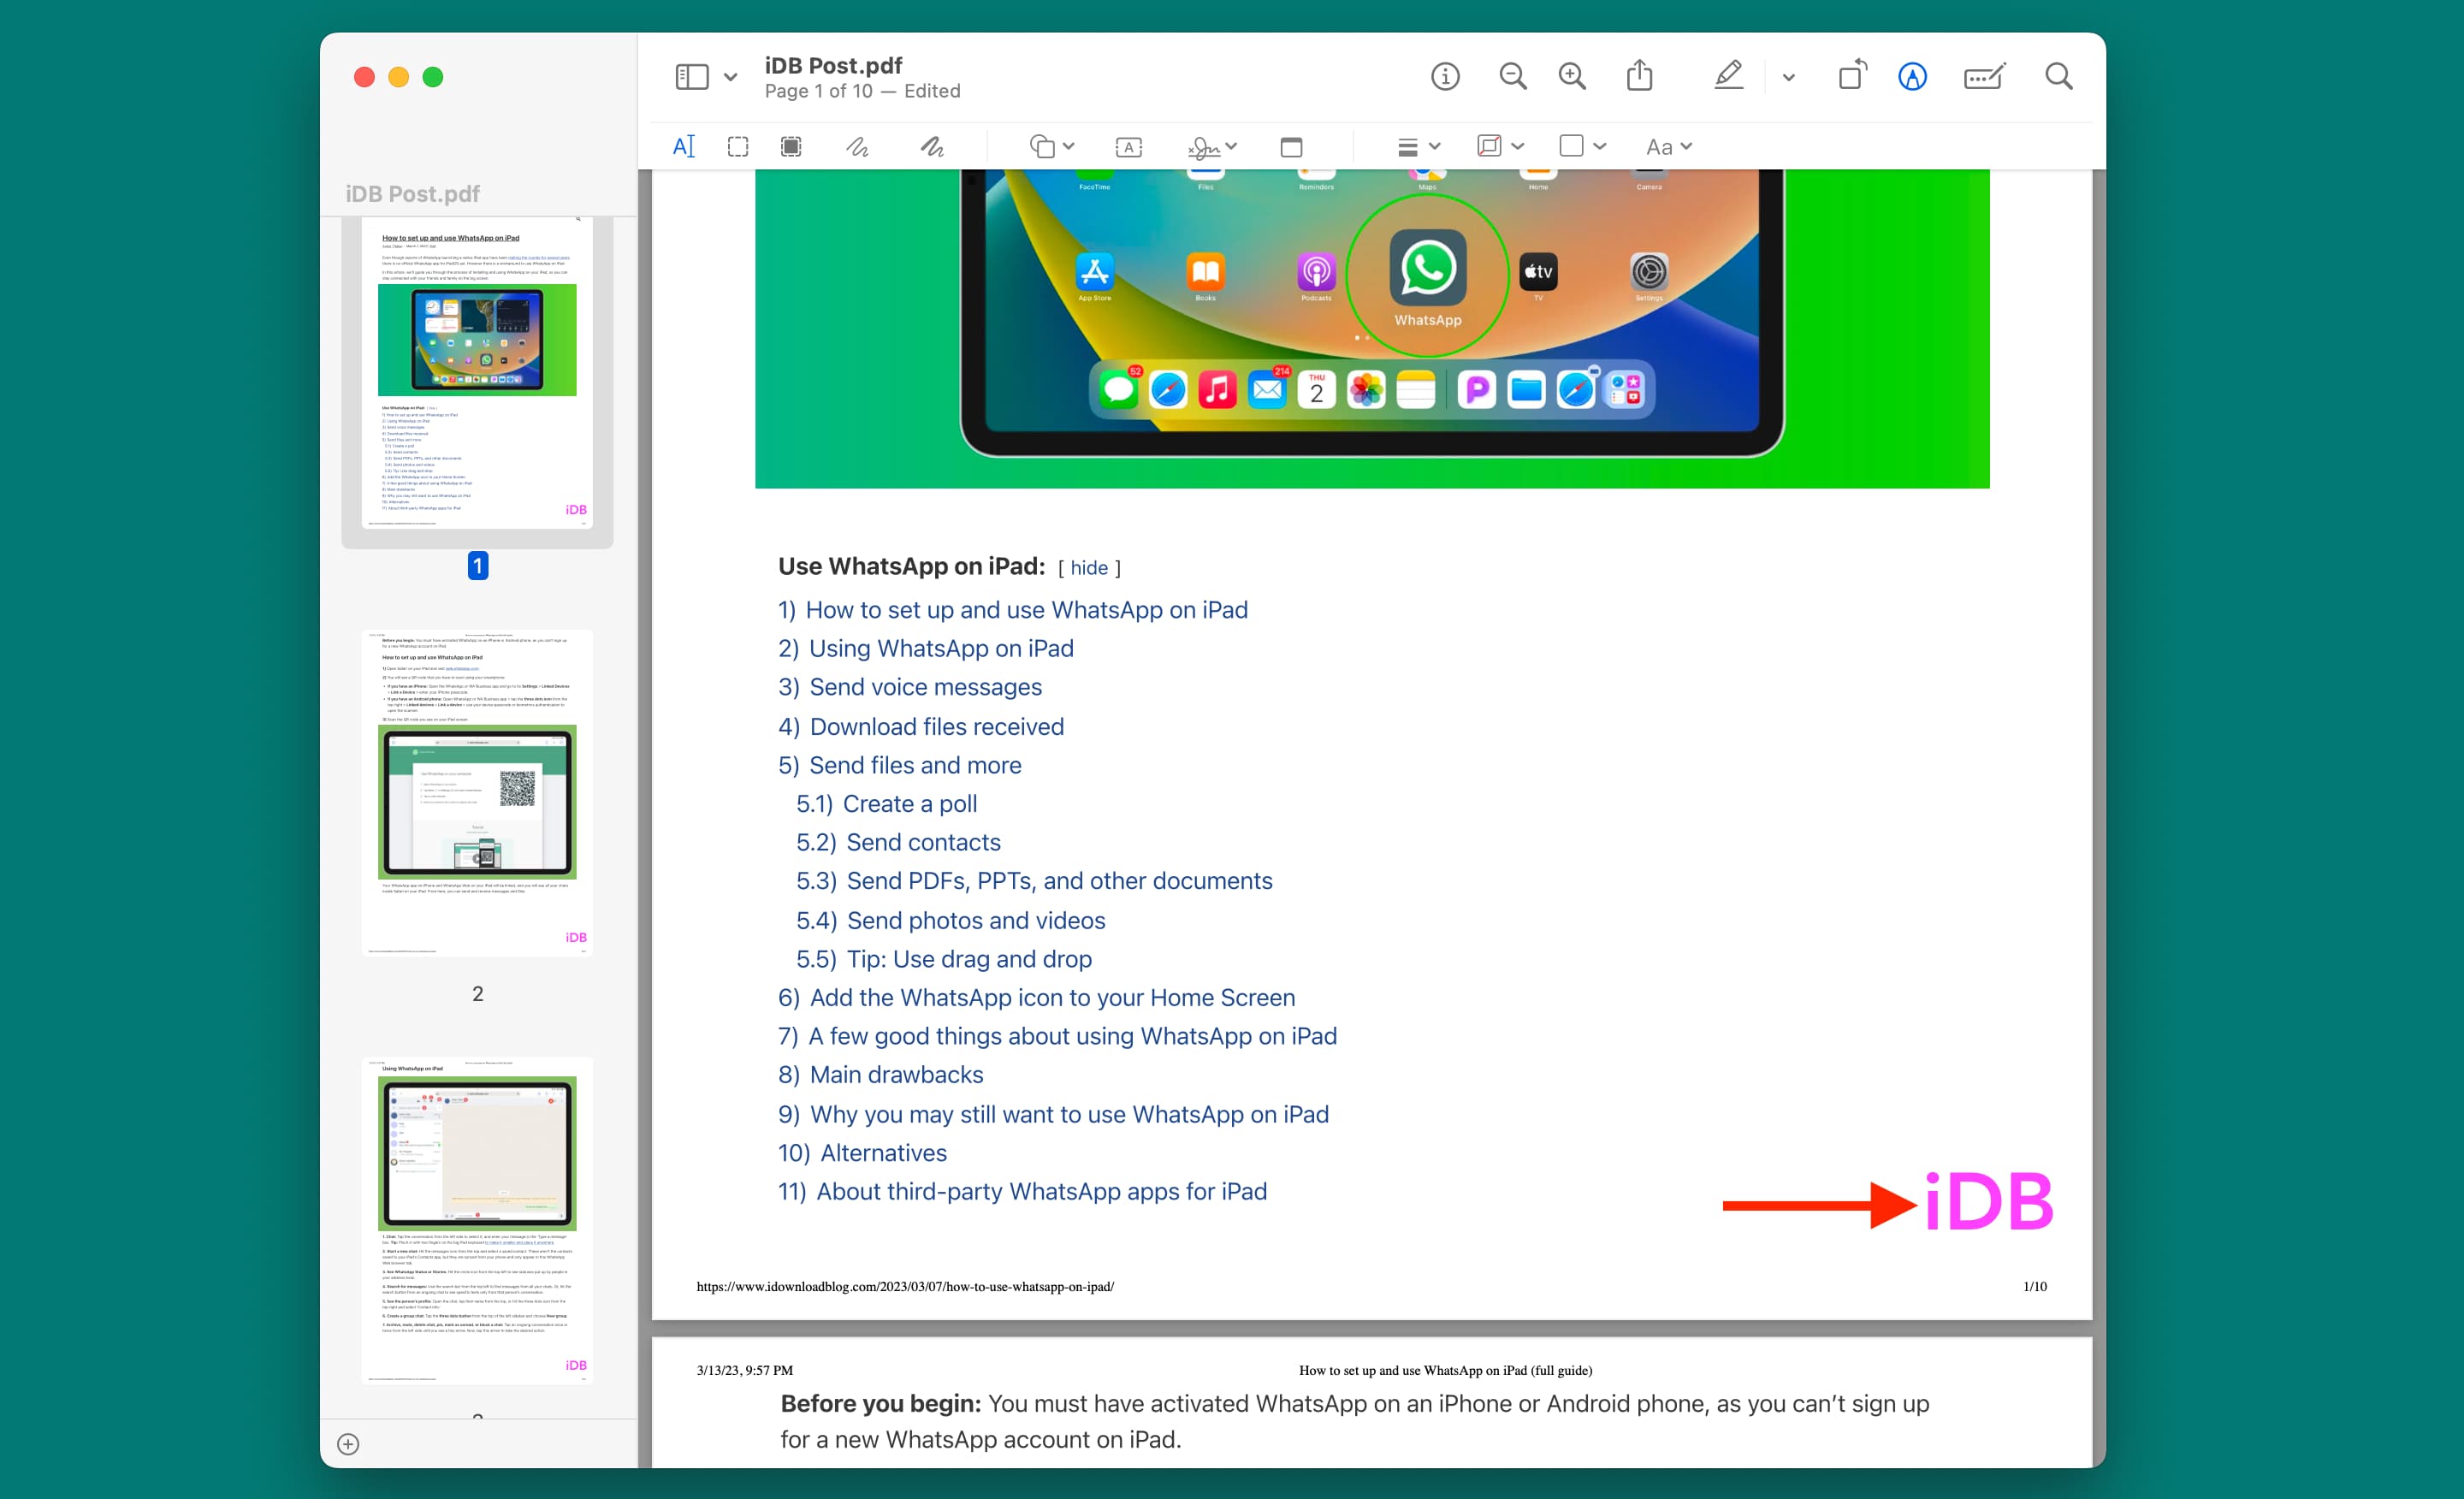
5) Optional: If you want to add the same watermark to multiple PDFs, click Add/Update PDFs and add more files to it. All these will have the same watermark you added and customized via the above four steps.
6) Click Browse and select the Output folder.
7) Finally, hit Watermark PDFs.
The app will put a watermark over your PDFs and save them to the chosen location.
2. Use the Preview app
Notable features of this app:
- Comes pre-installed on your Mac
- It can be used to add a simple text watermark to a PDF with one or a few pages
- No fancy watermarking options
Although this superstar app lets you add a signature to your PDFs (which in itself can be used as a kind of watermark), annotate them, and more, it lacks a robust watermark option. However, you can use it to add plain text to your PDF pages which can work as a watermark. Here’s how:
1) Double-click a PDF to open it in Preview. You can also right-click on a PDF and choose Open With > Preview.
2) From the top menu bar, click Tools > Annotate > Text.
3) Add your custom text in the “Text” box.
4) With the cursor still inside the “Text” box, click Aa from the top to customize the text. You can choose a different font, text color, size, bold/italic/underlined, and text orientation.
5) Next, drag the text to the position where you want to place it. Most people like to keep it in the bottom right corner.
6) Once you have finalized your watermark’s look and page position, select it and press the Command + C keys to copy it.
7) Scroll to the 2nd PDF page and press the Command + V keys to paste it. You will notice that the text is pasted at the same position (like the bottom right) as the first page. You can repeat the Command + V process to add this text to all your PDF pages.
8) Click File > Export or click File > hold the Option key to reveal Save As and select it.
9) Make sure it says PDF next to Format and hit Save.
3. Use iLovePDF.com
Notable features of this website:
- Add text or image watermark
- Change transparency
- Use rotation
- Option to put the watermark over the content or below it
- It can work in batch with up to 3 PDFs on the free version
- There is no need to download and install any app, making it perfect for adding quick watermarks
This website is free, quick, and reliable. However, you must understand that you’re uploading the PDF to this site’s server, and though its privacy policy says the files are encrypted and deleted after two hours, you may want to be a little cautious before using it for sensitive PDFs.
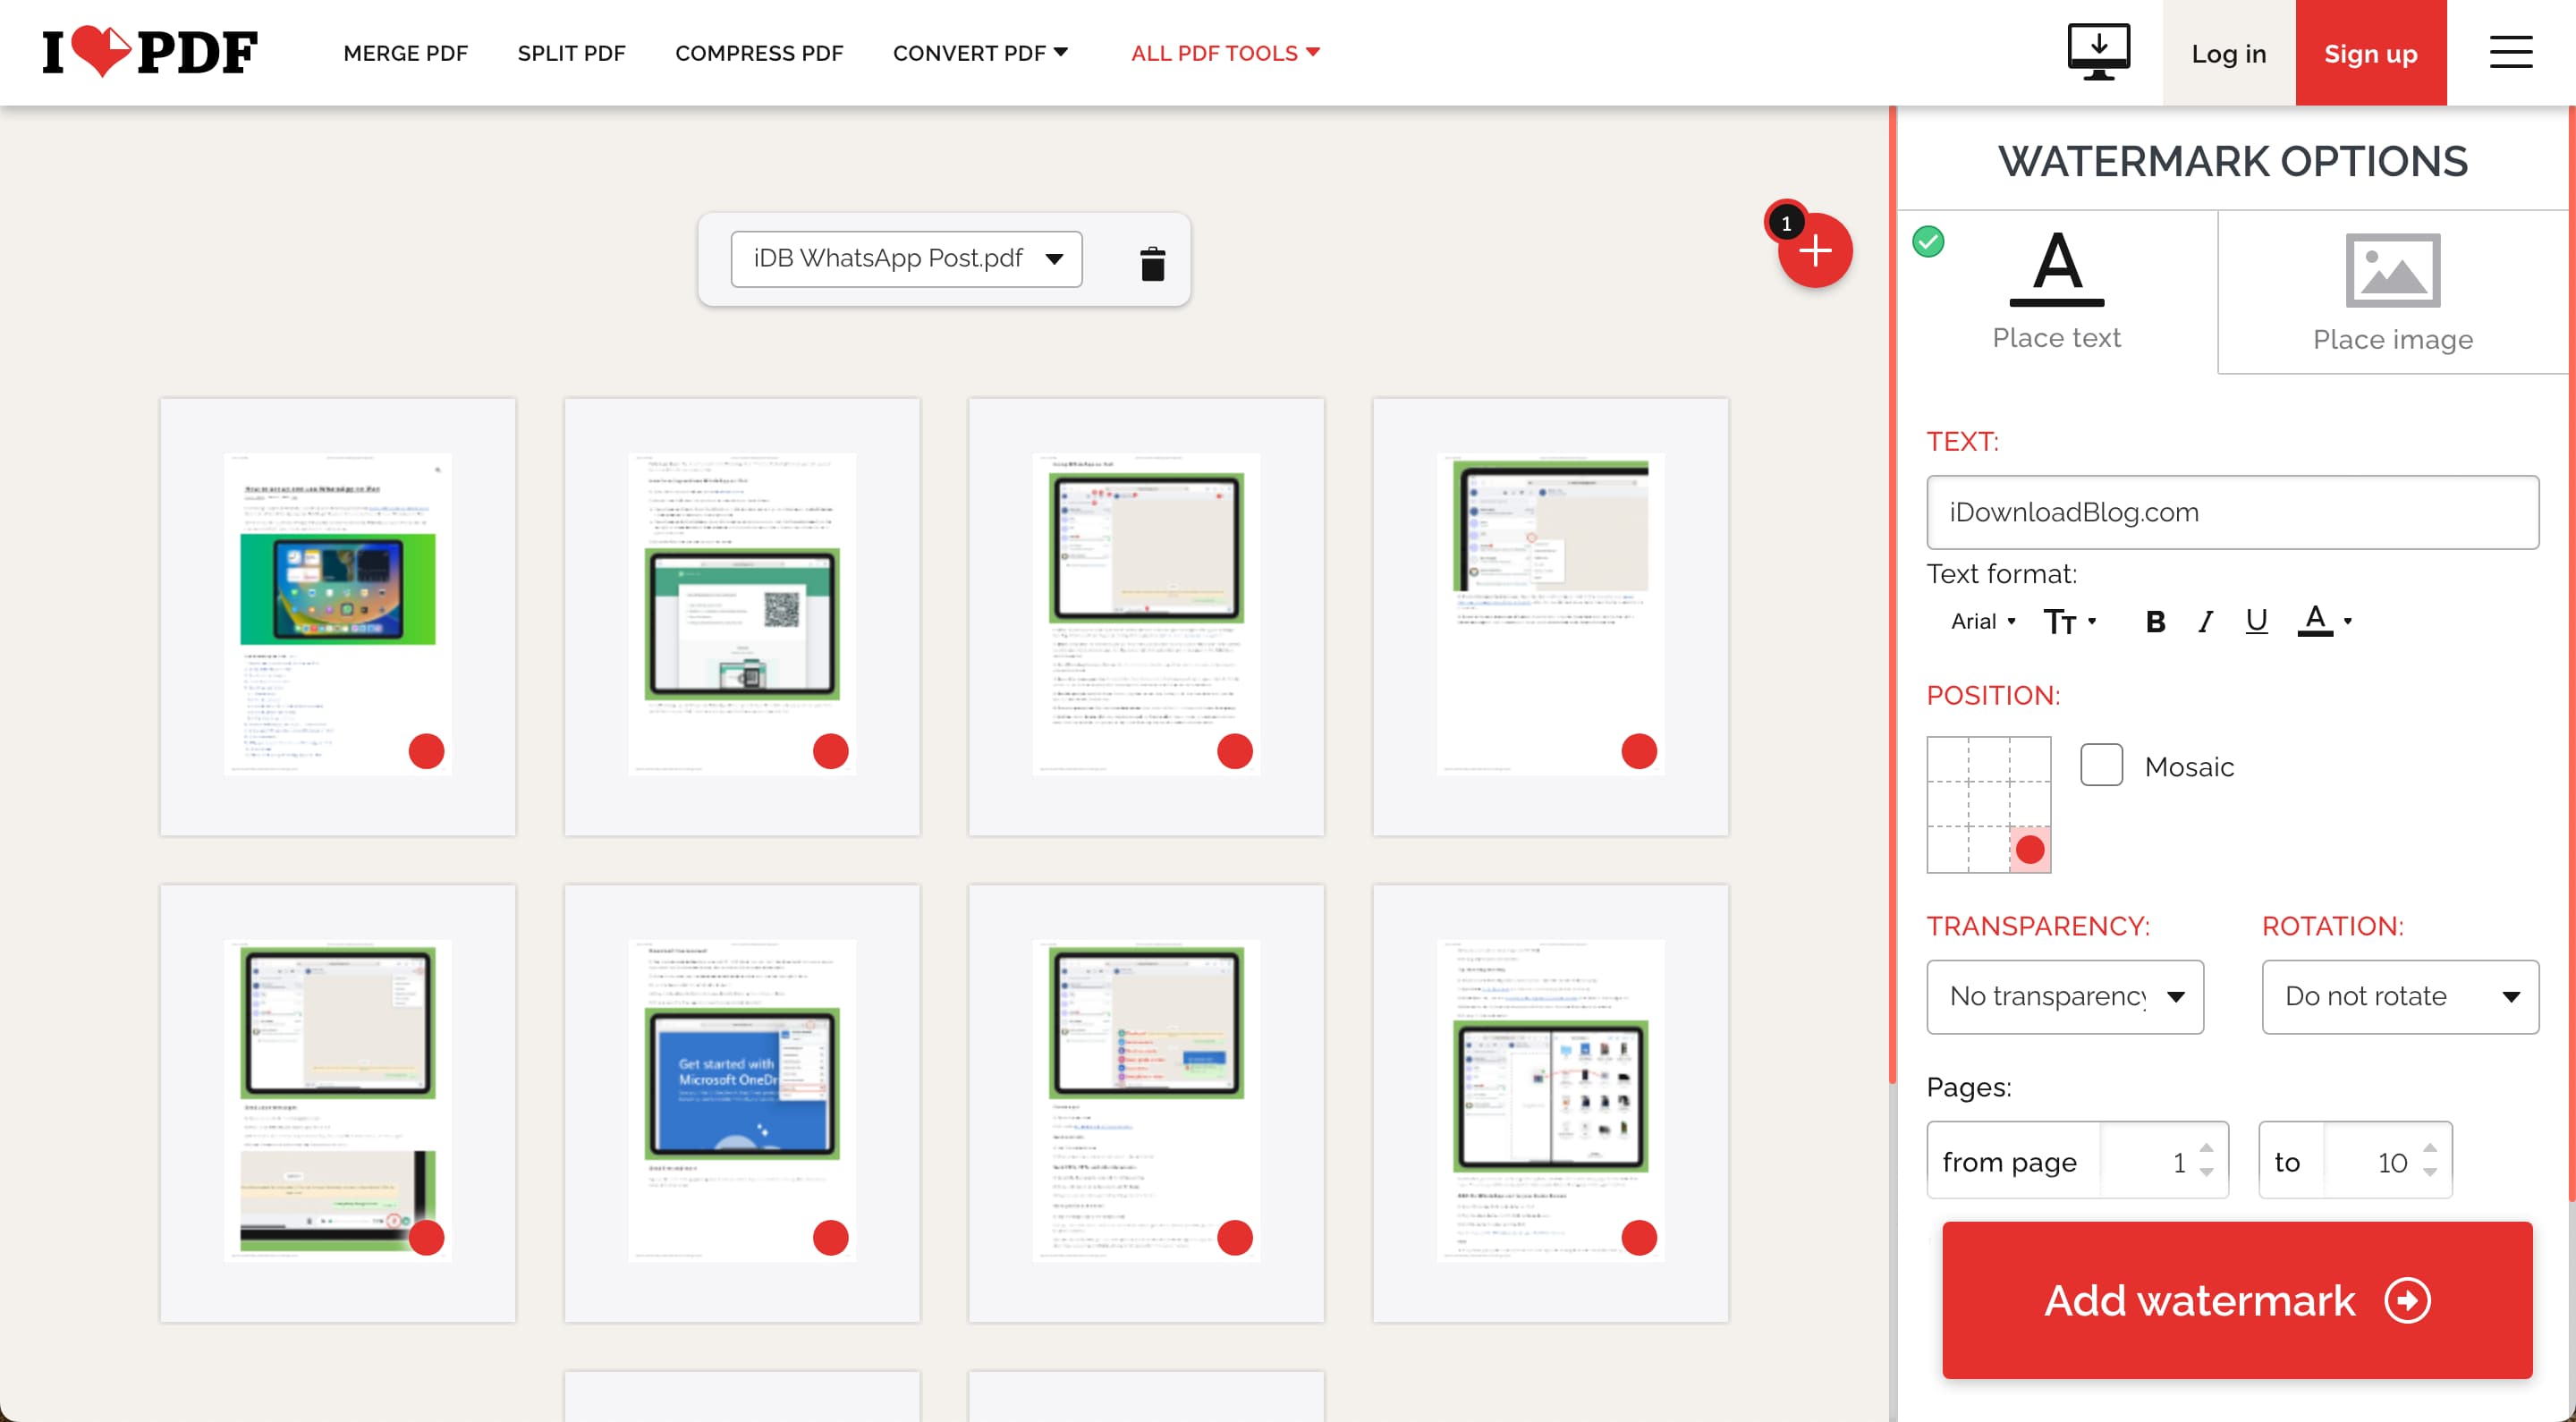
1) Visit iLovePDF.com and add your PDF here.
2) Select text or image-based watermark.
3) Customize the watermark using various tools. You can also choose if you want to exclude the first few or last few pages from being watermarked.
4) With all done, hit the Add watermark button.
5) Finally, click Download PDF with watermark.
Note: iLovePDF also has Mac and PC apps that work offline.
4. Use the Pages app
You can add a watermark to your existing PDFs using the above methods. However, if you’re starting from scratch and drafting your document, you can use the Pages app to add a watermark. Once that’s done, export your document as a PDF, and it will have the watermark.
Add a watermark to a PDF on iPhone and iPad
I spent a lot of time trying dozens of apps and selected the ones that work best while being free (completely free or ad-supported). I recommend you try all these apps and keep the one you’re most comfortable with.
1. PDF Scanner
Notable features of this app:
- Works offline
- Free to use
- Choose to watermark all or specific pages
- Ability to set the opacity/transparency of the watermark
- Various customization options like font size, color, style, and position
- Sadly, no preview when you’re customizing your watermark
- It cannot add image based watermark
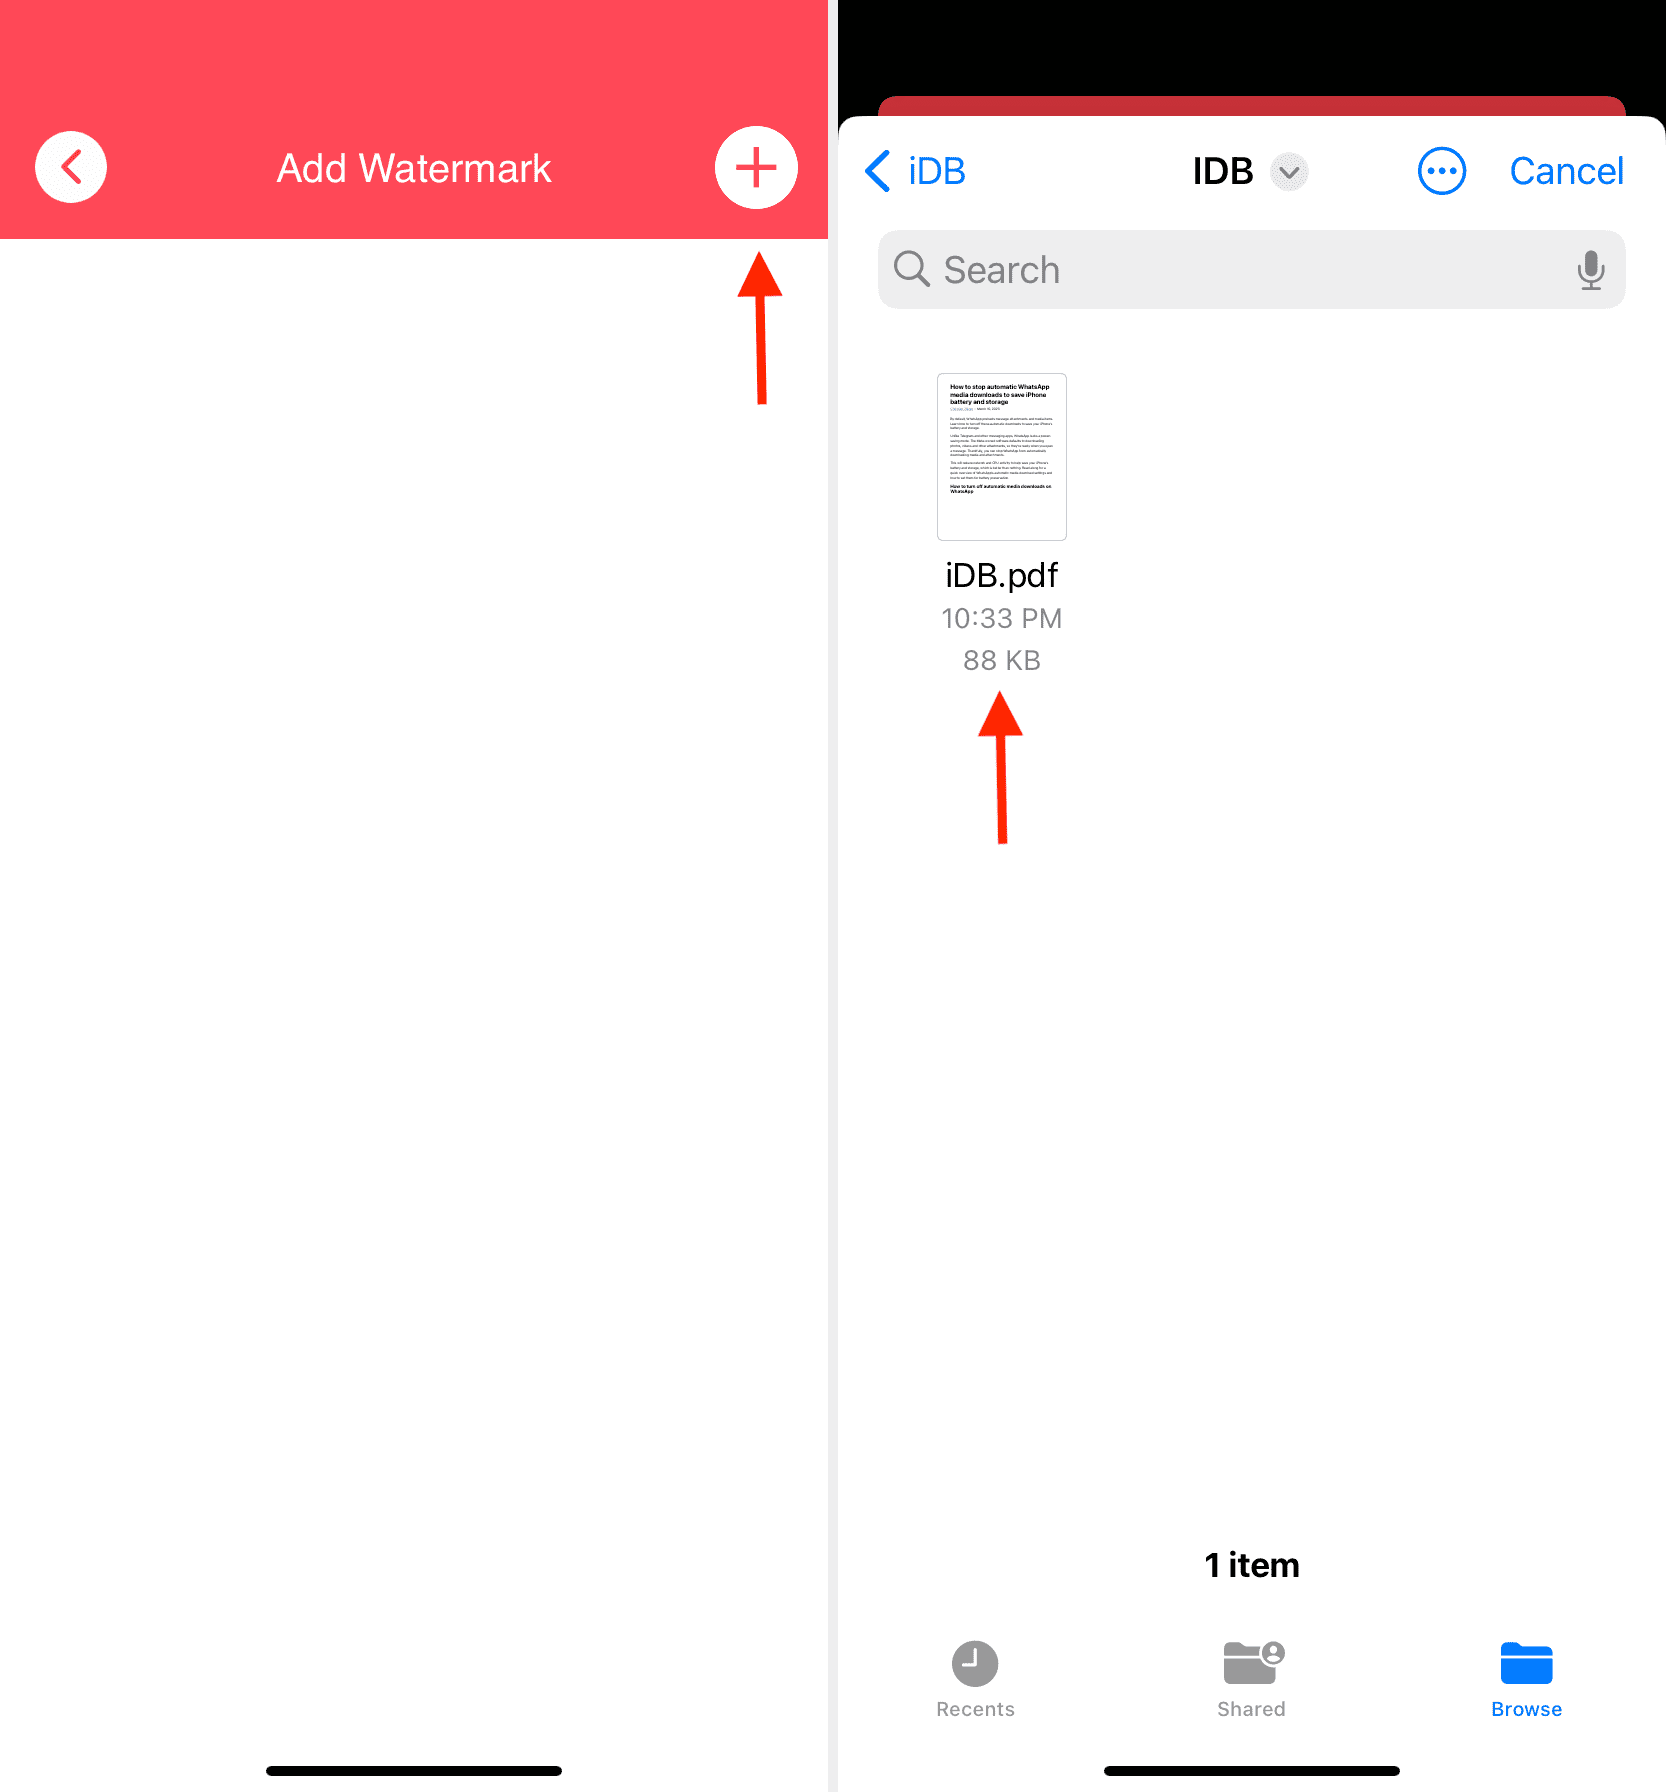
1) Get PDF Scanner for free from the App Store and open it.
2) Tap PDF Tools > Add Watermark.
3) Hit the plus icon from the top and select your PDF from the Files app.
4) Tap the added PDF, which will open the watermark tools.
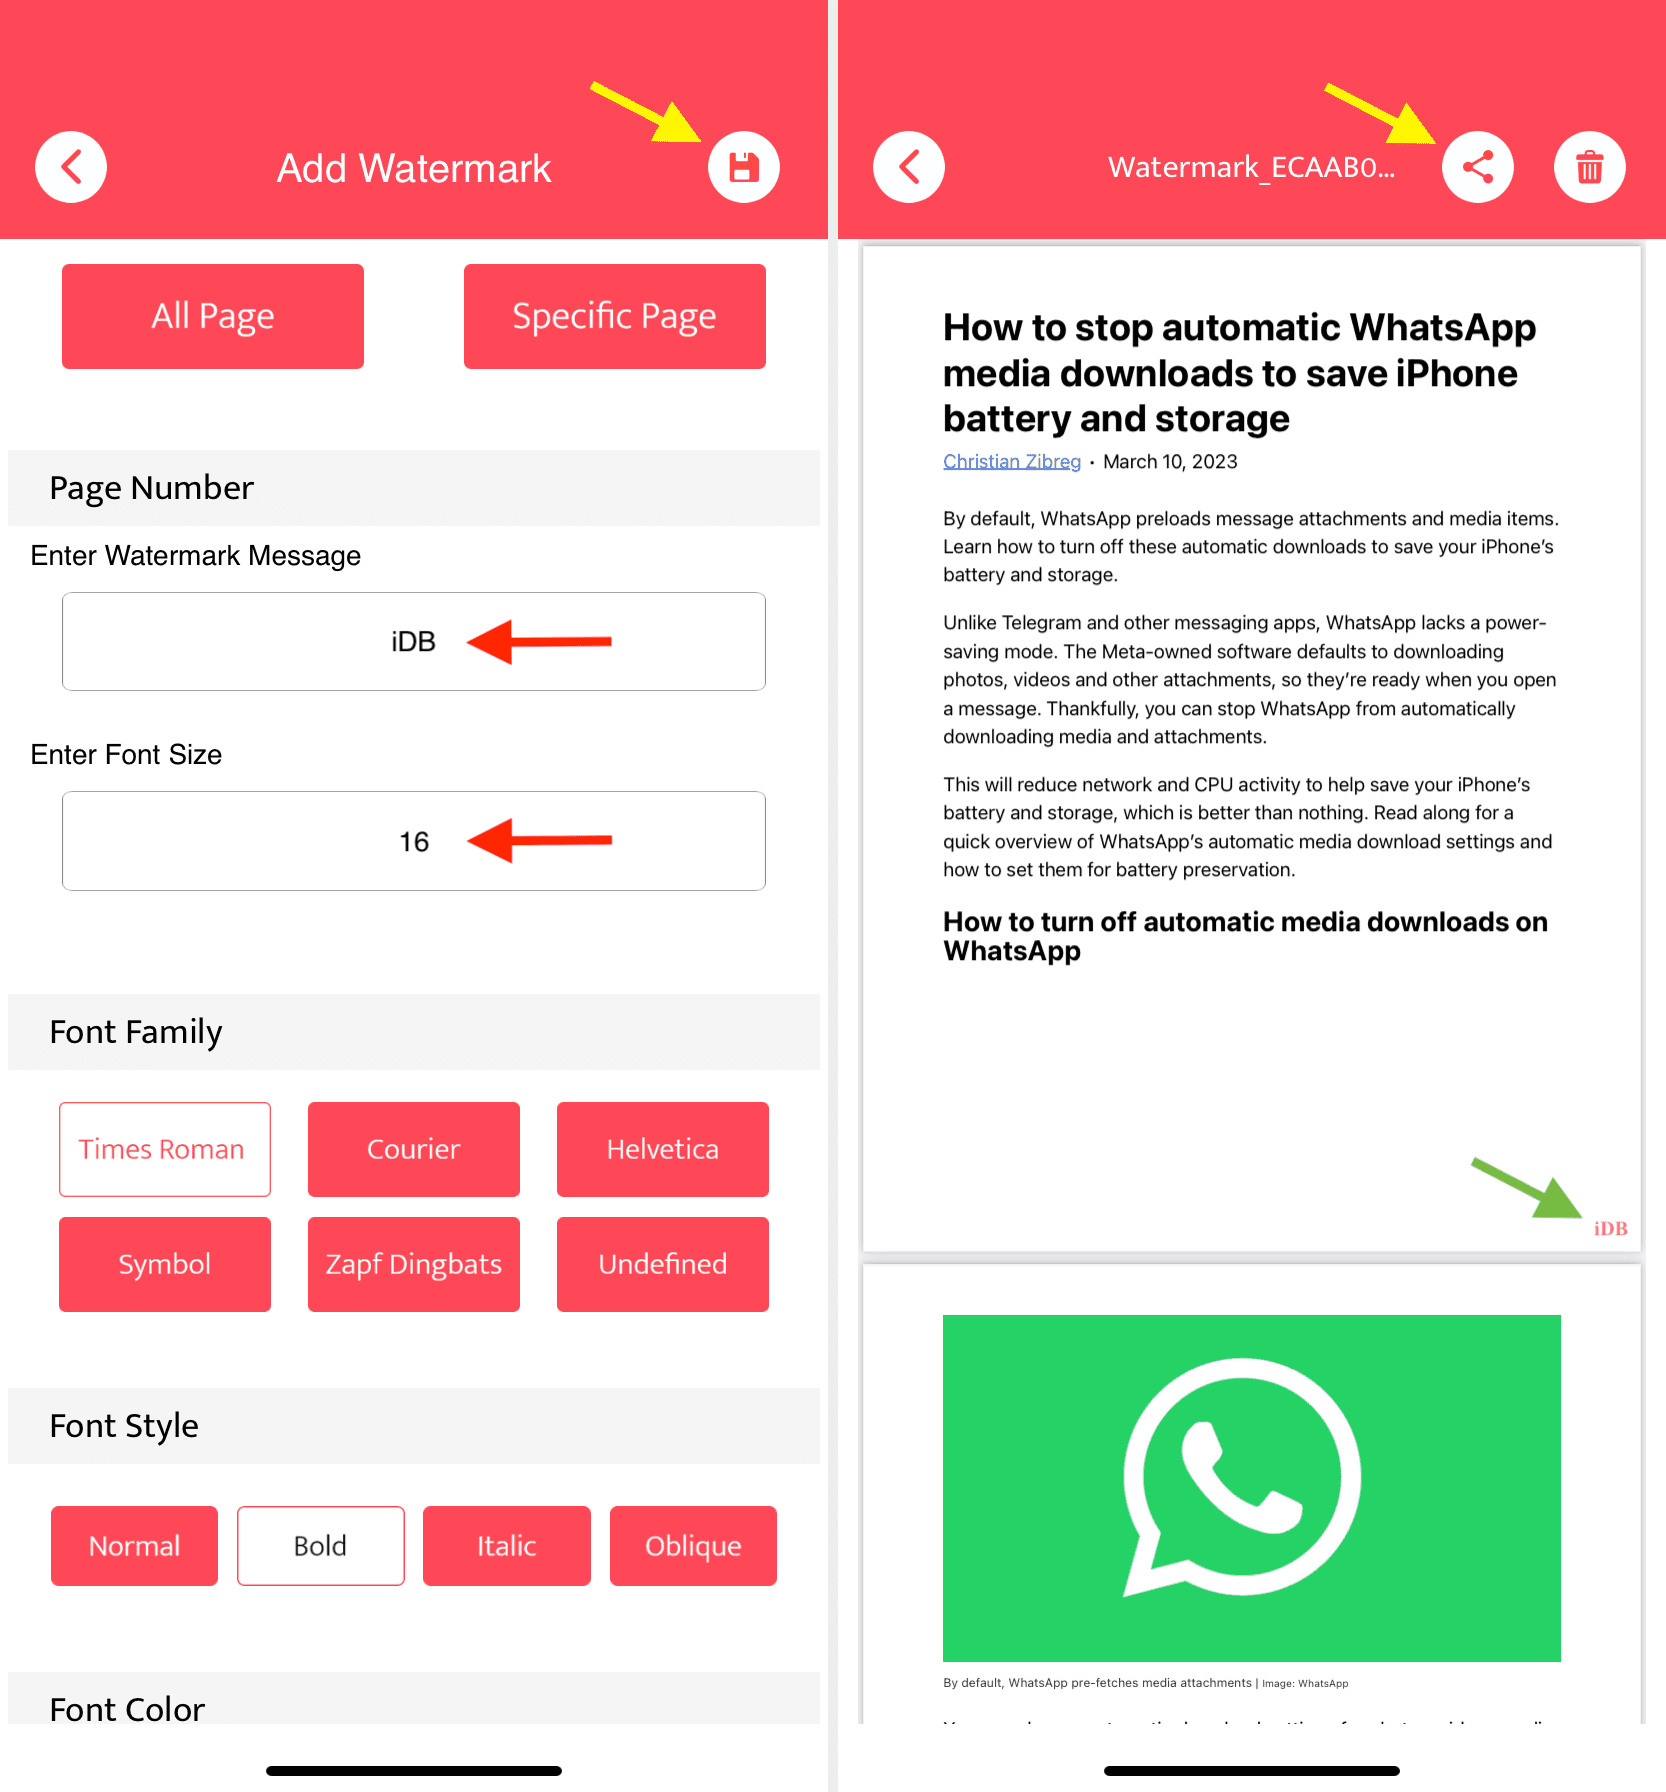
5) Select All Page or Specific Page.
6) Enter your watermark text and follow it by entering the font size .
7) Now, choose the font family, style, and color.
8) Pick the position where you want the watermark.
9) Next, set the opacity or transparency level.
10) With all done, tap the save icon from the top right.
11) Here, you will see the preview of the added watermark. If something needs changing, go back and tweak it. And if everything is perfect, hit the share icon > Save to Files > select a location > Save. The PDF is watermarked and saved to the Apple Files app.
2. PDF Tools
Notable features of this app:
- Works offline
- Simple, quick, and free to use
- Can only add text watermark
- You can preview your watermark while customizing it
1) Get the PDF Tools app from the iPhone or iPad App Store and open it.
2) Tap Add Watermark.
3) Hit the big plus (+) button from the top and select the PDF that you want to watermark.
4) Select the PDF and tap the arrow button.
5) Pick All Pages or Specific Pages and set a range.
6) Enter the text you want to add as the watermark.
7) Customize your watermark text font style, size, color, opacity, and position. You can see the changes in the small preview thumbnail on the top.
8) With all done, tap Add Watermark.
9) Enter the file name and hit Done.
10) Tap the three dots icon next to the watermarked PDF and choose Show File > share button > Save to Files > select a folder > Save.
3. watermarkLite
Notable features of this app:
- Works offline
- Add text or image watermark
- Set the right opacity of the text or image
- Add a QR code as the watermark
- You can convert the PDF into picture format
- No preview in the free version
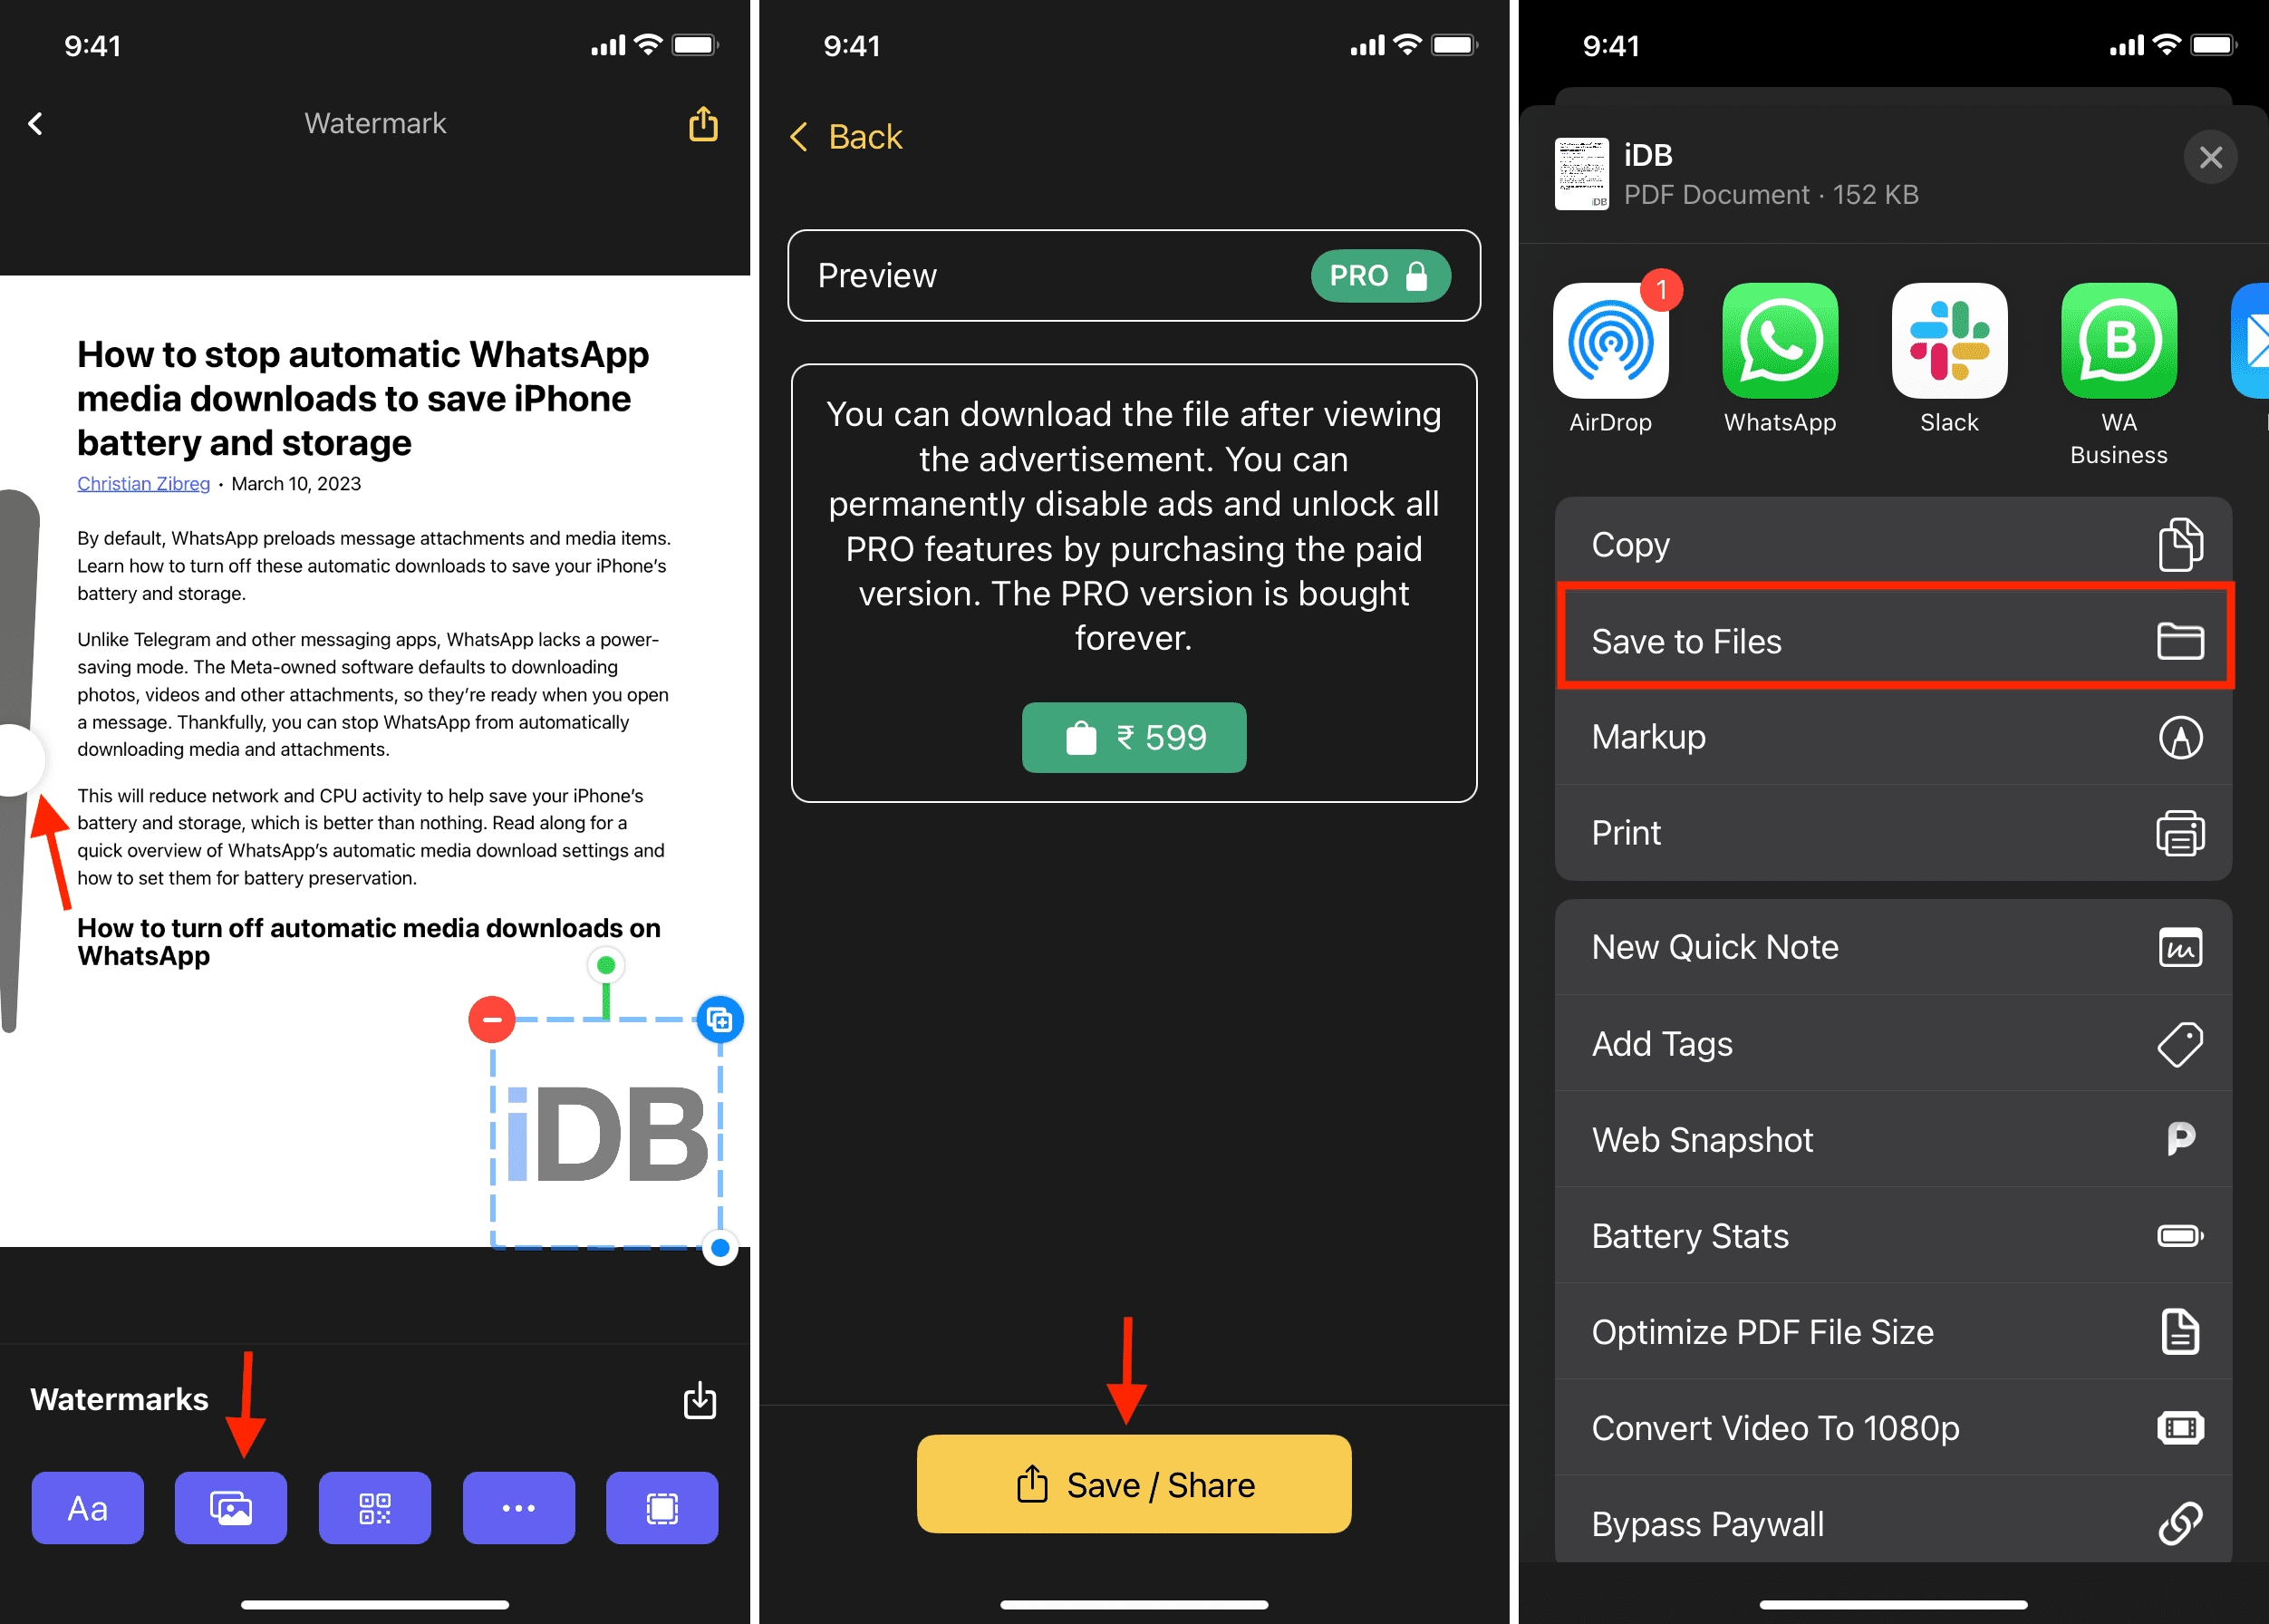
1) Open the watermarkLite app on your iPhone or iPad.
2) Tap the box for Click to select a PDF to add a watermark and pick the PDF from the Files app.
3) Tap Aa for text-based watermark or use the photo icon to add a logo or image as the watermark. We’re selecting an image.
4) Use the slider on the left to set the opacity. After that, adjust the watermark size and placement.
5) Tap the yellow share icon from the top.
6) Hit Save/Share > Save/Share.
7) Pick Save to Files from the Share Sheet and pick a location inside the Files app to save the watermarked PDF.
4. Watermarkly
Notable features of this app:
- Doesn’t work offline
- Can add text and image-based watermarks
- Watermark can be added below the PDF text
- With one tap, the app can remove the background of the image that’s being used as the watermark
- Unique tools like excessive tiling, spacing, rotation, effects, etc
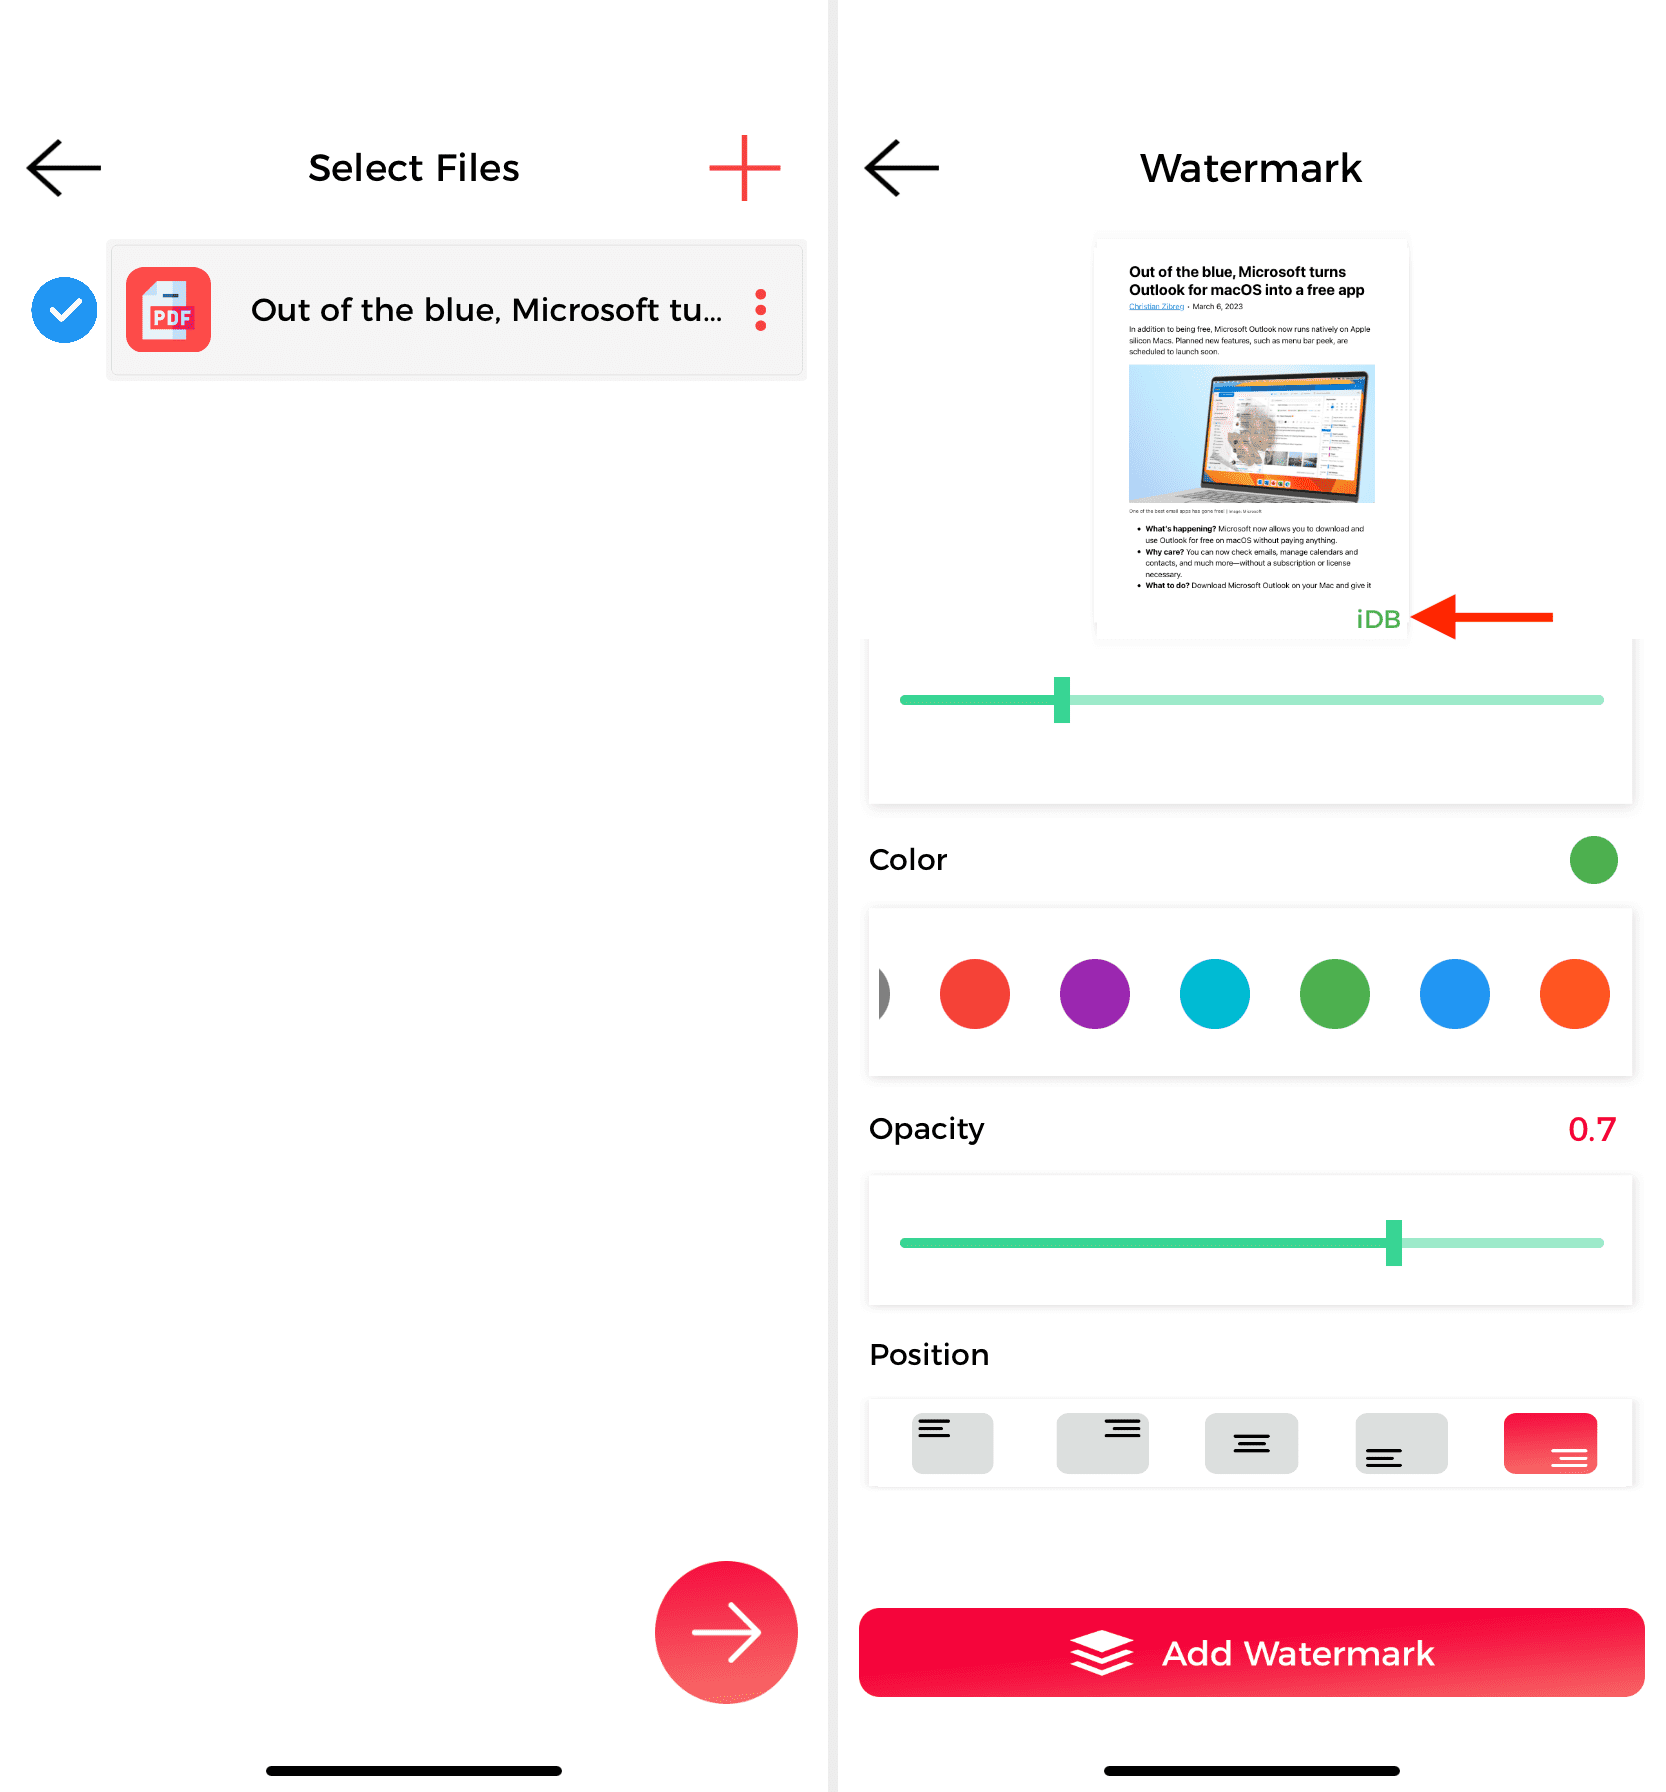
1) Open the Watermarkly app and tap Select Files > Select PDF. Now, pick the PDF from the Files app and hit Open.
2) Tap the PDF and then tap Next Step from the top.
3) Tap Text or Logo. We’re picking Logo, followed by From My Phone. Next, pick the image you want to use as the watermark from your Photos app and hit Add.
4) Use the tools to customize your PDF. Try them out. You can always hit the back button and restart if something goes wrong.
5) With all done, tap Next Step.
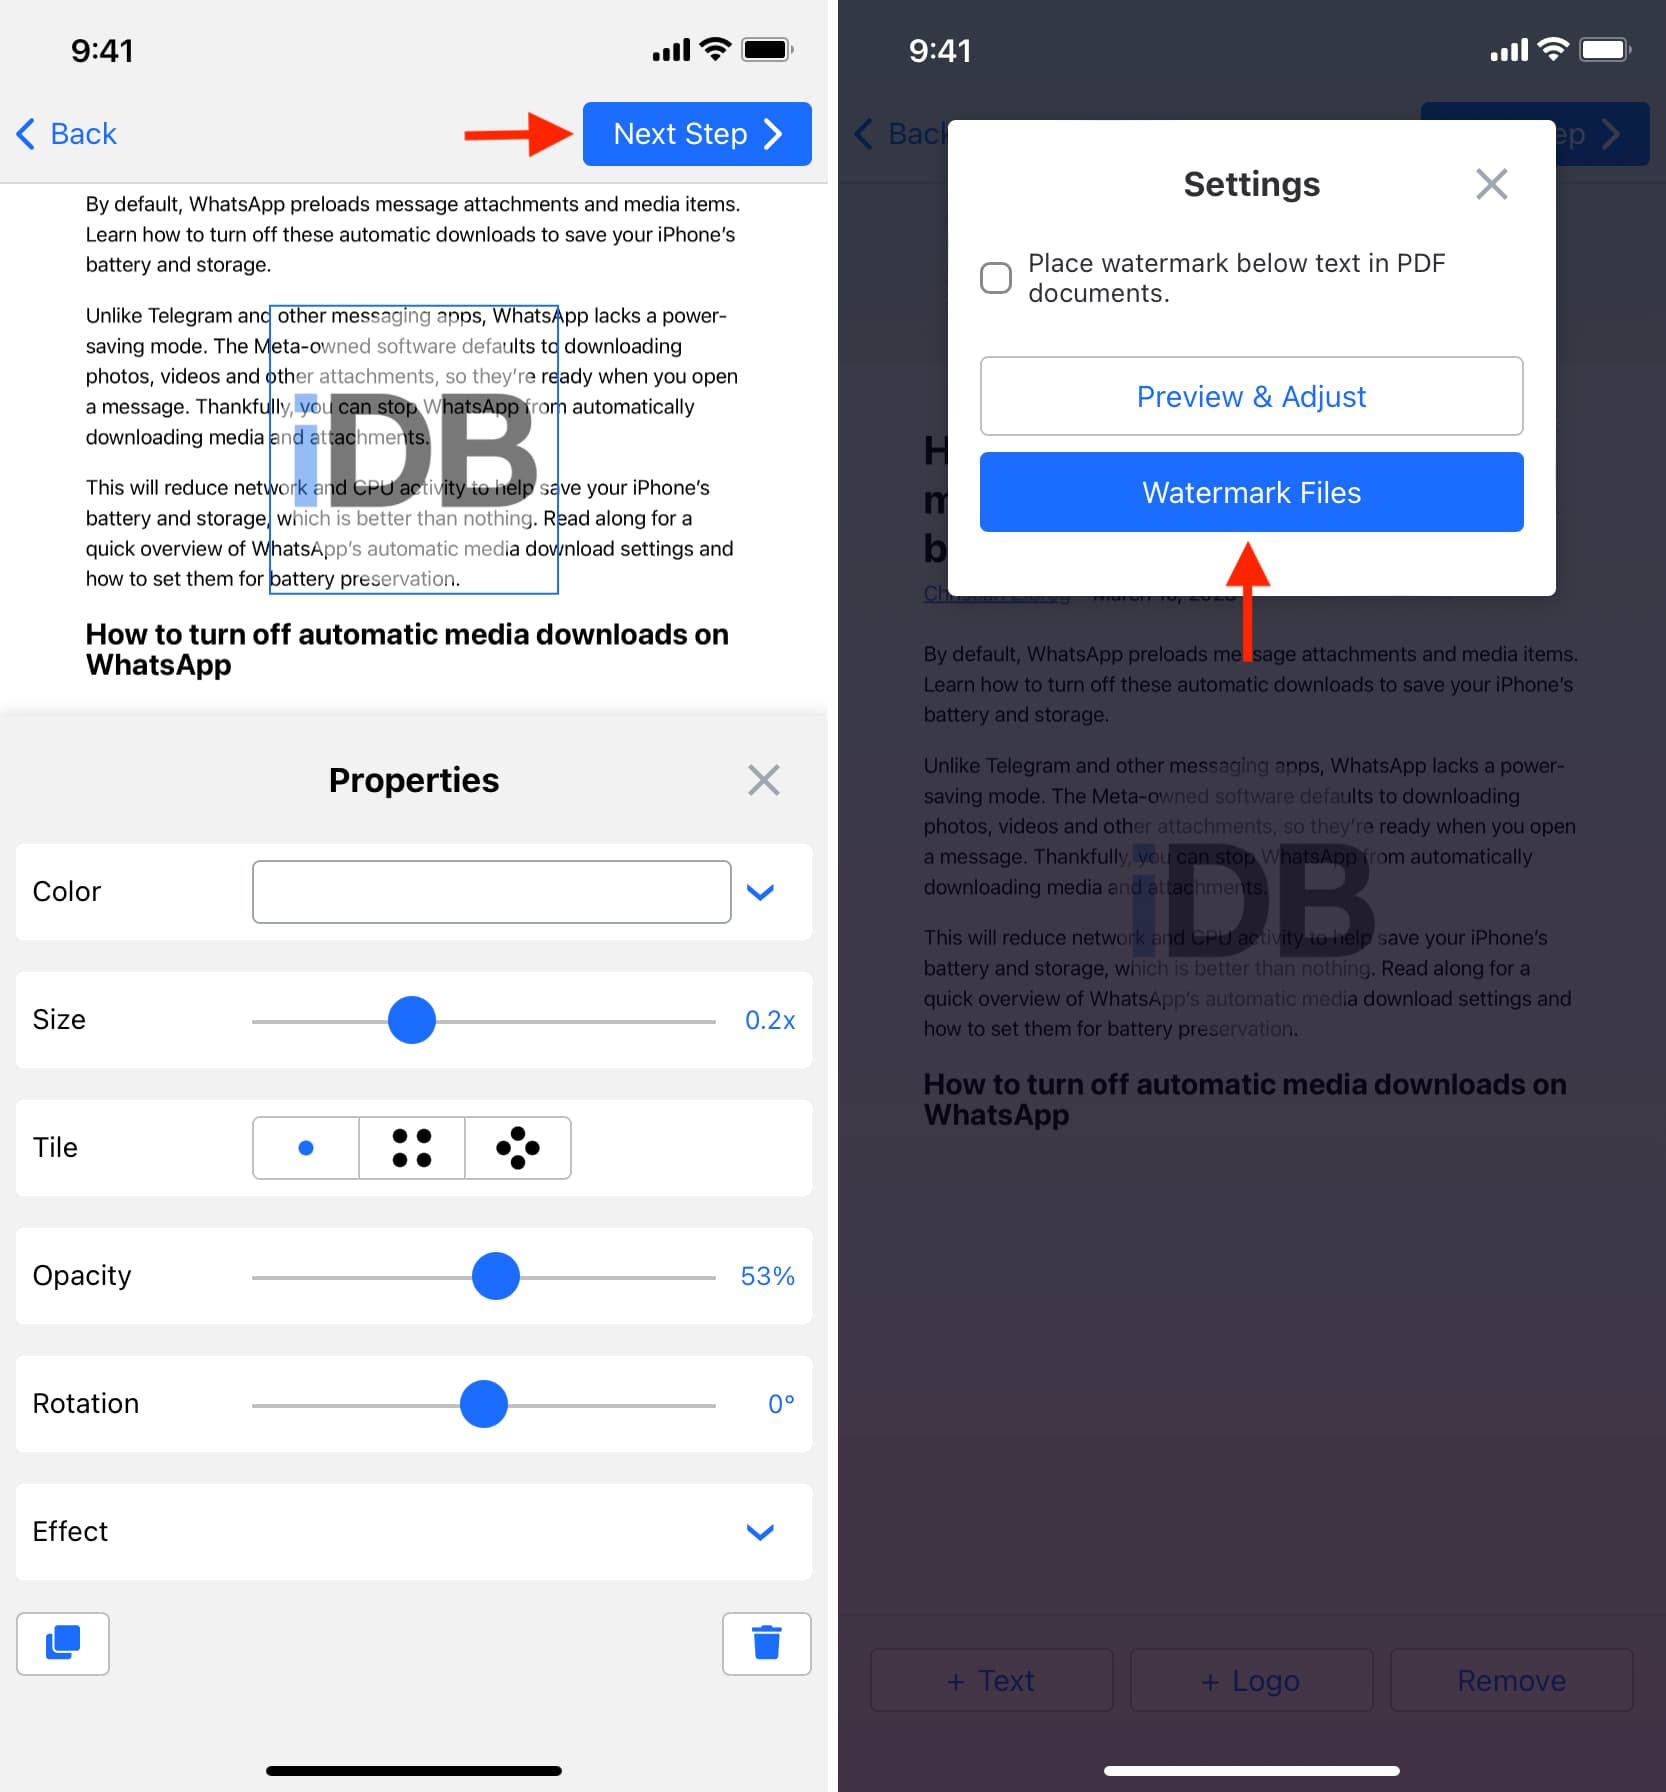
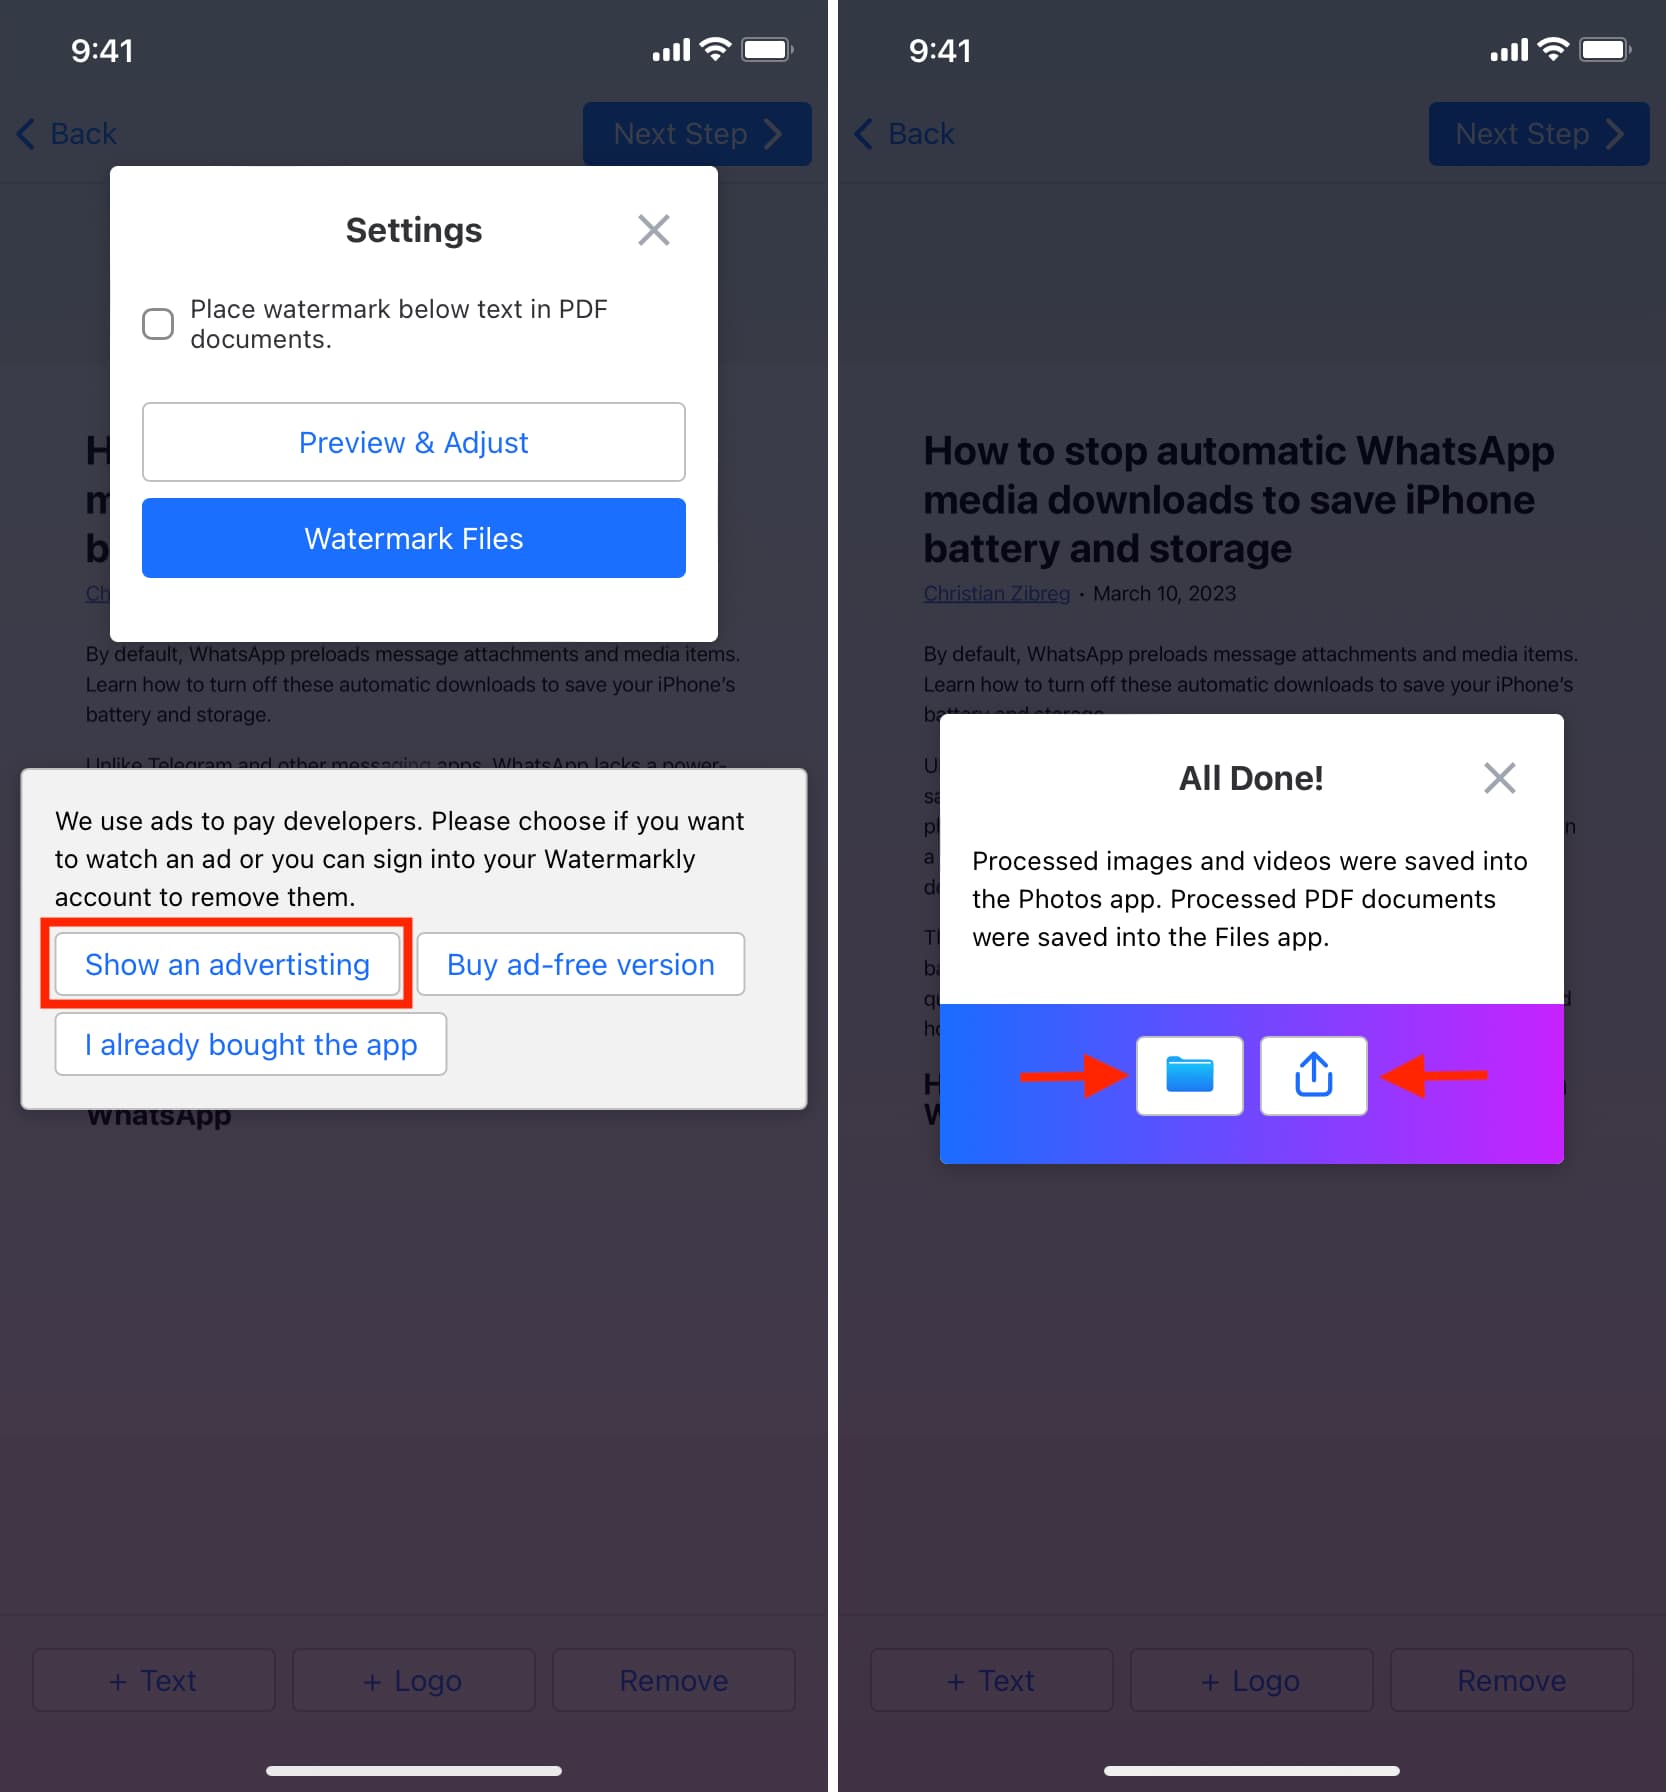
6) Go through the options here and tap Preview & Adjust. If everything looks fine, tap X to return from the preview screen. Now, tap Watermark Files > Show an advertising.
7) Once the ad finishes, close it and hit the:
- Files app icon, which will take you to the Watermarkly folder in iPhone/iPad’s Files app. You can access the watermarked PDF anytime in this folder of the Files app.
- Share button > Save to Files and have the watermarked PDF at the chosen location.
Other tips about PDF documents: