Learn how to protect your important, sensitive, and private notes on your iPhone and iPad by locking them behind a password and hiding them from plain sight.
Related: How to lock photos and videos with a password or Face ID on iPhone
1. Make sure a passcode is set on your iPhone
One of the critical ways to protect your notes, texts, photos, apps, app data, and everything else on your iPhone is to use a strong Lock Screen password and not share that with anybody else. You’re most likely already using a passcode, but in the rare case you aren’t, go to the Settings app > Touch ID/Face ID & Passcode and set one.
Related: How to secure your iPhone (17 tips)
2. Lock the note in the Apple Notes app
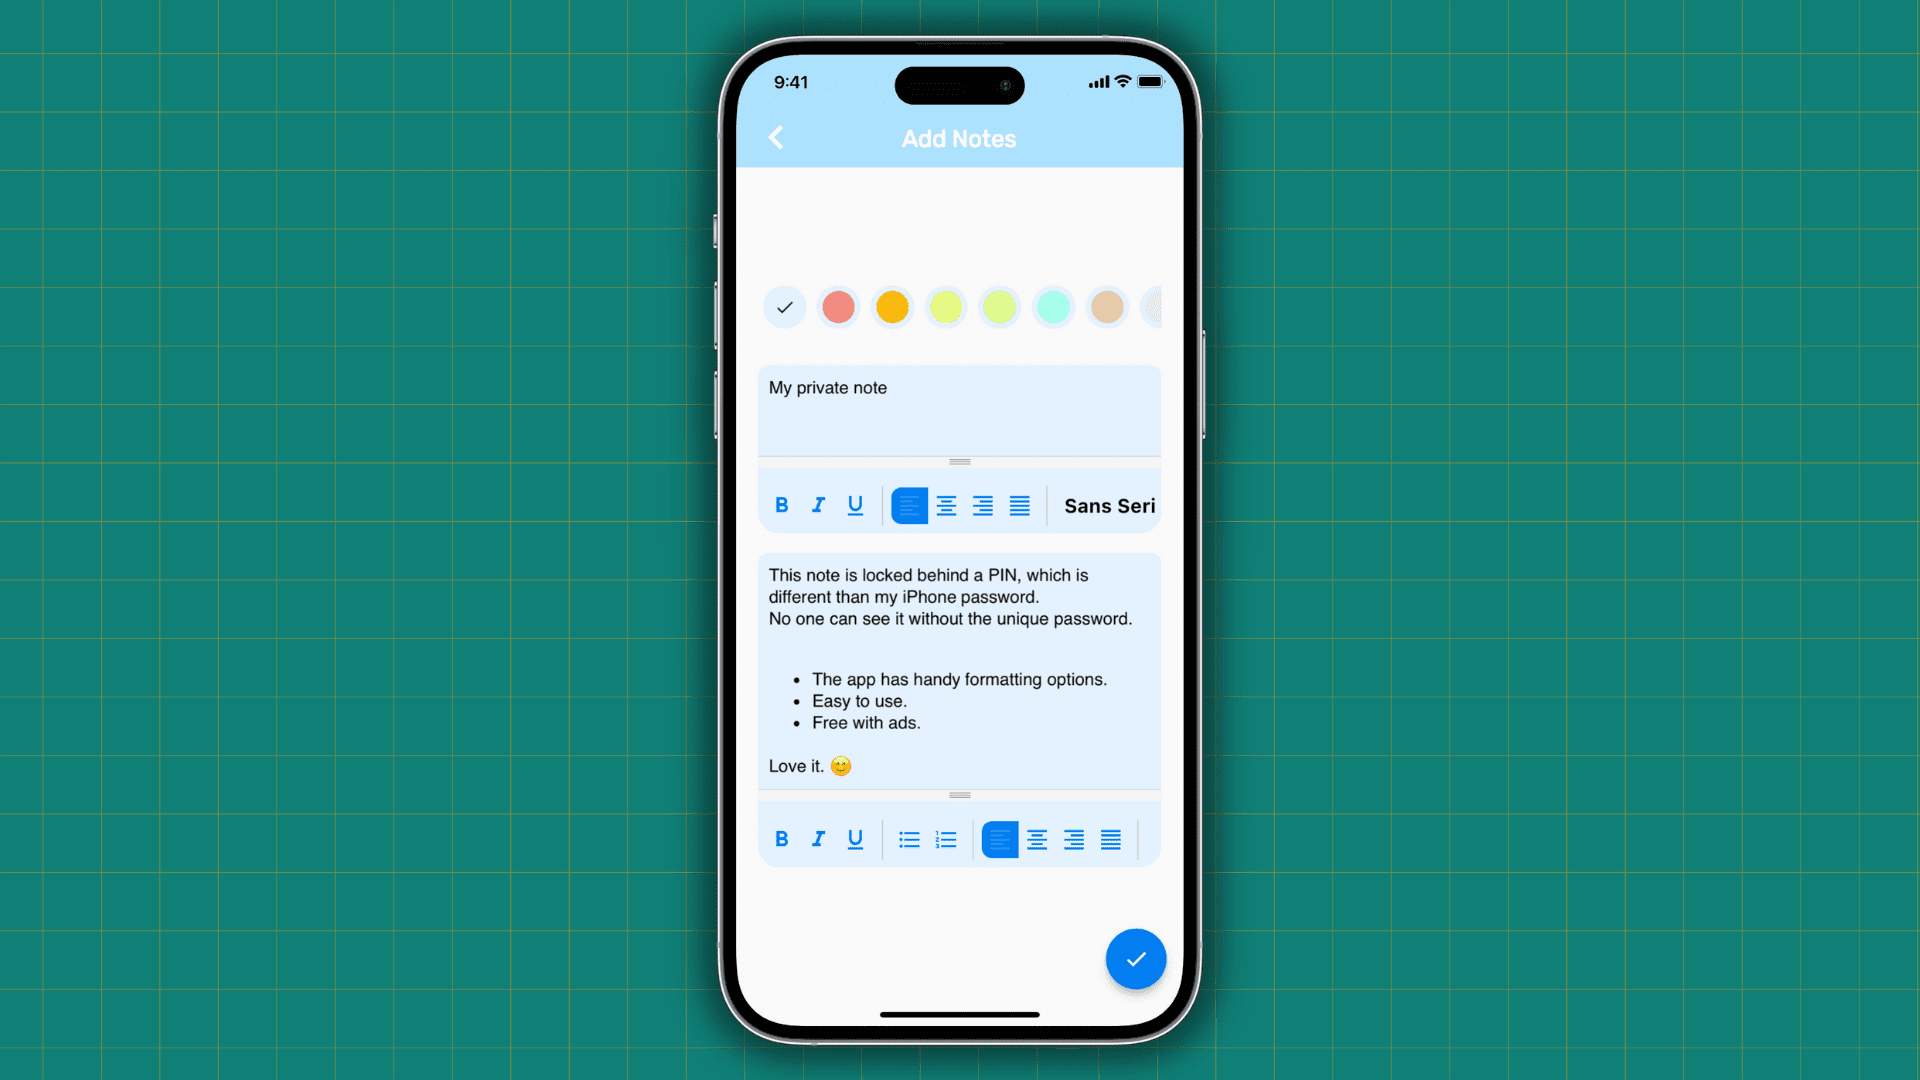
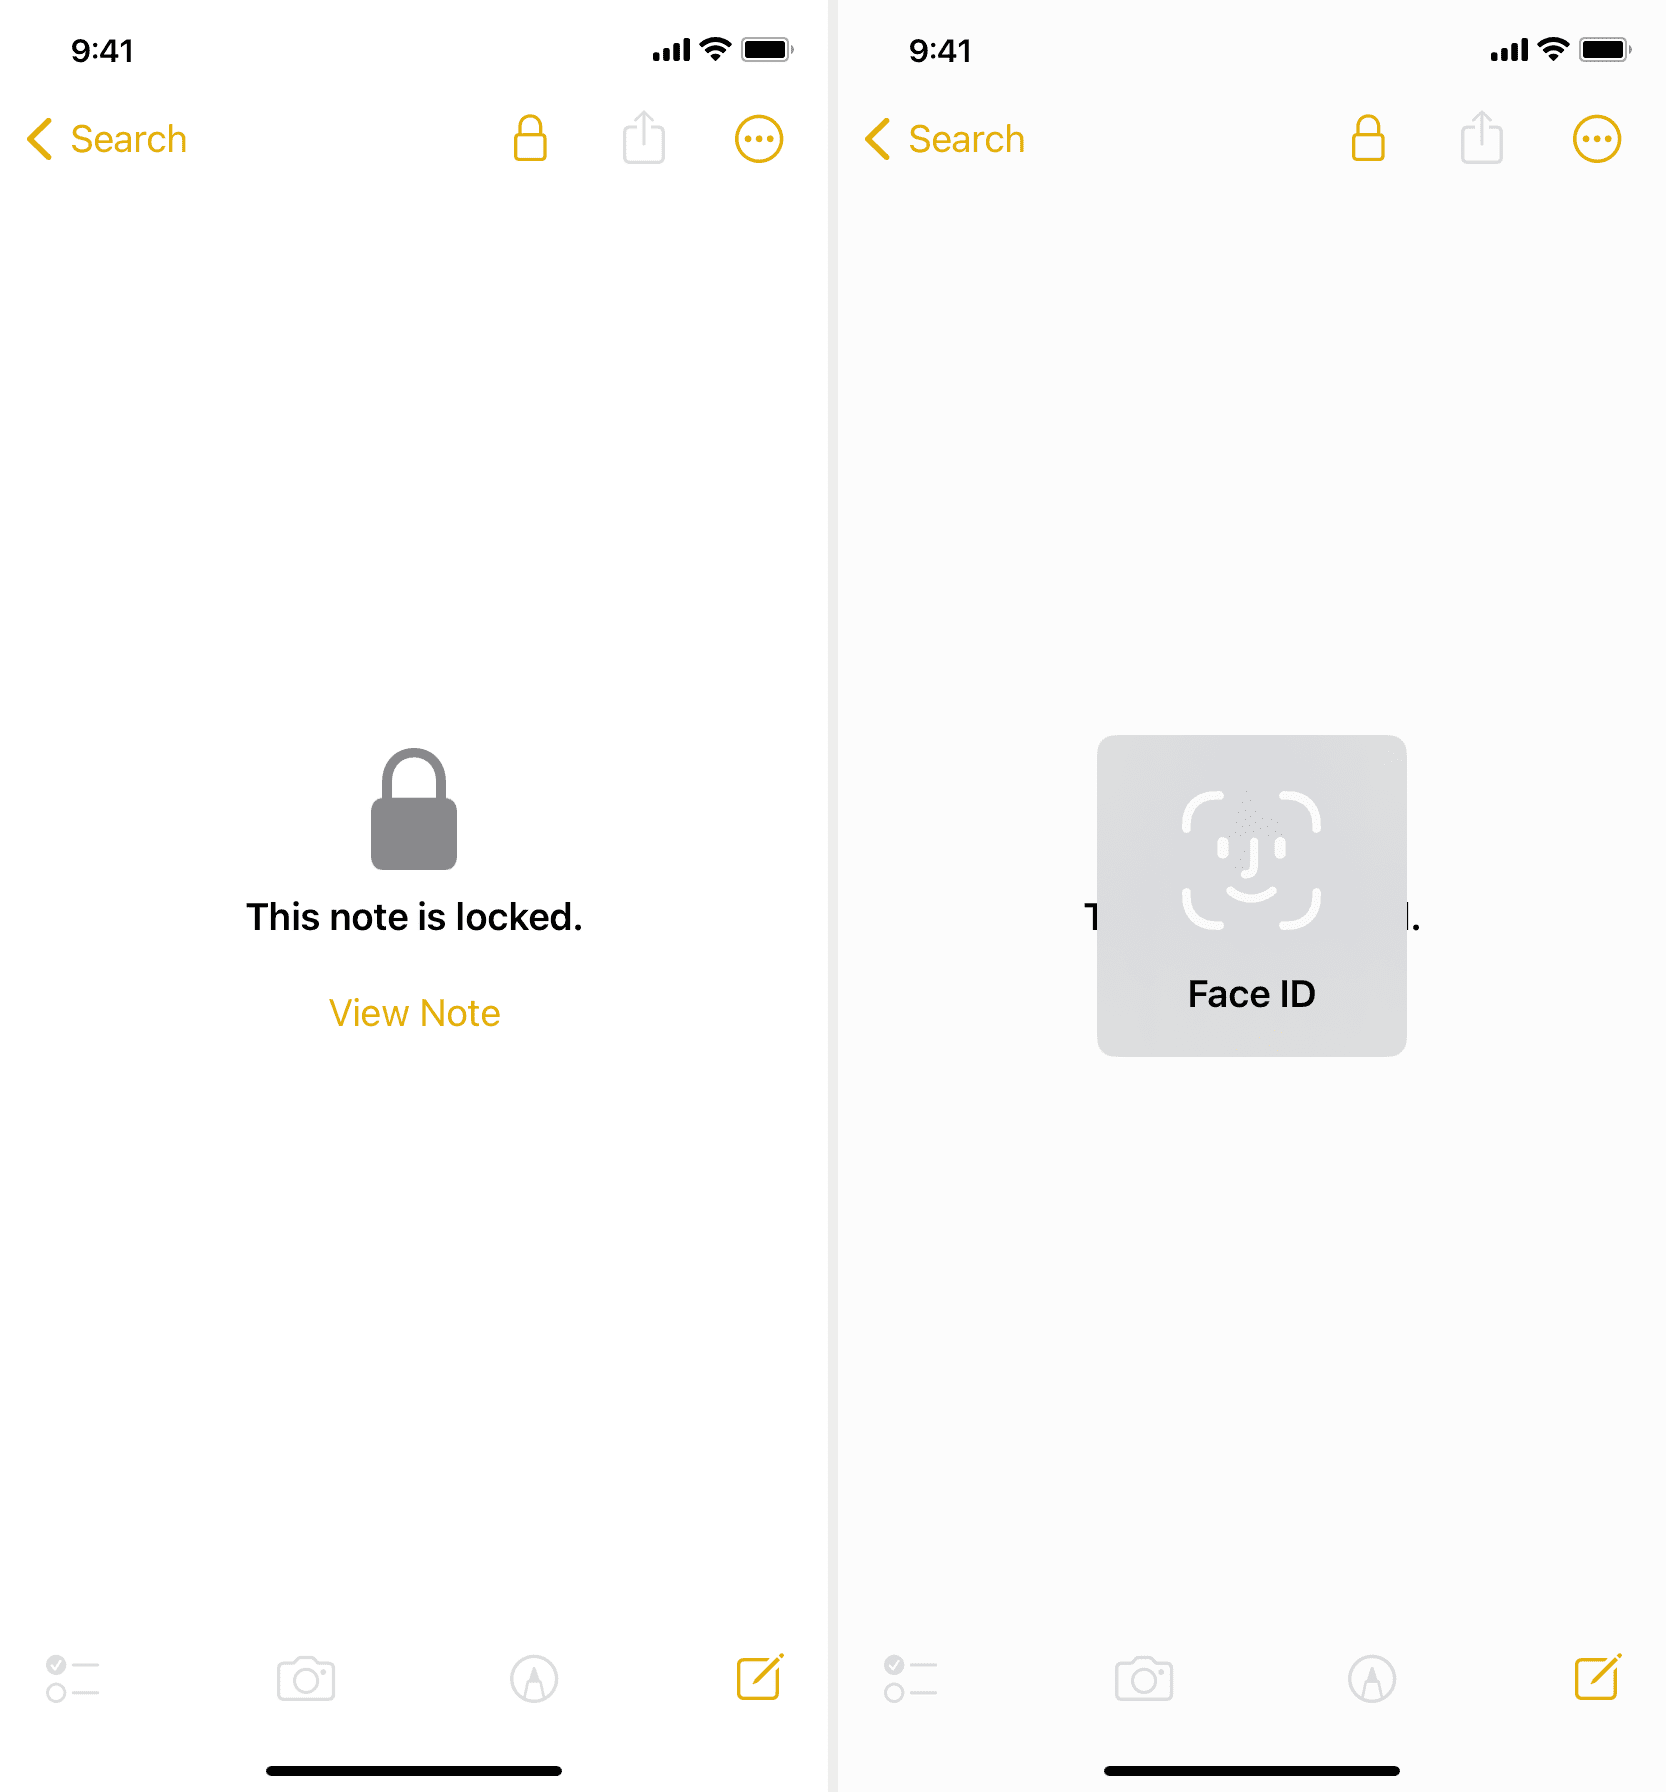
One of the best ways to protect your private notes is by using the Notes app that’s pre-installed on your iPhone, iPad, and Mac. You can type your note, add a weblink, photo, table, or to-do list, and then lock it. Once the note is locked, it is password protected by your device passcode and Face ID/Touch ID.
Tip: You can use a custom password that’s different than your device passcode by going to the Settings app > Notes > Passcode and opting for Custom Password. This way, the notes will be inaccessible to the person who happens to know your iPhone’s passcode.
3. Use third-party apps to hide notes and lock them with a PIN
The main benefit of using third-party apps is the ease of use and a higher level of discreetness. If someone decides to poke around for sensitive writings on your iPhone, they will look inside the obvious Notes app and may not think about third-party apps with names that do not resemble note-taking applications.
You can create several notes inside these apps, all of which will stay behind a custom password. You can also take things further by changing the app icon and disguising the app as a calculator or something else.
Here’s how to hide your private notes behind a password on iPhone and iPad:
1) Download the Vault app for free from the App Store.
2) Open the app and set the passcode you want to lock this app with.
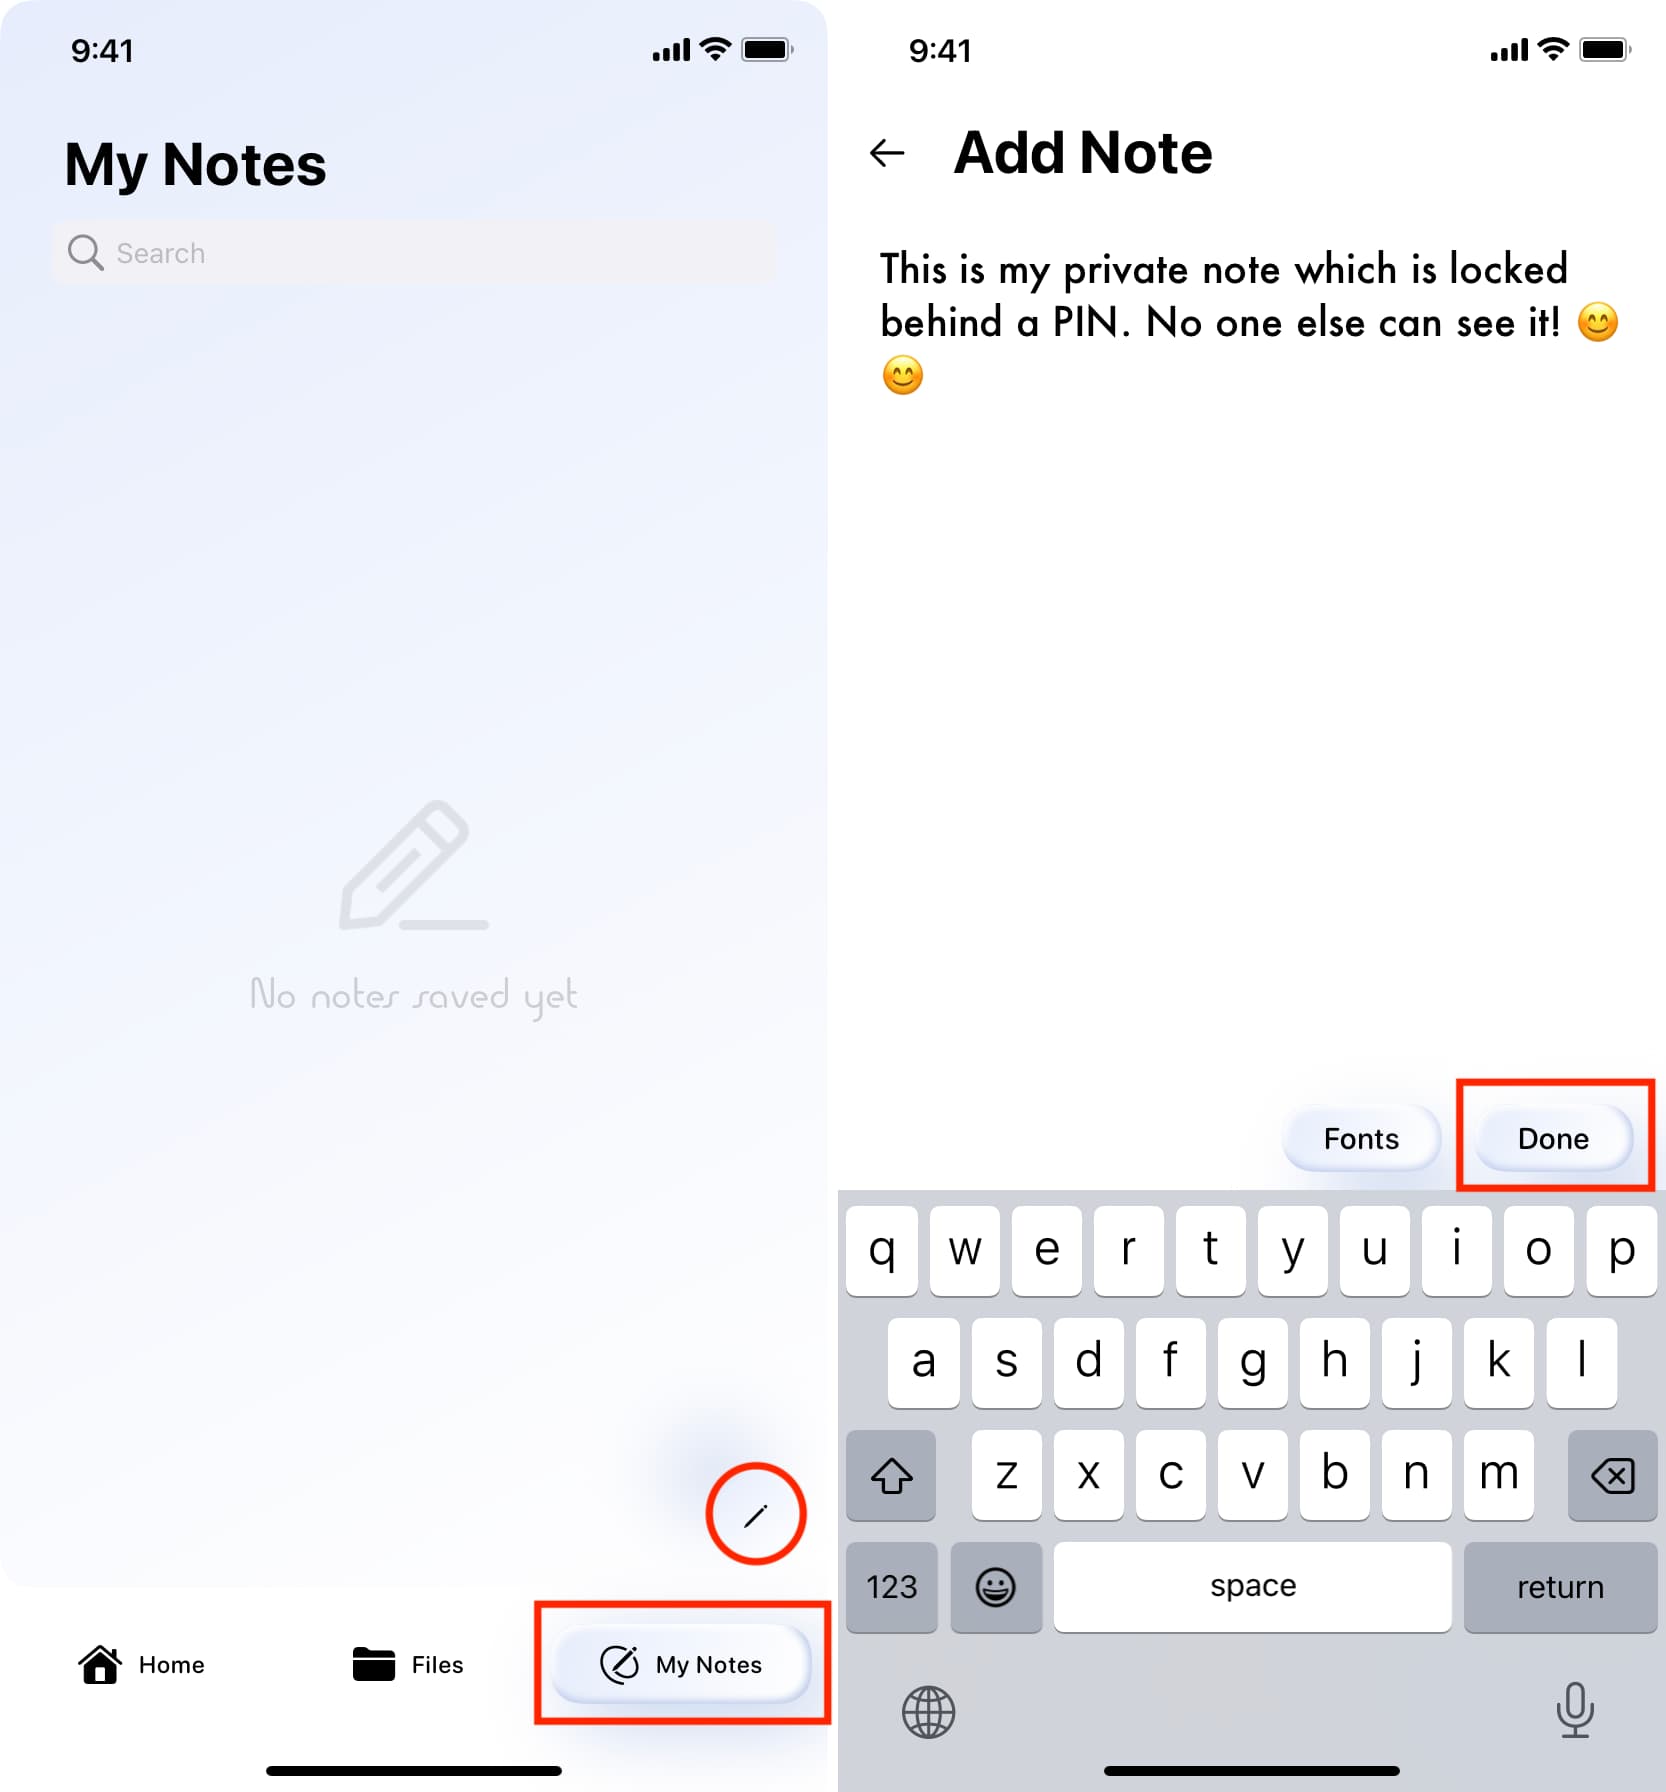
3) Tap My Notes from the bottom right.
4) Tap the tiny compose note button and type or copy & paste the text of your private note.
5) Tap Done after finishing.
To delete a note, touch & hold its tile from the My Notes section and tap Yes on the Delete popup.
6) Now, swipe up or press the Home button to exit this app and reopen it. You will see that it asks for the pin before letting you in.
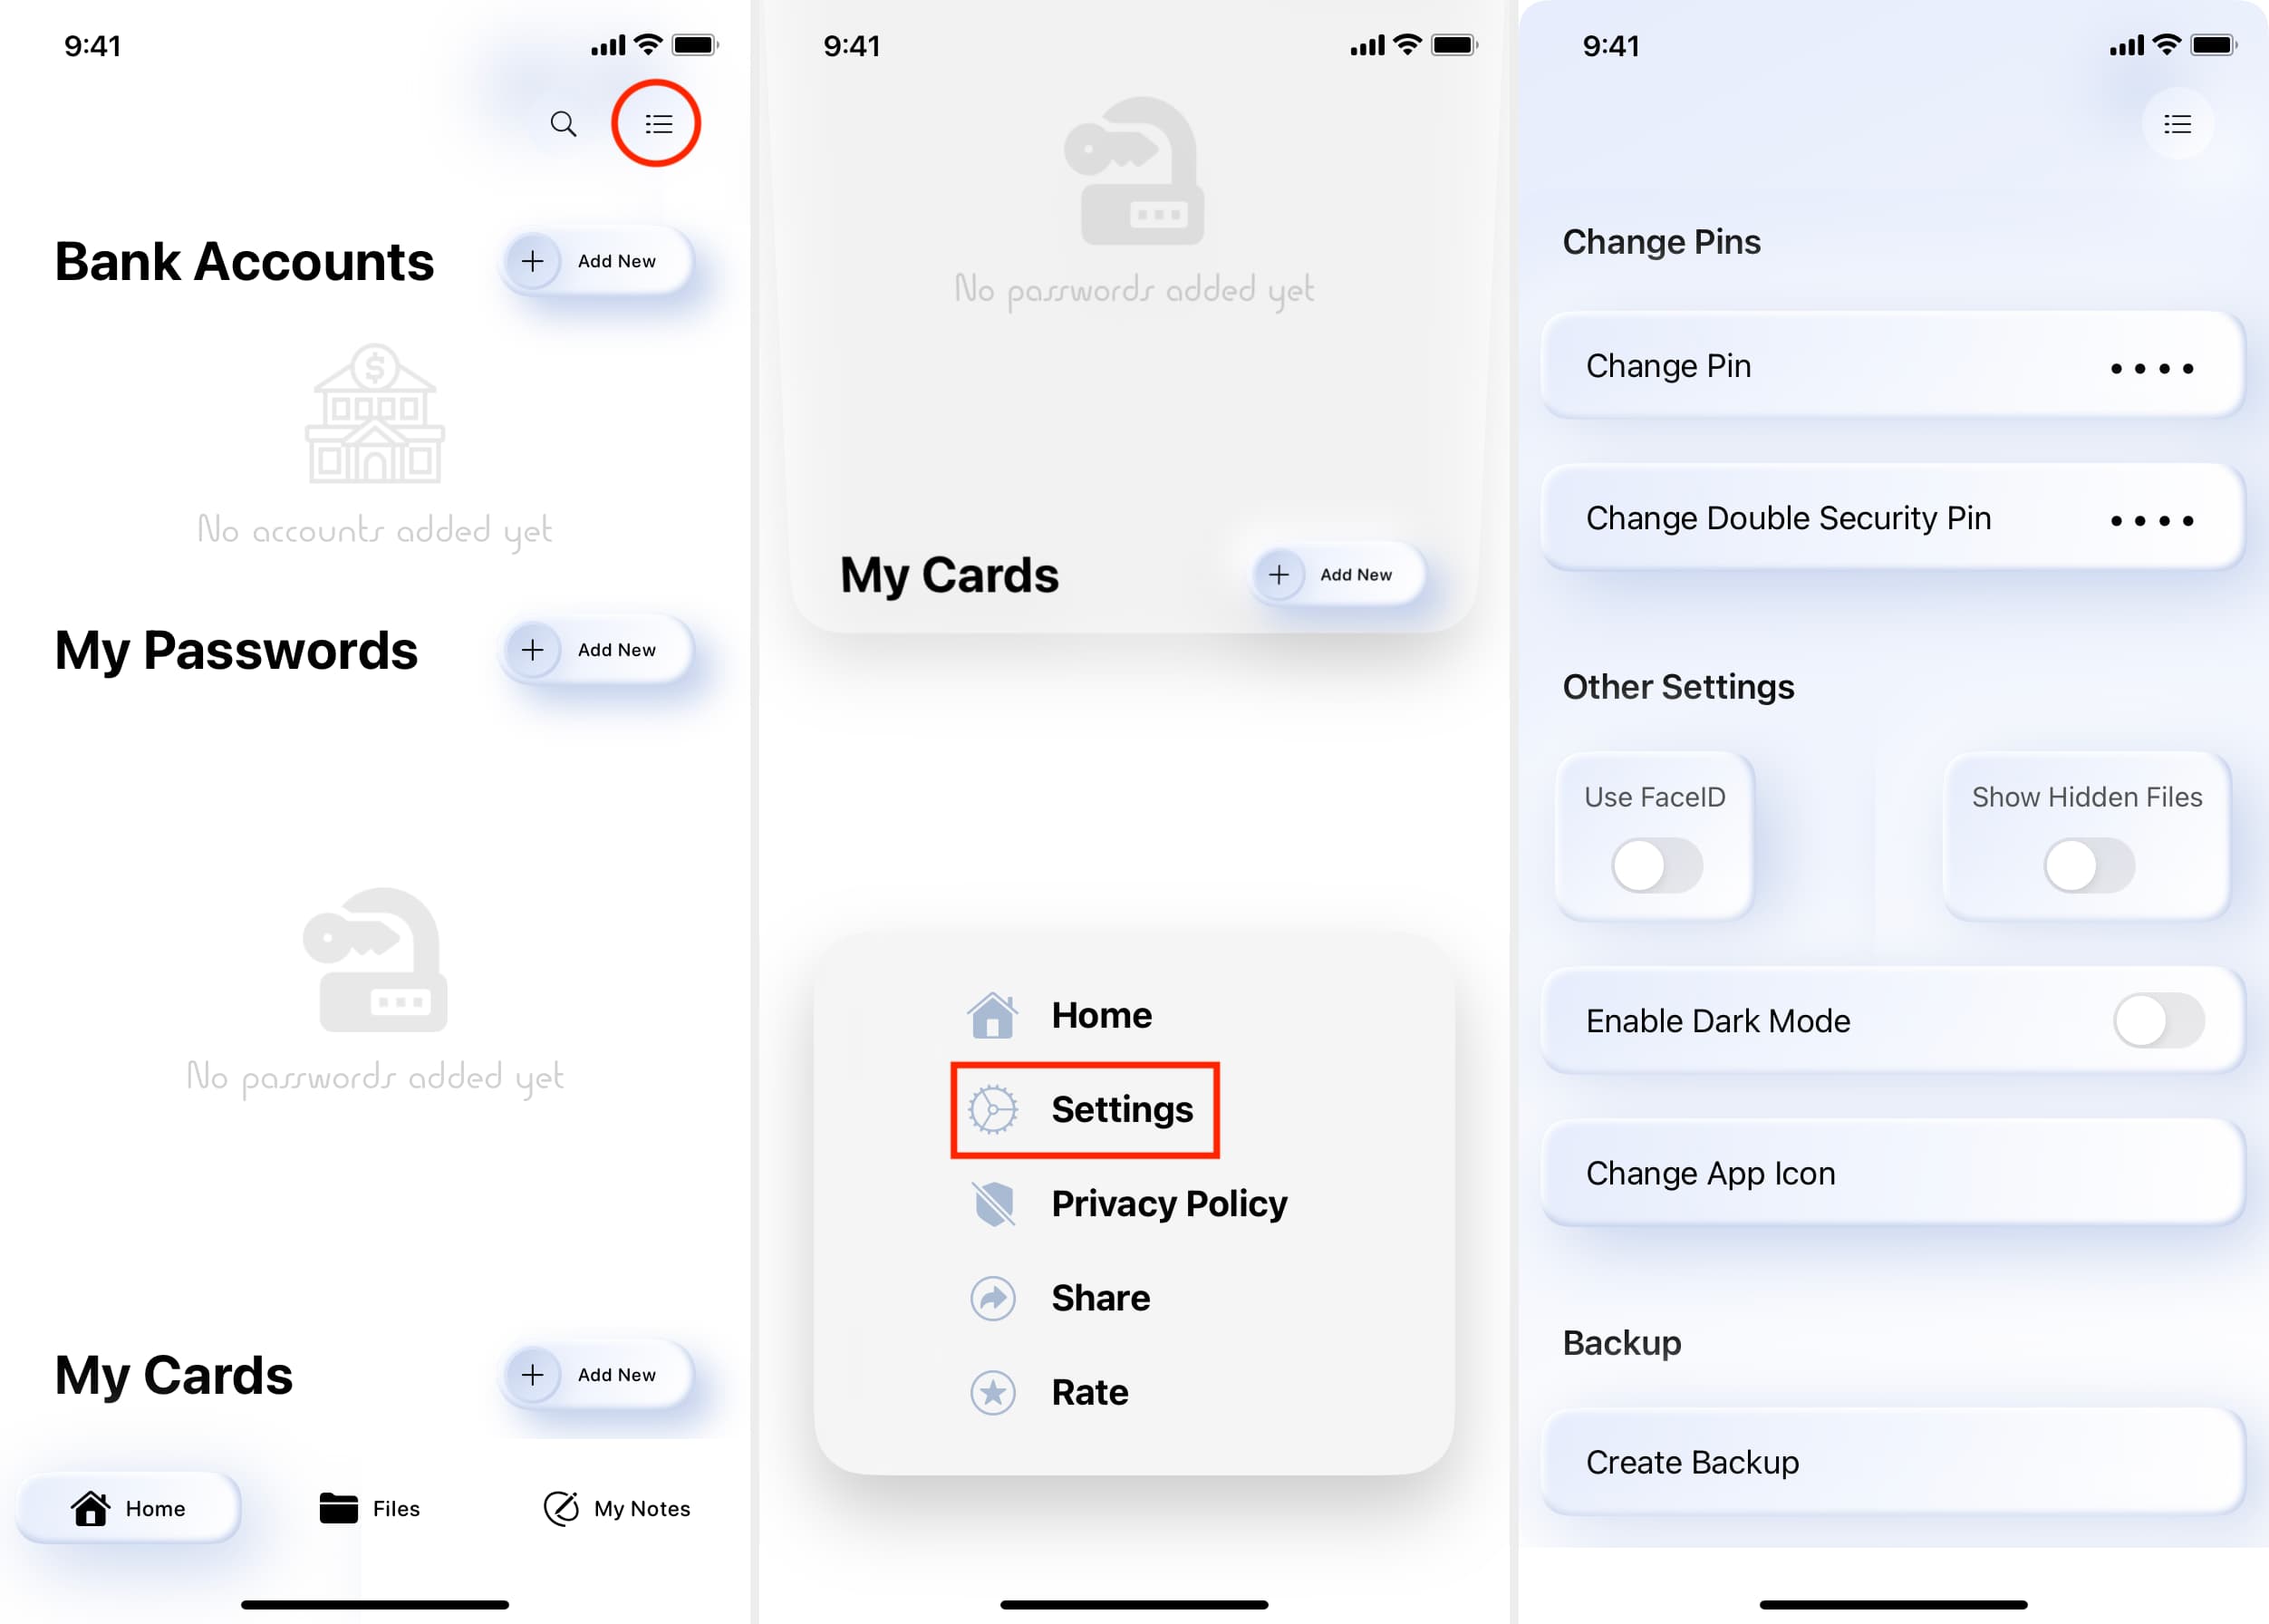
7) To customize the app, tap the menu button from the top right of the Home tab and pick Settings.
8) From here, you can choose to use Face ID, turn on Dark Mode, change the app icon, and even create backup.
In addition to Vault, you can try the following iPhone apps to create private notes that are locked behind a pin. All these apps are free to use and are supported by ads and optional in-app purchases.
- App Lock
- SPV
- Calc+
- Calculator Lock (The top image of this article shows this app.)
4. Add your note to the Pages app and set a password
Pages is a free Apple app that’s pre-installed on your iPhone and iPad unless you removed it to make space. You can add a long note with all kinds of attachments like charts, shapes, photos, etc., and set a password to protect it. No one else can view that note unless they enter the correct password.
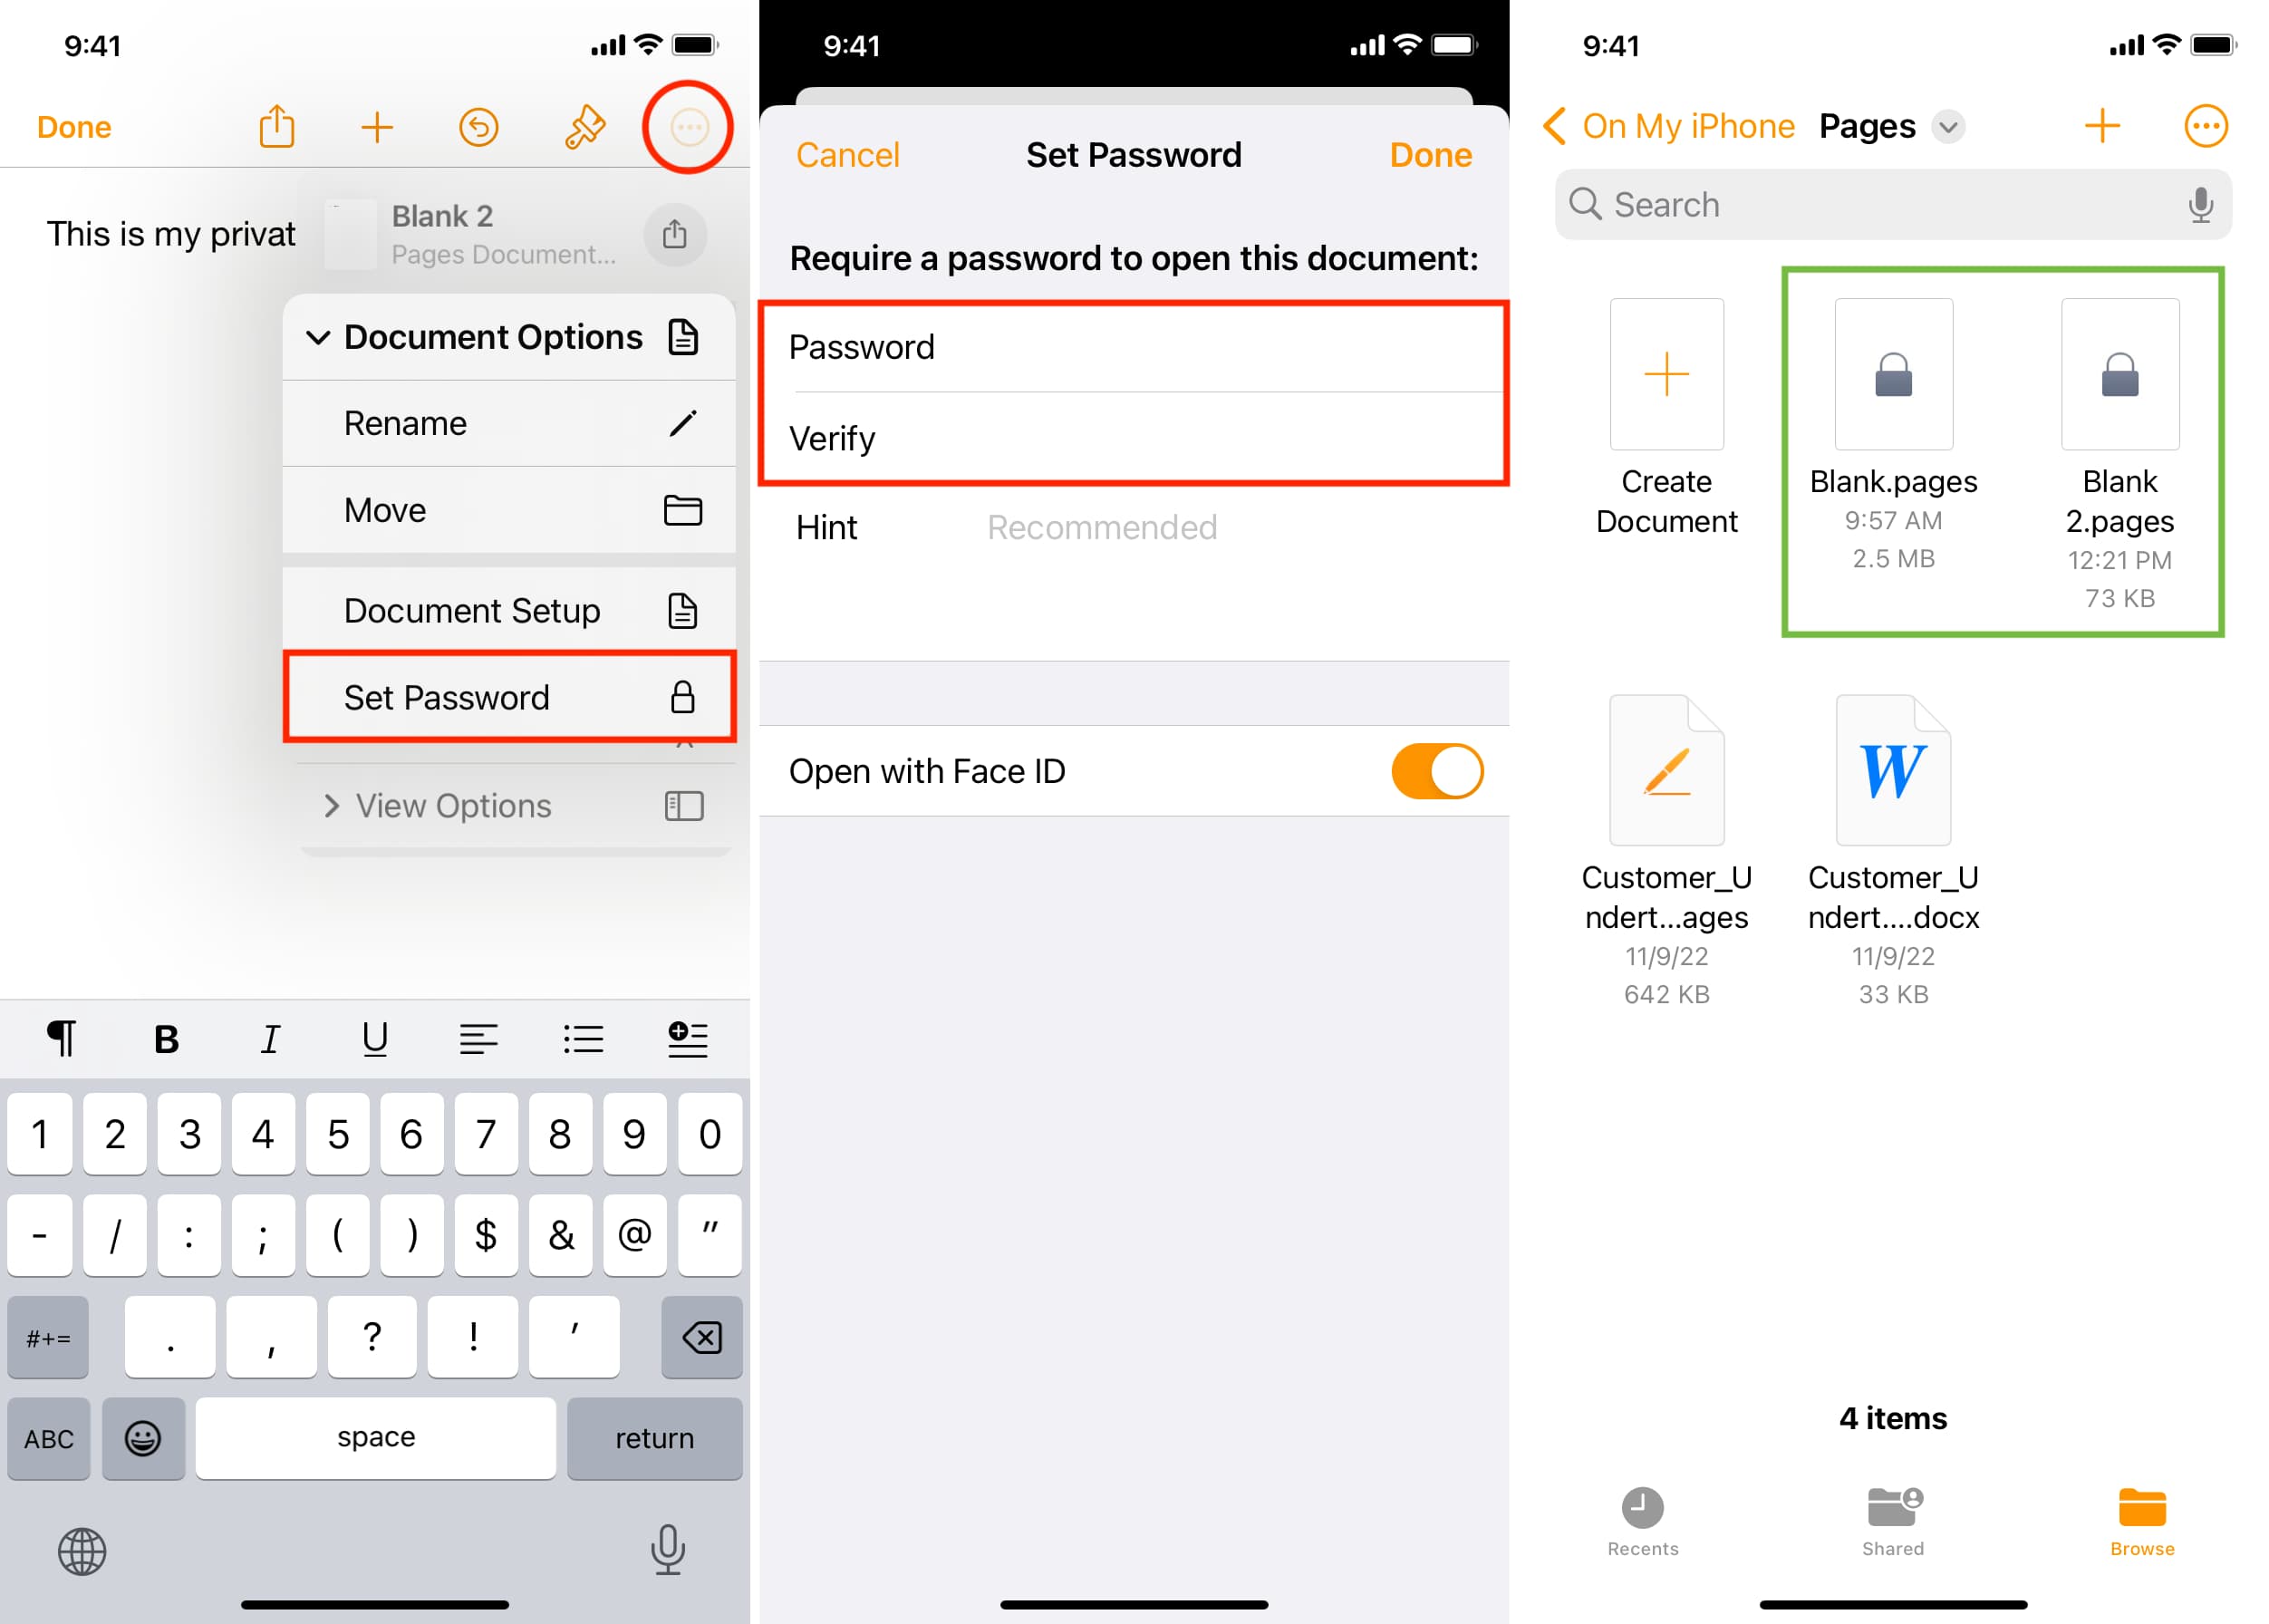
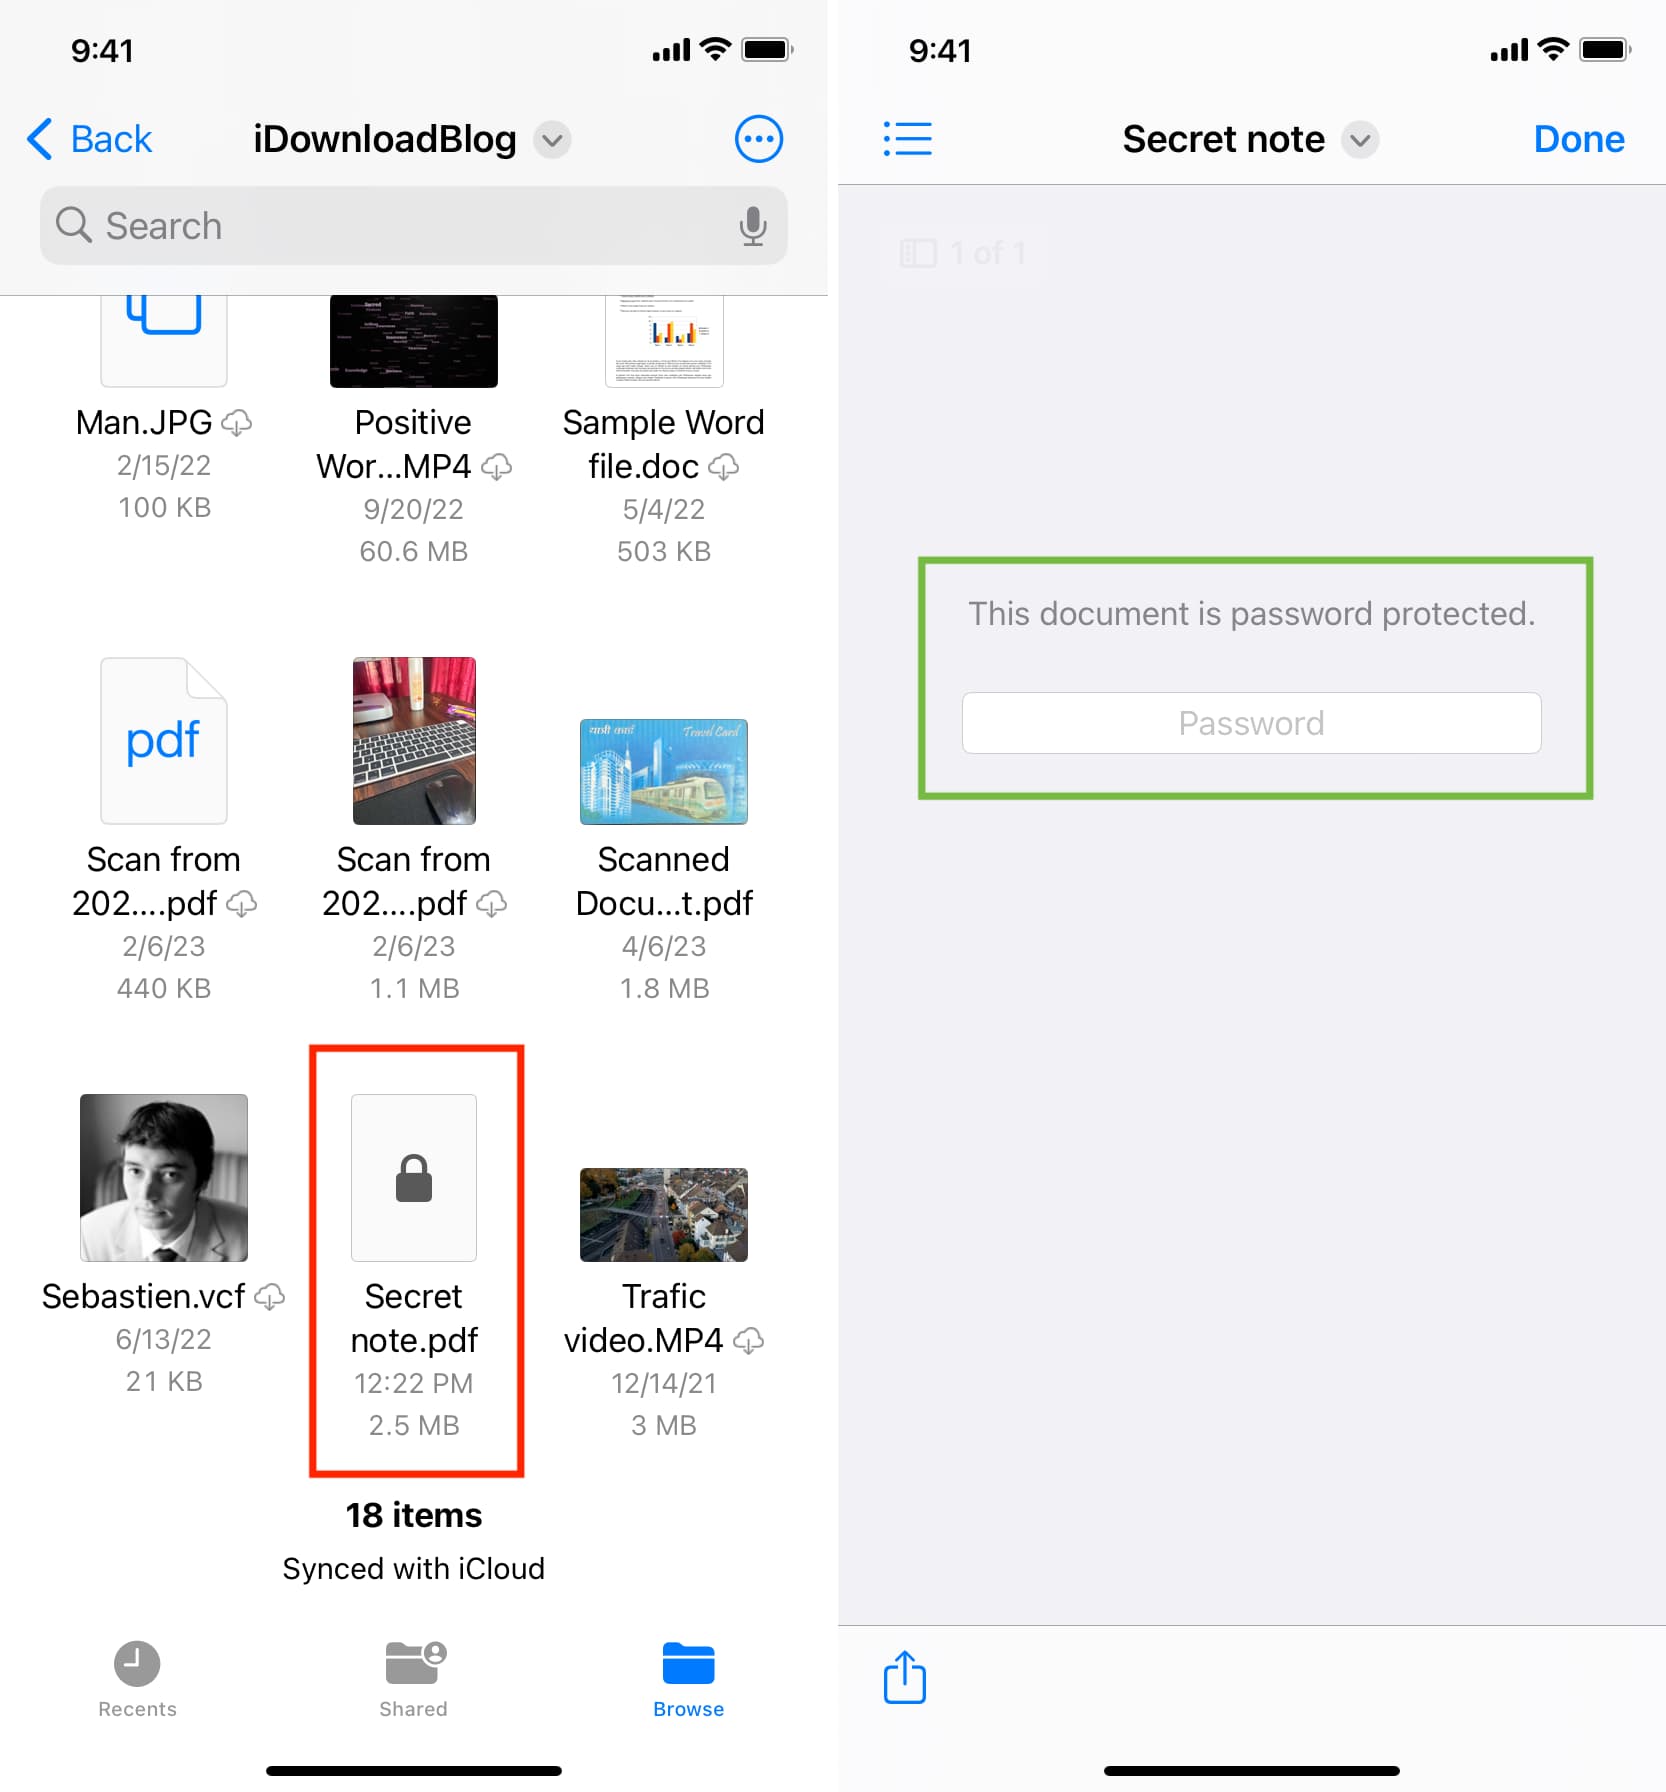
5. Create a password-protected PDF with your note
You can use the Pages app to create a PDF that’s password protected. Whenever you want to view that note, simply go to the Pages app or Files app, tap the PDF, and enter its password.
6. Create a PDF with your note, add it to Google Drive, and lock it
Password-protecting several individual PDFs can get challenging, and you may have to remember multiple passwords unless you use the same one for all PDFs.
To prevent this, you can create standard PDFs using the Pages app, save them to the Google Drive app, and lock the Google Drive app with Face ID:
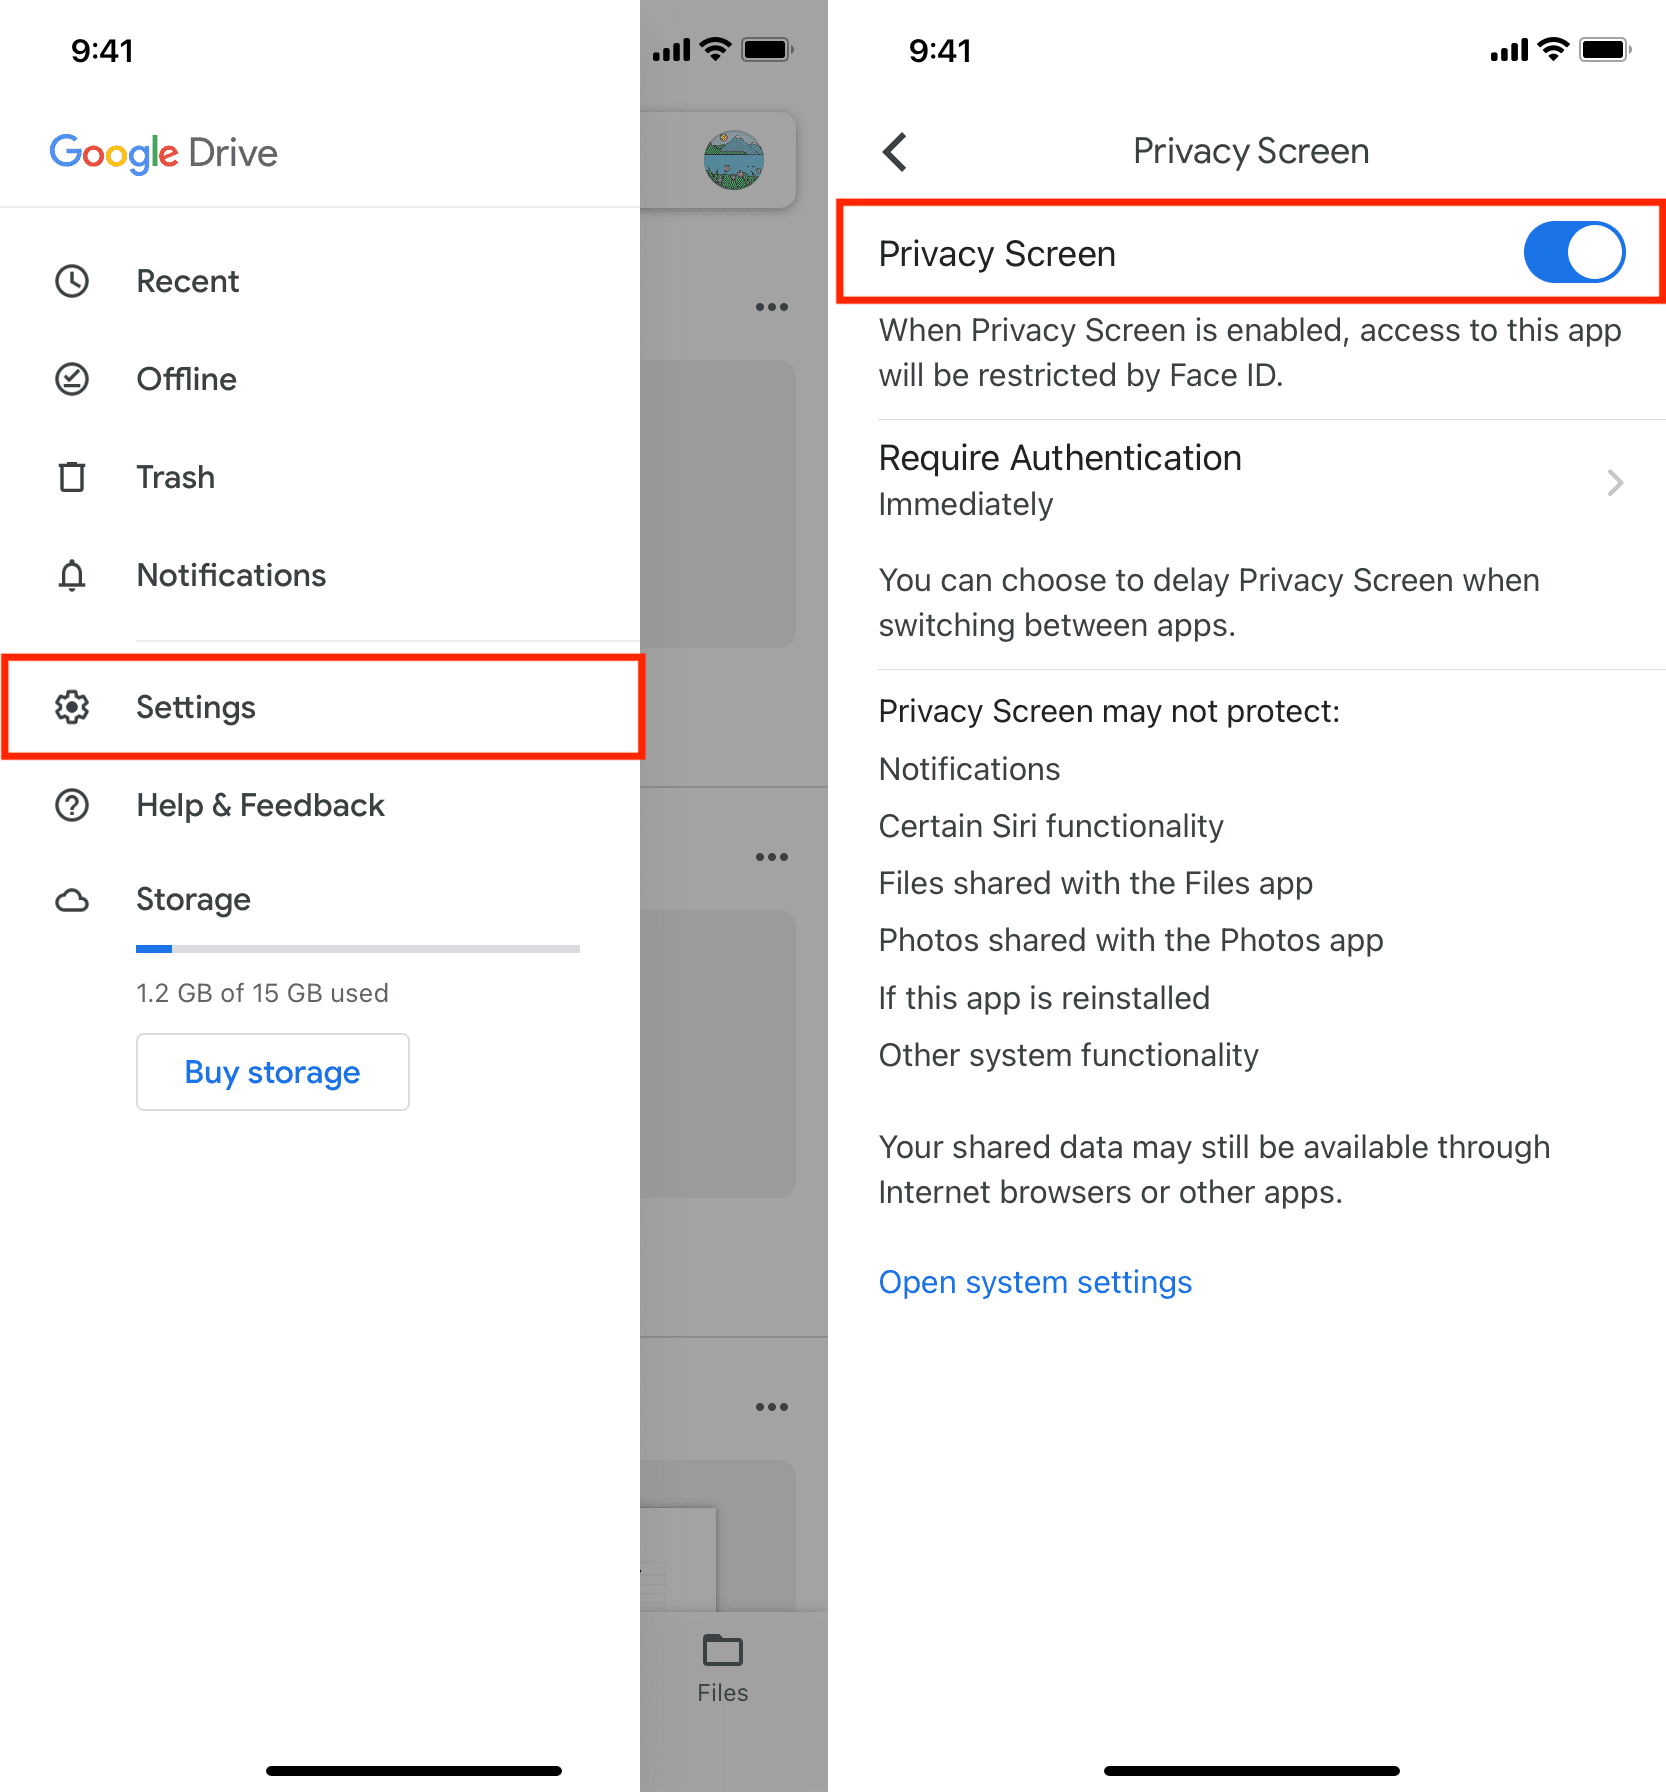
1) Get the Google Drive app on your iPhone and set it up by logging in with your Google/Gmail account.
2) Tap the menu icon from the top left and choose Settings > Privacy Screen.
3) Enable the switch for Privacy Screen and authenticate via Face ID or Touch ID.
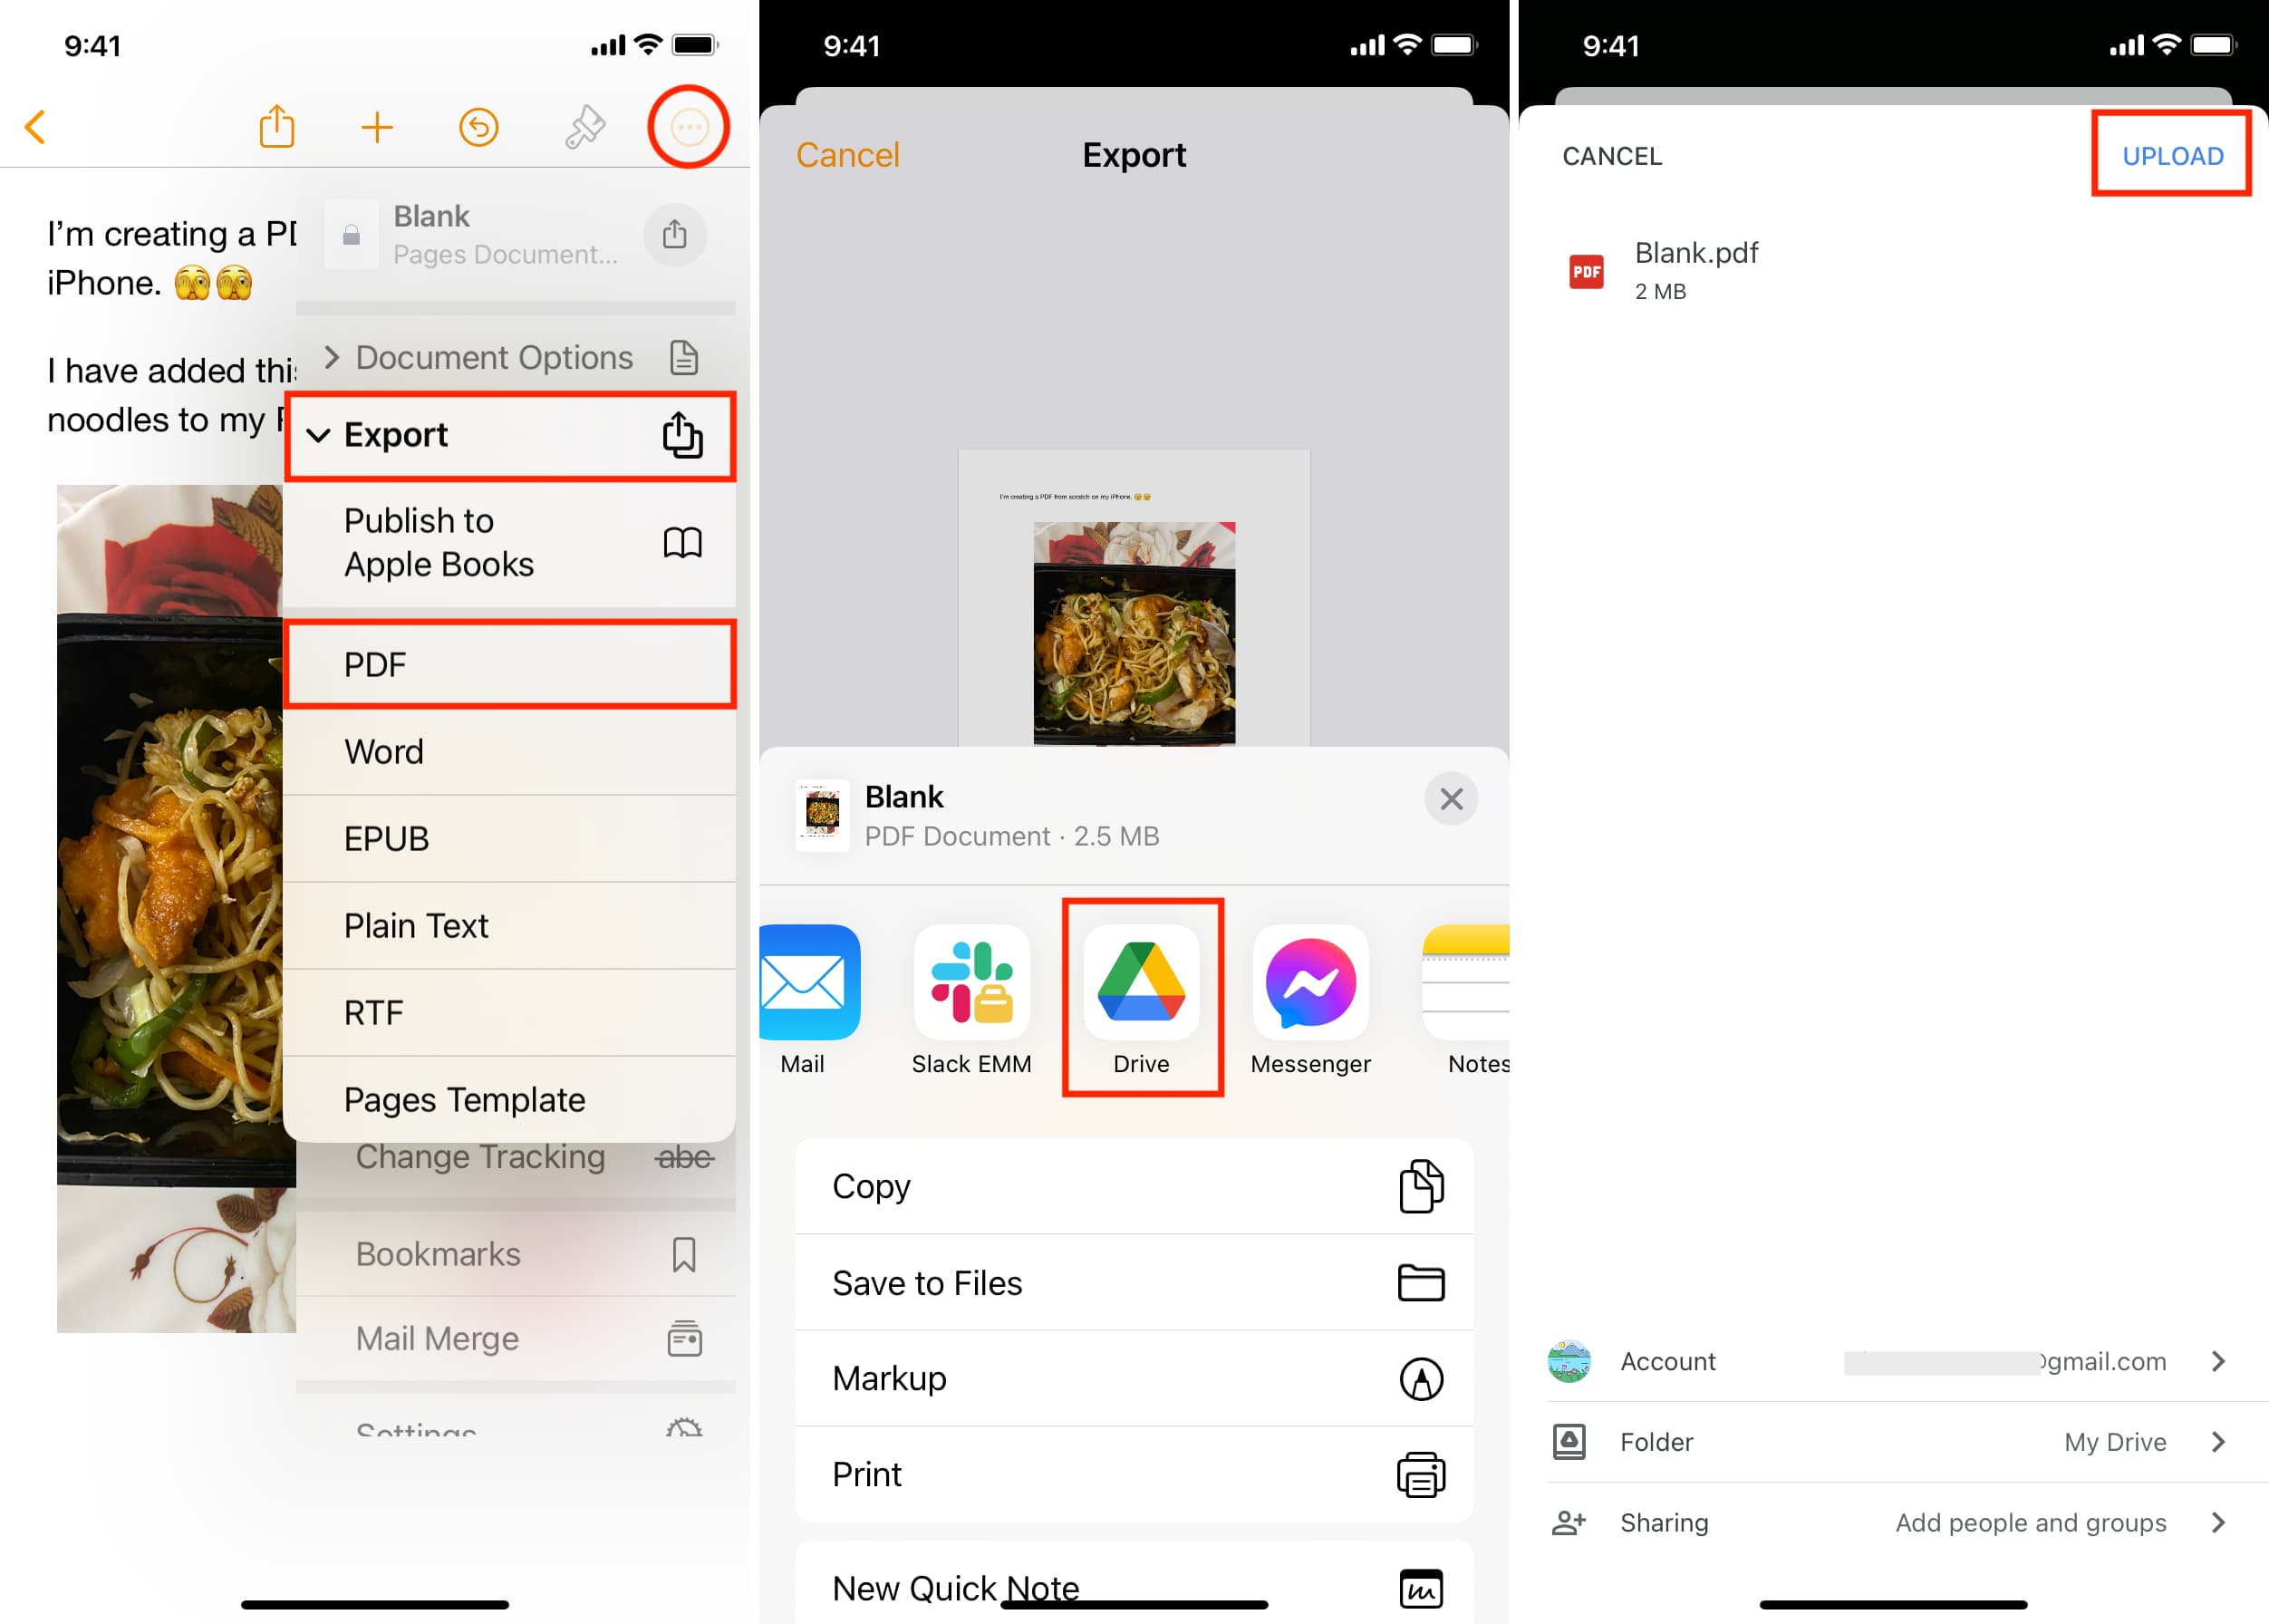
4) Now open the Pages app and create a new document by tapping the plus icon.
5) Once you finish creating your note, tap the More button from the top right and choose Export > PDF.
6) Select Drive from the row of apps. If you don’t see it, ensure Drive can appear in the iOS Share Sheet.
7) Hit Upload.
The PDF with your note is now saved to Google Drive, which is locked behind Face ID authentication. You can now return to the Pages app and delete the document you created to ensure you have only one copy of this note, and that’s saved and locked in Google Drive.
Check out next: