With iOS 15, iPhone now has a built-in authenticator that can generate and autofill two-factor authentication codes when signing in. You no longer require an additional app. In this post, we show you how to set up and use the new built-in authenticator on your iPhone or iPad.
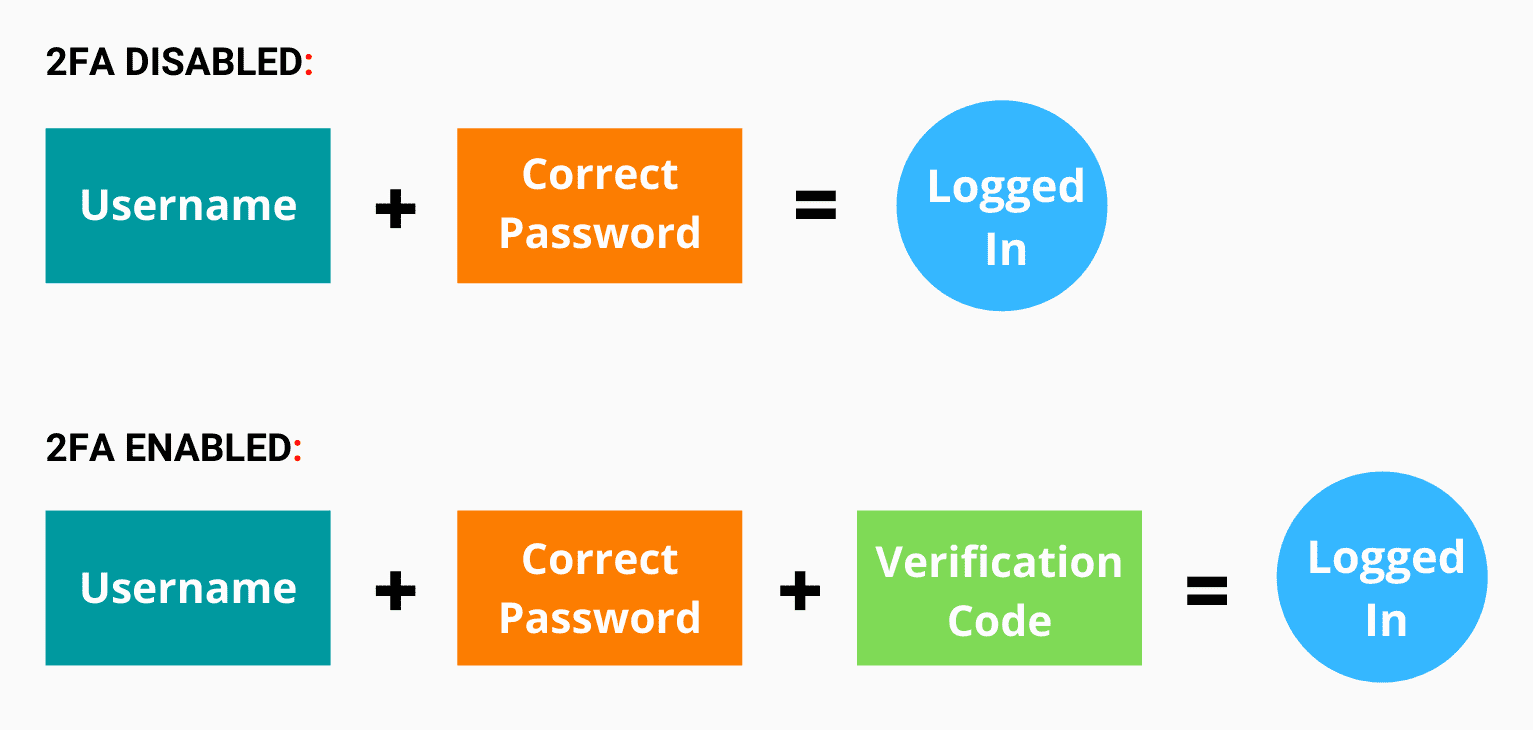
Two-factor or two-step authentication is an additional layer of protection for your online accounts. You are required to enter the two-factor authentication (2FA) verification code after entering the correct username/email and password. To get these codes, most people set up and use authenticator apps from Google, Microsoft, 1Password, LastPass, Zoho, etc.
But now as iPhone, iPad, and Mac running iOS 15, iPadOS 15, and macOS Monterey have a built-in authenticator, many people can choose to use Apple’s offering. Here’s all about it. But first, some important related questions to make things easy.
Should you even use two-factor authentication?
Since you are here, chances are you already know the importance of setting 2FA. As mentioned and illustrated above, it is a vital way to keep your accounts safe. If you are new, let me tell you in simpler words.
Suppose you have a Facebook account. To log in successfully, all you need is your email/username and password. Now, assume that someone knows your Facebook username and password due to a data breach (which is part of the online world) or any other reason. Now, they can also log in to your account and misuse it.
But if you have two-step verification set up, even if someone has your correct username and password, they cannot log in to your account as the additional verification code required to complete the login is not with them.
How are two-step verification codes secure?
New 2FA verifications codes are generated offline every 30 seconds. They are on your device, which means no one can access them without access to your device. Plus, in case someone gets ahold of your iPhone, its screen lock will keep the codes protected. Or, you can also remotely wipe your device in grave circumstances.
I already use SMS and Google/Microsoft authenticator to get verification codes. Is iOS 15’s built-in authenticator for me?
Most services offer multiple ways to set up and receive two-factor verification. You can get the verification codes or confirmation popup via SMS, email, service’s app, physical keys (that have Bluetooth, NFC, or plug directly into your phone or computer), or authenticator apps. You can use more than one way to get these codes.
For example, for my Gmail account, I have set up to receive codes via text message and authenticator app. I also receive a notification popup in my iPhone’s Gmail app to confirm the sign-in on a new device. Plus, I have the backup code saved safely.
iOS 15’s built-in authenticator is just an alternative to the third-party authenticator apps. It only eliminates the need to download an additional app like Google or Microsoft Authenticator. You should always have more than one way to get these verification codes. This ensures even in troubling situations (like no cell coverage, lost or broken phone, non-working SIM, etc.), you can get the code via at least one of the mediums and log in.
That being said, if you already use a third-party authenticator app, here are some important points to keep in mind before using iPhone’s inbuilt authenticator:
- First, you may have to go to the service’s (like Twitter, Gmail) account settings and turn off verification codes for the third-party app. After that, you can set it up to receive codes using the built-in authenticator. This is because no service offers setting up two authenticator apps. So, either you can use one of the third-party apps like Google Authenticator, Microsoft Authenticator, LastPass, etc., or use the inbuilt authenticator in iOS 15.
- If you are currently receiving 2FA codes via text or other methods but not an authenticator app, you can set up the built-in authenticator directly. No need to turn off anything.
Which is better: third-party authenticator apps or Apple’s inbuilt authenticator?
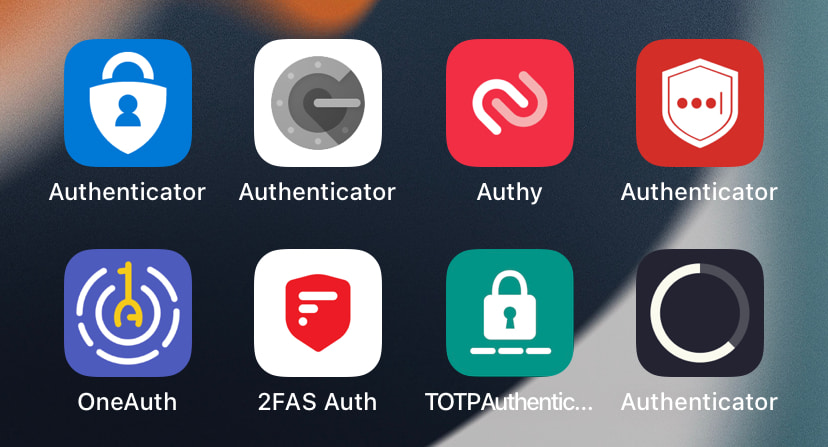
- If you own only Apple devices, the inbuilt authenticator on iPhone, iPad and Mac is great for you.
- If you also use Android or other non-Apple devices, it is suitable to use a service that’s available on all platforms. However, this doesn’t mean you are locked out. Like, while signing in to a website on Android, Windows, or Linux, you can open the iPhone Settings app and get the code from there. So, nothing to worry about. But we can agree that if you have the authenticator on your Android phone itself, it’s undoubtedly easier.
- I use Google authenticator, and it does not autofill the verification codes. I have to open the app, copy the code and paste it into the website or app I am trying to sign in to. Apple’s inbuilt authenticator can autofill codes for you. (explained below) This makes it a compelling option.
After considering the above points, if you are ready to use Apple’s inbuilt authenticator for your existing accounts or set up two-step verification for a service for the first time, here’s how to do that.
How to set up the built-in authenticator on iPhone in iOS 15
Quick summary:
- Go to the website or app (like Twitter or Facebook) settings.
- Enable two-step verification and choose to receive verification codes via an authenticator app.
- Set up your iPhone or iPad as the authenticator app to generate and autofill these codes.
Here are the detailed steps to set up automatic verification codes for a website or app on iPhone.
How to set up iPhone to generate two-factor verification codes by scanning the QR code
If you have a computer or iPad nearby, follow these steps. In this example, I’m using Twitter. Except for the first step, the remaining process for other websites and apps is the same.
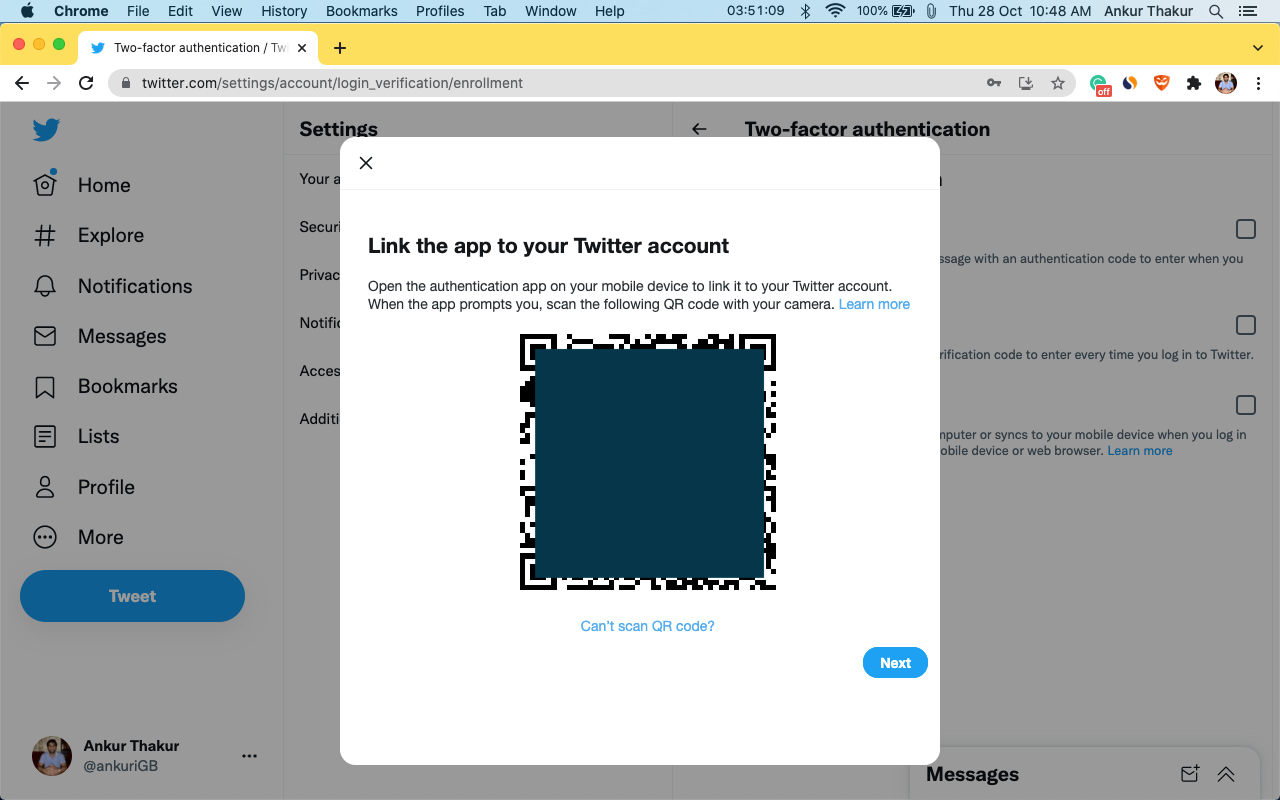
- On a computer on iPad, log in to your Twitter account. Now click More > Settings and privacy > Security and account access > Security > Two-factor authentication > Authentication app. You will see a QR code.
These steps will differ according to the service. But mostly two-factor or two-step authentication option is inside the Account, Password, or Security settings of the respective app or website.
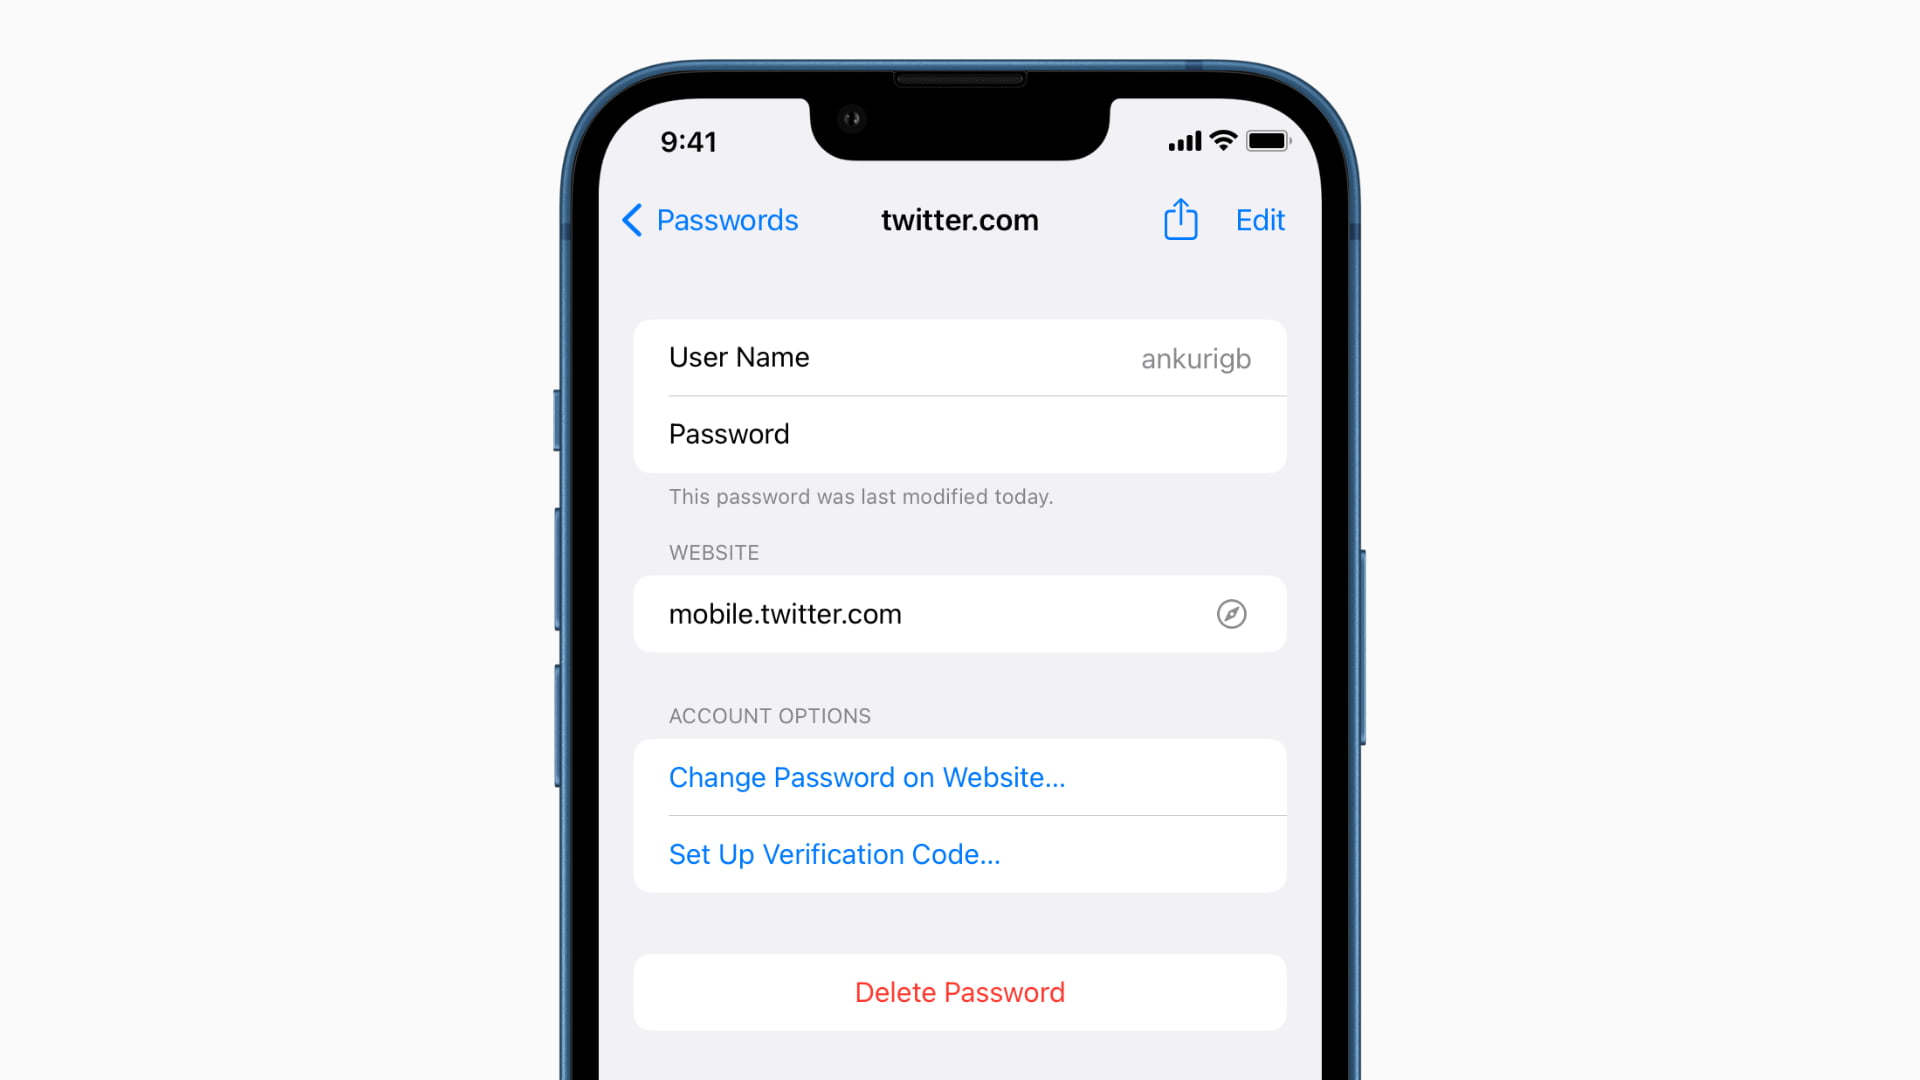
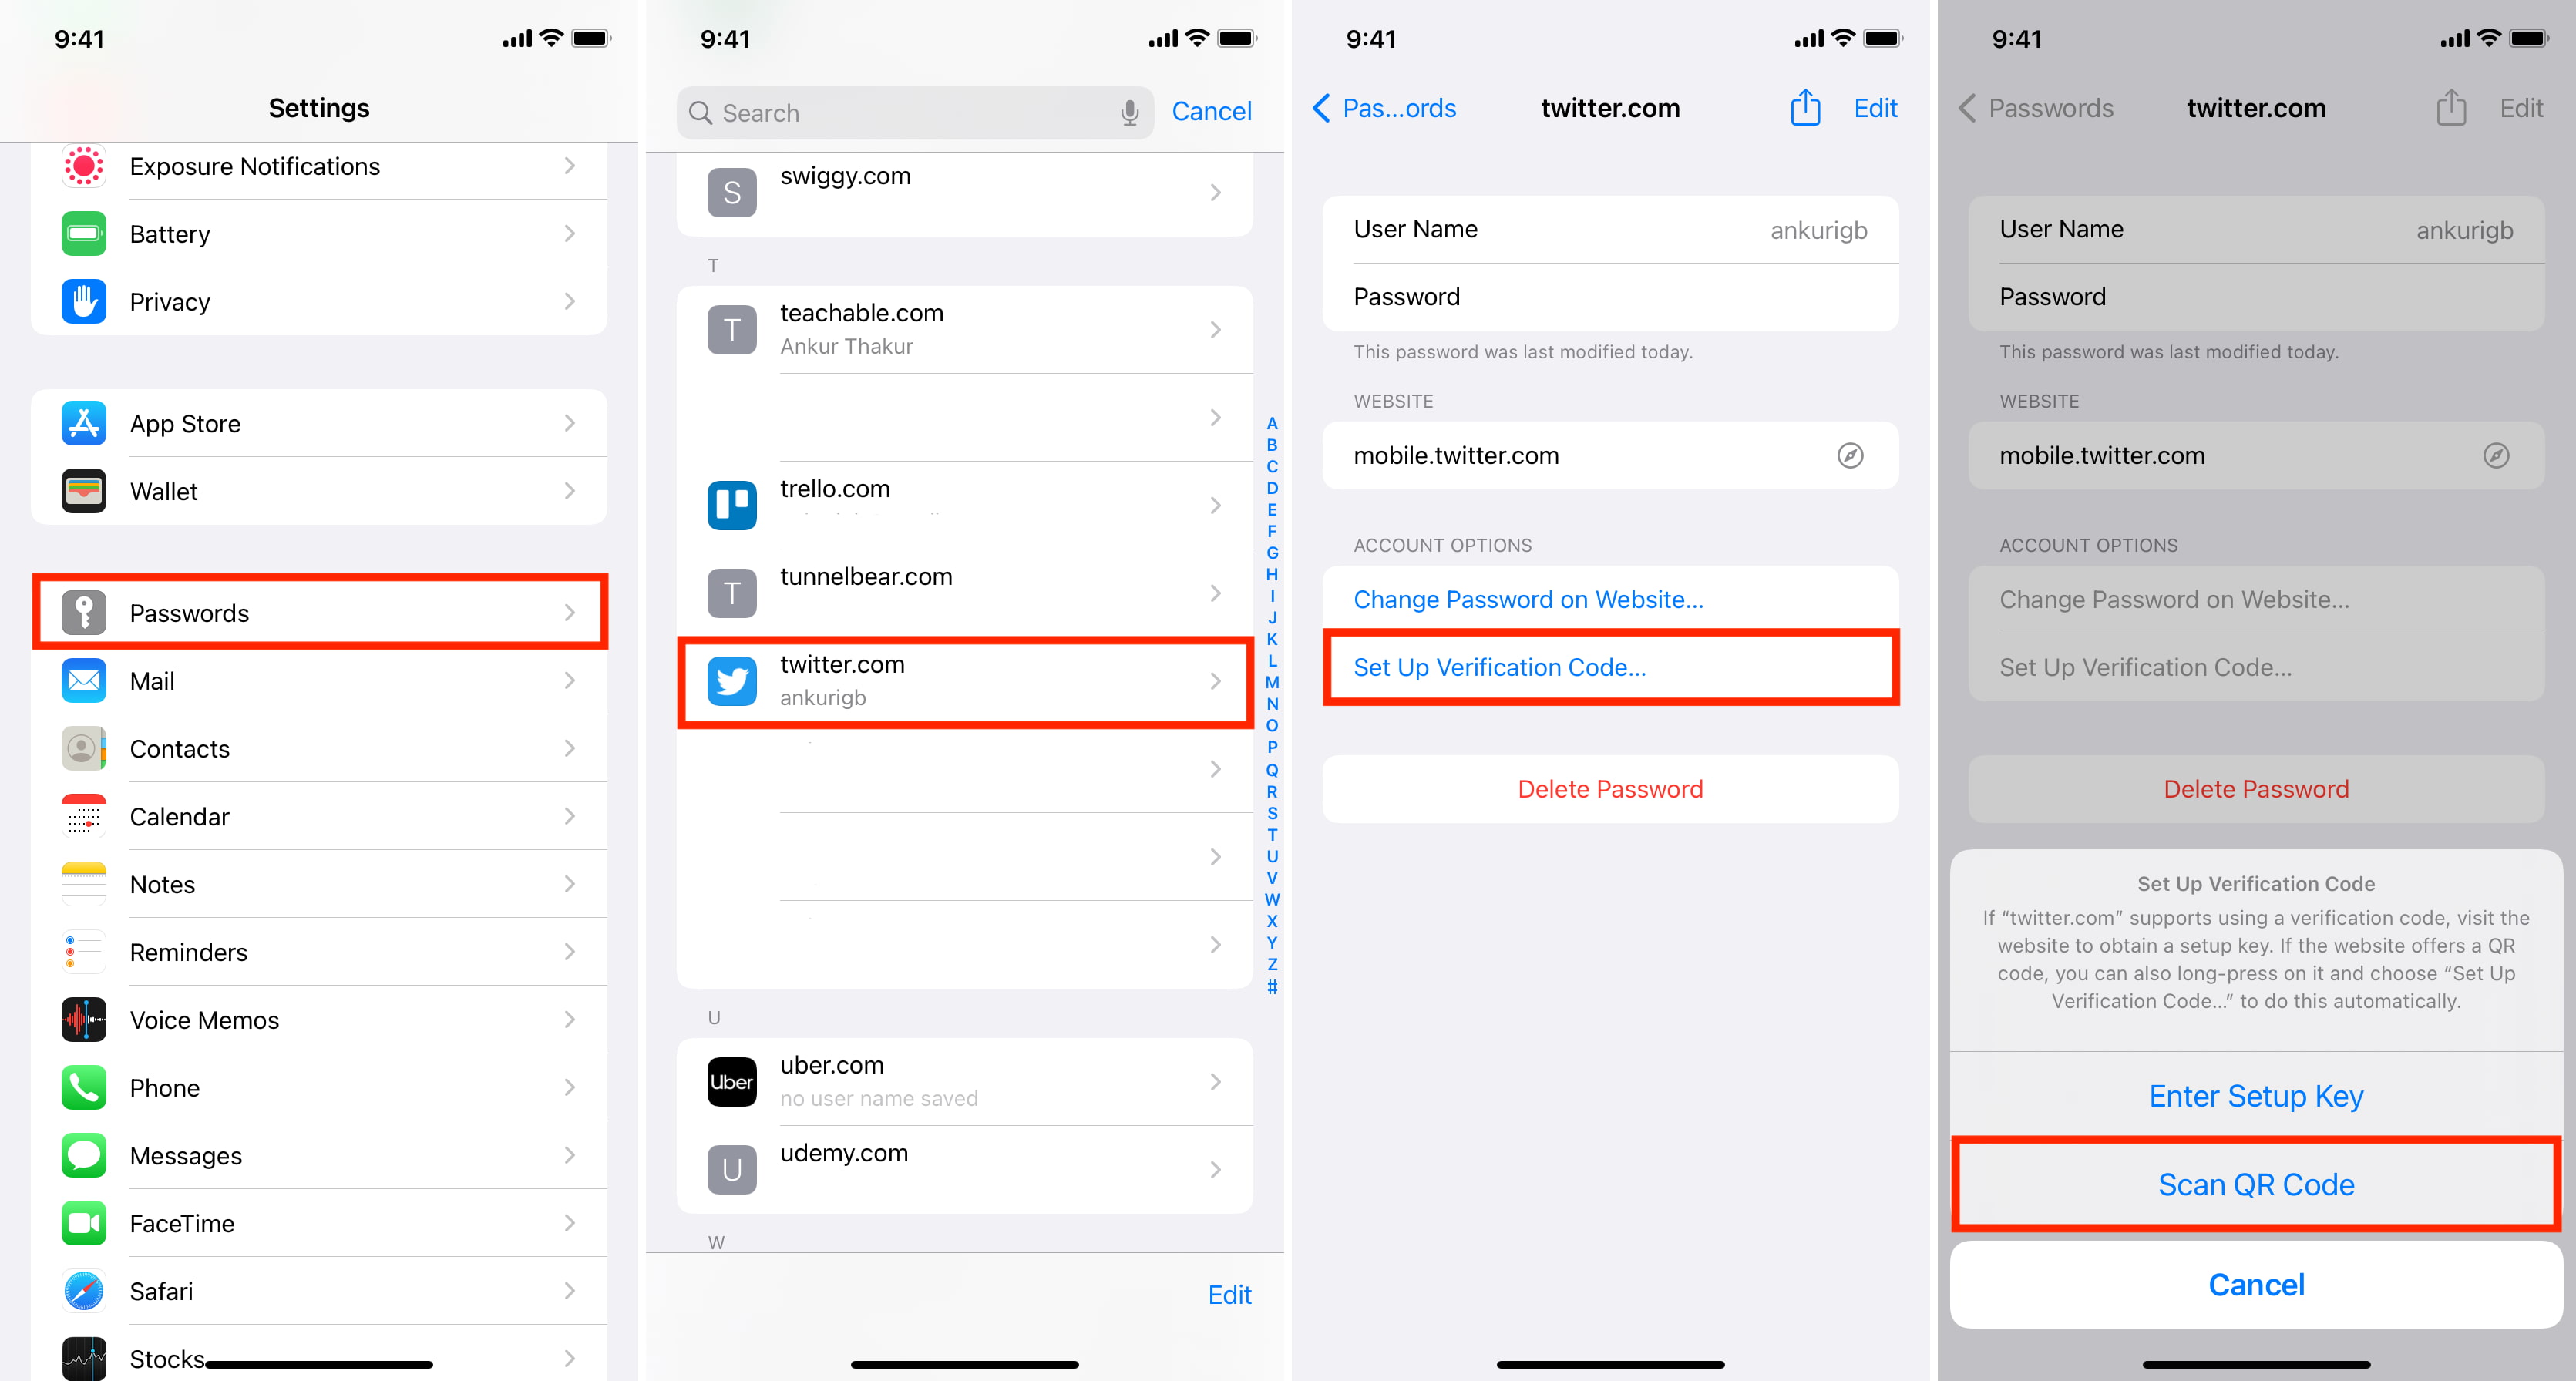
- On your iPhone, open the Settings app and tap Passwords.
- Now, if you already have the password for Twitter saved here in iCloud Keychain, scroll down and tap it. If you do not have the password set up, tap the plus icon > enter Twitter’s URL, your Twitter email and password > Done.
- Tap Set Up Verification Code and choose Scan QR Code. Point the iPhone camera to the QR code you see on your computer or iPad screen.
- On your computer or iPad, click Next. Now, enter the six-digit code from your iPhone Settings app here to verify. You have successfully set up 2FA codes inside the iOS 15’s built-in authenticator. Next, here’s how to use it.
How to set up iPhone to generate two-factor verification codes without scanning the QR code
If you do not have a computer or another device nearby, you can still set up iOS 15 two-step verification by following these steps.
- Go to the two-factor authentication setting of the app or website. From here, choose the authenticator app method.
- You’ll see a QR code. You’ll also see an option similar to “Setup on the same device” or “Can’t scan QR code.” Tap it, and you will see a long string of numbers and alphabets. Copy this code.
- Open iPhone Settings > Passwords > website or app name > Set Up Verification Code > Enter Setup Key. Now paste the code here and tap OK.
- Copy the six-digit code you see in iPhone Settings.
- Open the website or app and tap Next. Now, paste the six-digit code here to confirm. Done. You have successfully set up two-factor authentication for the service on your iPhone. Now, let me show you how to use it.
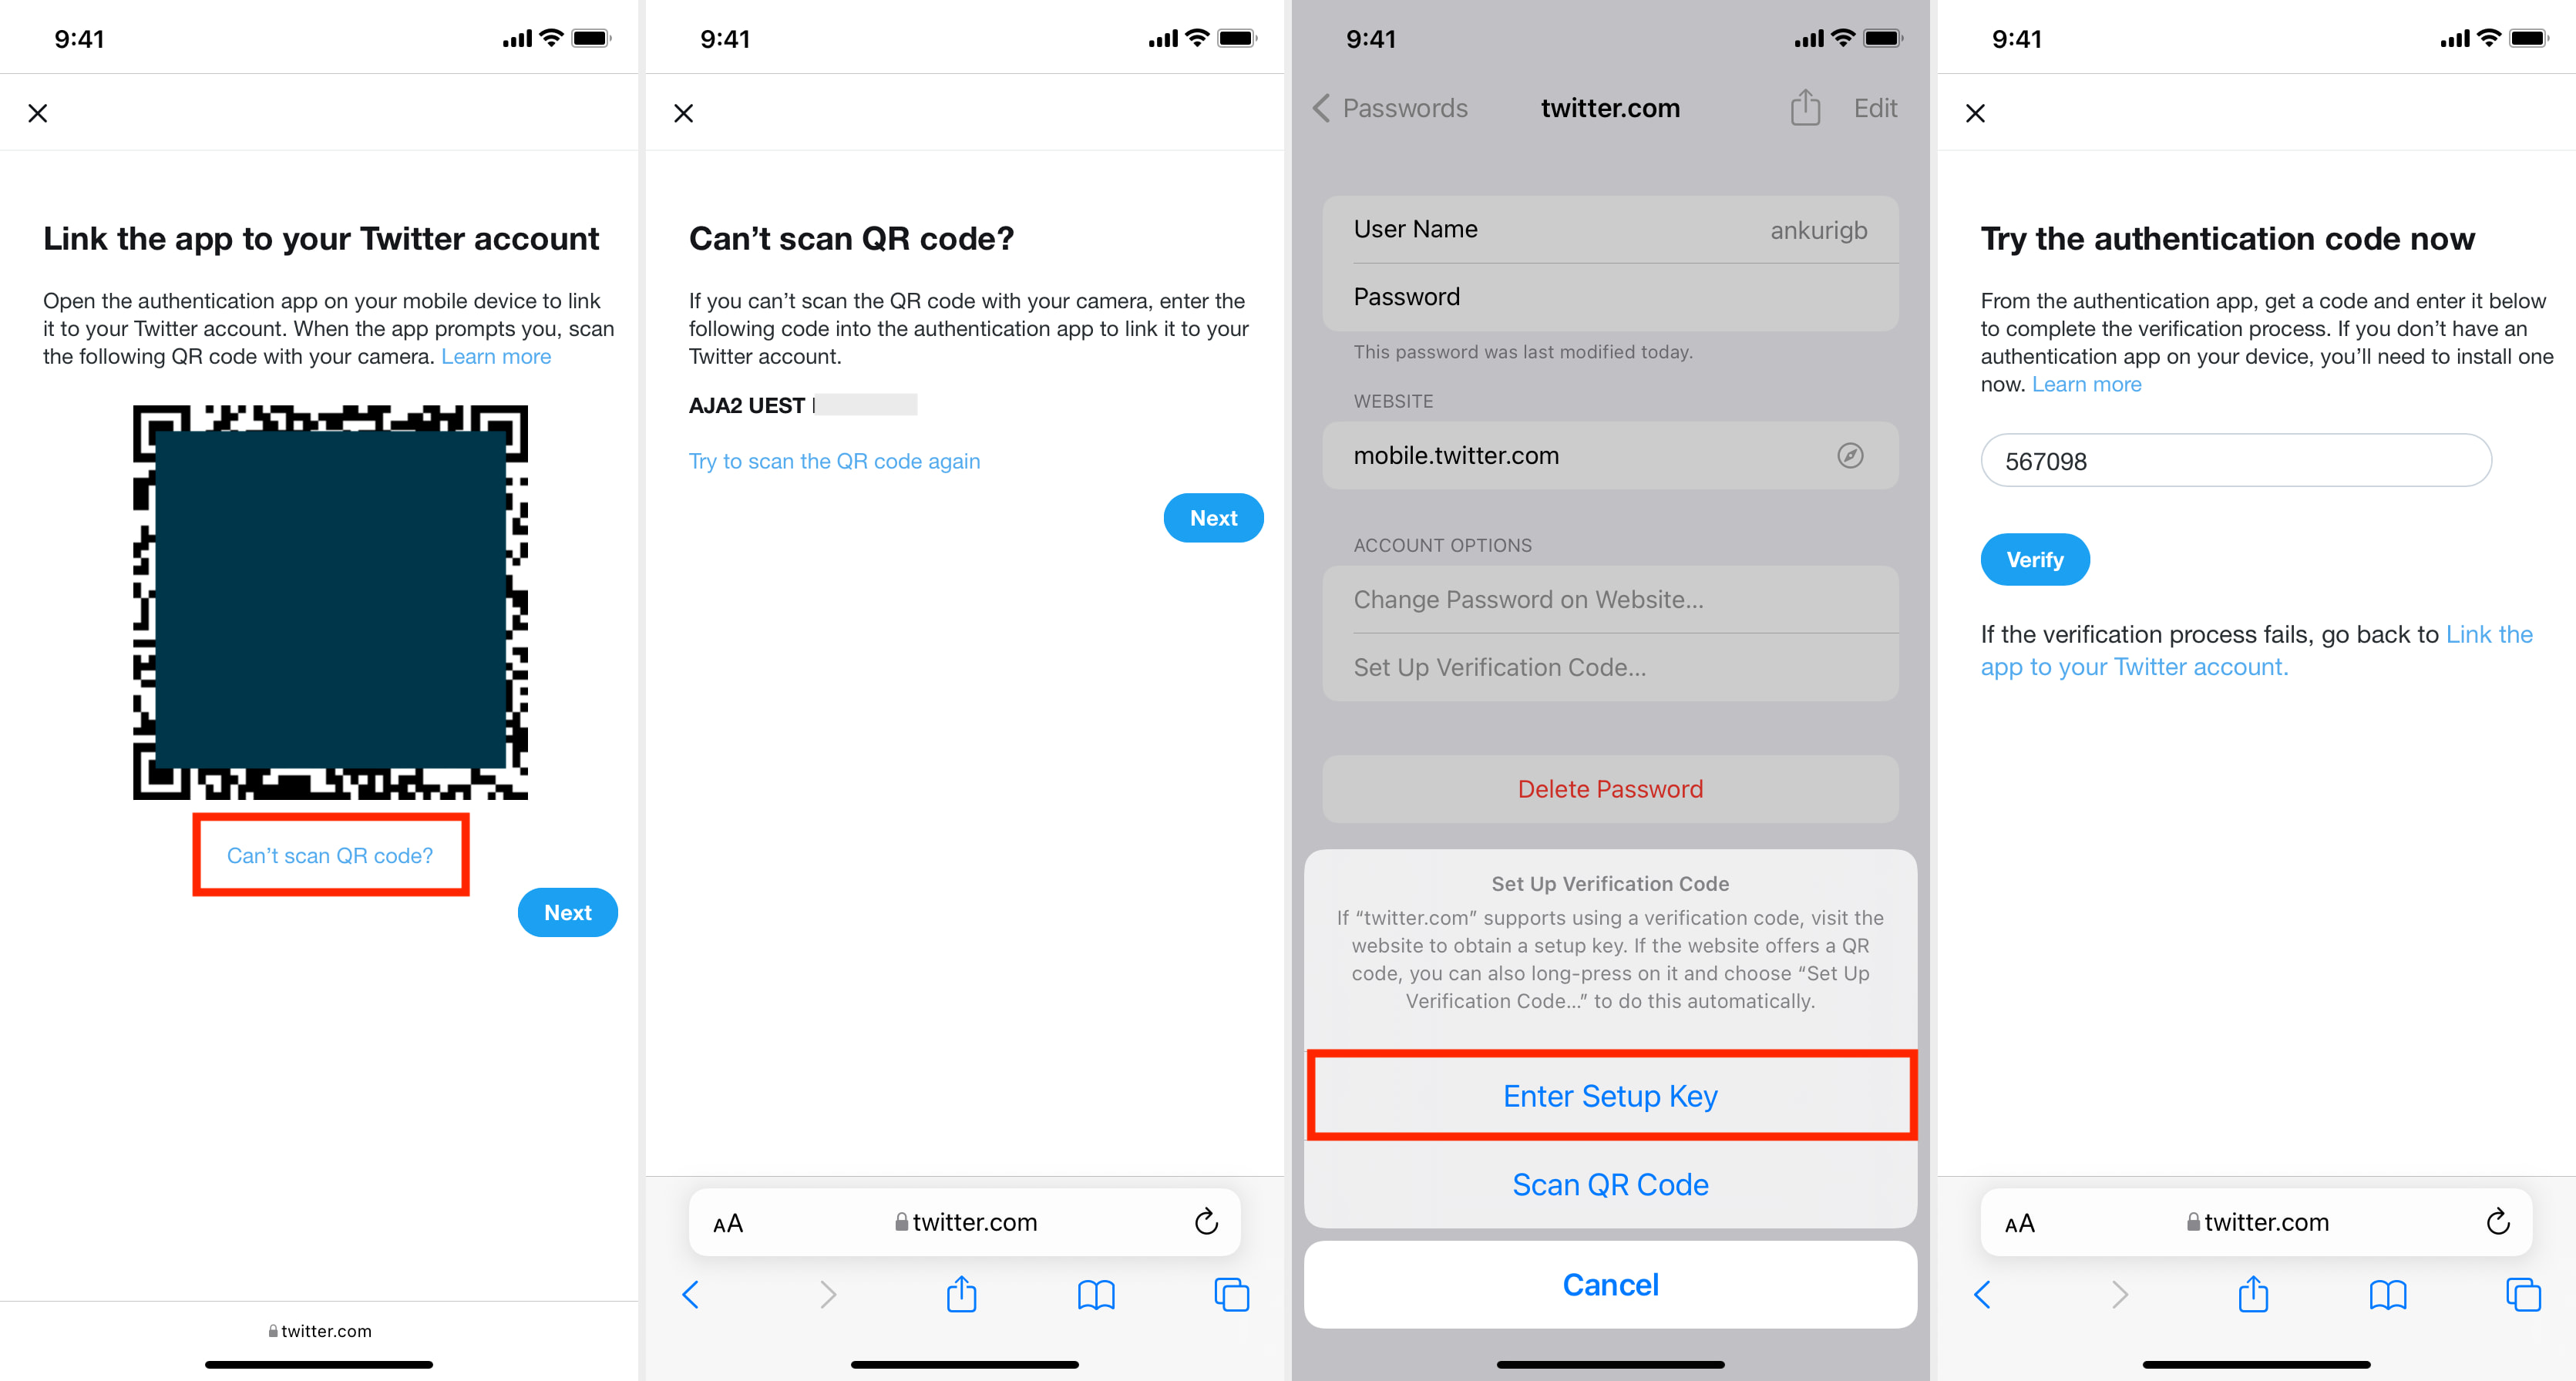
Notes for step 2: Some websites and apps like Facebook make things effortless. When you tap Setup on the same device, it will instantly open the iPhone password settings screen and add the code. No need to follow step 3 above. But you will have to follow steps 4 and 5 to verify. For some sites, you may also long-press the QR code you see in Safari and tap Open in “Settings”.
How to autofill 2FA codes from iPhone’s built-in authenticator
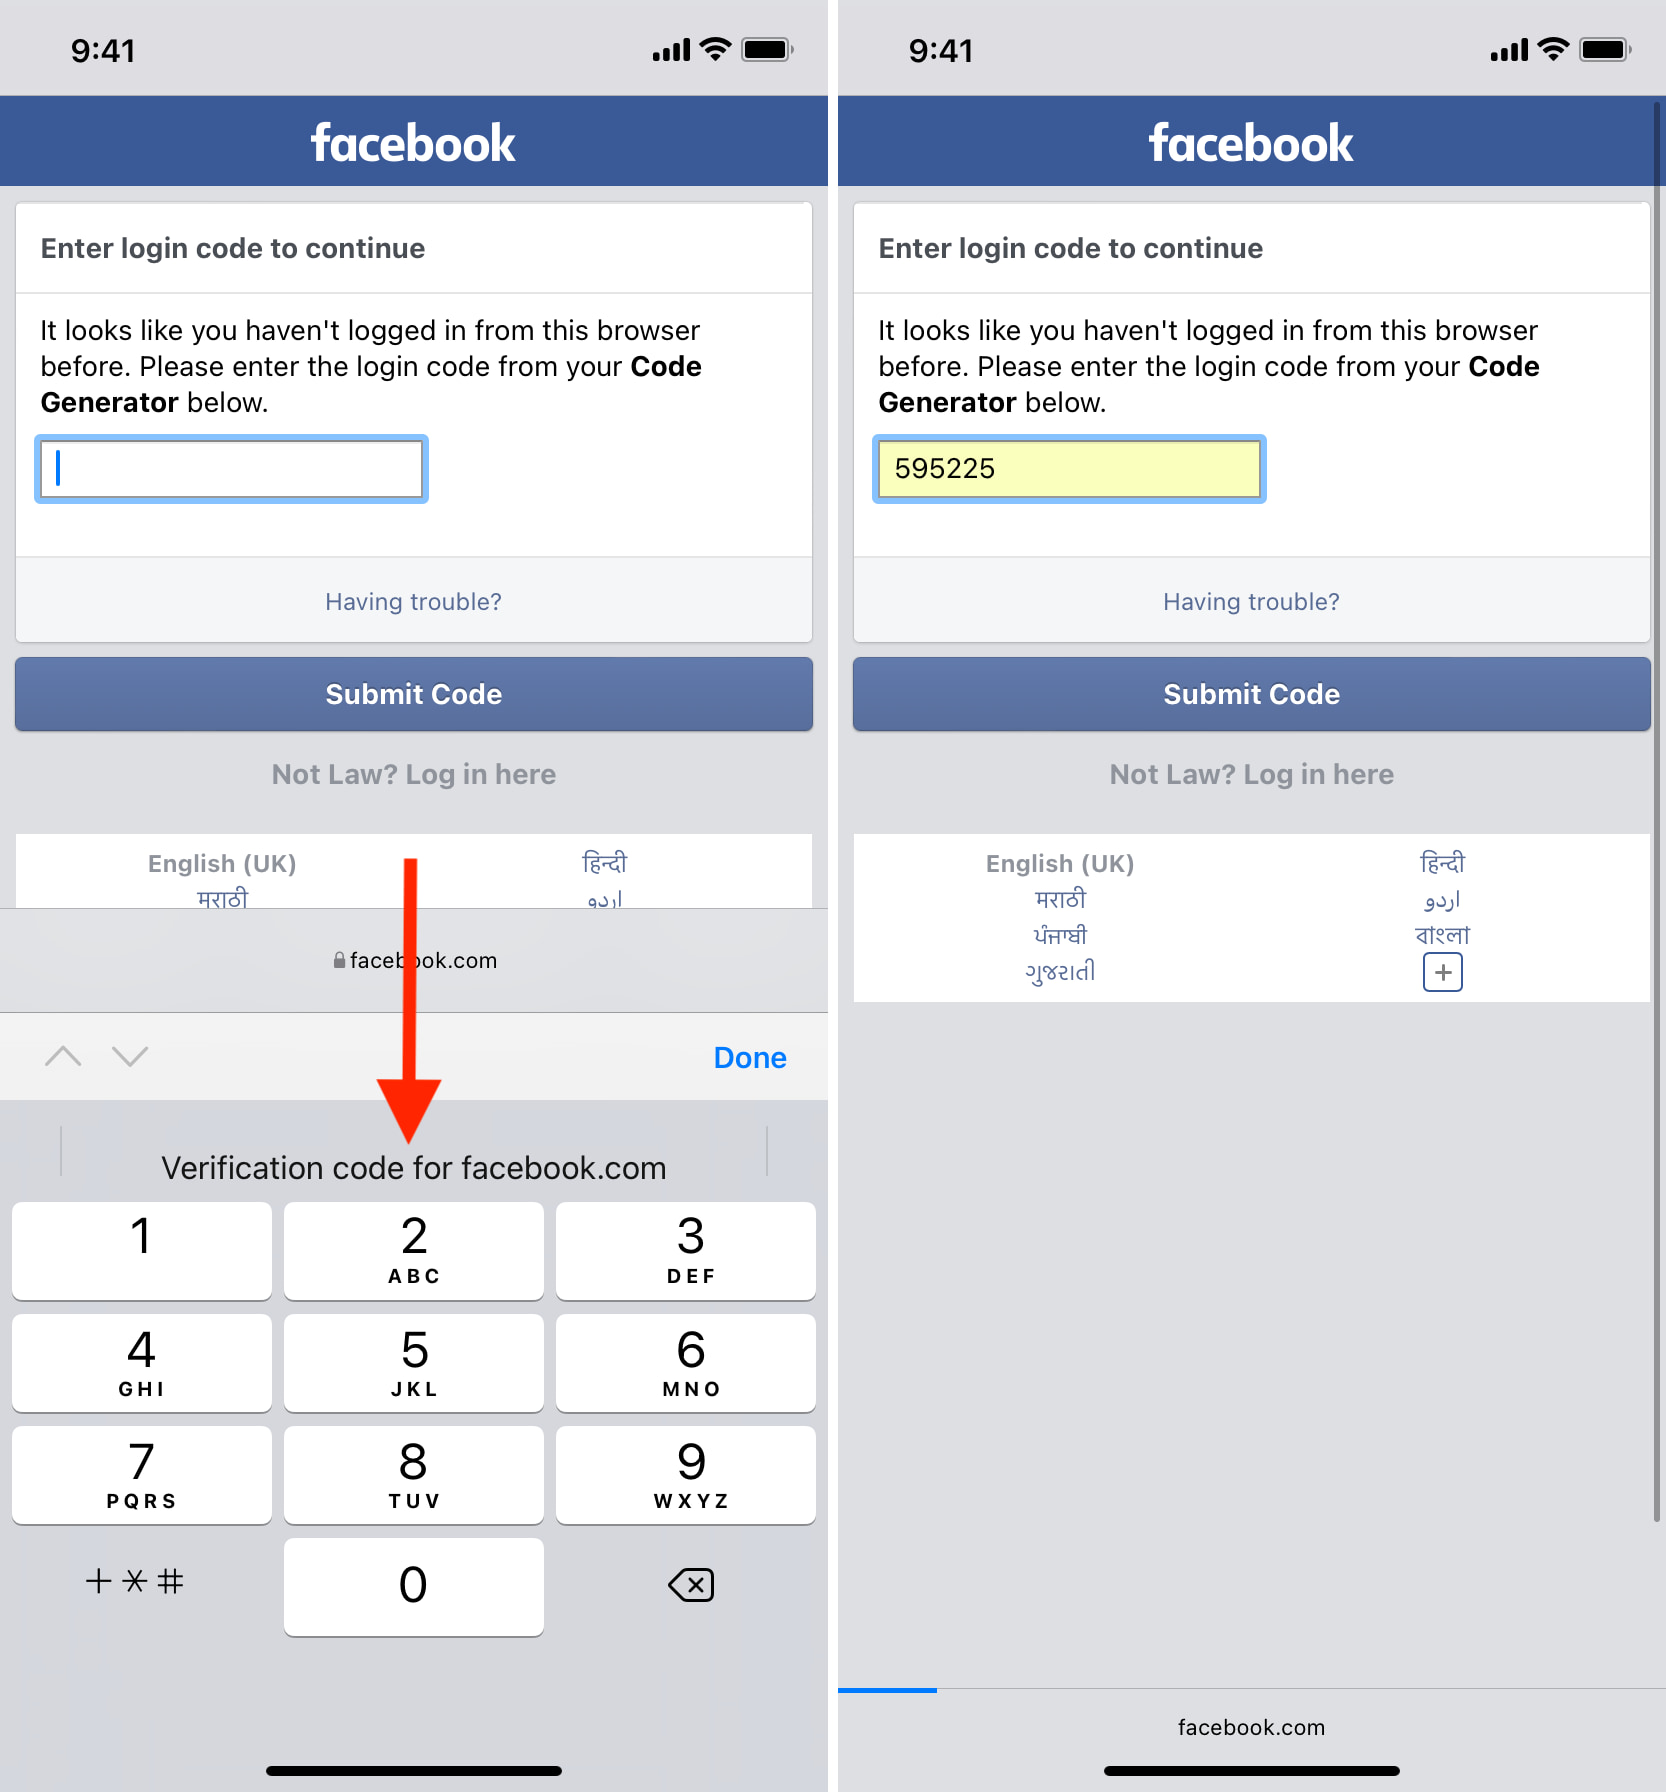
Once you have set up the two-factor authentication, using it is easy. When you log in to a website or app, enter the correct username and password. On the two-step verification screen, the iPhone will show a suggestion to autofill the code. Tap to enter the 2FA code.
What to do if 2FA autofill codes do not appear?
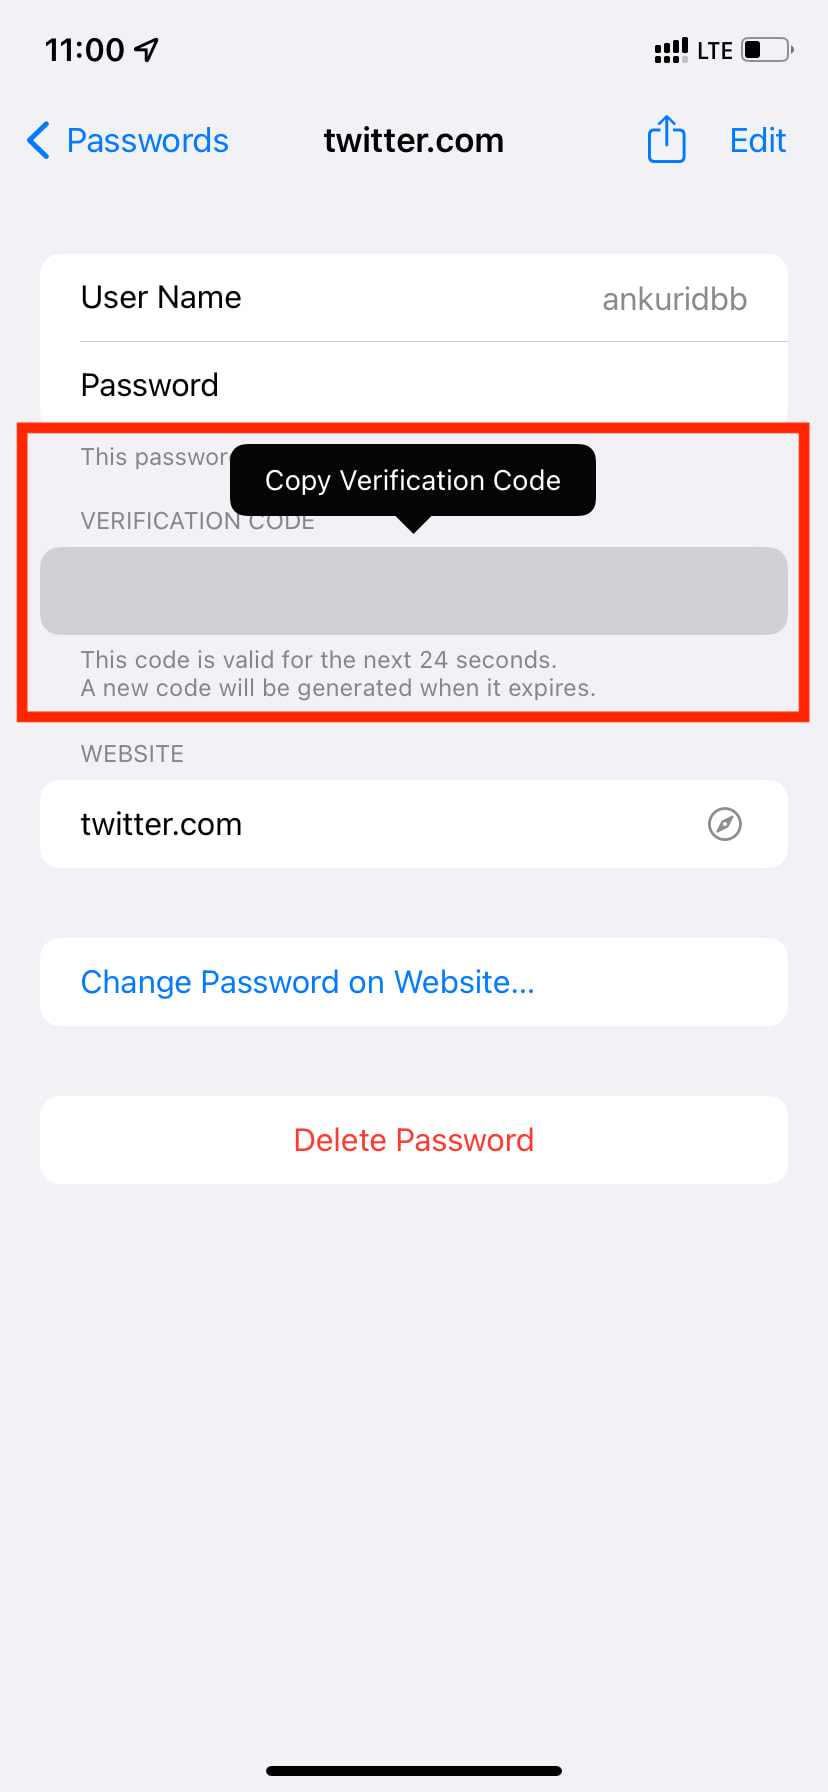
If the two-factor authentication code autofill suggestion doesn’t show up above the iPhone keyboard, you’ll have to copy and paste the code manually. To do that, go to iPhone Settings > Passwords > website name. You may also ask Siri to “Show my [website name] password.” From here, tap the six-digit code and then tap Copy Verification Code. Now, paste it on the website’s or app’s verification screen to log in.
iOS 15’s verification code autofill suggestion may not show up due to multiple reasons, the primary being the app or website does not support it. For example, autofill works flawlessly for Facebook on my iPhone Safari. But it doesn’t work for Twitter in the official app or Safari.
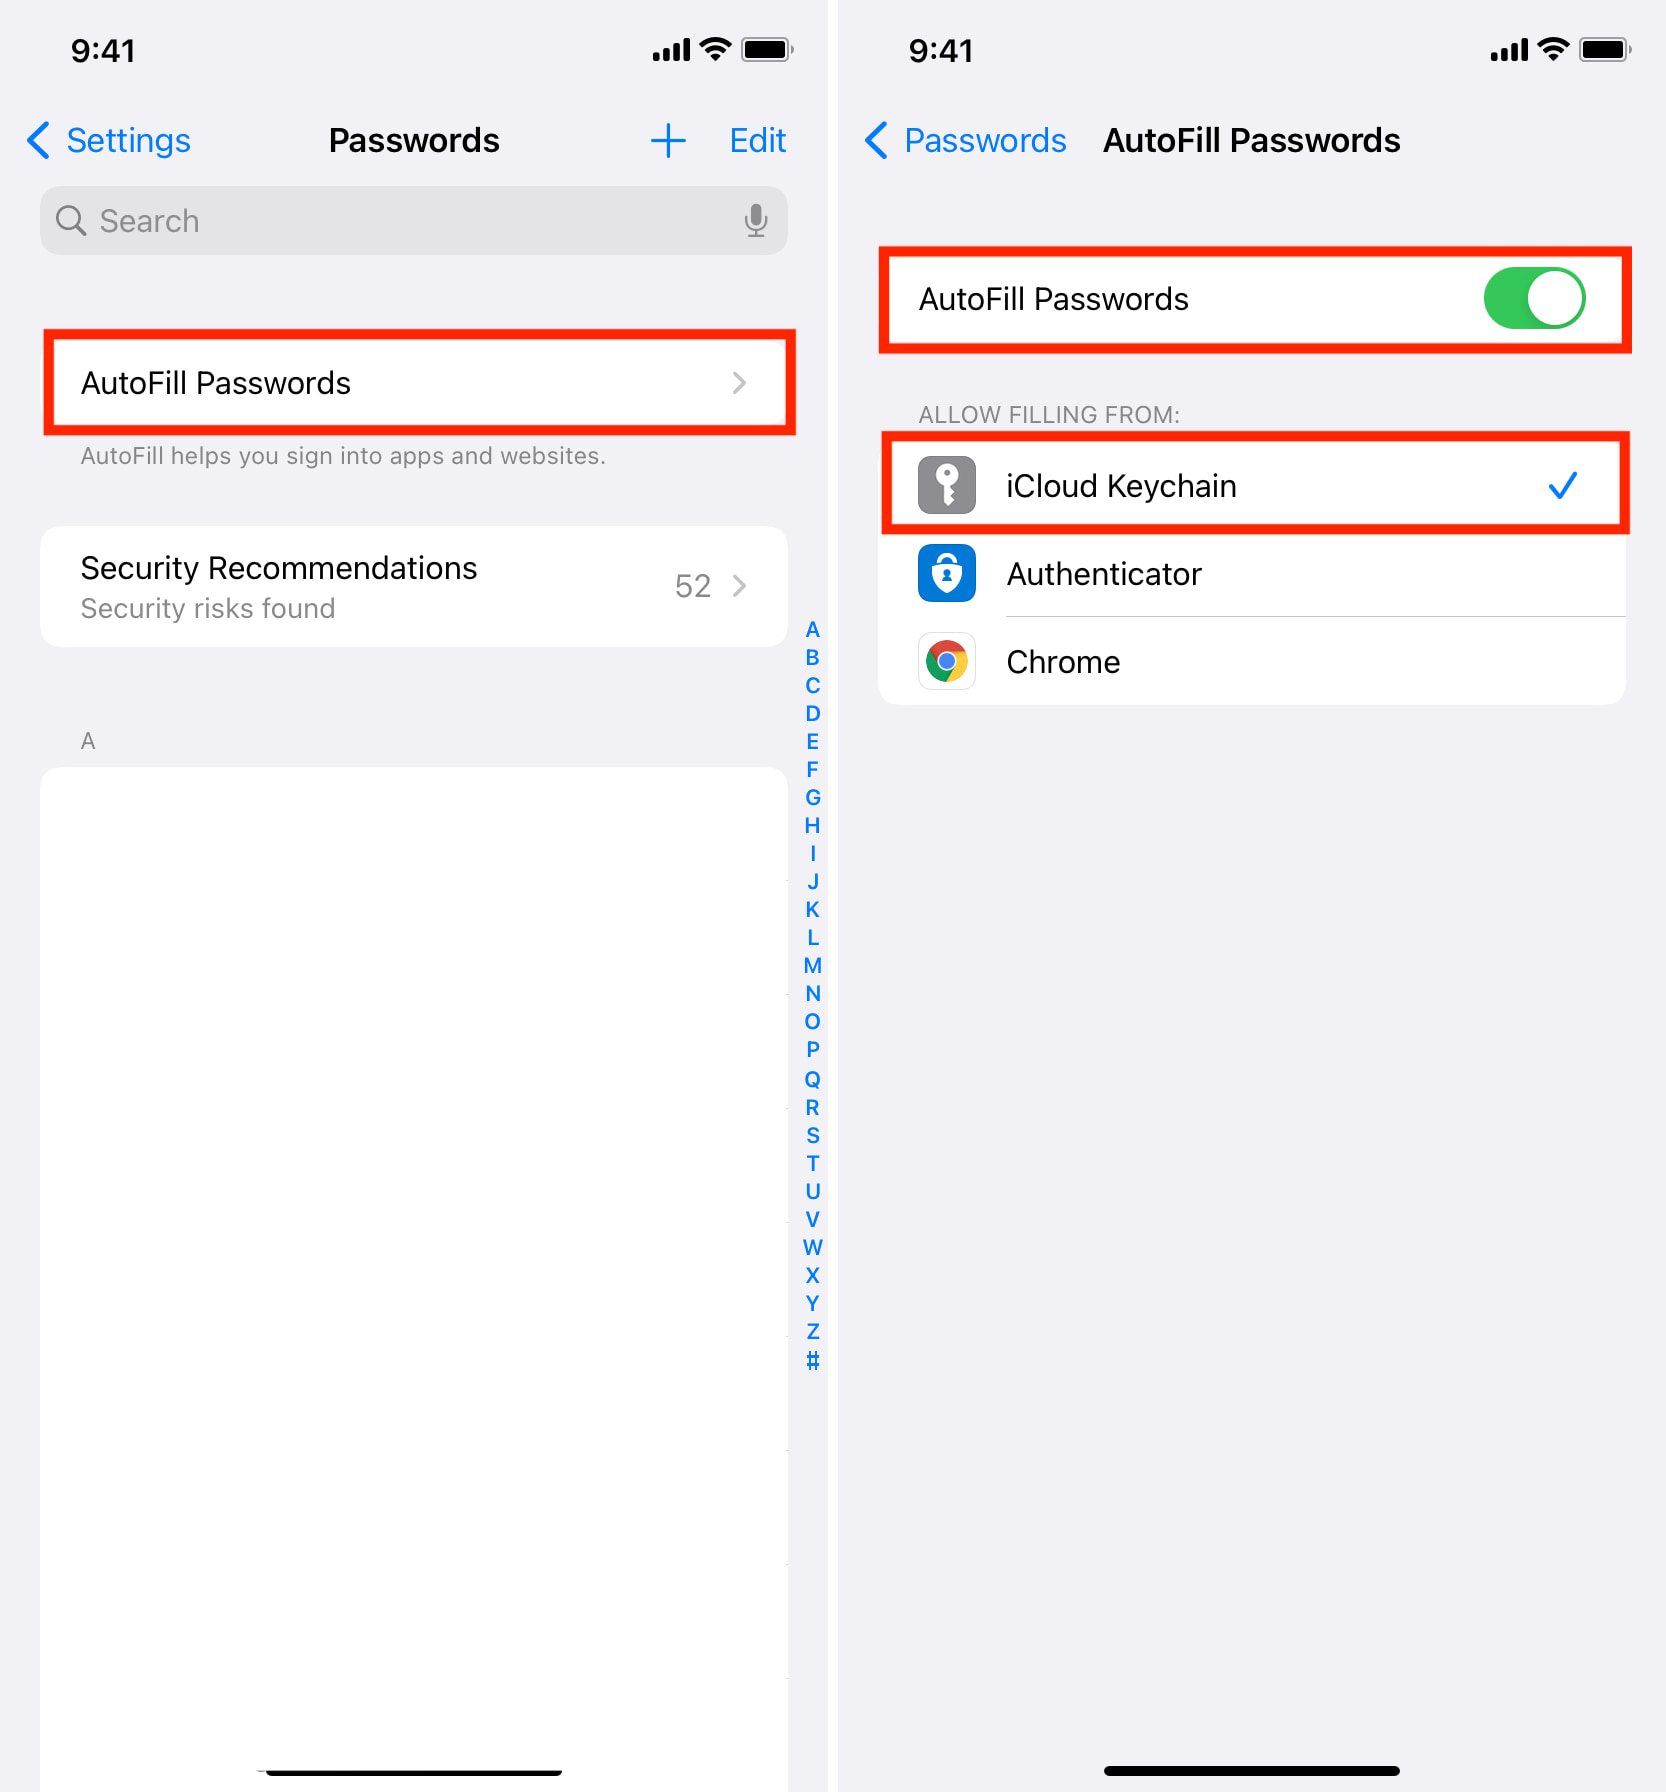
Next, it’s also likely that you have turned off autofill. To fix this, go to Settings > Passwords > AutoFill Passwords and enable it. Make sure iCloud Keychain is selected.
Does the inbuilt Apple authenticator autofill codes inside other browsers like Chrome, Firefox?
When I tried to autofill 2FA codes from Apple’s authenticator, it worked flawlessly in Safari. But on Chrome and Firefox, it didn’t. I tested it with Twitter and Facebook in these three popular iOS browsers. You can see the screenshots and my finding in these tweets.
While logging into Facebook in Chrome & Firefox, iCloud Keychain fills in the username and password, but on the 2FA code screen, it doesn't show anything.
In Safari it does perfectly.
Conclusion (for now): Keychain 2FA code autofill works well in Safari & not in other browsers. pic.twitter.com/LnWIM02zgY
— Ankur Thakur (@ankuriGB) November 10, 2021
How to stop using the inbuilt iPhone authenticator
Important: Before you decide to stop using any authenticator, including the inbuilt iPhone authenticator, you must first turn off two-step verification in the service’s account settings (for example on twitter.com). If you do not want to turn it off, make sure you have any other verification methods added so that you can receive the 2FA codes and not be locked out of that site or app forever!
Once you have done that, here’s how to remove a website or app from the built-in authenticator on iPhone in iOS 15.
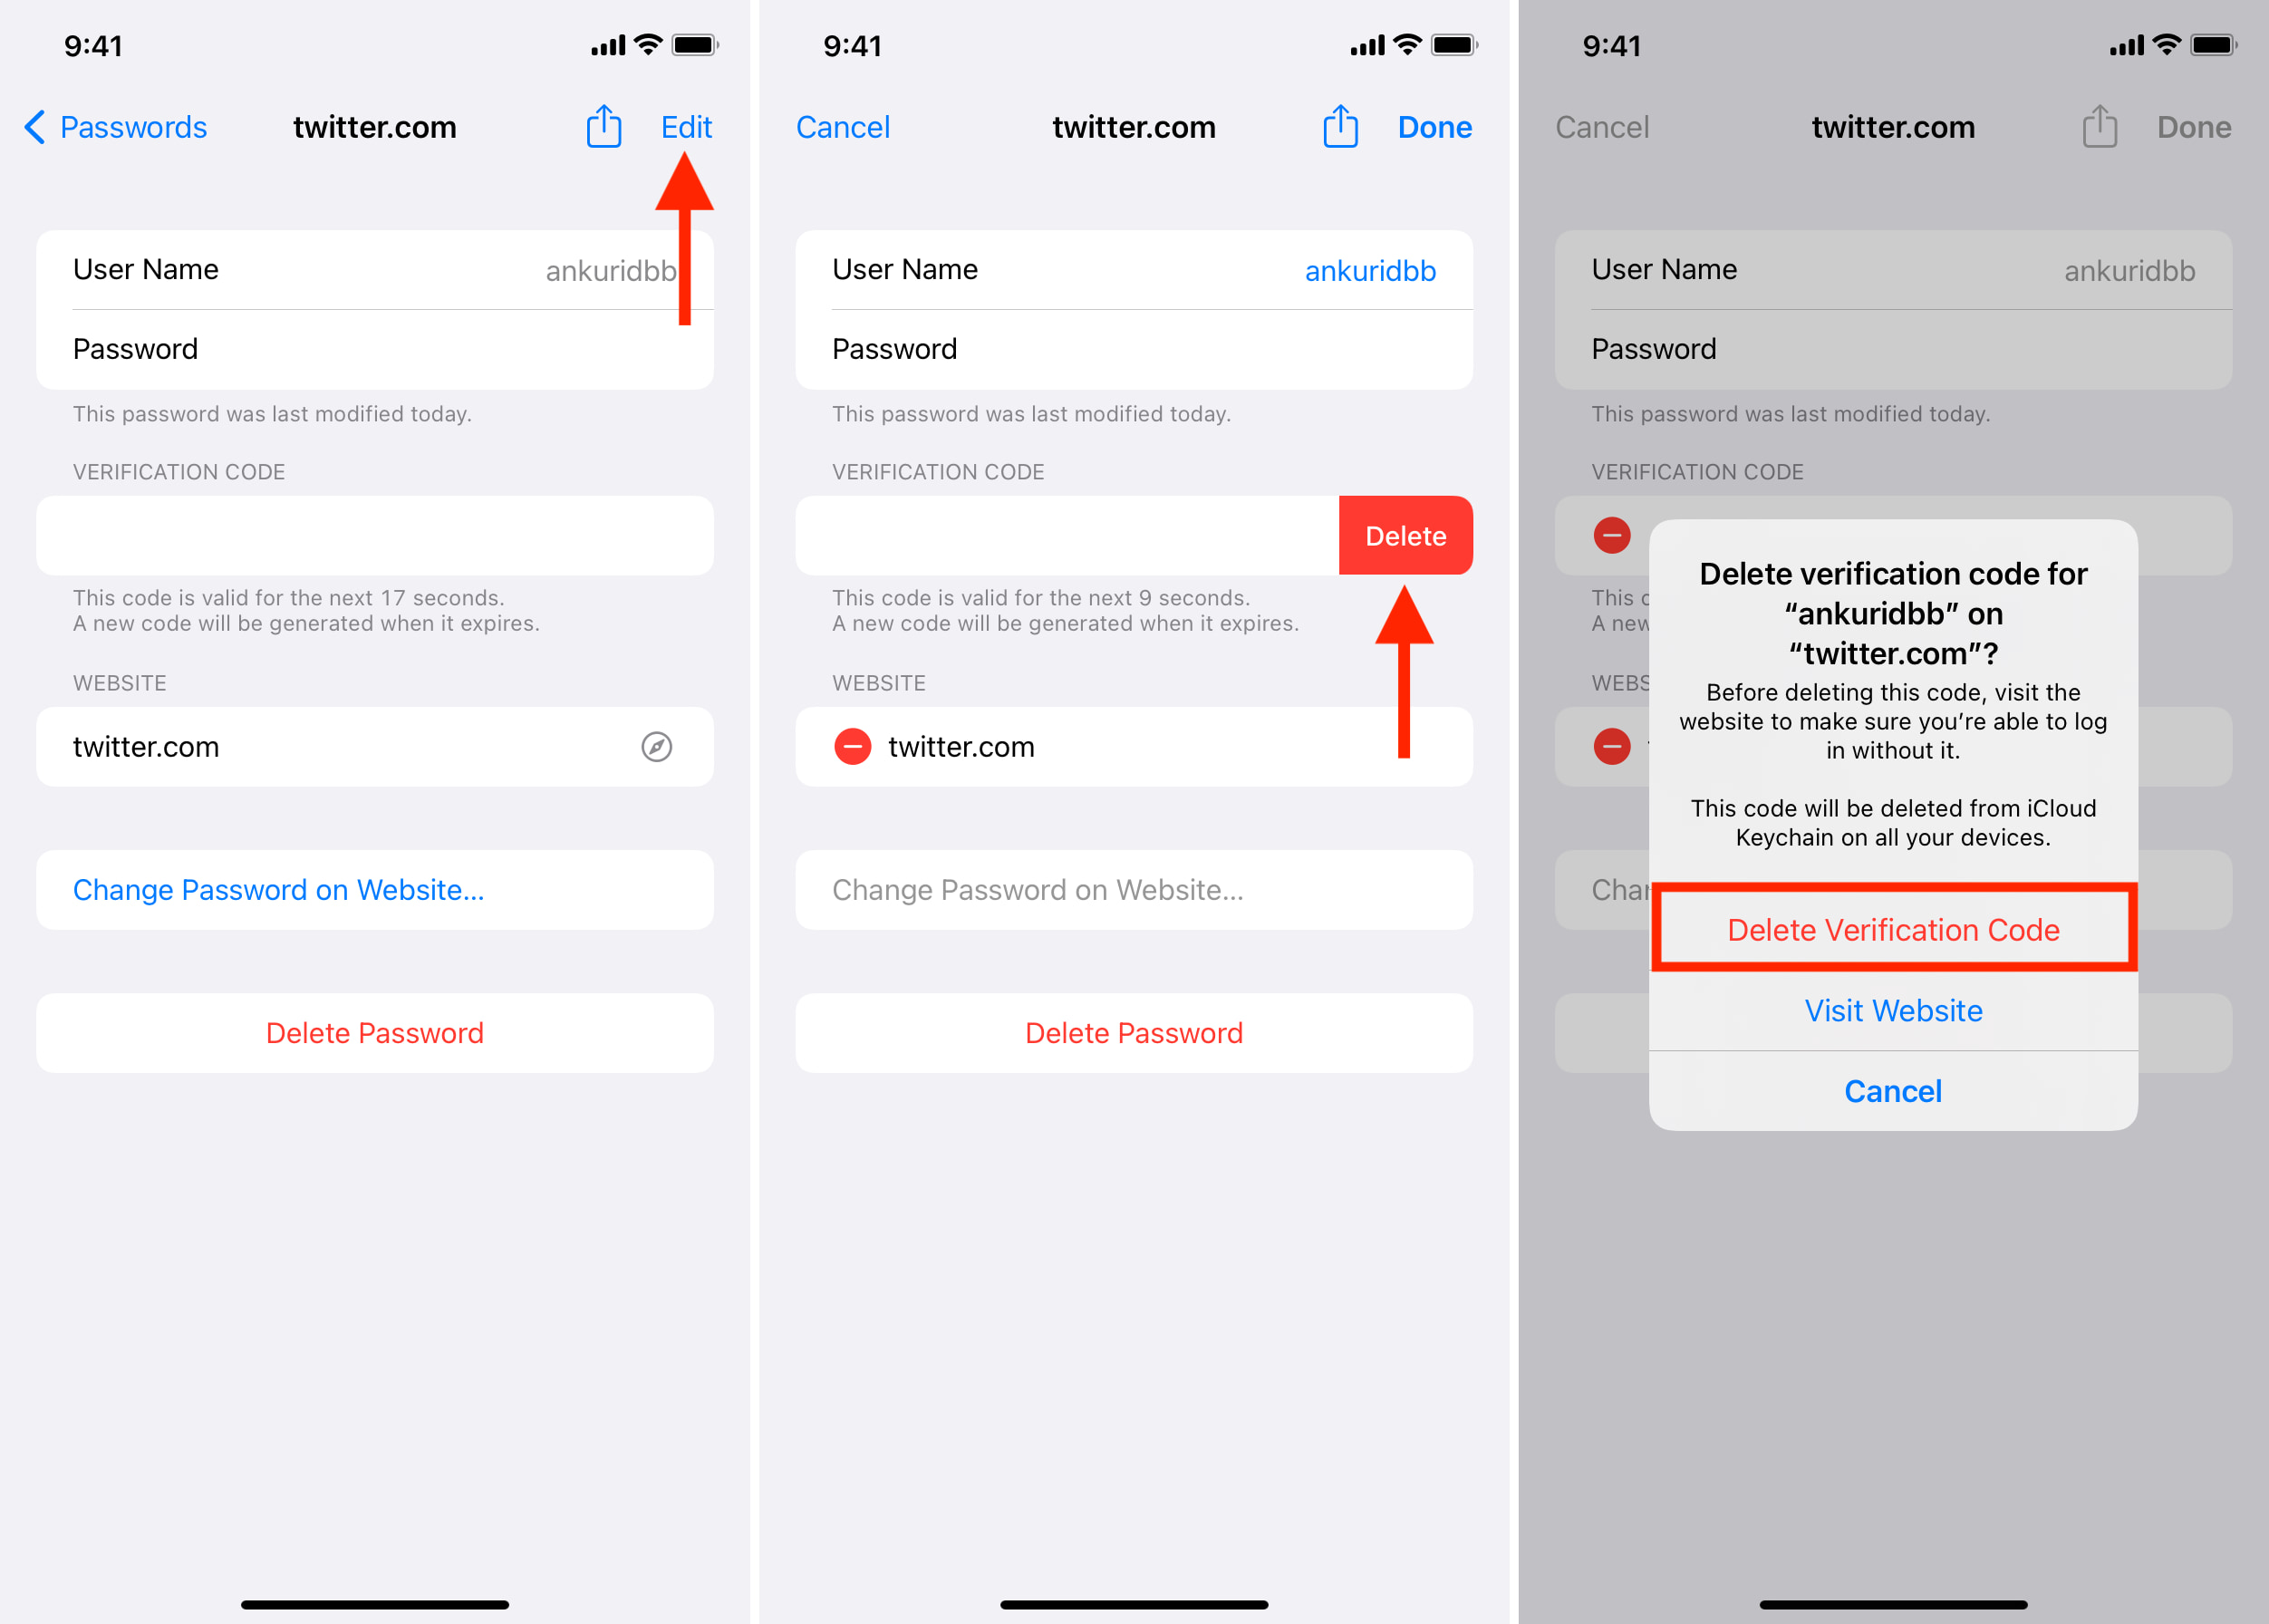
- Open Settings and tap Passwords.
- Tap the service name.
- Now, tap Edit.
- Tap the red minus icon > Delete > Delete Verification Code.
This is how you can use Apple’s new on-device authenticator on iPhone and iPad running iOS 15 or iPadOS 15. You can do the same on Mac running macOS Monterey by going to Safari Preferences or System Preferences. I hope this guide was helpful.
Must read: How to transfer Google Authenticator 2FA codes from one iPhone to another
