iPhone includes a magnetometer sensor, also known as digital compass. With it, your iPhone can tell the direction it’s pointed at. Along with built-in GPS and iOS’s Location Services, this allows for some cool navigation capabilities. If you’re wondering how to use iPhone compass with Apple Maps, you’ve come to the right place.
Displaying compass on a map not only helps you orient yourself better and find a route to a location, but also stay on course while navigating to avoid distractions that could lead to dangerous situations. In this tutorial, you’ll learn how to display the compass for navigation and use it with Apple Maps turn-by-turn directions.
My iPhone has built-in compass?
All iPhones from iPhone 3GS onward feature a built-in magnetometer sensor to measure the strength and the direction of the magnetic field in the vicinity of your device.
Compass accuracy can be affected by magnetic or environmental interference. Apple cautions that even the magnets in its AirPods or other manufactures’ earbuds can cause a deviation. When that happens, you can either move away from the interference or re-calibrate the compass sensor manually by moving your iPhone in a figure 8 motion.
You’re wholeheartedly recommended to limit your usage of compass in Maps to basic navigation assistance only. You should avoid relying on the feature to determine precise location, proximity, distance or direction.
Apple Maps automatically shows compass icon when interacting with your map. Compass is disabled by default in navigation mode to minimize distractions while driving. If you’d like to display compass while navigating, you can do so with just a few taps.
How to display compass for navigation
1) Go to Settings → Maps.
2) Tap Driving & Navigation.
3) Slide the toggle Compass underneath the heading Show in Navigation to the ON position.
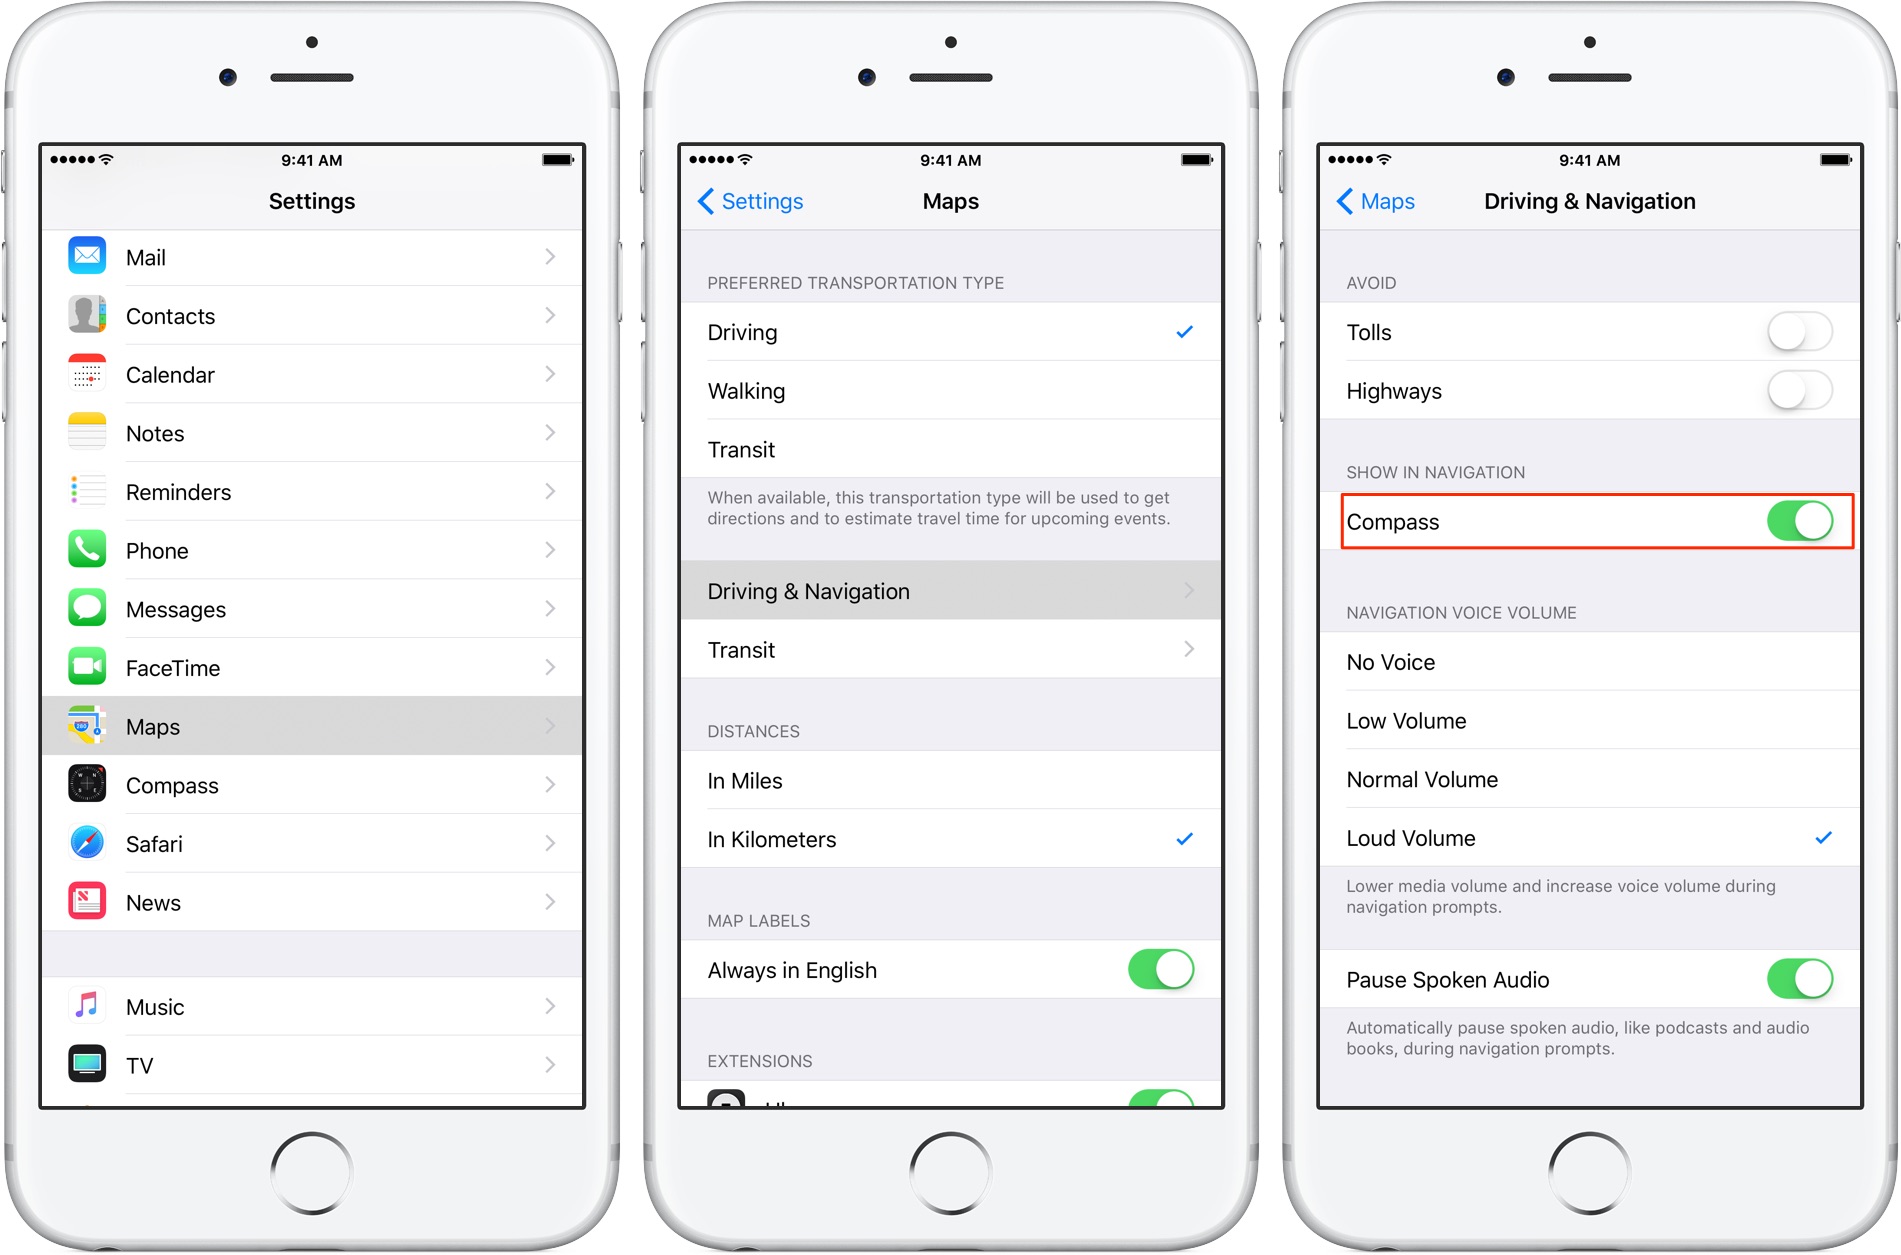
This will display the compass icon when navigating with Maps.
How to use compass with Apple Maps
Compass lets you do the following on Apple Maps:
- Quickly change your view to the north-facing orientation
- Lock your location in Compass mode
- Stay on course while navigating
And here’s how to use them.
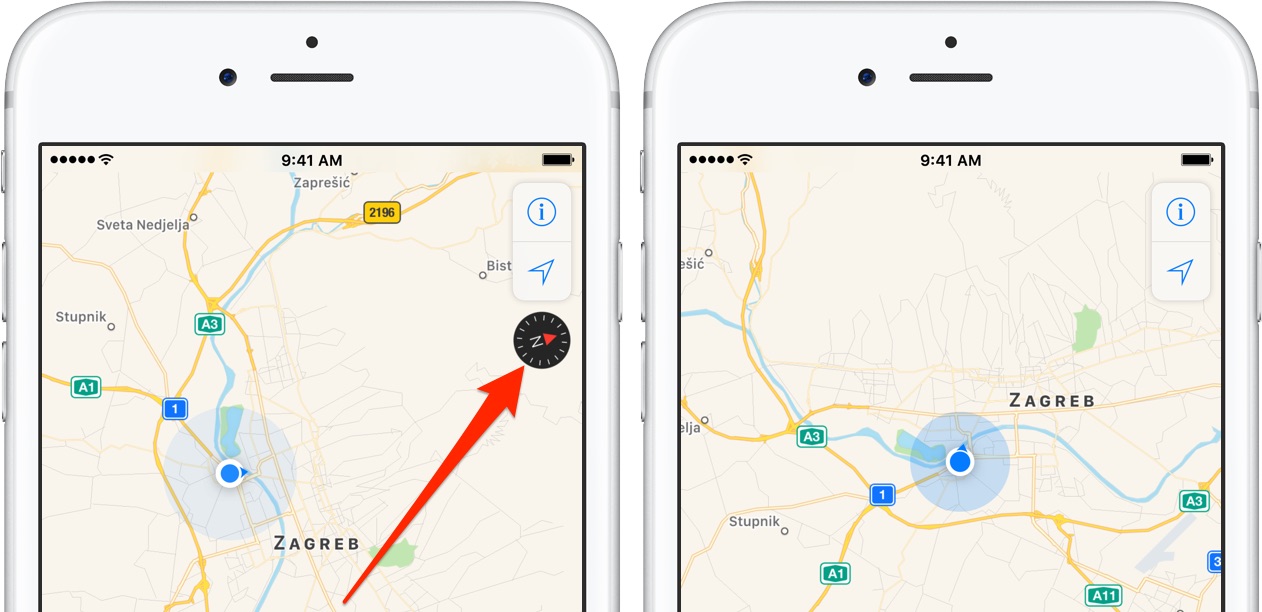
Reorient Maps to North
The compass sensor can help reorient your view after rotating the map with two fingers.
To return to North, simply tap once on the compass icon in the upper-right corner. Whenever Maps is not pointing North, tapping the compass icon shall return your view to the north-facing orientation.
Locking your location in Compass mode
You can switch Maps to Compass lock mode.
In Compass lock mode, the app automatically reorients the map in the direction you’re facing. To enter this mode, tap twice on the arrow icon in the upper-right corner. This will turn icon graphics to a solid forward-facing arrow and lock your location into Compass mode.
Your onscreen map will now automatically rotate to match the direction you’re facing.
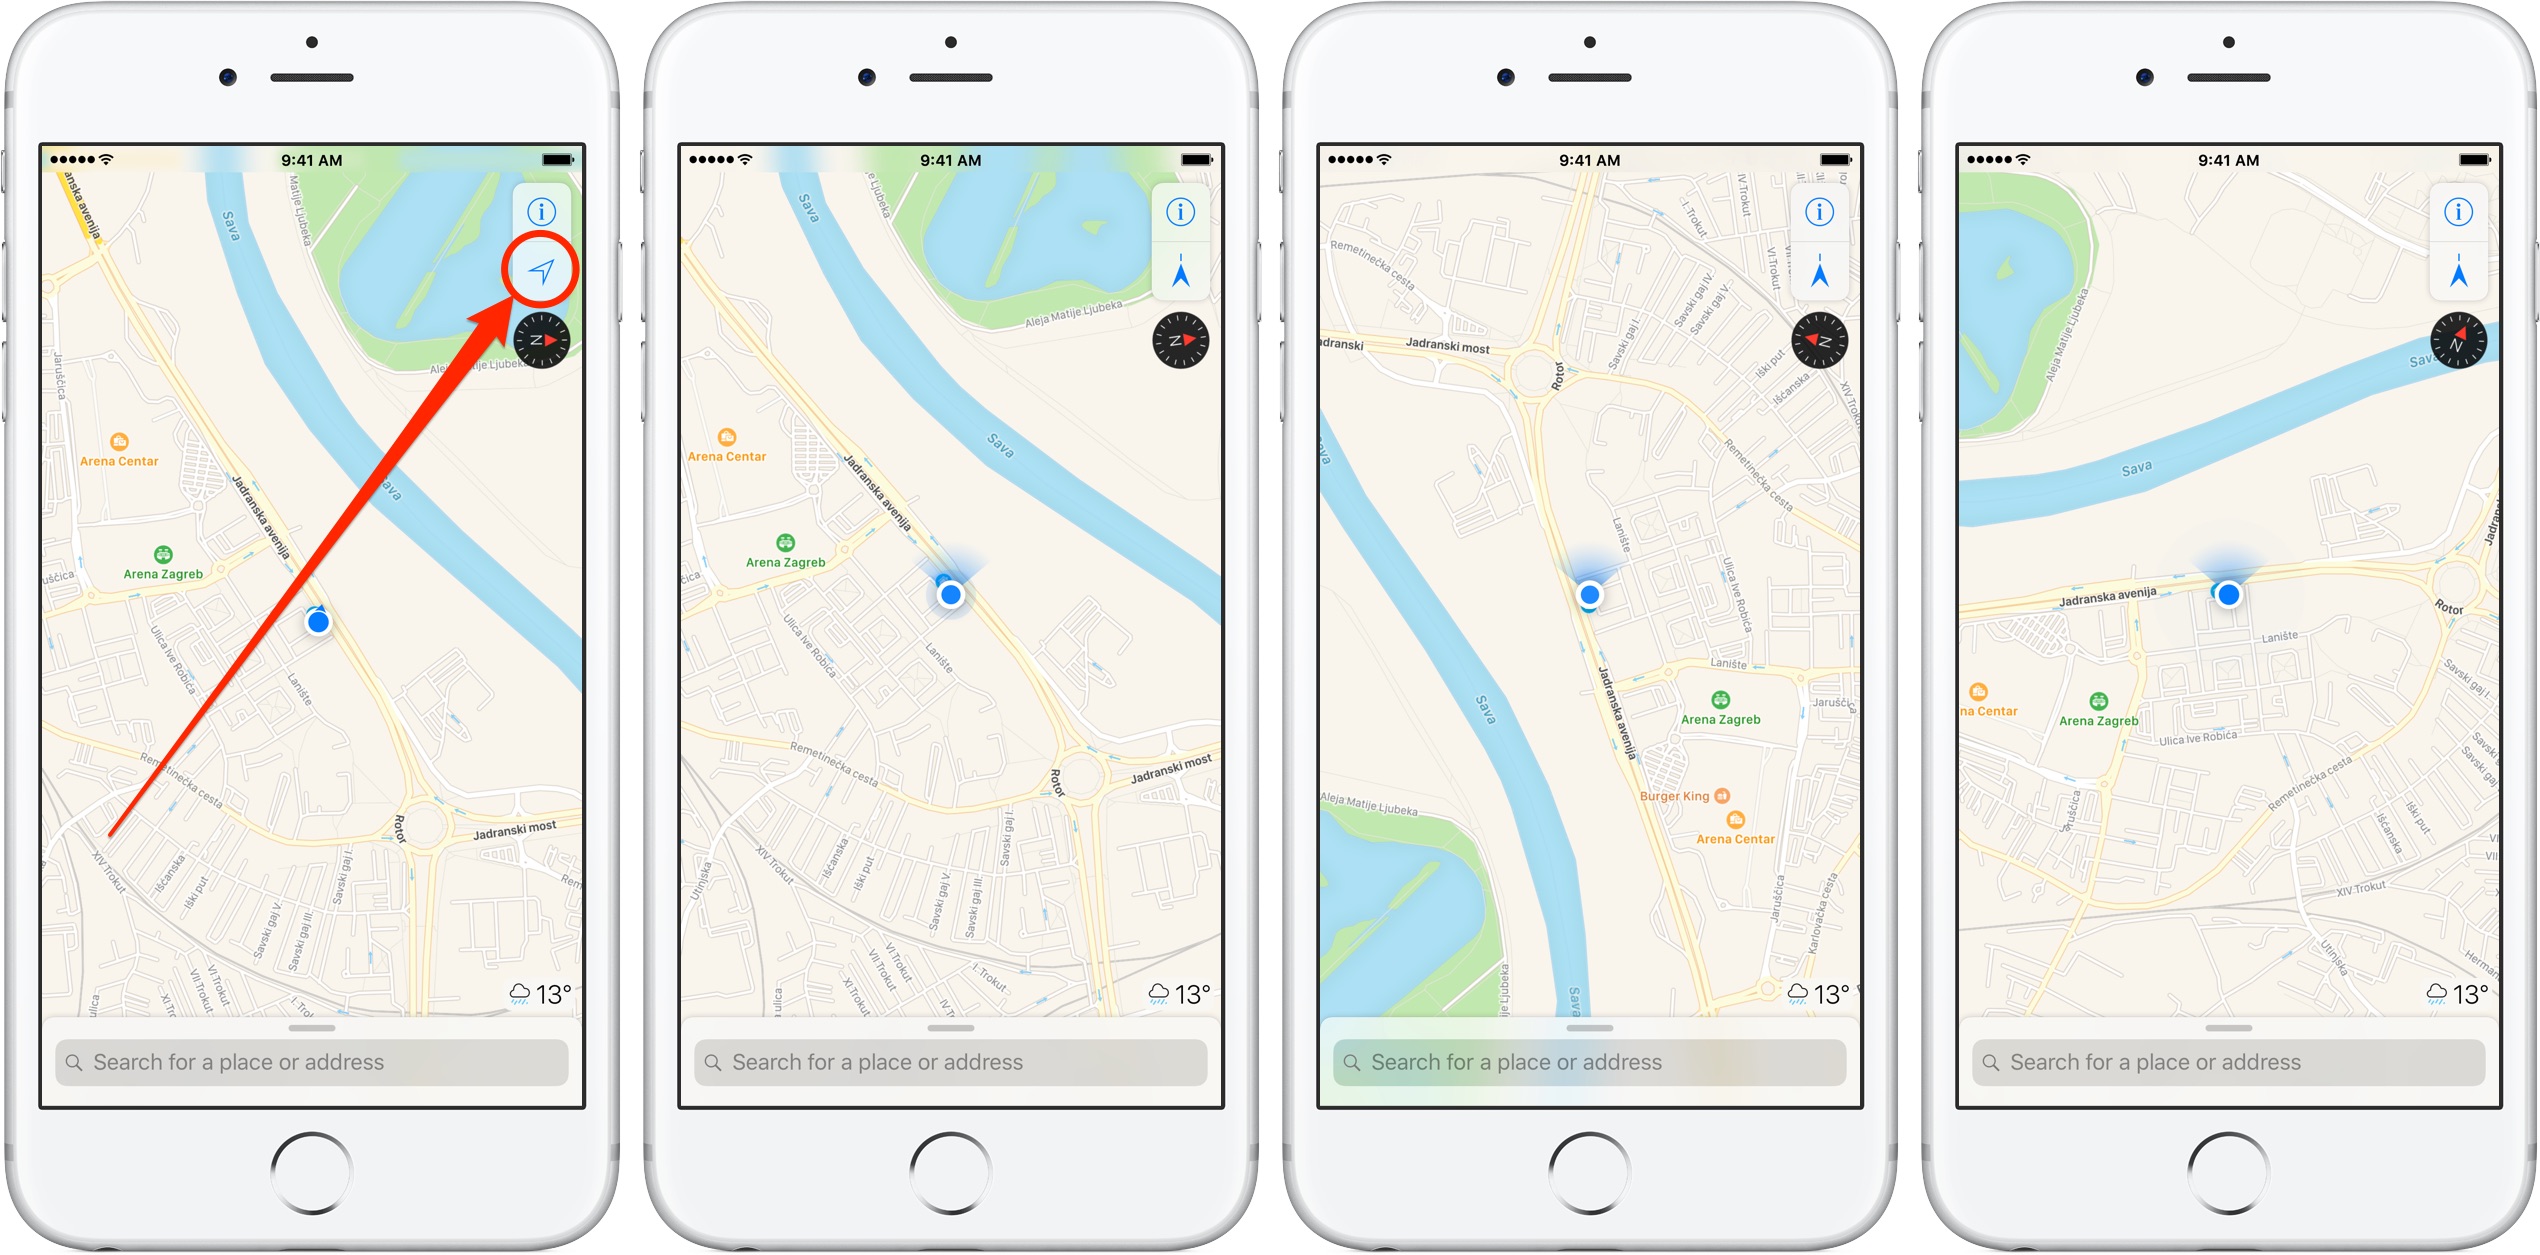
In this mode, the compass icon indicates where North is. To exit Compass mode and return to the traditional Maps view, tap the arrow icon again or hit the compass icon.
Staying on course while navigating
The compass sensor also helps you stay on course while navigating.
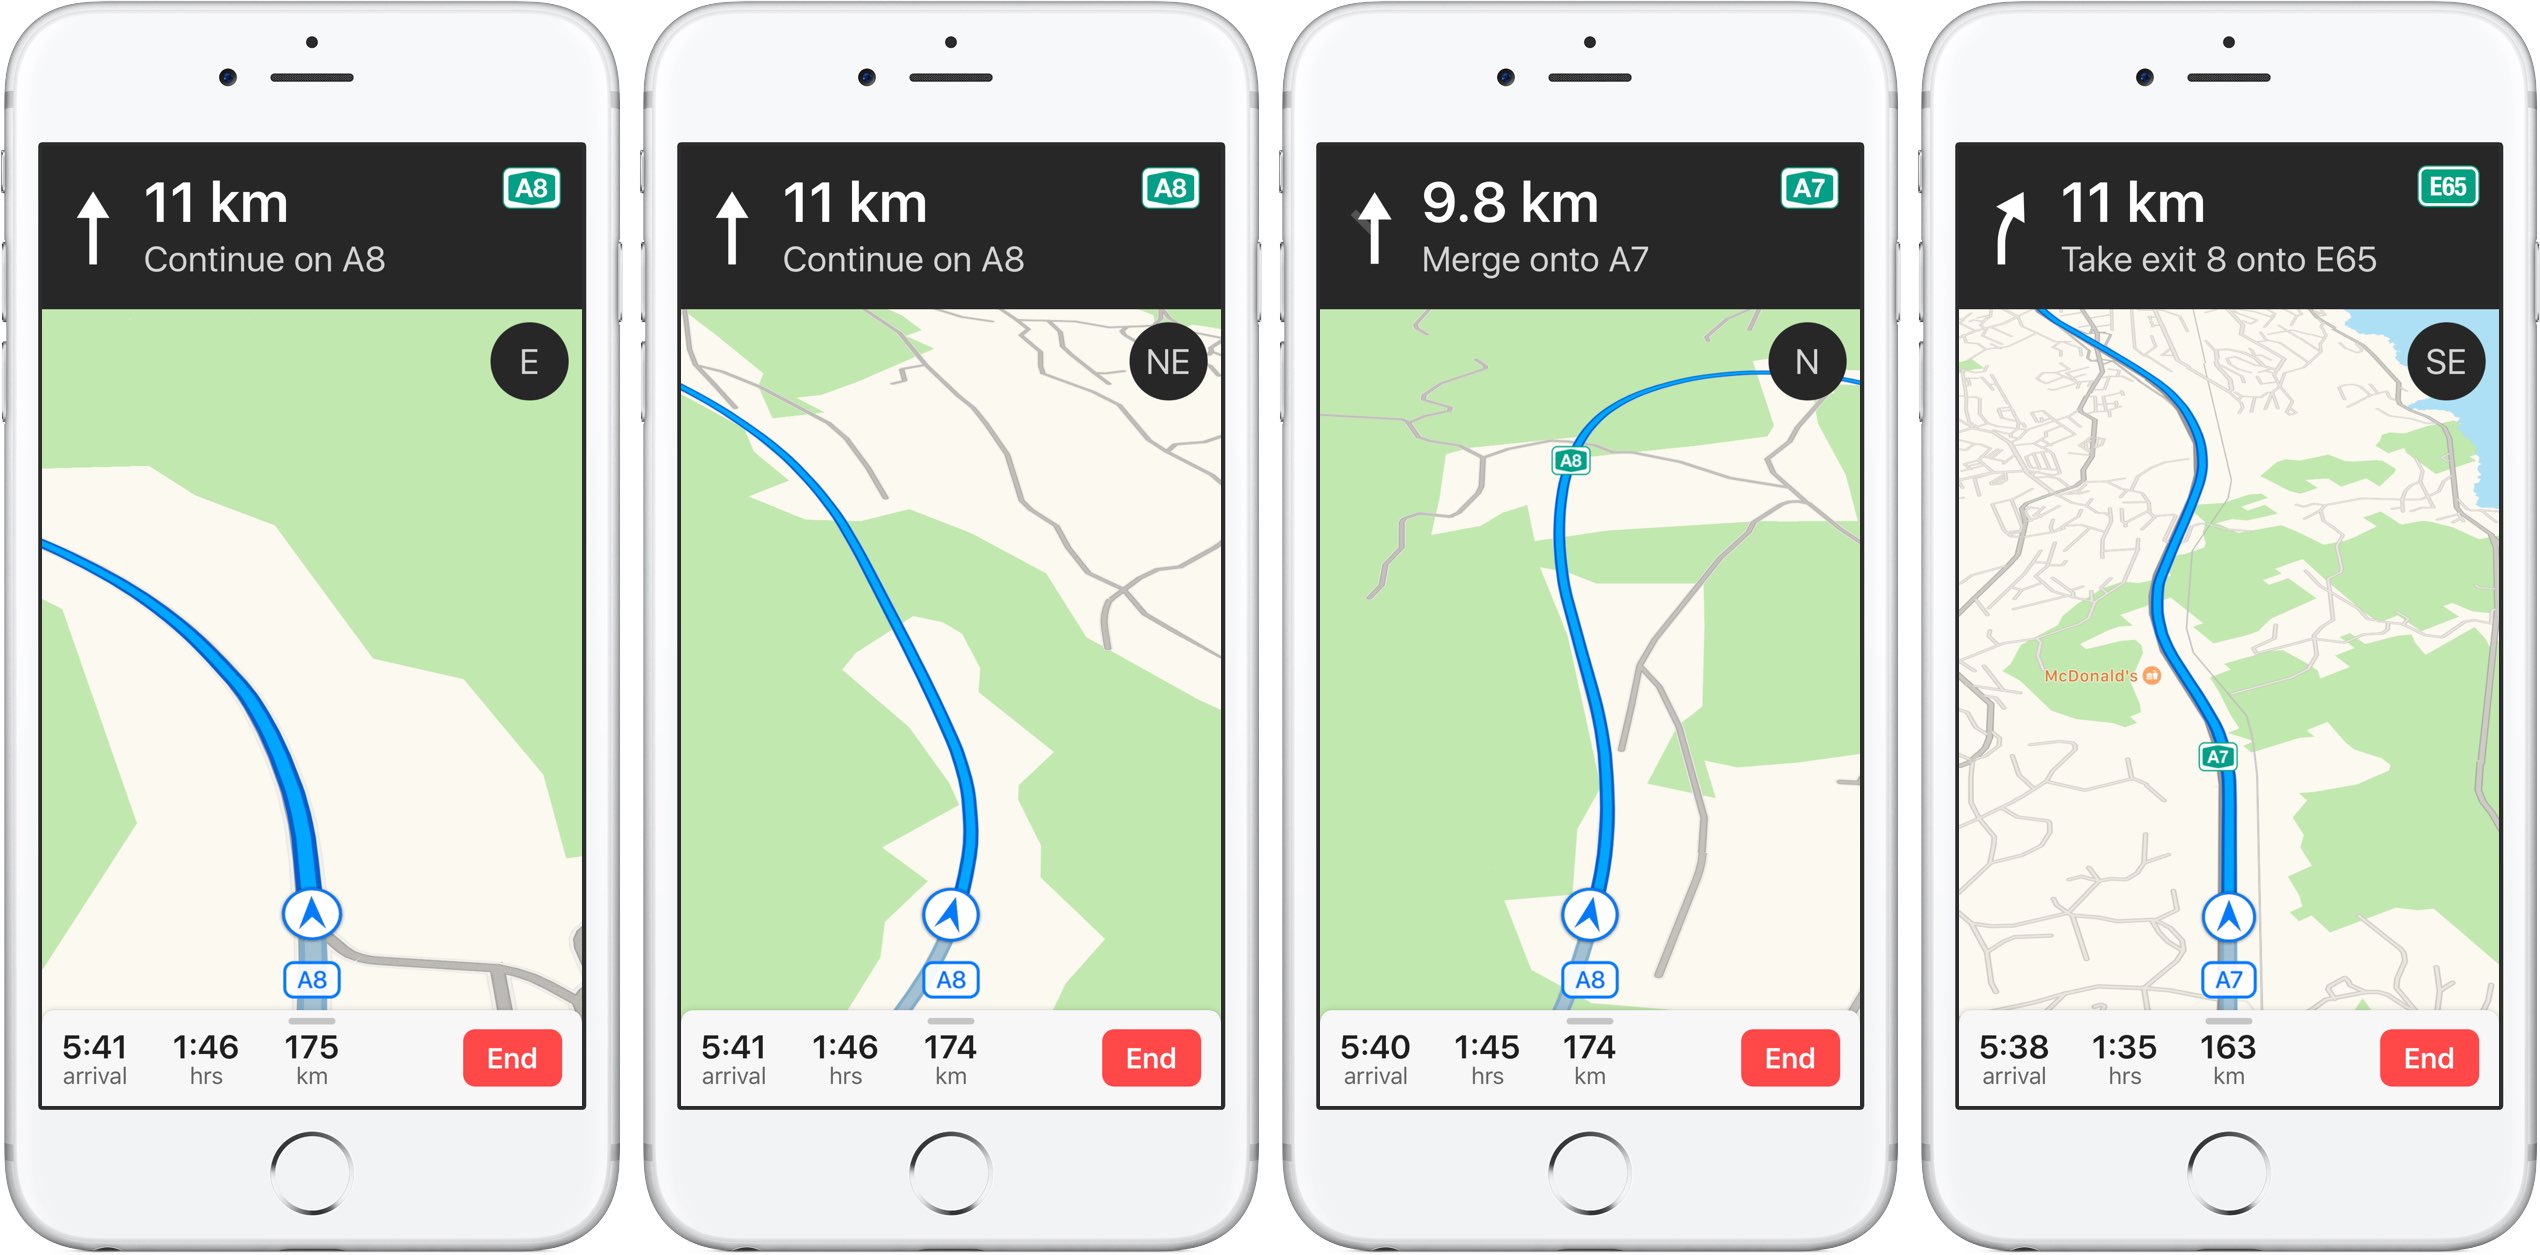
Assuming you’ve enabled compass for Apple Maps’ navigation mode, as explained in the previous section, you should see a solid black circle near the upper-right corner indicating your heading in navigation mode. I took the liberty of grabbing a pair of screenshots of Apple Maps during one of my recent trips to highlight the difference between navigating without, at left, and with compass bearing cues, at right.
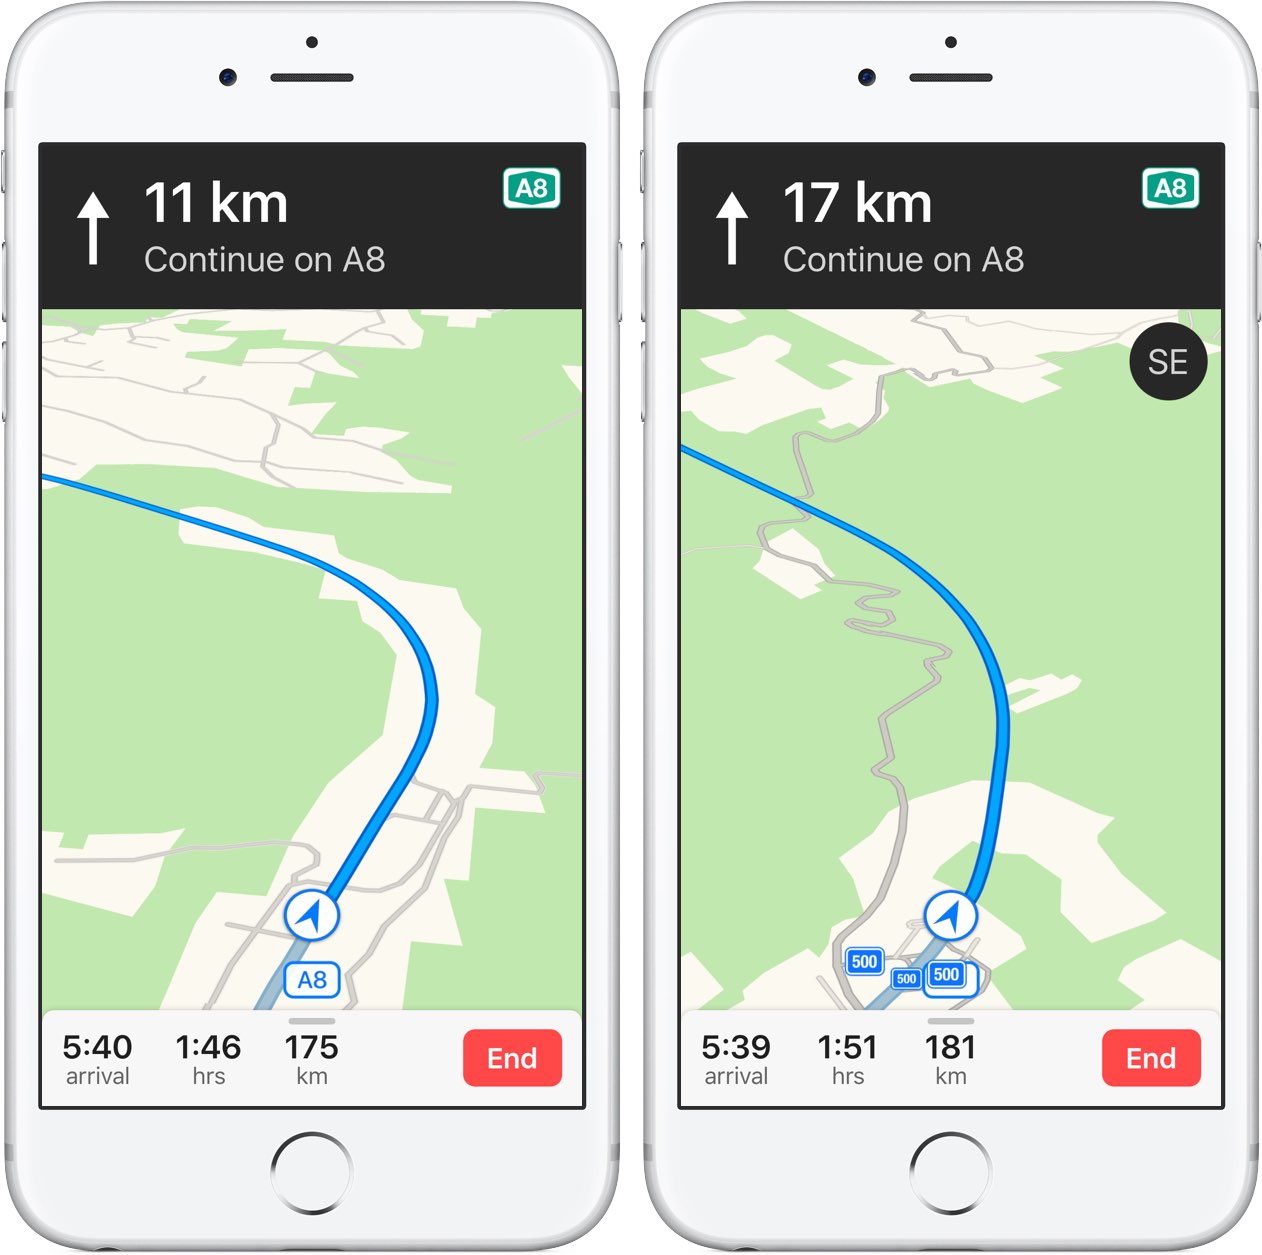
The compass icon indicates your current bearing:
- N—North
- S—South
- E—East
- W—West
- NE—North East
- NW—North West
- SE—South East
- SW—South West
Seeing your current heading while navigating may help you stay on course.
And that’s how the way the cookie crumbles, ladies and gents!
True North or Magnetic North?
Your iPhone’s compass can be set to follow True North or Magnetic North.
- True North—Also called Geodetic North, True North indicates the direction along the Earth’s surface towards the geographic North Pole. Geodetic True North differs from Astronomical True North by a few arcseconds because the local gravity does not always point at the exact rotational axis of the Earth.
- Magnetic North—Shows the direction your iPhone’s compass points toward the Magnetic North Pole, which is the point on the surface of Earth’s Northern Hemisphere at which our planet’s magnetic field points vertically downwards. The only place that occurs is near the Geographic North Pole and the Geomagnetic North Pole. Magnetic North setting may be preferred when you’re following a magnetic compass.
If this sounds overly complicated, don’t worry.
All you need to know is that your iPhone’s compass always points in the direction of the Earth’s magnetic field. For accuracy, set your iPhone to always use True North, not Magnetic North.
In Settings → Compass, slide the switch Use True North to the ON position.
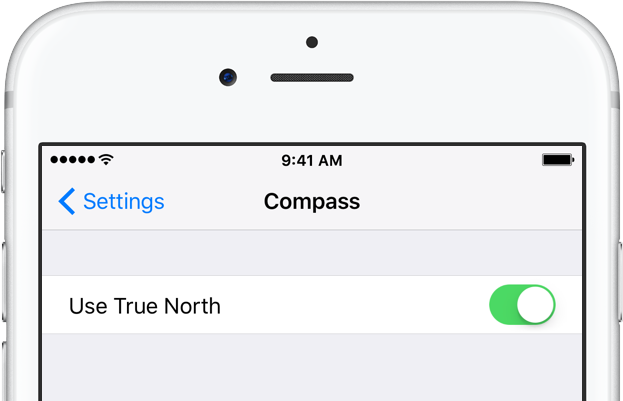
Disabling the switch prompts your iPhone’s compass sensor to use Magnetic North instead.
Although True North is recommended for all users, especially those who frequently use mapping apps over long distances, your iPhone’s GPS should be just as accurate if you’ve opted to use Magnetic North.
Maps published by the United States Geological Survey and the United States Armed Forces denote True North with a line terminating in a five-pointed star. Maps published by the United Kingdom Ordnance Survey typically include a diagram which illustrates the difference between True North and Magnetic North at a point on the sheet.
Compass calibration and Location Services
If you use Apple Maps, a third-party mapping app or other apps where constant access to a refreshed compass reading is required, be sure to allow the compass feature to use iOS Location Services for calibration. To do so, slide the Compass Calibration switch to the ON position in Settings → Privacy → Location Services → System Services.
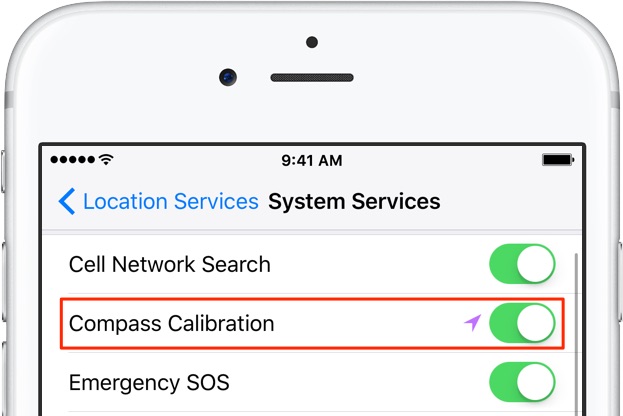
Disabling this switch may cause Apple Maps and third-party apps requiring reliable compass access to take a much longer time to refresh your relativity to True North.
Do you use the compass feature in Apple’s mapping app?
If you like this how-to, please pass it along to your friends and family and don’t forget we welcome your feedback and ideas for future tutorial coverage via tips@iDownloadBlog.com.