HDR is a photography mode that stitches together several pictures along a range of exposure settings. Using various algorithms, the effect creates pictures that can have fewer dark or washed out spots than a conventional digital still, which is great if you intend to capture textures and detail instead of glare or shadow.
Apple introduced HDR photography to iOS 4.1, but the feature wasn’t rolled out to every device. The devices that currently lack the option to enable HDR in the stock camera app include the iPod touch 4G, iPad mini, and the iPad 2 to the iPad 4. Lucky for us, this disabled feature is fairly easy to manually reintroduce on a jailbroken device…
In order to enable HDR photography on your unsupported iPod, iPad, or iPod touch, you will need to be able to navigate into the core filesystem. I used iFile to edit the plist files from my device, though you can also use iFunbox or a FTP client if you prefer editing system files from a Mac or PC.
According to Tkf1 of the iFans forum, each device has a different code, which will determine where the Plist files are located. Find the code for your device from the list below.
iPad 2nd generation – K93, K94, K95
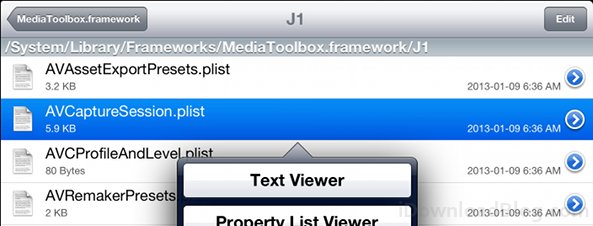
iPad 3rd generation – J1, J2
iPad 4th generation – P101, P102, P103
iPad mini – P105, P106, P107
The first thing you will want to do is enable HDR from the AVCaptureSession.plist file. You can access it by navigating to ‘/System/Library/Frameworks/MediaToolbox.framework/*/AVCaptureSession.plist’, where the asterisk(*) is the code for your device, listed above.
Open the plist file using a text editor and find the following snippet of code:
<key>AVCaptureSessionPresetPhoto</key>
<dict>
<key>Description</key>
<string>Back Facing **MP Photo</string>
Then scroll down a little until you find the section that reads:
<key>ChromaNoiseReduction</key>
<true/>
Right below here you will want to add:
<key>HDR</key>
<true/>
If the string is already there, but assigned to ‘false’, change the string to true. Once you are done, save and exit.
Next we will need to navigate to ‘/System/Library/CoreServices/SpringBoard.app/*AP.plist’, where the asterisk represents your device’s code. Open the plist with a text editor and find the following string:
<key>capabilities</key>
<dict>
All you need to do is add the following strings in place below (it does not need to be entered in alphabetical order, just make sure each string is directly followed by a boolean value):
<key>camera-flash</key>
<true/>
<key>hdr-image-capture</key>
<true/>
Once you are done, respring your device and the HDR mode should appear in both the Camera app and the Photos & Camera page in Settings.

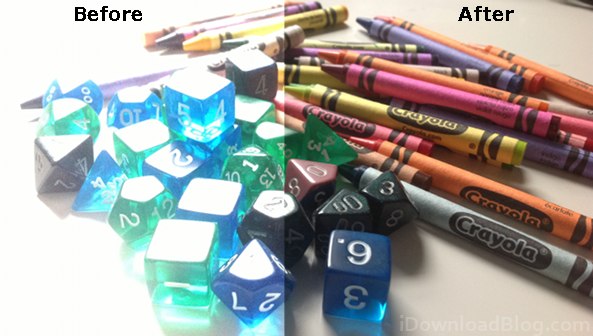
If you’re wondering whether the HDR shooting mode was disabled for practical reasons or just for artificial product differentiation, take a look at the image at the top of the page. What you see on both sides of the photo is the same shot, taken from an iPad 3 with and without HDR processing. In our glare stress-test the HDR photo provides a staggering visual improvement over the original.
Does iOS’ native HDR processing make a difference in your day-to-day photography? Share your thoughts in the comments below.