With the introduction of iOS 8 came new developer APIs allowing apps to have exacting control of several camera adjustments, including exposure, focus, and shutter speed. Manual is a photography app that implements these new freedoms in a beautiful package, granting users full control of their photos.
I went hands-on with Manual for a few days, venturing into my highly “unphotogenic” yard in an attempt to gather a few decent shots with both Manual and iOS’s stock Camera for comparison to see exactly how much of an advantage the ability to manually adjust camera settings can give.
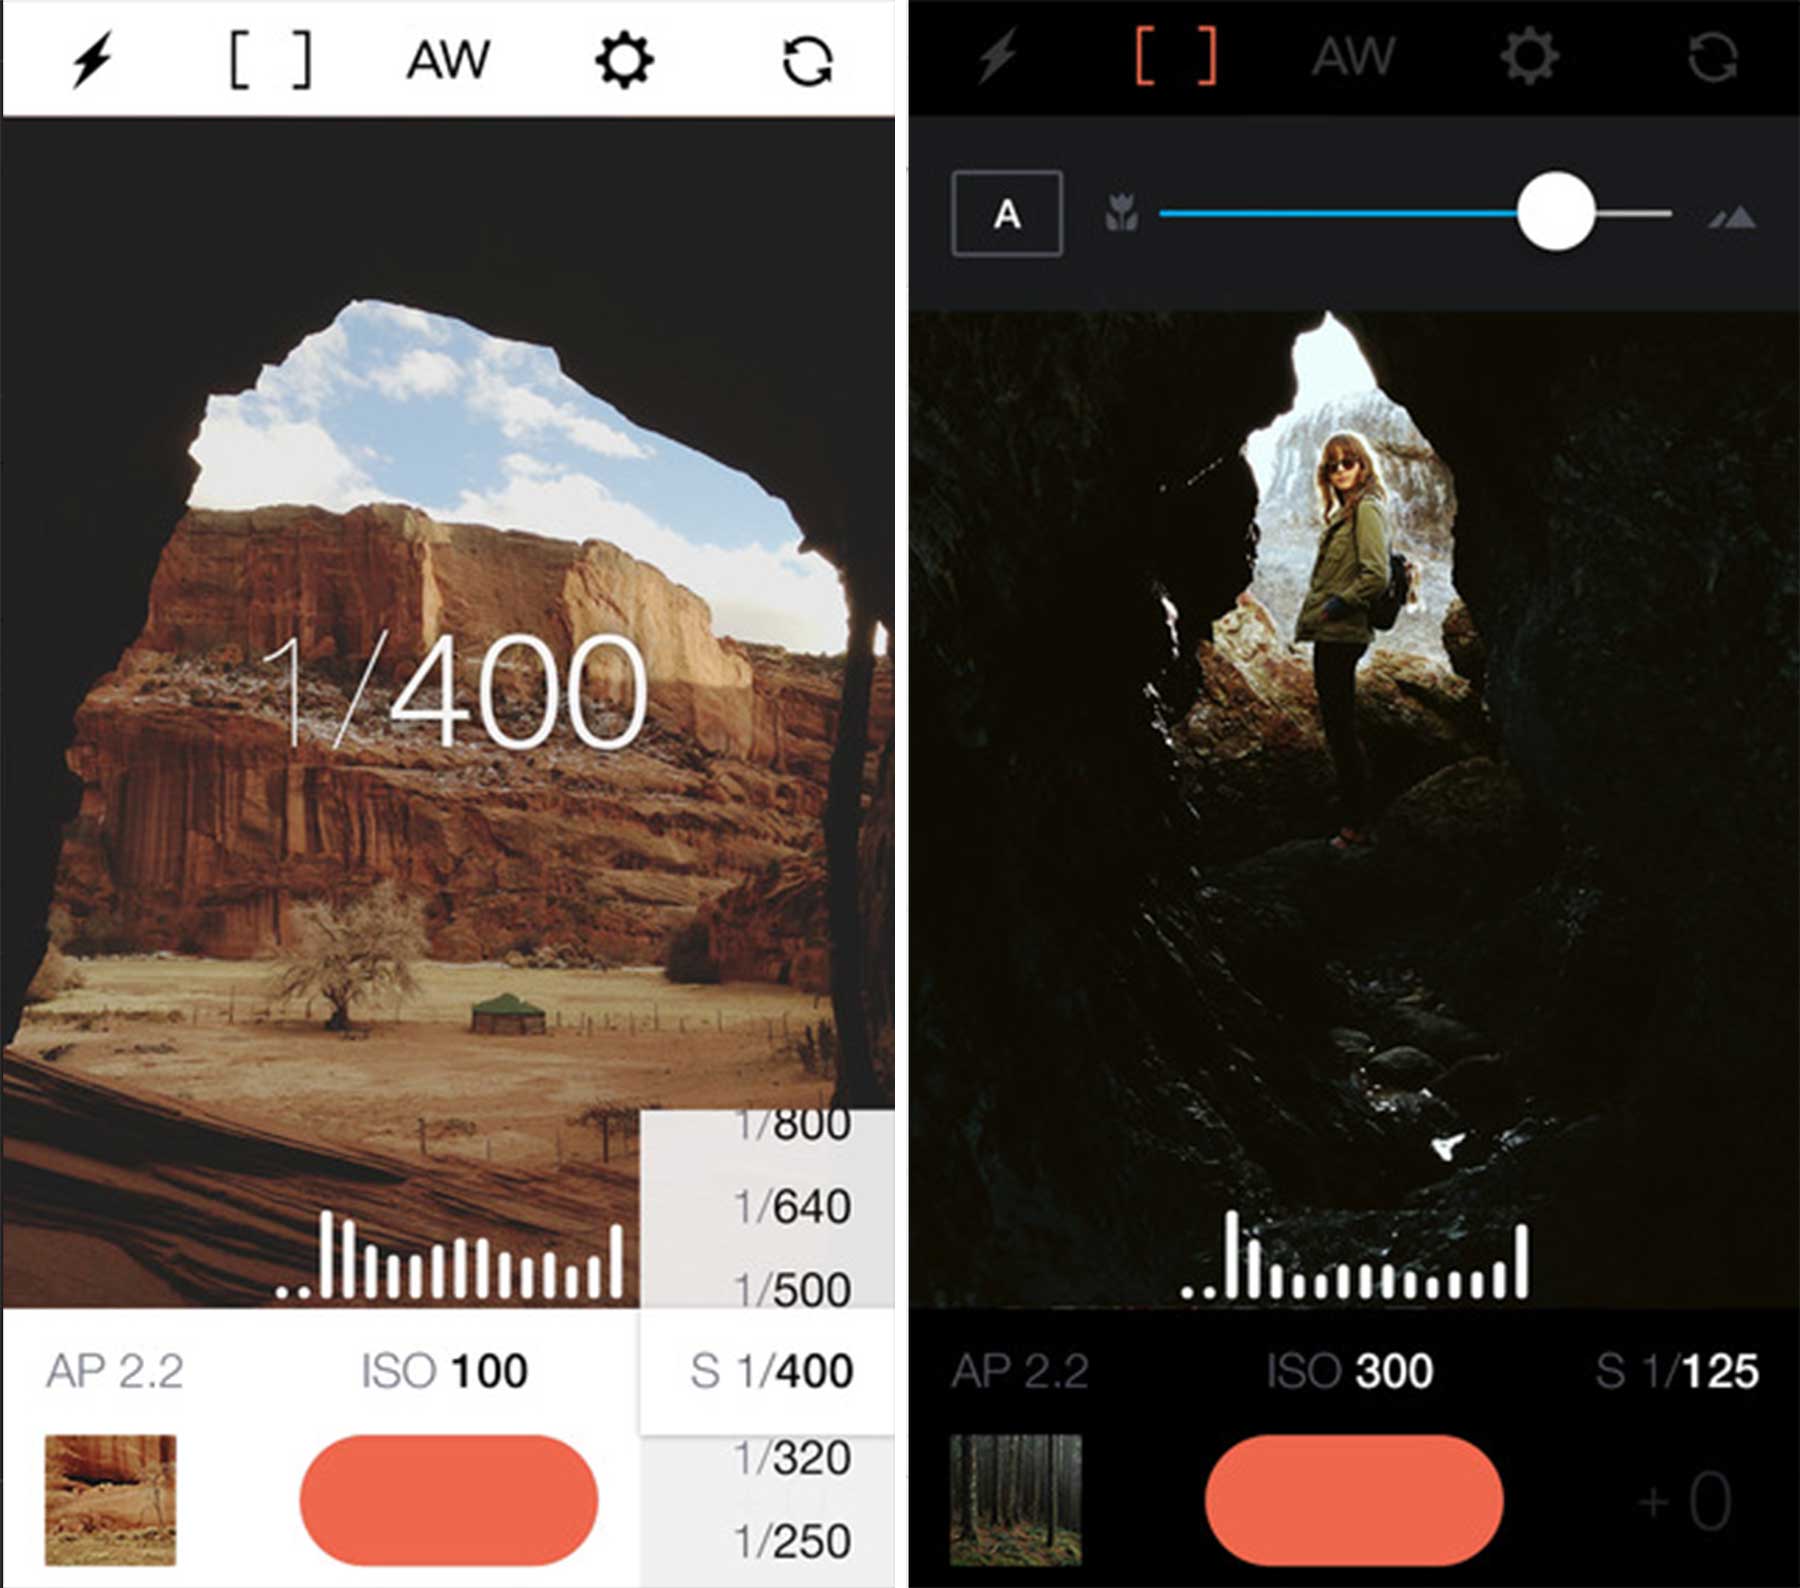
Manual doesn’t bring anything new to the table in the way of after-the-fact editing. Actually, Manual has nothing at all to do with photos after they’re taken – it simply sends them directly to your camera roll. Instead, it focuses on setting up a shot correctly before it’s taken by allowing full, independent control of things like shutter speed, ISO, and focus. It also features multiple grid overlays and responsive light and dark themes.
There are several others features listed in its App Store description, but I’m not going to detail each one. Instead, I’ve compiled a few comparison images so you can see for yourself what kind of difference Manual makes – and whether it’s good or bad – when next to iOS 8’s stock camera, which has received its own improved feature set since iOS 7.
For me, Manual’s main strengths are made evident in three main areas: focus, warmth, and shutter speed. Having precise control over these settings allows for great depth-of-field, just the right amount of warmth, and usable low light shots. I’ve tried to capture each of these strong points in various photos, all of which are unedited aside from cropping, so you can get an idea of how Manual might help in a variety of situations.
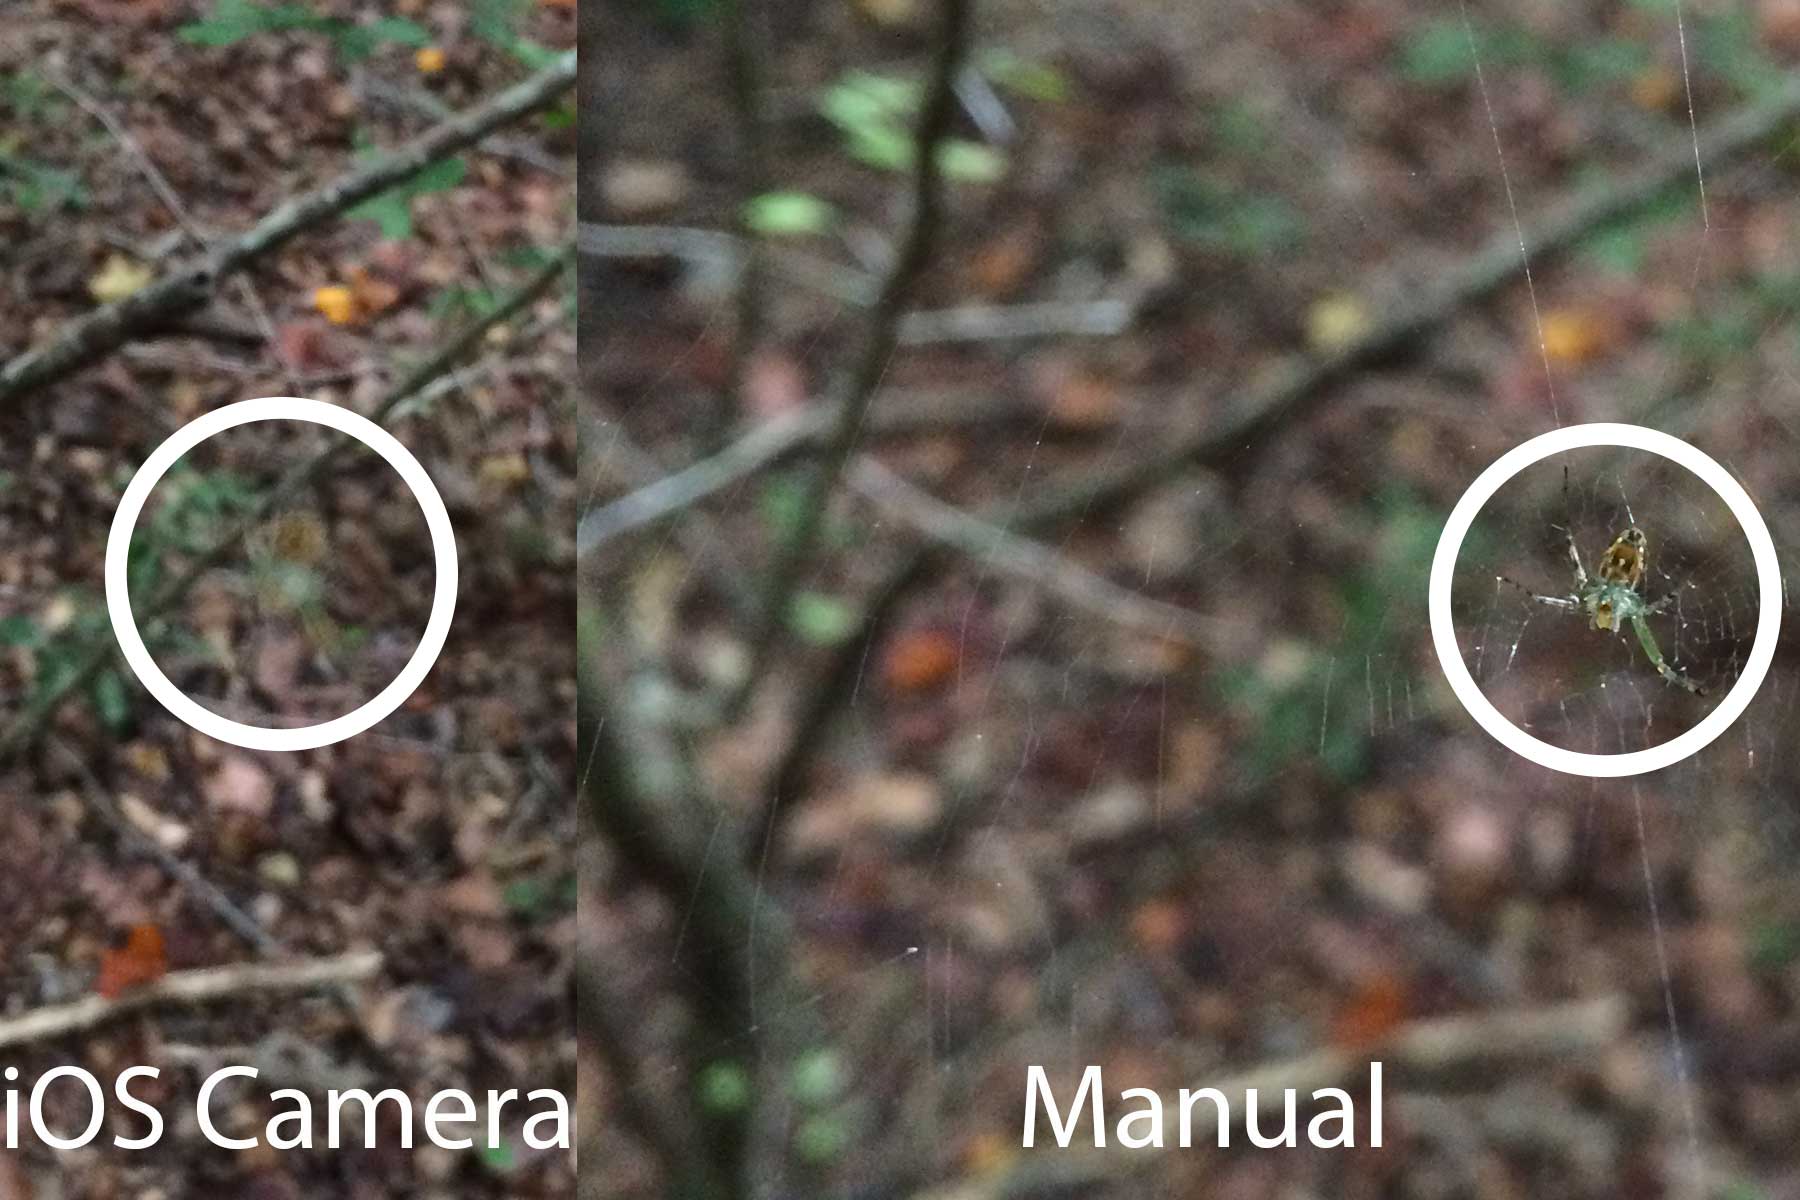
The ability to freely adjust the camera’s focus when taking a shot introduces a lot more freedom when setting up more intricate shots. The focus slider in Manual allows for a completely new level of accuracy, especially since iOS’s tap-to-focus method doesn’t always detect smaller objects in the forefront, leaving you with infinite, fruitless attempts to focus.
In the above picture, iOS’s stock Camera app didn’t even detect the spider in order to focus on it, despite me tapping several times on its location. The only way I could come close was by focusing on another near object and initiating AF/EF lock, then moving the camera up and down over the spider in order to find the focused sweet spot.
On the right side of the picture, it’s obvious that Manual did a better job at allowing me to focus on the spider, and without a lot of hassle. Not only it is excellent for focusing on objects that iOS’s Camera doesn’t notice, but it also works excellently when trying to focus on an exact point – one that tapping to focus can’t quite get.
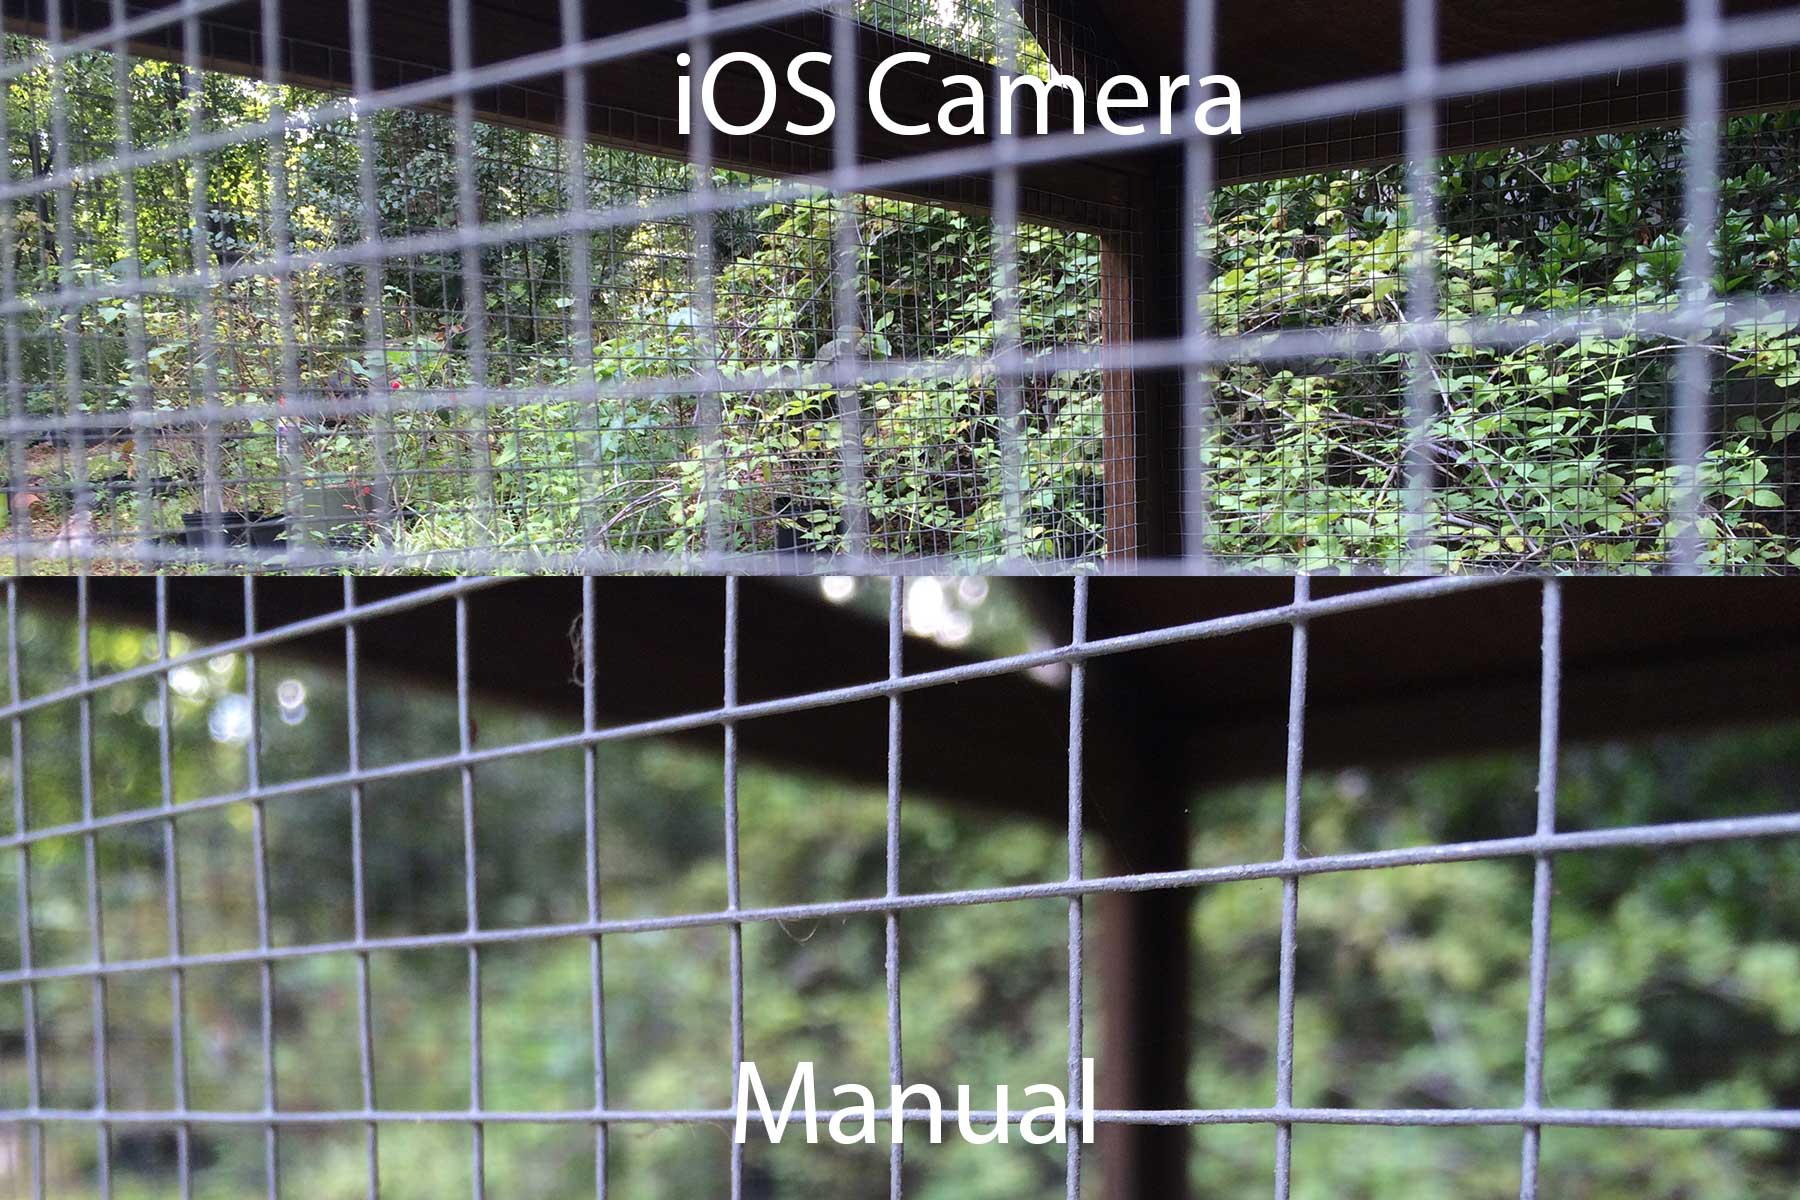
The same idea applies to the above chicken coup. iOS’s Camera app refused to recognize the wire as a focusable object, while Manual let me take over and adjust the focus in the way I wanted.
Warmth is another factor that plays into photos, and iPhones by default tend to take “cold” images with a bluer tint than is often desired. With Manual, adjusting the warmth of a photo before taking it is frictionless, with multiple presets for cloudy or sunny days, and a slider for fine tuning your own adjustments.
With a couple of taps, users can significantly increase the temperature of an image, perfectly tweaking the photo to turn out perfectly before ever taking it.
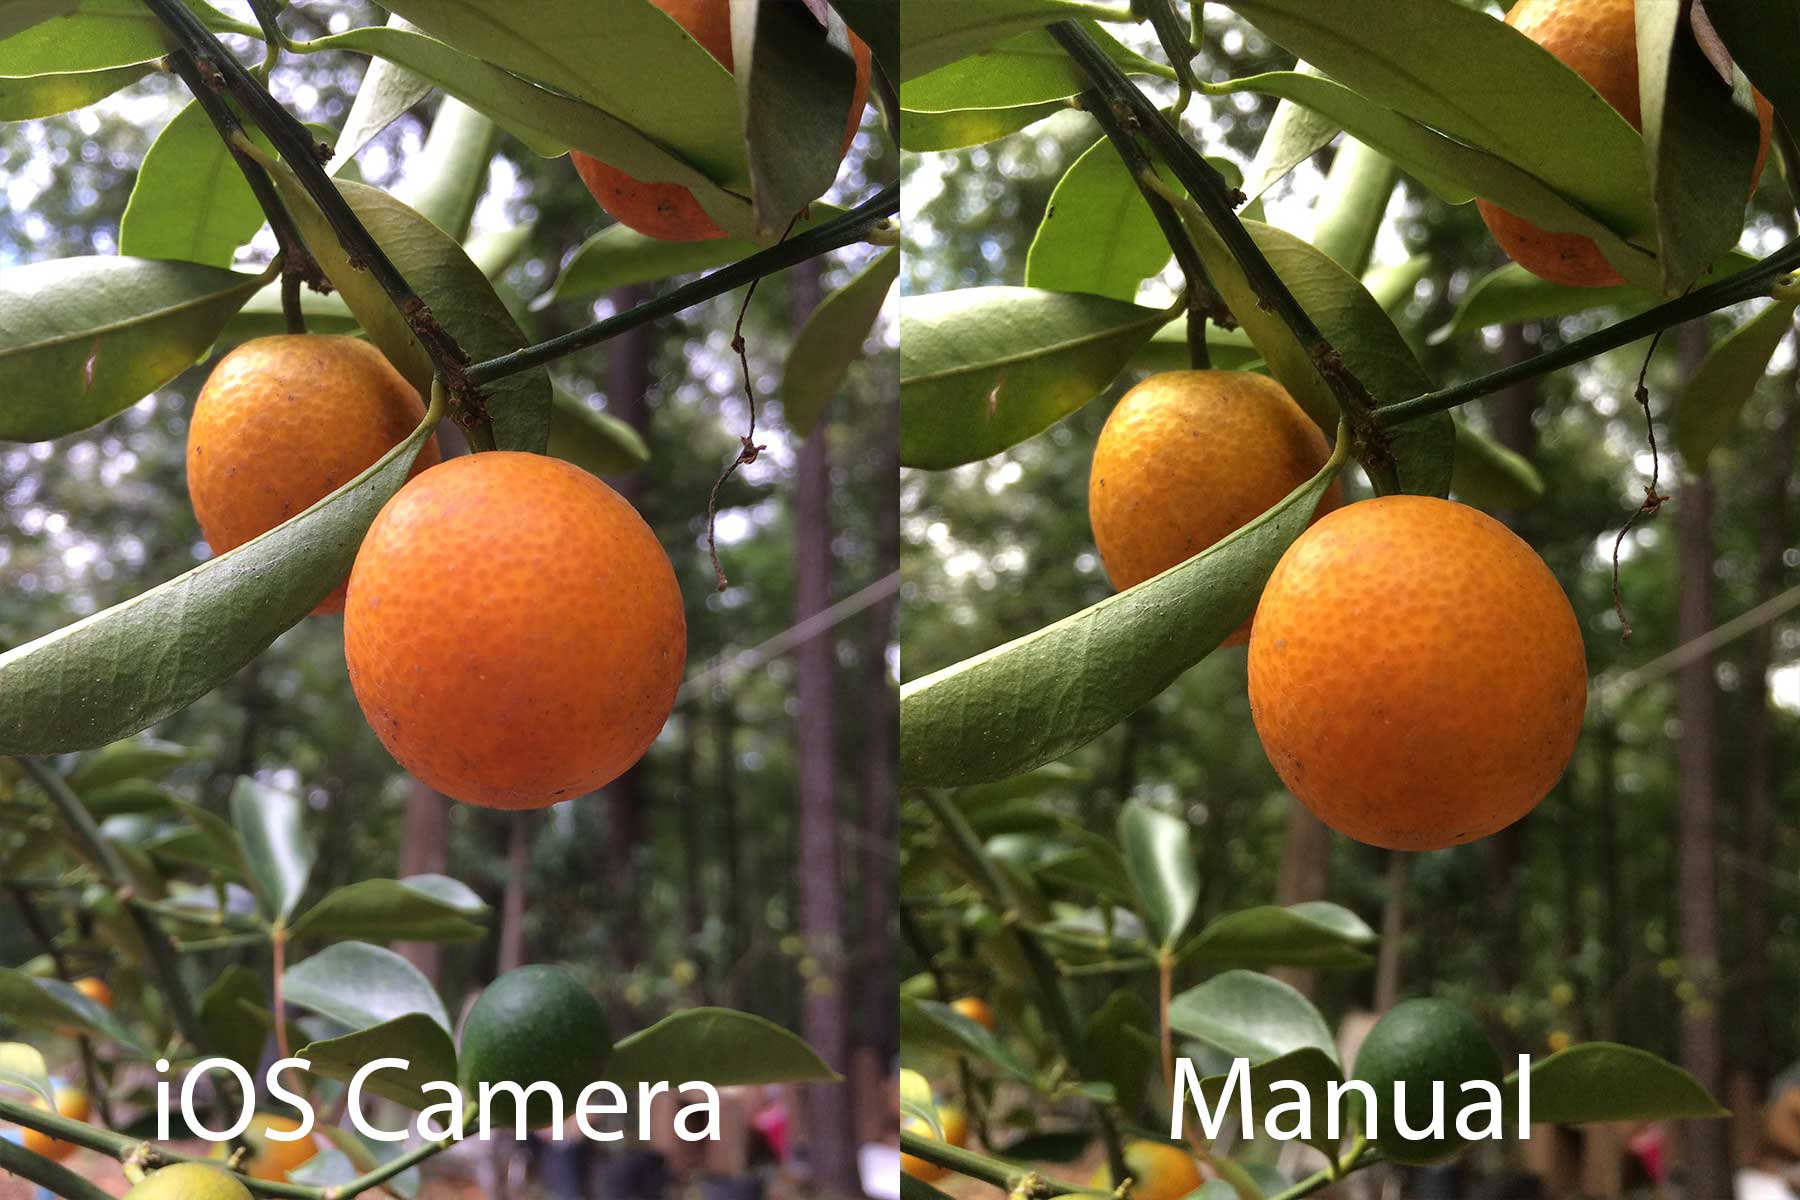
In the above comparison, the photo taken with Manual shows the kumquats in a much warmer light. Whichever you prefer is your opinion, but the differences are clear, and Manual’s ability to enhance an image in this way can help make a great shot that much better, depending on its context.
The latest iPhones are pretty good at taking low light photos, and most of the competition doesn’t quite compare in this area. Manual takes this ability up several notches, and side-by-side photos with iOS’s normally good low light camera app are the difference between night and day.
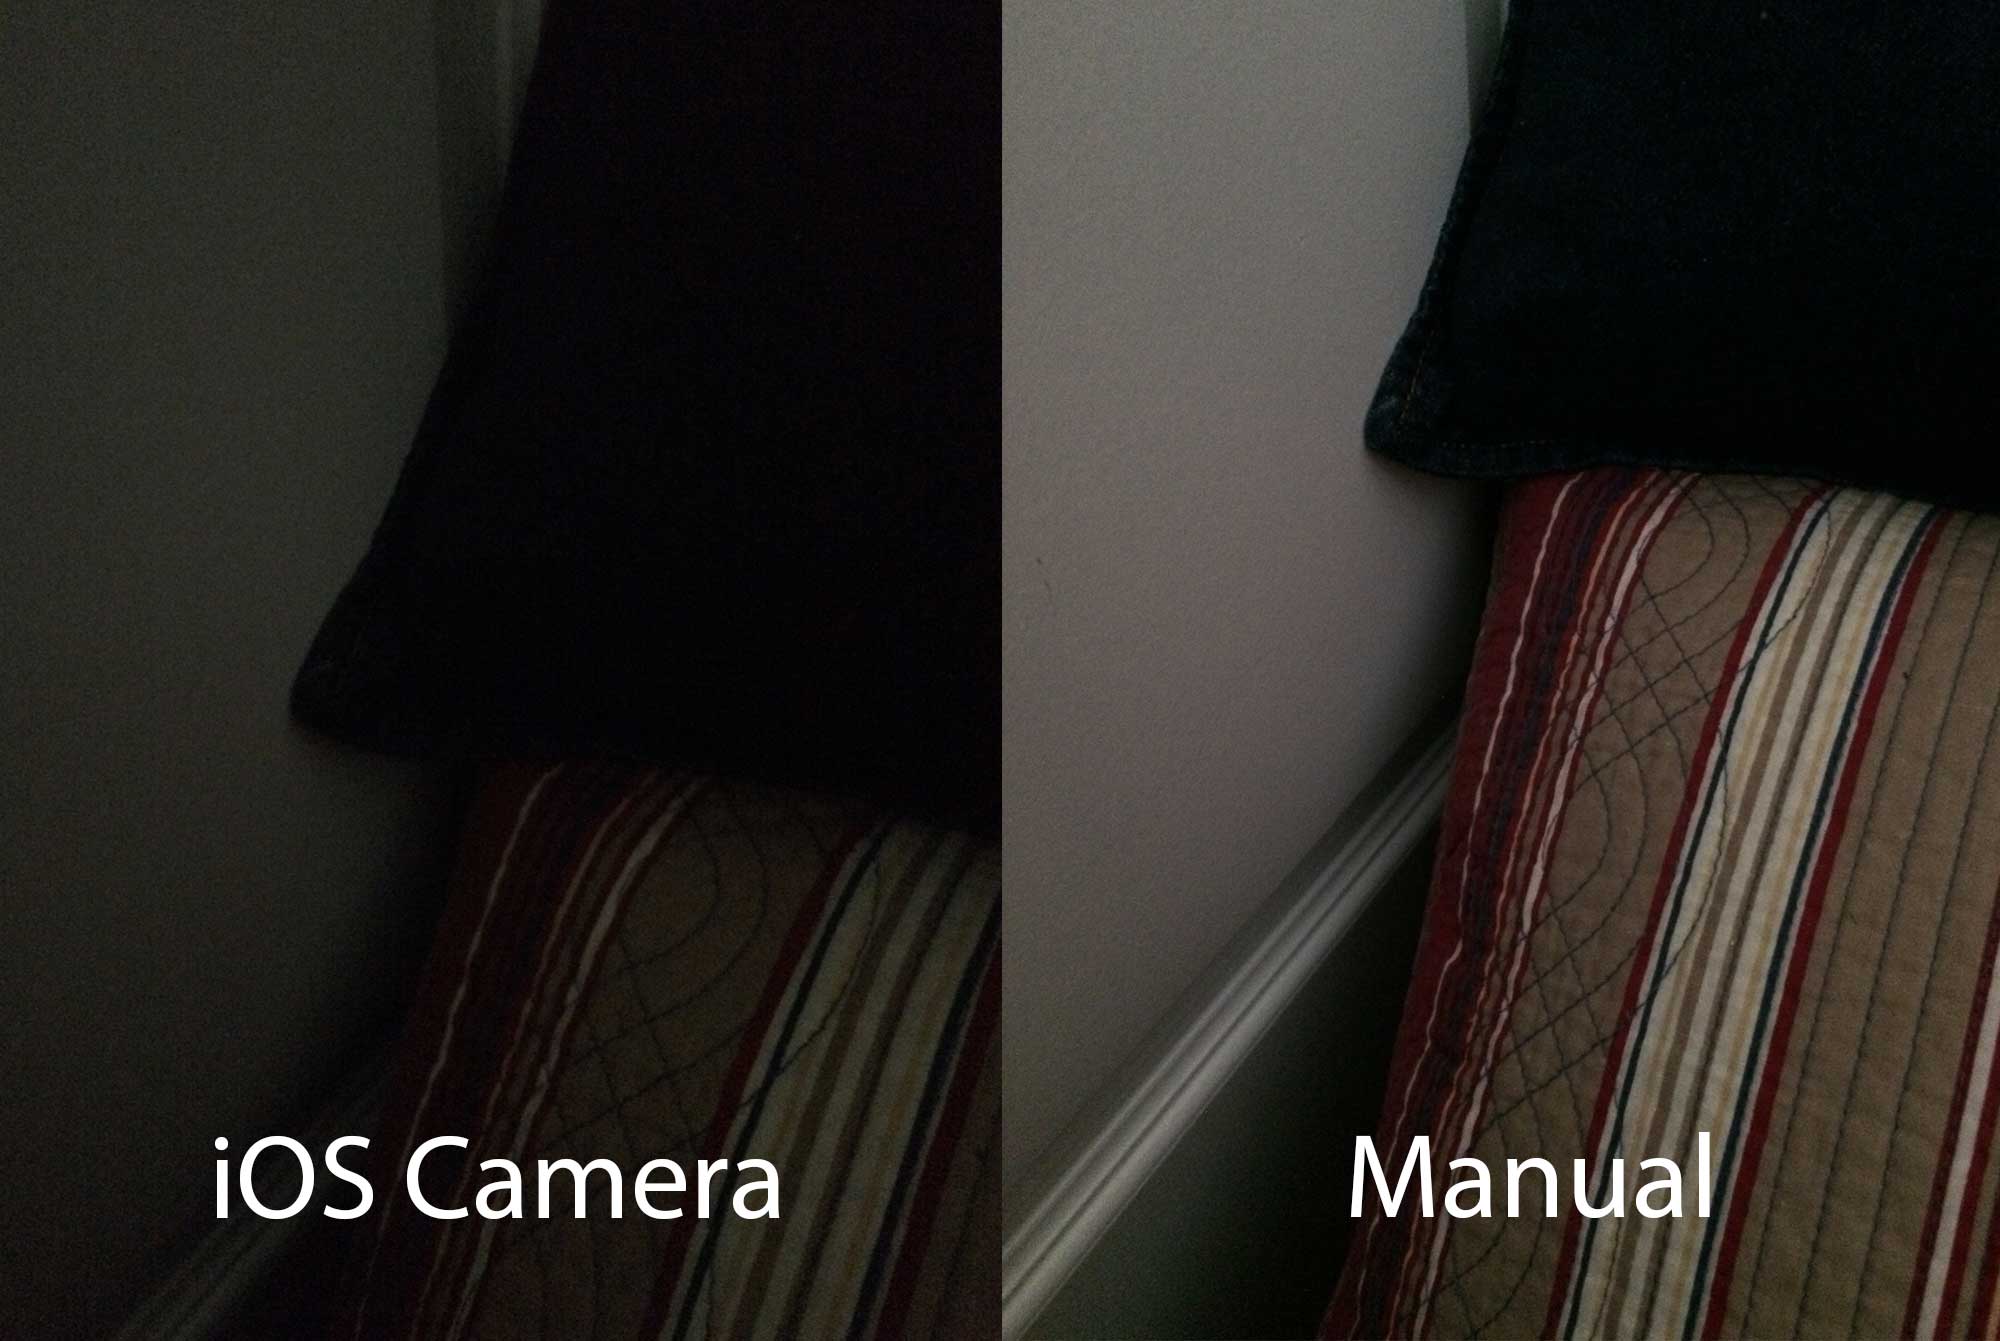
Despite my efforts to increase the amount of lighting in the left image by maxing out the exposure slider, Manual’s shutter speed controls captured much more light when turned all the way up. Naturally, the device will have to be held steady and the object of the picture will have to also need to remain still, but it certainly yields excellent results.
Another effect of slowing down the shutter speed is that the viewfinder appears to grow extremely laggy, but it’s simply updating per frame it’s receiving, which allows it to show you exactly what your image would look, were it captured during that moment. Note that this “lag” is intentional and isn’t a result of the app slowing down your device.
Throughout my time putting Manual through its paces, I noticed that I was continually spending a considerably longer than normal amount of time setting up my shots. I attribute this to the many factors over which Manual grants control, but it means that most people are only going to pull out Manual for well-planned photos of objects that won’t change before the perfect shot can be taken. However, it will most definitely help to make a lot of more intentional photos shine.
That said, I didn’t find it to be my go-to app for snapping quick photos, which is fine, because that’s not what it’s meant to be. Manual excels when taking pictures in which some thought is placed, and it shows in the end result.
Even though I’ve only highlighted a few strong points of Manual, there are several additional options and features to explore, all of which come together to make a beautiful, functional app. While my example images weren’t any sort of photographic excellence, the same general context in which the photos were taken – for example, a close, small object on which the automatic controls simply will not focus – still applies.