According to Apple, Notes is one of the most popular and most-frequently used stock applications on the iPhone, iPod touch and iPad.
People use Notes for everything from memorizing recipes to keeping track of errands, creating shopping lists, storing inspirational quotes and even passwords, codes and medical data.
Not all notes contain sensitive information, but many do. Beginning with iOS 9.3 and OS X El Capitan 10.11.4, you can protect your notes with a password or Touch ID.
In this tutorial, you’ll learn how to set up Notes protection, secure items on a note-by-note basis so no one can view their contents and more.
The Notes app on iOS and macOS lets you define a single password to secure specific notes that you want to lock. The password protects both your iCloud notes and ones stored locally on your device. On an iPhone or iPad with Touch ID, you can optionally choose to use your fingerprint to unlock your notes.
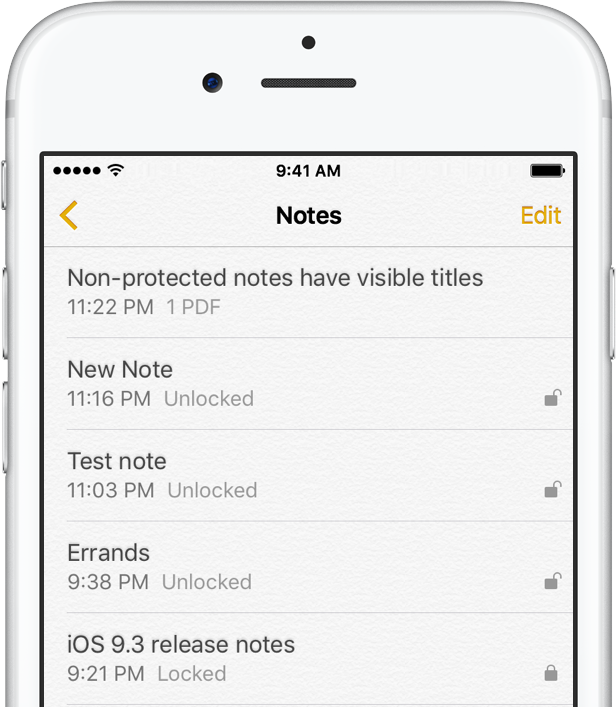
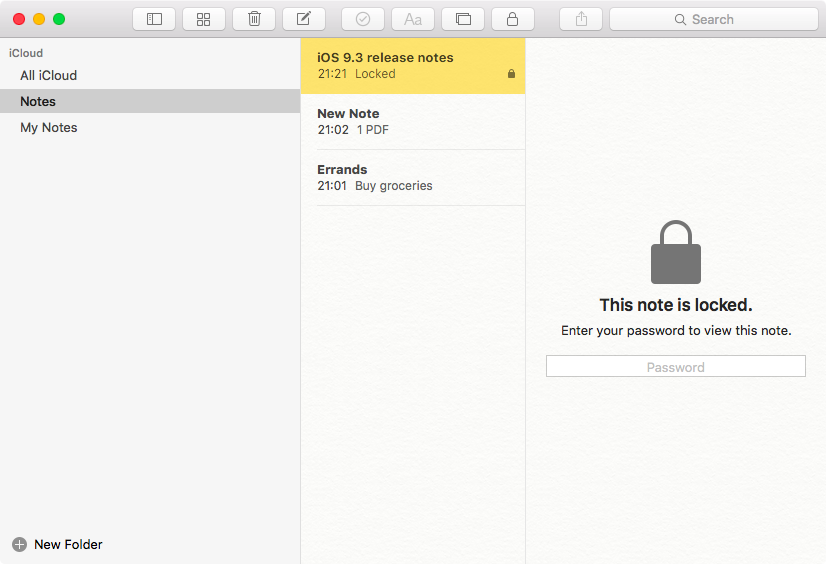
A protected, locked note is denoted with the unlocked icon next to it and displays just the title in the list and the date it was last edited.
Before we proceed, watch Andrew’s video overview of the password-protected Notes.
Pre-requisites
As mentioned, prior iOS and macOS releases don’t support password-protection in Notes. Securing your notes with a password or Touch ID requires:
- iPhone, iPod touch or iPad with iOS 9.3 or later
- Intel-based Mac running El Capitan 10.11.4 or later
- iCloud syncing of Notes enabled in Settings → Apple ID → iCloud on iPhone, iPod touch and iPad, and in System Preferences → iCloud on Mac
You can view locked notes with the web app at iCloud.com, but it does not yet support adding/removing a password lock and changing/resetting your password if you forget it.
Types of notes that can be password-protected
The following notes can be protected with a password and Touch ID:
- Notes in your iCloud account
- Local notes stored on your device (in your ‘On My iPhone/Mac’ account)
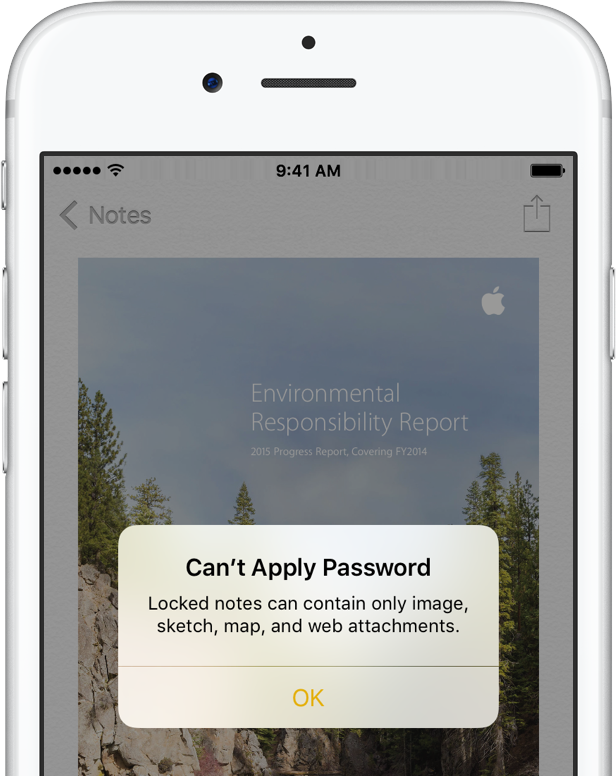
- Notes that include images, sketches, maps and web attachments
You cannot password-protect the following notes:
- Notes that include other types of attachments like PDFs, audio, video, Keynote, Pages or Numbers documents
- Notes in other online accounts, such as a Yahoo or Google account
Attempting to protect notes that contain these attachments will yield an error message stating that locked notes can contain only image, sketch, map and web attachments.
Your Notes password is used for unlocking any password-protected note across any of the devices that are authorized with the same Apple ID/iCloud account.
How to set Notes password
You can create a password directly in Notes for iPhone, iPod touch, iPad and Mac, or through Settings on your iOS device. Notes on iPhones and iPads with Touch ID lets you elect to use your fingerprint to unlock notes without needing to type the password.
Settings on iPhone and iPad:
1) Go to Settings → Notes → Password on your iOS device.
2) Enter a custom password for the Notes app, enter it again in the Verify field, then tap Done to save the changes.
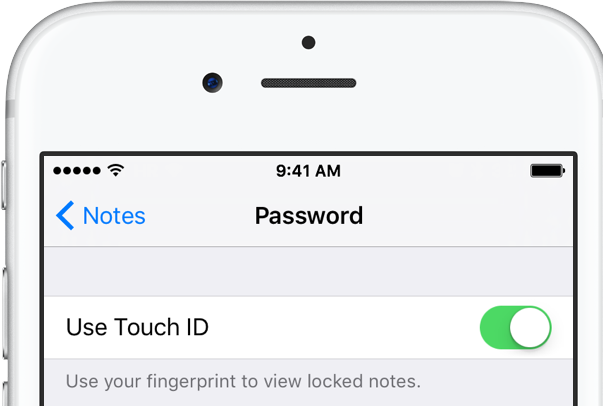
Tip: To unlock protected notes with your fingerprint on Touch ID-enabled iPhones and iPads, flip the Use Touch ID switch to the ON position.
Notes on iPhone and iPad:
You can also create a password directly in Notes for iPhone, iPod touch and iPad.
1) Tap Lock Note in Notes’ Share menu.
2) Enter a custom password for the Notes app, enter it again in the Verify field, then tap Done to save the changes.
Notes on Mac:
On the Mac, a password for Notes is set in the app, not through System Preferences.
1) Click Notes → Set Password in the app’s menu.
2) Enter a password for the Notes app, then enter it again in the Verify field and click Set Password to save the changes.
Tip: You’re strongly advised to do yourself a favor and choose a password hint to prevent locking your notes permanently in an unfortunate scenario of forgetting your password.
Do yourself a favor: create a good password hint
You’re wholeheartedly recommended to add a hint for your Notes password.
Please don’t be lazy—creating a password hint should drastically reduce chances of losing access to password-protected notes should you forget your Notes password.
It should be something that you and only you can grasp the meaning of. The password hint appears if you enter the wrong password three consecutive times. Wise users will avoid using their iOS passcode or Mac login password as their Notes password.
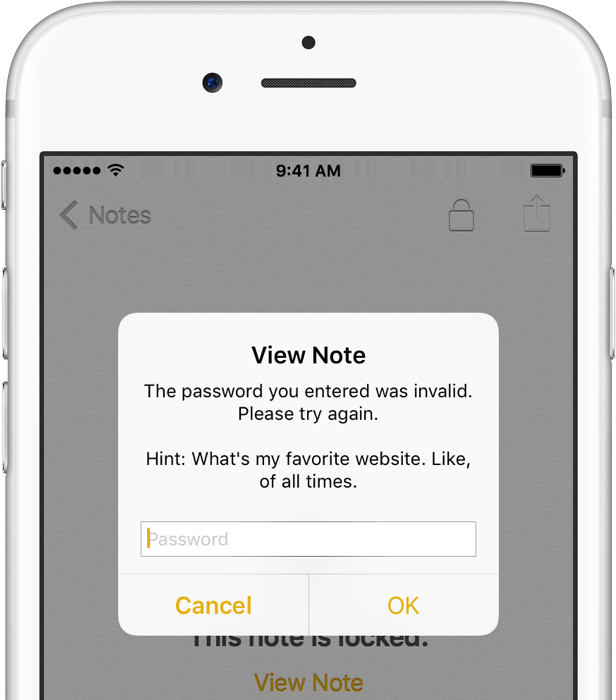
A properly chosen hint will help you remember the password.
If you haven’t added a hint and have forgotten your password, you won’t be able to view existing locked notes. And, don’t count on Apple to help you regain access to locked notes because these are encrypted and Apple doesn’t have the keys to decrypt their contents.
You can reset your Notes password, as described further below, but this won’t give you access to the notes protected with your old password.
How to add a password lock to a note
Adding a password lock is the first step toward keeping your notes safe from prying eyes. Adding a password lock to a note isn’t the same as locking a note: it just adds a lock, without actually hiding contents of the note.
iPhone and iPad:
1) Tap Lock Note in the Share menu of the note you wish to add a password lock to.
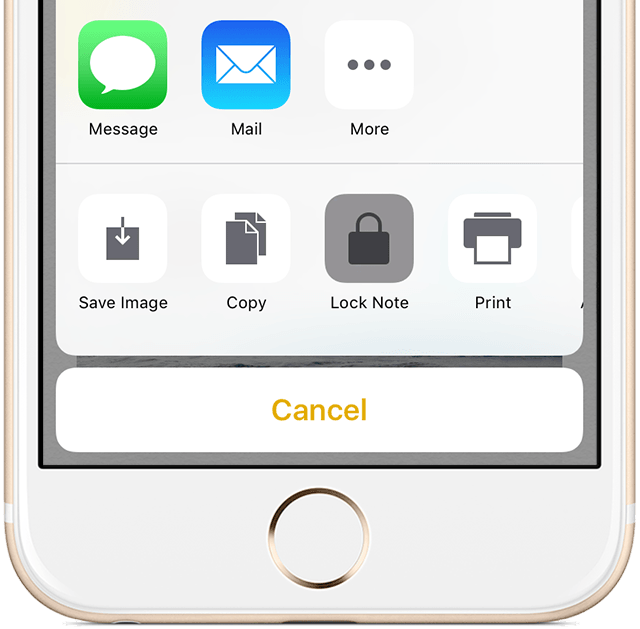
2) Enter your Notes password and tap OK to add a password lock to this note.
Mac:
1) Select the note to add a password lock to and choose File → Lock This Note.
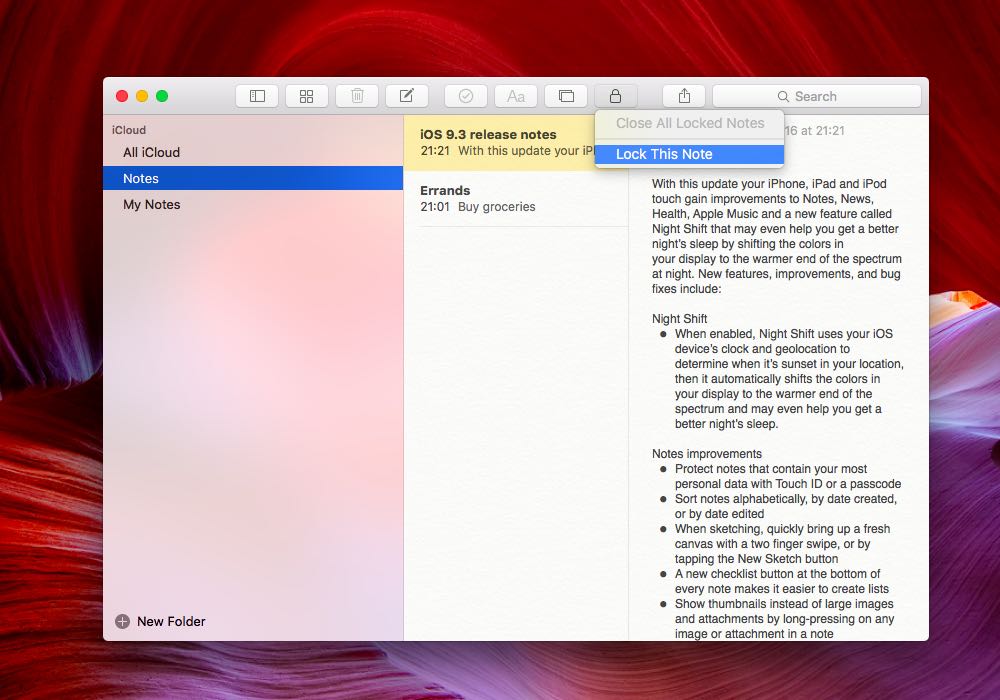
2) Enter your Notes password and click OK to add a password lock to this note.
Tip: You can also lock a note by clicking the lock icon in Notes’ toolbar and choosing the option labeled Lock This Note from the pop-up menu.
How to lock a note
When you add a password lock to a note, its contents isn’t automatically hidden from view until you specifically choose to lock that particular note.
iPhone and iPad:
1) Tap your note in the list and then hit the unlocked button at the top to lock it.

Mac:
1) Select the note to lock and choose File → Lock This Note in the menu.
2) Enter your Notes password and click OK to lock this note.
Tip: You can also lock a note by clicking the unlocked icon in Notes’ toolbar and choosing the option labeled Lock This Note from the pop-up menu.
Don’t worry about forgetting to lock a note: password-protected notes automatically lock after inactivity, if your device locks, goes to sleep or you quit Notes.
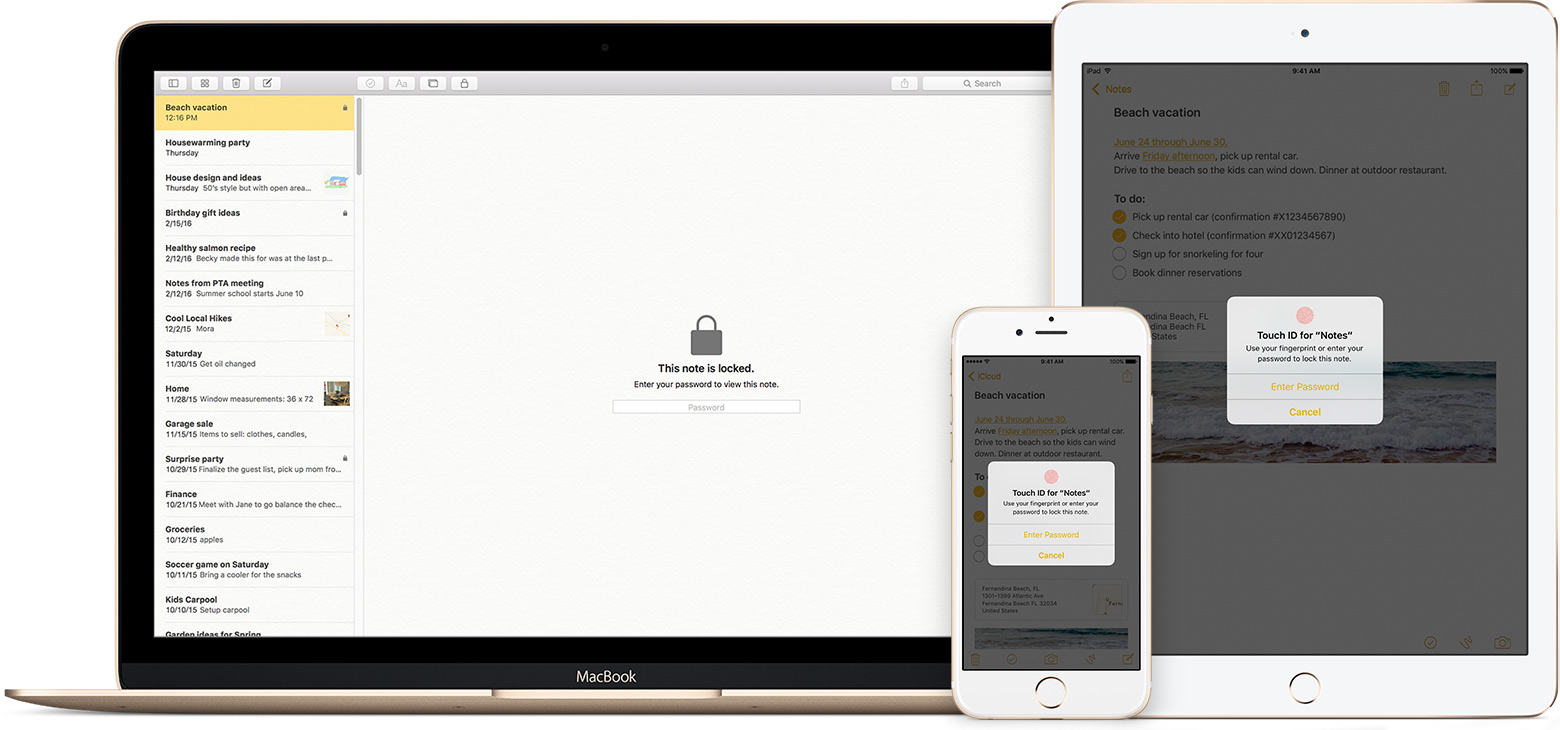
How to view a locked note
Before any locked note can be opened, you must provide your password or verify with Touch ID. For the sake of your own security, locked notes stay open for up to three minutes. Furthermore, password-protected notes will automatically lock with inactivity, when you close the Notes app or your device goes to sleep.
iPhone and iPad:
1) Tap a locked note. A “This Note is Locked” message appears.

2) Now tap View Note.
3) Type the password and then hit OK to reveal contents of the note, or use fingerprint verification on a Touch ID-enabled iPhone or iPad to view this note.
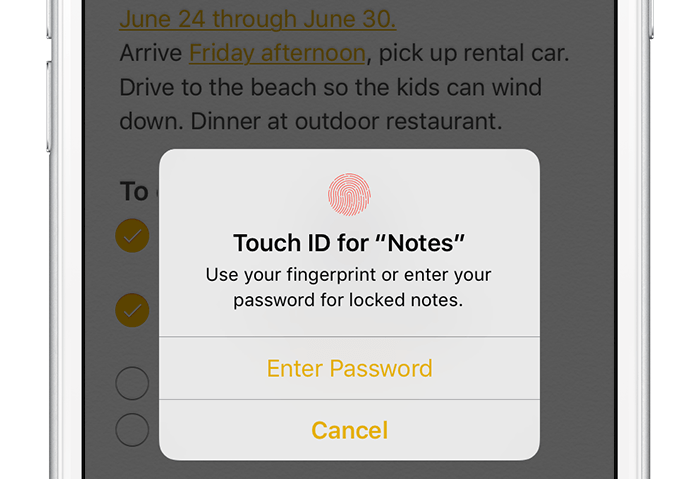
Tip: You can also tap the lock icon at the top to unlock the note.

Mac:
1) Select a locked note.
2) Type your password and then press Return to reveal its contents.
After entering your Notes password for one locked note, you can view other locked notes without entering it again as long as you’re working in Notes.
How to quickly hide contents of all unlocked notes
Notes remain unlocked for your current Notes session for up to three minutes so you can easily view them as you work, jump to another note, copy and paste information from other apps and more, but you can also lock them manually.
iPhone and iPad:
1) Tap Lock Now at the bottom of the Notes screen.
![]()
This shall immediately lock any unlocked notes in one go.
Mac:
1) Choose File → Close All Locked Notes.
This shall immediately hide contents of any unlocked notes from view.
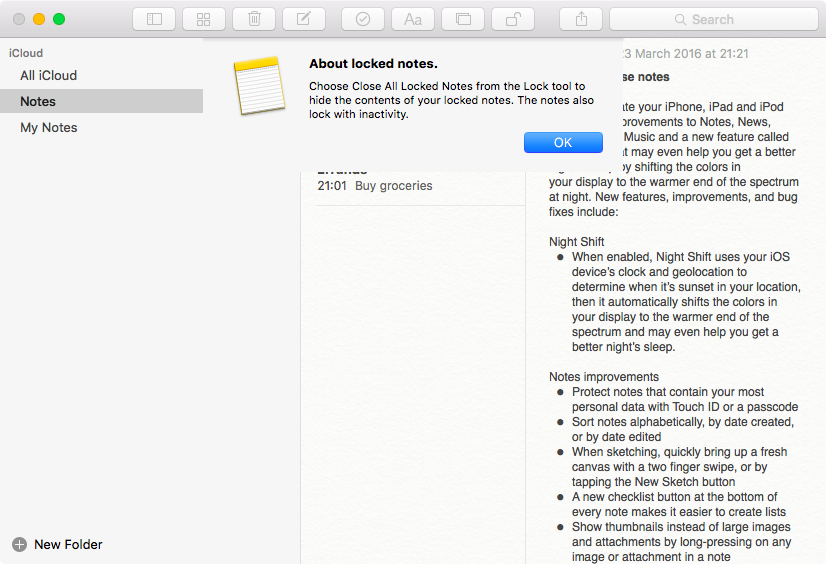
After choosing this option, opening any previously unlocked note will require you to re-enter your Notes password or verify with Touch ID.
How to remove a password lock from a note
iPhone and iPad:
1) Open a locked note and provide your password or verify with Touch ID, if asked.
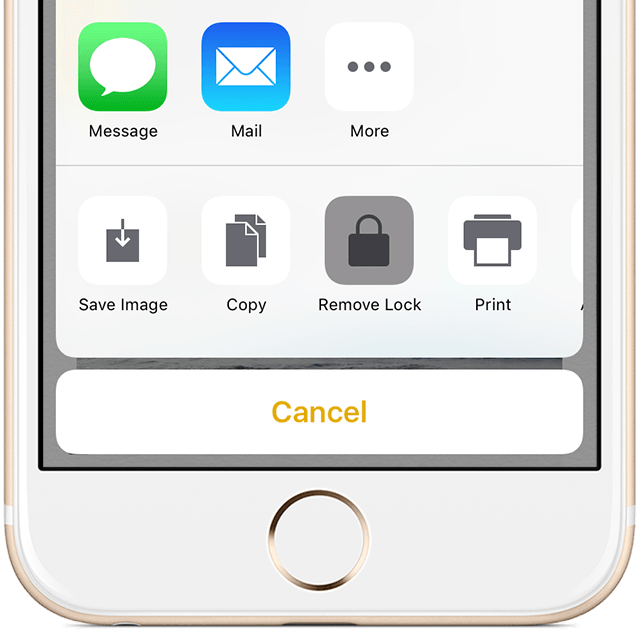
2) Tap Remove Lock in the Share menu.
Mac:
1) In the Notes menu, chose File → Remove Lock.
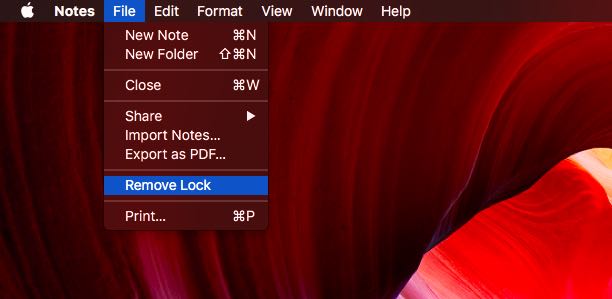
2) Enter your password to remove the lock from this note.
How to change your Notes password
Changing your Notes password will immediately apply the new one to any protected notes.
iPhone and iPad:
1) Go to Settings → Notes → Password and tap Change Password.
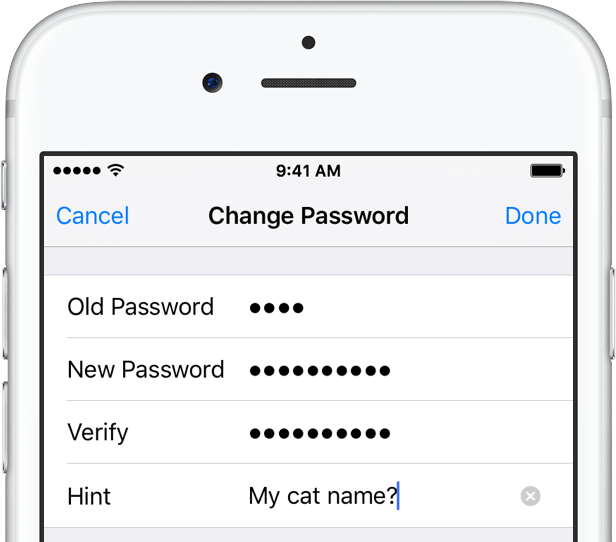
2) Enter the old password, then your new password and confirm it in the Verify field.
3) Optionally provide a password hint and tap Done to save the changes.
Mac:
1) Click Notes → Change Password in the app’s menu on your Mac.
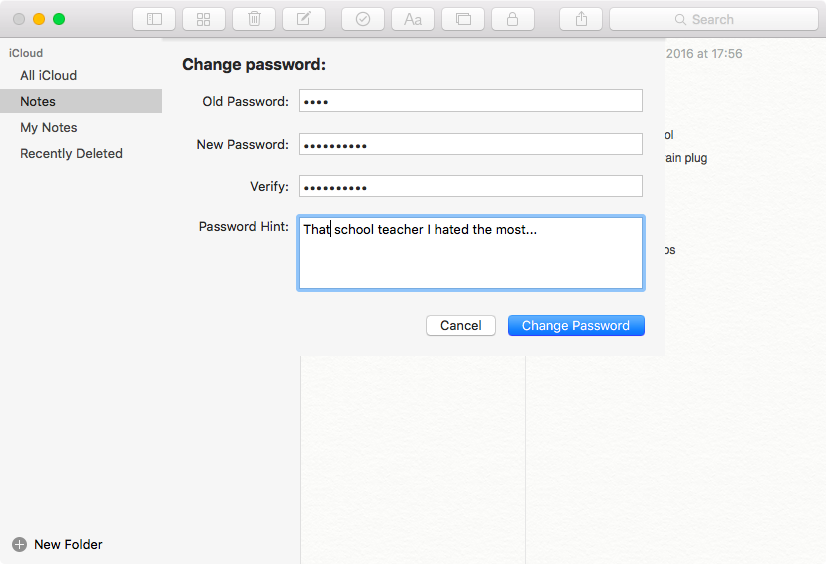
2) Enter your old password, then a new password and click Change Password.
How to reset Notes password
Resetting your Notes password permits you to create a new one for future notes, but at a significant cost: all of the existing password-protected notes shall still have your old password in effect.
iPhone and iPad:
1) Tap Settings → Notes → Password → Change Password → Reset Password.
2) Enter your Apple ID/iCloud password.
3) Confirm the action by tapping Reset Password.
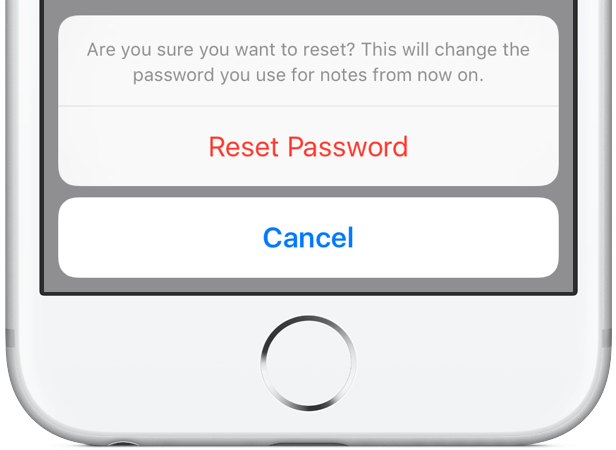
4) Choose your new password and password hint.
Mac:
1) Choose Notes → Reset Password and click OK to confirm.
2) Enter your Apple ID/iCloud password to continue.
3) Click Reset Password.

4) Enter your new password and password hint.
Important tidbits about resetting Notes password
Resetting your Notes password lets you protect notes that you create from that point onward with your new password, but it won’t unlock any notes that you locked using long-forgotten password. Think twice before resetting your password just for the kicks because the interface doesn’t help you distinguish whether a note has been protected with one of your old passwords or locked with your newly chosen password.
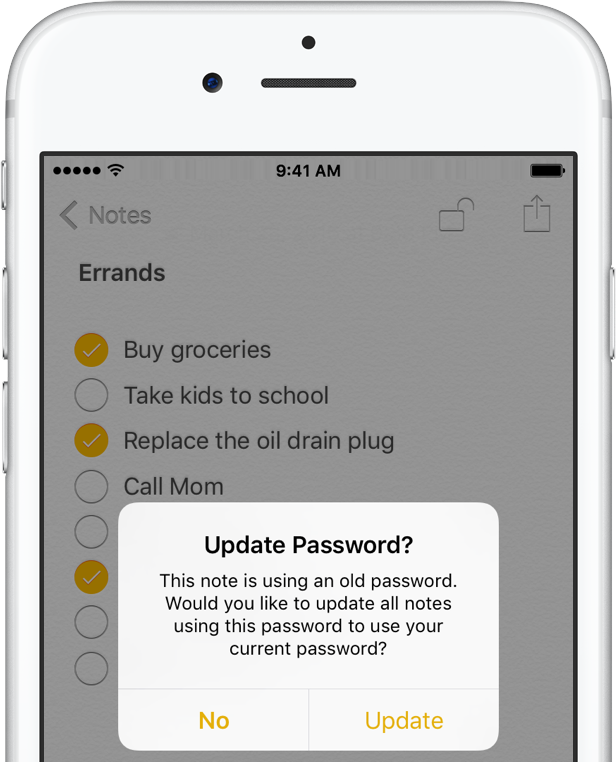
Thankfully, there’s a workaround to this dilemma.
If you see a wrong password alert accompanied by a hint for your old password—that note uses your old password. And assuming you remember your old password, and enter it, the app will offer to update that note’s password to your current one.
If I could single out any sound piece of advice, I would recommend that you always turn on Touch ID verification because this will ensure that you will be able to open any locked notes with a fingerprint even if you forget your password.
Notes protection and iCloud.com
A Notes web app at iCloud.com is less capable than its mobile and desktop counterparts.
Granted, you can view locked notes in a browser, close all protected notes with a click of the unlocked icon in the toolbar—but that’s about it.
To perform other tasks listed below, you must use the Notes app on one of your devices with iOS 9.3 or later or OS Xv10.11.4 or later:
- Add a password lock to a note
- Remove a password lock from a note
- Change the password for locked notes
- Reset the password if you forget it
“If you ever forget your password for locked notes, and you reset it using Notes on a device with iOS 9.3 or later or OS X v10.11.4 or later, entering your password for one locked note lets you view all locked notes that use the same password,” Apple states.
Need help? Ask iDB!
Problems with your Apple device? Not sure how to do certain things on Apple’s many software platforms?
Let us know at help@iDownloadBlog.com and we may cover your specific problem and provide a solution in upcoming tutorials.
Feel free to browse our how-to archive for more articles like this one and don’t forget you can submit tutorial suggestions at tips@iDownloadBlog.com.