The Reminders app is a stock iOS application that allows you to establish specific reminders based on groups of reminders called lists. The app integrates with Siri and features various geo-location elements to form what is a fairly deep and significant application.
Of course, there is no shortage of apps and methodologies to help users remember various things, but, as is the norm with most of the stock applications, no other reminders app has the privilege of being so tightly integrated within iOS. Inside, we’ll take a deep look at the Reminders app. We’ll show you the basics and some of the more advanced techniques in order for you to get the most benefit from this highly useful stock app.
Table of contents
Basics
- Creating a new reminder
- Reminder details
- Completing a reminder
- Deleting a reminder
- Searching reminders
- Viewing the reminders schedule
- Creating a new list
- Switching between lists
- Moving lists
- Editing and deleting lists
Settings
Siri
Notification Center
Spotlight
Conclusion
Basics
Creating a new reminder
The most elementary task when it comes to using the Reminders app is creating a reminder. A reminder can be anything that you need to remember. It can consist of the most basic and mundane item, to the most complex project; it’s really up to you.
To create a new reminder, you’ll first need launch the Reminders app. If you’ve yet to use the Reminders app, you will already have a default list created on your device called Reminders.
To create a new reminder, tap anywhere on the body of a list. This will cause a new entry to be created, which is indicated by the flashing cursor, the appearance of the keyboard, and the circle icon to the left of the cursor.
Once your keyboard appears, type the name of the reminder that you wish to add. There are no particular conventions that you need to use when adding your reminder; choose a system that cooperates well with your workflow.
Creating new reminders is a cinch
There doesn’t appear to be any limitations with regard to the length of the reminder name, just keep in mind that the Reminders app will only preview four lines of text at any given time. If your reminder’s name is longer than four lines of text, you can expand it to view the full reminder by tapping on the previewed text. You can always go back and tap on the name of the Reminder to edit, remove, or add to its name.
Once you have finished typing your reminder, you have a few of options. You can a). Tap the Done button in the upper right-hand corner, and be finished with the reminder b). You can tap the return key on the keyboard to add another reminder; or c). You can tap the ‘i’ button to the right of the reminder name to view and edit its details.
Reminder details
Tapping the ‘i’ button that appears when adding a new reminder allows you to view the reminder’s details. The details include the following:
- Name – the name you gave the reminder
- Remind me on a day – set an alarm for a specific time in correlation with the reminder
- Remind me at a location – establish geo-fencing for reminders
- Priority – set a reminder priority
- Notes – add additional details to the reminder that the title couldn’t cover
Let’s break each reminder detail section down step-by-step:
Name
The name is the same name that you used when initially creating the reminder. This name can be changed either on the main list page, or within the details view. The details view provides no distinct advantages for editing the name over that of the list view.
Editing a name in the Details view
Remind me on a day
This section allows you to establish an alarm for a specific reminder at a specific date and time of day. The date setting is a wheel base toggle that can be cycled via day, hour, minutes, and AM and PM designations. It should be noted that there is no separate year designation, so if you want to create a reminder a long way into the future, you will have to scroll on the date setting for a considerable amount of time.
Reminder schedules are easy to set up
The Details view also gives the user control over setting up repeat alarms. The repeat possibilities are as follows:
- Never
- Every Day
- Every Week
- Every 2 Weeks
- Every Month
- Every Year
By default, an alarm is set to never repeat.
When an alarm is set for a specific reminder, you will see the date and time for the alarm beneath the name of the reminder in the list view.
Remind me at a location
The iPhone’s geo-location abilities are flexed when using app’s Remind me at location setting. Enabling this toggle will display a Location section, that, when tapped, reveals the Reminders Location screen.
Set reminders for a specific location
The Location screen contains a search bar at the top to search for specific locations, such as restaurants and grocery store. The Location screen will also allow you to utilize your current location, or already established locations like your home or work address. Once you select the trigger location, you can further establish when you want the Reminder to alert you—when you arrive at the location, or when you depart the location.
Priority
The reminder priority feature has four levels: None, !, !!, or !!!, with !!! equaling the most urgent type of reminder. Like the alarm date and time, the reminder’s priority is also displayed in the list view. The priority will show up on the left-hand side of the reminder’s name.
Establish reminder priority
List
The list section allows you to quickly alter the list location for an individual reminder item. If you find that a reminder is more appropriate for another list, you can quickly change its parent list instead of deleting and recreating the item in another list.
Sometimes changing a reminder’s list makes sense
To change the list that an item belongs to, tap the list section to invoke the Change List page. You can then tap on the list that you’d like to move the item to. If you only have one list created in the Reminders app, the List section will not appear, because there is no other list to switch to.
Notes
Although it’s totally possible to write what equivocates to a small novel in the name of the reminder, you should try to avoid doing so. Instead, why not try typing extended information related to the reminder in the spot dedicated for that sort of thing—the notes section.
 Adding notes to a reminder
Like the name of the reminder, the Notes section in the Details view can contain a seemingly limitless amount of characters.
Completing a reminder
To the left of each reminder contained within each list, you’ll find a radio button which signifies the status of the reminder. Enabling the radio button will mark the reminder as completed, while disabling the button marks the status of the reminder as not completed. After a period of time or after closing the app and reopening it, the completed reminders will disappear.
Completing, showing, and hiding reminders
Showing and hiding completed reminders
The Reminders app allows you to quickly toggle between displaying all reminders and only showing reminders in an uncompleted state. To toggle between the two, tap the Show or Hide Completed button that resides at the bottom of the list. Once you show completed reminders, you can always go back and mark a completed reminder as uncompleted if desired.
Responding to schedule alerts
If you’ve enabled a schedule for a reminder, you will be alerted much in the same way that you’re alerted with a calendar appointment. This is done via a pop-up notification by default, but you can alter the notification type in the Notification Center settings. View our ultimate Notification Center guide for deeper instruction regarding Notification Center.

A scheduled reminder alert
Once you receive an alert, you’ll see several options for responding. You can snooze the alert to remind you again in 15 minutes, you can mark an alert as completed right on the spot without going into the Reminders app, you can view the reminder, or you can close the alert, which effectively dismisses the notification and keeps the reminder active.
Deleting a reminder
Deleting a reminder can be done one of two ways. The easiest way to delete a reminder is to simply execute a swipe from right-to-left gesture on the name of the reminder. This will invoke a red Delete button, which can then be pressed to delete a reminder. Be careful, as there is no undo mechanism when deleting a reminder item from a list.
There are two ways to delete reminders
The second way to delete a reminder is to go into list edit mode, which we’ll discuss more in-depth later. To enter edit mode, tap on the Edit button in the upper right-hand corner of the list. This should cause a red ‘-’ button to be displayed to the left of the individual reminder item in a given list. Tap the red ‘-’ button to start the delete process, and then tap the Delete button that appears to the right of the reminder. As stated, it’s much quicker to use the first swipe gesture method listed when deleting a reminder.
Searching reminders
Reminders can be searched by using the search box that appears above the various cards that make up all of the reminder lists. To reveal the search box, tap the name of any list once. This will cause all of the cards to be gathered in a deck, revealing the search box interface above. You can also use a slide down gesture to pull the list of cards down, exposing the search box.
Searching reminders
Once the search box is displayed, you can use it to search for specific reminder entries or specific lists. You can even combine keywords from both lists and individual reminder entries for a more specified search. Unfortunately, the notes portion of each reminder isn’t a searchable field.
One oddity that I found while doing this guide is that searching reminders is case sensitive in some instances. For example, “Idb” does not equal “iDB” when searching for a list.
Case sensitivity can affect searches
Viewing the reminders schedule
Reminders created with the ‘Remind me on a day’ option enabled in the reminder details will automatically show up in the reminders schedule. The reminders schedule will help you quickly assess which items across all lists need to be acted on.
Viewing the reminders schedule
The reminders schedule lists all reminders with scheduled due dates, and sorts them automatically according to the date due. In this view, the list that the reminder belongs to becomes irrelevant.
Like any other list, users can delete items directly from the list by using a swipe gesture from right-to left on each individual item that you’d like to delete. Items deleted from the schedule will also be deleted from its parent list, so use caution.
Creating a new list
Lists are the high-level elements that contain individual reminders inside of the Reminders app. You must have at least one list created in order to add reminders to the app.
Creating a new list is accomplished via the New List card, which is a card that is always available and can’t be removed from the Reminders app. Tap the ‘+’ button in the upper right-hand corner of the New List card to create a new list. Once you do, you’ll be prompted to name the list and provide it with a custom color. There are seven colors included with the Reminders app; they are purple, green, blue, yellow, brown, red and orange.

Creating a new list
Once you have finished naming the list and assigning it a color, tap the Done button in the upper right-hand corner to finalize the list creation. After tapping Done, you will be immediately switched to the new list and can start adding new items to the list.
Switching between lists
Lists are displayed as cards inside of the Reminders app. The card view is the only view available for lists. To switch between each list inside of the Reminders app, tap the stack of lists that appear at the bottom of the interface and then tap on the name of the list that you wish to switch to. This will cause the remaining lists to be moved to the bottom of the interface, while the list that you selected comes into full view.
Switching between lists
Moving lists
You can easily rearrange the order of your lists inside of the Reminders app. To do so, tap on the stack of cards at the bottom of the Reminders app interface as if you’d like to switch between lists. Then, tap and hold on the name of the list that you’d like to move, drag your finder to the desired resting place, and release your finger.
Moving lists
Editing and deleting lists
To edit a list, switch to the desired list that you’d like to edit, and tap the Edit button in the upper right-hand corner of the list card. While in edit mode, you’ll see a Color section just below the name of the list. Tap this section to bring up the Color panel, which allows you to edit the color of the list using any of the aforementioned color choices. Once you select a color, the Color panel will disappear, and you’ll be taken back to the card view for the list and removed from edit mode.
Editing a list
If your list contains individual reminder items, placing your list into Edit mode will allow you to delete those reminders using the ‘-’ button, or rearrange the reminders using the drag handles to the right of each individual item. Once you are finished rearranging and deleting individual items, you may tap the Done button in the upper right-hand corner to finalize your changes.
Deleting an entire list
Lastly, you can outright delete an entire list and all of its individual reminder elements in one fell swoop. To do so, go into list edit mode as mentioned above, and tap the Delete List button at the bottom of the list. You will receive a pop-up notification alerting you to the gravity of such an action.
Deleting a list
Deleting a list will not only delete the list itself, but it will permanently delete all of the reminders inside of the list. Deleting a list is permanent and cannot be undone, so proceed with caution. Once you are sure that you want the list and all of its elements removed, tap the Delete button on the pop-up box; otherwise, tap the Cancel button to cancel the list deletion.
Settings
There aren’t many settings to be found for the Reminders app, but it does have a dedicated preference section in the stock Settings app.
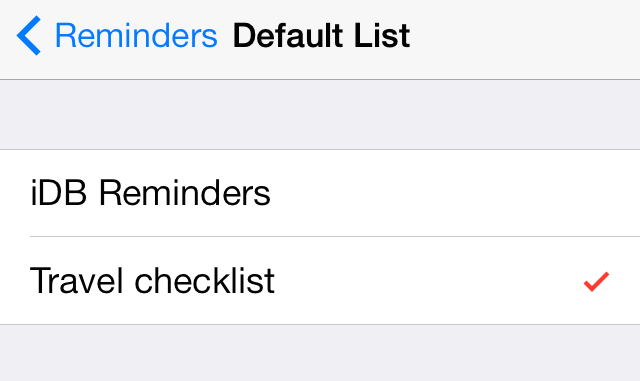
The Reminders app settings
Open the Settings app > and tap on Reminders. There you will see a single section for Default List. The Default List section will be populated with all of the lists that you currently have added to the Reminders app. This setting will force new reminders created outside of a specific list to default to the list selected here. A good example of the need for this is when creating new reminders via Siri. If you tell Siri to remind you to tie your shoes, and you don’t specify a list while doing so, it will place the tie your shoes reminder in the default list.
Syncing with iCloud
If you have an iCloud account enabled on your iOS device, you can sync reminders between other iOS devices like the iPhone, iPad and iPod touch. You can also sync between a Mac, or via iCloud online. You must have the Reminders toggle enabled for the syncing to work. You can find the toggle in Settings > iCloud.
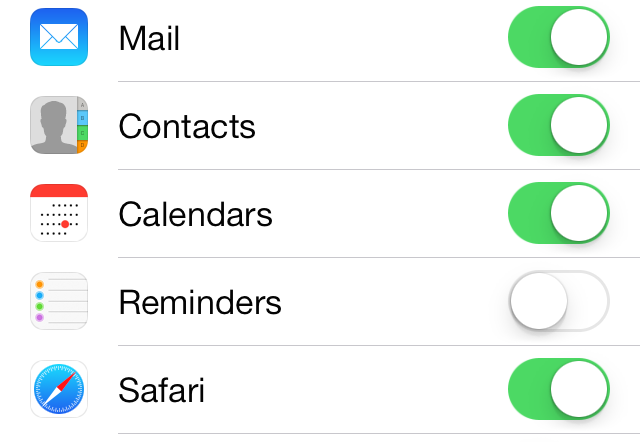
Enable the iCloud toggle for Reminders to enable syncing
Siri
As you would expect, the Reminders app and Siri integrate to allow you to create reminders using voice commands. Siri supports several different types of reminder commands, which include the following:
- Add pizza to my grocery list
- Add visiting Antarctica to my bucket list
- Remind me to call dad
- Remember to take my favorite shoes
- Remind me to take my medicine at 8am tomorrow
- Remind me to finish this post by 3
- Read my blogging to-do list
- Remind me to call mom when I get to work
- Remind me when I leave to call Seb
- Remind me to pick up flowers when I leave here
As a side-note, Siri cannot be used to delete reminders, and she’ll tell you so if you try.
Notification Center
The Notification Center’s Today View allows you to have elements from the Reminders app right inside of the Notification Center and on the Lock screen. To integrate Reminders with Notification Center, you’ll need to go to the stock Settings App > Notification Center > and enable the Reminders toggle under the Today View section. For more information on Notification Center, please be sure to view our ultimate Notification Center guide.
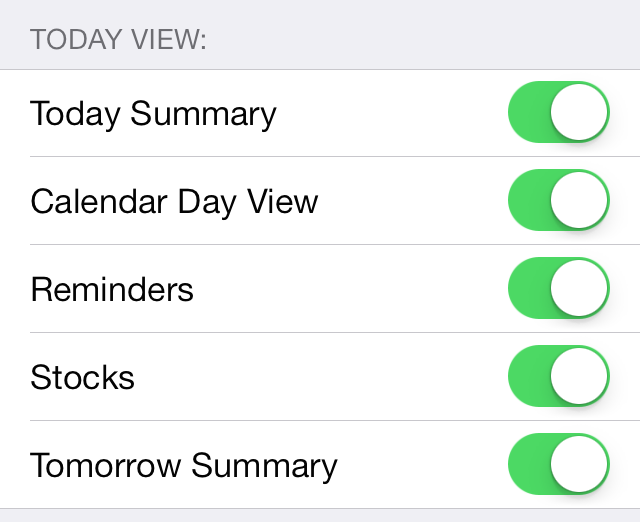
Notification Center’s Today View toggle for Reminders
Reminders will only be displayed under the Notification Center’s Today View if you have reminders that have schedules within the next day. All other scheduled reminders will appear on the day that they have been scheduled for.
Reminders in Notification Center
Reminders listed in Notification Center include details for geo-location, time of the reminder, whether or not it’s a repeated reminder, priority, and a summary of the notes that you have added to the notes section of the detailed reminder view.
A reminder can be opened in the stock Reminders app by tapping on the reminder name in Notification Center. By doing so, you will be taken directly to the list where the Reminder appears, and the Reminder will be displayed in bold to help you quickly identify its location within the list.
You can complete Reminders directly from Notification Center by tapping on the radio button to its left. The button will reflect the color of the list that the reminder belongs to, and will cause the reminder to disappear from your uncompleted list inside of the Reminders app.
Spotlight
To enable Reminders app searching within Spotlight search, open the stock Settings app and select > General > Spotlight Search > and tap the Reminders section to place a check mark next to that section. You can also use the drag handle next to the Reminders section to move its location within the Spotlight search results.
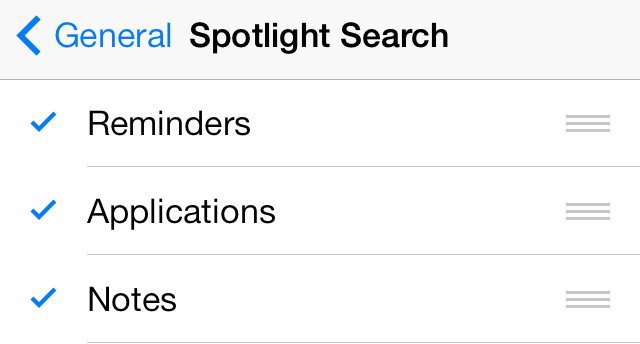
Spotlight search setting for Reminders
Searches can be done on list names, which will display results from all reminders contained within the list, or they can be on individual reminders themselves. Like with Notification Center, if you tap on a Reminder from Spotlight search, it will open the Reminders app to the list containing the reminder, and the reminder’s name will be displayed in bold to help with quick identification.

Searching for reminders in Spotlight
Conclusion
The Reminders app, if wielded correctly, is a powerful stock Application. It has a leg up on other third-party applications, because it integrates so deeply within iOS. As is the trend with most stock apps, it doesn’t feature all of the bells and whistles that third-party apps may have, but its integration with iOS, its simplicity, and its ease of use can’t be ignored.
How do you use the Reminders app? Are there any specific tips or tricks that you use that wasn’t included in this guide? Did you learn anything new? Sound off down below in the comments section and let us know.