[digg-me]
Credit where it’s due: A big thanks to Mark for his exceptionally helpful tutorial which provided the original templates I used and the basis of much of this tutorial.
Here’s what you’ll need:
- A jailbroken iPhone (Duh!) with Winterboard Installed
- File transfer utility – I used the handy iPhone browser
- Graphics program – capable of editing layered .png files (Fireworks pictured)
- The template files, downloadable here.
If you want to change the keypad background only while retaining the default iPhone fonts, you’ll probably prefer the template from Mark’s tutorial, which has the default text/fonts, already positioned. (I choose to retype the letters and numbers to have custom fonts and effects.)
Here’s a breakdown of all the images we’re making and how they’re used. The iPhone will default to standard images for any you don’t include, so you can always start off with just a custom keypad background (dialerkeypad.png) and add more later.
- dialerkeypad.png – The dialing area. This image must be 320px wide x 273px high.
- dialerkeypad_pressed.png – Same, for pressed key variations.
- dialercd.png – Above the keypad, this is the background for number display when making a call.
- addcontact.png – The “Add a Contact” button
- addcontact_pressed.png – Pressed version
- delete.png – The backspace button
- delete_pressed.png – Pressed version
- callbkgrnd.png – The background for either an outline and/or transparent areas of call button. Repeats horizontally. 74px high.
- callbkgrnd_pressed.png – Pressed version
- callglyph_big.png – The call button that you’ll see on your custom keypad.
- callgplyph.png– Another call button image, can be a copy of the callglyph_big.png image. I haven’t been able to figure out yet when this image is actually used, because it is NOT used as a pressed version but your custom call button will NOT show if you don’t have both these callglyph images. More on that later.
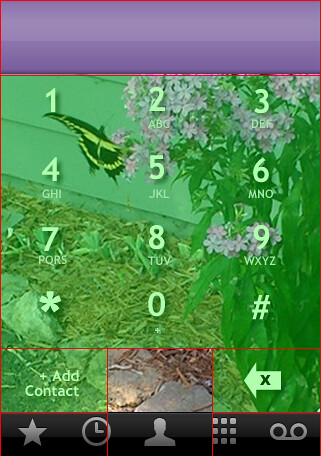
Open up CustomKeypadTutorial.png, you’ll see slices and layers all sized and laid out and ready to go for ya.

Sliced Image Template
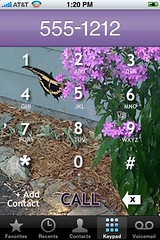
- Now for the fun part – get busy changing the fonts, colors, and effects as desired. You’ll probably want to add your own background pic first – I picked a lovely butterfly pic that I snapped with my iPhone, of course.
For my keypad, I wanted to create the illusion of keys being pressed. So I added a slight drop shadow to all the keys in customkeypad.png. (We’ll get our pressed effects done in a minute.)
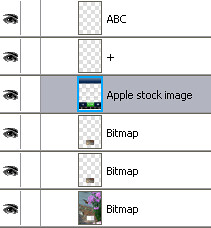
Grid Layer
 Get everything just how you want it, and save a backup copy of this image. Backups are your friend, oh iPhone themer! Then let’s get back to your working image. We’re preparing to save the images.
You’ll need a folder for your keypad. The folder structure is “Dialer Name/Folders/MobilePhone.app/” with the images placed in the innermost folder. If the folders are not named properly, you keypad won’t work. To make it easy, I included a “My Dialer” folder in the tutorial download to use for your images, so just find the “Your Images Here” text file to know where your images belong. Export the slices as .png images; I used png 8 settings with transparent matte.
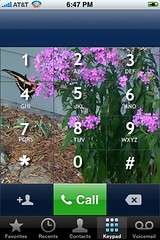
Then, in your working image copy, create a second frame that is an exact copy of the work you’ve done thusfar. This is for your “pressed” image versions. Make any changes you’d like for the pressed state of your buttons.
For example, I removed the drop shadows and moved the text down and right a few pixels to create a pressed button effect. I also added a light glow to text make the buttons appear to light up when pressed.
When you’re done, save these images with the same name as their slices but ending with _pressed.png and put them in your keypad folder. Save your working file, of course.
That Pesky Call Glyph
If you want a custom call button with your own background, you’ll have to work a little harder. That call button is confusing, since it doesn’t have a pressed version like the other buttons. In fact, to get a call button pressed effect, part of this image must be transparent, and the callbkgrnd.png and lbkgrnd_pressed.png images provides the backgrounds. This took a while for me to pin down.
Now, if you don’t want to mess with it, you can easily skip this step (as well as the “Add Contact” and “Delete” buttons) for iPhone to use the default ones. Me? I wanted my background image to show on the call button, so I foraged on. Trial and error and looking at other themes is the way you get this to display the way you want.
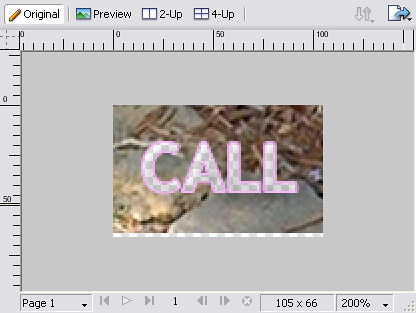
To make this button, I cut out a section of the background image where the call button belongs, and saved it as callglyph_big.png. Then I increase the size of the canvas to give a couple transparent pixels at the bottom.
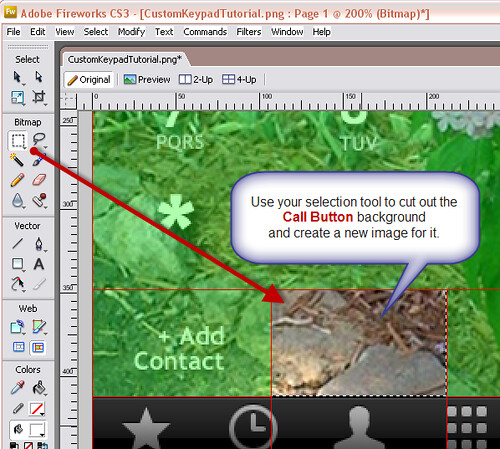
I added my effects and made the letters themselves transparent. Blowing up the image, I then erased the background image behind the letters so that the pressed background can show through.

Call Glyph
So are you ready? Let’s get this stuff over to your iPhone and see how your work of art turned out. Go to the iPhone browser (or you file transfer method of choice), find the Winterboard themes, and add your new dialer folder.
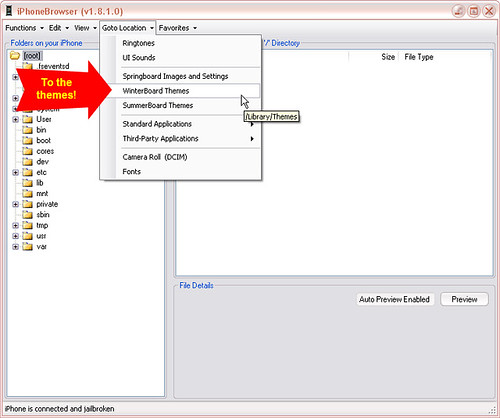
Now that you’re in the themes area, put that keypad on your iPhone, man!

Once the files are on your iPhone, open Winterboard and activate your new keypad theme. Any time you replace one of the images and want to see the new version, you’ll also need to open Winterboard, deactivate and reactivate your keyboard theme and wait for the phone to respring. Each time you change the theme, there will be a brief flash of the old keypad which appears to be cached.
As mentioned, the basic idea works for more than just keypads. I used the same technique to alter the cool flower slider theme to some nice Yin-Yang slider buttons. Just grab yourself a theme and use your iPhone browser to grab the files and customize away.
I’d love to hear from anyone who gives this a go, and know how it worked out for you. Happy theming!