 A few days ago, I was contacted by a guy at UniqueSkins.com who asked me if I’d like to become an affiliate of his site. I receive some of these inquiries several times a week and most of the time, I don’t follow through because the product they sell has nothing to do with the iPhone or iPod Touch. But this time, 2 things got my attention: 1. the product seemed original to me; and 2. he offered to give me free samples. Alright, I’ll admit that the “free samples” really caught my attention 😉
So I decided to look into the product by going to Unique Skins’ website and found the concept really cool. Basically, Unique Skins offers a simple and cheap way for you to create your own skin for your iPhone. You can get your custom iPhone skin for about $7. You can also create skins for your iPhone dock. They don’t only make custom skins for iPhone; they make skins for pretty much any type of phone you can think of, as well as laptops, gaming consoles, MP3 players. They even make skins for bluetooth headsets!
Here is how it works:
- Choose your device
- Click on “Design Now”. It then brings up their online skin creator.
- At this point, you can either choose from a library of images or, that’s where it gets interesting, you can choose to upload your own image.
- Once your image is uploaded, you can move it around, rotate it, and you can even add text.
- When you’re done creating, you can preview your custom skin and then add it to the cart.
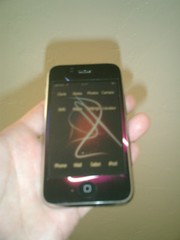
Today I received my 2 skins and I was positively surprised by the great quality of the printing. Given that I had used low quality images to create my custom skin, I expected a print out all pixelized. Not at all.
I couldn’t wait any longer, I decided to stick one of them on my lovely iPhone.

At first, I was a little scared that I wouldn’t be able to install the skin without making a few air bubbles. I was also worried that I would lose my nerves on this mini project. I have very little patience and I am usually not good at doing things with my hands (although my girlfriend would argue this, hehe ;-).
I decided to start by the back of the phone as I thought it would be the easier part. I removed the sticky skin from the sheet and started applying it to the top left of the phone, right by the camera lense. Once this part was done, I moved toward the top right, making sure to remove the little air bubbles that I feared so much. In no time, the top of the phone was done. I then started to stick the rest of the skin, going all the way to the bottom of the phone, while still making sure no air bubble would sneak in.
Almost done! Oh NOOOOOO! There is this tiny bubble that I forgot to remove. You can barely see it but I’m a neat freak; I like things to be perfect. I removed what I had done and started over again until the back was perfectly done. It took me about 3-4 minutes from the time I removed the sticky skin from the sheet to the time I sat back and proudly looked at the hip skin on the back of my iPhone.
Now, the hardest part of the job; the front of the phone. I had a bad feeling about this from start, especially because of the light and proximity sensors (you can barely see them right next to the phone speaker (not speakerphone) but if you cover them, you’re screwed as your iPhone won’t be able to tell how lit it is around you or whether your ear is against the phone or not.
So again, I decided to start with the top of the phone, as it would be the hardest part. I did my best to apply the skin and it almost looks ok but I was not satisfied with it at all. It actually makes my iPhone look a little ghetto. What drove me nuts was the sideline of the screen that was not straight. I guess most people would have been satisfied with the result but again, I’m a neat freak so I simply decided to completely remove the skin from the front of my iPhone. I kept the back though, as I think it looks sick!
|
|
|

To sum up, I’d say Unique Skins is a great, inexpensive way to customize your iPhone with your own design. $7 + $3 for shipping is very affordable for this product. When creating my iPhone skins, I uploaded low resolution images but they turned out really good once printed. The set up was pretty easy although I would have expected them to send me a quick “how to” guide, as well as a tool to make sure you are correctly removing the air bubbles. But for this price, you can’t expect much and you can’t really go wrong. If I had had to pay for it, would have I done it? Yes, I most likely would have bought a cute custom iPhone skin for my girlfriend’s phone and one for me.