In this tutorial, we will show you how to customize Apple Maps so you can make the most of it while navigating or route planning on your iPhone, iPad, or Mac.
The Apple Maps app is very easy to use. You can get directions in a snap, find details about locations you want to visit and save your favorite spots. So, you might not even think about taking a few minutes to customize your experience, but you should.
You can see the weather conditions for where you’re traveling, view a different angle of your map, and much more.
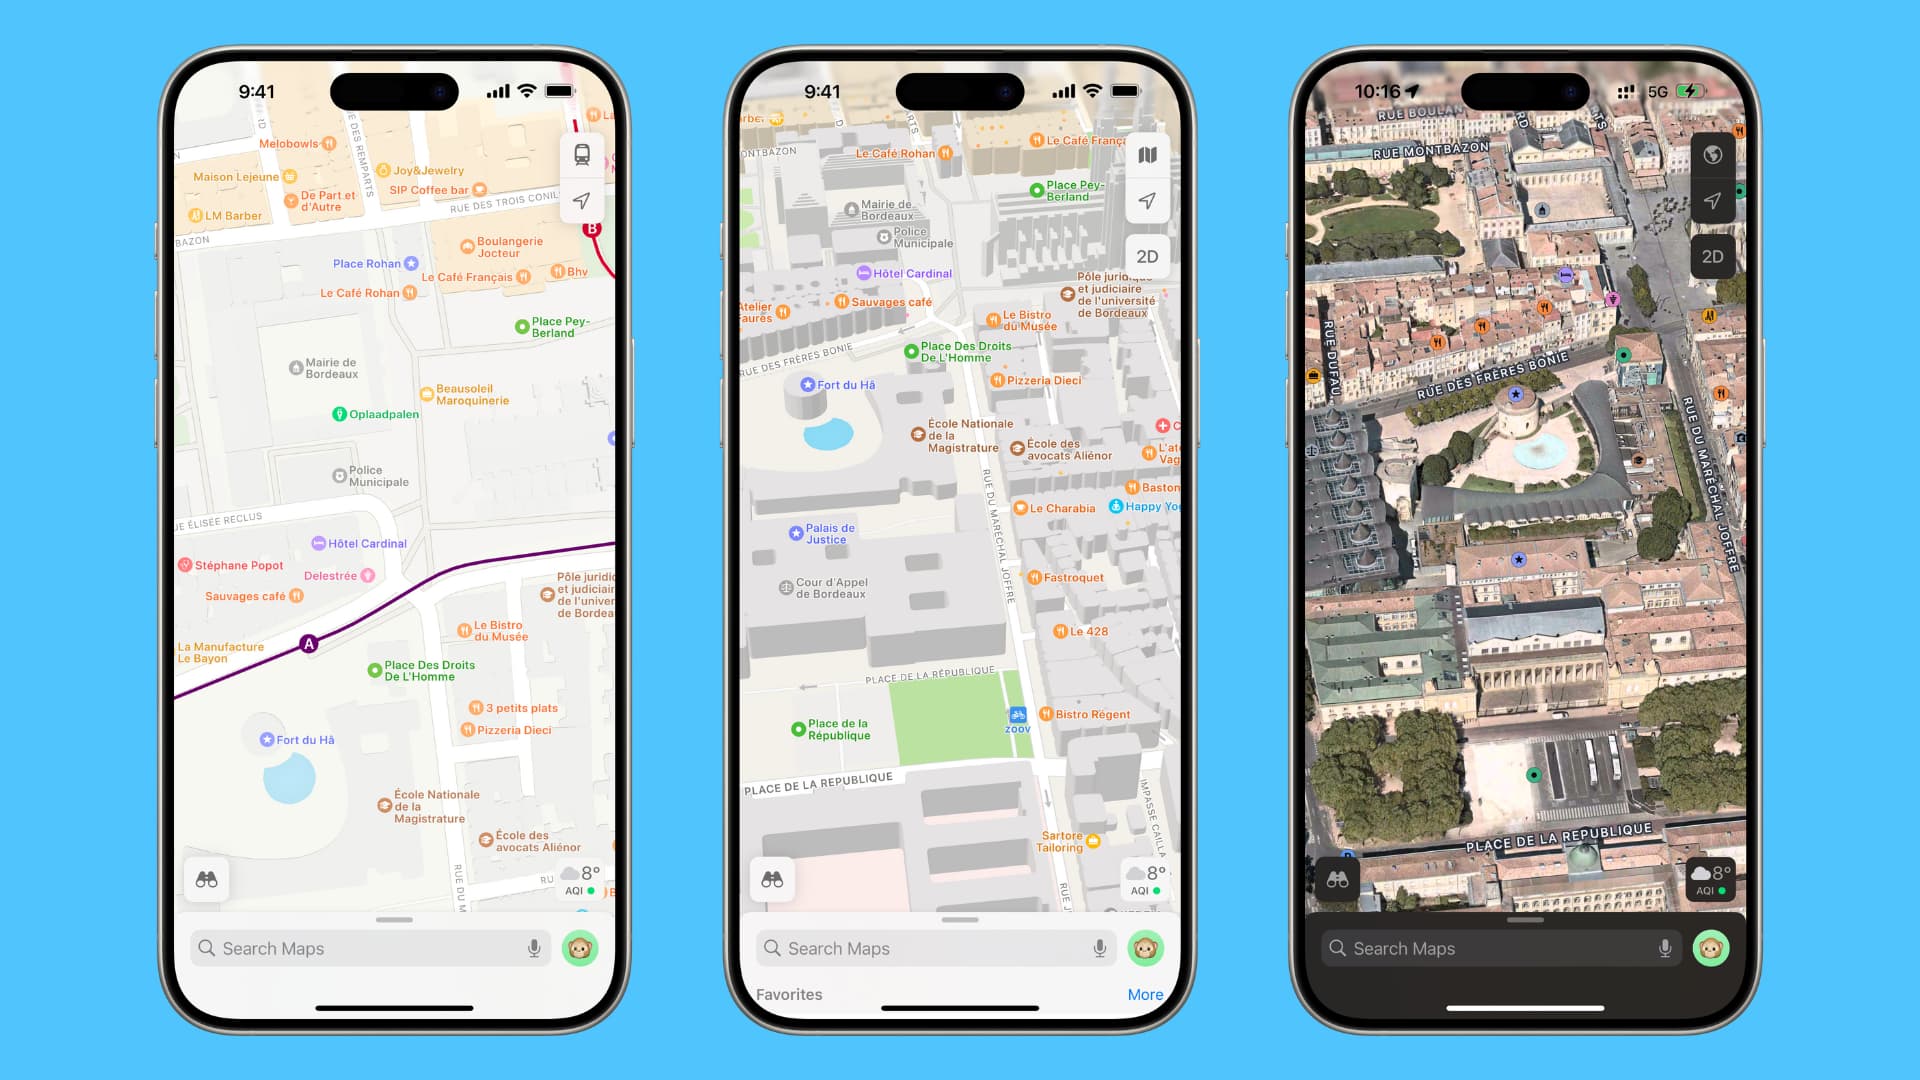
1. Use the desired map view
The Apple Maps app lets you pick from a colorful explore map view, a driving view with live traffic, a transit view for public transportation, and a satellite view that looks photographic.
On iPhone and iPad, you can change the view by tapping the current map view button at the top and then choosing Explore, Driving, Transit, or Satellite.
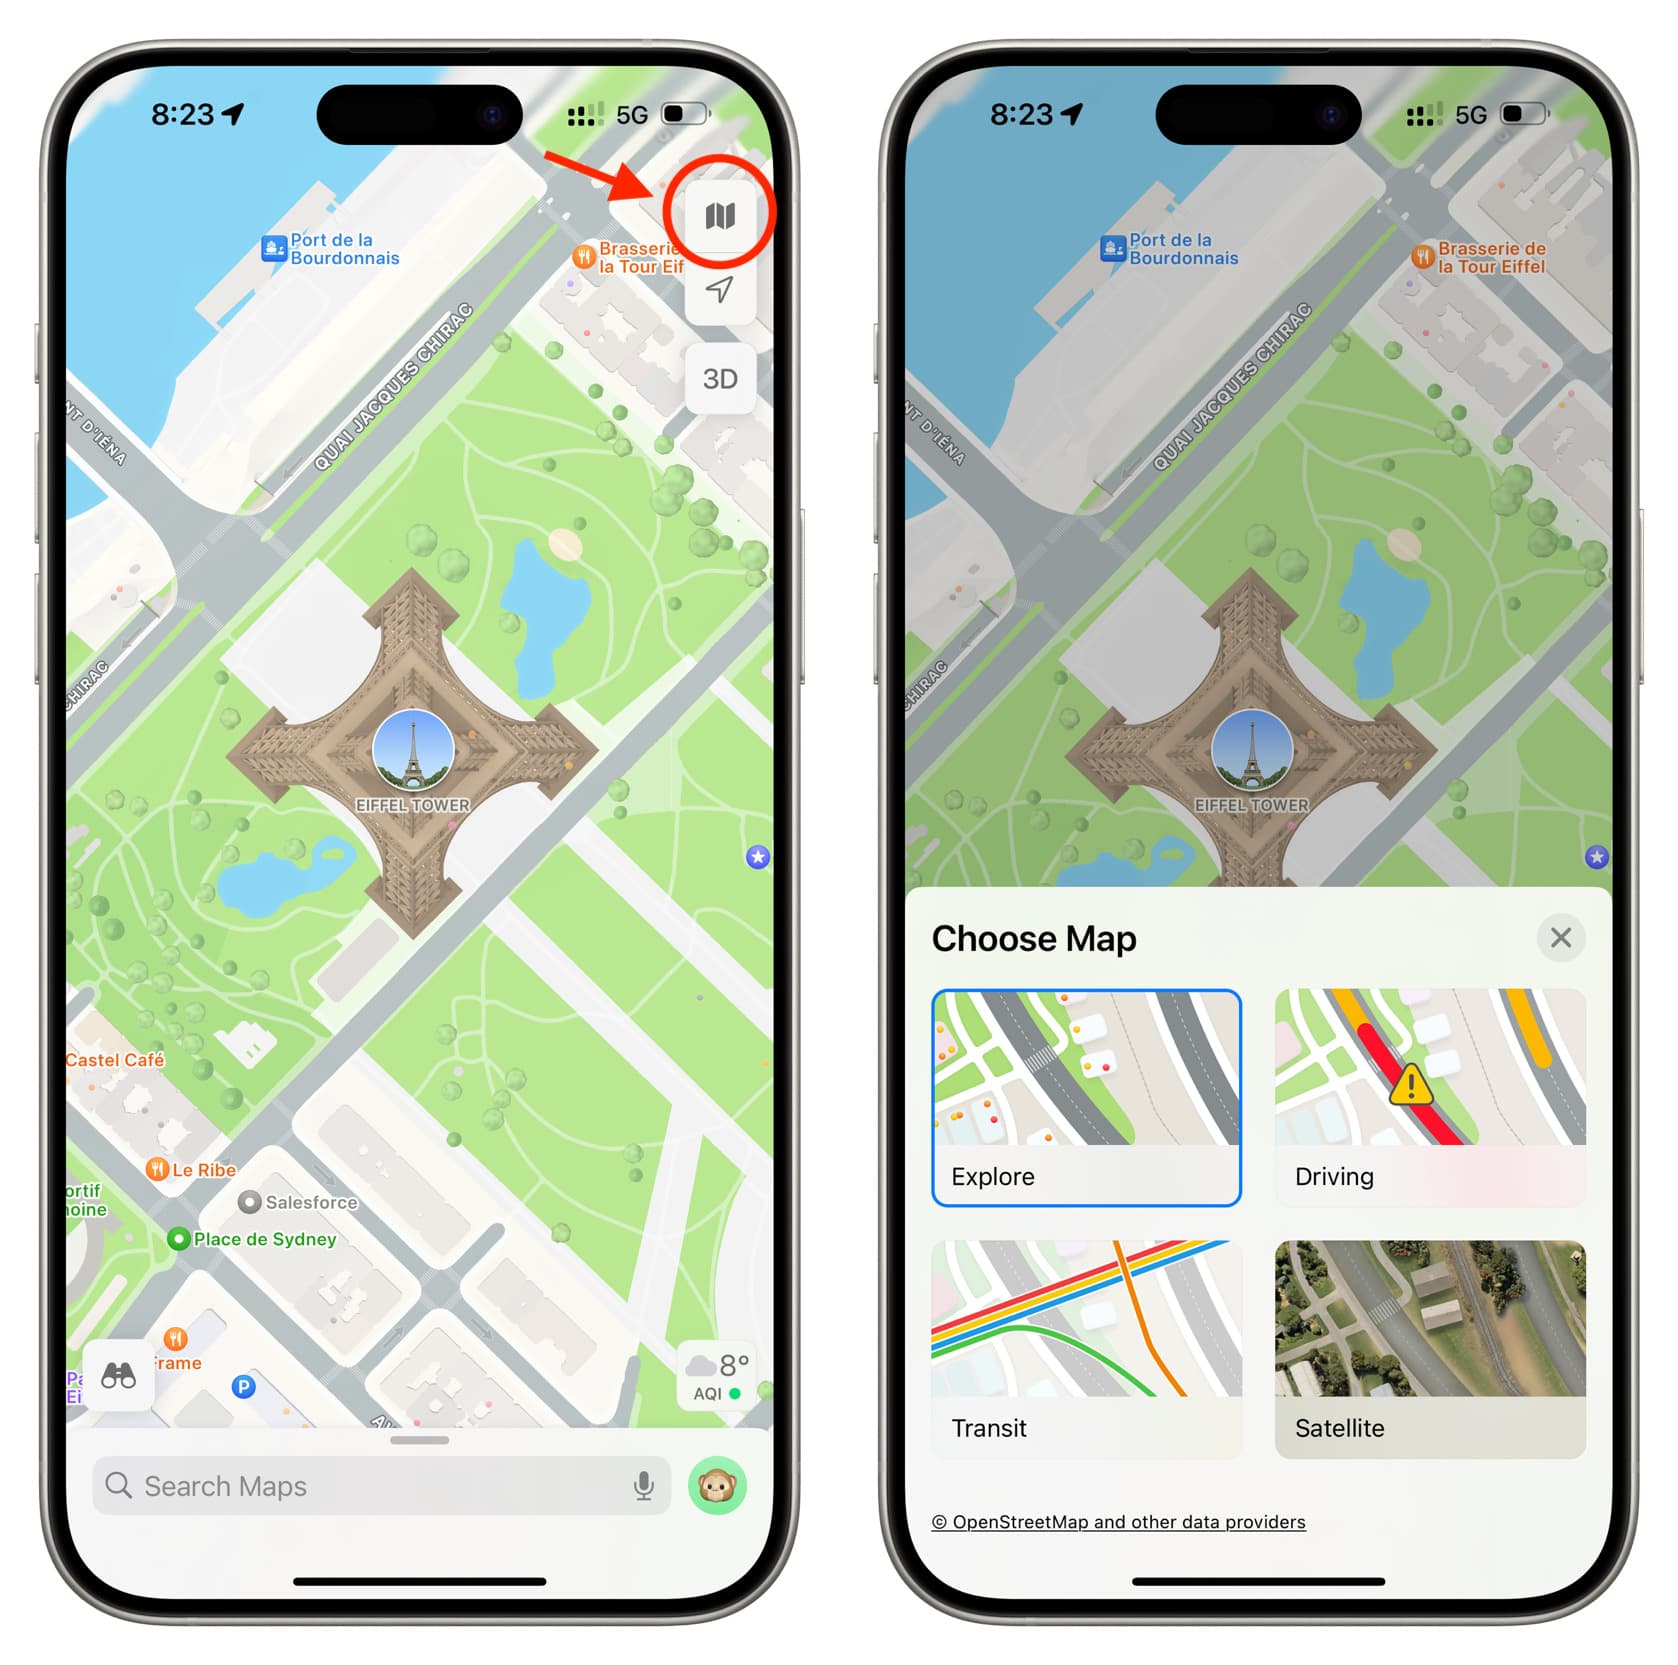
On Mac, you can switch between these views easily using the three buttons in the toolbar on the top right of the window.

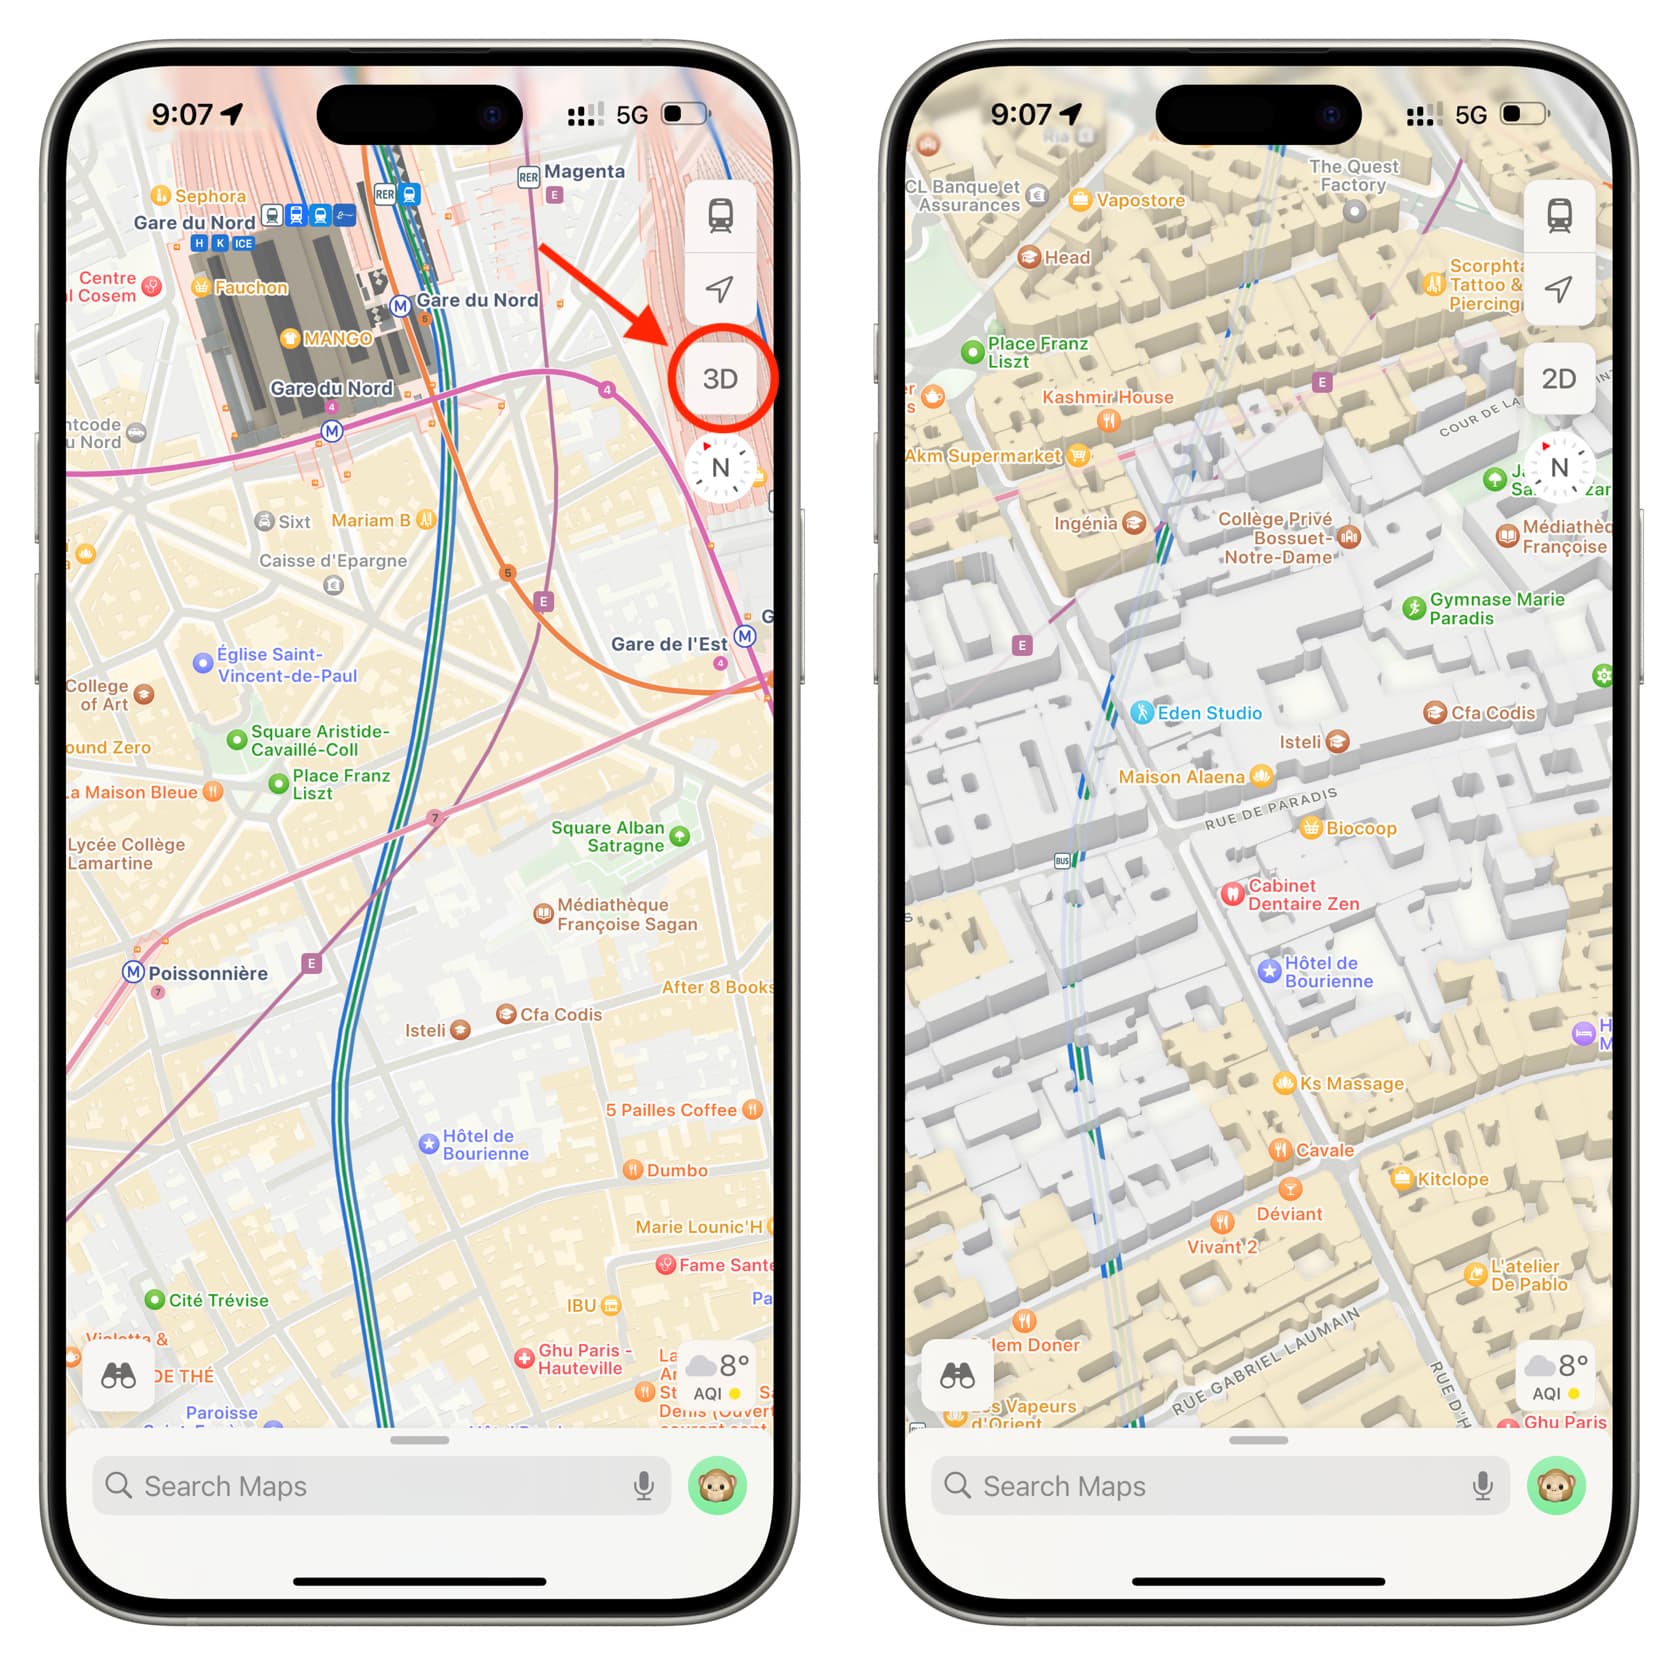
2. Change your perspective to 3D
When you open Maps, you’ll want to view the areas from the top, which is considered 2D. But you can change your perspective to 3D if you prefer.
The 3D view is especially cool if you use Satellite view for your map. Maybe you’re looking for a restaurant that you know is by that really tall building on Main Street. The 3D view lets you see elements on the map as if you’re standing by them.
To do that, tap the handy 3D button on the top right of the Apple Maps app on iOS or macOS. Additionally, you can also click View > Show 3D Map from the Mac’s top menu bar.
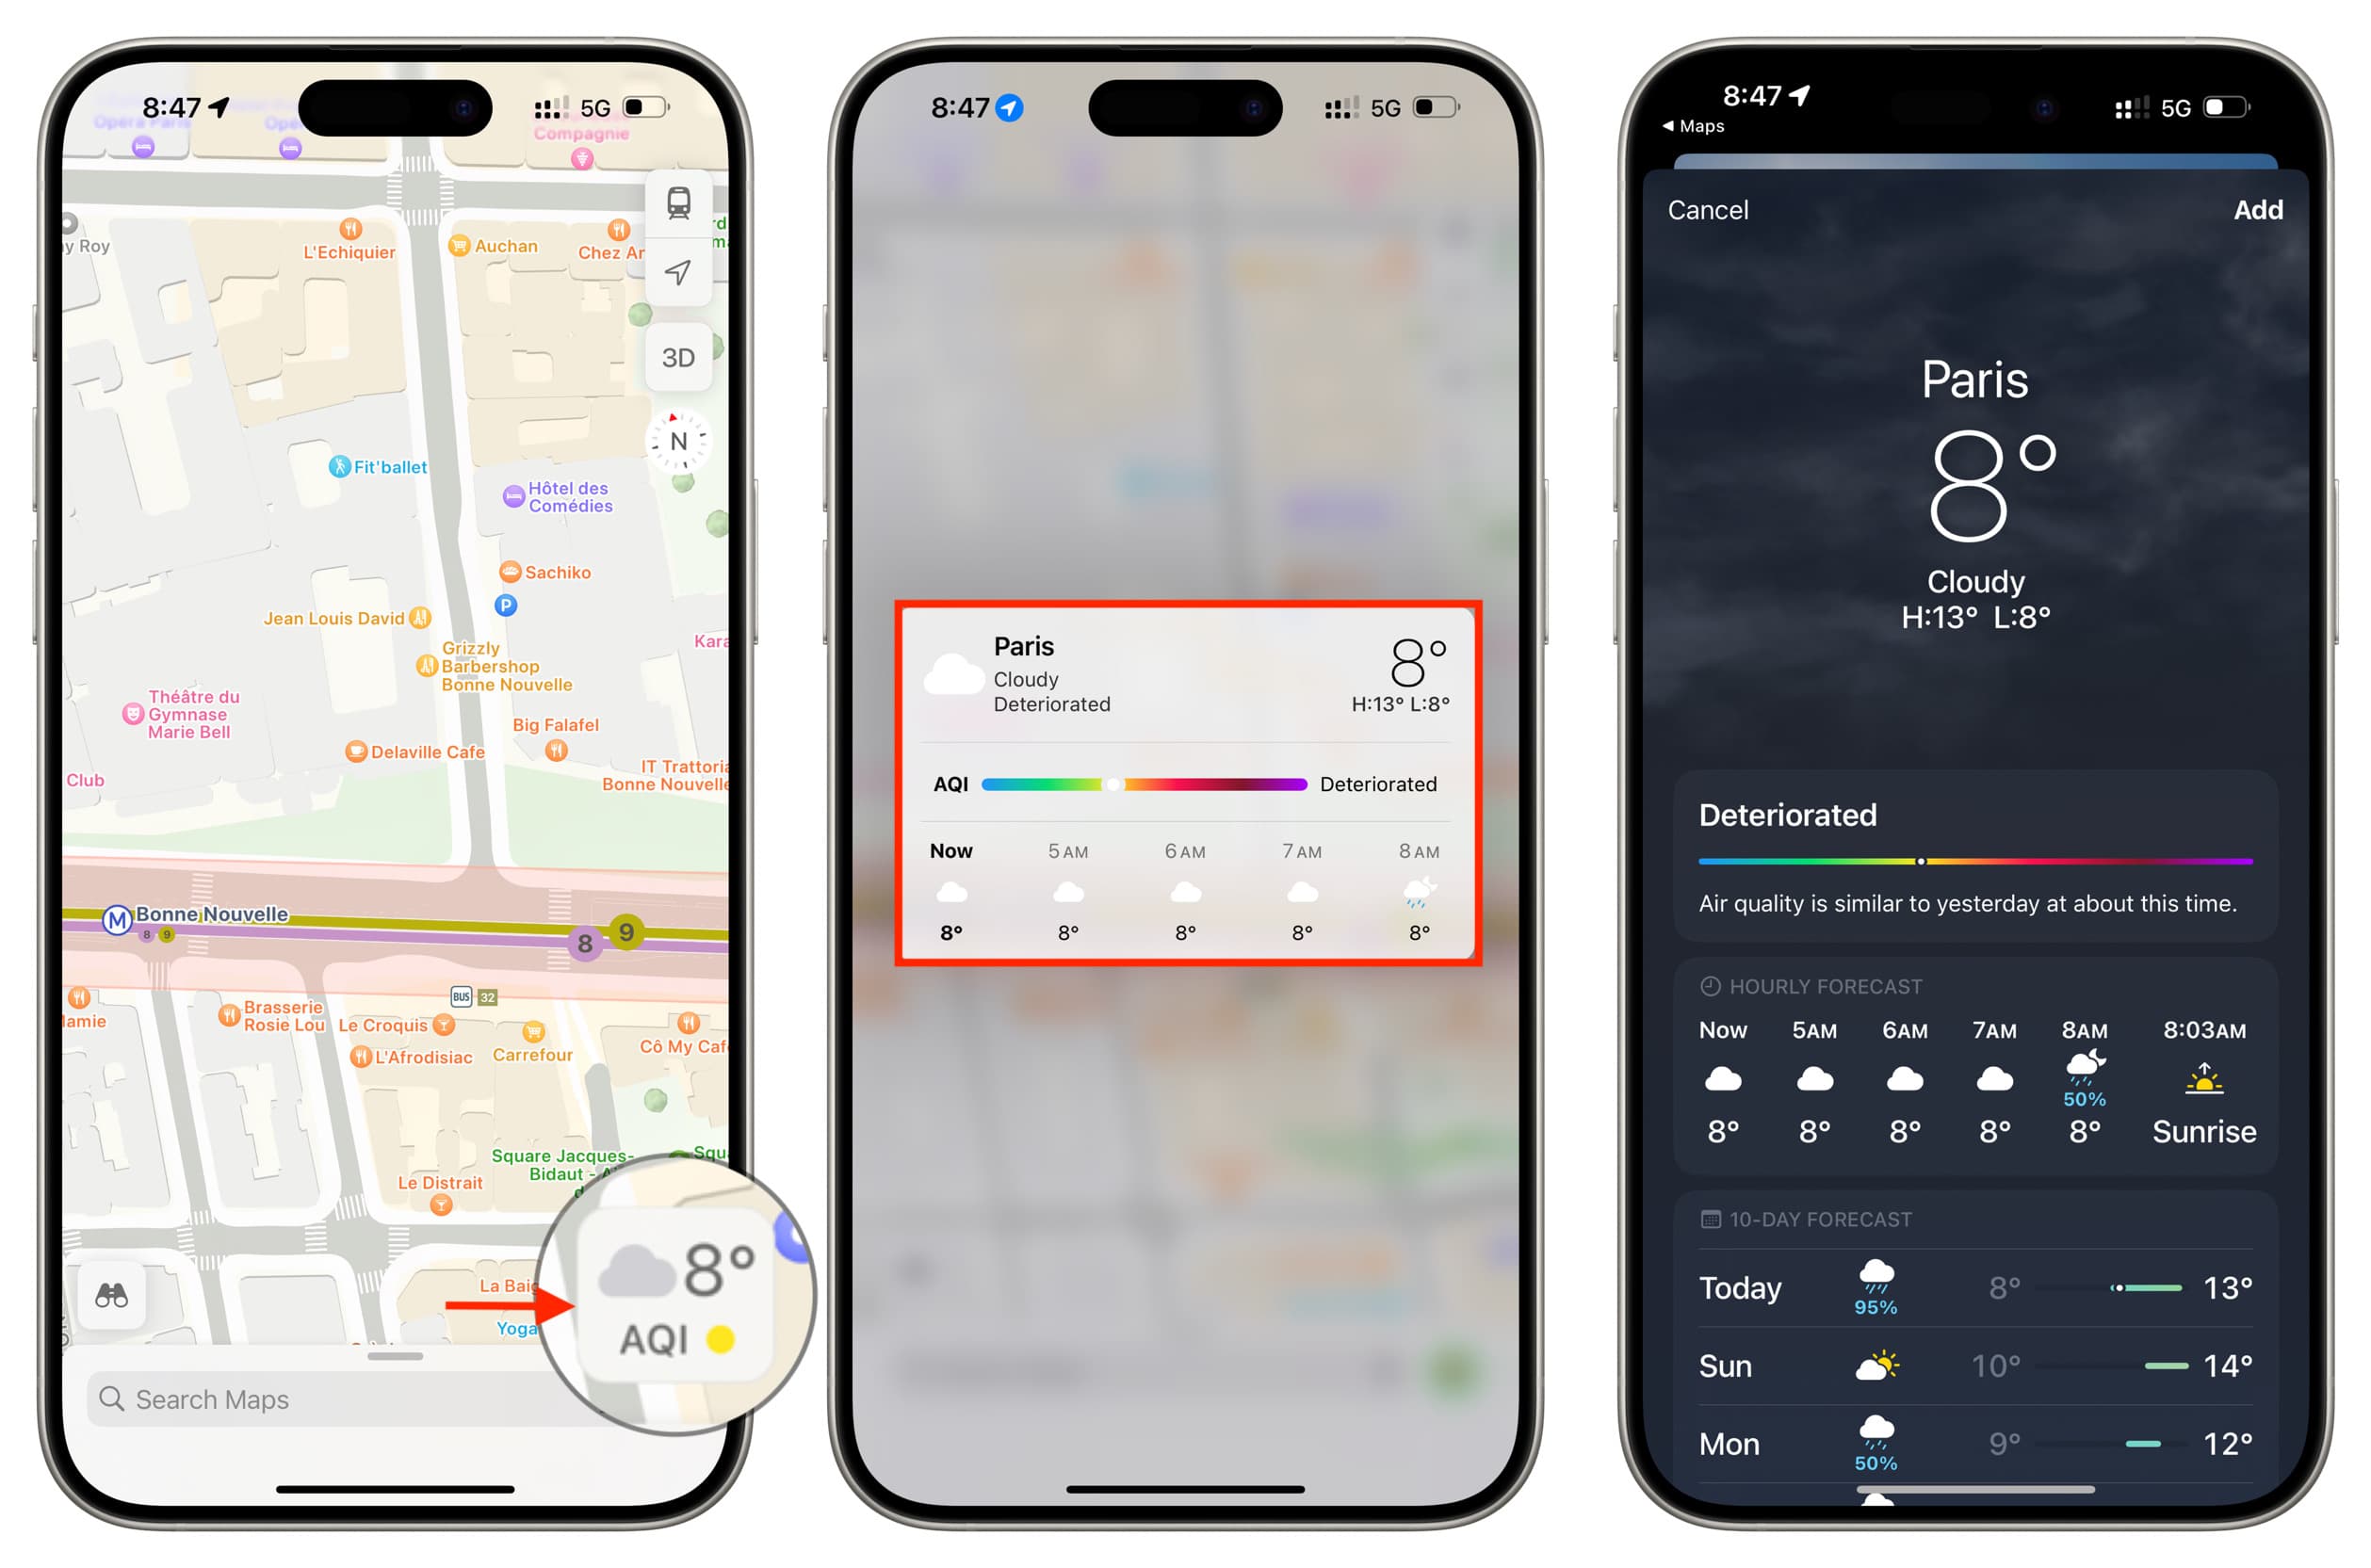
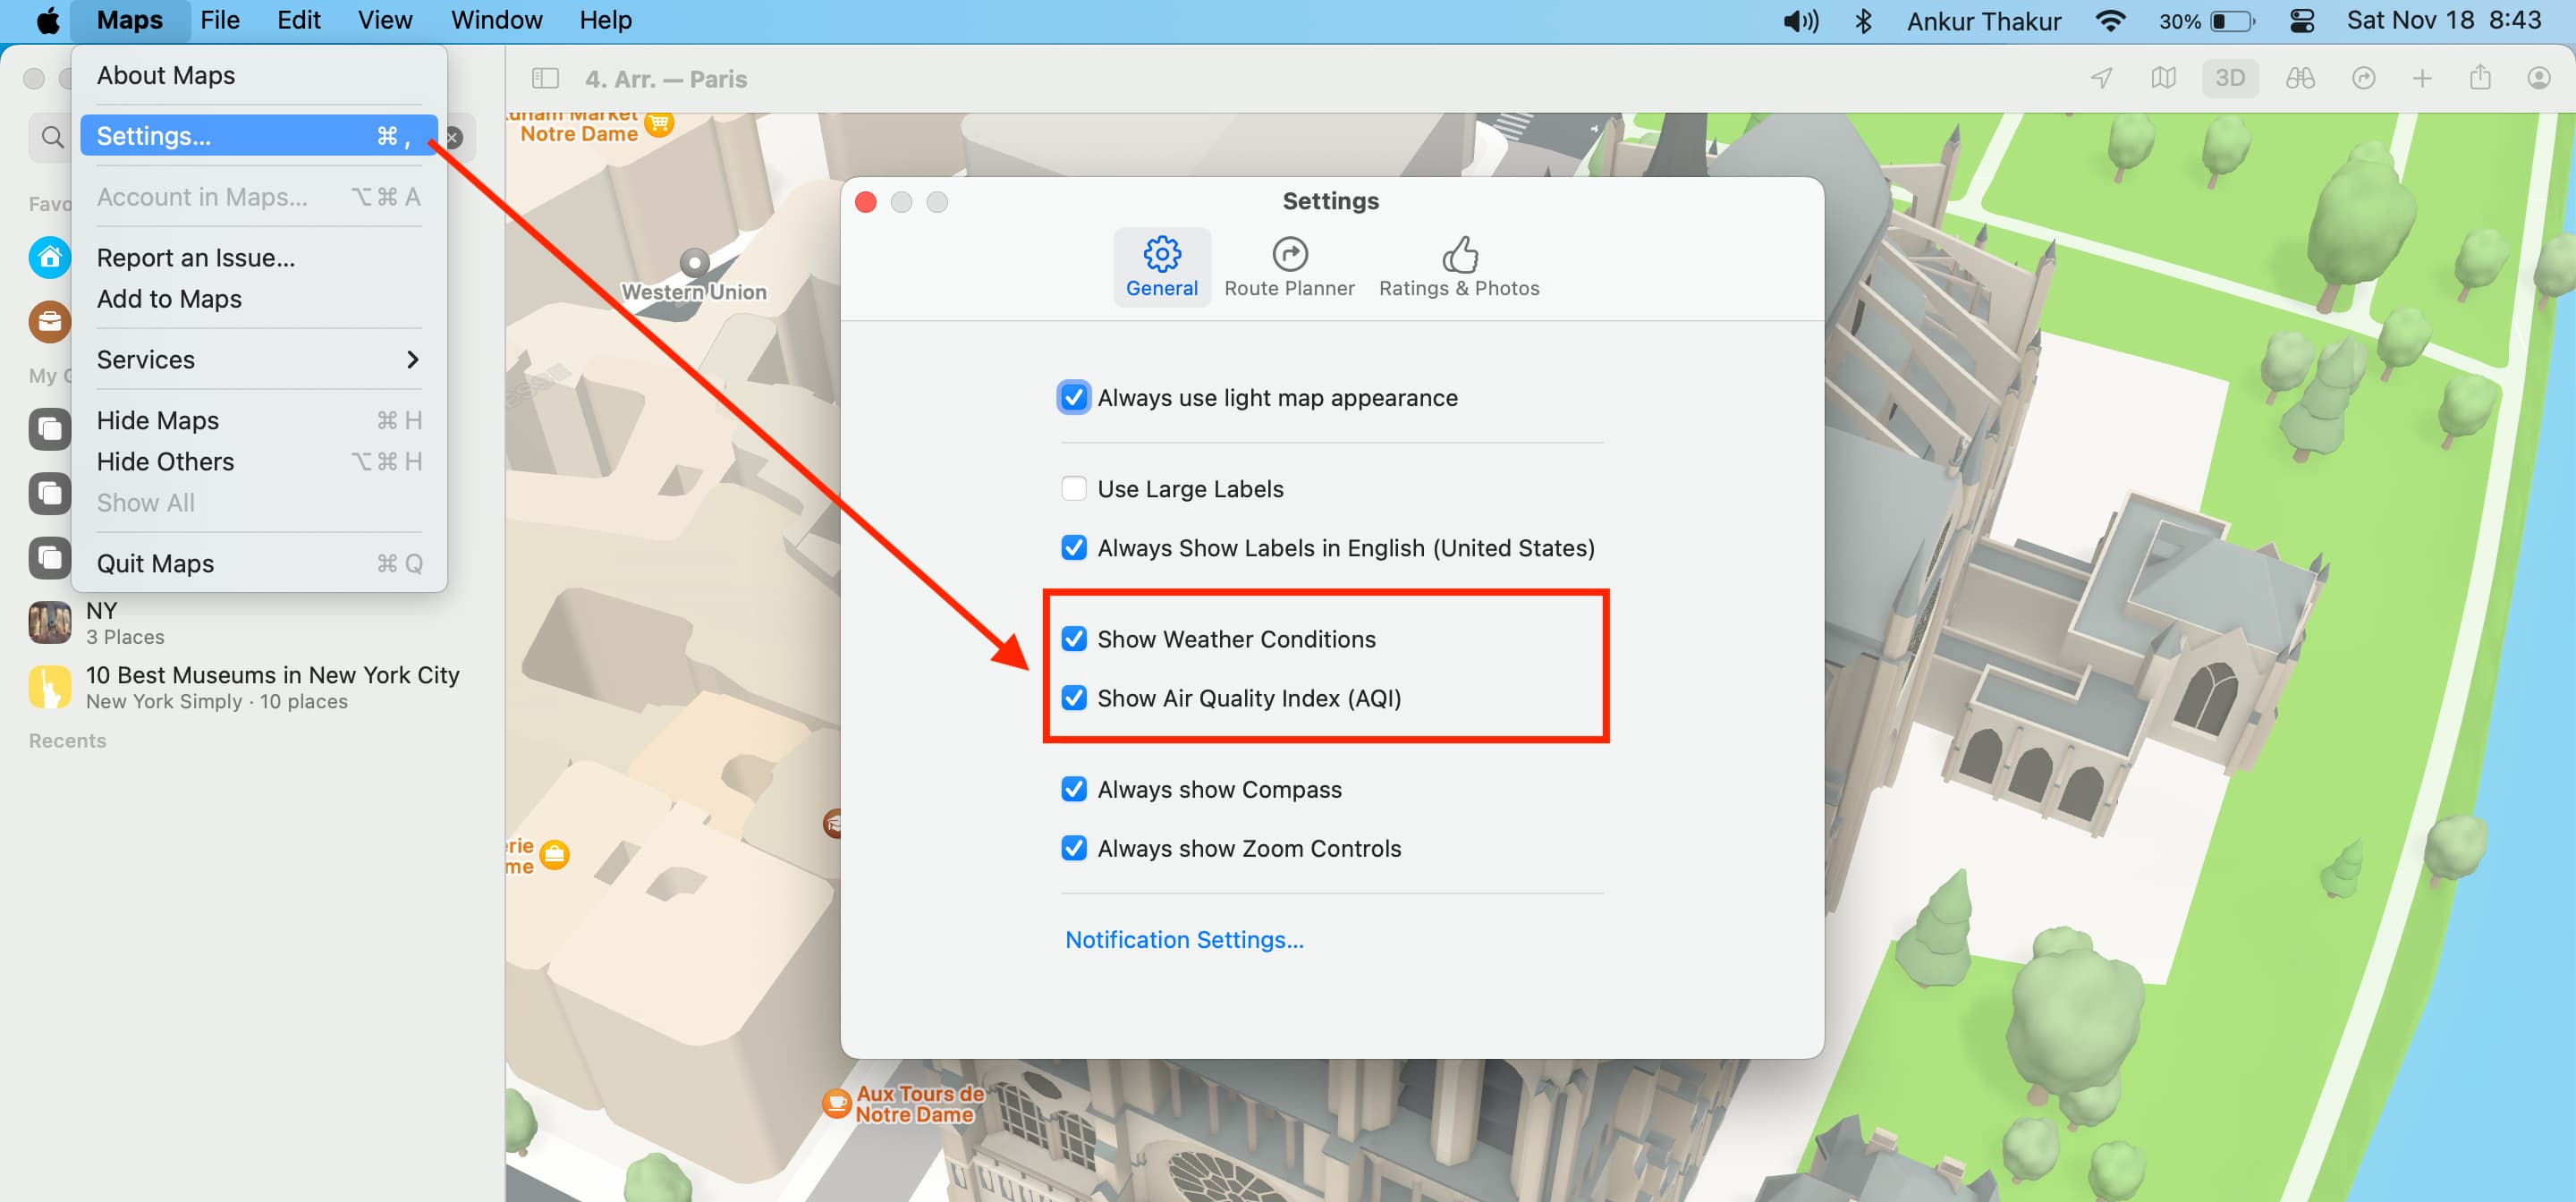
3. See the air quality and temperature for a place
If you’re traveling to a location a bit far from yours, getting the weather conditions and even the air quality for that spot can be convenient.
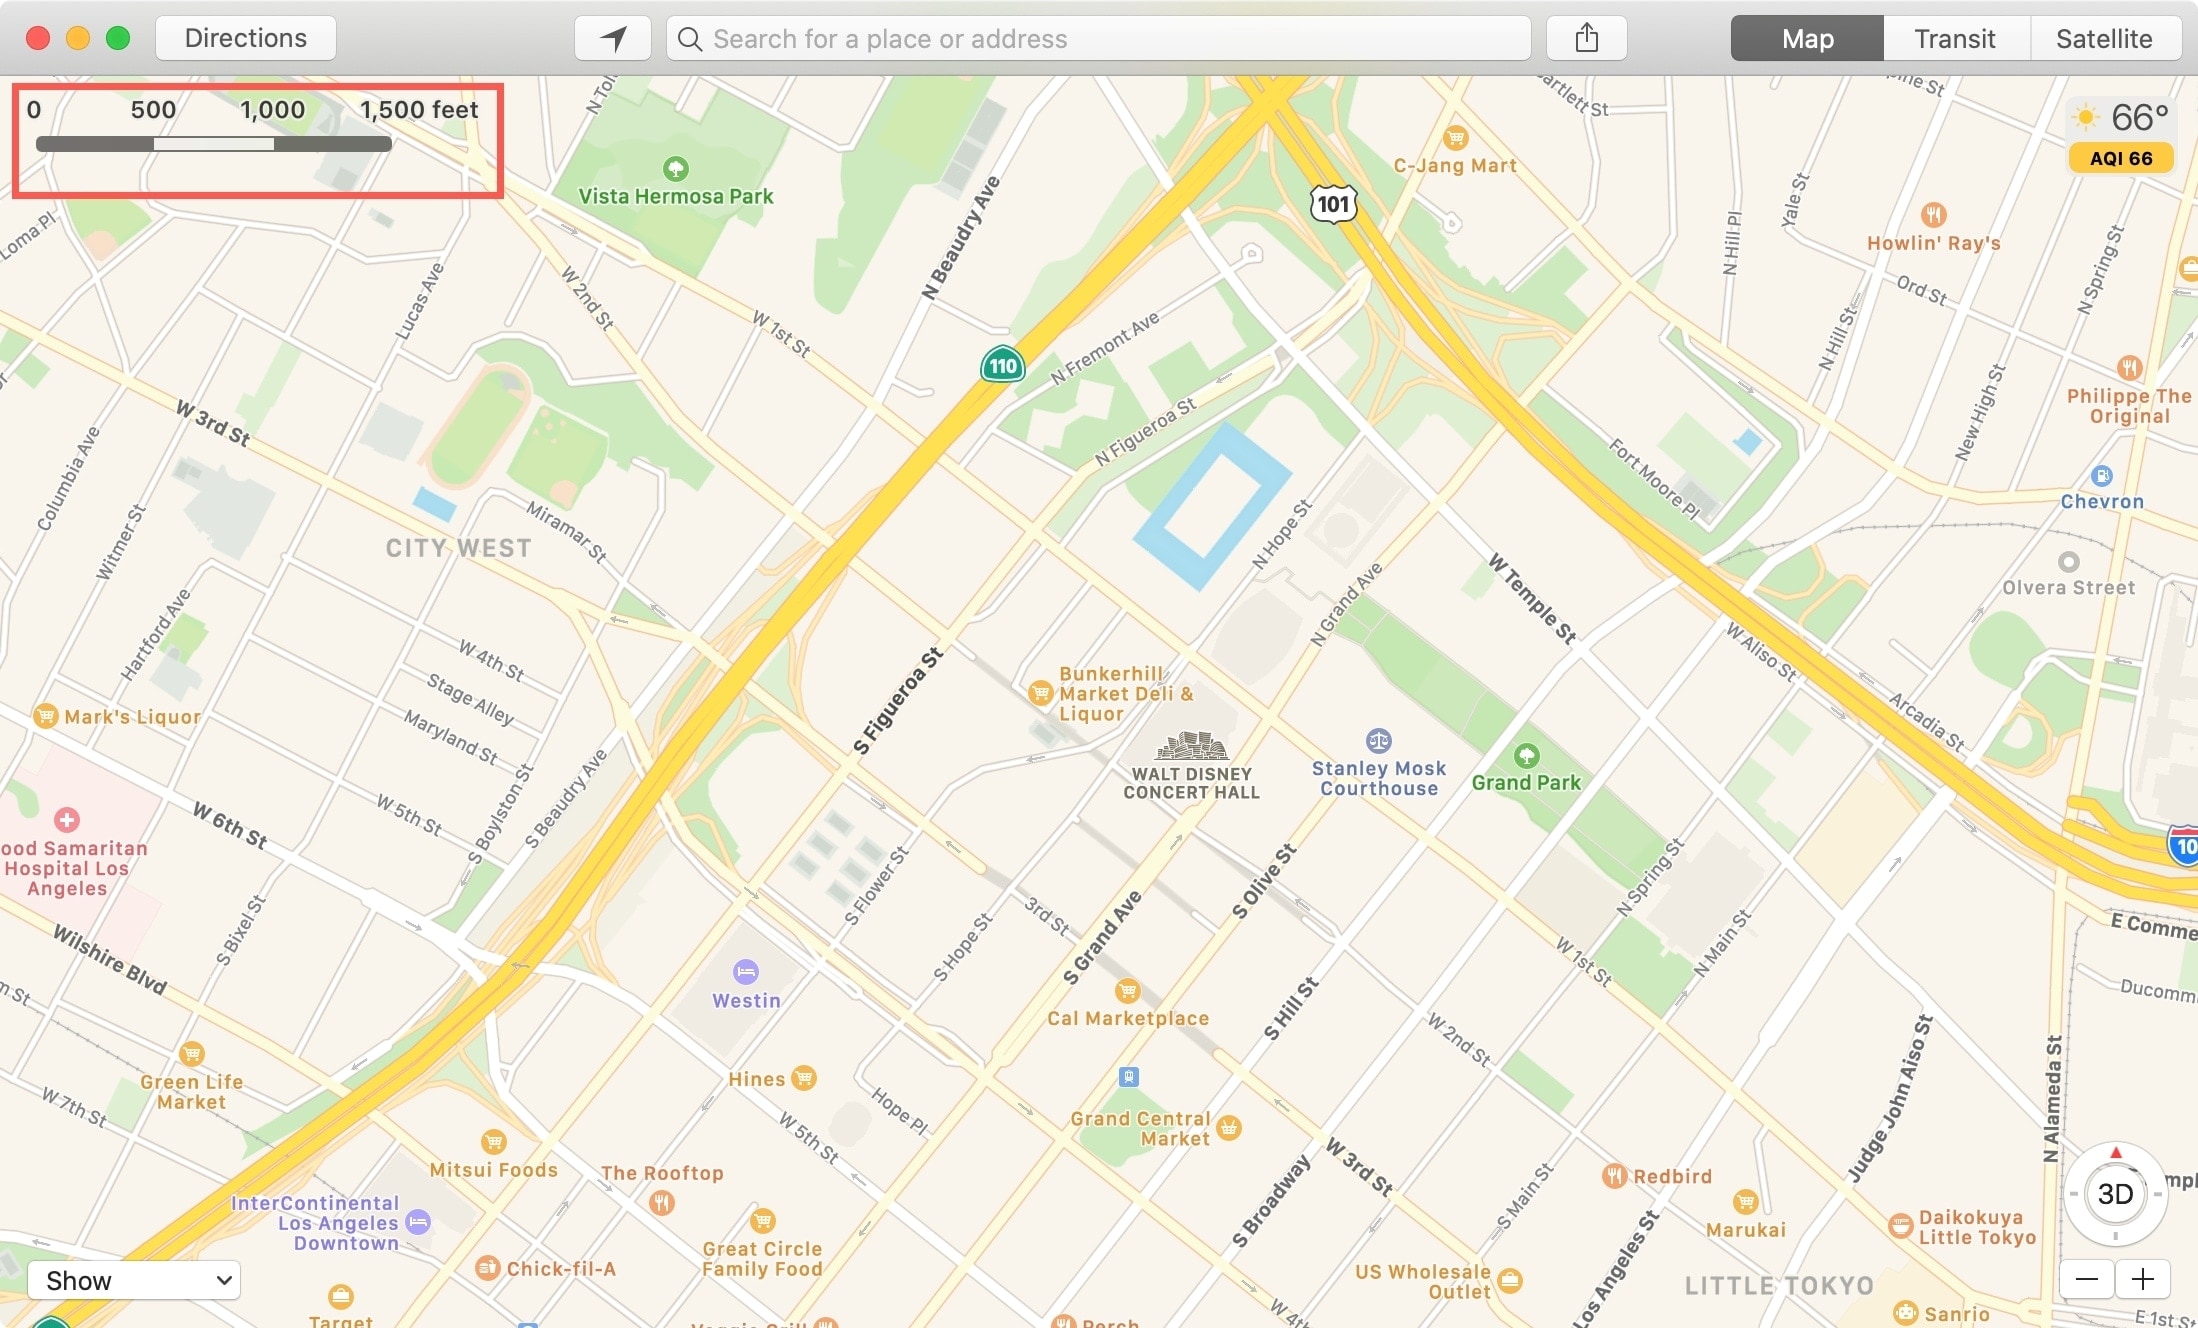
You can see the Air Quality Index (AQI) and temperature for a place at the bottom of the Apple Maps screen. On iPhone, you can tap & hold this tiny tile to expand it and then tap it again to open it in the iOS Weather app. On Mac, clicking it will open a relevant website.
In case you don’t see the air quality and temperature for a city in Apple Maps:
- Go to iPhone or iPad Settings > Maps and enable the toggle(s) for Air Quality Index and/or Weather Conditions under the Climate heading.
- On Mac, click Maps > Settings from the top menu bar and check the boxes for Show Air Quality Index and/or Show Weather Conditions under the General tab.
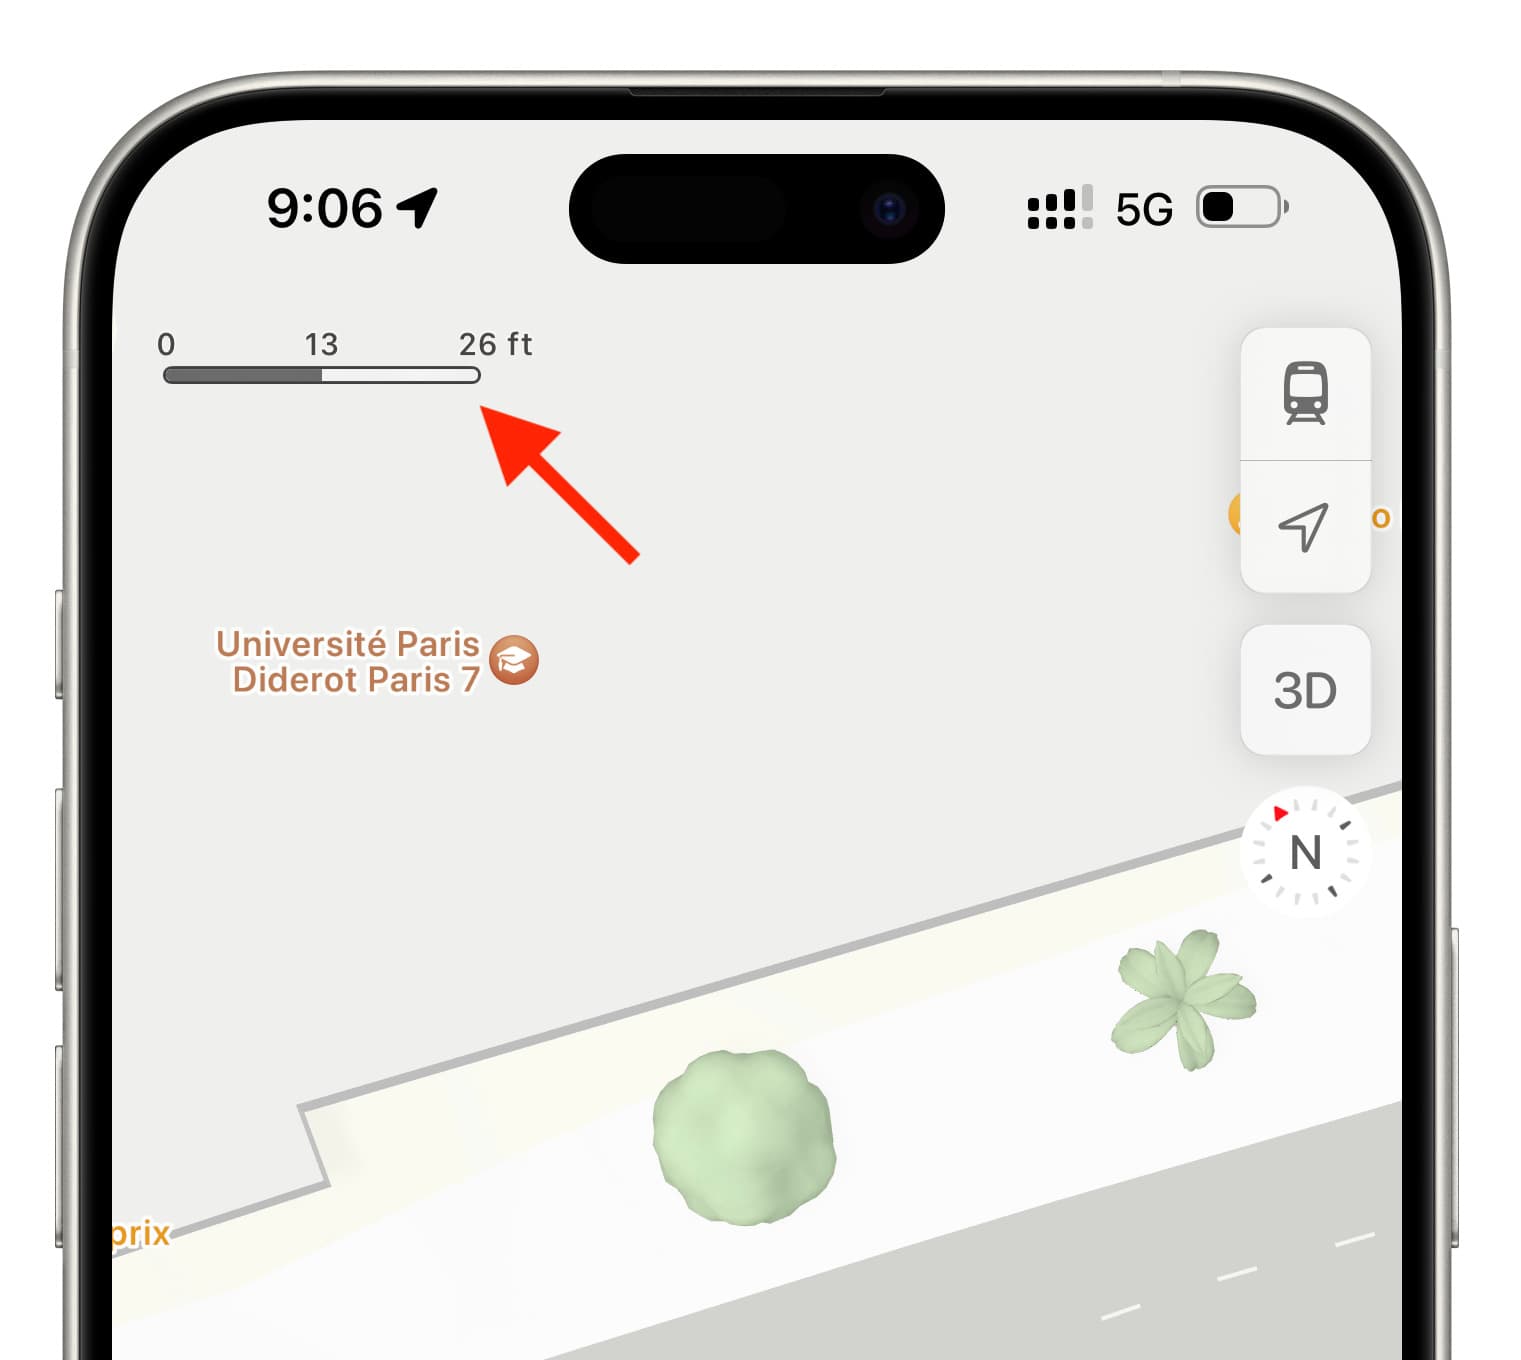
4. Use the distance scale
The Maps app lets you use either miles or kilometers for measuring distance, which is an important setting to customize in Apple Maps. Plus, you can view the distance scale on your map as well.
The distance scale in Maps works a bit differently on iOS than it does on Mac. On iPhone and iPad, you’ll see the distance scale as you zoom in and out, which allows it to adjust automatically. It does not remain on the screen, nor is there currently a setting to do so.
On Mac, the scale also adjusts as you zoom, but you’ll need to click View > Show Scale to see it. It’ll then display and remain on the top left corner of your map. Click View > Hide Scale to remove it.
Note: You will not see the distance scale if you are viewing maps in 3D.
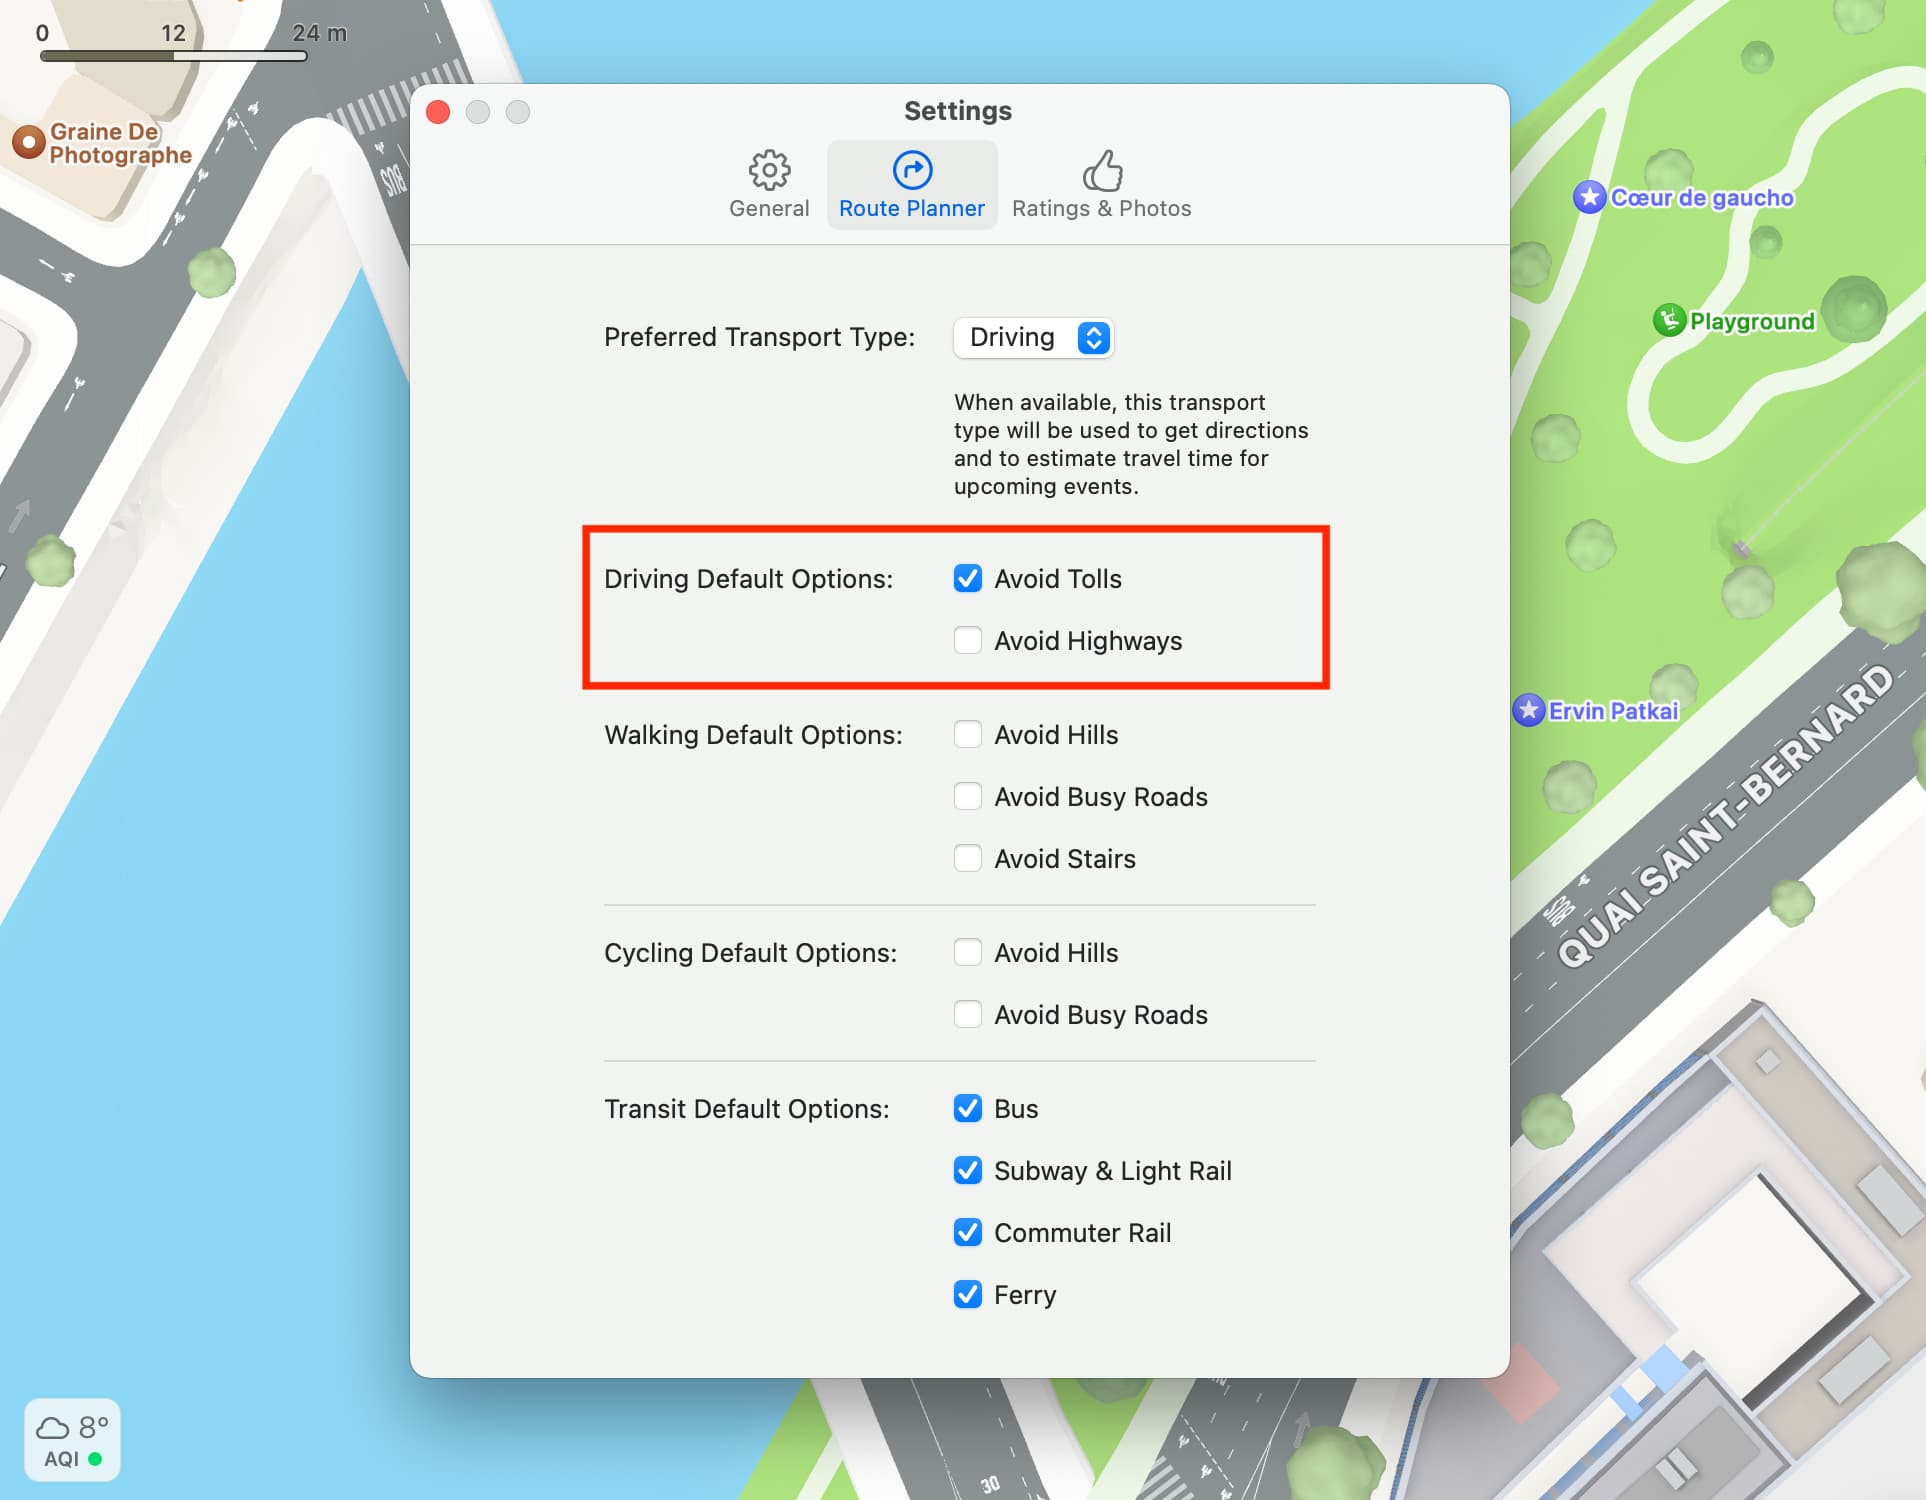
5. Select driving and transit options
If you switch between driving and transit directions in Apple Maps on your devices, there are a few settings for each of these that you can set up as default options to save some time in the future.
Driving direction settings
Maybe you’d like to avoid highways or stay away from toll roads when you travel.
On iPhone and iPad, open the Settings app on your device and select Maps. Tap Driving and enable the toggle(s) under Avoid at the top for Tolls and/or Highways.
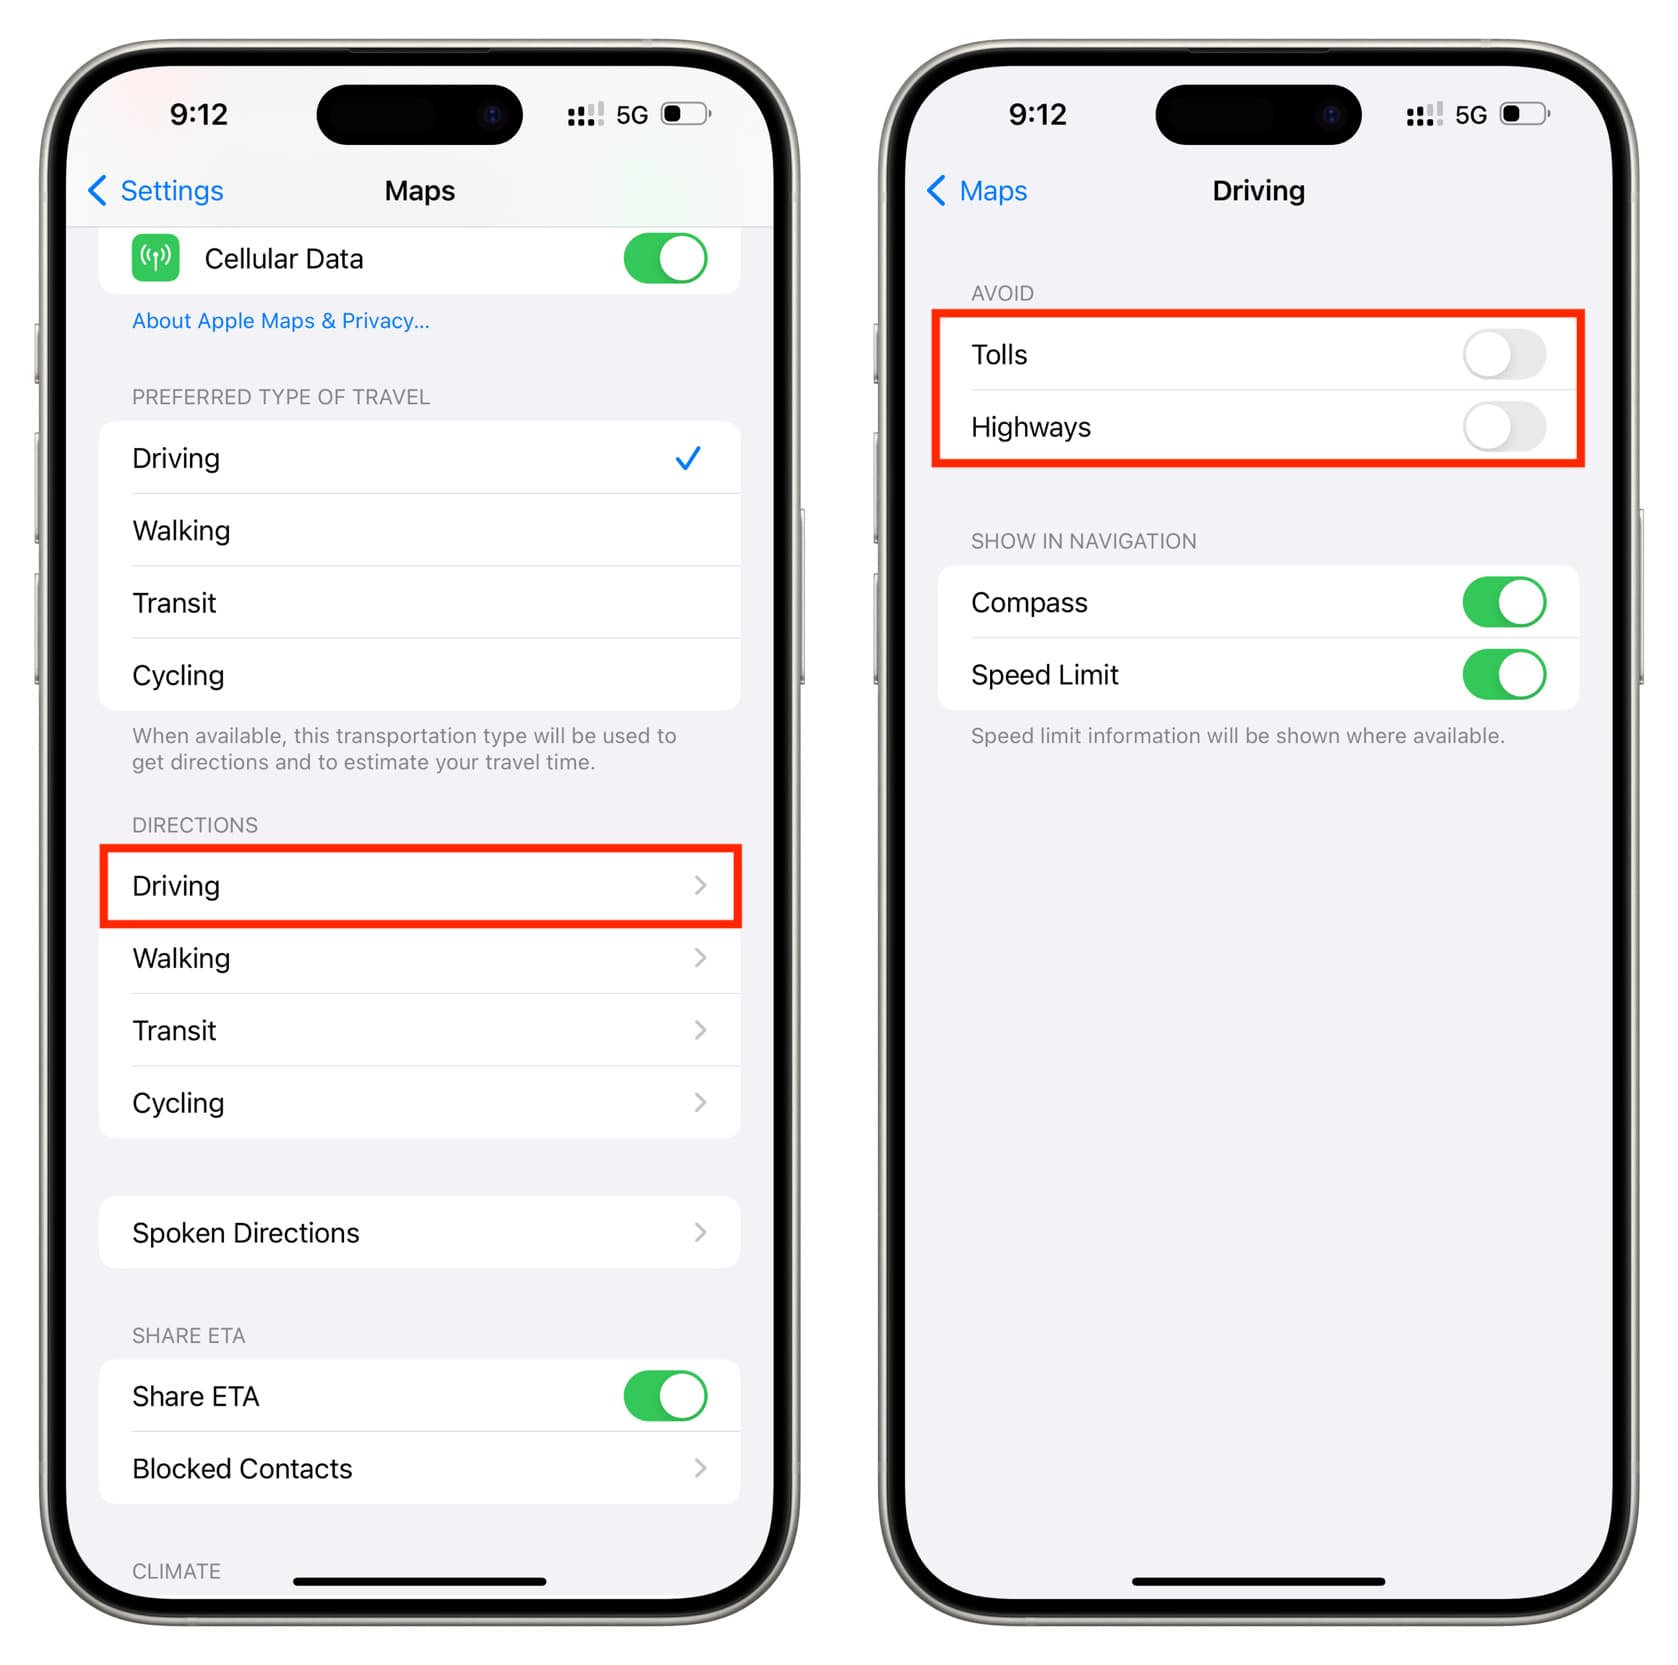
On Mac, open Apple Maps and click Maps > Settings from the top menu bar. Next, go to the Route Planner tab and uncheck or check the Avoid Tolls and/or Avoid Highways.
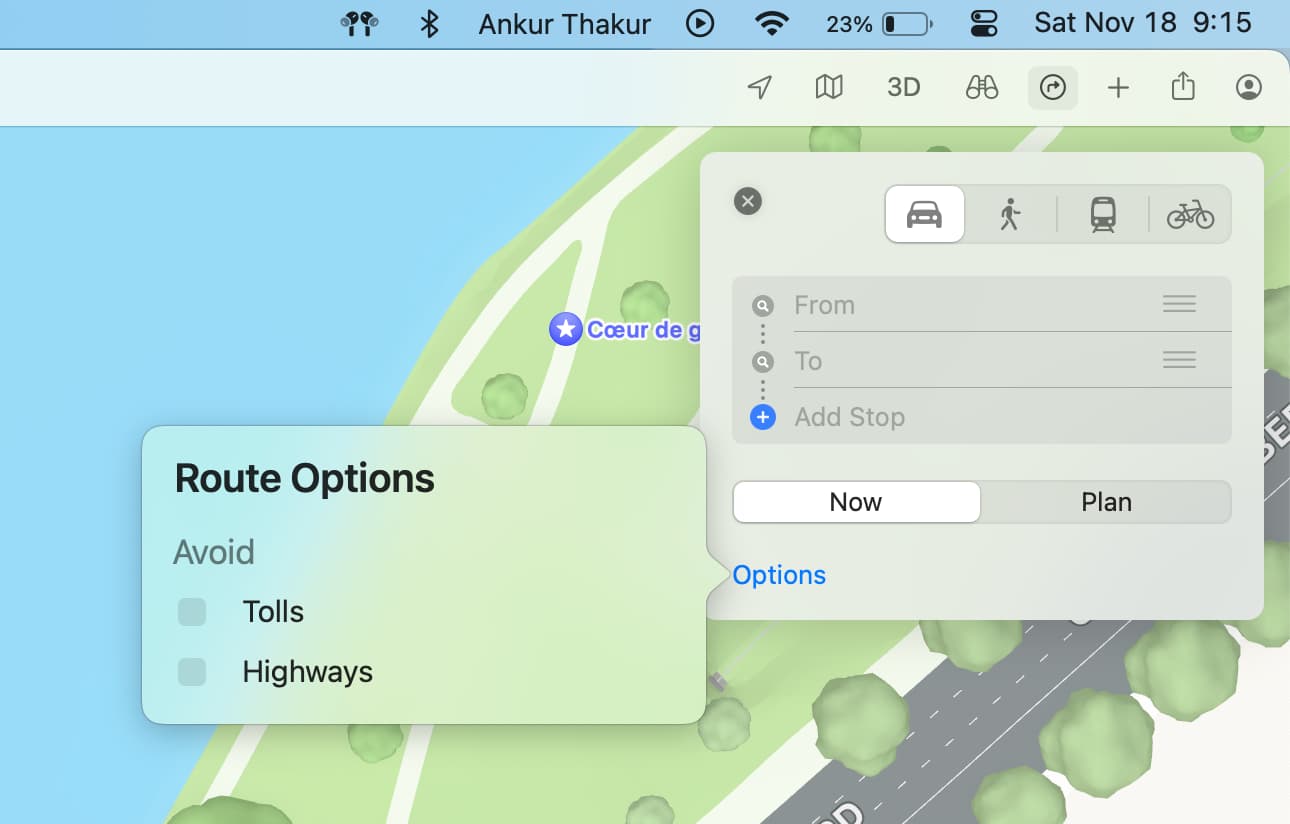
You can also choose this while planning the route by clicking the Options button and making your choice.
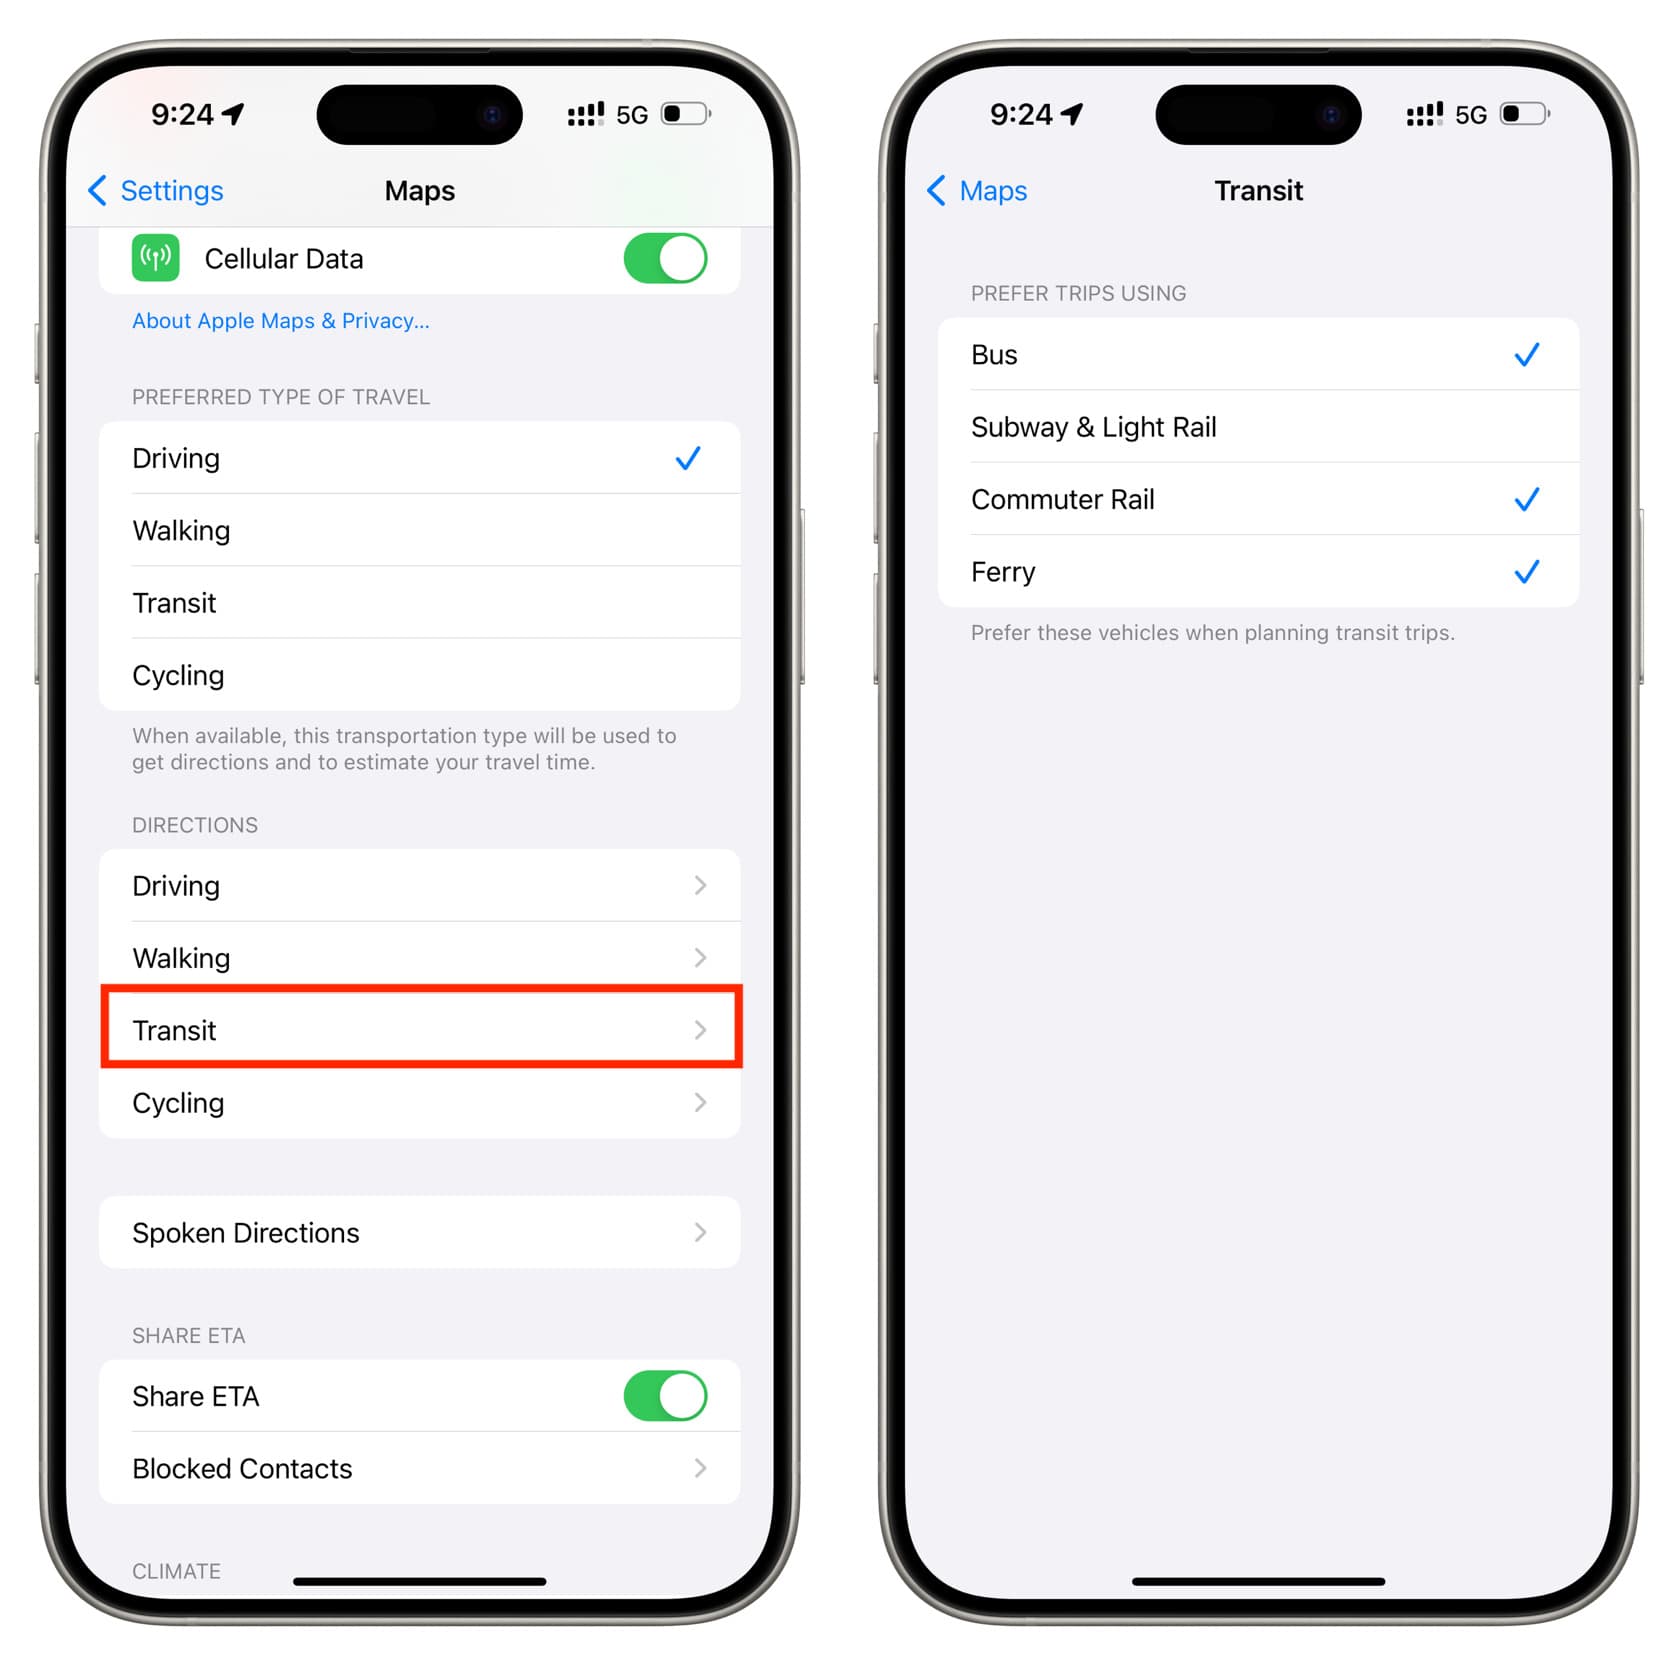
Transit direction settings
When it comes to public transportation, you may live in or visit a city that offers more than one type. Maps lets you select the type of transit to display by default.
On iPhone and iPad, open the Settings app on your device and select Maps. Tap Transit and mark Bus, Subway & Light Rail, Commuter Rail, or Ferry. You can mark them accordingly.
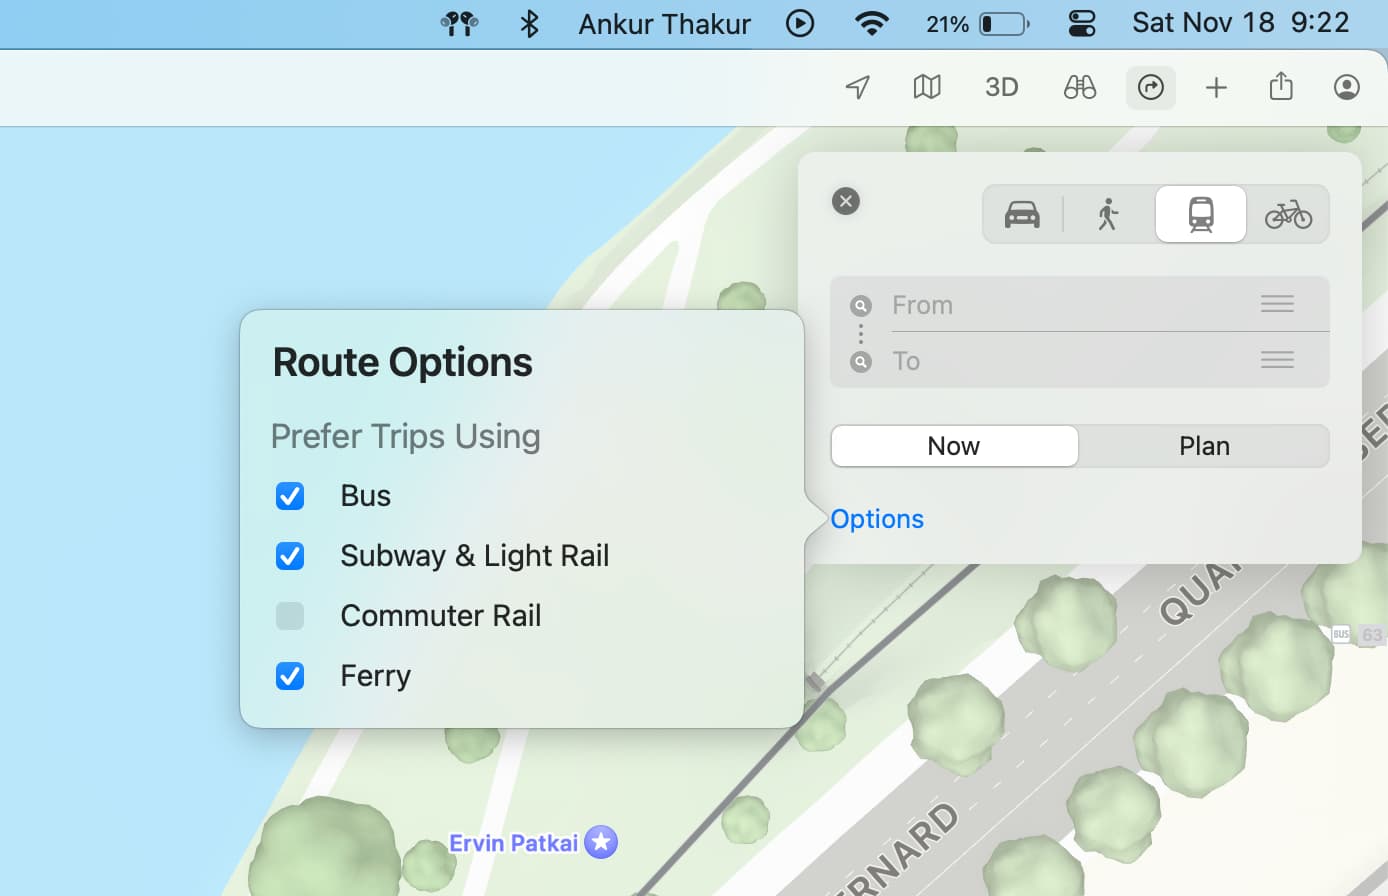
On Mac, you can do it under the Route Planner tab of the Apple Maps settings or while planning a route by placing a checkmark next to the one(s) you want to use.
6. View map labels
Labels are used to show you locations on the map, and you’ll see them for everything from streets to restaurants to parks. These labels are key to helping you in unfamiliar areas and display by default in Map and Transit view. But you have a few settings for the Labels that you should be aware of and customize in Apple Maps per your device.
On iPhone and iPad
Unfortunately, the only setting for Labels available in Maps on iOS currently is for language. However, if you’re using Maps outside the U.S., this is an important one.
On iPhone and iPad, open the Settings app on your device and select Maps. Under Map Labels is a toggle for Always in English. If you use Maps in another country with a different dialect, you may want to enable or disable it, depending on your understanding of the language.
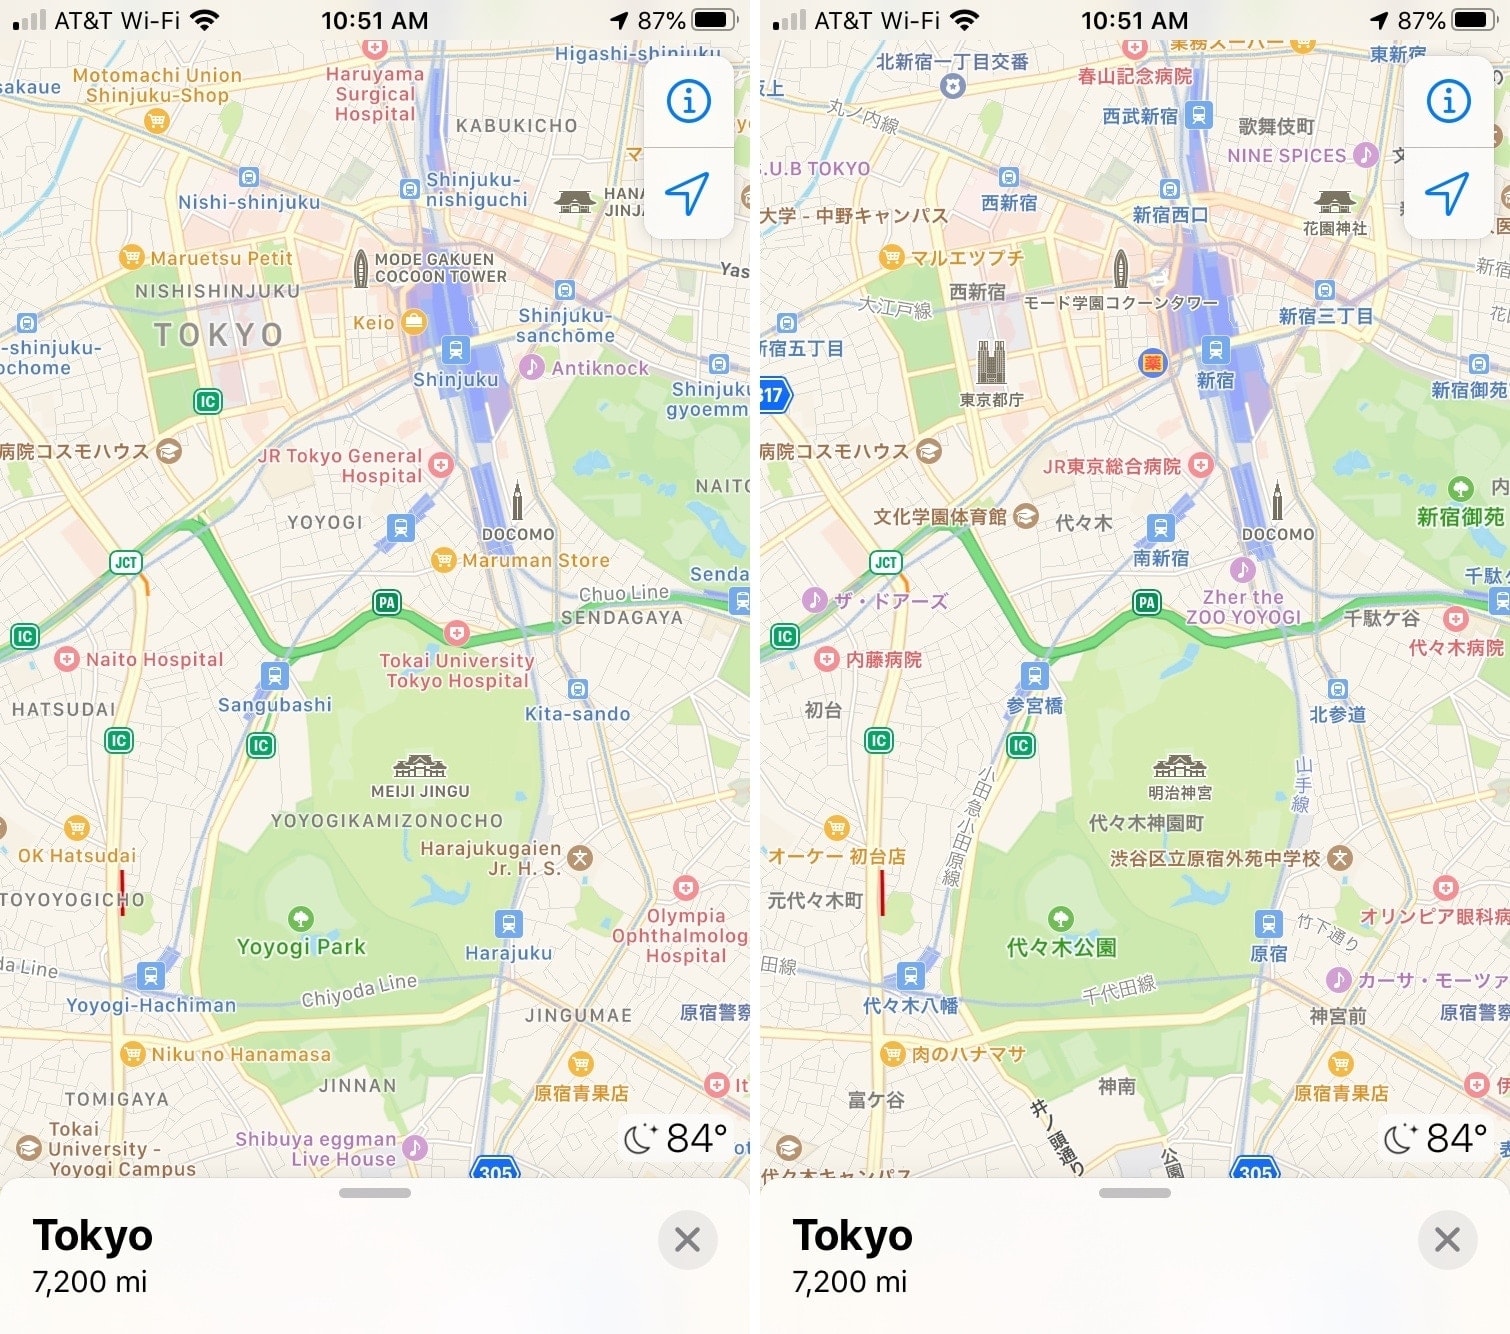
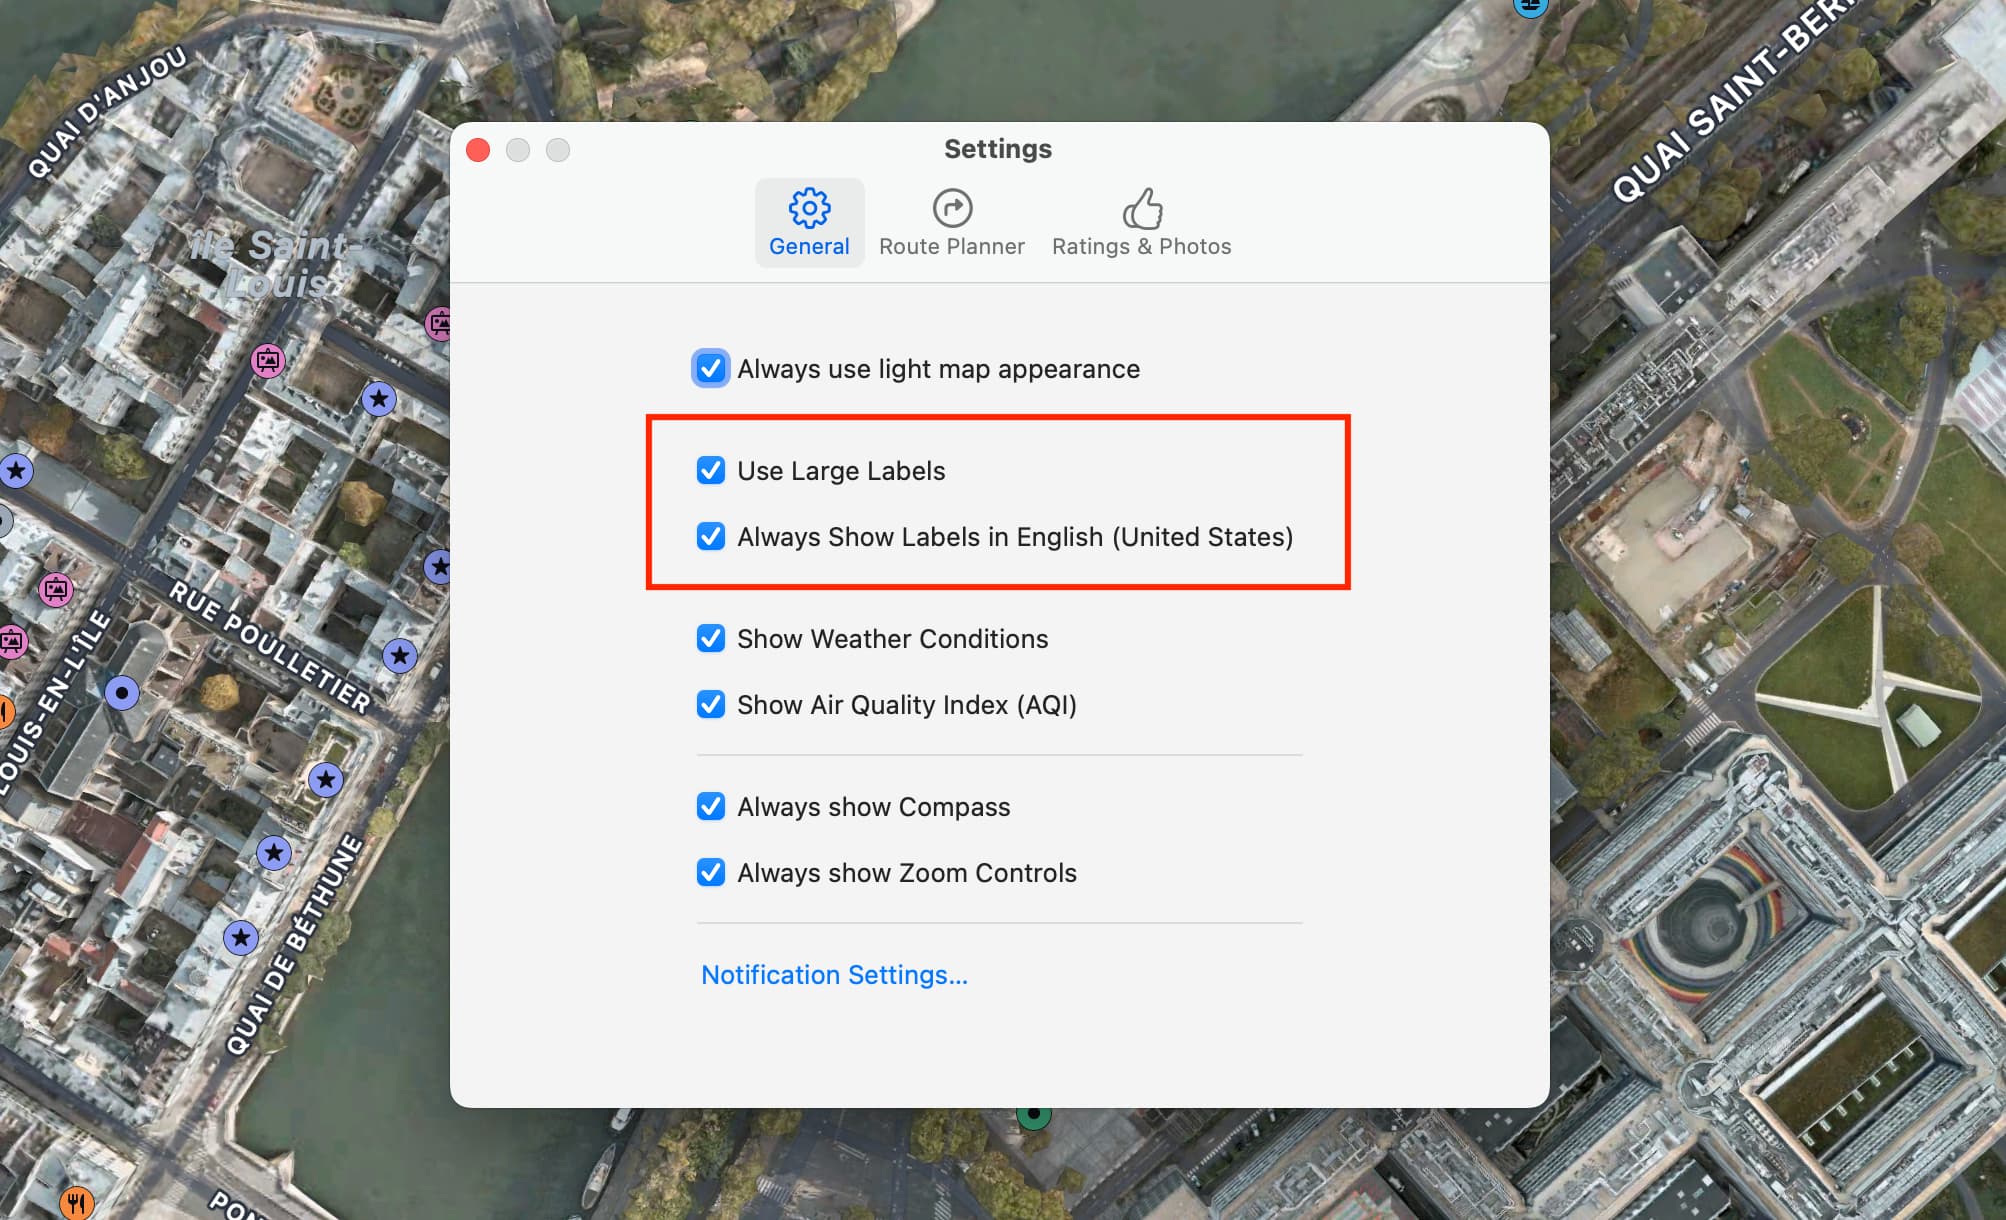
On Mac
On Mac, you have a few more settings for Labels to check out.
- To enable Labels in Satellite view, first, make sure you have Satellite selected in the toolbar. Then click View > Show Labels from the menu bar.
- You can also go to Apple Maps settings and choose to Always Show Labels in English or Use Large Labels.
With some simple changes, you can make the Apple Maps app fit your needs and your preferences. Each setting is easy to change, so you can revert it if you need to for a particular trip or by default.
Which setting in Maps do you make sure to have set for all of your trips on each of your devices? Let us know your favorite way to customize Apple Maps!
Check out next: