 Rather than budget for a new computer, sometimes you can put together a deal that will keep you going with what you already have – or what you can get your hands on cheap – that turns out to be a better value. That’s what I discovered recently with a 13-inch MacBook Pro (Mid 2012) that I got my hands on. Here’s what I did.
This tutorial will walk you through the process of installing RAM inside an older 13-inch MacBook Pro. 13-inch MacBook Pro models are plentiful and have been very popular throughout their entire production run. They combine the right amount of screen real estate with the right amount of performance to provide most of us with what we need to get our work done. The instructions in this guide should be applicable to the following 13-inch MacBook Pro models:
- MacBook Pro (13-inch, Mid 2012)
- MacBook Pro (13-inch, Late 2011)
- MacBook Pro (13-inch, Early 2011)
- MacBook Pro (13-inch, Mid 2010)
- MacBook Pro (13-inch, Mid 2009)
13-inch MacBook Pro RAM Installation Guide
- Why bother?
- Order the right RAM for your 13-inch MacBook Pro
- Install the RAM in your 13-inch MacBook Pro
- Start up your MacBook Pro
- Troubleshooting your RAM installation
Why bother?
Why not just replace the computer altogether? That’s certainly one valid approach, depending on your budget and your needs. Certainly Apple and Mac app developers have moved the goalposts a lot over the years, and if your needs have moved along with the current state of the art, it may very well be that putting more money into an older Mac isn’t worth your time or your effort.
For me, I prefer to keep using things for as long as they’re useful. And a 2012 MacBook Pro is still useful to me, even seven years later. I use my Macs mainly for web surfing and web page editing, some light graphics work, and lots of productivity software, text editing, and other tasks that might be marginally faster with newer hardware, but certainly sufficient for me to get by on an older Mac.
I got a chance to rehab this unit after its previous owner did that “fix it or replace it” calculation and decided that, at least in their case, it wasn’t worth it. You know what they say: One person’s trash is another one’s treasure. I couldn’t resist.
To get this puppy running with Catalina and a suite of applications I depend on, all I needed to do was upgrade the RAM from its stock 4 GB configuration and replace a hard disk drive with an SSD. By the end of it, I was out only about $100 in parts after I shopped around.
$100 for a working Mac laptop running the latest macOS software is a solid deal, as far as I’m concerned. If you already have a MacBook Pro to work with, you’re going to be looking at a similar expense. Given that a new 13-inch MacBook Pro is more than an order of magnitude more, I don’t regret putting this good money into a bad computer to get it working again. Because now it’s running quite nicely and will be for a while longer. When I can eke out another year or two of life from hardware that’s still working well, I consider that good value, when a few cheap parts and a couple of hours of sweat equity is all it takes to keep it going.
My first step was to give Catalina and the apps I use a little more breathing room than the paltry 4GB that Apple included on this Mac. Even though an SSD was in my budget and would speed things up, I knew that my heavy dependency on lots of open tabs in Safari and a dozen or so open applications at any given time would end up sending this poor Mac into swap memory hell. So I ended up budgeting for a nice beefy RAM upgrade that maxed out this older Mac’s ability.
Order the right RAM for your 13-inch MacBook Pro
From 2009 to 2012 Apple changed little about the way the 13-inch MacBook Pro was made. They steadily ratcheted up performance but internally the devices are very similar. So the same basic procedure applies for installing RAM in any of these devices.
What you need to know ahead of time is how much RAM your particular model can handle (8-16 GB for the model range I’m discussing), and what speed you need to get. You can find both of these things by clicking on the Apple menu, selecting About this Mac, and clicking on the Memory tab. This will produce a window showing you how many memory slots your computer has, and what sort of memory module you can use.
Most vendors that sell RAM suitable for these models offer some sort of guide or way for you to make sure you’re getting the right thing, as well. Always buy DIMMs in pairs. These 13-inch MacBook Pro models have two DIMM slots; they should both be occupied by a pair of DIMMs with identical characteristics.
The specs on what RAM to install and how much each machine can take will vary, so if you are confused, the best thing to do is to check with Apple to find out for sure. Also bear in mind that 2012 is the cutoff for Catalina, so upgrading your older Mac might make it run faster, but it won’t let it run any newer software than what Apple allows.
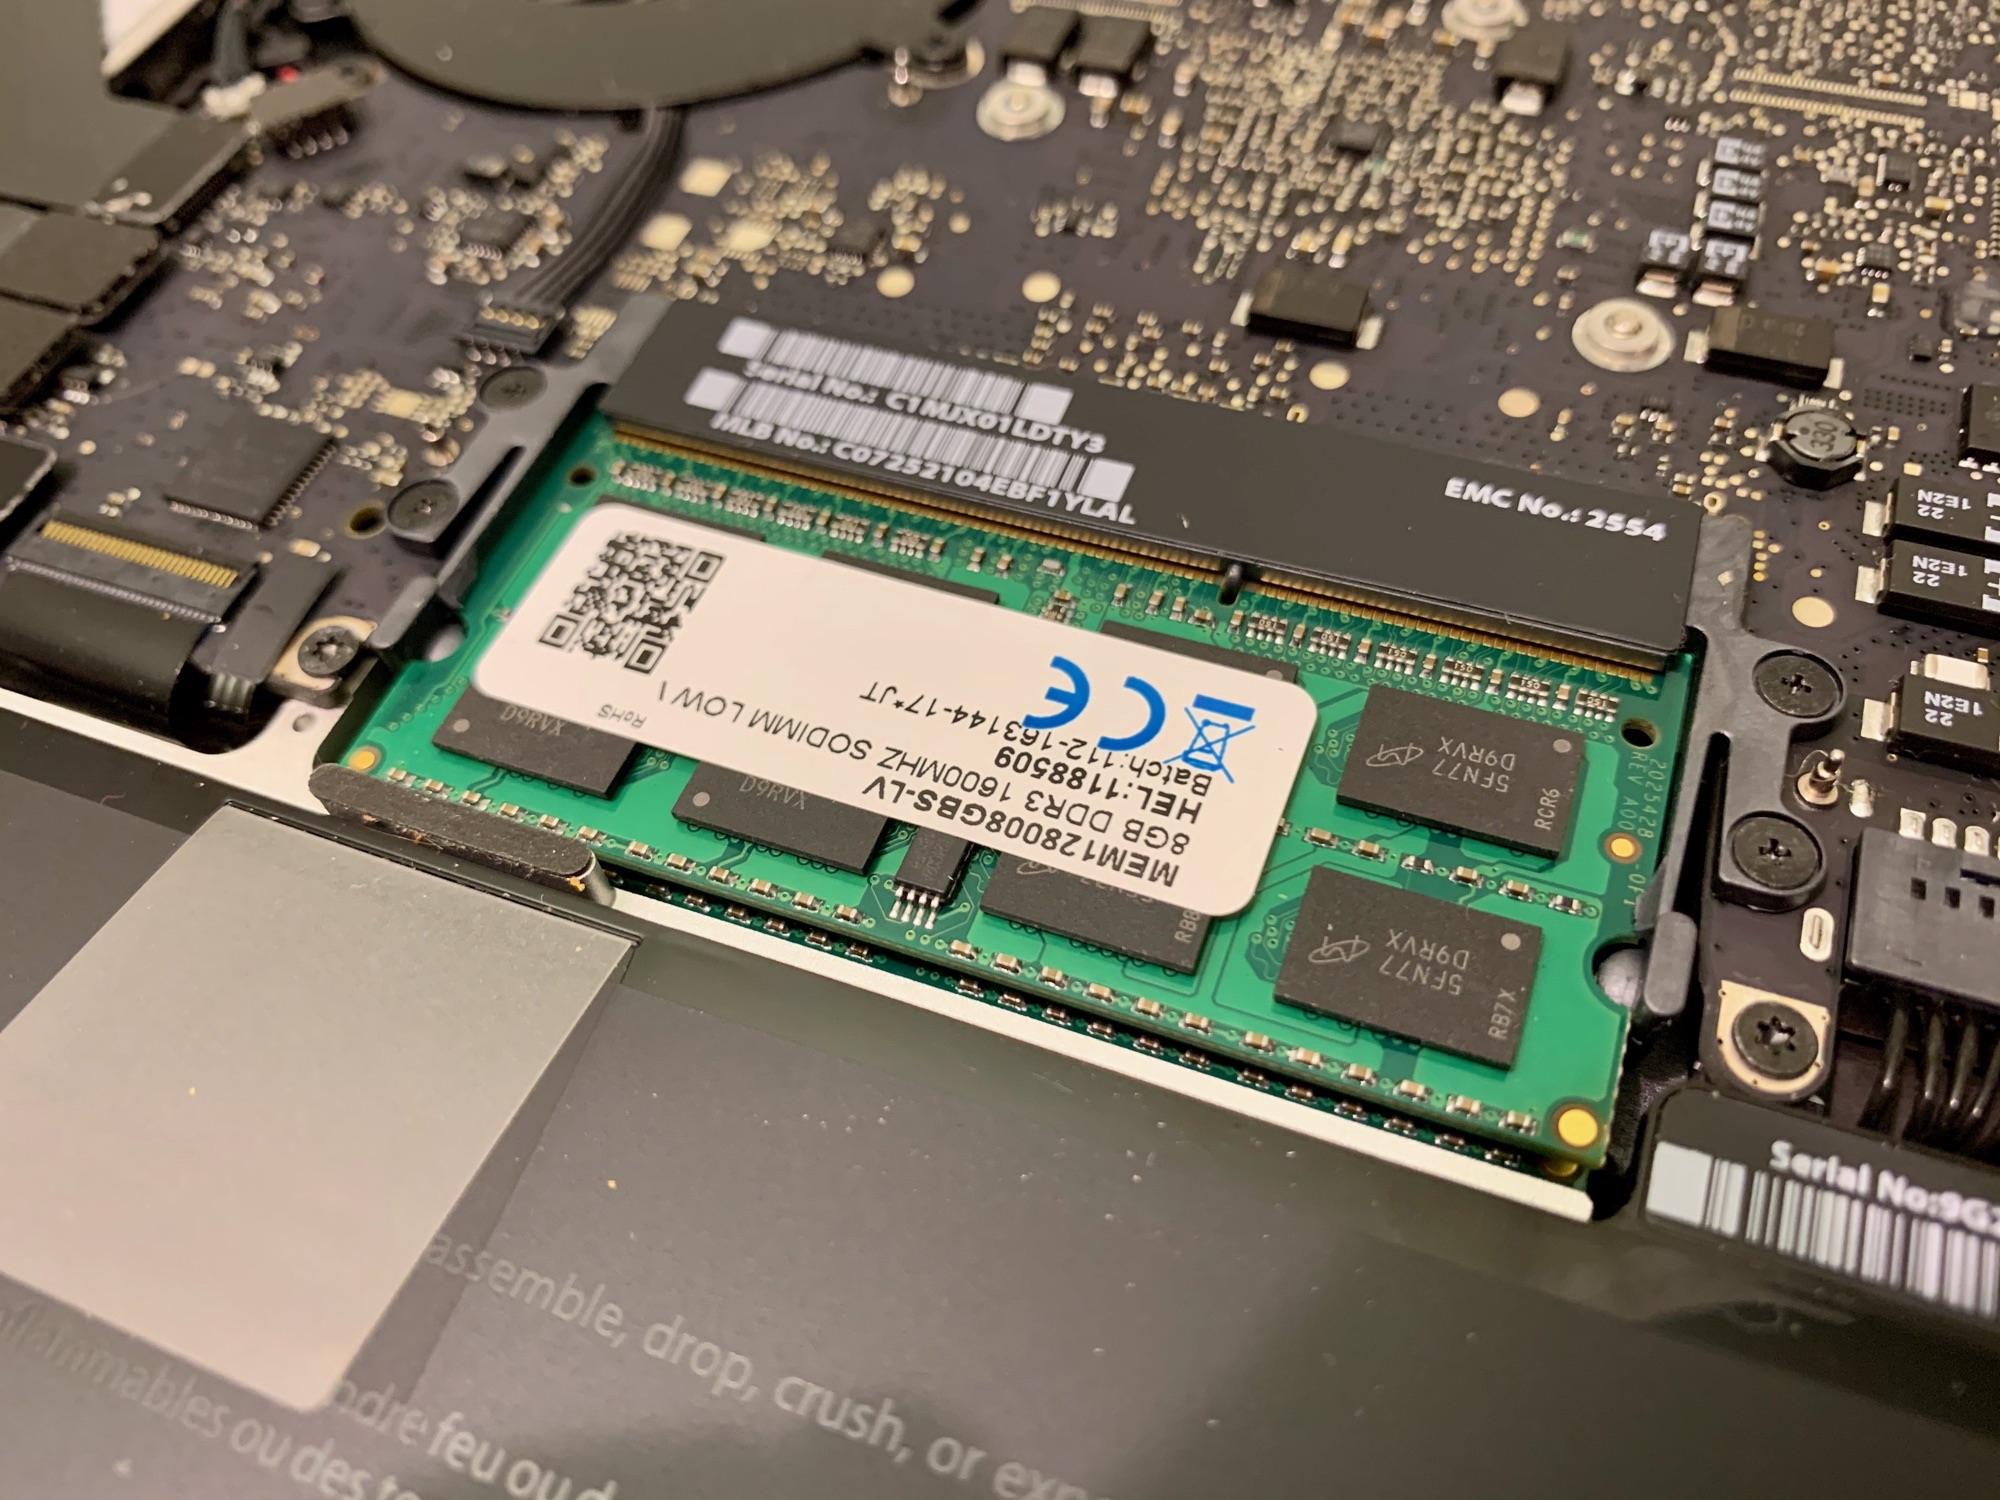
Once you know what you’re working with, order the RAM from a trusted vendor. I ended up with 16 GB of PC3-12800 DDR 1600 MHz RAM, two 8 GB DIMMs from Data Memory Systems. Those replaced the 2 2GB DIMMs Apple installed from the factory. 16 GB was as far as I could take this computer, and it was only marginally more expensive than an 8 GB upgrade, so I figured I’d max it out.
We older Mac owners have a big advantage over newer gear – these things get taken apart with much simpler tools. There’s no need to extract Pentalobe screws or any other exotic parts to get inside your Mac. In fact, the only thing you’ll need for this particular surgery is a Philips head screwdriver, albeit a very small one – a PH000-sized one. You’ll find them in precision screwdriver kits like this one at Amazon.
While the instructions I’ll provide here and the images are from a 2012 13-inch MacBook Pro, the same basic techniques for installation can also be used on many older models with similar setups going back to 2009. Bear in mind that this isn’t suitable for Retina Display-equipped MacBooks.
Install the RAM in your 13-inch MacBook Pro
First, shut down your Mac and unplug the power supply and any peripherals connected to it. Find a good flat, well-lit surface to work from and flip it over.
Remove the MacBook Pro’s bottom case
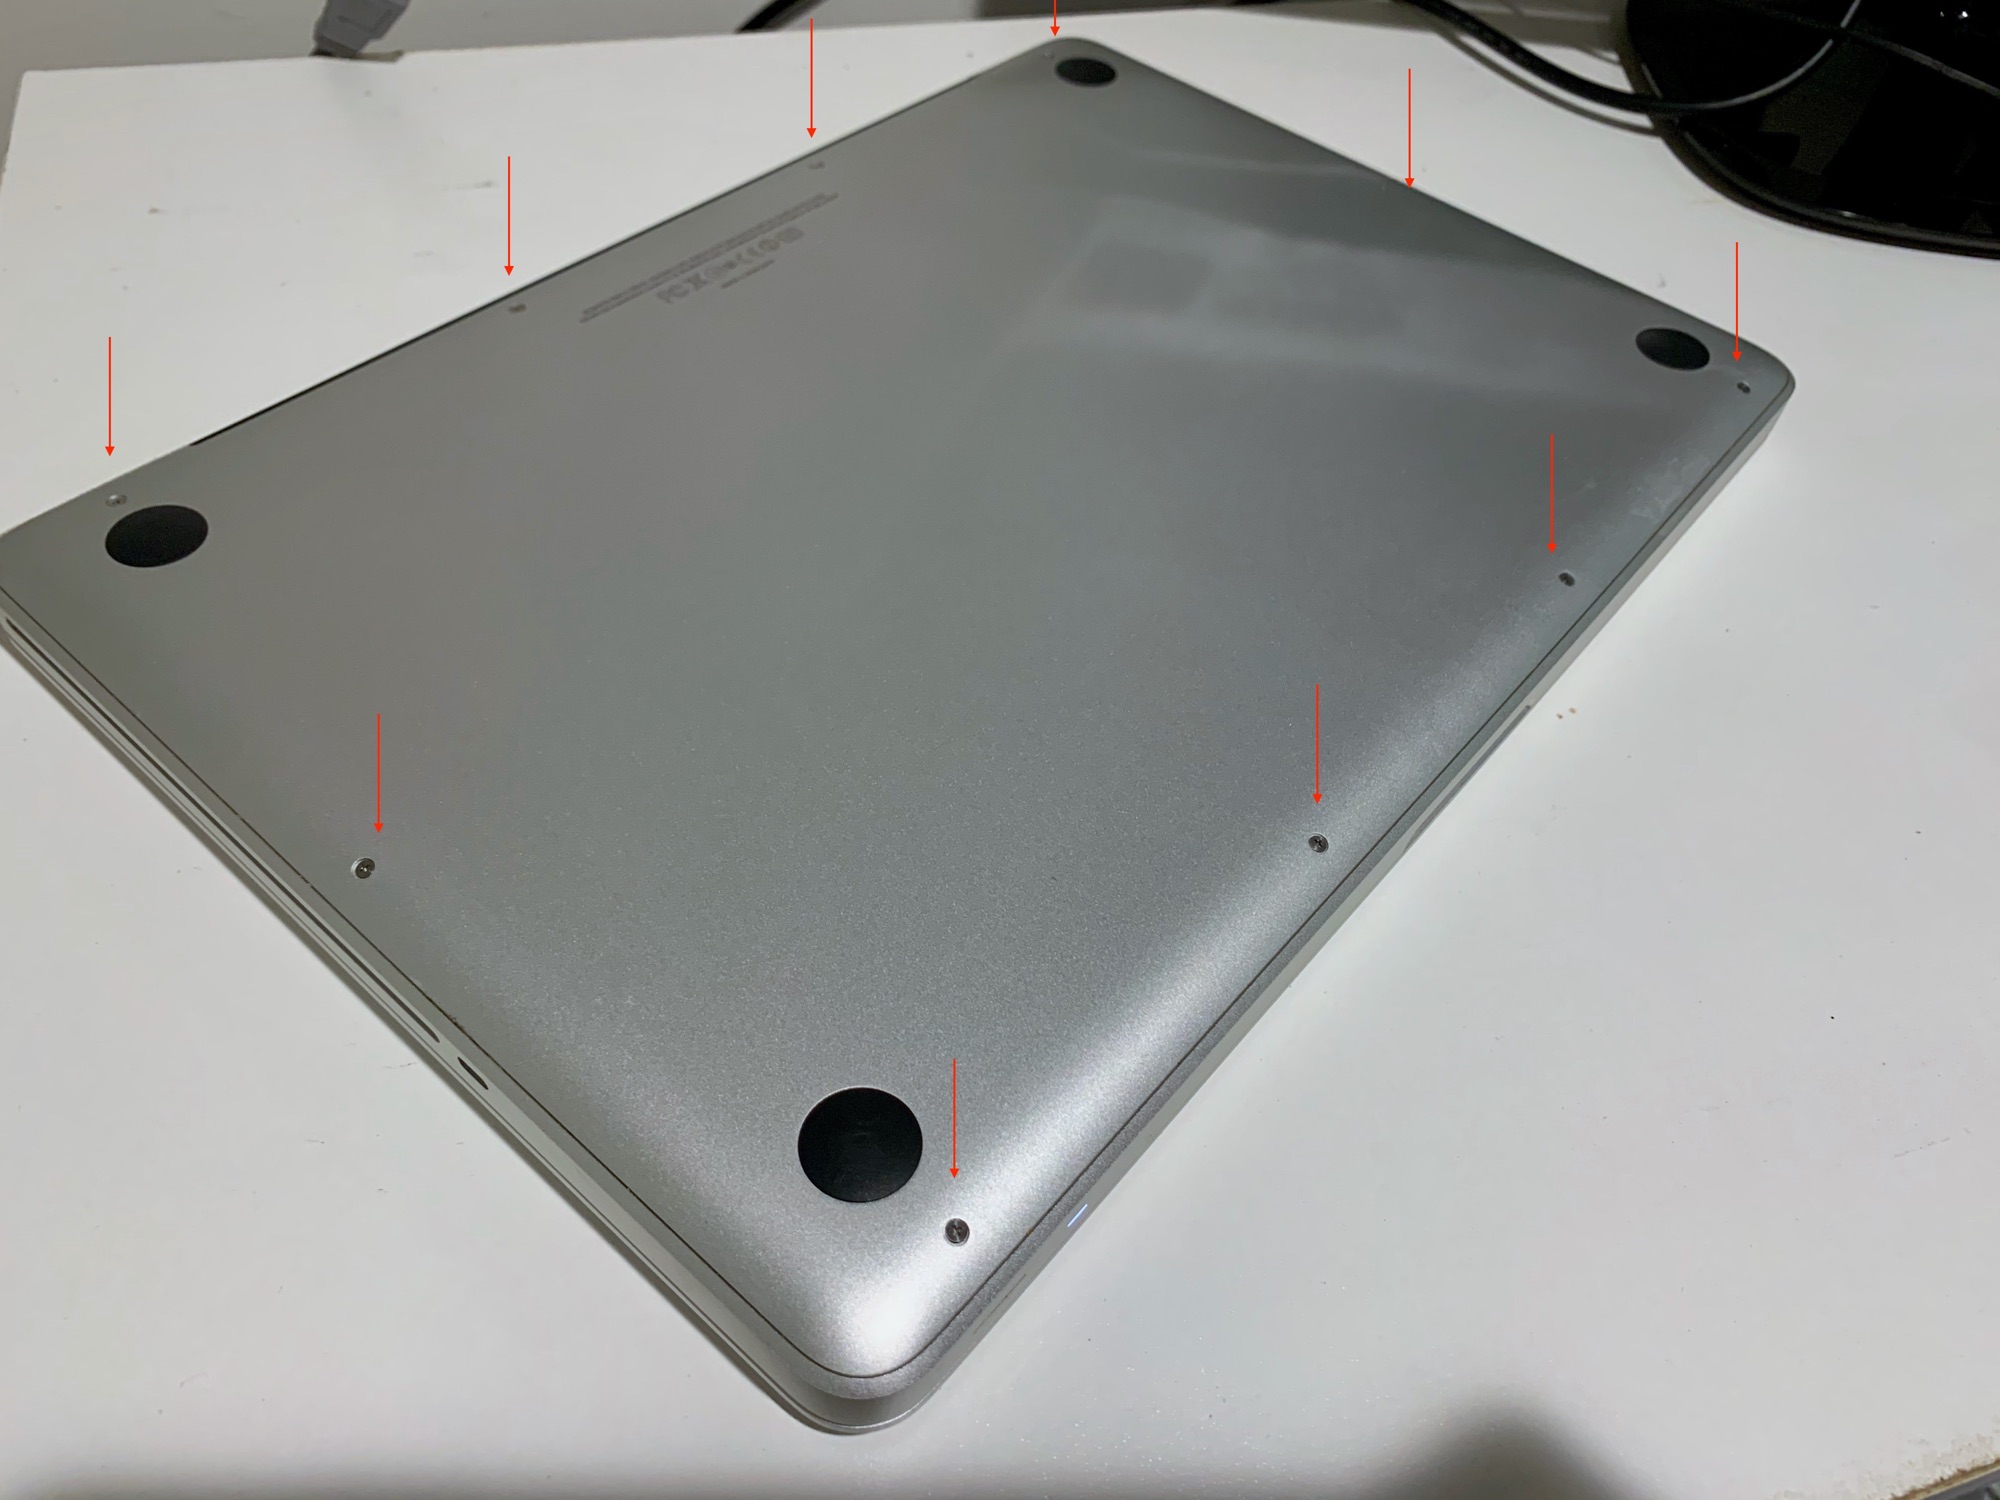
1) Using a #000-sized Philips head screwdriver, remove the ten screws that hold in the bottom case. Three long screws are located on the top edge, near the display hinge. The rest are short screws. When I’m doing this, I like to keep the screws together on a non-skid pad nearby, in the same approximate layout that I’ll put them back in so I remember which screws go where.
2) With the screws removed, pull the bottom panel off the bottom of the MacBook Pro and lay it aside.
Remove the old RAM
3) Locate the existing RAM. You’ll find it located about half way down from the top. Existing RAM DIMMs will be laying parallel to the main logic board, clipped in place by the memory module.
4) Push the levers on the sides of the memory module outward to release the DIMM from its slot. It pops up at an angle. Look for half-circle notches you can use to gently remove the DIMM using your fingertips. Don’t touch the gold edge connectors. DIMMs should be located in both upper and lower slots. Remove both.
Install the new RAM
1) Align the gold edge of the first DIMM with the lower slot.
2) Tilt and push the DIMM into the slot completely – make sure the metal contacts are all the way in.

3) Gently push down on the DIMM to make it click in place.
4) Repeat this process with the second DIMM.
Reattach the MacBook Pro’s bottom case
Align the removed bottom case with the screw holes and gently tighten the ten screws you removed from the bottom case. This is where keeping the screws in a layout approximated to how you took them out comes in handy, because you’ll easily see which holes get the long screws and which ones get the short screws.
Start up your MacBook Pro
Flip over your Mac, plug it in to a power supply if necessary, and power it up. If all has gone successfully, your Mac will automatically acknowledge the additional RAM. To check, wait for it to boot and then wait for the desktop to load. Then:
1) Click the Apple menu.
2) Click About this Mac.
3) Click the Memory tab.
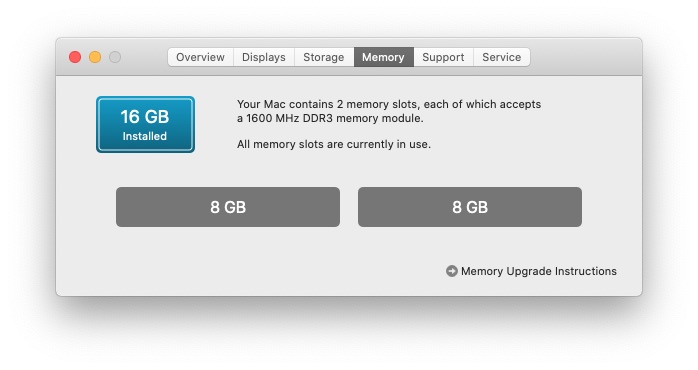 If everything has gone according to plan, your 13-inch MacBook Pro should report the new memory. Now you’re off to the races! Start using more memory-hungry apps, or more apps at a single time without your Mac having to page virtual memory constantly out to the hard disk.
Troubleshooting
You flip over your MacBook Pro, plug it in, hit the power button, and nothing happens. Black screen. Or your Mac freezes. Or something worse happens. Don’t panic. Turn off your Mac.
The first step is to reset the non-volatile RAM (NVRAM) on your Mac.
TUTORIAL: How to reset NVRAM on your Mac
If that fails to work, there might be a physical issue preventing your RAM from working. The number one problem people have with a 13-inch MacBook Pro RAM upgrade is that the DIMMs are not inserted into their memory slot correctly.
If this happens, turn your Mac off and unscrew the bottom panel as described above. Carefully remove and reinsert the DIMMs individually, making sure that the gold contacts are completely seated in the memory socket. You should feel some resistance pushing them in, and while metal may still be visible, they should mostly be covered when you push them in completely.
Then make sure they click into place horizontally, parallel to the main logic board. Try again.
If this fails, remove the DIMMs again and check their labels. Are they a matched pair with identical specs? Are they the correct DIMMs for this particular Mac model? If the answer is yes, try putting the old DIMMs back in and see if your Mac works. If it does, you may have bad RAM. If so, contact the vendor you purchased from for an exchange or return.
That’s all there is to it. Are you ready to rock a RAM upgrade on your older Mac? Do you have questions? Let me know in the comments.