The iOS 13 and iPadOS public betas are out but we don’t recommend them even for the so-called “thrill-seekers” due to pre-release bugs that can prevent the normal use of your device.
If you’d like to revert back from the iOS 13 or iPadOS beta to a prior iOS 12 release, you can do so with a little help from desktop iTunes. If you’ve followed our steps for installing the iOS 13 or iPadOS beta, you’ve created an archived backup of your iOS device prior to installing the beta.
TUTORIAL: How to install the iOS 13 and iPadOS beta
You’ll need an archived iTunes backup from prior to installing the beta to restore the device to the way it was before the update, meaning without losing any data. If you haven’t created an archived backup of the device in iTunes, you can still downgrade to the latest iOS 12 version but you’ll need to set up your iPhone or iPad as new.

You cannot revert to a prior iOS 12 release and restore from a backup created in the iOS 13 or iPadOS beta. The video embedded right ahead details all of the changes in the second beta of iOS 13 (which has the same features and fixes as the inaugural public beta).
Subscribe to iDownloadBlog on YouTube
Follow the steps below if you’d like to downgrade from the iOS 13 or iPadOS beta.
Downgrading from iOS 13 or iPadOS beta
To revert your device running the beta of iOS 13 or iPadOS back to the standard version of iOS, you’ll need to use iTunes for Mac or Windows and put the iOS device into Recovery Mode.
1) Turn off your iOS device by choosing Settings → General → Shutdown.
Alternatively, follow the steps for your specific device:
- Face ID devices: Hold the Power button (also called the Top button) and either Volume button until the shutdown screen appears, then drag a finger across the slider.
- iPhone 8 and iPhone 8 Plus: Hold down the Power button (also called the Side button) until the shutdown screen appears, then drag your finger across the slider.
- All iPod touches, Home button iPads, iPhone 7 and older: Press and hold either the Side or Top button until the shutdown screen appears, then drag across the slider.
2) Launch iTunes on the computer.
3) Put your iOS device in Recovery mode by following the steps for your model:
- Face ID iPads: Connect your powered-down device to the computer while holding the Top/Power button and keep holding it until you see the Recovery mode screen.
- iPhone X and iPhone 8 or later: Connect your powered-down device to the computer while holding the Side/Power button and keep holding it until you see the Recovery mode screen.
- iPhone 7, iPhone 7 Plus and iPod touch (7th generation): Connect your powered-down device to the computer while holding the Volume Down button and keep holding it until you see the Recovery mode screen.
- Home button iPads, iPhone 6s and iPod touch (6th generation) or earlier: Connect your powered-down device to the computer while holding the Home button and keep holding it until you see the Recovery mode screen.
4) When you see the option to Restore or Update in iTunes, choose Restore.
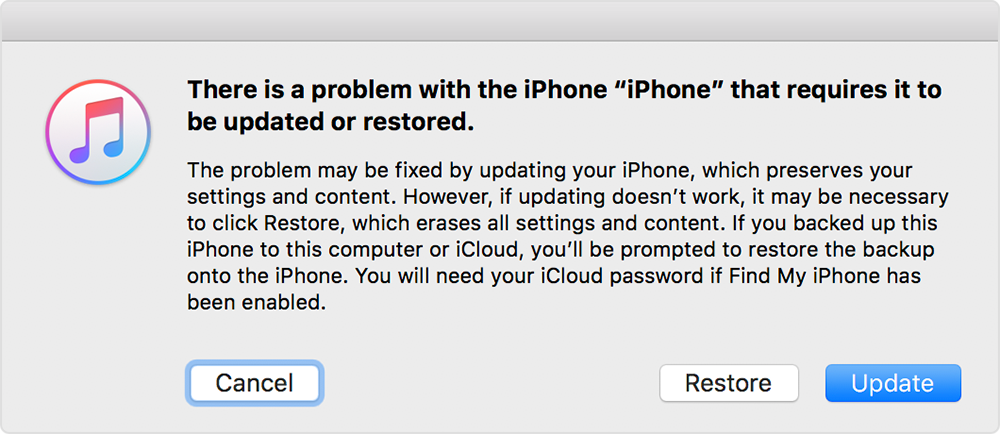
5) Click Restore and Update to confirm.
6) Click Next on the Software Update screen.
7) Click Agree to accept the Terms and Conditions.
iTunes will download the latest stable iOS software, which can take anywhere from a few minutes to half an hour or more, depending on your Internet connection and other factors. If the iOS device exits the Recovery mode screen, let the download finish, then repeat step 3.
When iTunes finishes downloading the software, your device will be wiped clean and the iOS install process will kick off. It’s perfectly normal for your device to reboot a few times during this phase. Don’t disconnect the device from the computer until iTunes has finished restoring it.
One more thing: with the restore process finished, you’ll want to choose Restore From This Backup from an iTunes prompt, then select the archived backup made prior to installing the beta. Keep the device connected after it restarts and wait for it to sync with the computer.
You can disconnect after the sync finishes.

Again, it’s not possible to restore from a backup created with the iOS 13 or iPadOS beta to a device running an older version of iOS so definitely keep that in mind.
iOS 13 compatibility
iOS 13 is compatible with the following Apple smartphone models:
- iPhone XS
- iPhone XS Max
- iPhone XR
- iPhone X
- iPhone 8
- iPhone 8 Plus
- iPhone 7
- iPhone 7 Plus
- iPhone 6s
- iPhone 6s Plus
- iPhone SE
- iPod touch (7th generation)
For more information, read Apple’s press release or visit apple.com/ios/ios-13-preview.
iPadOS compatibility
iPadOS is compatible with these iPads:
- 12.9-inch iPad Pro
- 11-inch iPad Pro
- 10.5-inch iPad Pro
- 9.7-inch iPad Pro
- iPad (6th generation)
- iPad (5th generation)
- iPad mini (5th generation)
- iPad mini 4
- iPad Air (3rd generation)
- iPad Air 2
Watch our video overview of the new iPad-only updates embedded below.
Subscribe to iDownloadBlog on YouTube
For more, read Apple’s press release or visit apple.com/ipados/ipados-preview.
Need help? Ask iDB!
If you like this tutorial, pass it along to your friends and leave a comment below.
Got stuck? Not sure how to do certain things on your Apple device? Let us know via help@idownloadblog.com and a future tutorial might provide a solution.
Submit your own how-to suggestions via tips@idownloadblog.com.