Apple on June 3, 2019 released developer betas of the new iOS 13 and iPadOS software. You’re advised to avoid deploying the betas onto your daily drivers, but if you do happen to have a spare iOS device laying around somewhere – or you’re the type who prefers to live on the bleeding edge of technology – follow the instructions in our step-by-step guide to learn how to download and install the iOS 13 beta on your iPhone and the beta of iPadOS 13 on your iPad.
Apple has said that it will not offer public beta builds of iOS and iPadOS 13 until later this month, but of course there’s nothing barring you from taking developer betas for a spin.
Living on the bleeding edge?
We said we advise against installing the betas on your primary devices due to the possibility of data loss and reliability issues stemming from bugs—and so does Apple. The company provided the following statement in the official iOS and iPadOS 13 release notes.
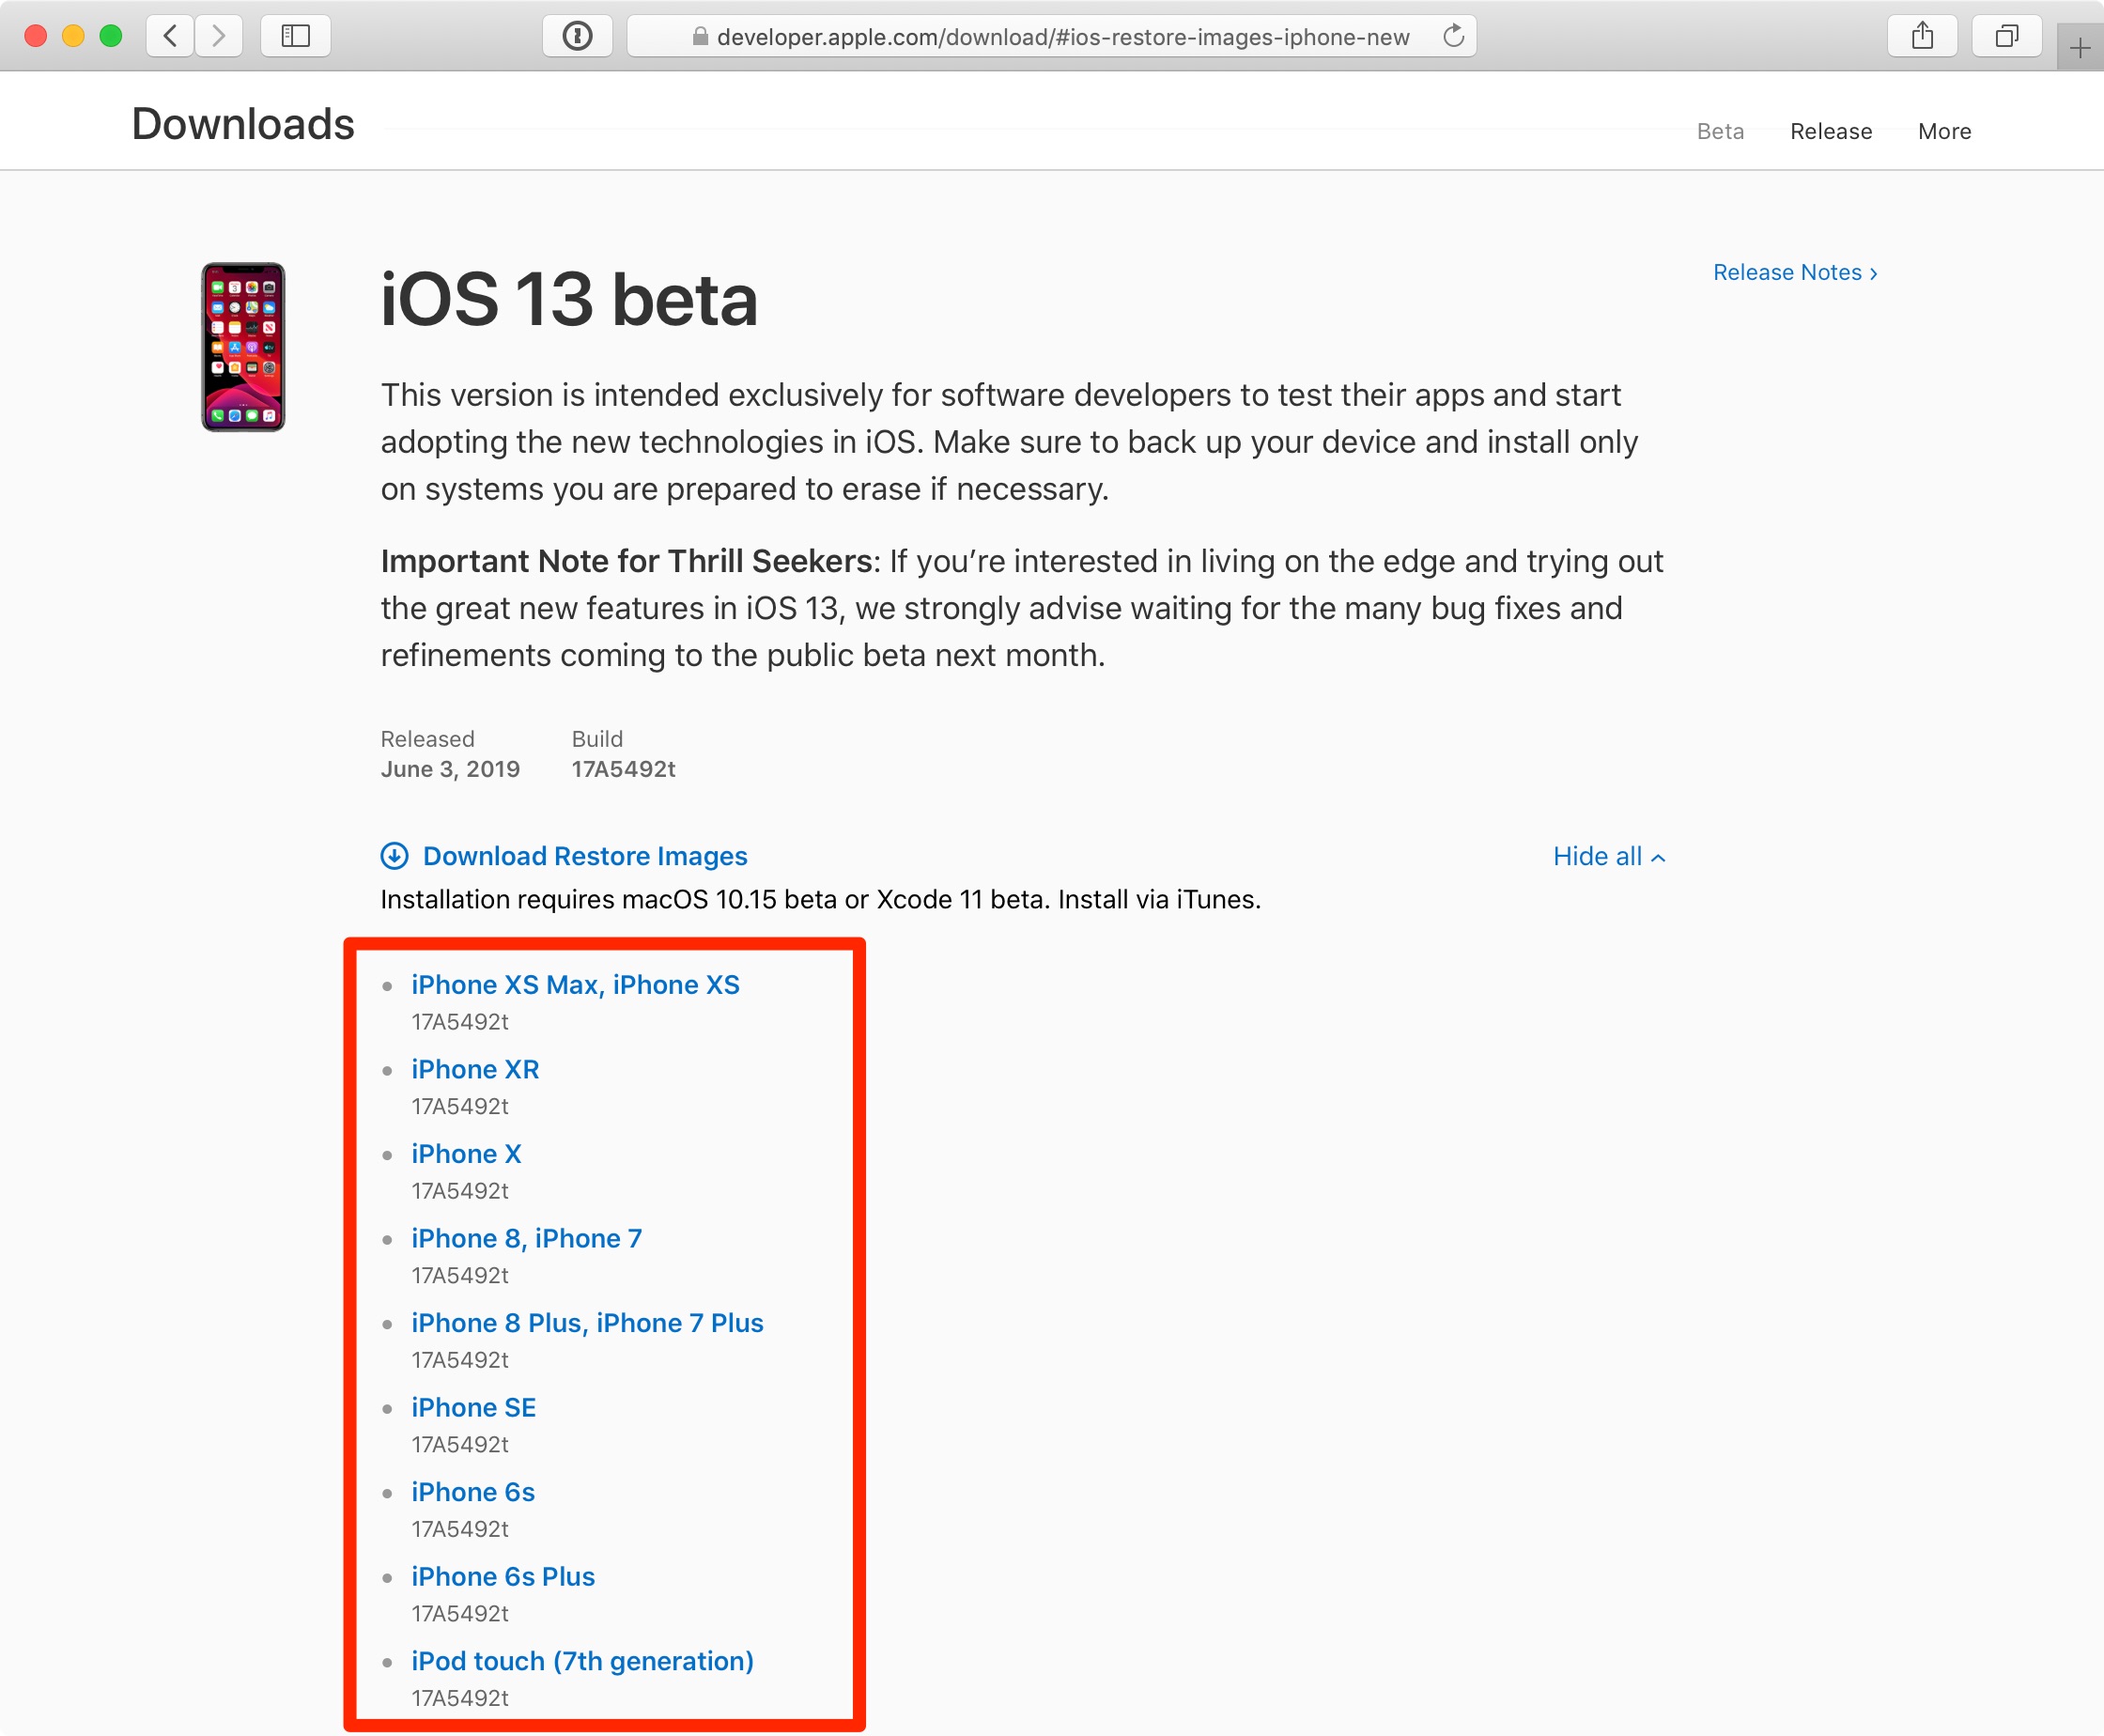
This version is intended exclusively for software developers to test their apps and start adopting the new technologies in iOS. Make sure to back up your device and install only on systems you are prepared to erase if necessary.
Important Note for Thrill Seekers: If you’re interested in living on the edge and trying out the great new features in iOS and iPadOS 13, we strongly advise waiting for the many bug fixes and refinements coming to the public beta later this month.
You’ve been warned.
Prerequisites
The installers are hosted on Apple’s portal for developers so you will need to sign in there with your Apple ID. If you’re reading this and own an iOS device, chances are you already have an Apple ID account. You will also need a paid $99 per year membership to access the downloads section so keep that in mind. Finally, you’ll want to double-check that your hardware meets the minimum system requirements for iOS 13 and iPadOS 13.
iOS 13 system requirements
iOS 13 is compatible with these devices.
- iPhone XS
- iPhone XS Max
- iPhone XR
- iPhone X
- iPhone 8
- iPhone 8 Plus
- iPhone 7
- iPhone 7 Plus
- iPhone 6s
- iPhone 6s Plus
- iPhone SE
- iPod touch (7th generation)
iPadOS system requirements
iPadOS is compatible with the following tablets:
- 12.9-inch iPad Pro
- 11-inch iPad Pro
- 10.5-inch iPad Pro
- 9.7-inch iPad Pro
- iPad (6th generation)
- iPad (5th generation)
- iPad mini (5th generation)
- iPad mini 4
- iPad Air (3rd generation)
- iPad Air 2
Apple offers two ways of installing the betas.
Two ways to install iOS and iPadOS 13 beta
In the past, installing a major iOS beta was a simple matter of grabbing a special configuration profile for your device from Apple’s portal for developers that in turn prompted the Software Update mechanism to find and present an over-the-air beta update to the user.
With the iOS and iPadOS 13 beta, Apple has moved to different methods that involve using either the developer beta of macOS Catalina 10.15 or the Xcode 11 beta.
How to install iOS or iPadOS 13 beta using Xcode 11
This method is perfectly suitable for people who are currently running macOS Mojave or one of the earlier commercial releases of macOS because it doesn’t require updating their computer to the macOS Catalina 10.15 beta. What you’ll do instead is download and install the multi-gigabyte Xcode 11 beta which in turn will let you install the iOS 13 beta through iTunes.
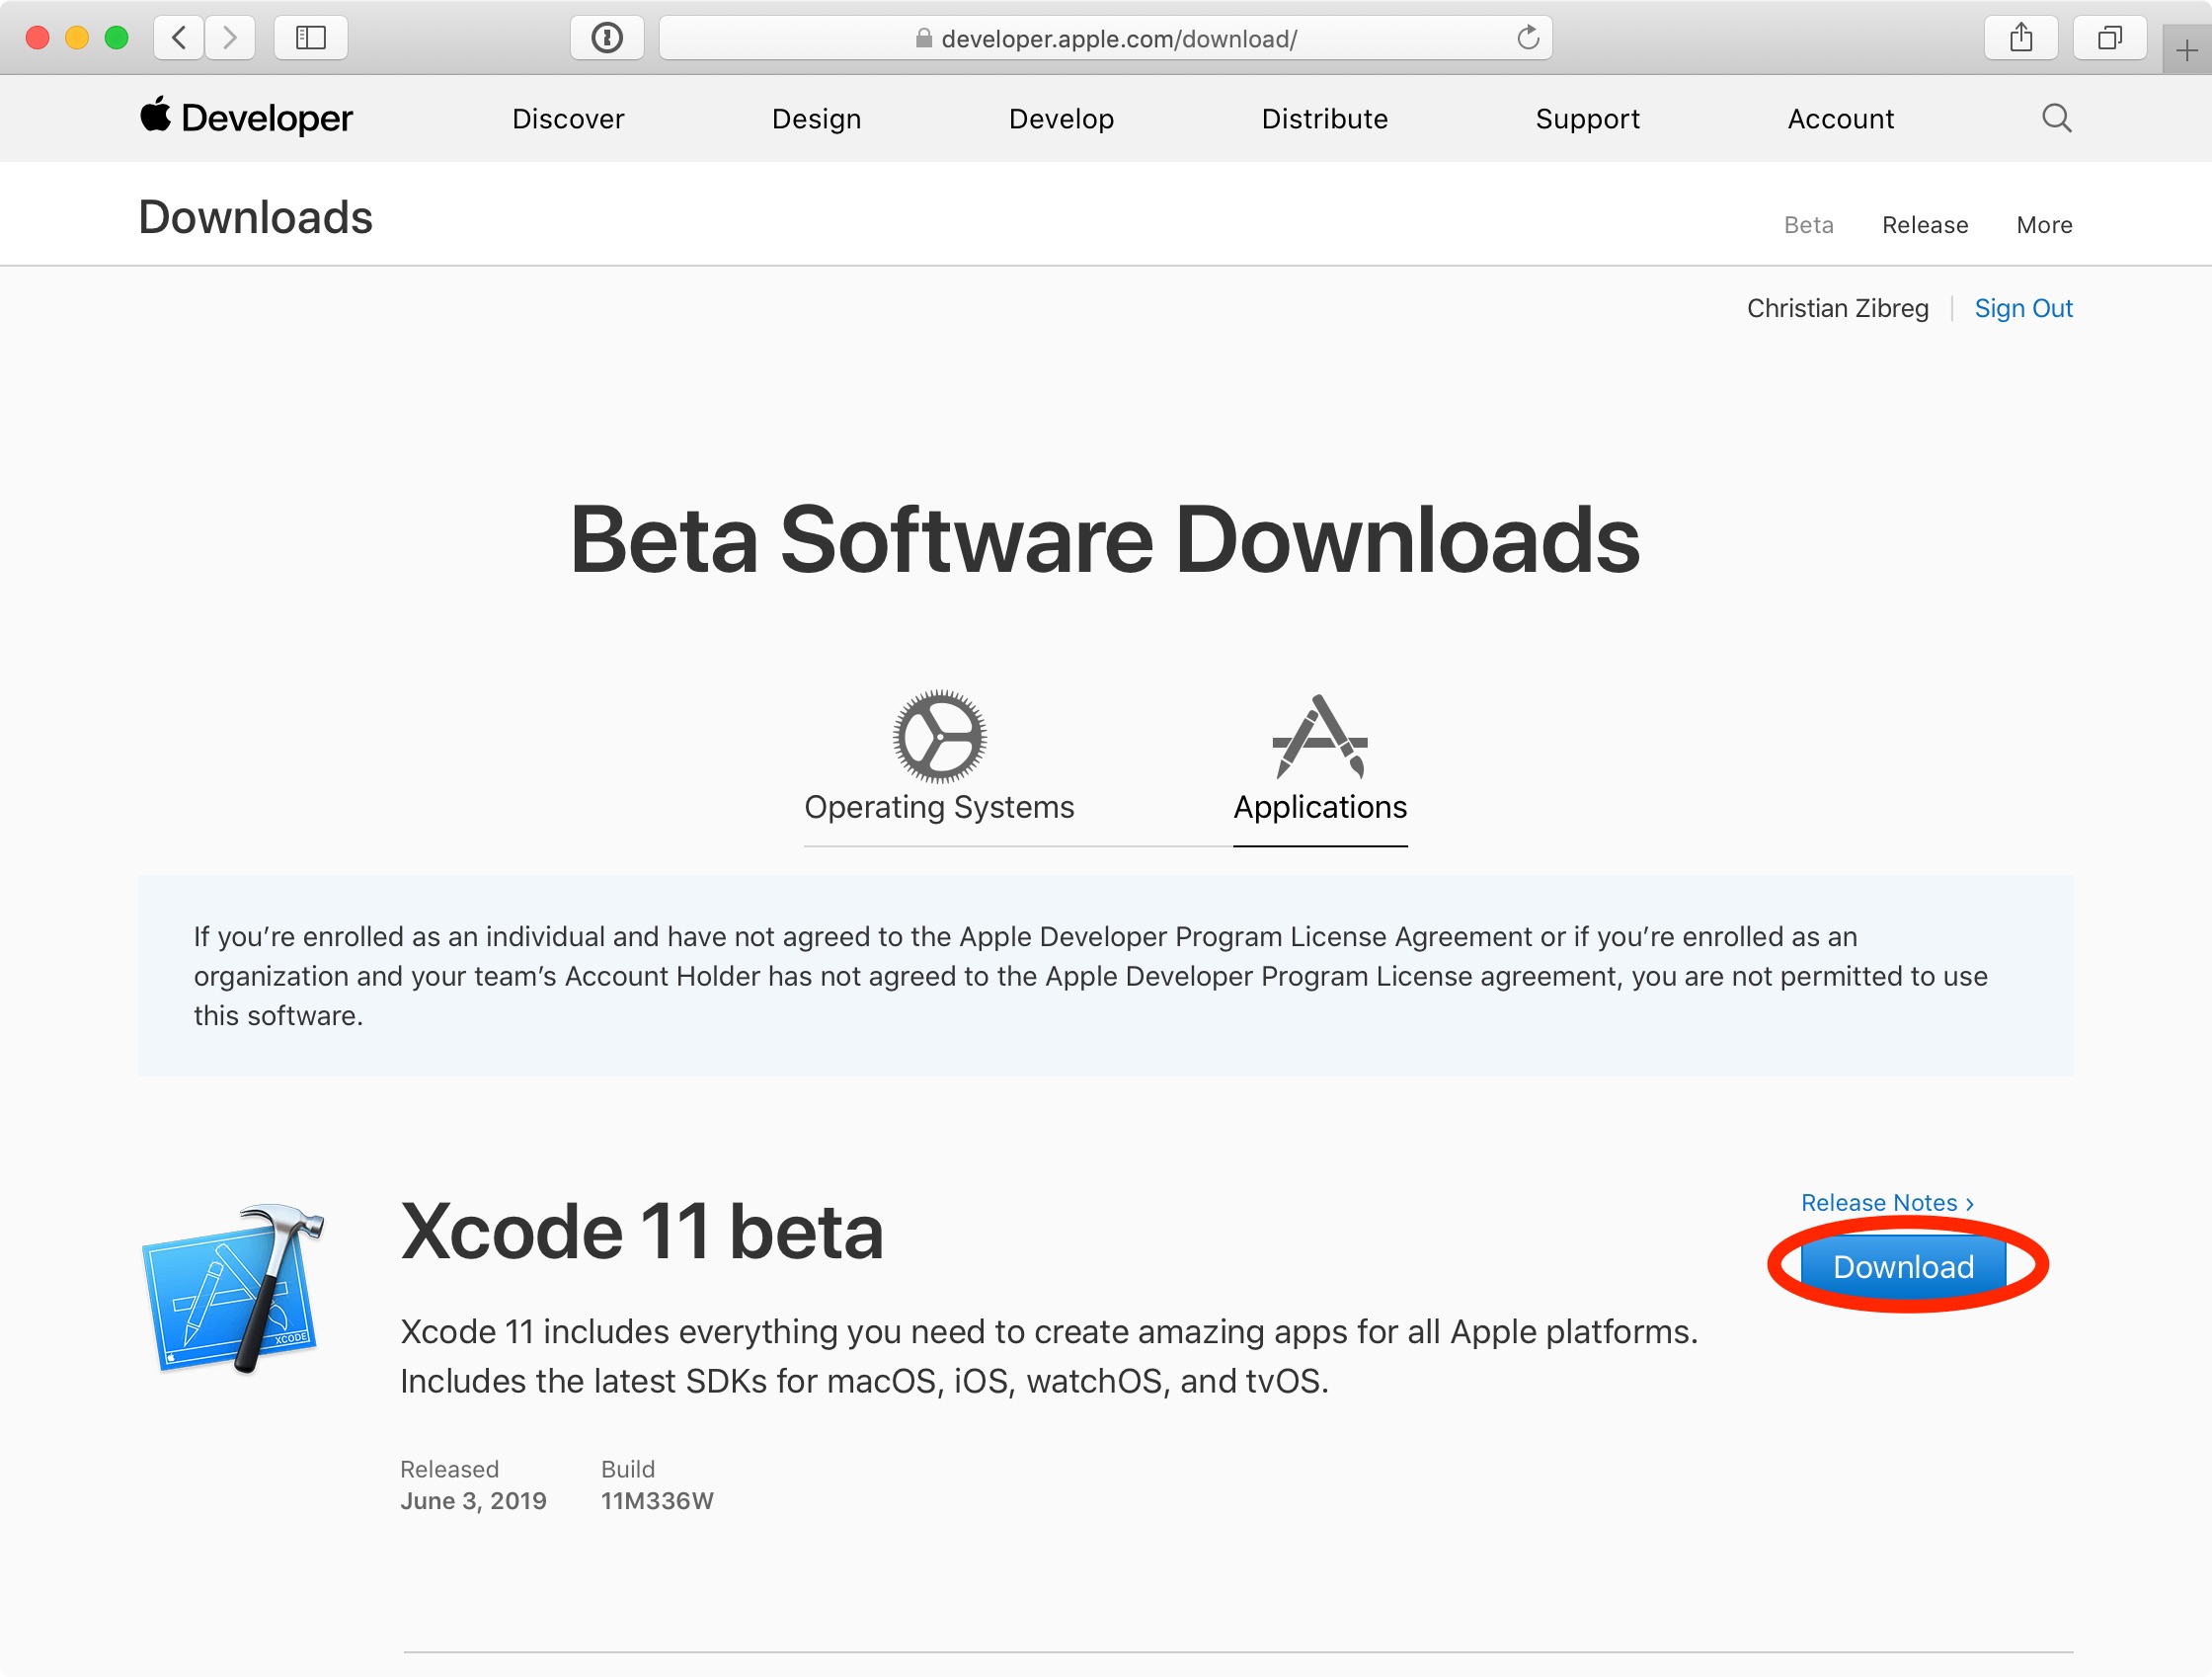
1) Visit developer.apple.com/download on your Mac and sign in with your Apple ID account.
2) Click Applications near the screen top and hit Download in the Xcode 11 Beta section.
The Xcode beta is a 7.66-gigabyte download so now could be the perfect time to do a little spring-cleaning and free up storage space on your Mac. For that, we recommend MacPaw’s excellent cruft-cleaning app, CleanMyMac, available as part of Setapp subscriptions.
3) Wait for the Xcode 11 beta to finish downloading, then launch the installer.
First, open your macOS account’s Downloads folder by clicking the desktop and then press the Option – Command – L combination on the keyboard. Alternatively, choose Downloads from the Finder’s Go menu. Now double-click the file “Xcode_11_beta.xip” to launch the installer and follow the instructions to install the software onto your Mac. You may be asked to authenticate the install process with your macOS user account’s password.
4) With the app successfully installed, open the Xcode 11 beta from your Applications folder.
Xcode needs to install some additional components. Be sure to respond positively to that prompt and wait until the operation has finished. After the app launches for the first time, you can quit it because we now have the required software support in place.
5) Next, we’ll grab those iOS and iPad OS 13 beta installers. Click Operating System near the top of the Apple Developer portal window in Safari, hit Show All in the iOS or iPadOS 13 beta section and then click the restore image for your iOS device model.
This will start downloading the restore image into the Mac’s Downloads folder. To monitor progress, click Safari’s View menu and choose Show Downloads. Alternatively, press the keyboard combination Option – Command – L with the Safari window selected.
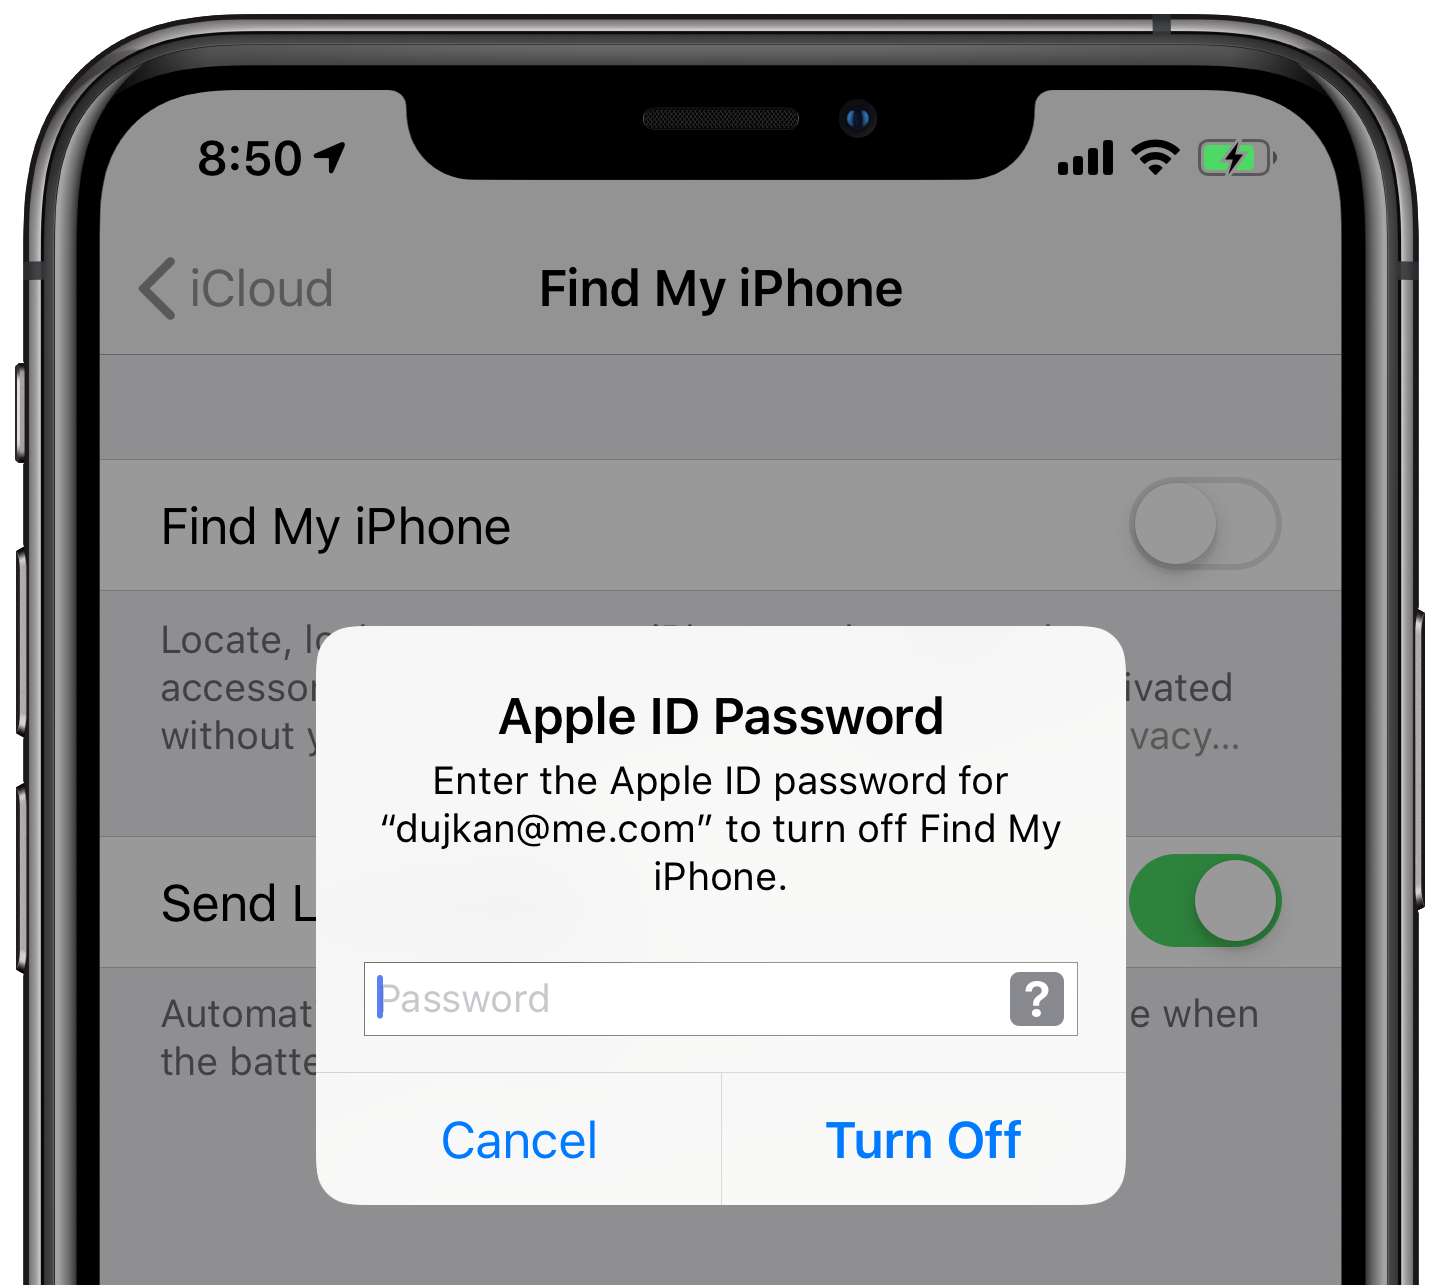
6) We must disable Find My iPhone before installing any new iOS software. Launch Settings on the iOS device and tap your Apple ID bio at the top. Next, tap iCloud, choose Find My iPhone/iPad from the list and slide the switch next to Find My iPhone/iPad to the OFF position. Lastly, type in your Apple ID password and hit Turn Off to confirm the operation.
7) Now launch iTunes from the Dock or your Applications folder.
8) Connect an iPhone/iPad to your Mac using the cable it came with and click its device icon to reveal options (you may be asked to enter your passcode on the iOS device).
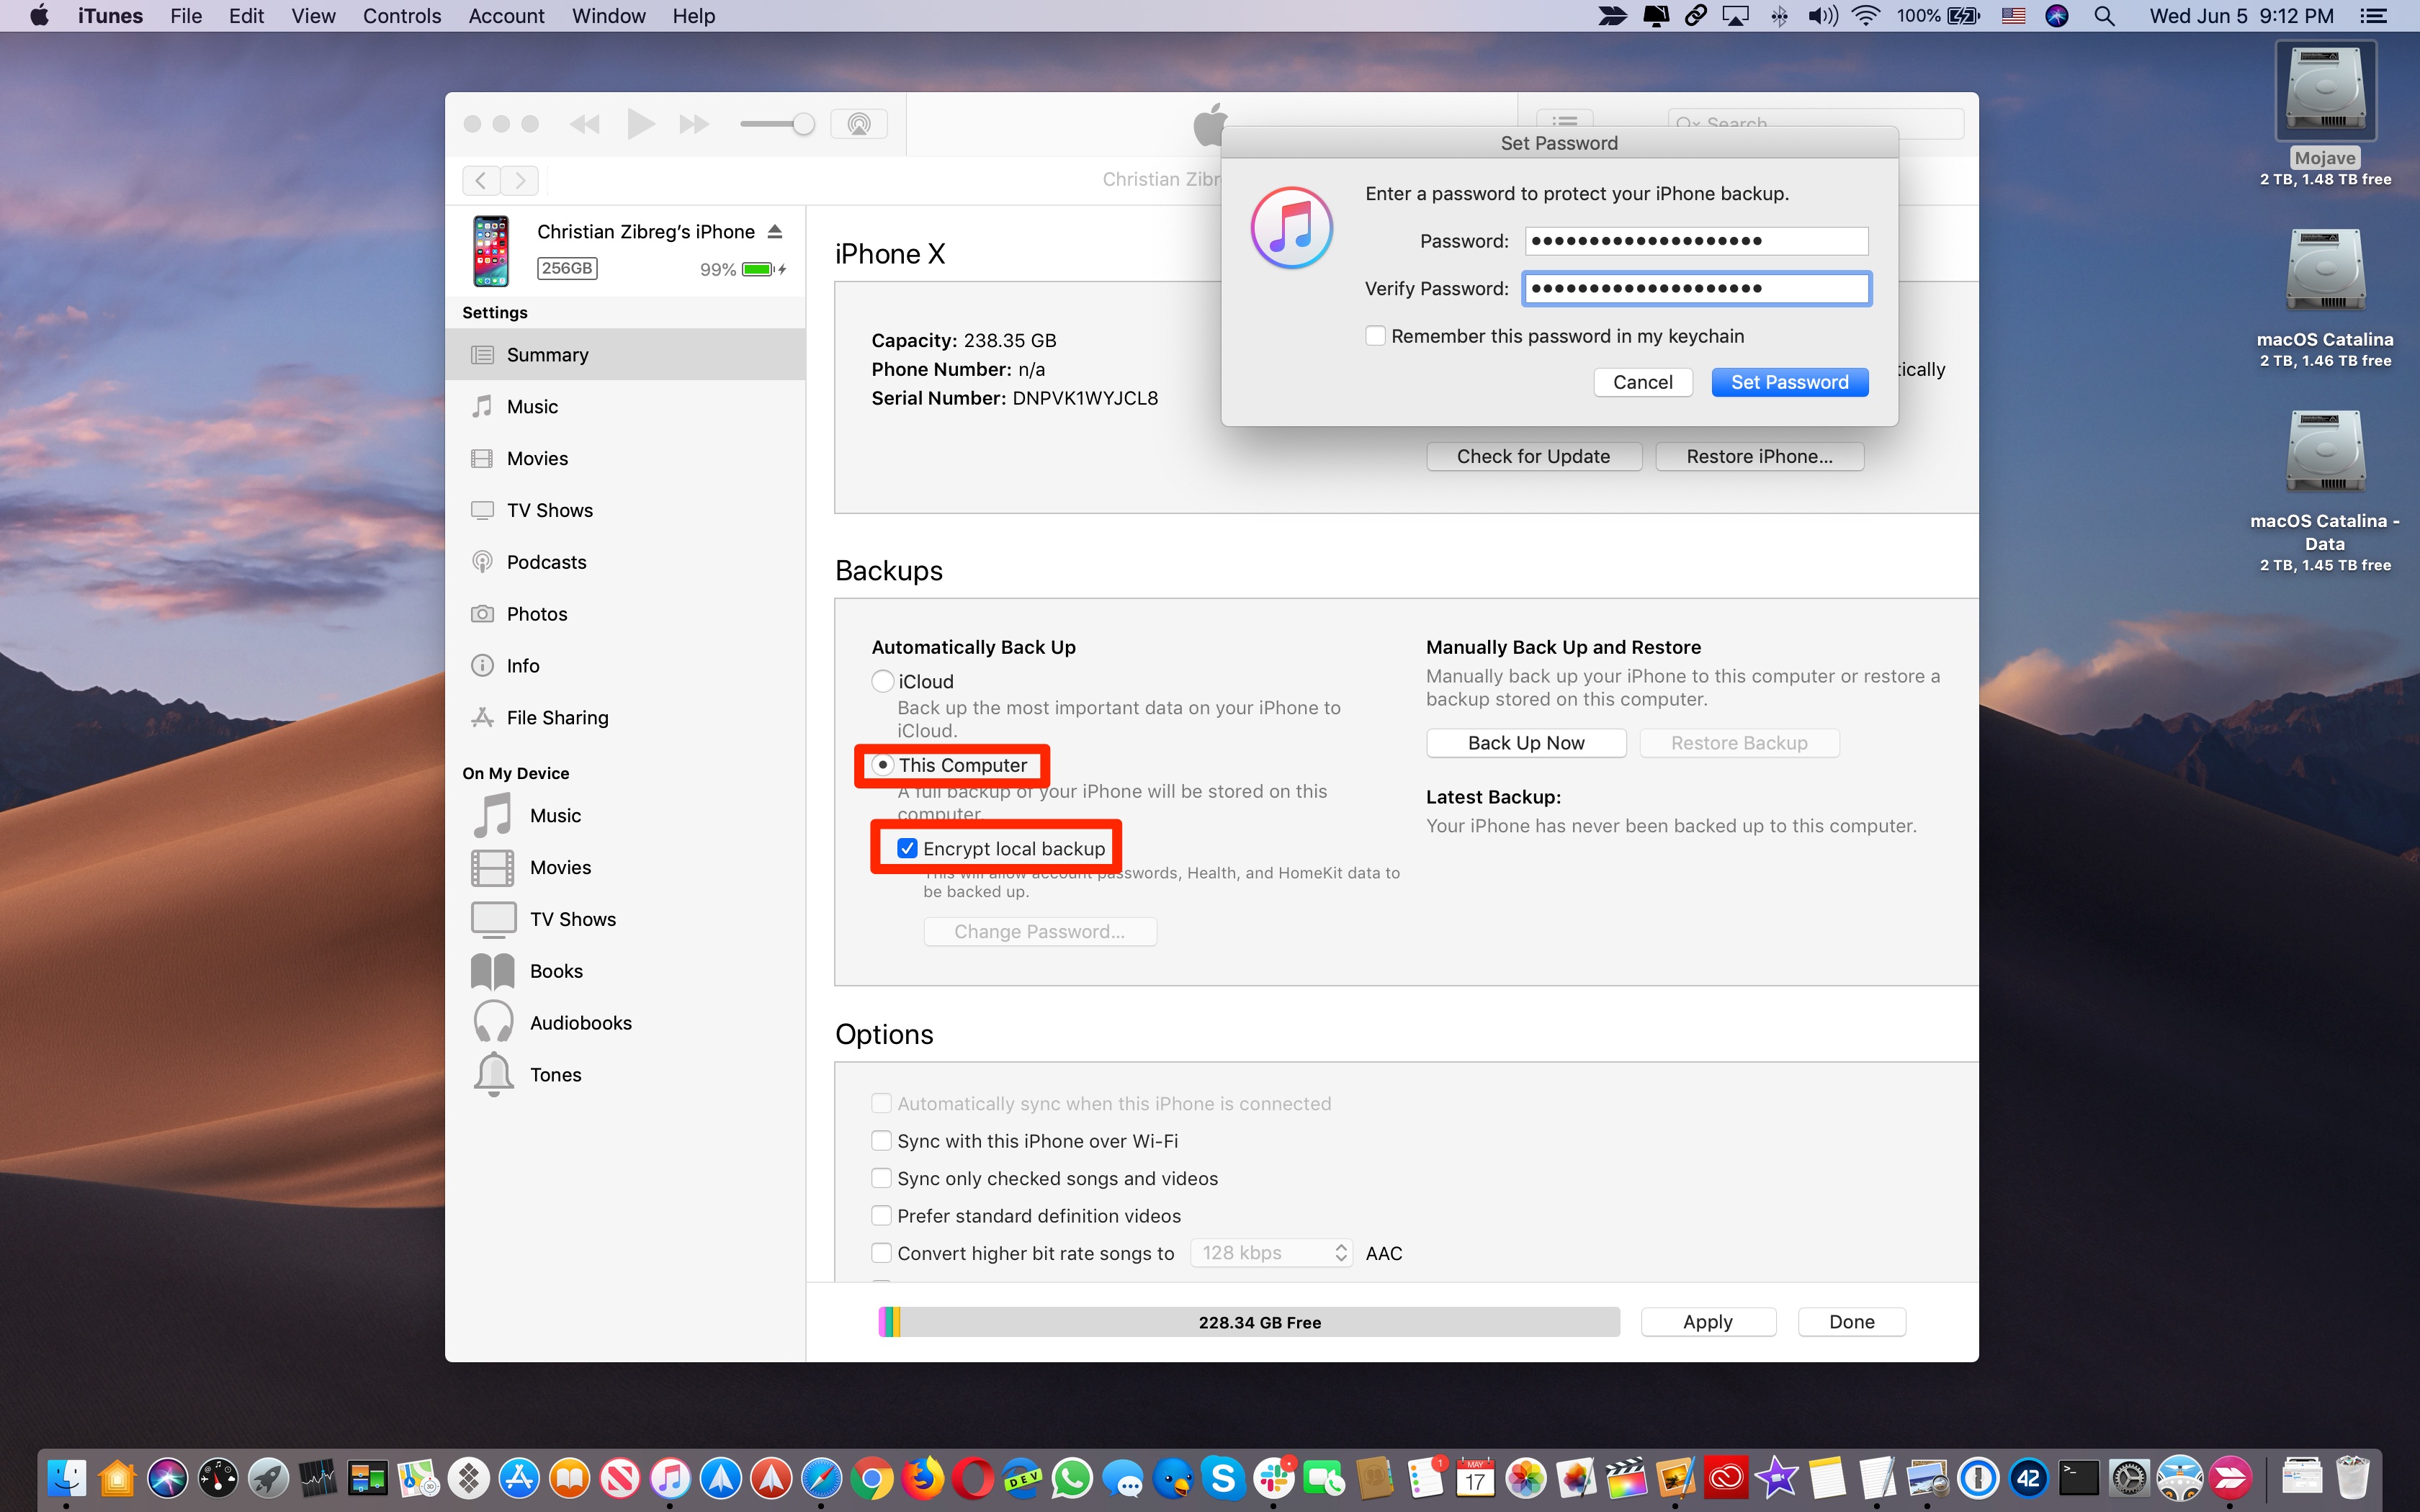
9) We’re going to make an archived backup of the iOS device so we can downgrade to the previous iOS version at will, without losing any data. Making sure backup is set to This Computer, tick the box next to “Encrypt local backup” and choose your encryption password. Now click the Back Up Now button in iTunes’ Backups section Back up apps, if asked.
Only encrypted backups store sensitive personal data such as your Health database or saved passwords for any Wi-Fi networks your device has connected to in the past.
10) With the iOS device backed up, it’s time to archive the backup file. Choose Preferences from the iTunes menu and select the Devices tab, then right or Control-click the backup you’ve just created and choose Archive. Confirm the operation by clicking the OK button.
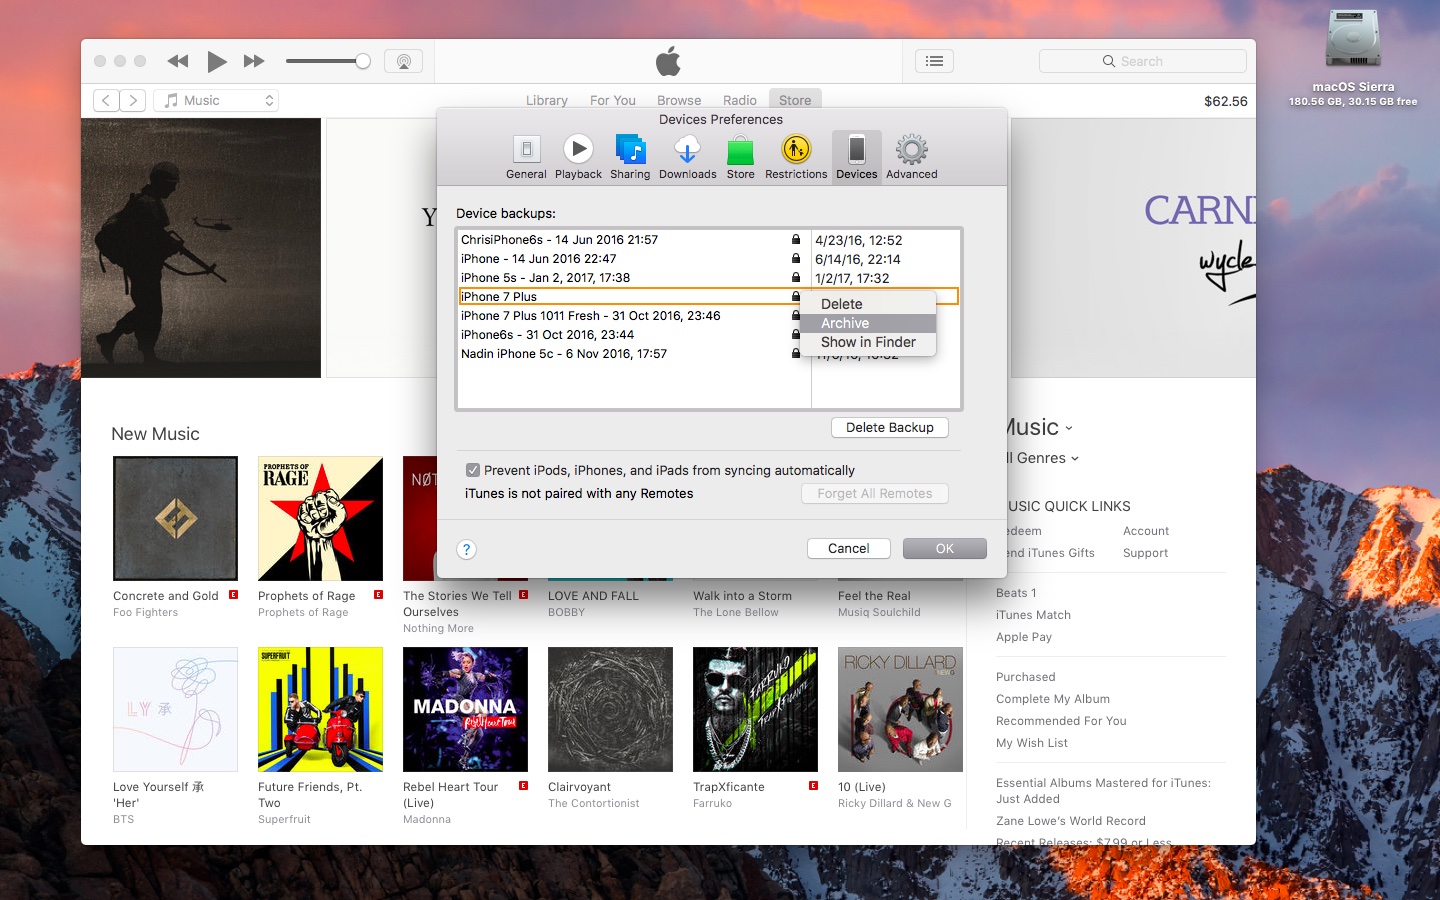
Archiving ensures the backup file doesn’t get overwritten by any subsequent backups in the future. Archived backups are distinguished from normal ones with a timestamp.
Should anything go terribly wrong with our beta installation, we can always comfortably downgrade back to our previous iOS version without worrying about losing any precious data.
11) While holding the Option key on the keyboard, click Restore iPhone/iPad in iTunes.
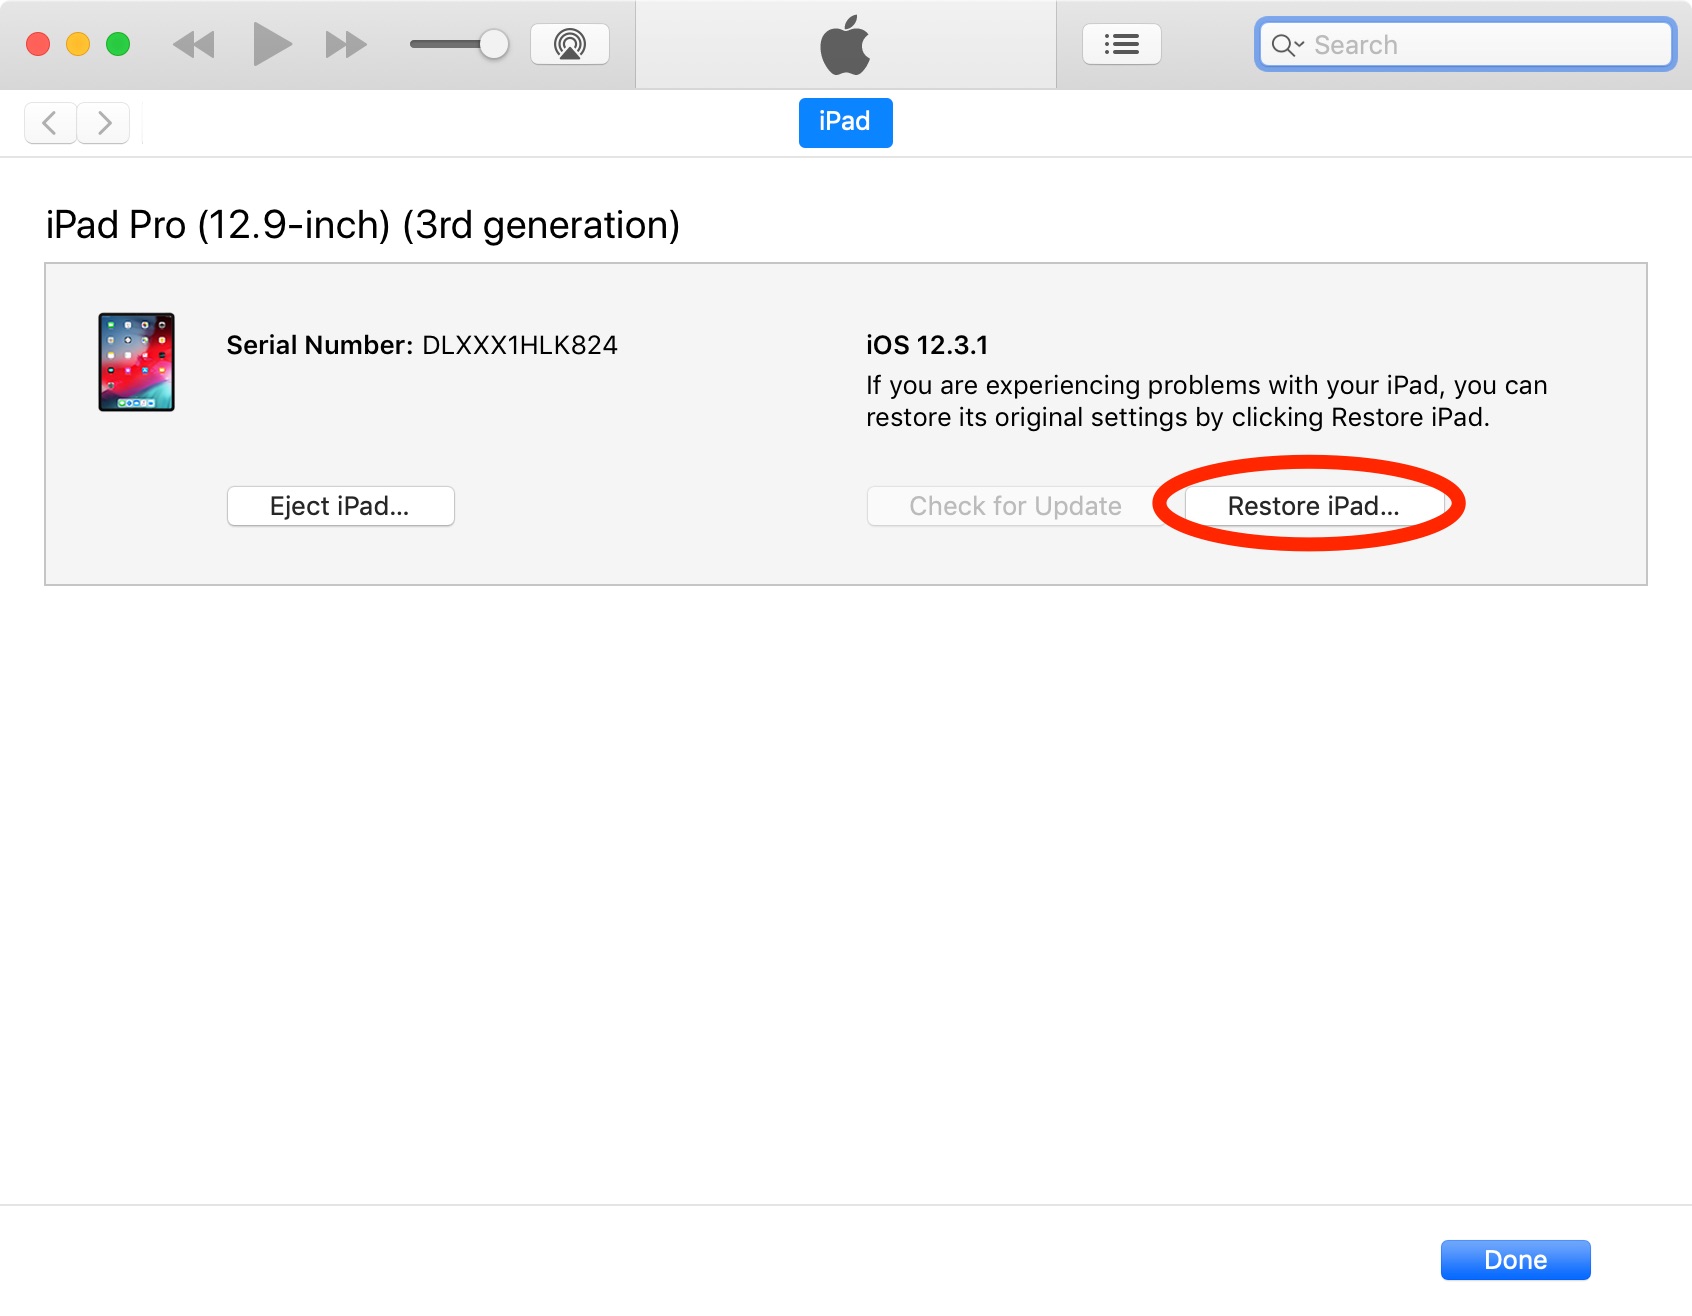
12) Click Downloads in the sidebar of the Finder window that has popped up, or navigate to whichever location you downloaded the restore image to, then choose the IPSW restore file that you’ve just downloaded and hit that OK button.
iTunes will now install the beta onto your iOS device.
Now’s a good time to grab yourself a sandwich or check your email. The iOS device may automatically restart a few times during the install process. Do not turn it off or unplug it from the computer until the update is complete.
How to install iOS or iPadOS 13 beta using macOS Catalina 10.15 beta
This method is recommended for people who’d like to install the macOS Catalina 10.15 beta alongside the iOS or iPadOS 13 beta. It doesn’t require downloading the Xcode 11 beta at all.
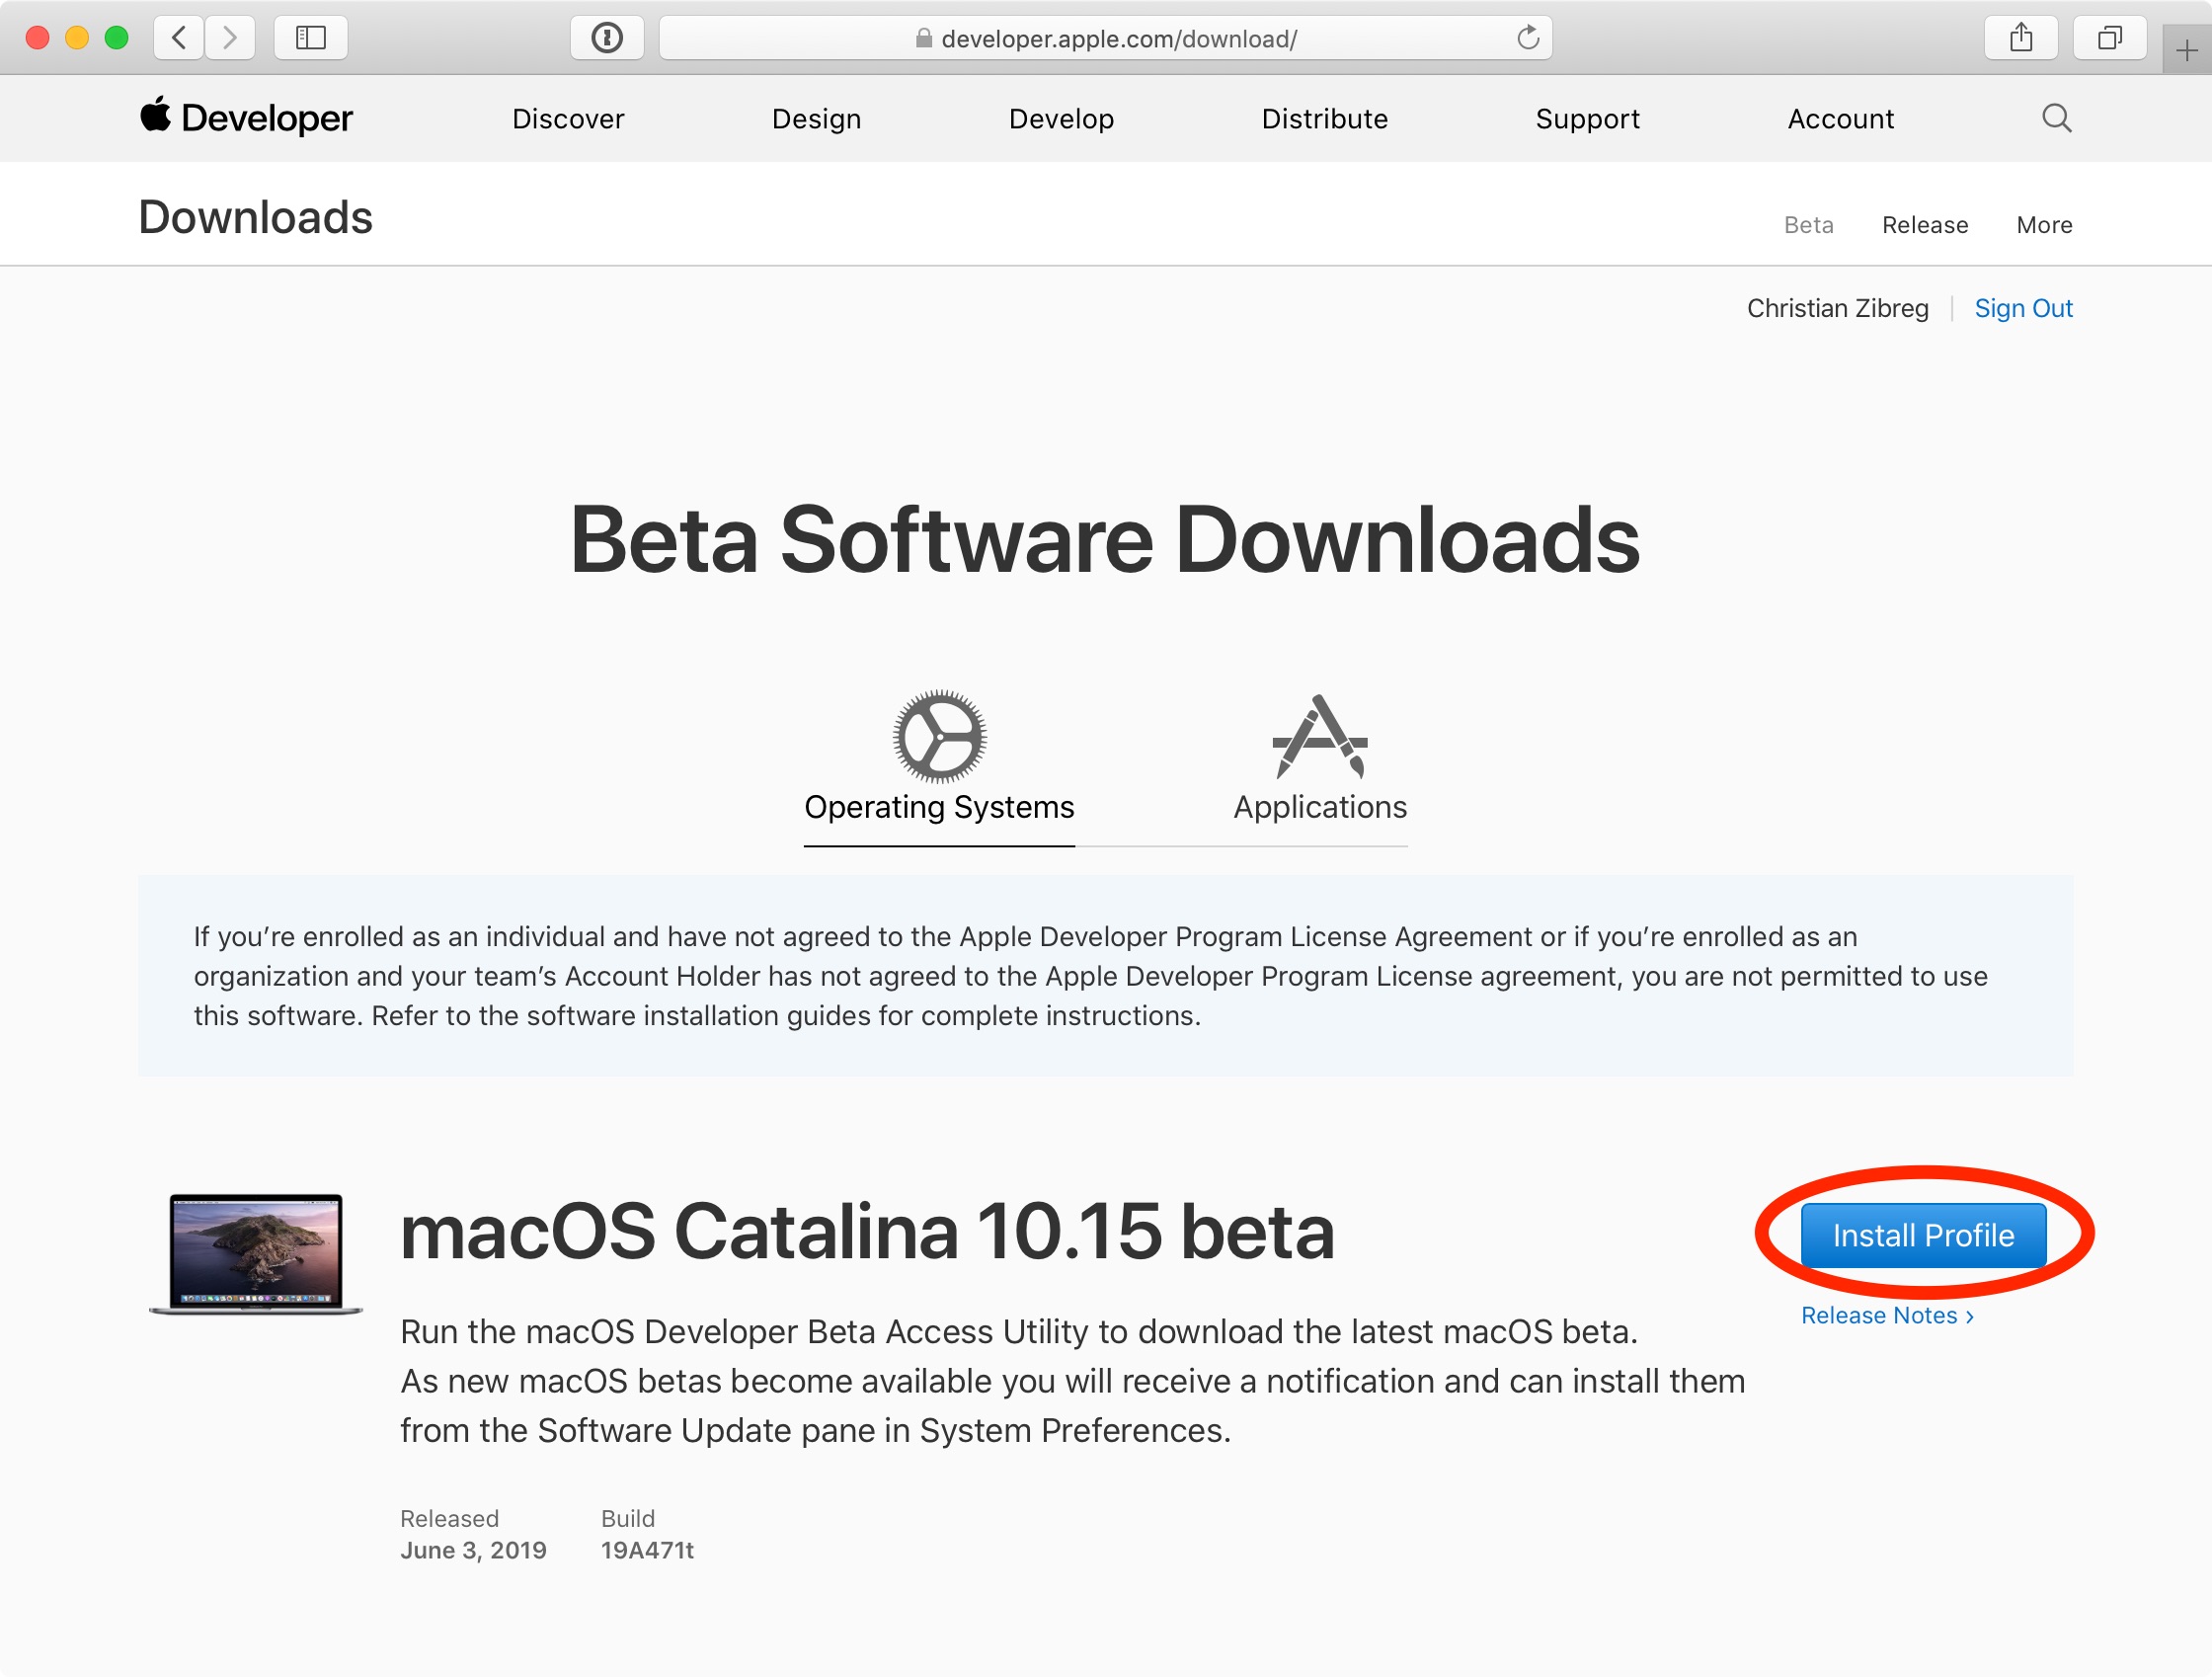
1) Visit developer.apple.com/download on your Mac and sign in with your Apple ID account.
2) Click Operating Systems near the screen top and hit Install Profile in the macOS Catalina 10.15 Beta section to download Apple’s special utility. After it finishes downloading, install it by double-click the file “macOSDeveloperBetaAccessUtility.pkg” from the Downloads folder.
3) Your Mac is now ready to receive beta macOS builds. System Preferences will automatically launch to invoke the Software Update mechanism and check for an update. If not, check for updates manually. You should see a message saying that the macOS Catalina 10.15 developer beta is available. Click Update in order to download the macOS Catalina 10.15 beta installer.
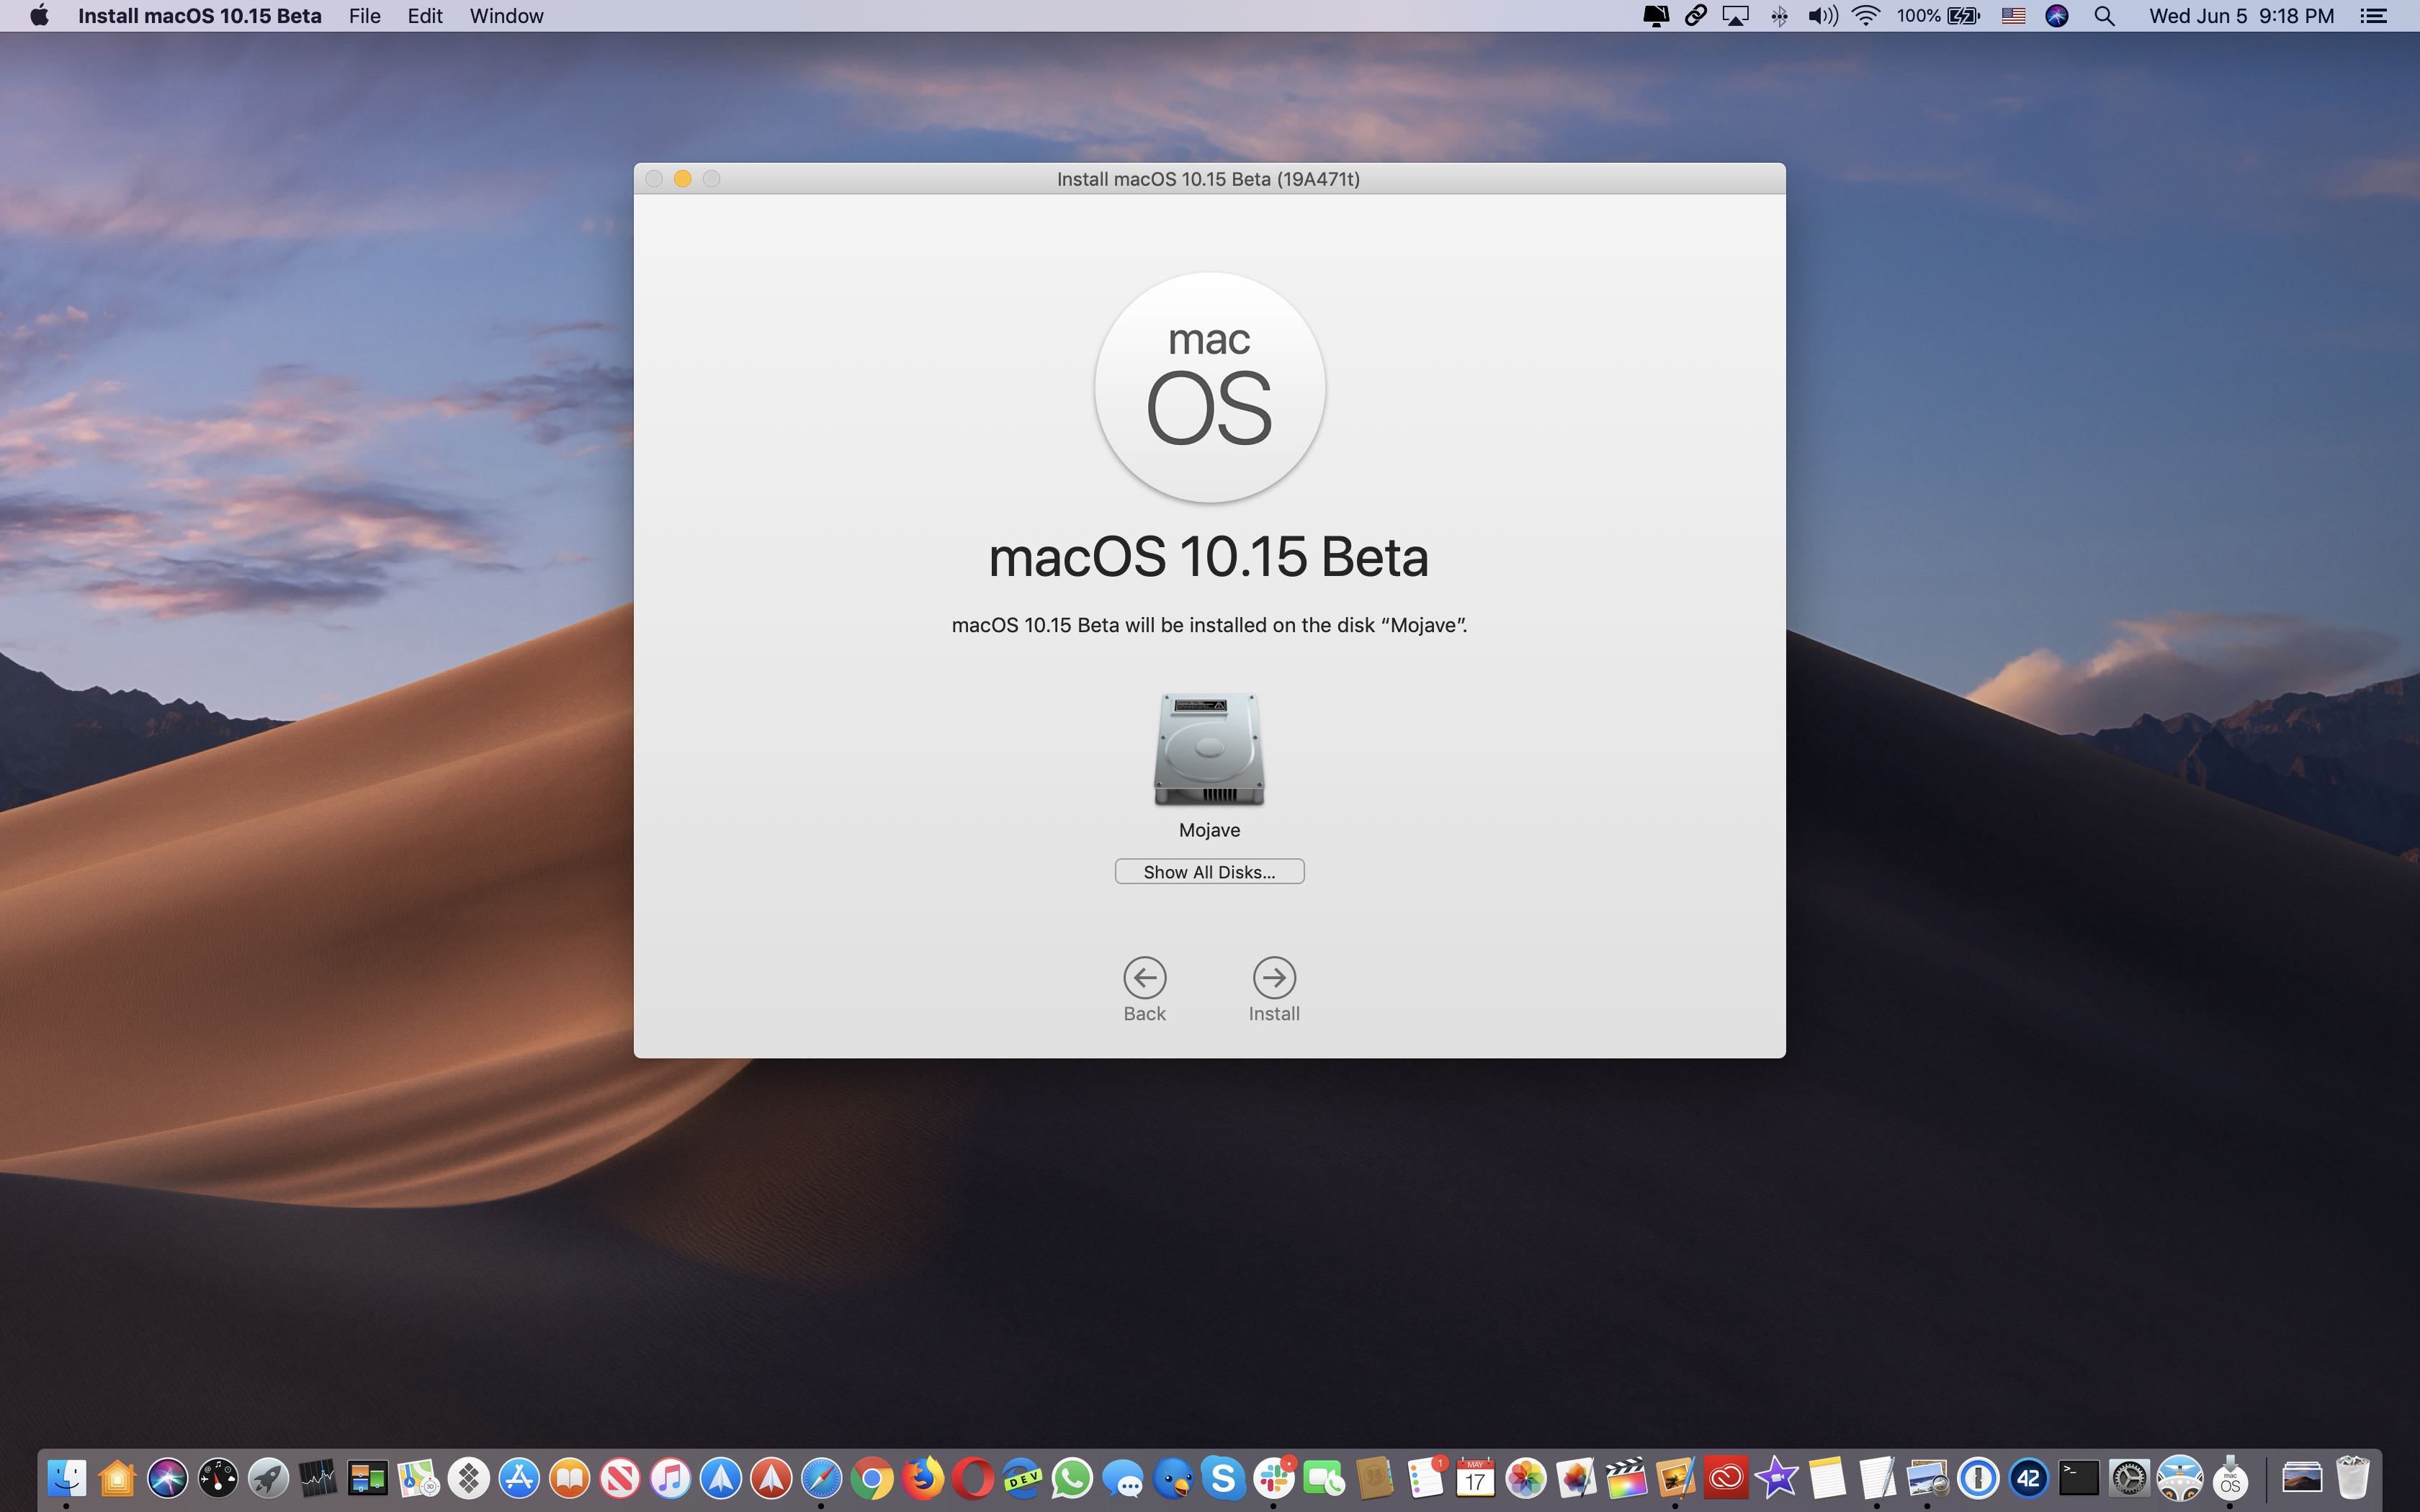
4) The installer opens automatically after it finishes downloading (if not, find it in your Application folder). Click Continue and agree to the Terms and Conditions, then click Install and follow the instructions to deploy the beta onto your Mac.

Your computer may reboot a couple of times during the install phase. You’re wholeheartedly recommended to avoid installing the beta onto any Macs you regularly use for work and play.
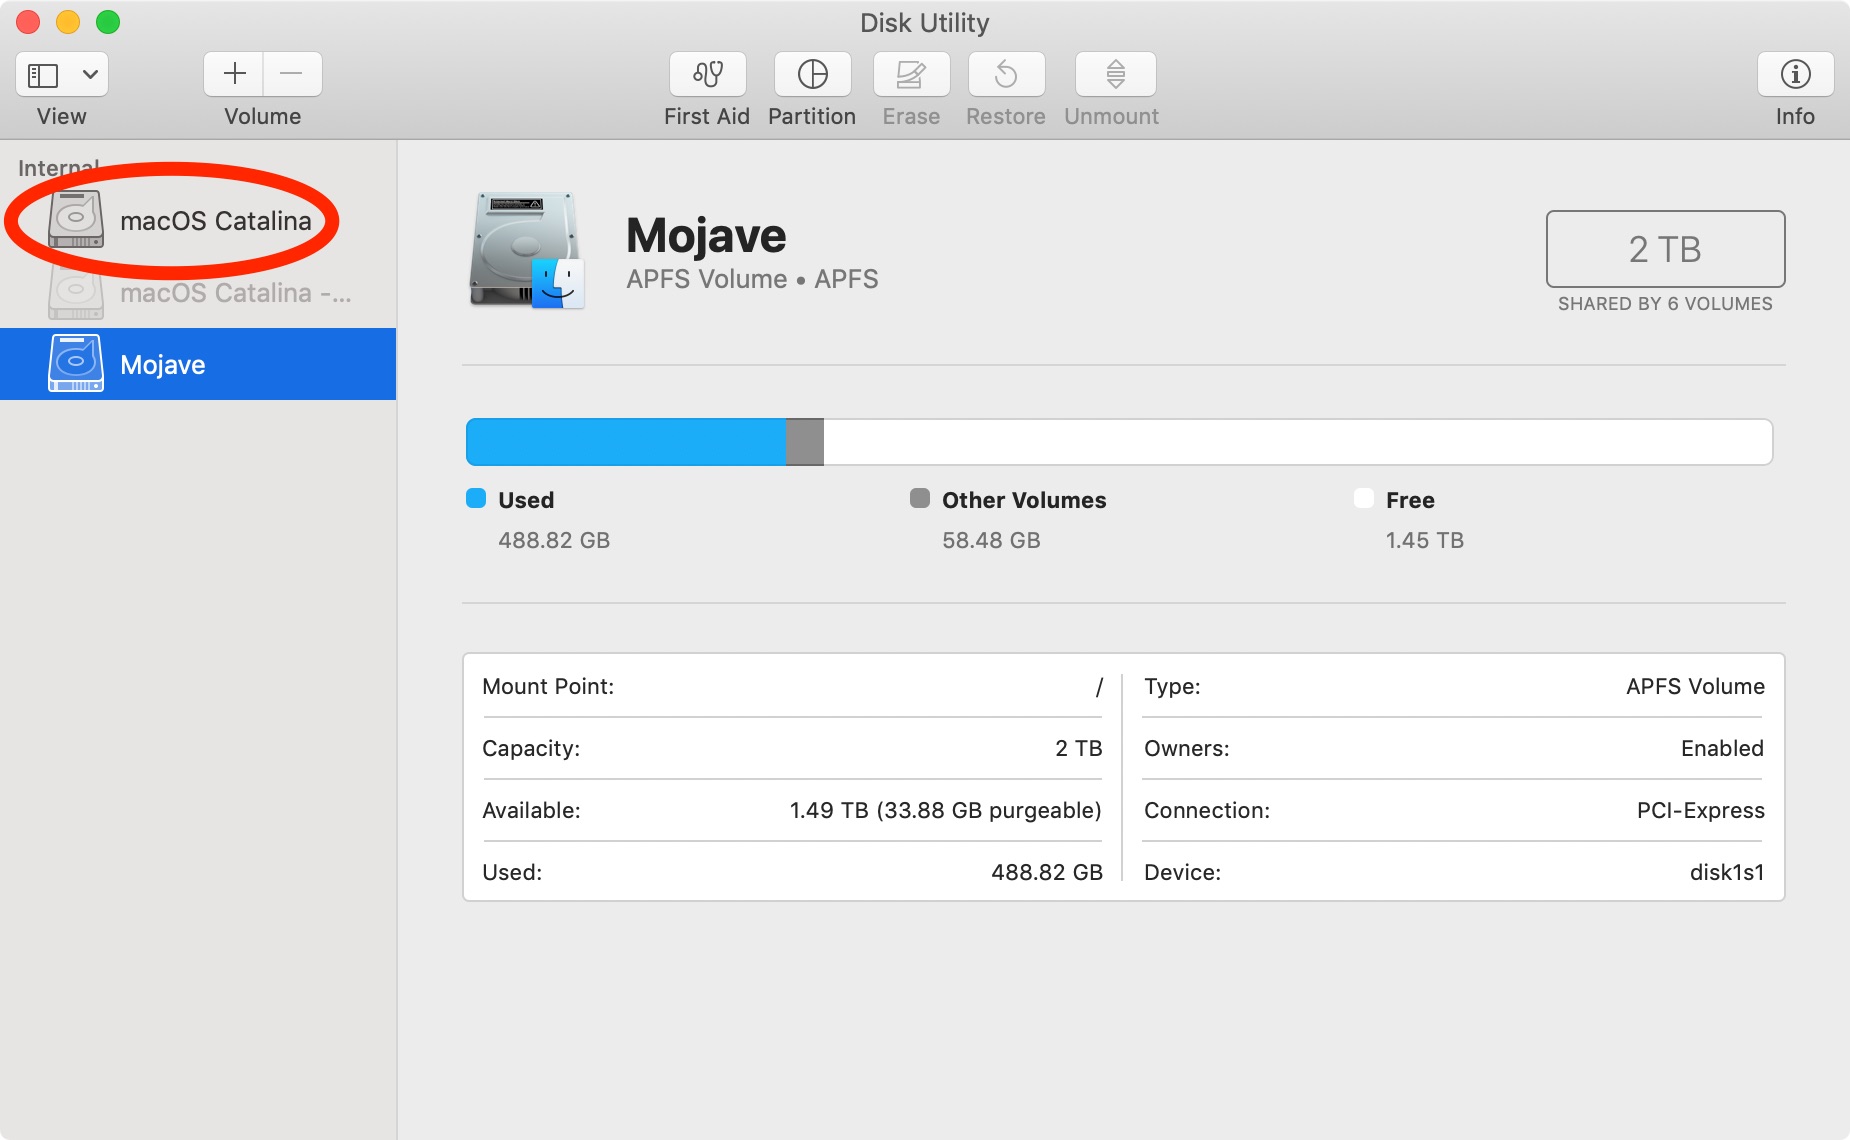
As a matter of fact, what a prudent user might want to do is create a dedicated 50-gigabyte or so partition with Disk Utility, formatted as APFS, and select it as a target when prompted by the installer (you may need to click Show All Disks).
Choose this course of action to run a clean copy of the macOS Catalina 10.15 beta rather than have your Mojave installation upgraded to Catalina. And don’t you worry a thing because the installer will offer to optionally transfer information from your current operating system.
5) With the macOS Catalina 10.15 beta successfully installed and booted into, visit developer.apple.com/download in Safari and sign in with your Apple ID account.
6) Click Operating System near the top, hit Show All in the iOS or iPadOS 13 beta section and choose the restore image for your iOS device model. The installer will start downloading immediately and you can press Option – Command – L to see download progress.
7) Now connect your iOS device to the computer using the cable it came with. Next, open a new Finder window: click the desktop and select the File menu, then choose the command New Finder Window. Alternatively, select the Finder by clicking the desktop, then press Command – N on the keyboard. Now click the iOS device in the Finder’s sidebar, listed underneath the Locations heading, and finally hit the Pair button to connect your iPhone or iPad to this computer. To confirm the operation, tap Trust on the iOS device and authenticate with your passcode.
8) Make an archived backup of the iOS device so that you can easily downgrade if you determine that the beta isn’t for you after all. Start by clicking the radio button labeled with the text This Computer. Next, tick the box next to “Encrypt local backup” and create an encryption password. Finally, click the button Back Up Now found in the section titled Backups.
9) With the backup process complete, click Manage Backups, then right or Control-click the backup you’ve just created, choose Archive and confirm the operation by clicking OK.
An archived backup is never overwritten by any subsequent backups you may create on this computer. An archived backup gives you a fixed point in time to restore an iOS device from in case you want to downgrade back to the previous iOS version.
10) Launch Settings on the connected iOS device, tap your Apple ID bio at the top, hit iCloud and choose Find My iPhone/iPad from the list. Slide the switch next to Find My iPhone/iPad to the OFF position, type in your Apple ID password and tap Turn Off to confirm the operation.
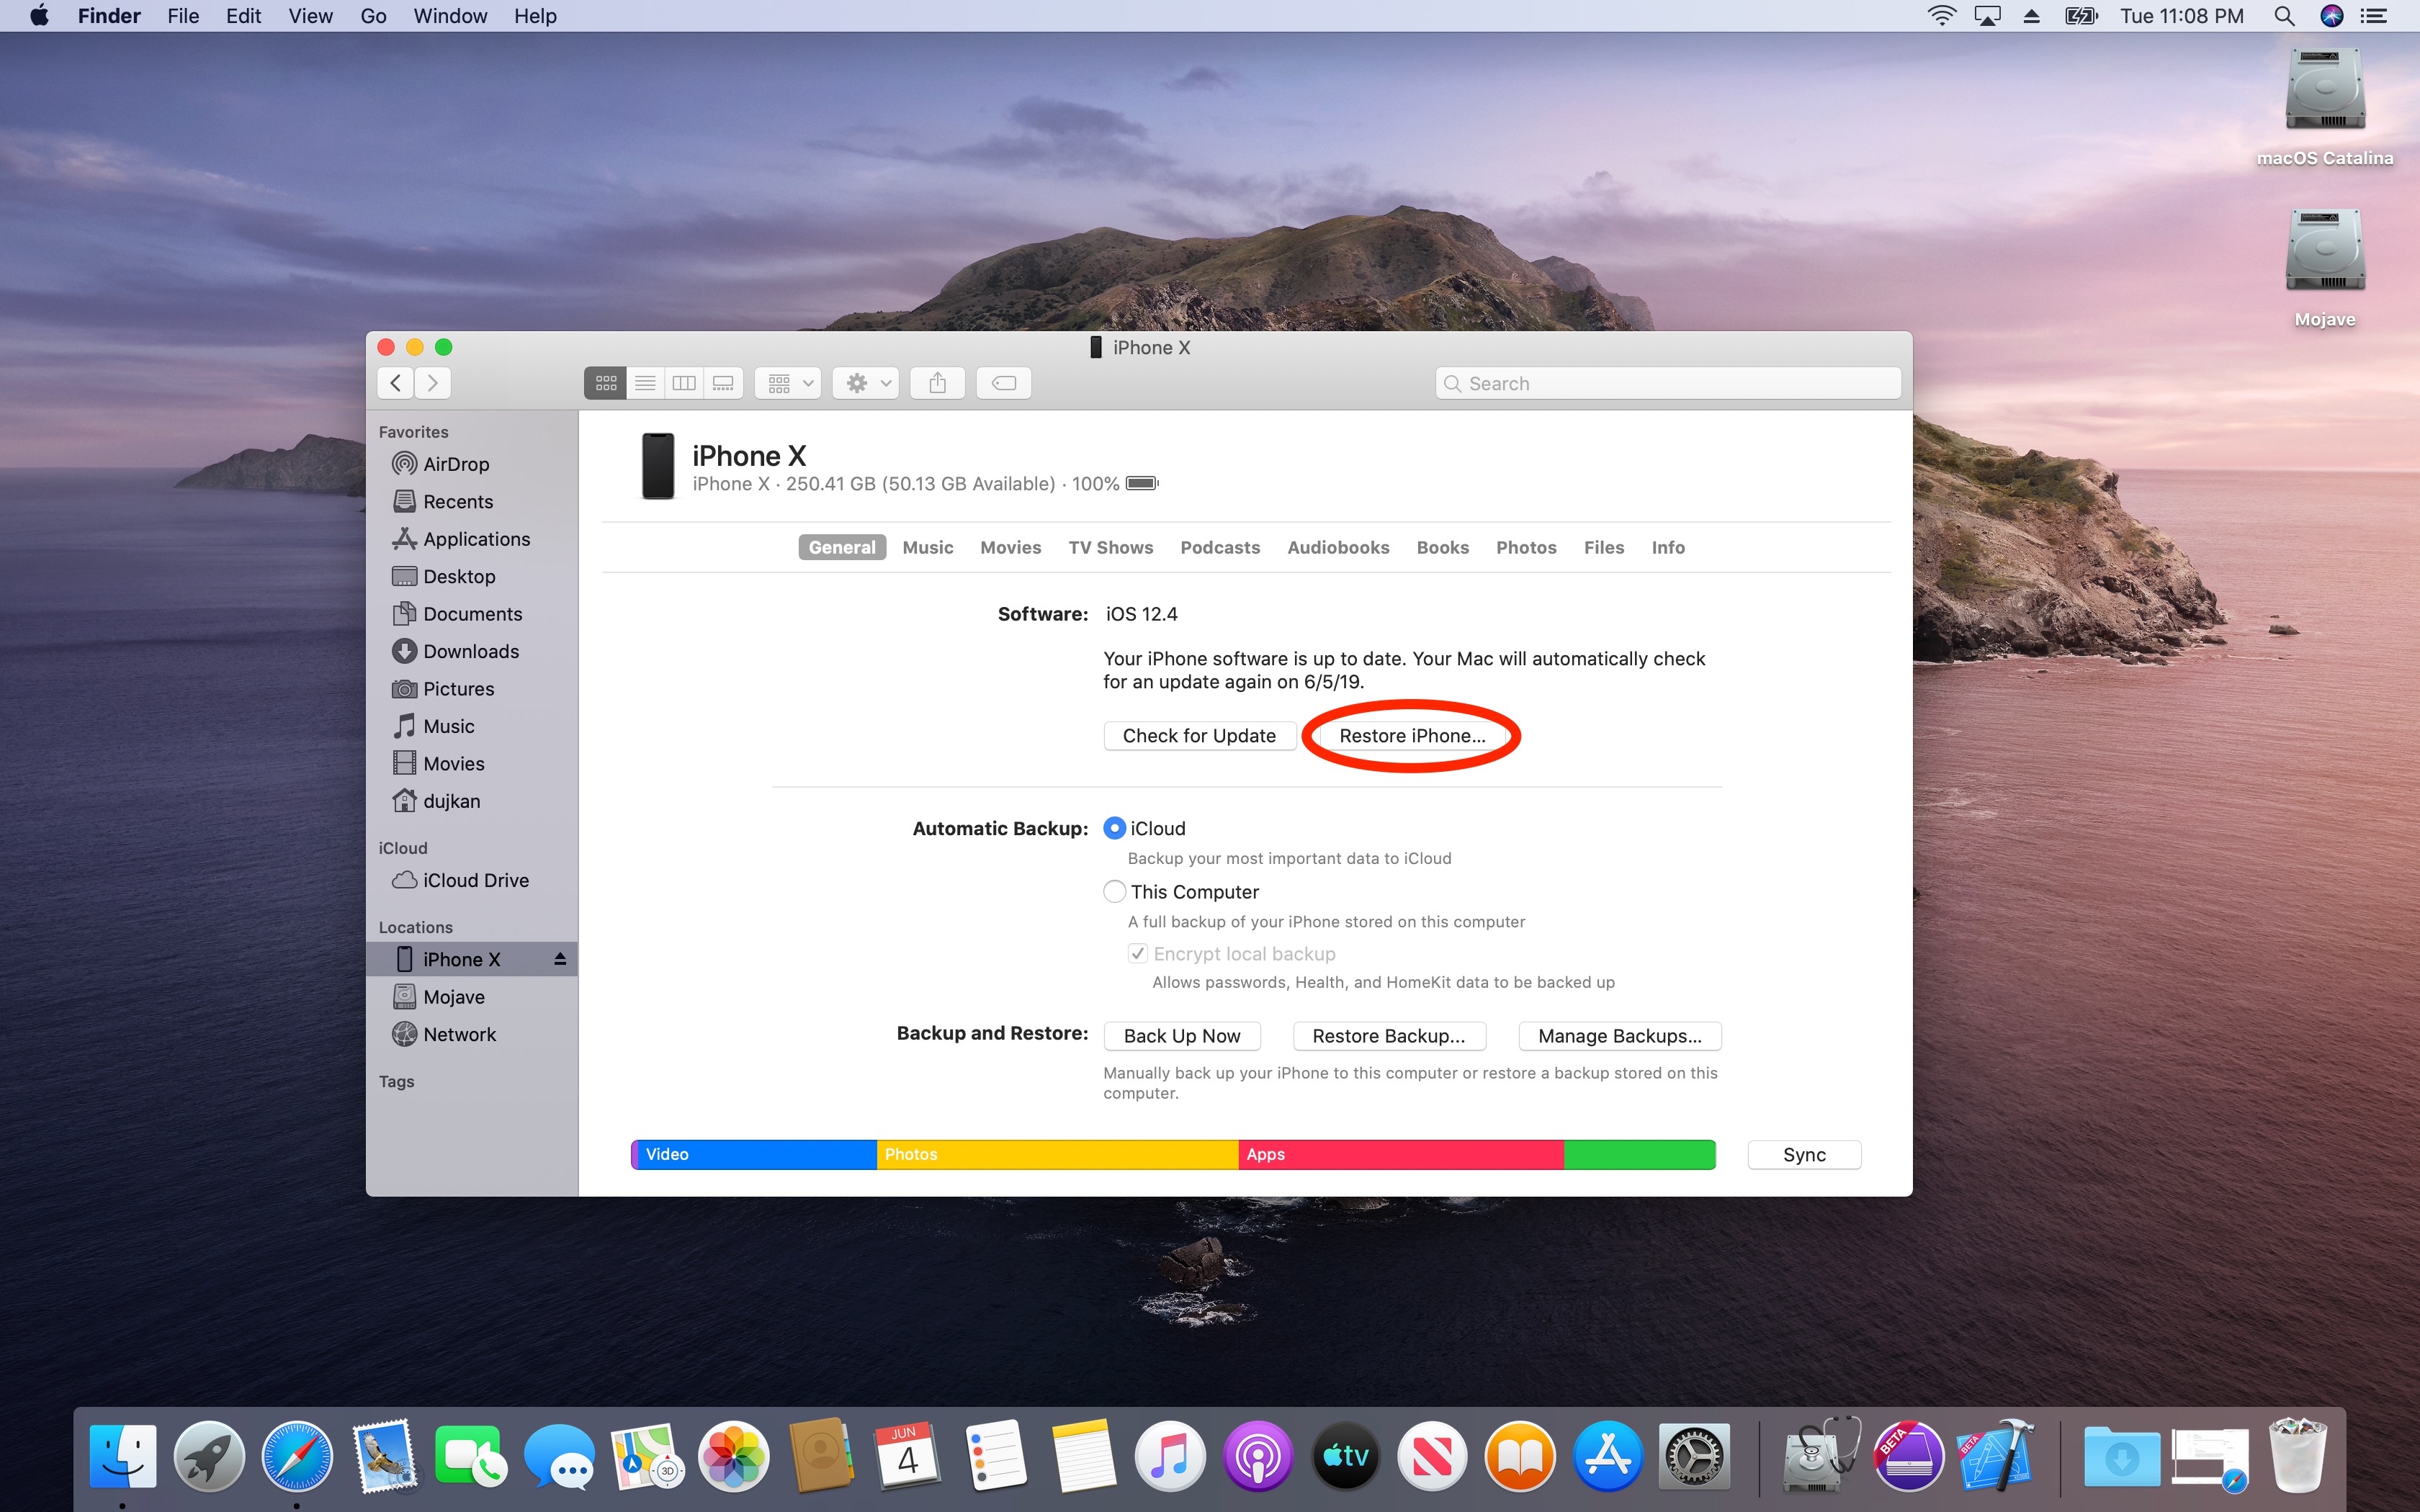
11) With Find My iPhone/iPad disabled and the device still connected to the Mac and selected in the Finder window, click Restore iPhone/iPad while holding down the Option key.
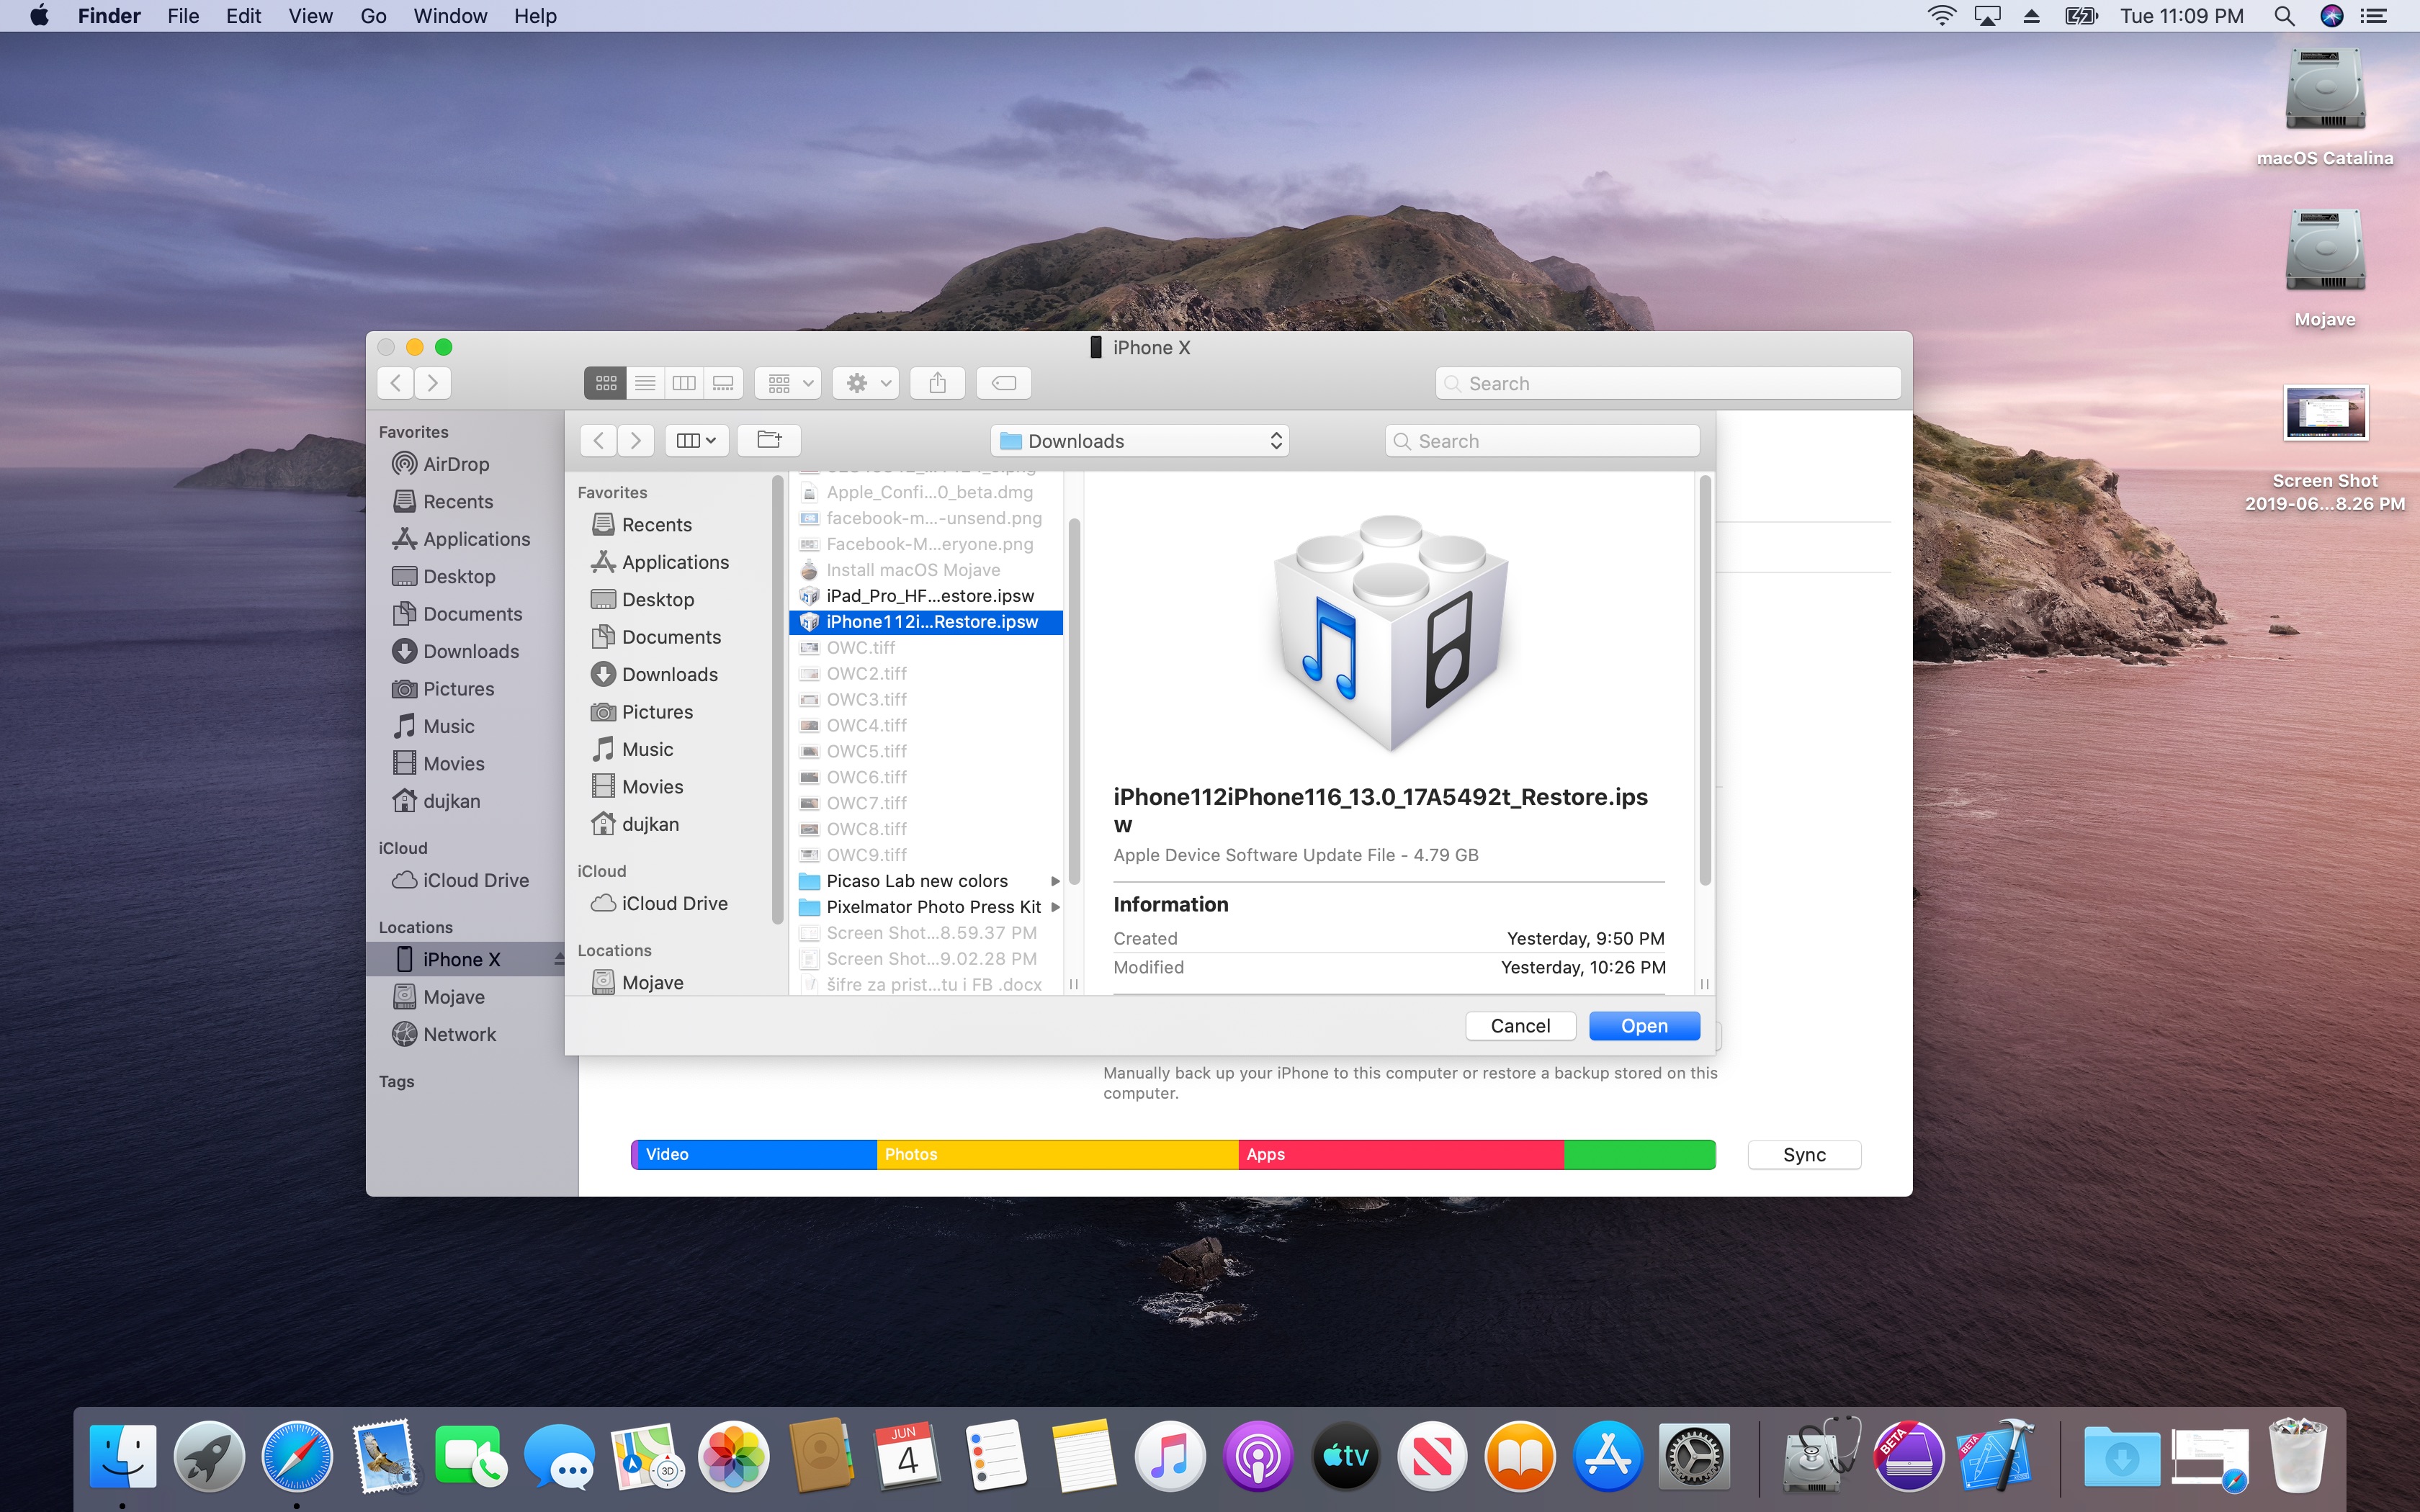
Another Finder window will launch—navigate to the restore image you’ve previously downloaded, select it (the IPSW file) and confirm the operation by clicking OK.
12) When prompted, click Update.
Your Mac will now start installing the beta onto your iOS device.
The instal process can take a couple of minutes or more, depending on your iOS device model. Do not turn the device off or unplug it from your Mac until the update is complete.
iOS and iPadOS 13 are scheduled to release commercially this fall.
Need help? Ask iDB!
If you like this tutorial, pass it along to your friends and leave a comment below.
Got stuck? Not sure how to do certain things on your Apple device? Let us know via help@idownloadblog.com and a future tutorial might provide a solution.
Submit your own how-to suggestions via tips@idownloadblog.com.