Instead of using your real email address, you can use an alias if you want to disguise your main Gmail email address. This is handy when you give your email address for newsletters, websites, online comments, and similar situations.
Basically, an email alias is a different name for your primary email address. For instance, if your email address is realname@gmail.com, you can set up a separate address for fakename@gmail.com. Then, use the second as an alias when you don’t want to give out your primary address but still have the emails delivered to your main Gmail inbox.
In this tutorial, we show you how to create a Gmail email alias in your existing account.
A bit more about alias
Alias as a noun means “a false or assumed identity.” You are Daniel, but you identify yourself to the world as James.
On iCloud email, creating an alias is easy and super helpful. For example, my main iCloud email is ******ankur@icloud.com. But I have set an alias as ankur.writer@icloud.com. If I have to share my email with any HR, I just share ankur.writer@icloud.com and not my real email. All emails sent to alias ankur.writer@icloud.com automatically show up in the Mail app – no configuration or anything extra is needed.
On Gmail, the approach is different. It isn’t as straightforward as iCloud.
3 ways to add a temporary alias to your Gmail address
Here’s how to create Gmail aliases and set filters to manage your account.
1. Use the dot
Suppose your email address is YourName@gmail.com. Now, if you add one or more dot/period anywhere in between your email address, Gmail will still treat it as your email. That means:
- Your.Name@gmail.com
- Y.ourName@gmail.com
- You.rName@gmail.com
- Y.o.u.r.N.a.m.e@gmail.com
are all the same email addresses.
So, in a way, all these are aliases of your original email YourName@gmail.com. Google will ignore the dots and all emails sent to these aliases will appear in your main inbox. But most other services will treat all the above email addresses as separate emails.
Note: You must not use two dots together. For example, avoid Your..Name@gmail.com
2. Use the plus sign
If you add the plus sign (+) at the end of your Gmail address, Gmail still treats it as the same email. In fact, after the plus sign, you can add anything else you like, and Gmail will ignore everything that’s between + and the @ sign. That means:
- YourName+@gmail.com
- YourName+newsletter@gmail.com
- YourName+signups@gmail.com
- YourName+amazon@gmail.com
- YourName+spam@gmail.com
are all the same email addresses in the eyes of Google.
So, if you sign up for a newsletter, just give them YourName+newsletter@gmail.com email. The emails sent to this will still show up in your main YourName@gmail.com account. And you can use filters to organize your emails.
3. Googlemail and Gmail
When you create a Gmail email (or Google account), you have your usual YourName@gmail.com email address. What you might not know is you also get YourName@googlemail.com email address. That means:
- YourName@gmail.com
- YourName@googlemail.com
are the same email addresses.
And if some service sends you an email to YourName@googlemail.com, it will show in YourName@gmail.com Gmail account.
Now you know how to have temporary Gmail aliases. You can use these to sign up for different services or the same service twice (giving the service an impression of two users). And don’t forget to set up email filters to keep your main account organized of all the emails sent to your temporary aliases.
Problem with temporary Gmail aliases
Suppose you use one of the tricks mentioned above to disguise your actual email. But, in the end, all the emails you receive on your alias still show up in your primary Gmail. And if someone (or some service’s algorithm) is knowledgeable/trained, it’s no rocket science to figure out your actual email address – just remove the dots, plus sign, or use @gmail instead or @googlemail, and they have your original email.
To address this, you can create a different Gmail or email account with any other service (or use an existing one – Gmail, Hotmail, Yahoo, personal email, etc.) and link it to your main Gmail account. The emails sent on that second account will appear in your main Gmail account.
After this, you can give away your second throwaway email to anyone, put them on social profiles, use them for newsletter or service signups, and more. During all this, your main email stays protected.
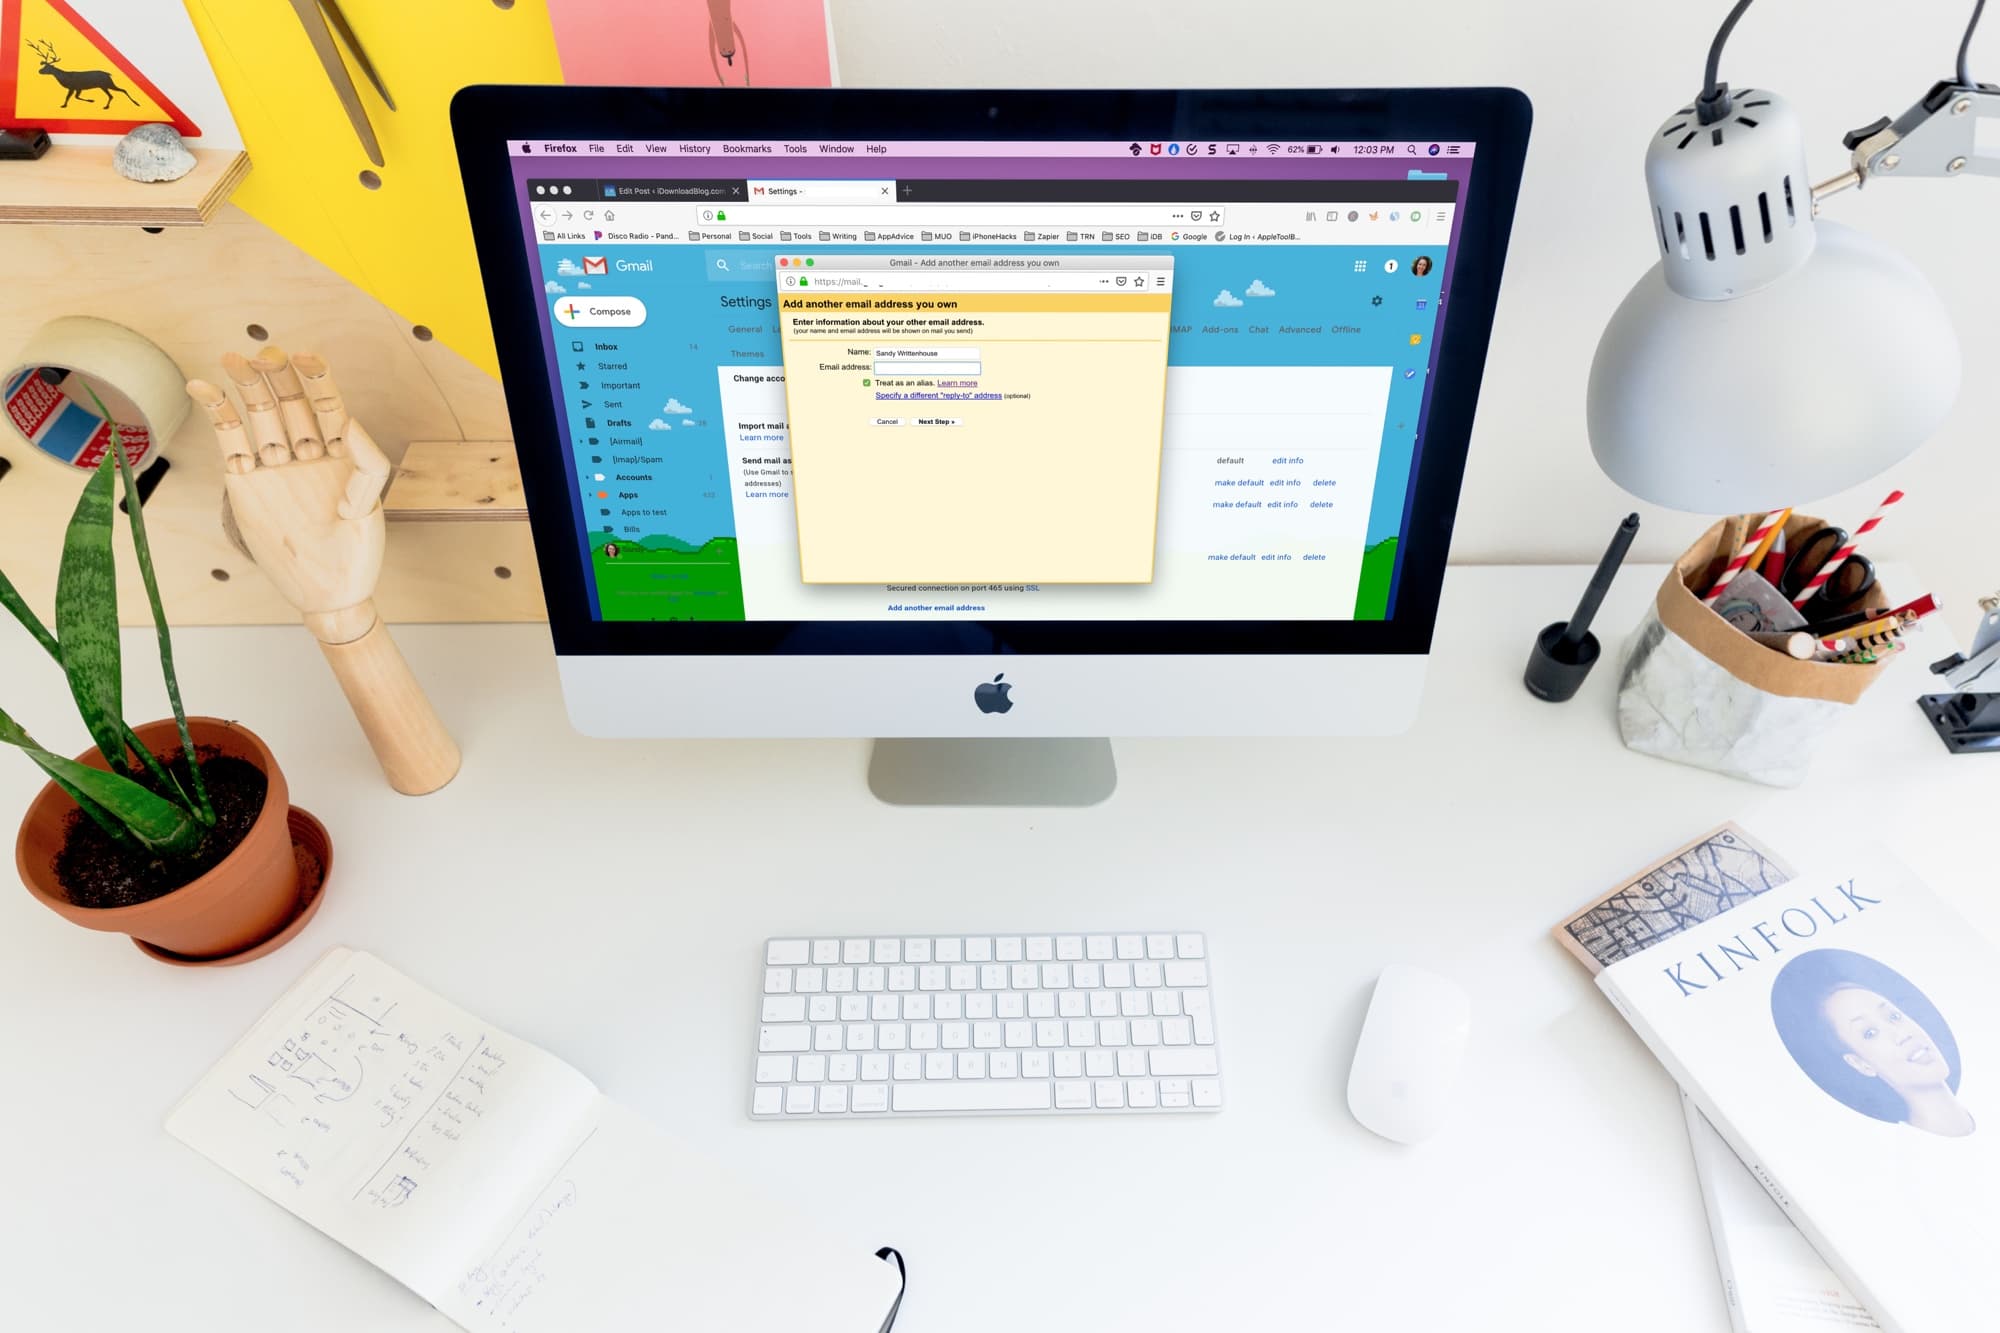
How to set up and use alias in Gmail
Here’s how to create a permanent Gmail alias to maintain your privacy.
I have two email accounts:
- MyPersonalEmail@gmail.com (the main account that I don’t want to share with any person or service)
- MyPublicEmail@gmail.com (that is on my social profiles, and I share it with anybody).
Now, here’s how to ensure that all mails sent to my second email (MyPublicEmail@gmail) show up in my primary email (MyPersonalEmail@gmail.com). After this, you will also see how to reply to incoming emails (on second account) while being logged into your primary account.
Set up email forwarding
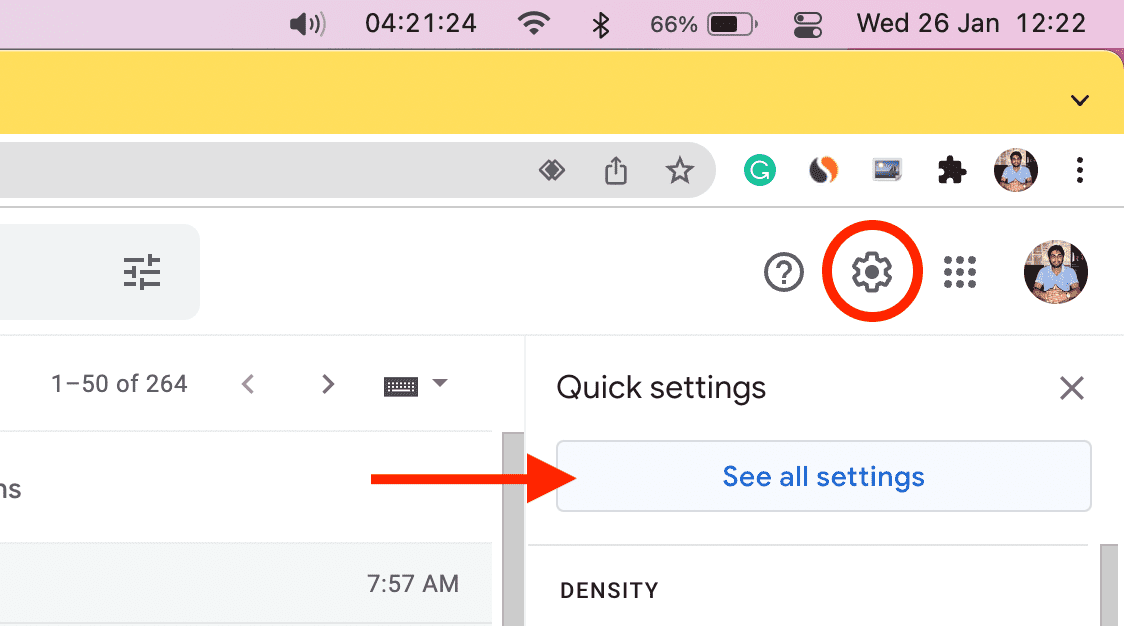
1) Open Gmail on your second account and click the settings icon > See all settings.
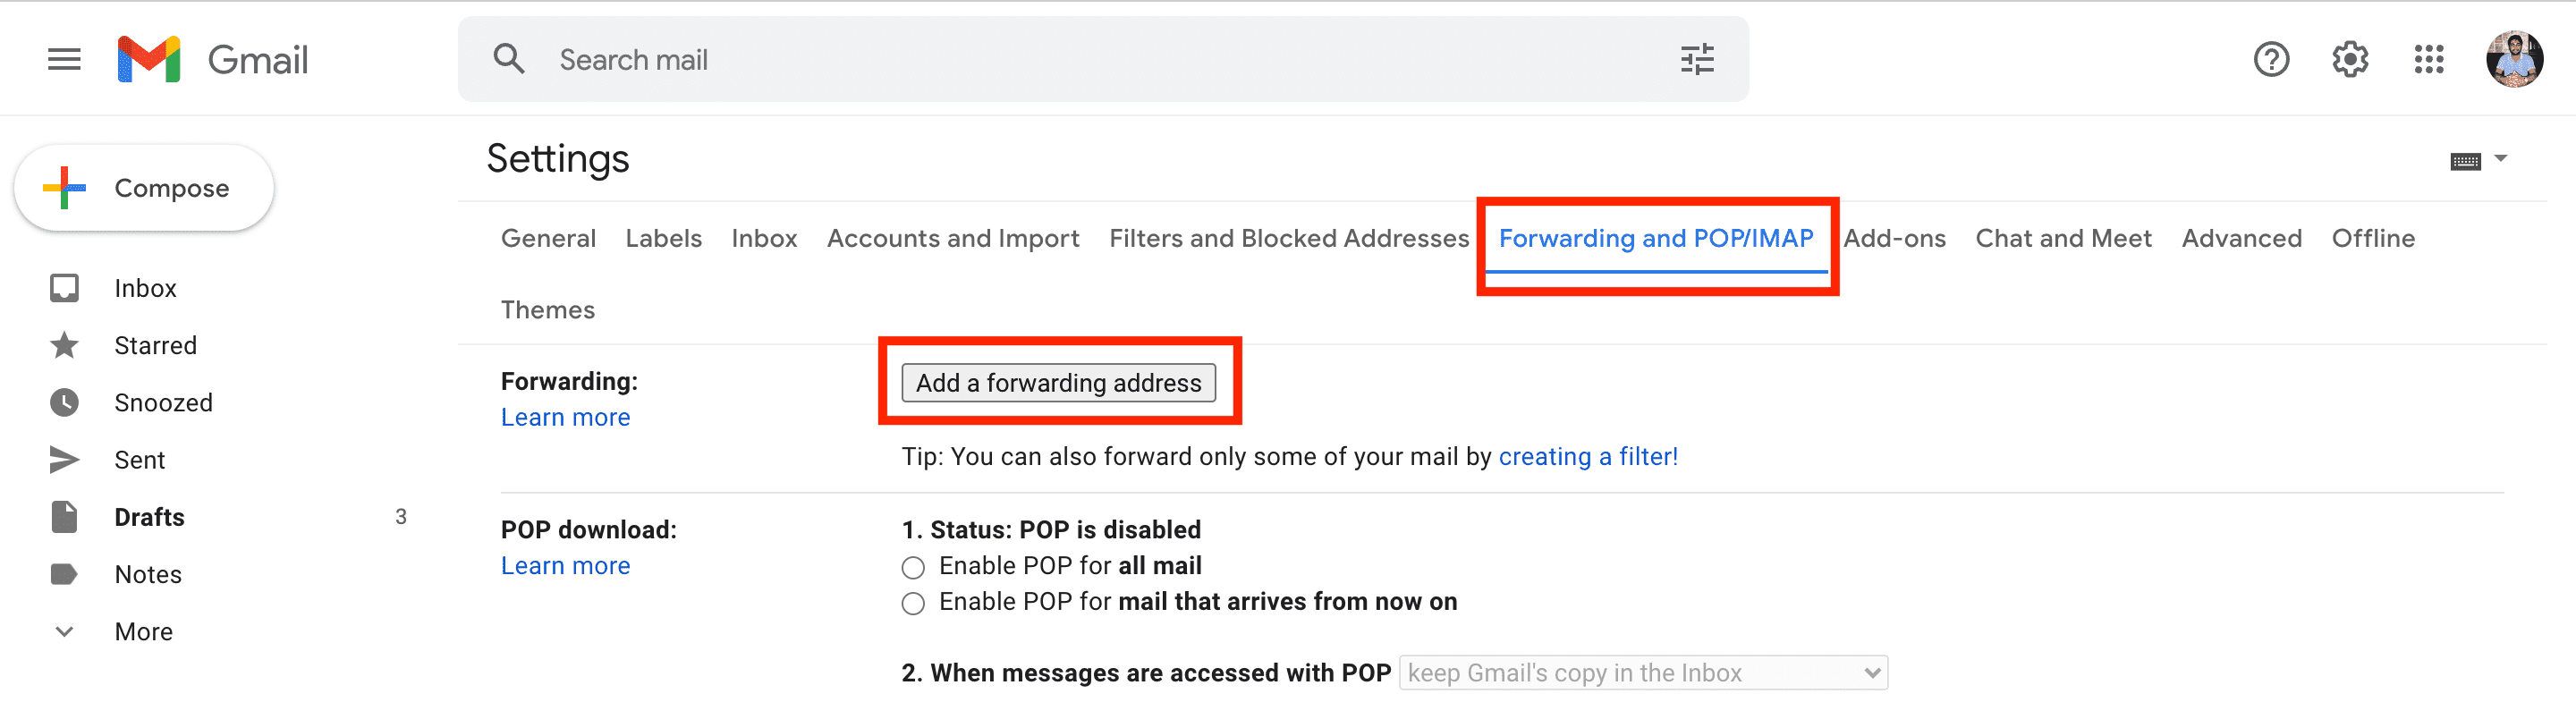
2) Click Forwarding and POP/IMAP.
3) Click Add a forwarding address.
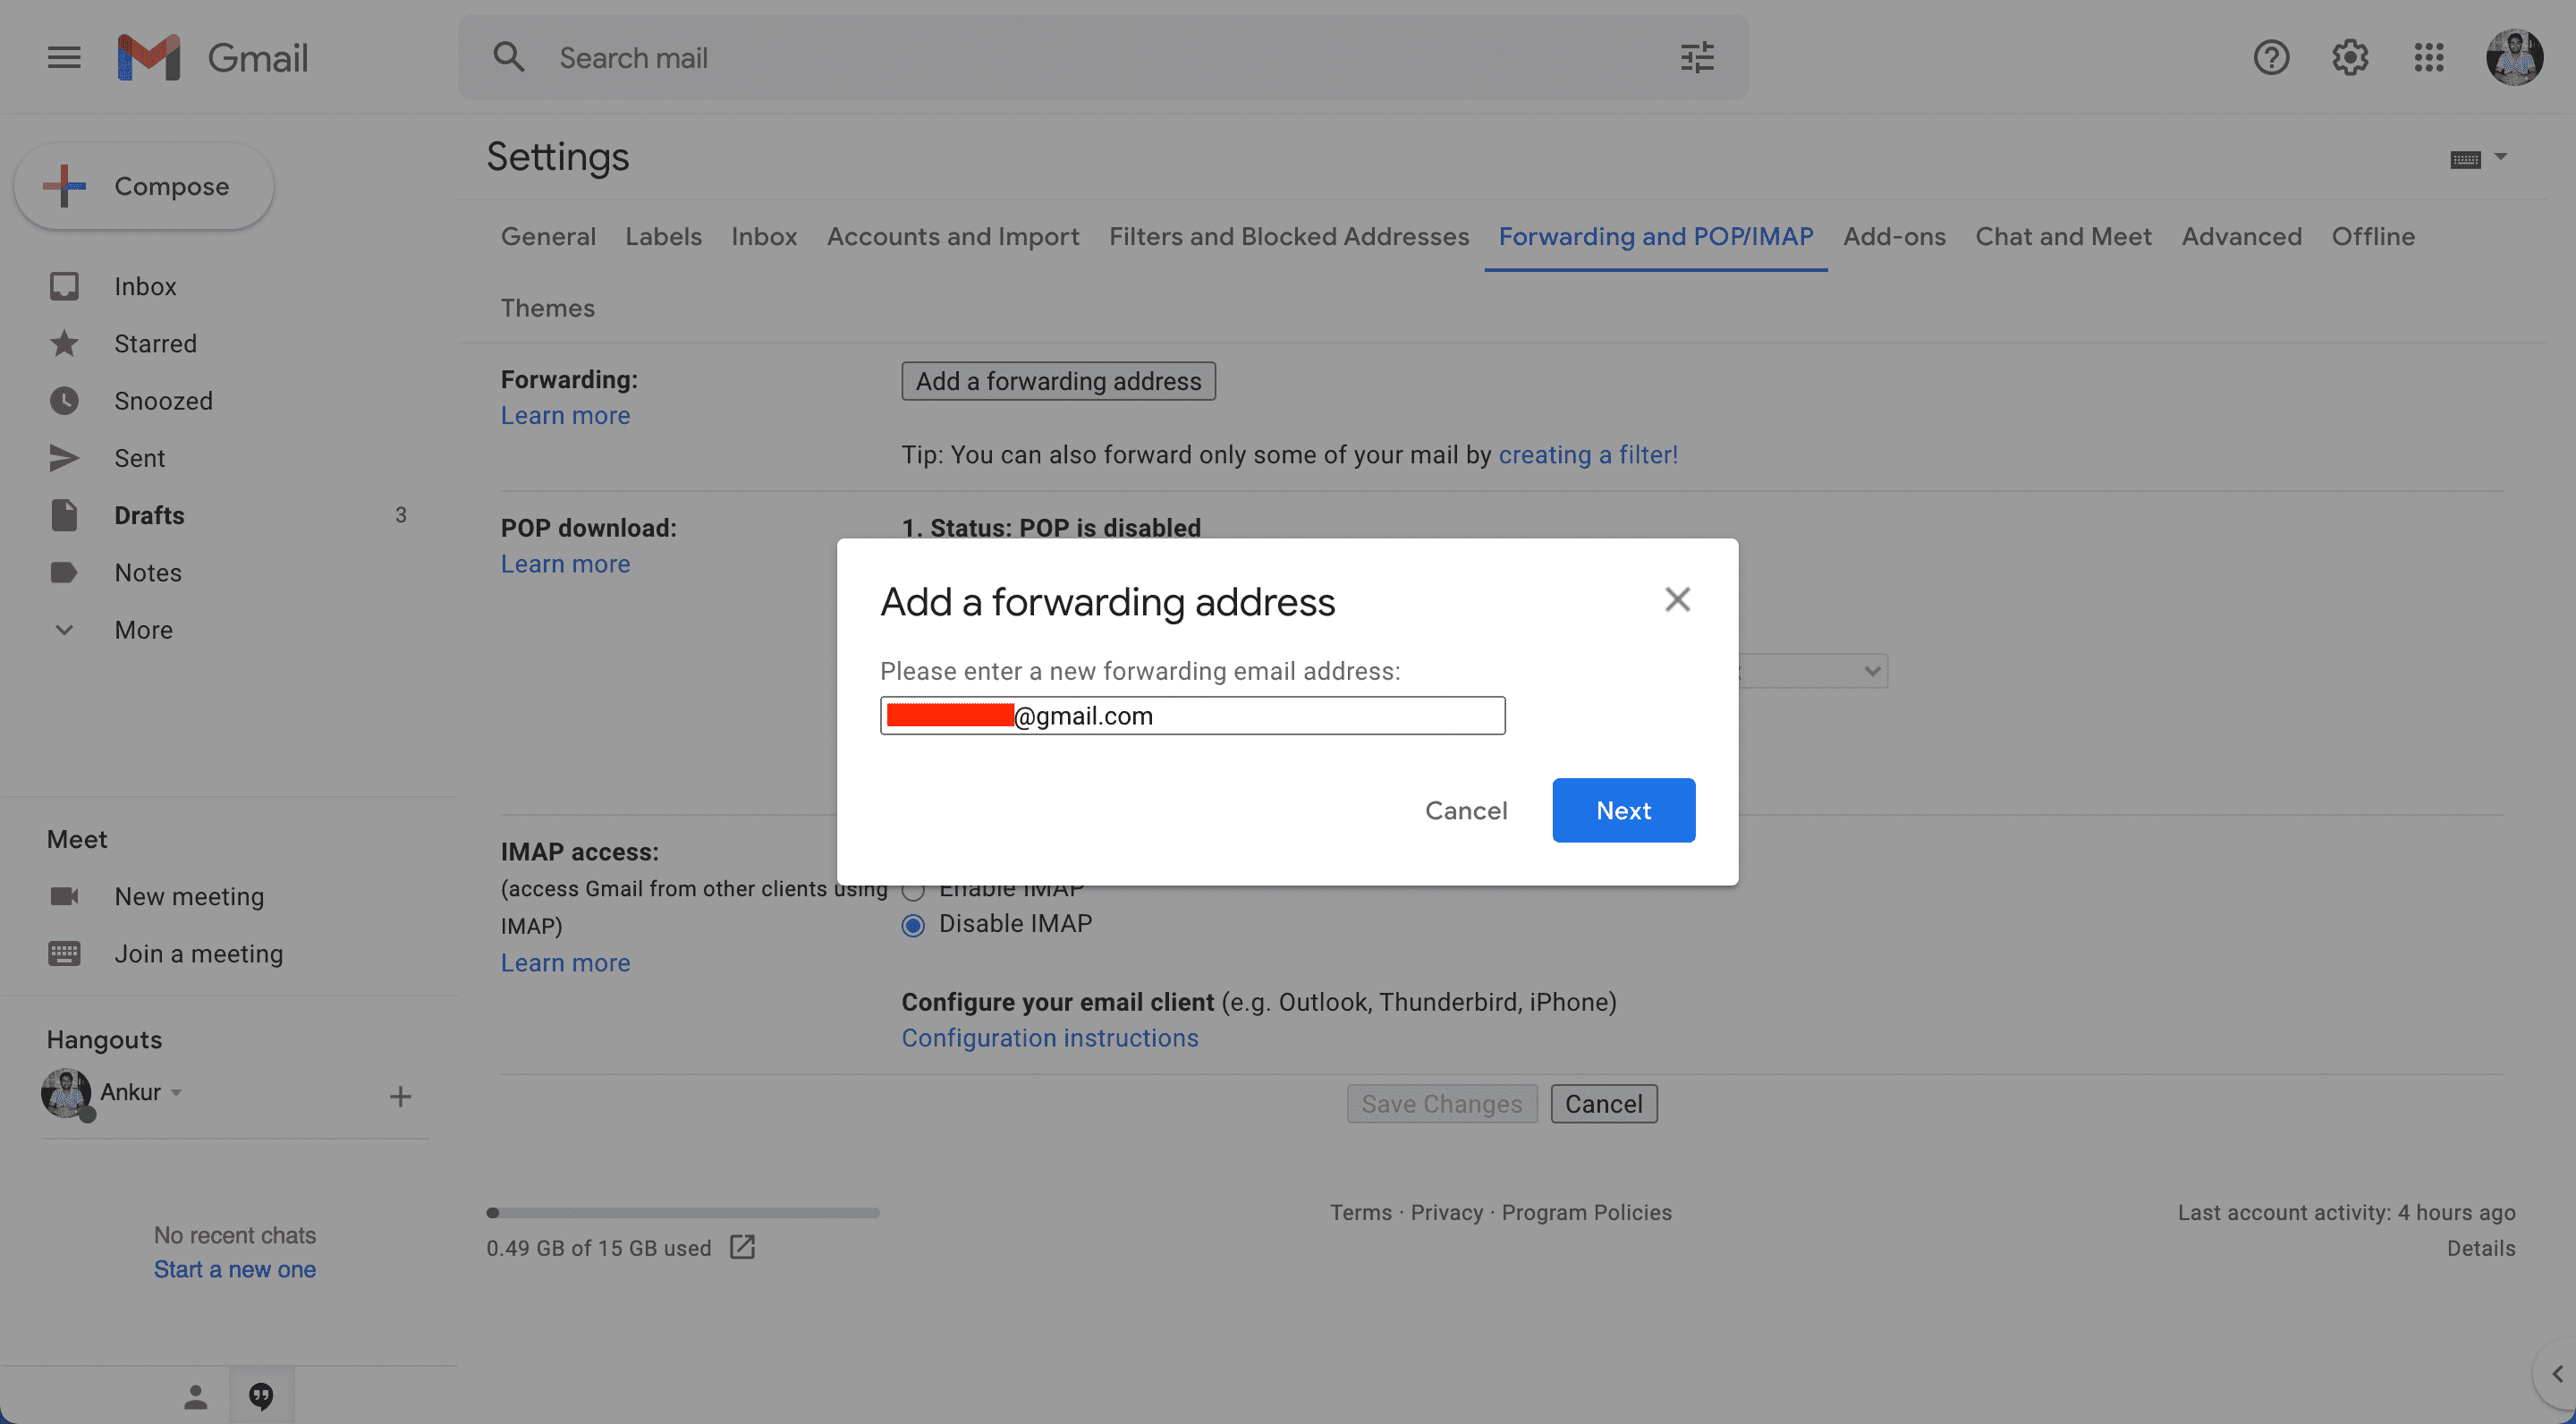
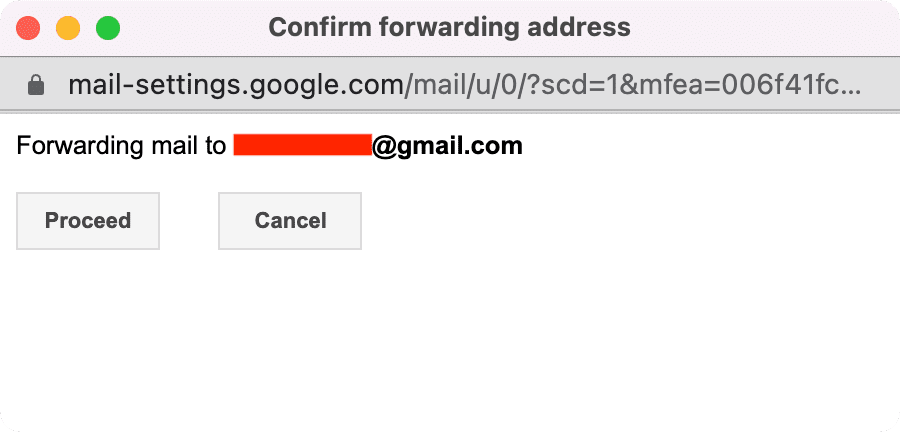
4) Now, enter your main private email here and click Next.
5) Click Proceed > Ok.
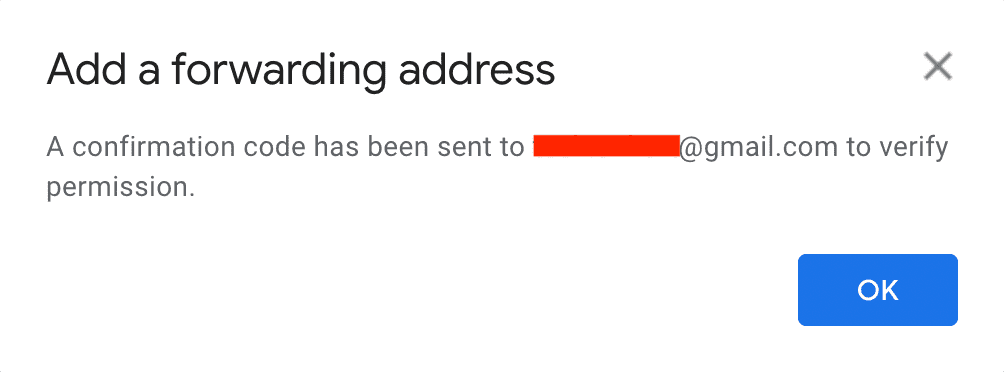
6) Open your main email and click the verification link. You can also copy the code you receive here and paste it on the second account’s verification box and click Verify.
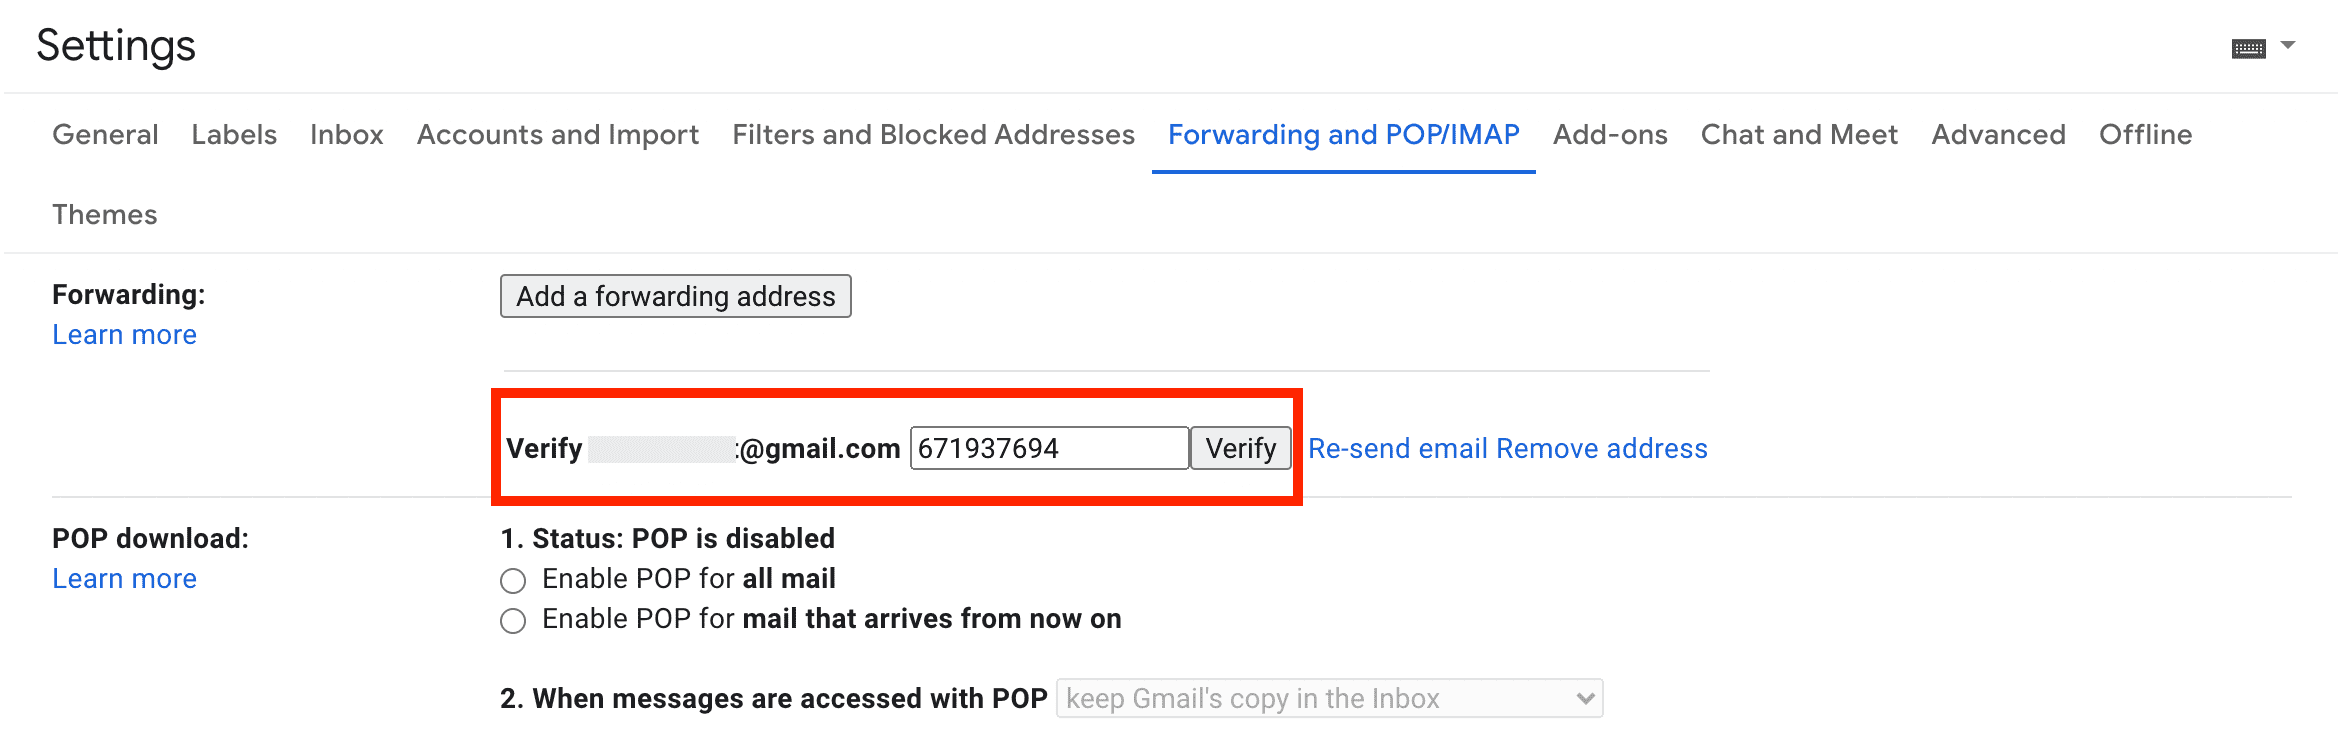
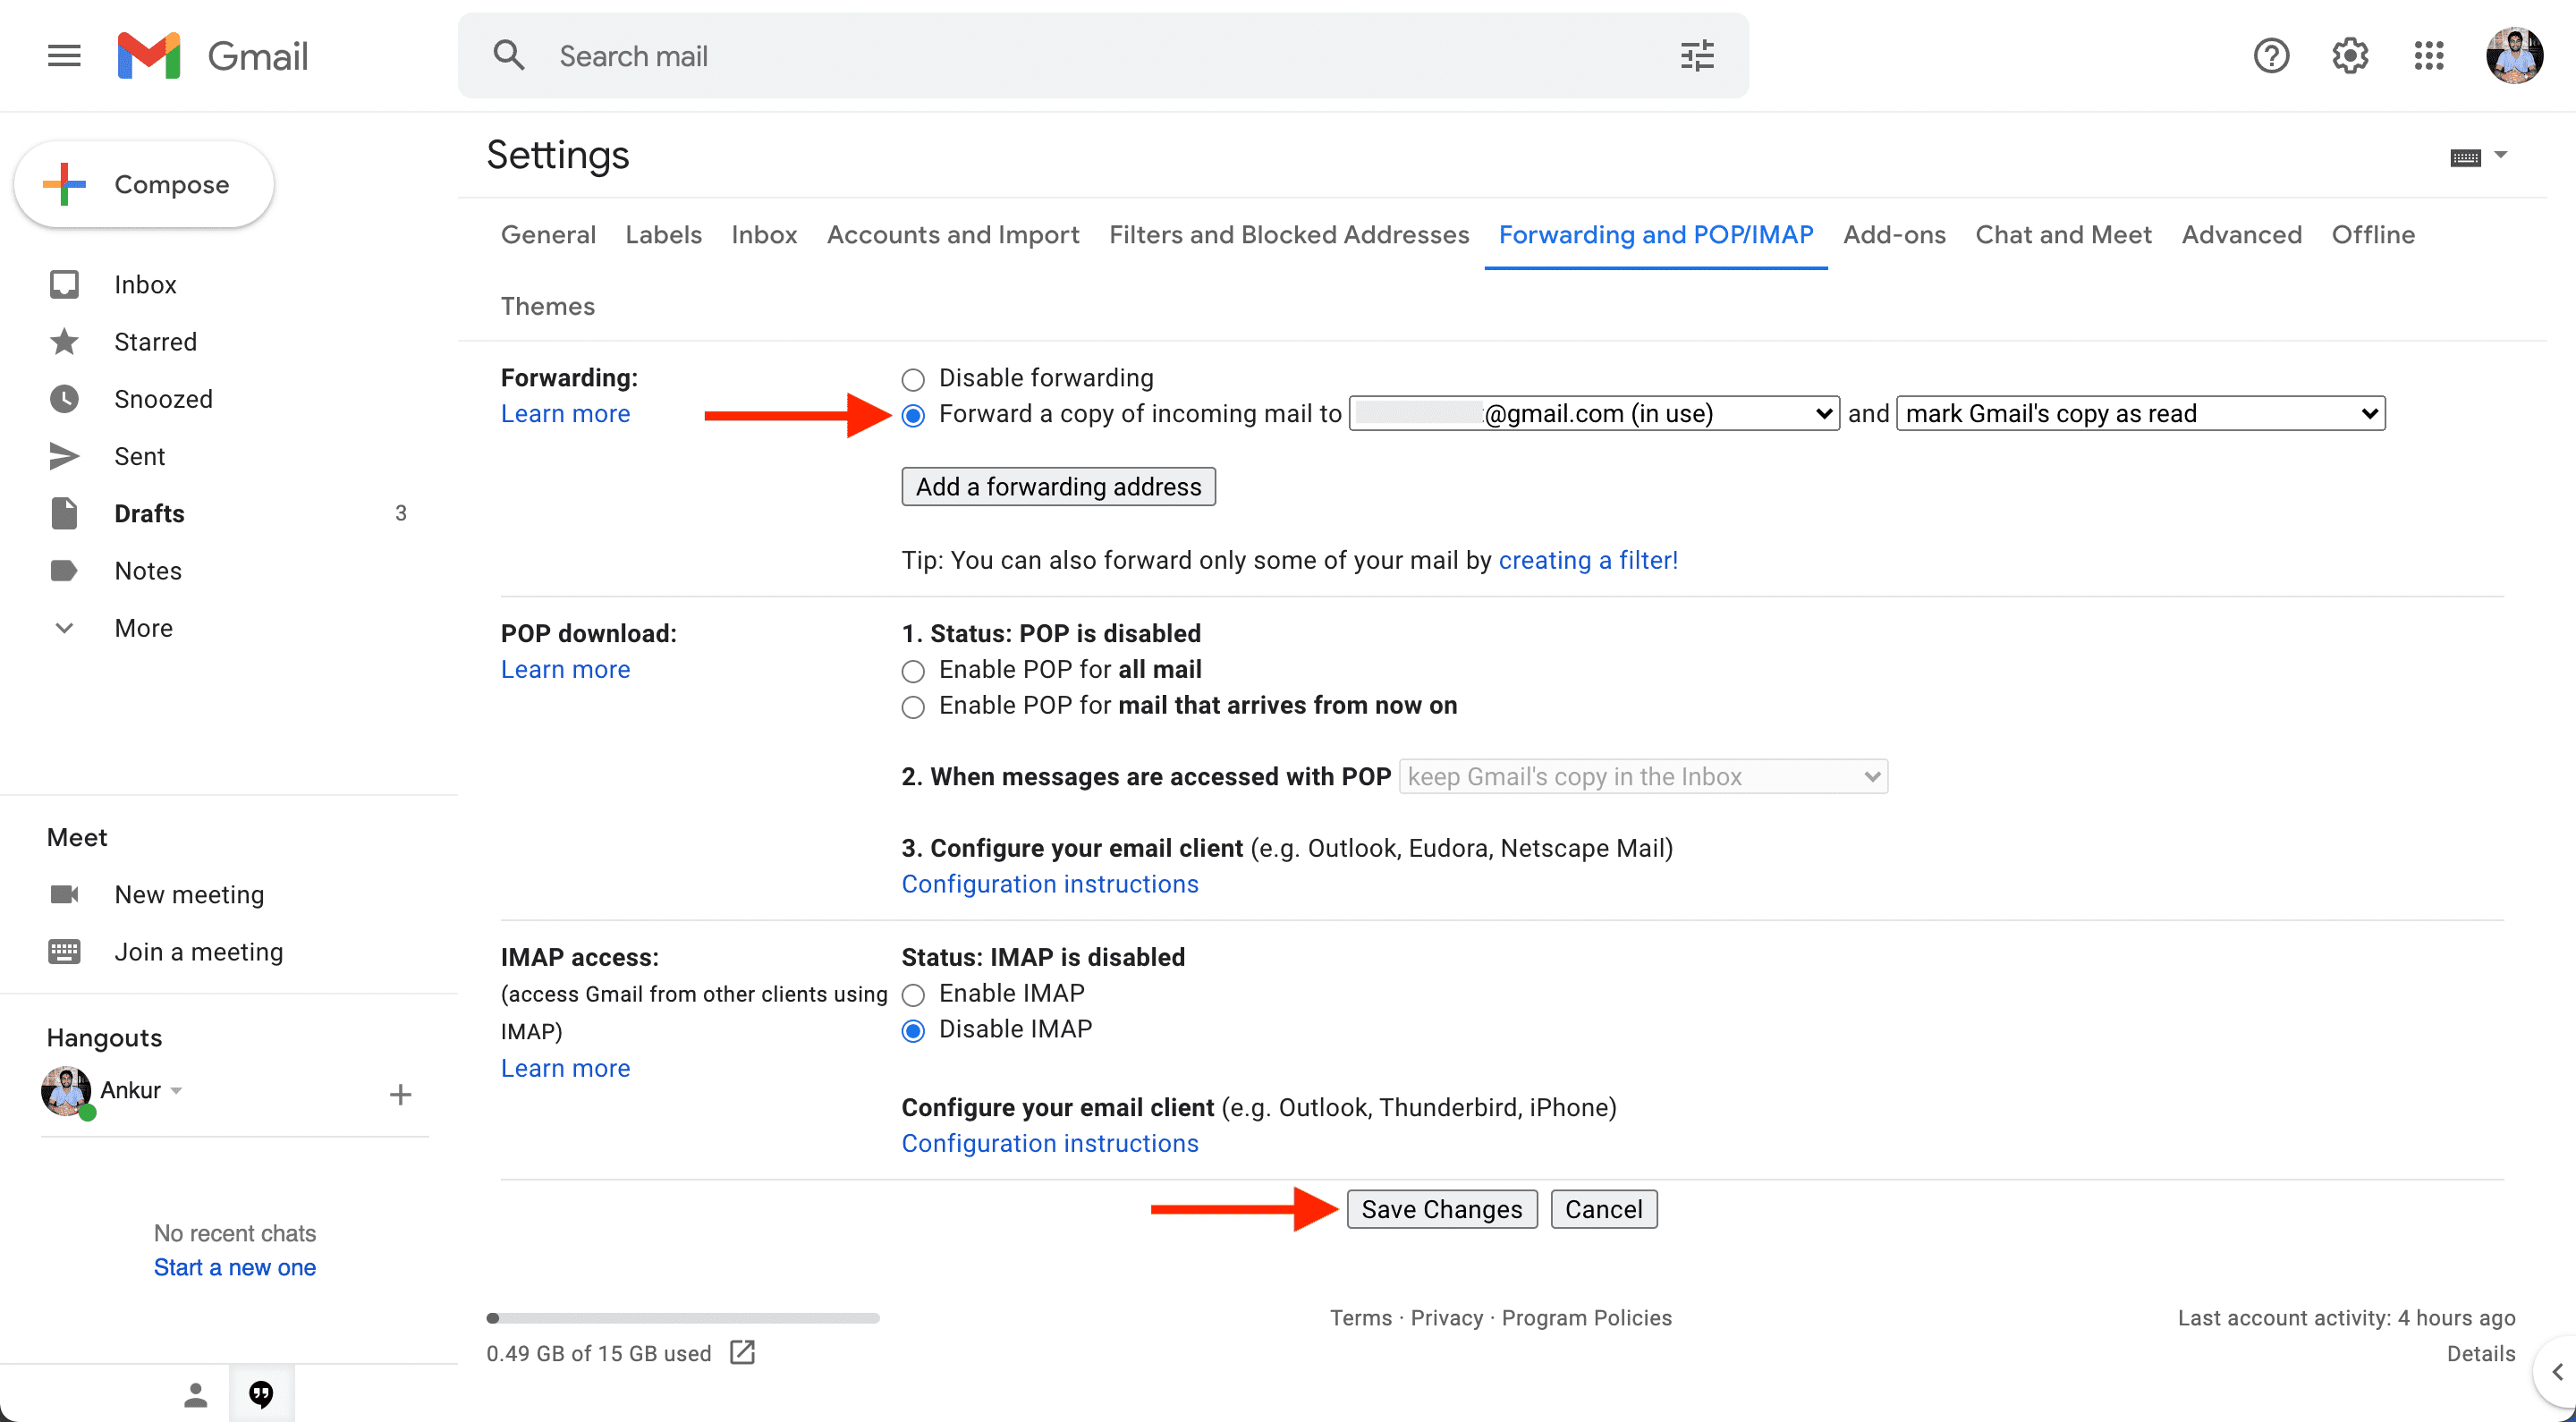
8) Check the box for Forward a copy of incoming mail to.
9) Finally, click Save Changes from the bottom.
That’s it. Now, you can freely share your second email with any person or service. All the emails sent to this will be forwarded to your main email. You can even create a filter to forward only some of your emails.
So, now, you get the emails sent to your second Gmail account on your main account. Next, follow these steps to ensure that you can reply to these forwarded emails while being logged in to your private, main email. The receiver will see this as if the reply was sent via the second email (which they have and on which they sent you the original email).
Set up Send mail as
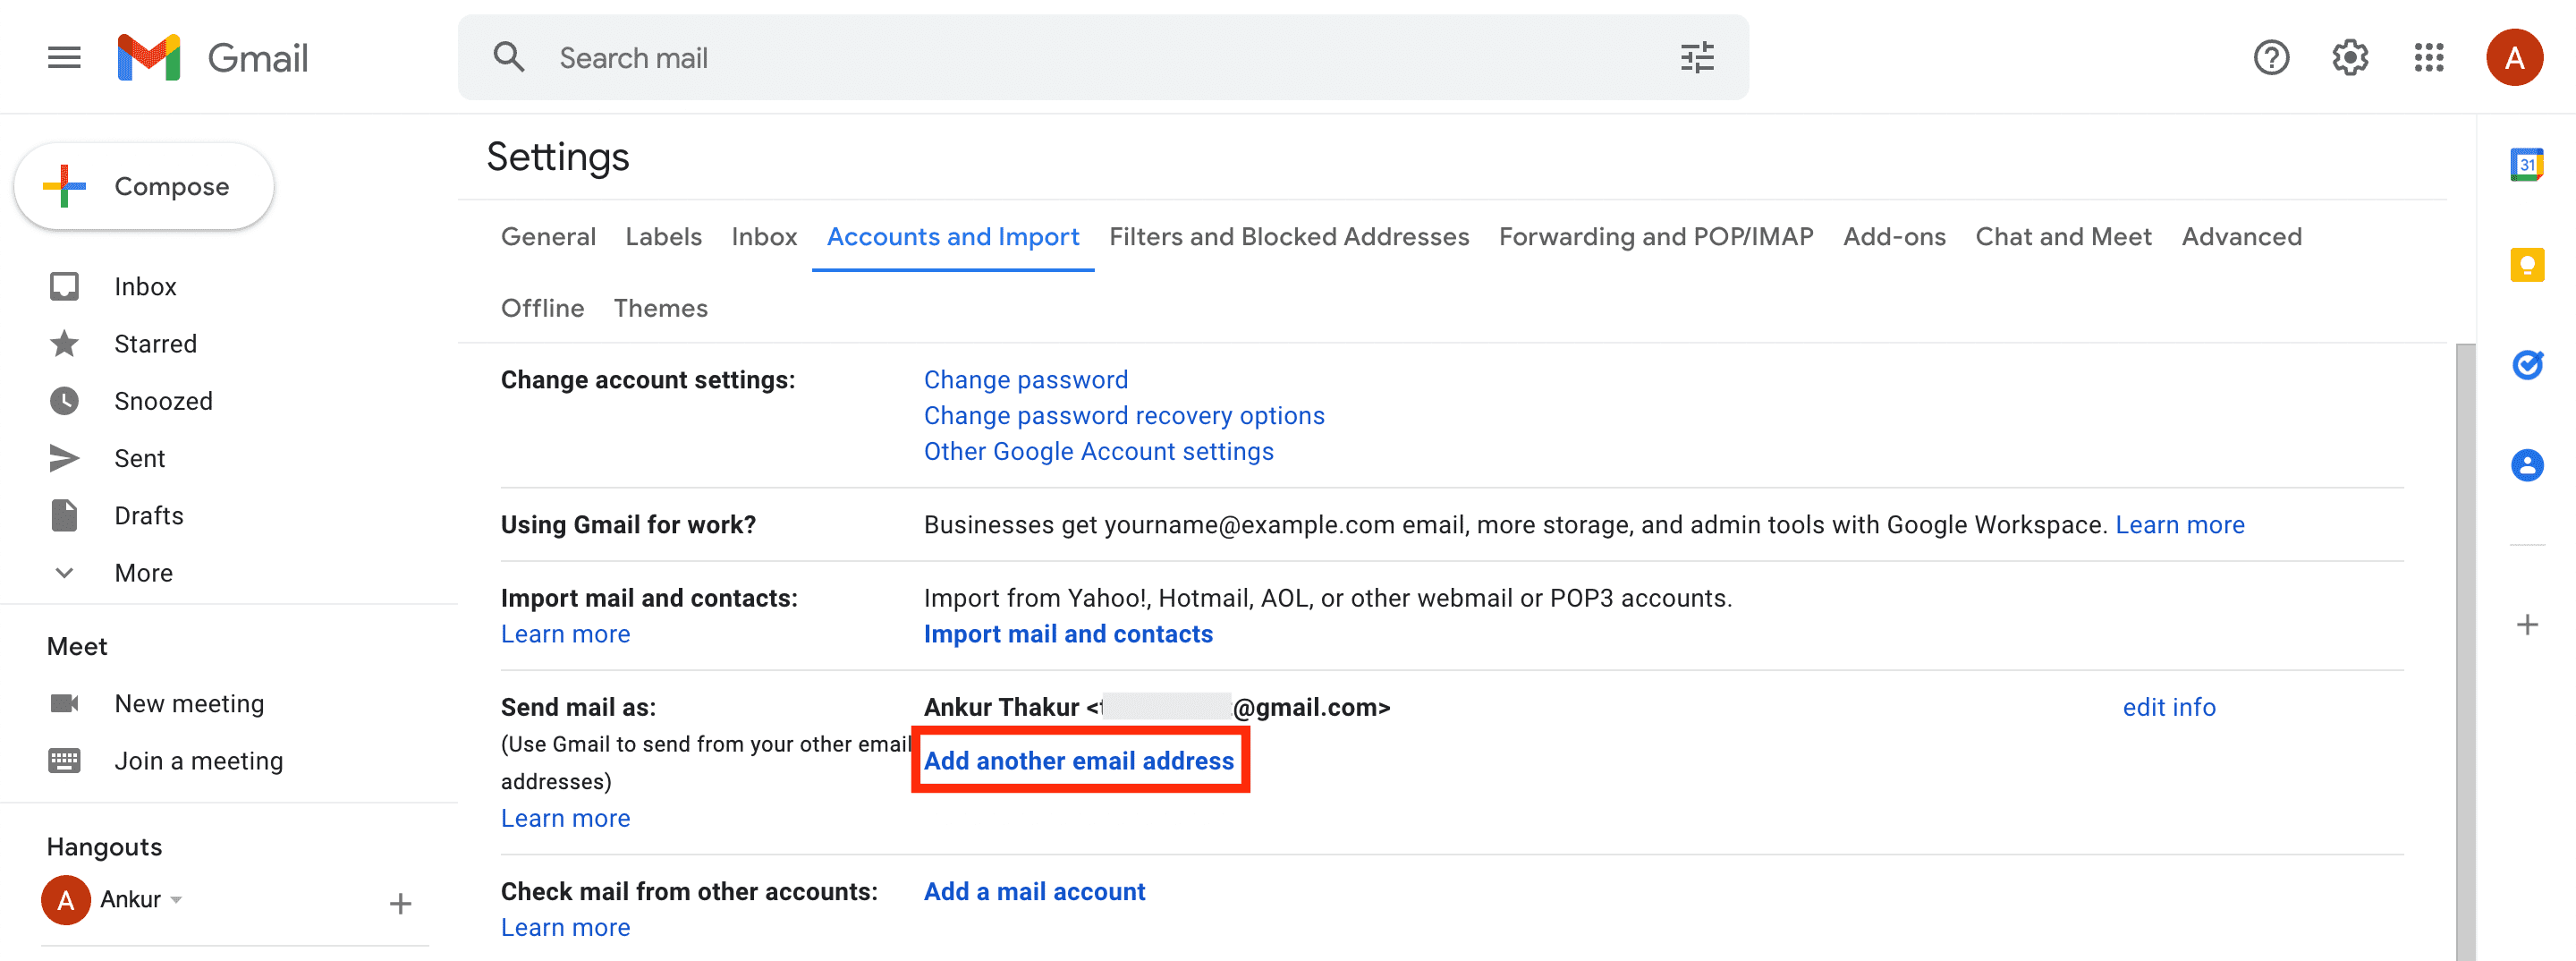
1) Inside your main, private Gmail account, click the settings icon > See all settings.
2) Click Accounts and Import.
3) Next to Send mail as, click Add another email address.
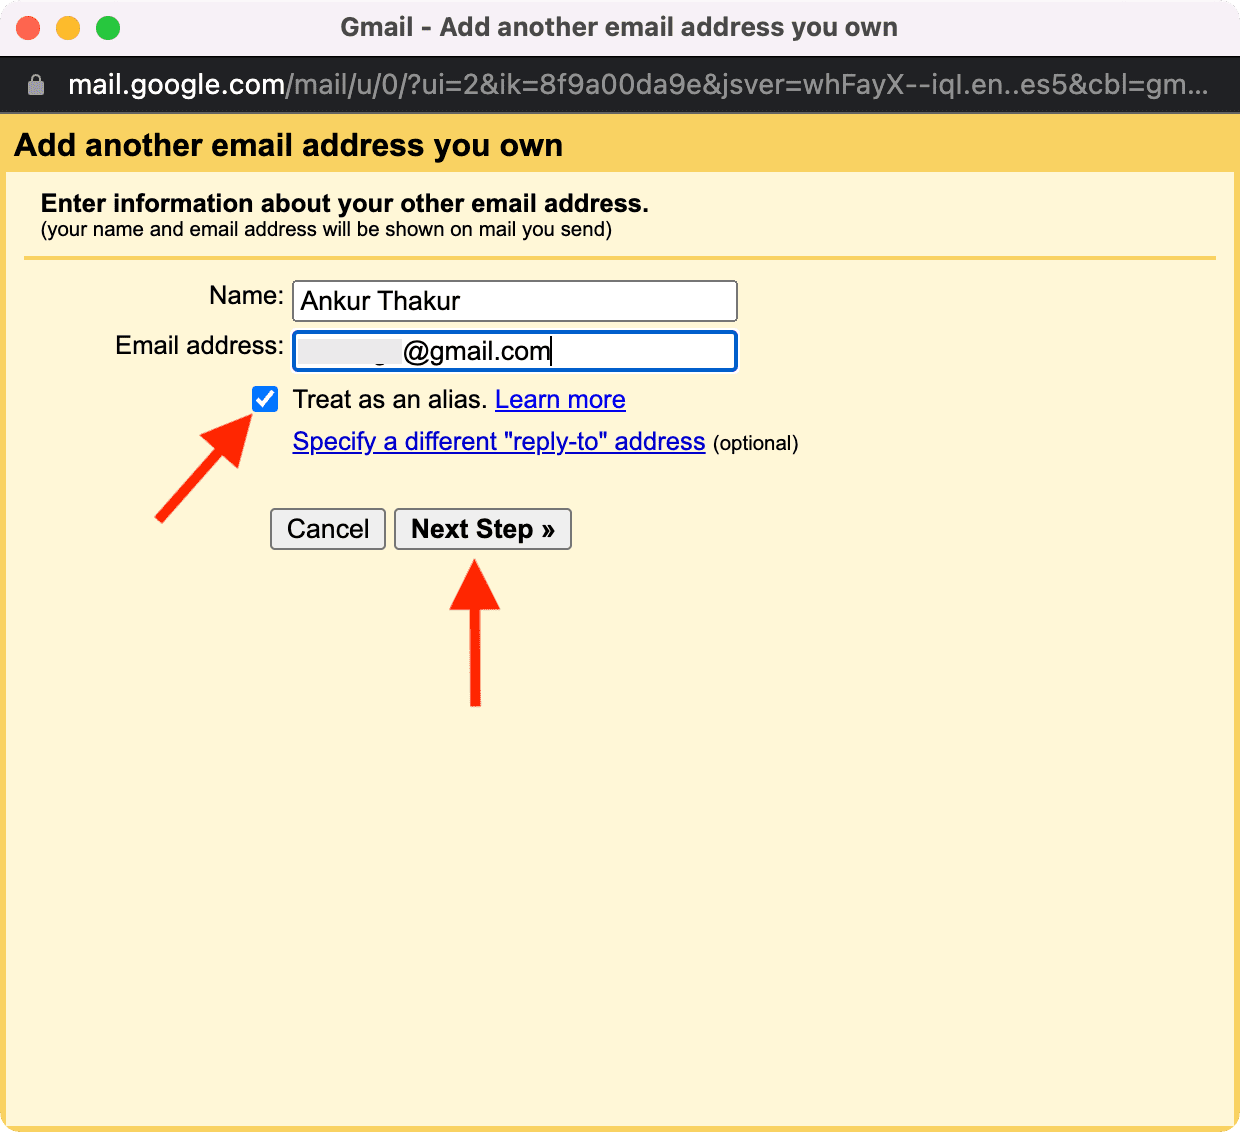
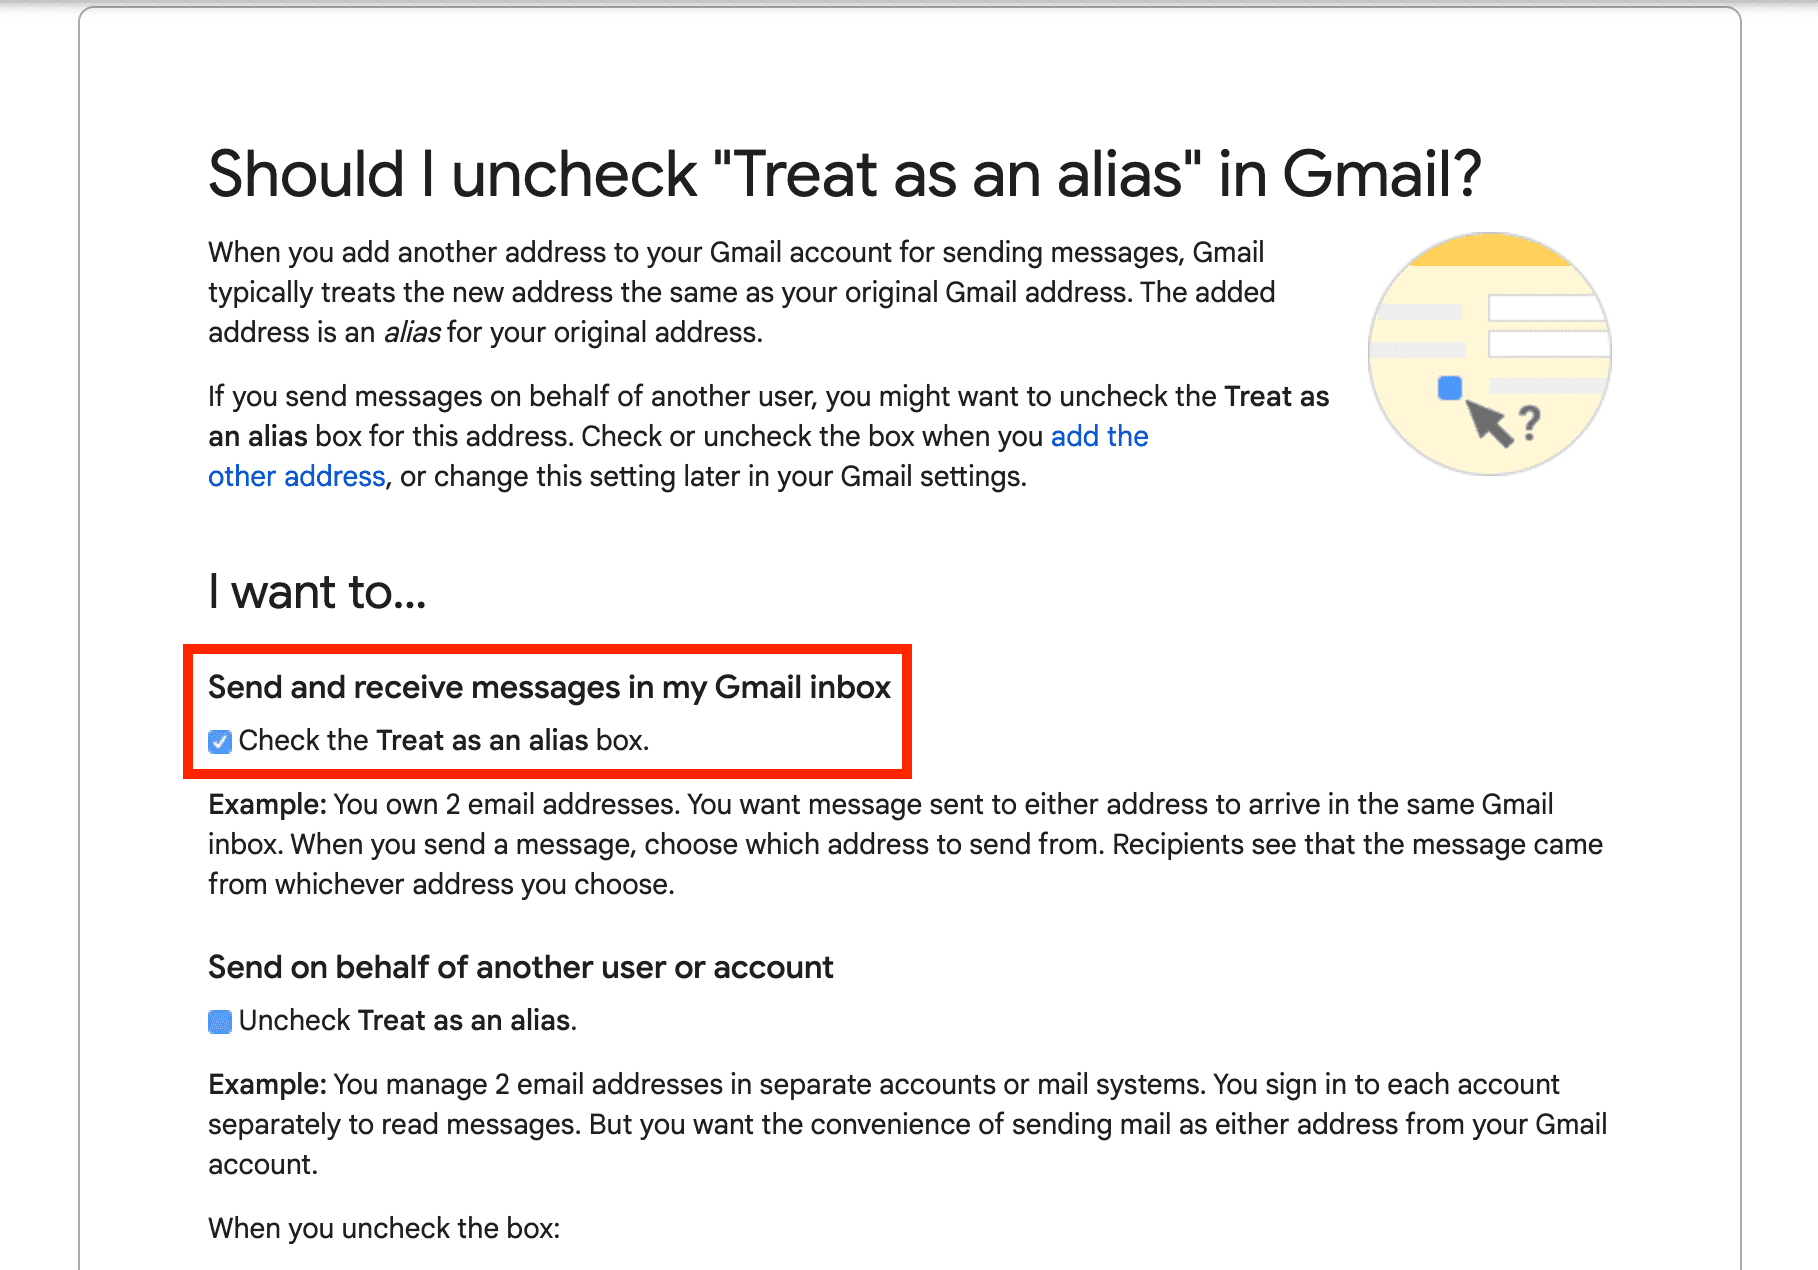
4) Enter your second email address, make sure “Treat as an alias” is checked, and click Next Step.
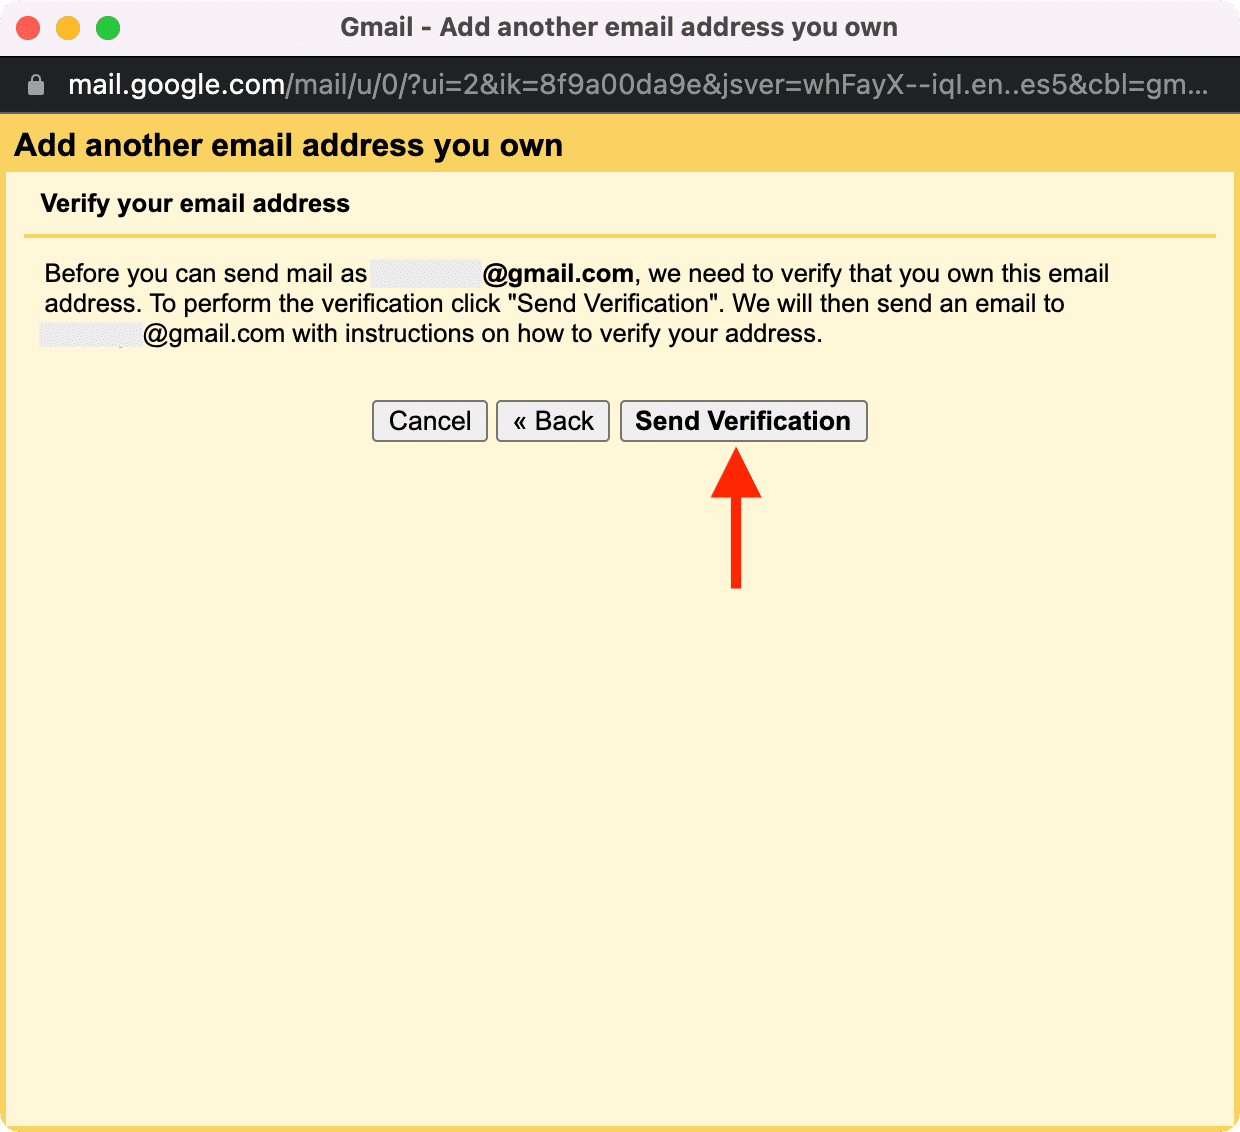
5) Click Send Verification.
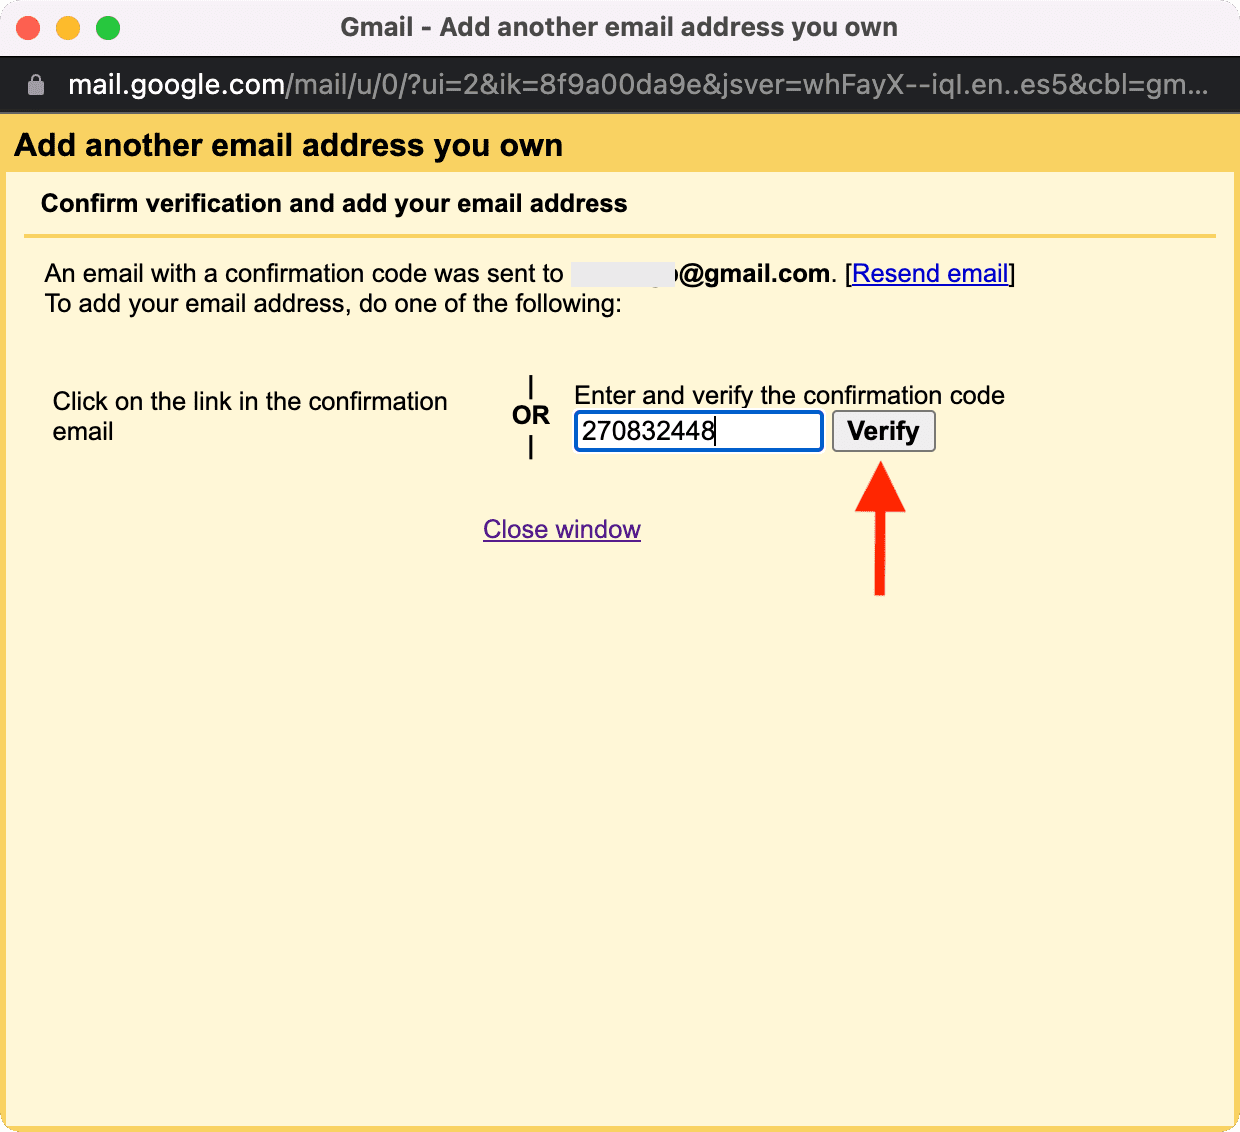
6) Open your second email address (or this same one as emails are already being forwarded) and click the link there or copy the verification code there and paste it in this box.
Done. From now, you can send emails via your second account while being logged in to your main account. Make sure Reply from the same address the message was sent to is checked. This will ensure that if someone sends you an email on your second account and you reply to it (while logged in to your main account), the sender will see your second email address and not your main one.
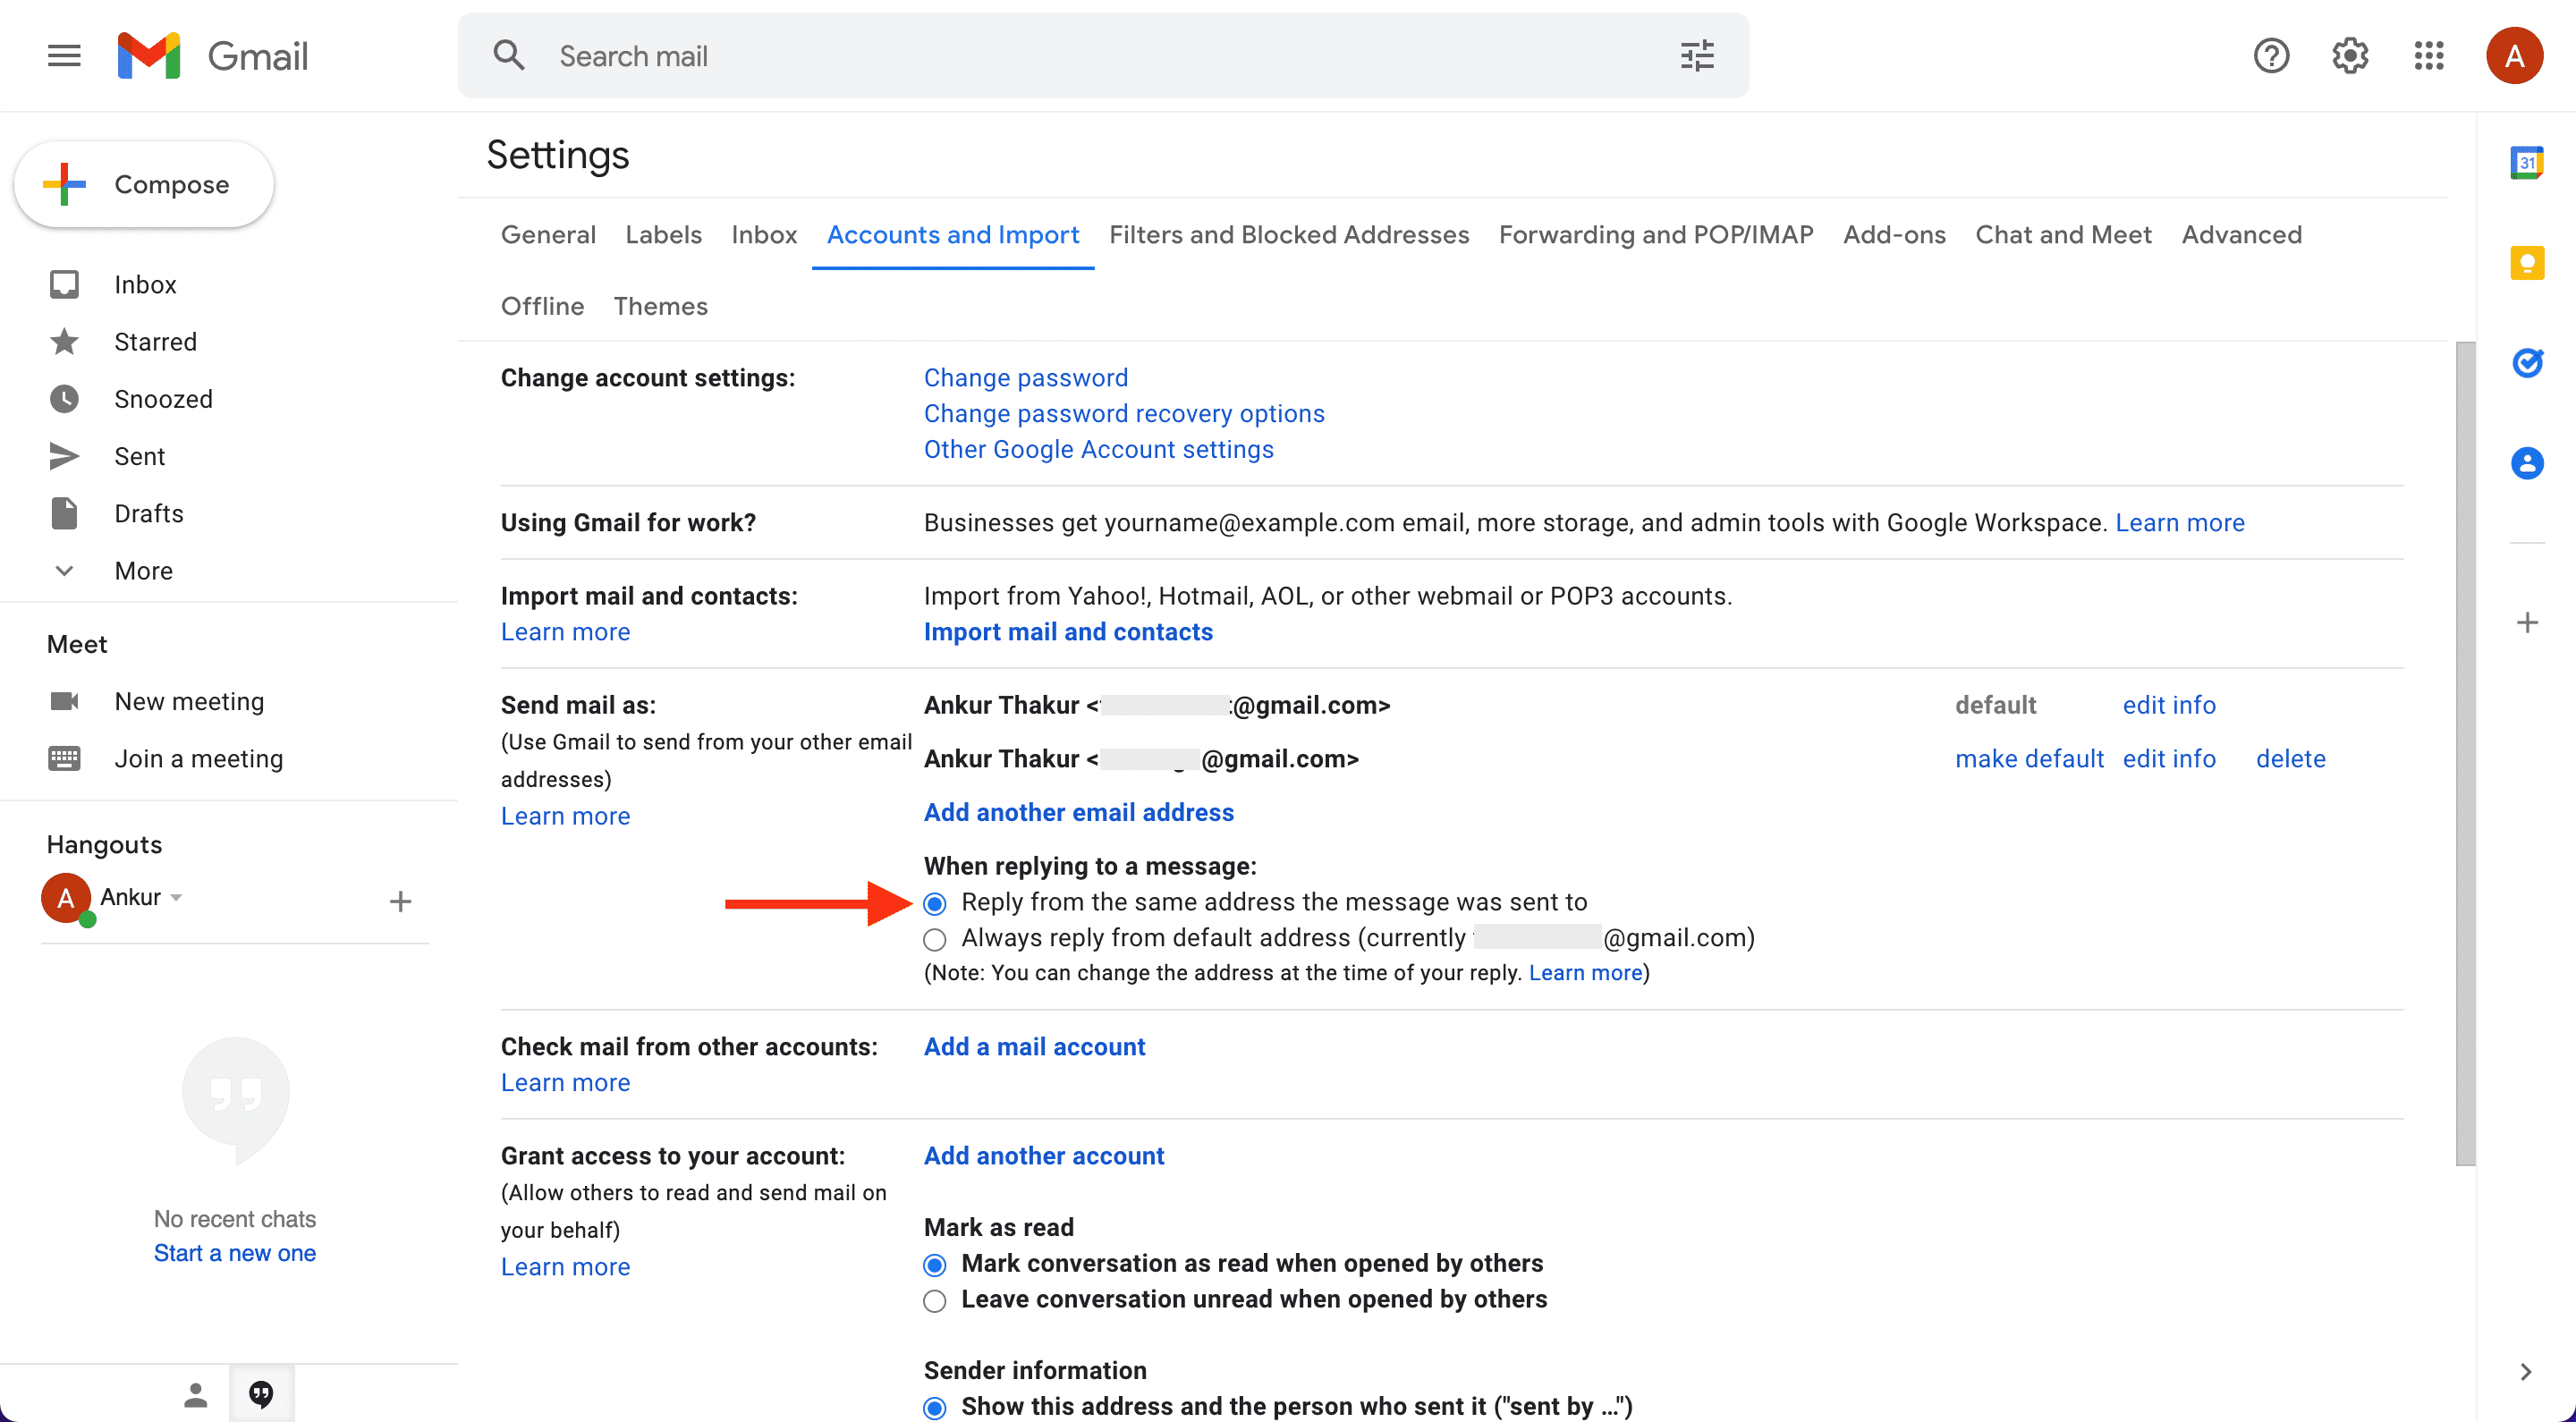
Note: Google support page says once you set up Send mail as and check “Treat as alias,” you can send and receive emails. But in my testing with three different Gmail accounts, it didn’t work. Therefore, I asked you to set up email forwarding (above heading) and then set up Send mail as to get and reply to emails of a different account from one place (your main Gmail account).
Use Gmailify
If you have an existing email account from Yahoo, Outlook, Hotmail, AOL, or a few other non-Gmail services, you can link this email account with your Gmail account. After that, you can:
- read, reply to, and organize messages from your other account just like you do in Gmail.
- get Gmail features like spam protection, improved mobile notifications, email sorting and search, even in these non-Gmail services.
So, suppose that like me, you have an old Yahoo account that you no longer actively use. You can Gmailify your Yahoo account. After this, you can treat this Yahoo account as an alias – use for signups, share it with others, and more. No need to share your main Gmail address anywhere.
All the emails you receive on this Yahoo address will appear in your Gmail. You can see, manage, and reply to these Yahoo mails from inside Gmail.
Here’s how to link your non-Gmail account to Gmail and treat it as an alias:
1) Open Gmail, click the settings icon and choose See all settings.
2) Click Accounts and Import.
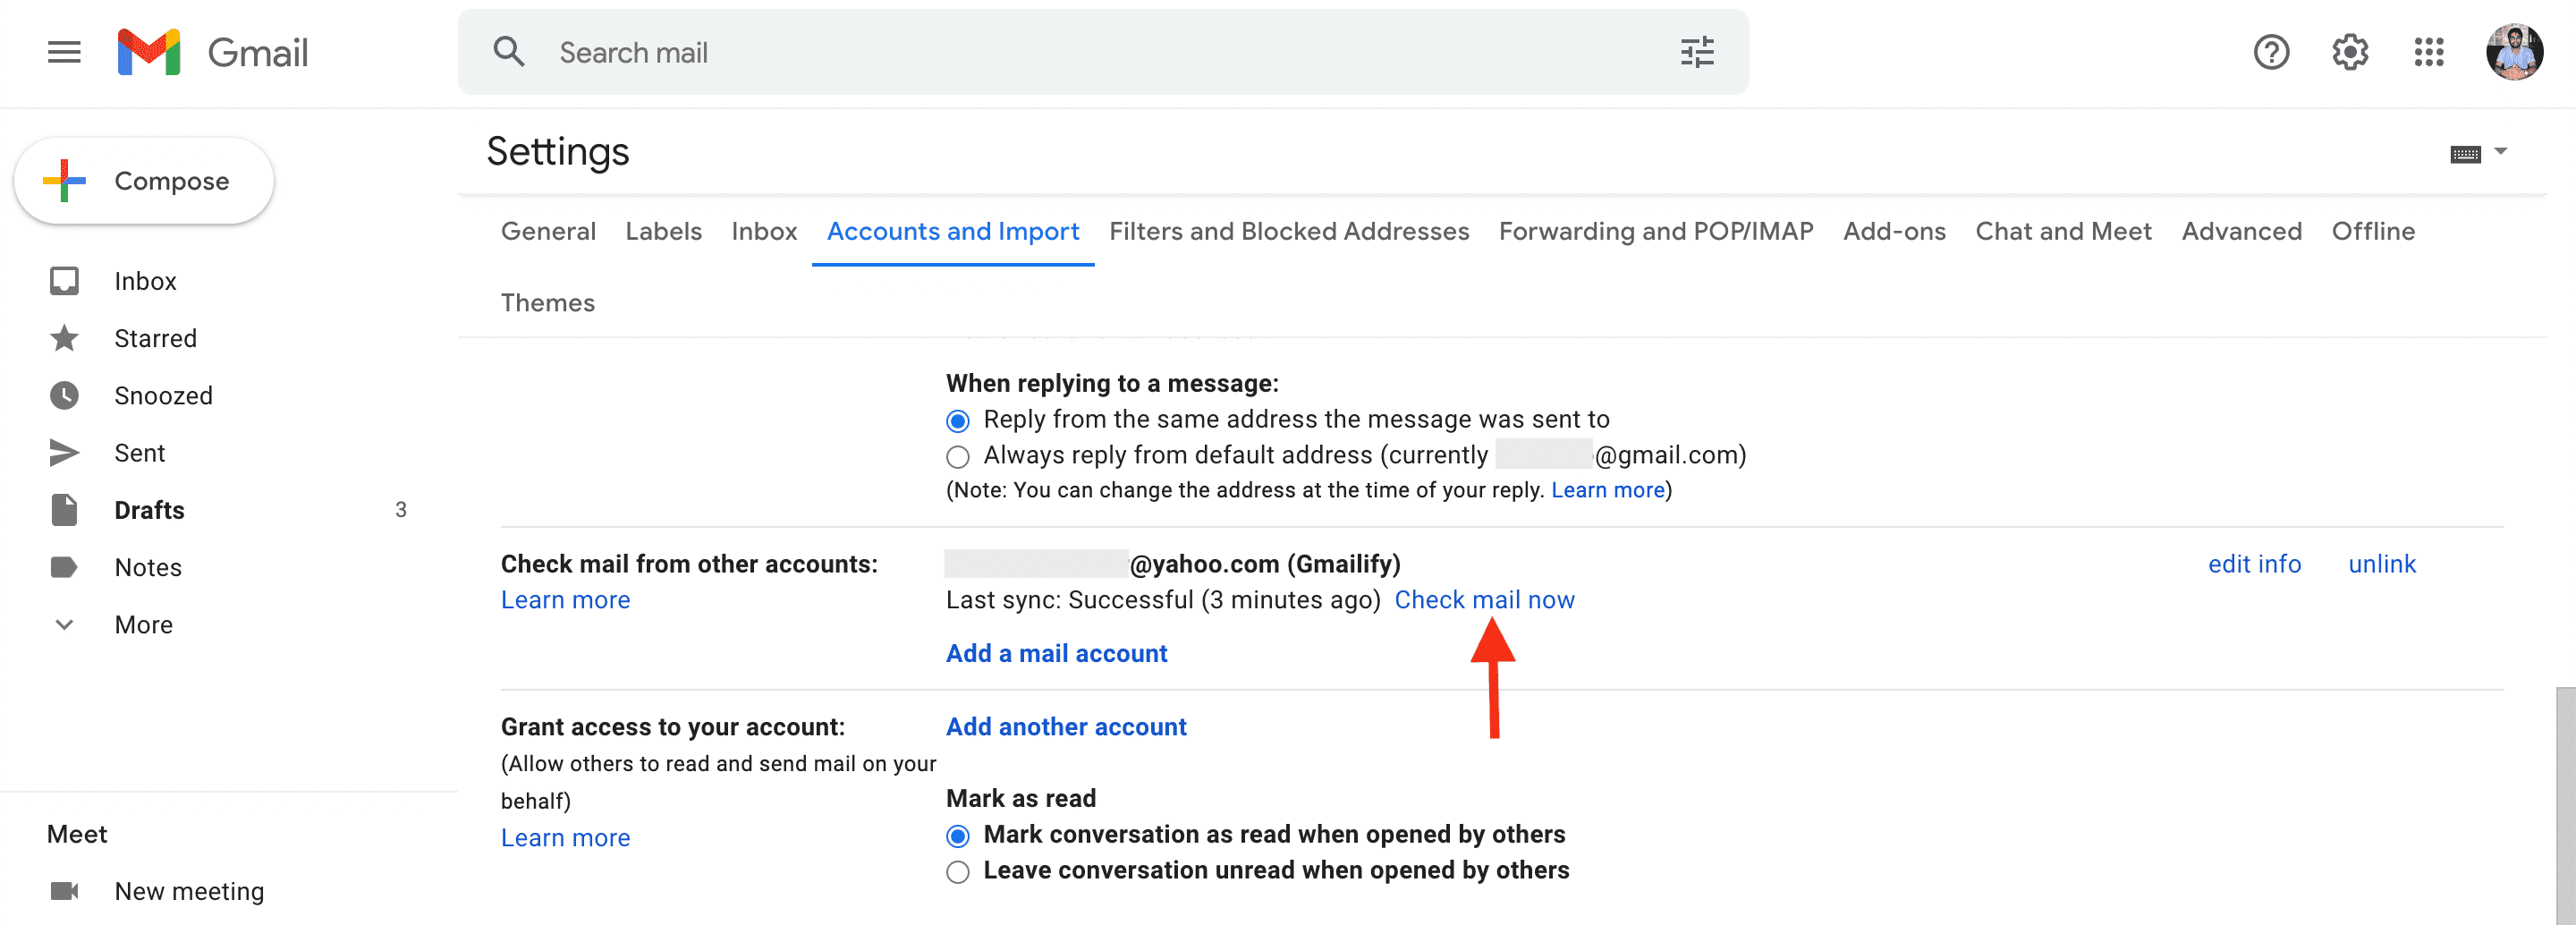
3) Next to Check mail from other accounts, click Add a mail account.
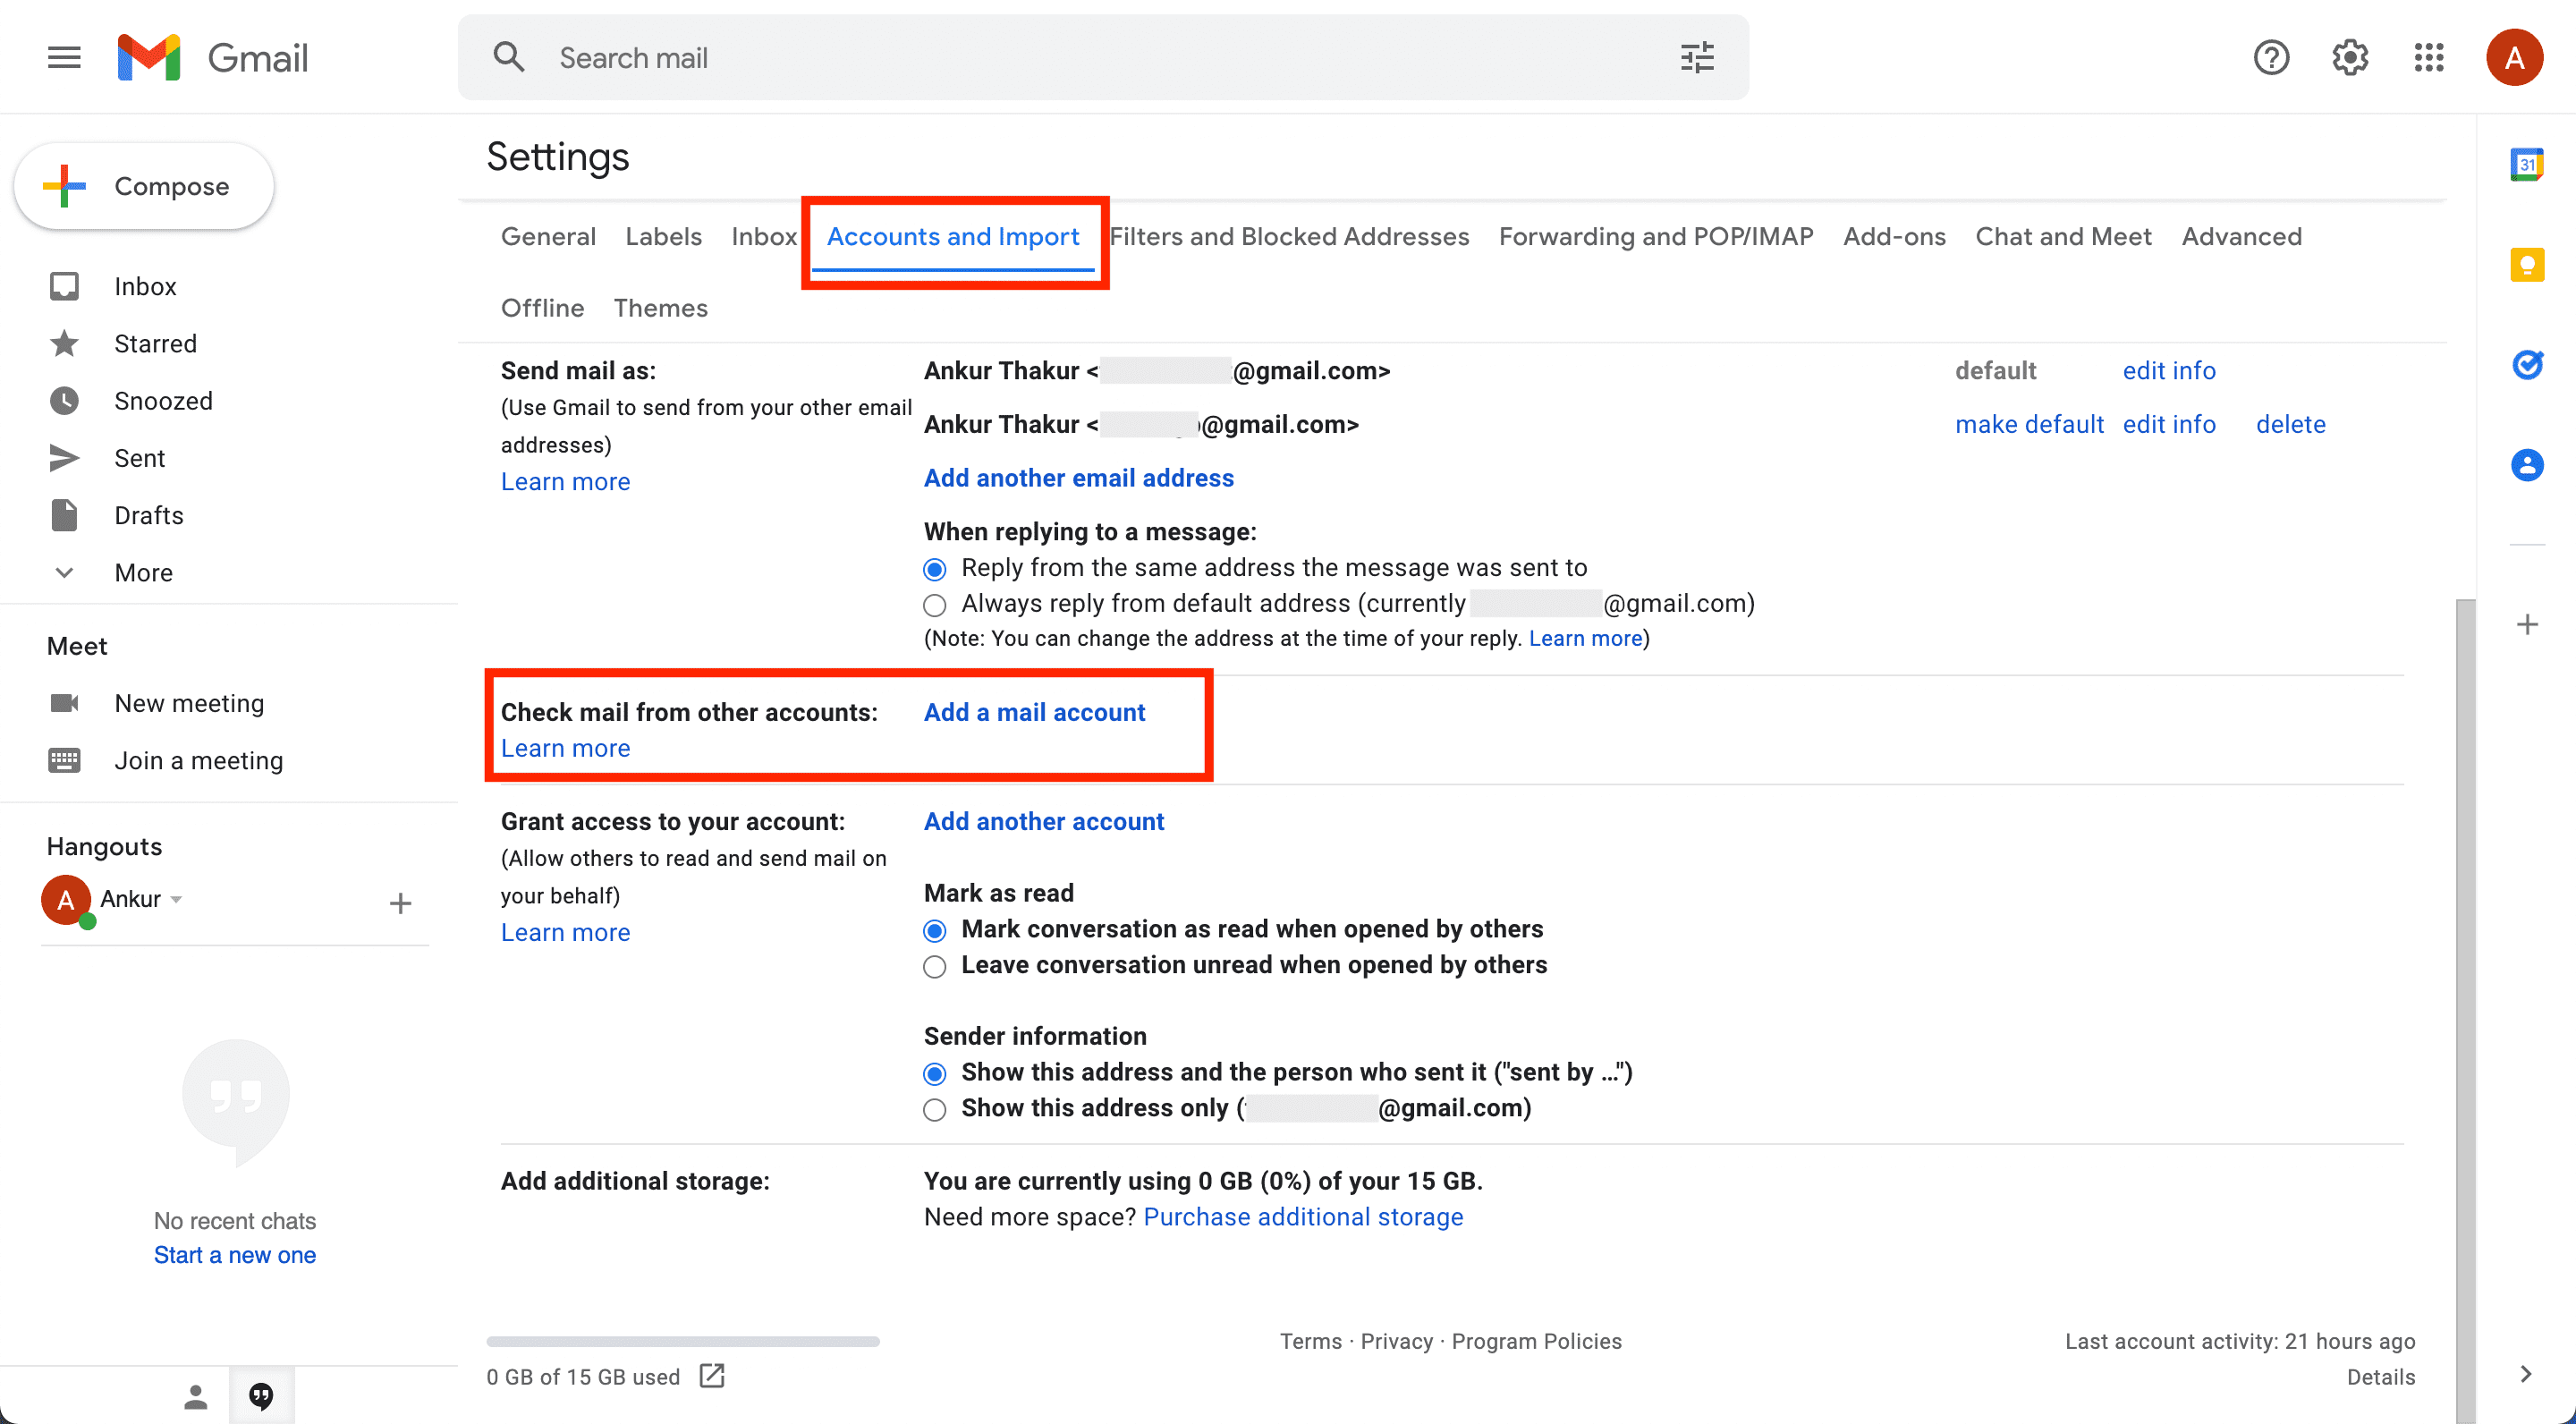
4) Enter your Yahoo, AOL, Hotmail, Outlook, or other non-Gmail account and click Next.
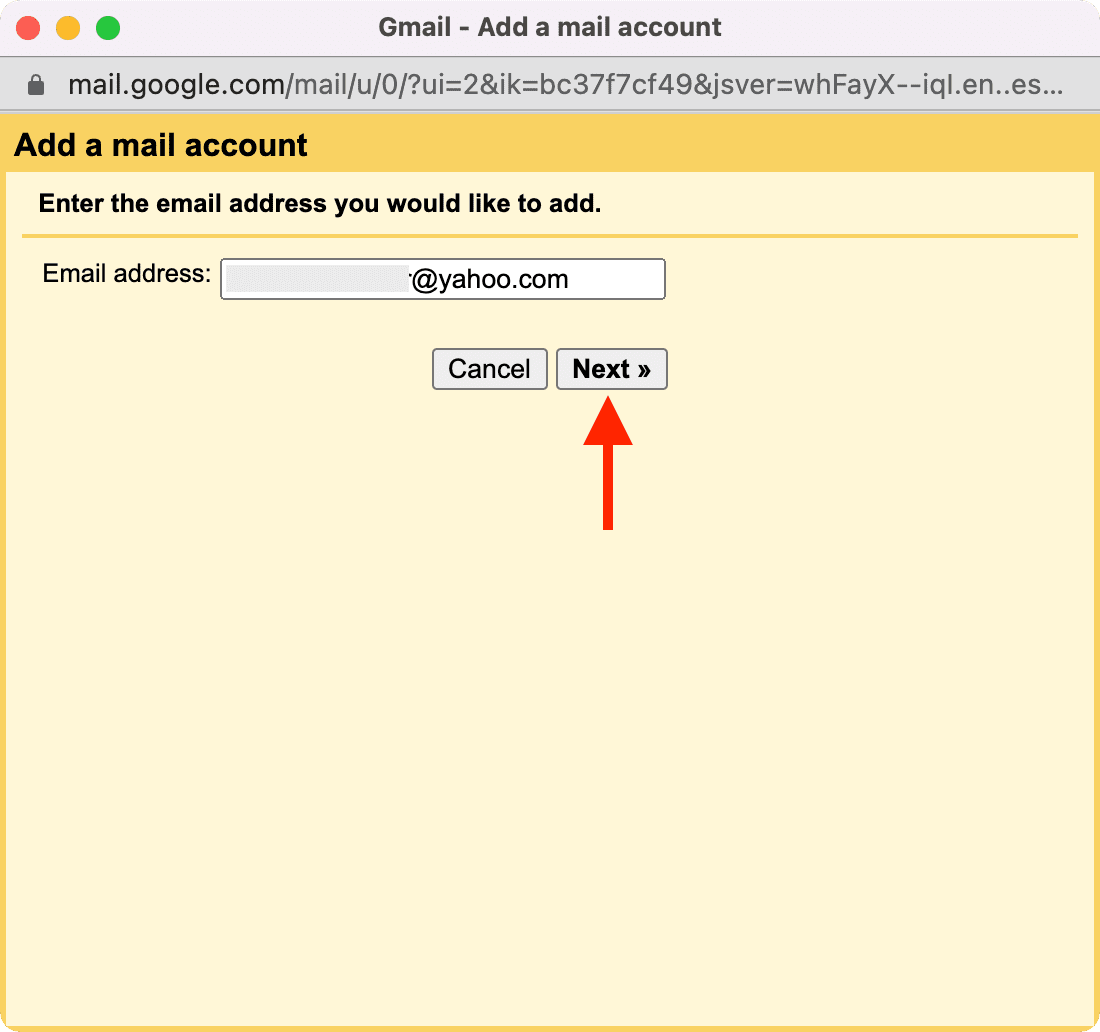
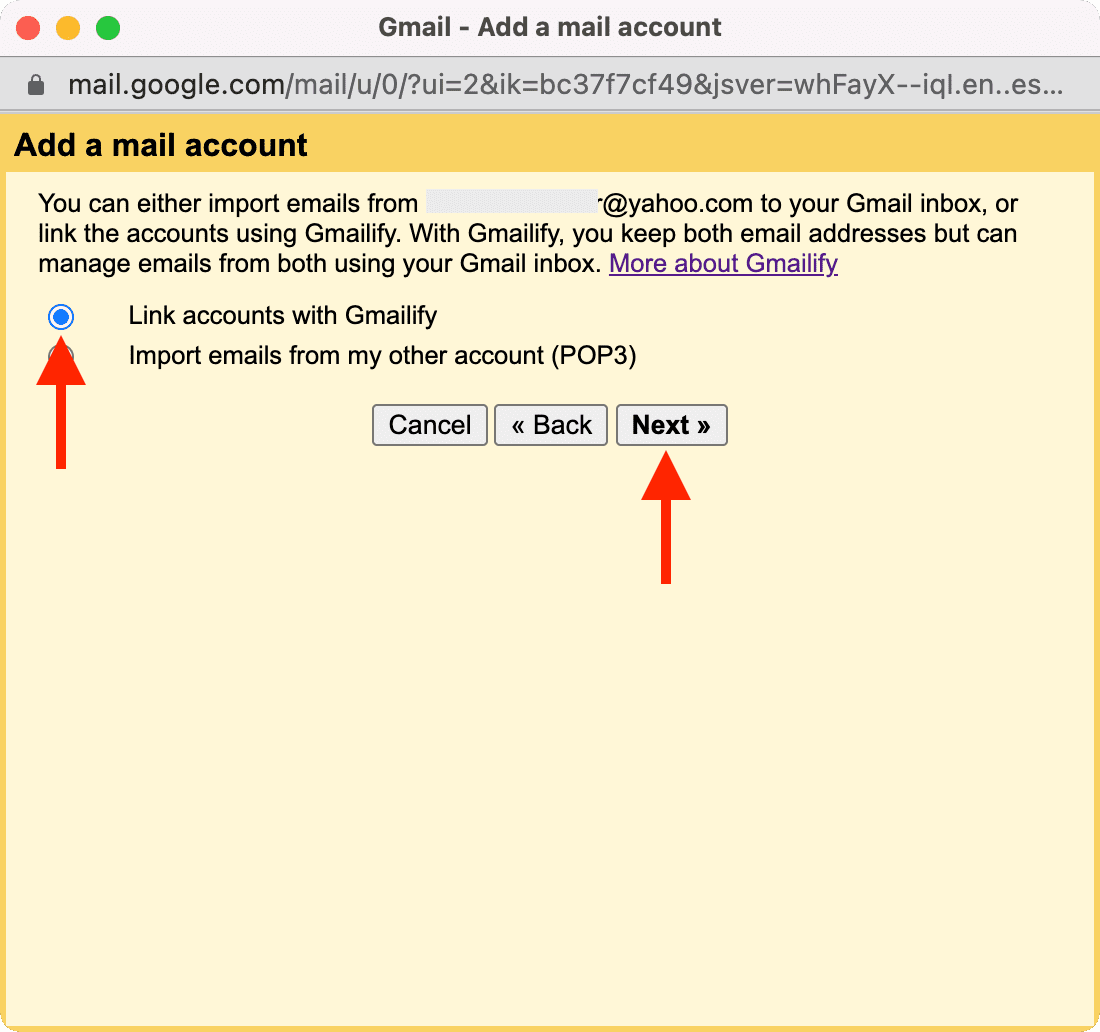
5) Make sure Link accounts with Gmailify is checked and click Next.
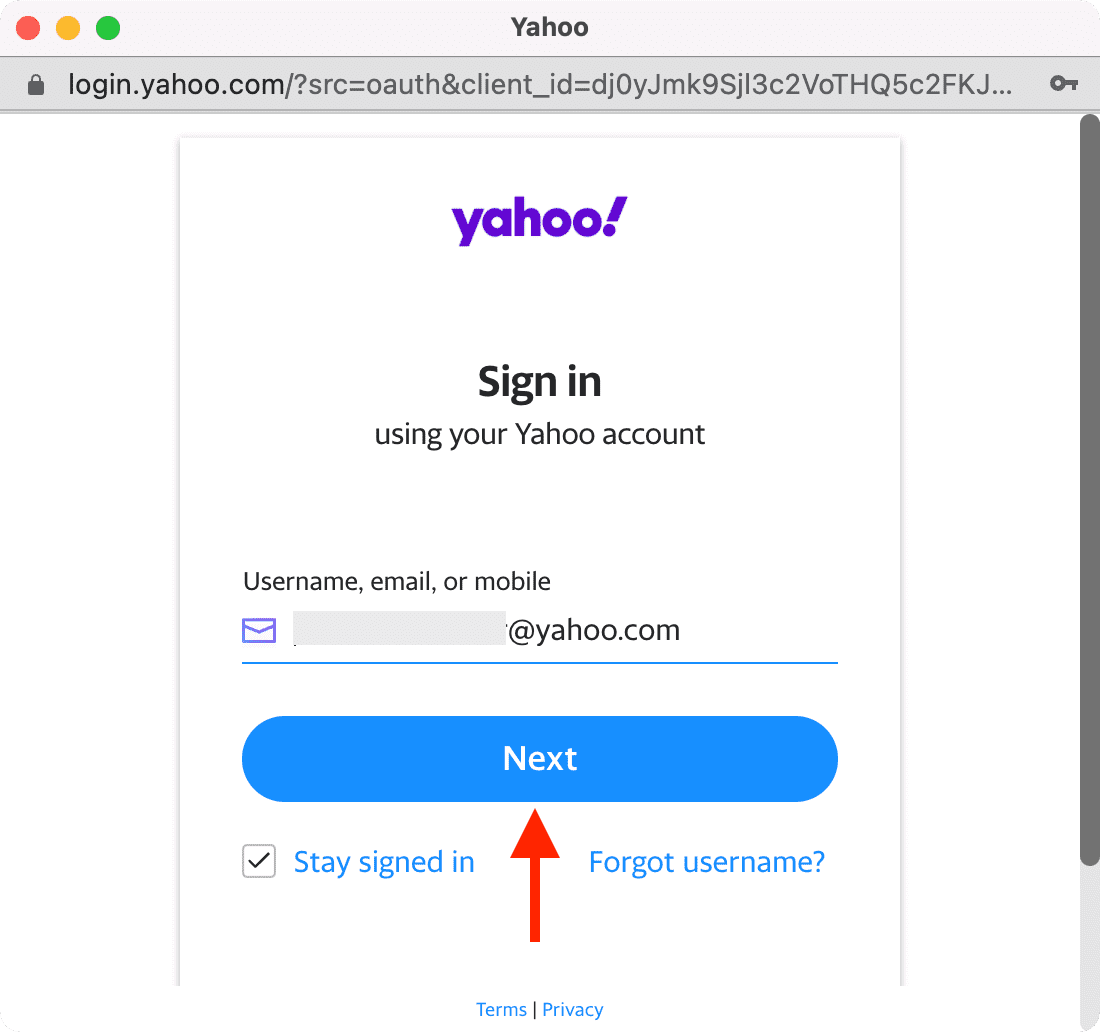
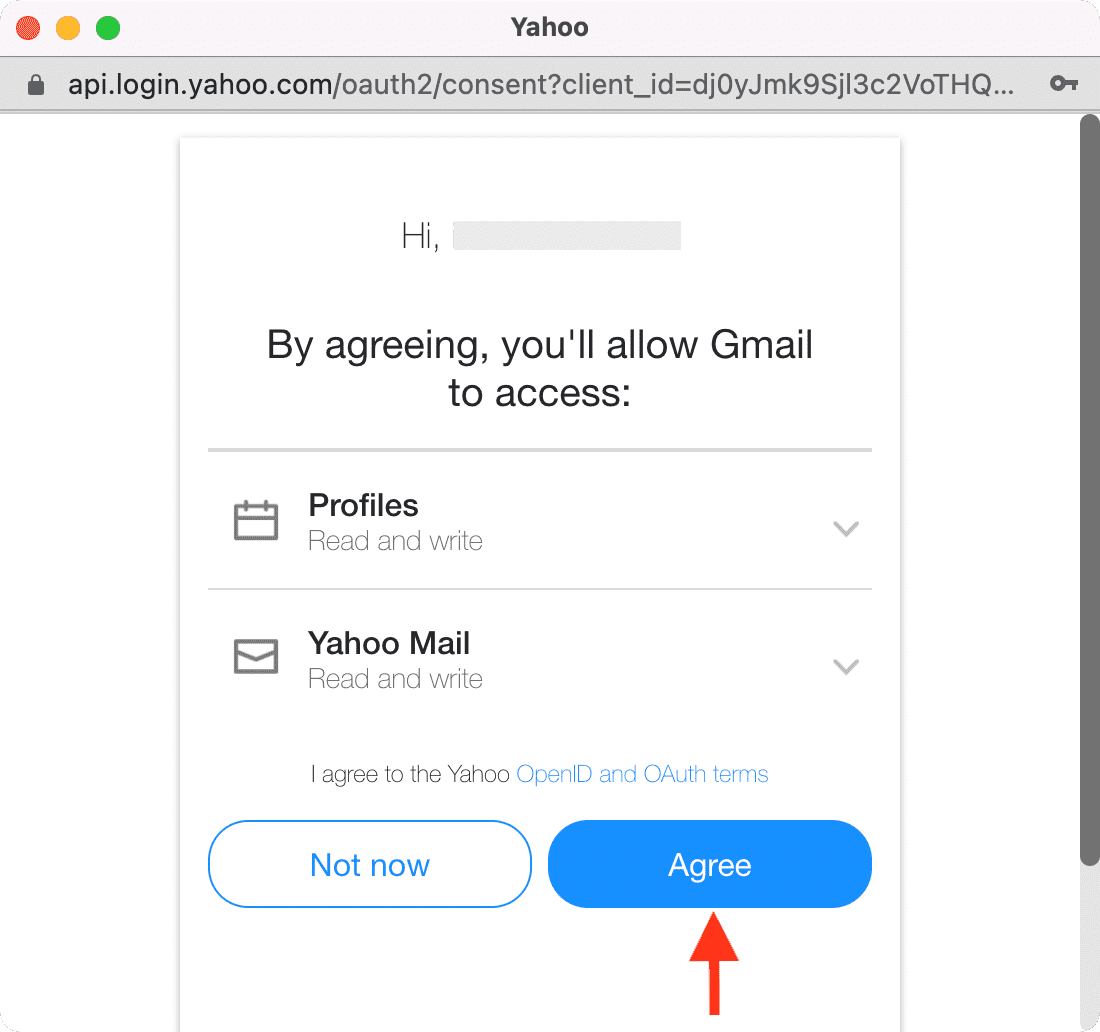
6) Sign in to your non-Gmail account and agree to let Gmail access and manage this second email account.
That’s it. You have successfully Gmailified your other email. Now, you can use it inside Gmail with all its advanced features.
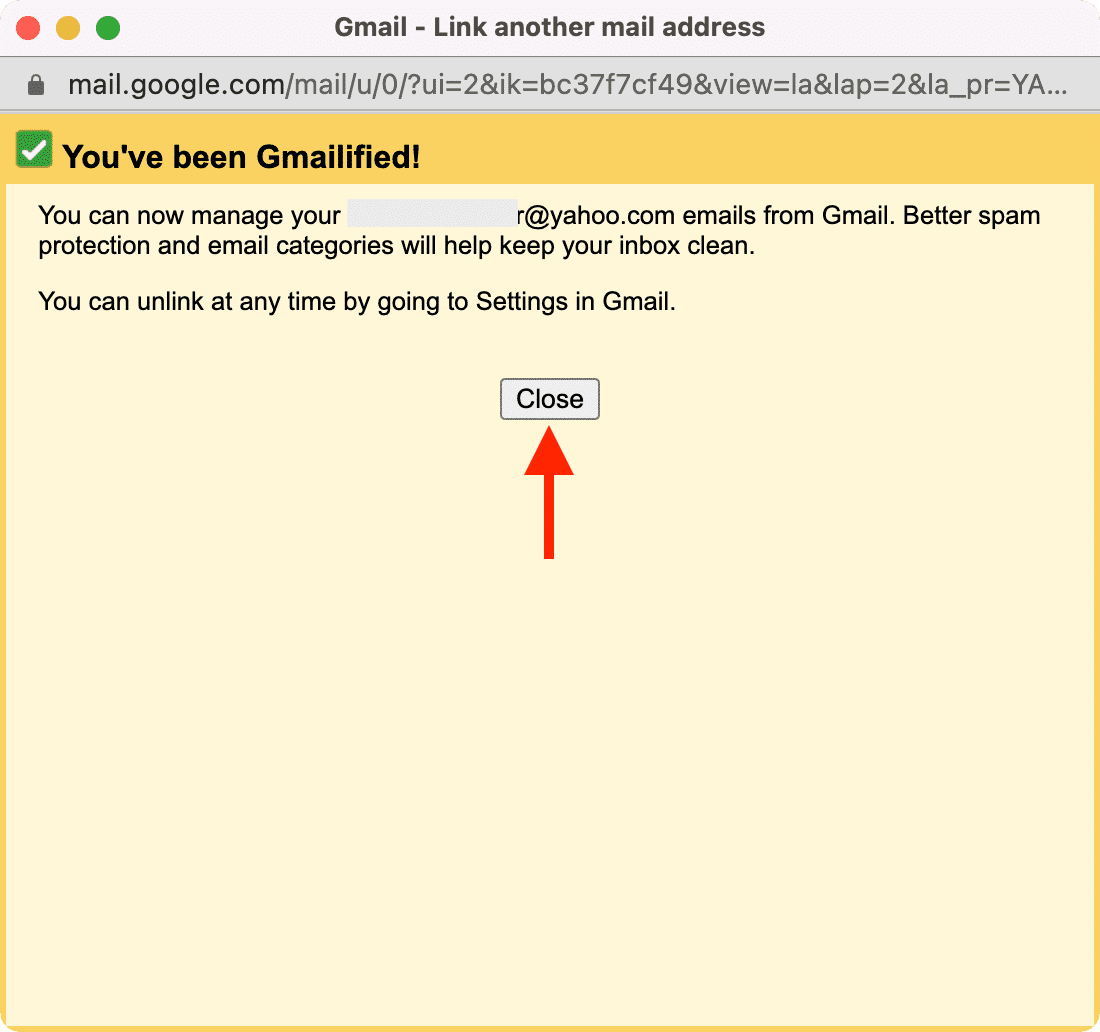
Any mails you get on your non-Gmail account will appear in your Gmail account. There may be a delay of about one minute. You can also manually go to Gmail settings and click Check mail now.
From inside Gmail, when you reply to an email originally sent on your non-Gmail account, click the name, and you have the option to choose which account you would like to reply with. For most cases, I would recommend using the non-Gmail account so that your main Gmail address isn’t shared with them.
Using alias in Gmail – Conclusion
By now:
- You know how to use a dot, plus sing, or @googlemail to create a temporary alias.
- You know how to set up email forwarding from one Gmail account to another.
- Plus, you also know how to add your one Gmail account to another so that you can reply to its emails using your main Gmail account.
- If you have a non-Gmail account, you know how to link it with Gmail and use it to send, receive, and reply to emails.
As far as aliases in Gmail go, this is almost everything you can do. Once again, alias in Google isn’t as straightforward, enjoyable, and effective as what iCloud provides. So, if you can’t go through what’s mentioned above, just create an iCloud alias. Even if you don’t have an Apple device, use iTunes on Windows PC to create an Apple ID and use iCloud Mail in a web browser.
Public email inboxes
Finally, one more trick that I have been using for a few years to protect my main Gmail email is to use throwaway public mailboxes.
For example, suppose I have to sign up for a website I don’t trust or care about. I will go to a service like Mailinator. Here, I will enter any address I want, like idb, and click GO. I now have access to the public-inbox for idb@mailinator.com. Now, I will give this email address to any service to receive OTP or verification link.

Note that there are no passwords, etc. Anyone can access these inboxes. So, quickly use the email sent here. Or, for a bit more privacy, use a random name like yourname785634ghi@mailinator.com
Check out next: