Learn how to manage your T2 Mac’s Secure Boot settings to ensure your computer always starts from a legitimate and trusted operating system.

Macs with an Intel process and a T2 Security Chip have a feature called Secure Boot. It takes advantage of the onboard Apple T2 chip, an ARM processor similar to the one in an iPad or iPhone, allowing the computer’s firmware to validate the bootloader prior to loading.
The T2 chip validates the entire boot process when the power comes on whilst ensuring that the lowest levels of software aren’t tampered with and that only the initial bootloader and operating system software trusted by Apple loads at startup.
Important: This tutorial does not apply if your Mac has an M1, M2, M3, or other Apple silicon chip. For Apple silicon Macs, check out how to change its security settings.
Related: Top 18 tips to secure your Mac and all of its valuable data
What is Secure Boot?
Secure Boot helps ensure your Mac always starts up from its designated startup disk and always from a trusted operating system.
Secure Boot settings are available within Startup Security Utility, which is only accessible through macOS’s Recovery Mode.
Startup Security Utility offers the following toggles to help secure your Mac against unauthorized access:
- Firmware password protection: Prevent the computer from starting up without providing your firmware password.
- Secure Boot: Adjust the startup security level of your computer.
- External Boot: Disallow booting from external media.
Secure Boot settings don’t affect Target Disk Mode. This mode, invoked by holding the “T” key when starting up your computer, turns your Mac into an external disk for another Mac.
In other words, Secure Boot won’t stop a bad actor with physical access to your computer from booting up your computer in Target Disk Mode and mounting it on their Mac with full access to all the attached drives and volumes.
Turning on FileVault disk encryption, which ties SSD encryption to your password, helps mitigate this issue because it prevents data on your SSD from being decrypted without the proper hardware and your password.
Related: All the ways you can start up your Mac
If you don’t own a Mac with T2 Security Chip, creating a strong firmware password will make it impossible for other people to start up your computer from a disk other than your designated startup disk without the password.
How to adjust your Mac’s Startup Security Level
1) Restart or turn on your Mac, then press and hold Command + R immediately after you see the Apple logo. This will boot the machine into macOS Recovery Mode.

2) Click Utilities in the menu bar in the Utilities window.
3) Click Startup Security Utility in the Utilities window.
Tip: If Startup Security Utility won’t open, you have not created any user accounts on the computer, or the Setup Assistant has not yet been run.
4) When asked to authenticate, click Enter macOS Password, then select an administrator account and enter its password.
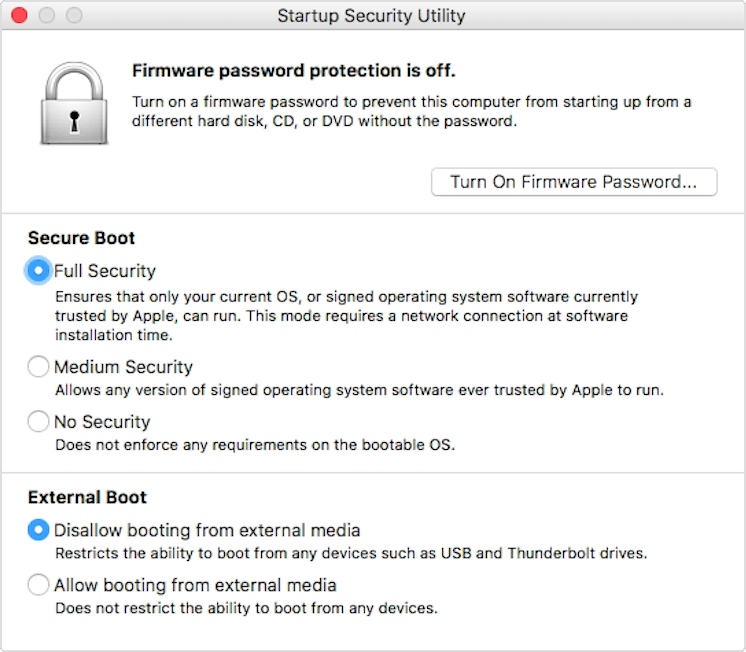
5) Startup Security Utility will present three Secure Boot settings:
- Full Security: The default setting that brings the highest level of security. An active Internet connection may be required at software installation time so that your Mac can confirm that it’s booting up a macOS or Windows version that hasn’t been tampered with in any way. Leave this setting enabled to run a macOS or Windows version that’s currently installed on your Mac or any cryptographically signed operating system trusted by Apple.
- Medium Security: This setting verifies the macOS or Windows version on the startup disk only to see if it’s been properly signed by Apple or Microsoft, but doesn’t require an Internet connection or updated integrity information from Apple. It does not prevent the machine from running an operating system that’s no longer trusted by Apple. Use this setting to boot into older versions of macOS regardless of Apple’s level of trust.
- No Security: This is the lowest security setting, which doesn’t enforce any security requirements for the bootable operating system on your startup disk. Use it to boot into Linux or any other operating system supported on your hardware; no signing or verification with Apple is required. This is the way all other older Macs currently start up.
If you use Boot Camp, you can boot into Windows while remaining fully secure because the T2 chip and Secure Boot both respect Microsoft’s signing authority for Windows 10, beginning with 2017’s Fall Creators Update.
6) Close out the Startup Security Utility window.
7) Click Restart in the Apple menu to restart the machine with your security settings in place.
Note: If you have selected either Full or Medium security and the operating system on your startup disk has failed to pass verification, this is what happens:
- macOS: An alert pops up informing you that a software update is required to use the startup disk. Click Update to open the macOS installer, which you can use to reinstall macOS on the startup disk (this requires an Internet connection). If you don’t want to upgrade your installed copy of macOS to the latest available version, choose the Startup Disk option instead and then select a different startup disk that Secure Boot will attempt to verify.
- Windows: An alert informs you that you need to install Windows with Boot Camp Assistant.
Note: Turning off full security and then toggling it back on will prompt you to go online.
If you’re wondering about the effects of resetting NVRAM on Secure Boot settings, there are none. While reseting NVRAM turns on System Integrity Protection (if it was disabled), your Secure Boot settings remain the same as before the reset.
Read on for detailed descriptions of Full and Medium security settings.
About Full security
A level of security previously only available on iOS devices, this setting ensures that only an up-to-date operating system (macOS) or a cryptographically signed operating system currently trusted by Apple (Microsoft Windows) is able to run on your computer. No other operating systems will be allowed to run on this T2 Mac.
If Secure Boot finds an unknown operating system on your startup drive or is unable to verify it, the computer will connect to the Internet and download the updated integrity information from Apple as it needs to verify the operating system. “This information is unique to your Mac, and it ensures that your Mac starts up from an operating system that is trusted by Apple,” according to the company.
If you’re offline, you may see an alert saying that an Internet connection is required. Choose an active Wi-Fi network from the menu bar, then click Try Again.
If your Mac uses FileVault disk encryption, you may be asked to enter a password to unlock the disk before the computer attempts to retrieve updated integrity information from Apple. Enter your administrator password, then click Unlock to complete the download.
About Medium security
When the Medium setting is toggled on, your Mac is allowed to run any operating system version ever trusted by Apple, not just the current version. Unlike the Full setting, it doesn’t require an Internet connection or updated integrity information from Apple.
This setting is best used when you need to boot into an earlier macOS version that’s no longer trusted by Apple, not necessarily the current macOS version installed on your Mac.
Setting up a firmware password
You can stop people with physical access to your machine from attempting to boot it up from a disk other than your designated startup disk by creating a firmware password in Startup Security Utility (not to be confused with your macOS user account’s password).
1) Restart or turn on your Mac, then press and hold Command + R immediately after you see the Apple logo to start up the computer using macOS Recovery Mode.
2) Click Utilities in the menu bar in the Utilities window.
3) Click Startup Security Utility in the Utilities window.
4) When you’re asked to authenticate, click Enter macOS Password, then select an administrator account and enter its password.
5) Click Turn On Firmware Password in the Startup Security Utility window.
6) Enter a desired firmware password in the fields provided, then click Set Password.
Note: Write this password down and store it somewhere safe. If you forget the firmware password, you’ll need to schedule a service appointment with Apple or an Authorized Service Provider to unlock the machine.
7) Close out the Startup Security Utility window, then choose Restart from the Apple menu to reboot your iMac Pro with your new security settings in place.
Your Mac should start up normally from its designated startup disk.
Anyone who knows your firmware password will be able to boot your Mac from a non-startup disk. To select a storage device from which you’d like to boot your Mac, hold down the Option key after turning the computer on, then highlight a disk containing a usable operating system and hit Enter.
The firmware password field pops up: type in the firmware password you created and press Enter to unlock the computer and continue booting it from the designated disk.
Tip: To kill the firmware password, repeat the steps above, but click Turn Off Firmware Password in step 4.
Setting up a firmware password gives you another layer of security and peace of mind, knowing that no one will be allowed to start up your Mac from an external hard drive, CD/DVD, USB thumb drive, or any other storage device.

You’ll also need to type in your firmware password before entering macOS’s Recovery Mode. This provides a safeguard against local attacks since anyone with physical access to your computer can boot into macOS’s Recovery mode.
Even if folks in your household or your co-workers know your firmware password, you can still stop them from booting up your Mac from external media by adjusting the options detailed further below.
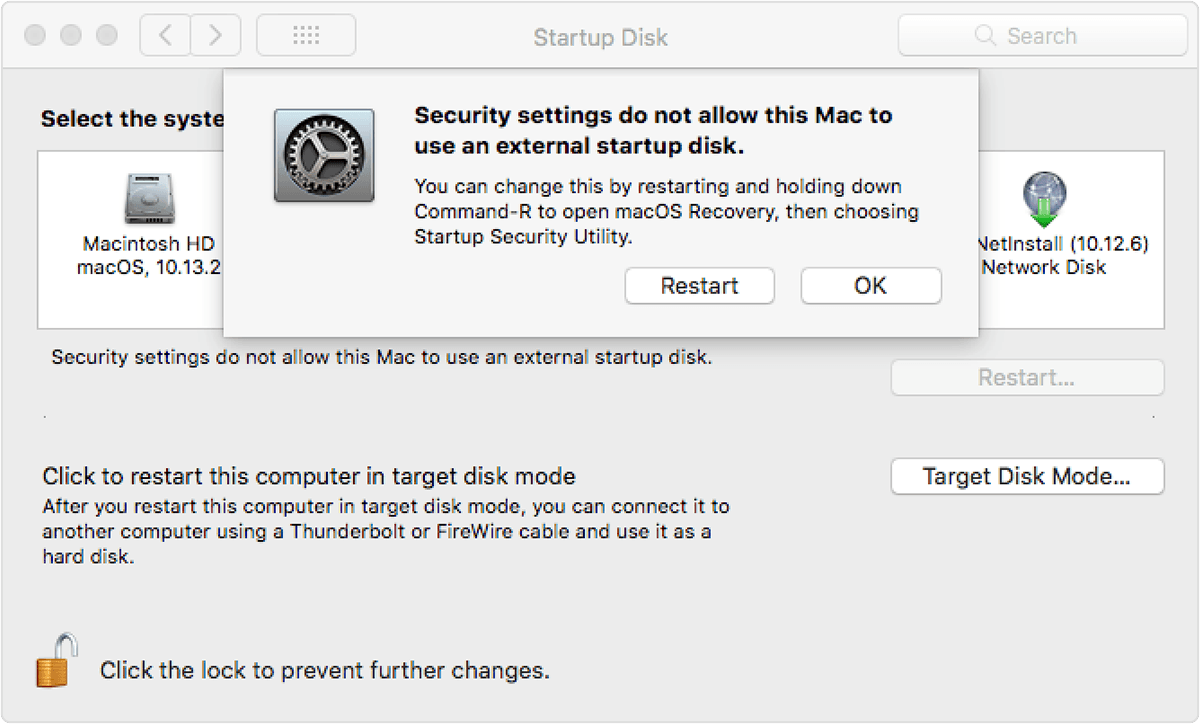
Preventing booting from external media
The External Boot settings let you control whether your Mac is allowed to boot up from external media. By default, the computer is set to use the most secure option that disallows booting from any external hard drives, USB thumb drives, or other external media.
To adjust these settings to your liking, follow the step-by-step instructions below:
1) Restart or turn on your Mac, then press and hold Command + R immediately after you see the Apple logo to start up the computer using macOS Recovery Mode.
2) Click Utilities in the menu bar in the Utilities window.
3) Click Startup Security Utility in the Utilities window.
4) When you’re asked to authenticate, click Enter macOS Password, then select an administrator account and enter its password.
5) Choose your desired level of startup security right underneath the External Boot heading in the Startup Security Utility window:
- Disallow booting from external media: your Mac can’t be made to boot up from any external media.
- Allow booting from external media: Your computer can start up from external media.
6) Quit Startup Security Utility, then choose Restart from the Apple menu to restart your Mac with your new security settings in place.
Tip: If you’ve allowed booting from external media and want to select a startup disk before restarting, quit Startup Security Utility and choose Startup Disk from the Apple menu.
When the ”Disallow booting from external media” setting is selected, selecting a non-startup disk in System Preferences > Startup Disk will yield a warning message saying your security settings do not allow this to happen.
Tip: To choose your startup disk at boot time, invoke Startup Manager by holding down the Option key immediately after turning on or restarting your computer.
Doing so when the “Disallow booting from external media” setting has been enabled shall cause your Mac to restart to a message saying your security settings prevent it from booting from external media. You’ll then be presented with the option to restart from your current startup disk or select another startup disk.
Signing off, toggling the “Disallow booting from external media,” setting on and setting up a strong firmware password is the best way to prevent nefarious users from starting up your unattended Mac from their USB thumb drive.
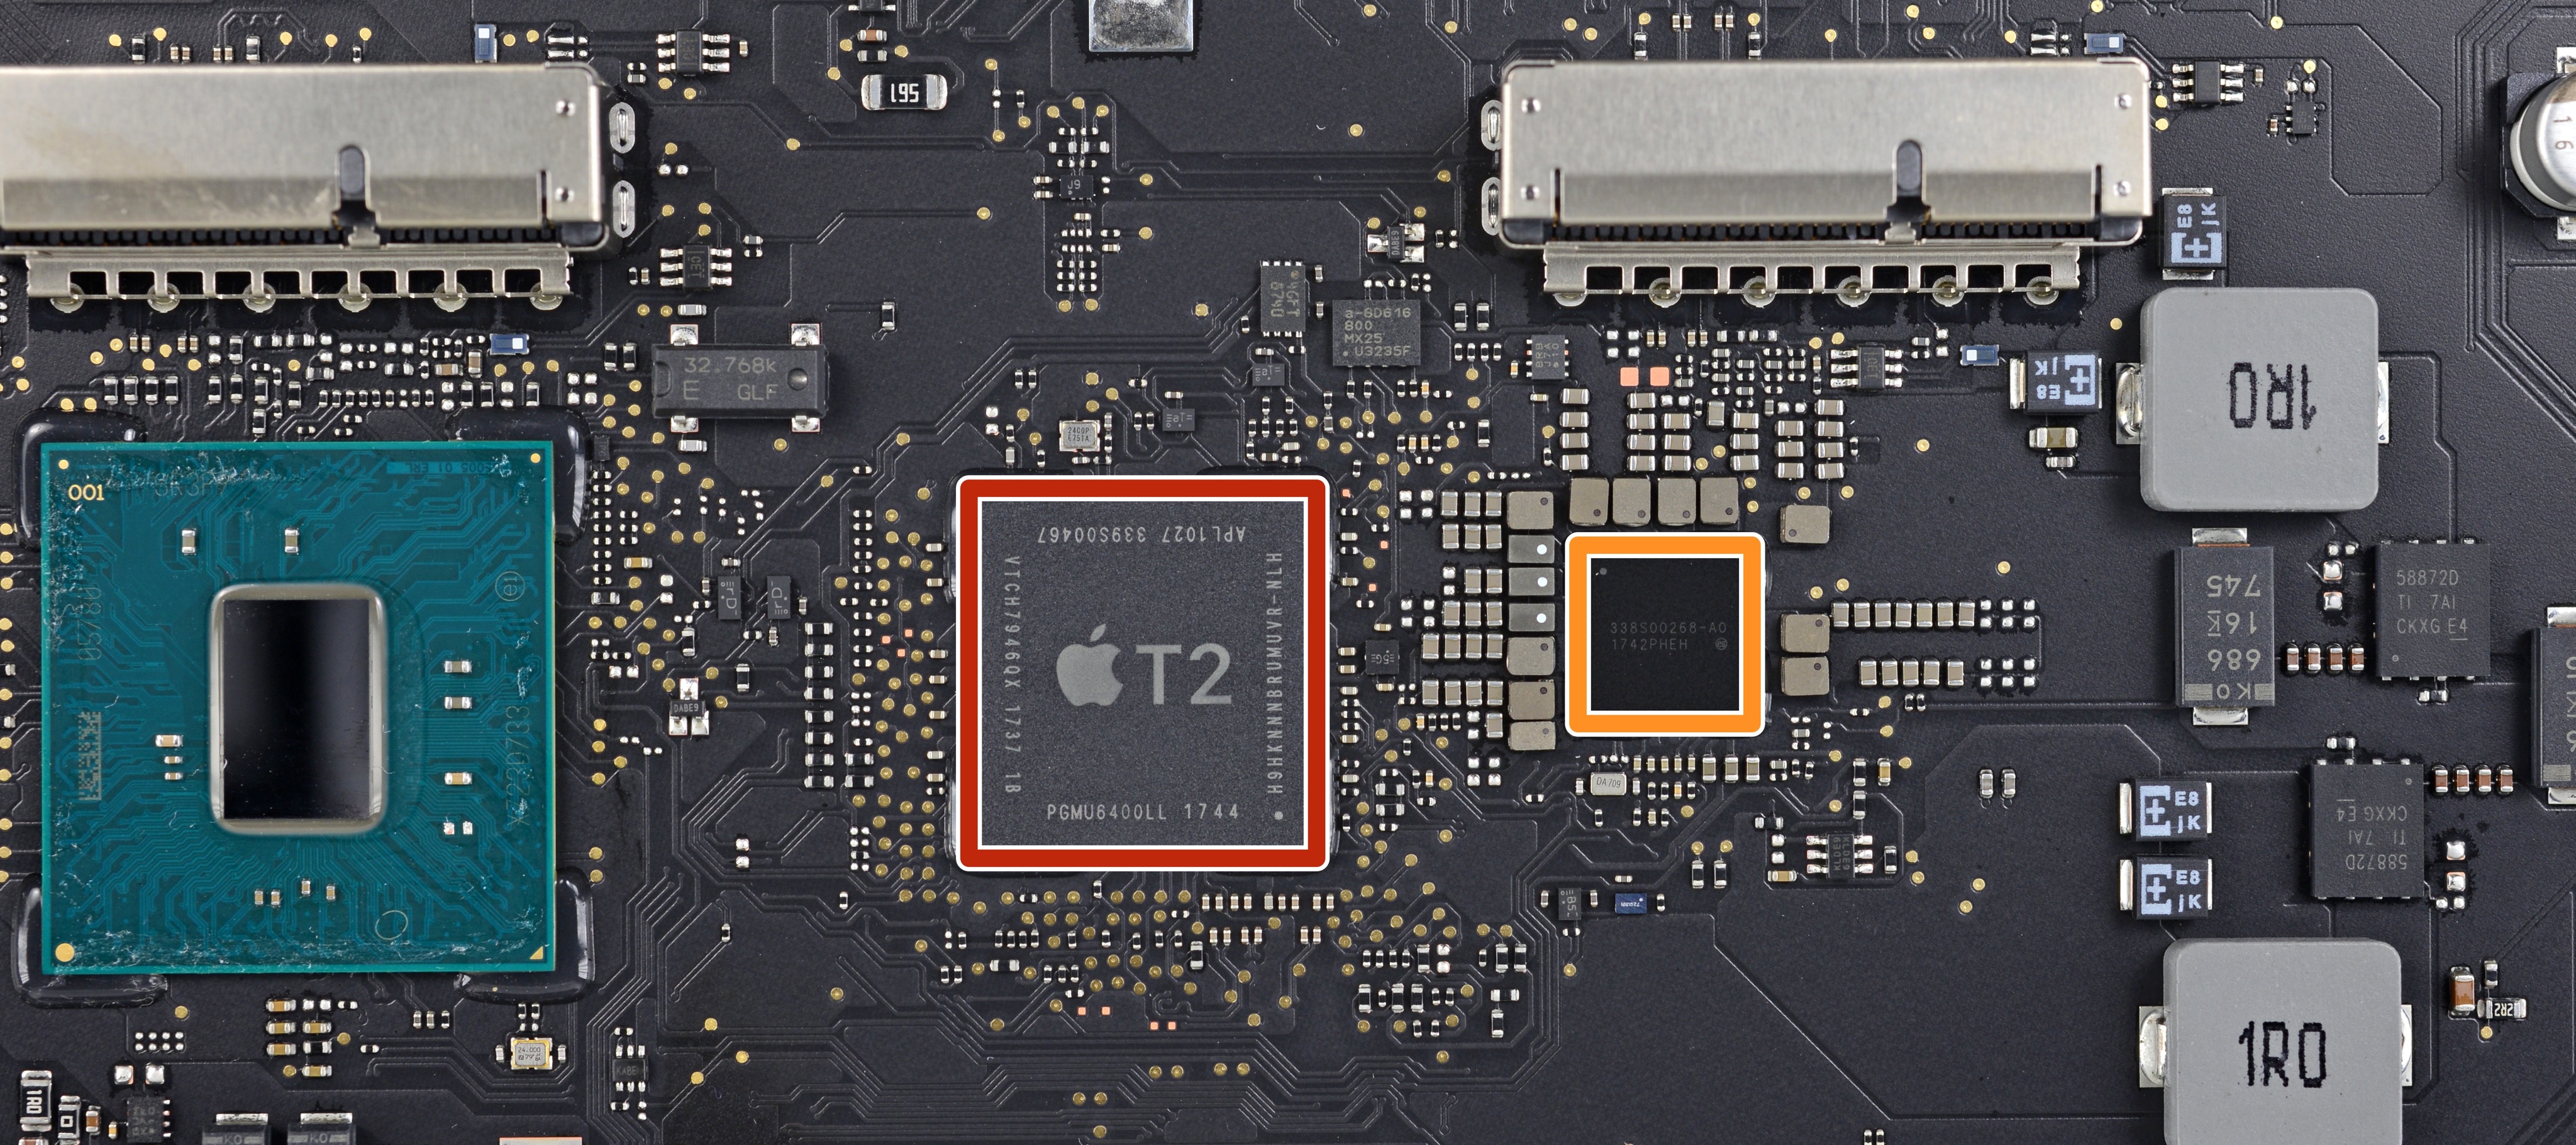
Your Mac and Apple T2 chip
Apple began offloading certain Mac system functions to a dedicated ARM-based coprocessor called T1, which debuted in the MacBook Pro with Touch Bar.
Its successor, the Apple T2 chip in your iMac Pro, not only supports the new Secure Boot features to ensure the machine runs a legitimate operating system but also integrates various controllers and specialized coprocessors onto a single chip:
- System management controller
- Image signal processor
- Audio controller
- SSD controller
- Secure Enclave cryptographic coprocessor
Aside from Secure Boot features, the T2 chip handles the following tasks:
- Enhanced imaging for the 1080p front-facing FaceTime HD camera
- Hardware-based flash storage encryption without performance penalty
Because the T2 chip incorporates Apple’s in-house designed image signal processor, it makes possible hardware-accelerated imaging features for the FaceTime HD camera not unlike those on iOS devices:
- Improved exposure control
- Enhanced tone mapping
- Auto exposure based on face detection
- Auto white balance based on face detection
Lastly, the T2 silicon includes a special protected section like the Secure Enclave cryptographic coprocessor embedded into Apple’s A-series mobile chips powering iPhones and iPads.
T2’s Secure Enclave holds your storage encryption keys and the trusted certificate stored in its own protected memory that’s walled off from the rest of the system. It also houses dedicated AES hardware engines that encrypt/decrypt data on the fly with no effect on the SSD’s performance while keeping the Xeon processor free for your computing tasks.
Lastly, it provides cryptographic functions to the rest of the system.
Check out next: