Travel Time is a nifty addition to Apple’s Calendar app, capable of precisely estimating the duration of your upcoming trip based on parameters such as milage and traffic. Used properly, it can notably ease some of your daily scheduling woes, but paradoxically, a large contingent of regular Calendar users still routinely overlook the feature.
Formerly introduced as frequent locations and traffic conditions widgets, the service has only slowly gained traction amongst users. Travel Time today however has come of age and is now neatly integrated into one of the most popular productivity applications both on iOS and macOS. So if you didn’t get the memo on the virtues of Travel Time in Calendar, here’s what you need to know.
Why you should use Travel Time
We have all been there before: you have a jam-packed day ahead of you and already squander way too much time just scheming routes and plotting where to leave at what time. Thorough preparation cannot hurt, I grant, but keep in mind that Apple’s Travel Time has been put in place to – if not supplant – at least assist you with exactly that. Setting up addresses and checking more boxes with every Calendar entry might sound gratuitous at first, but if the payoff is a lot less private time wasted mulling over your schedule, it is decidedly anything but that.
The moment Travel Time is integrated, Calendar entries will send you timely alerts as to when you want to leave (accounting for changes in traffic conditions) in order to show up on time, and appointments are going to intelligently expand in your day-to-day view in order to reserve the time spent on the road. If you like the sound of this (why wouldn’t you?) and want one less thing to worry about on a busy stretch, check out our walkthrough.
How to use Travel Time on iPhone, iPad or iPod touch
Rigging up Travel Time on your iPhone or any other device running on iOS 10 can feel a little bit jarring if you are new to it, but once you have gotten the hang of it, the setting is added in no time. It is also somewhat intelligent in helping you set locations, but let’s not get ahead of ourselves.
1) First of all, open your Calendar and create a new entry.
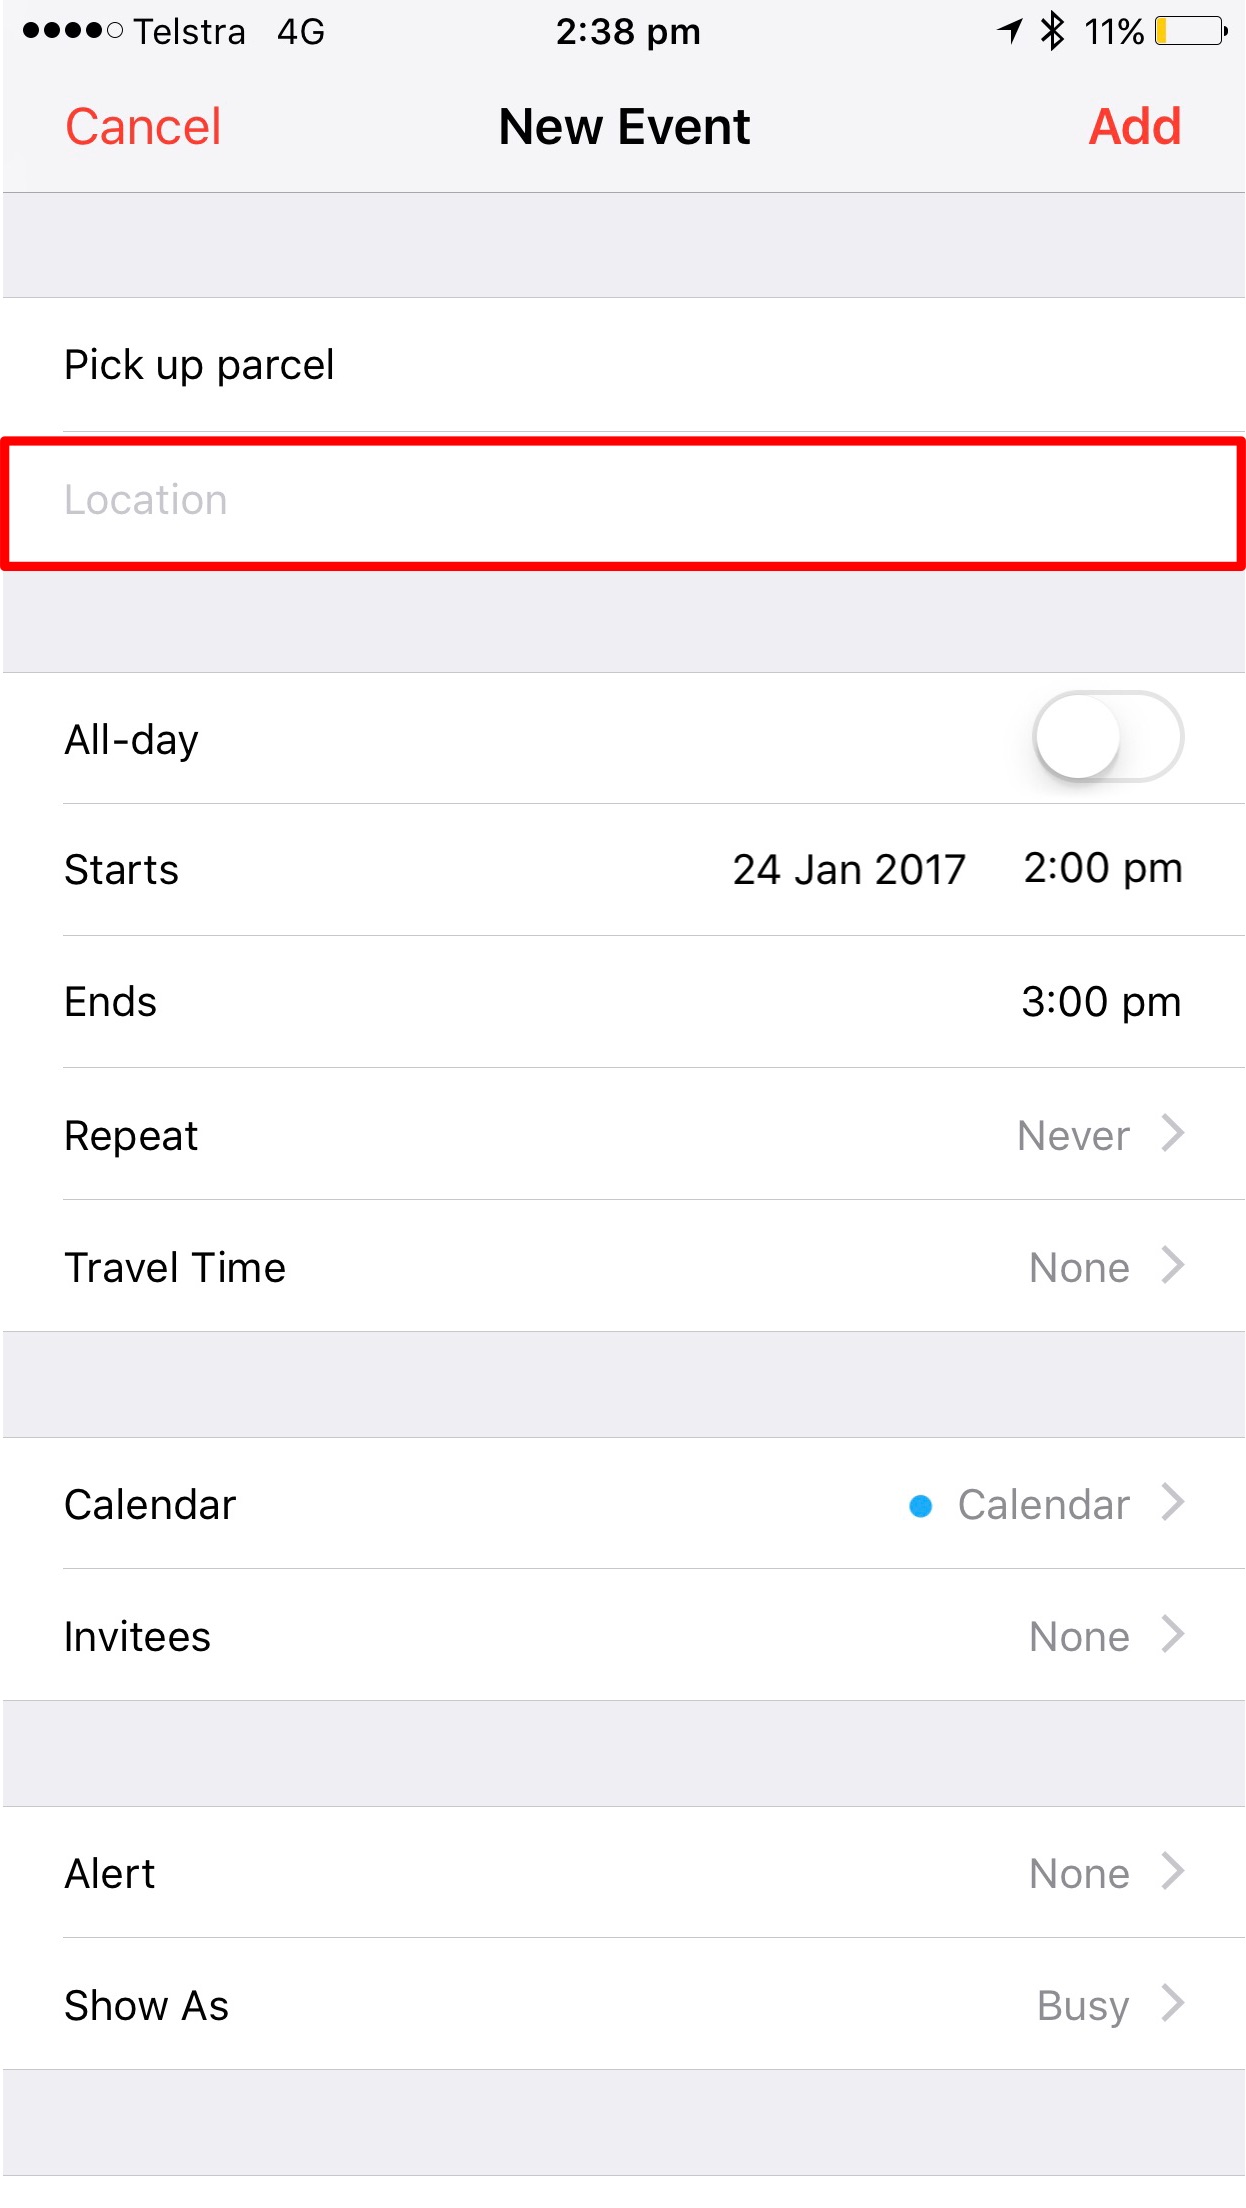
2) On filling in event information, make sure to provide the appointment’s precise address. This will be important later on to ensure accurate travel estimates that you can trust. Tap Location.
3) If you know the event’s location, just go ahead and type it in the search bar, then click Done. Alternatively, start writing and wait for Calendar to suggest places. Suggestions will pop up right under another smart list labelled Recents. Tap the one you’re happy with to confirm.
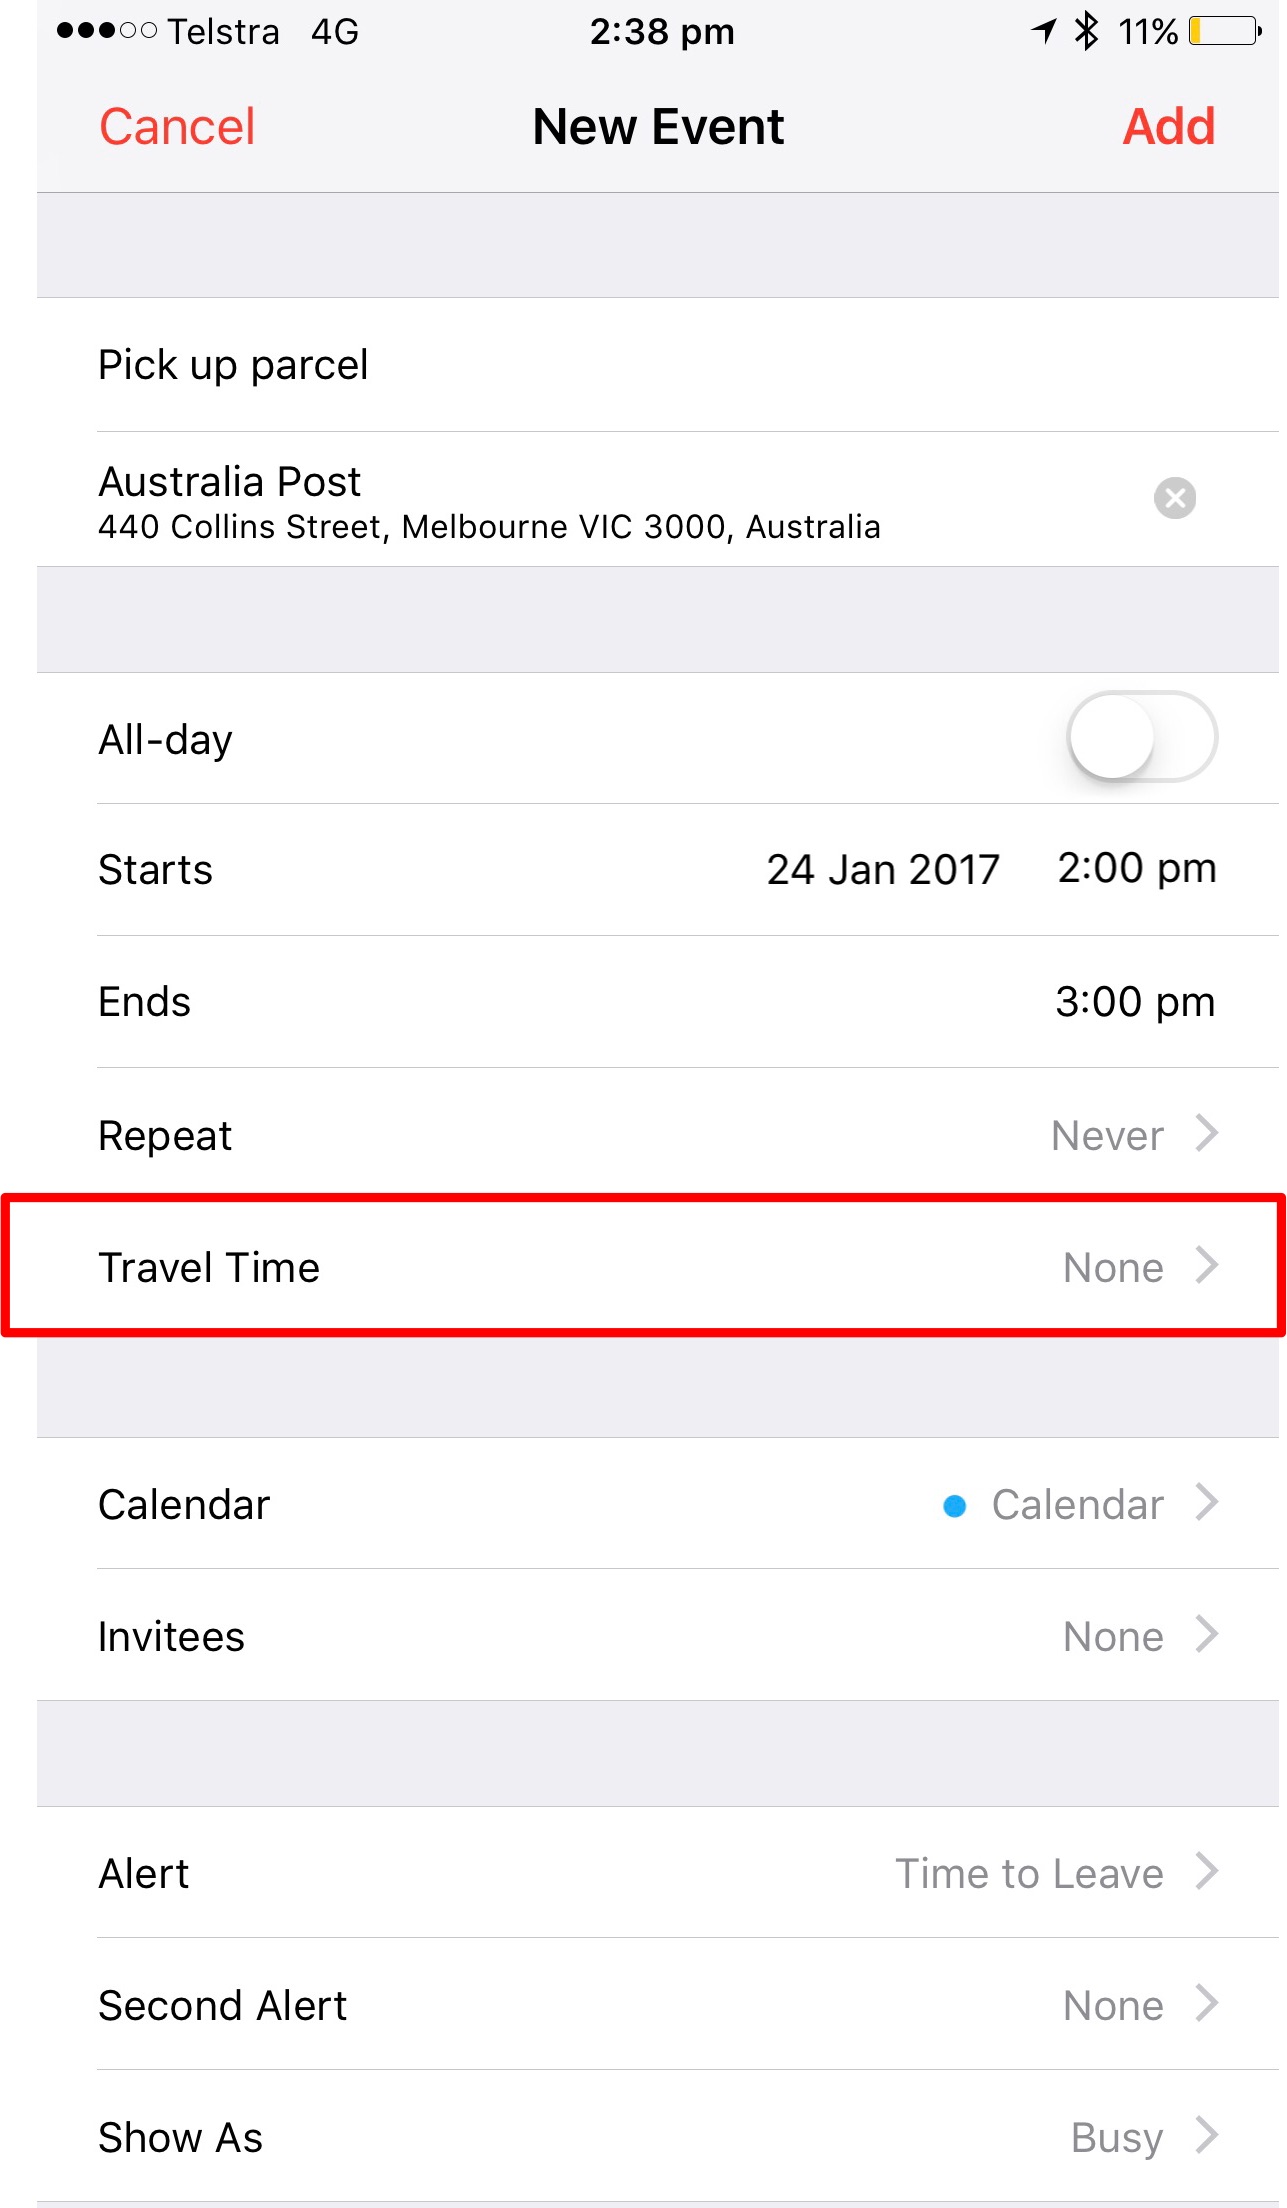
4) Now that Calendar knows where you are headed, it needs to learn about your starting point. To feed it with that piece of information, find Travel Time in the list of items and select it.
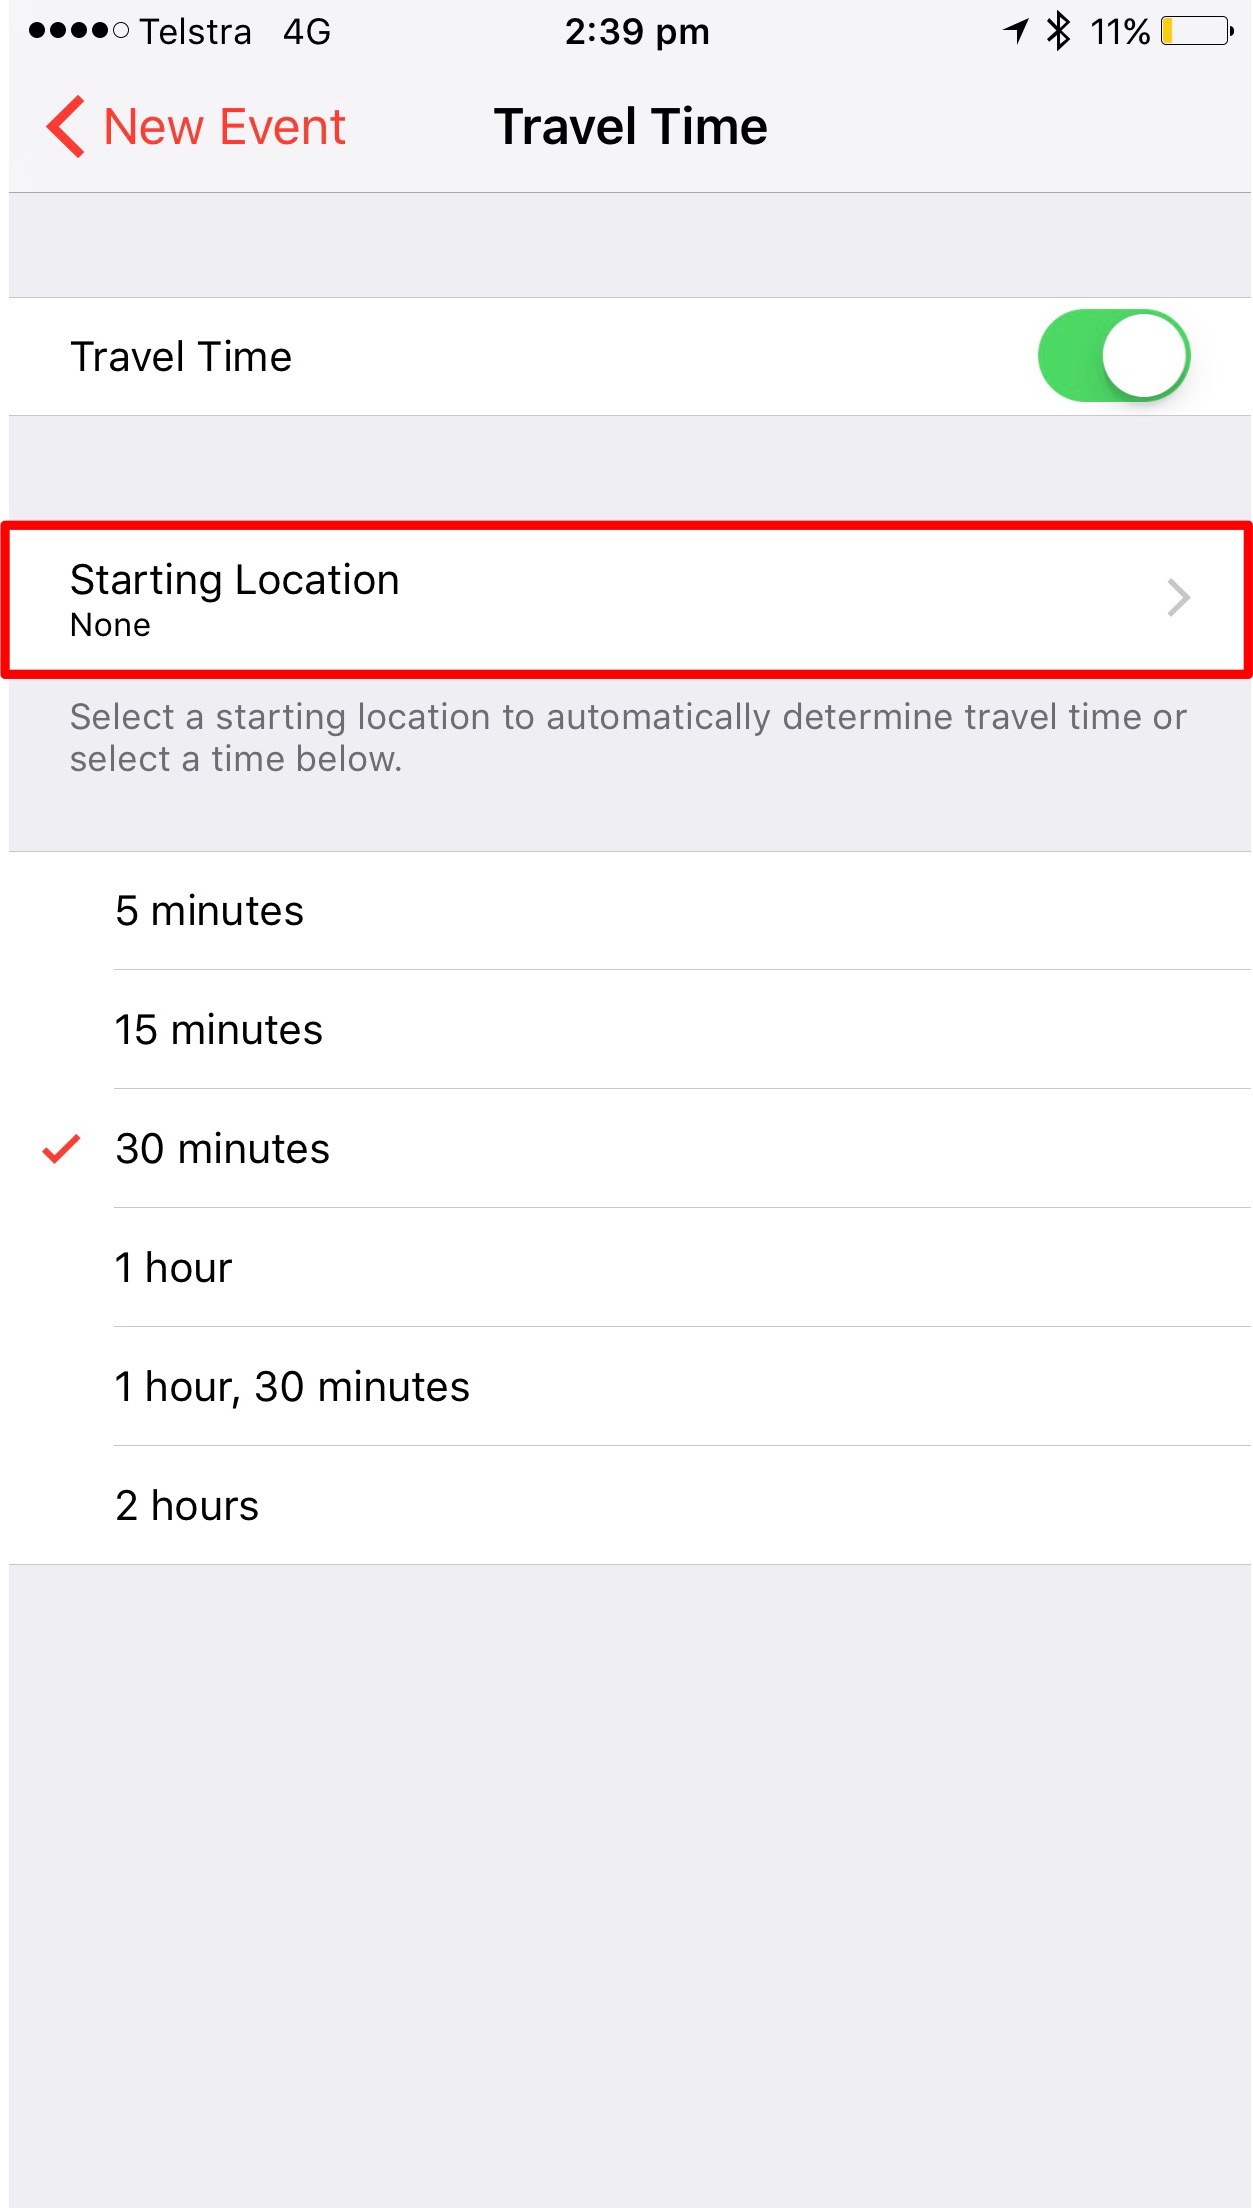
5) Toggle the switch to the right in order to unveil a new menu.
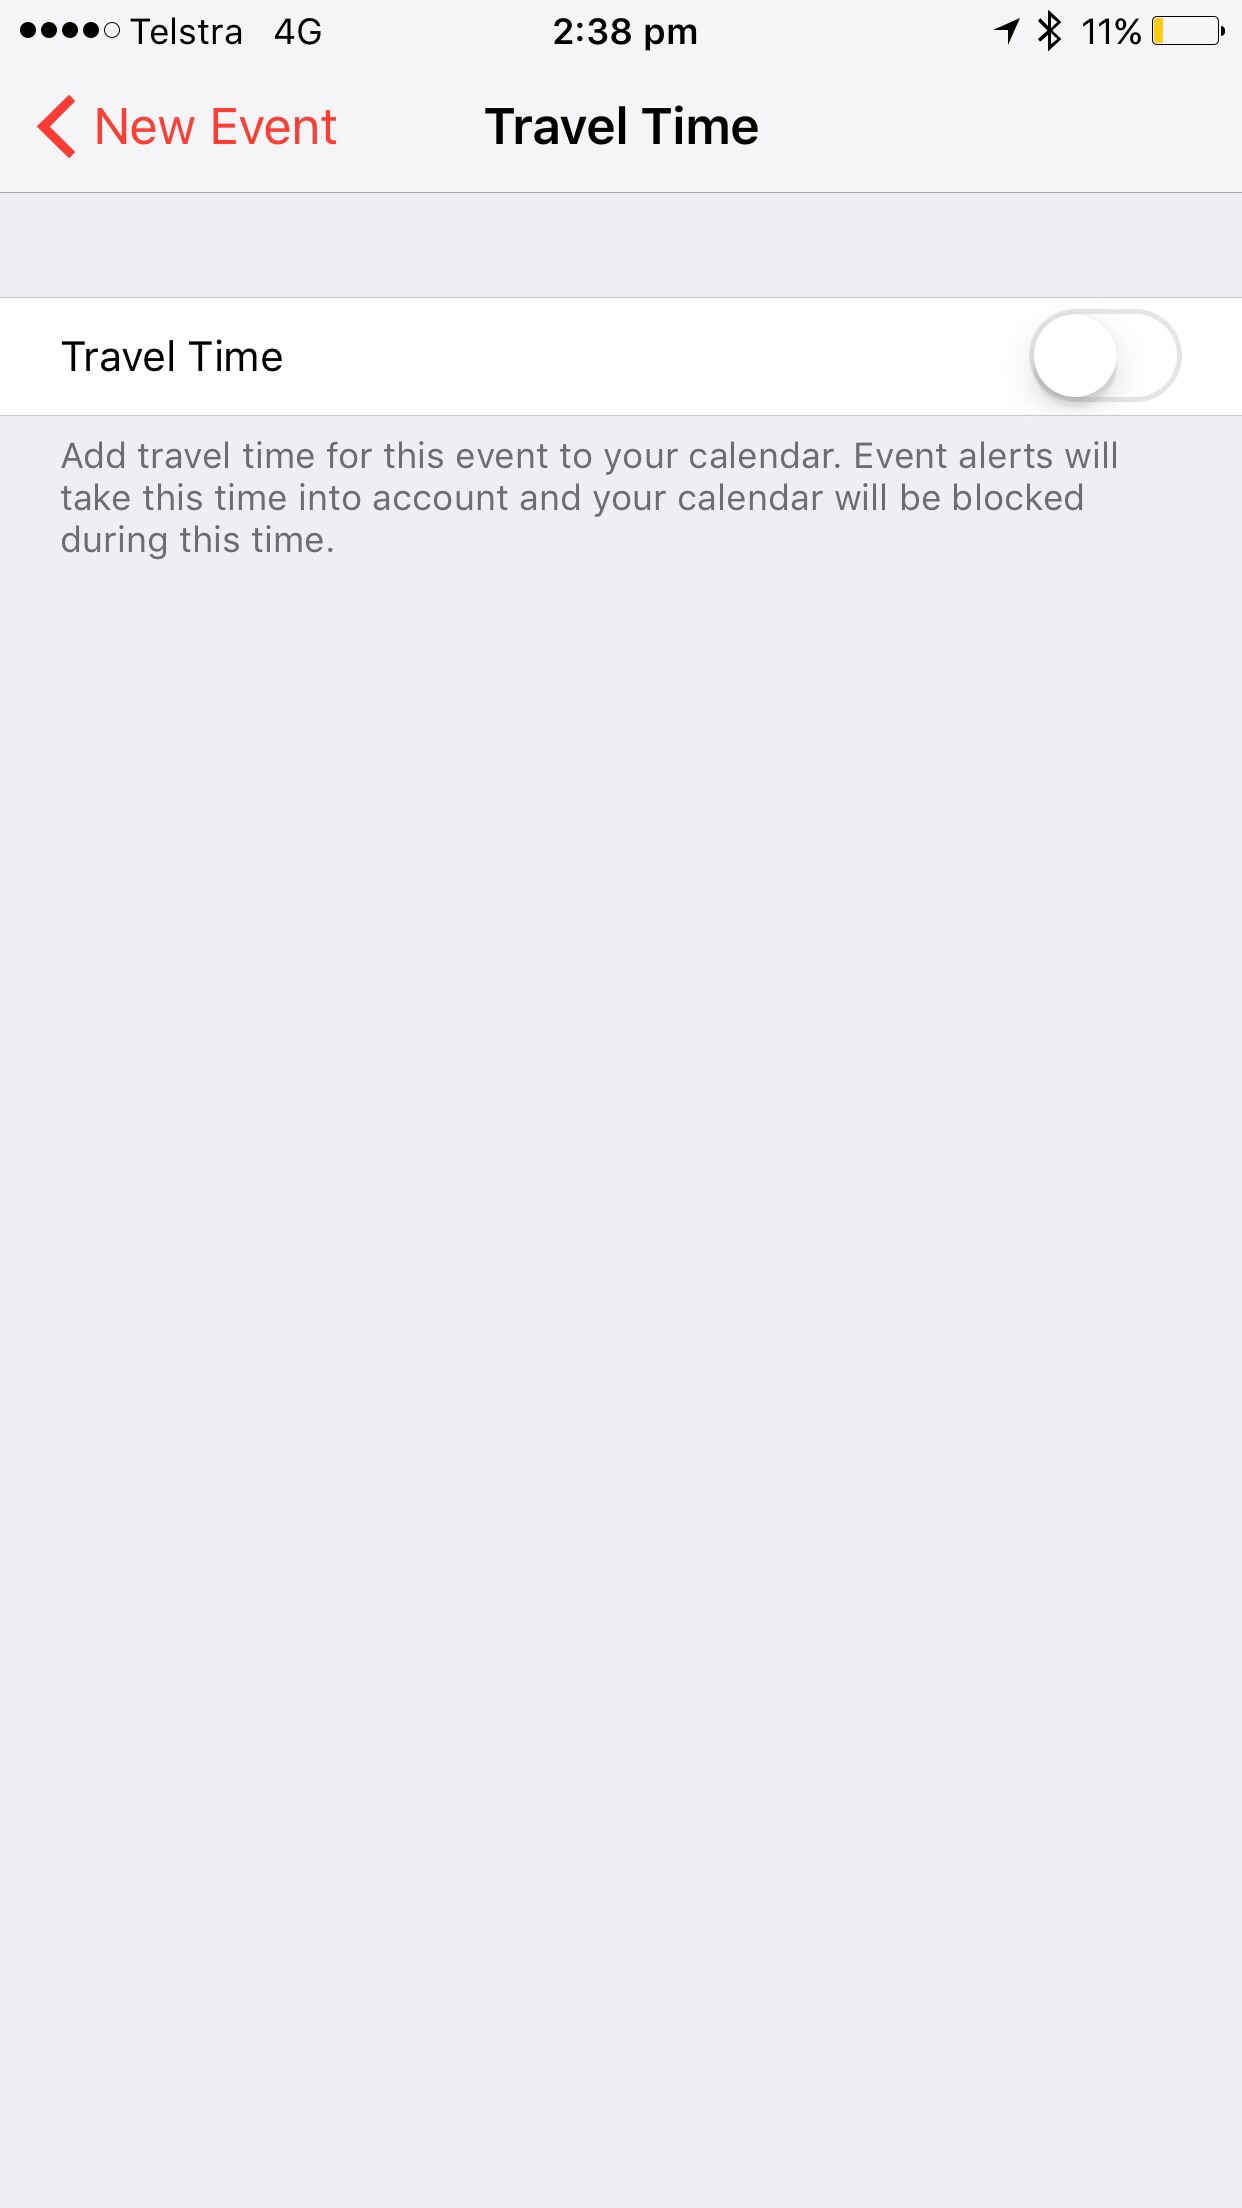
6) You are now handed two options: there is a generic submenu of preset travel times, and above it (marked red), the superior smart tab. Preset times will not send you smart alerts accounting for traffic or actually take into account real data (miles), so we disregard those and instead tap Starting Location.
7) Immediately following your touch, you are prompted to detail your departure location. The interface is akin to the one from Step 3, so type or select your starting point. Keep in mind that you can quickly hit Current Location if this is your first appointment of the day and you are situated at home.
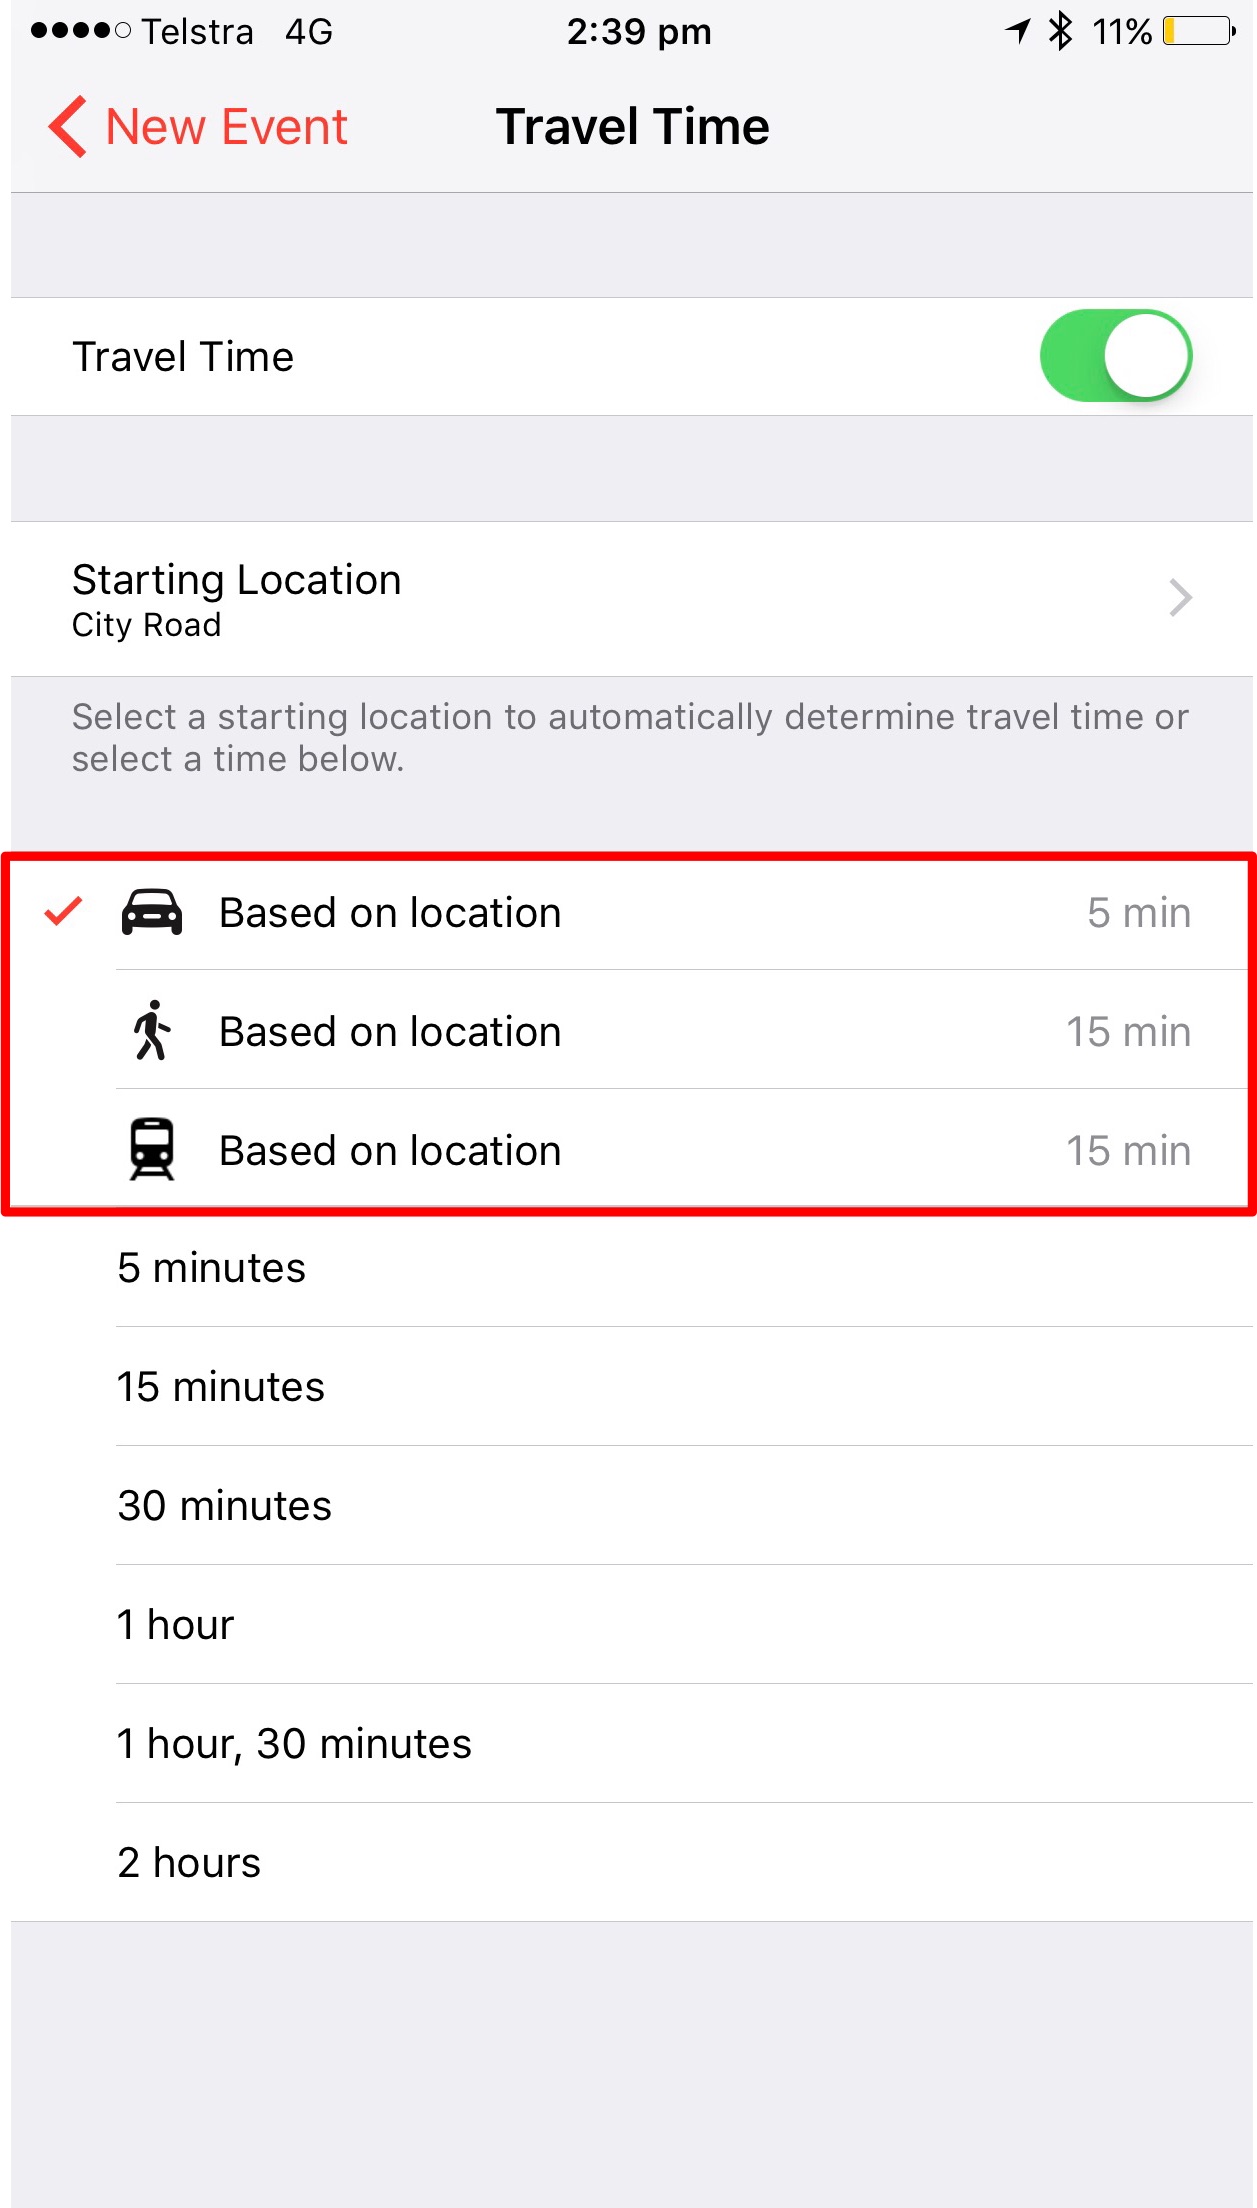
8) After this has been taken care of, a new set of items will pop up in the Travel Time register: this time however they are smart suggestions. As indicated by the icon next to it, Calendar has run the numbers and will predict the time you should block to get to your destination. Either by car, foot or public transport. Tick which of the three options applies to you and go back by hitting New Event.
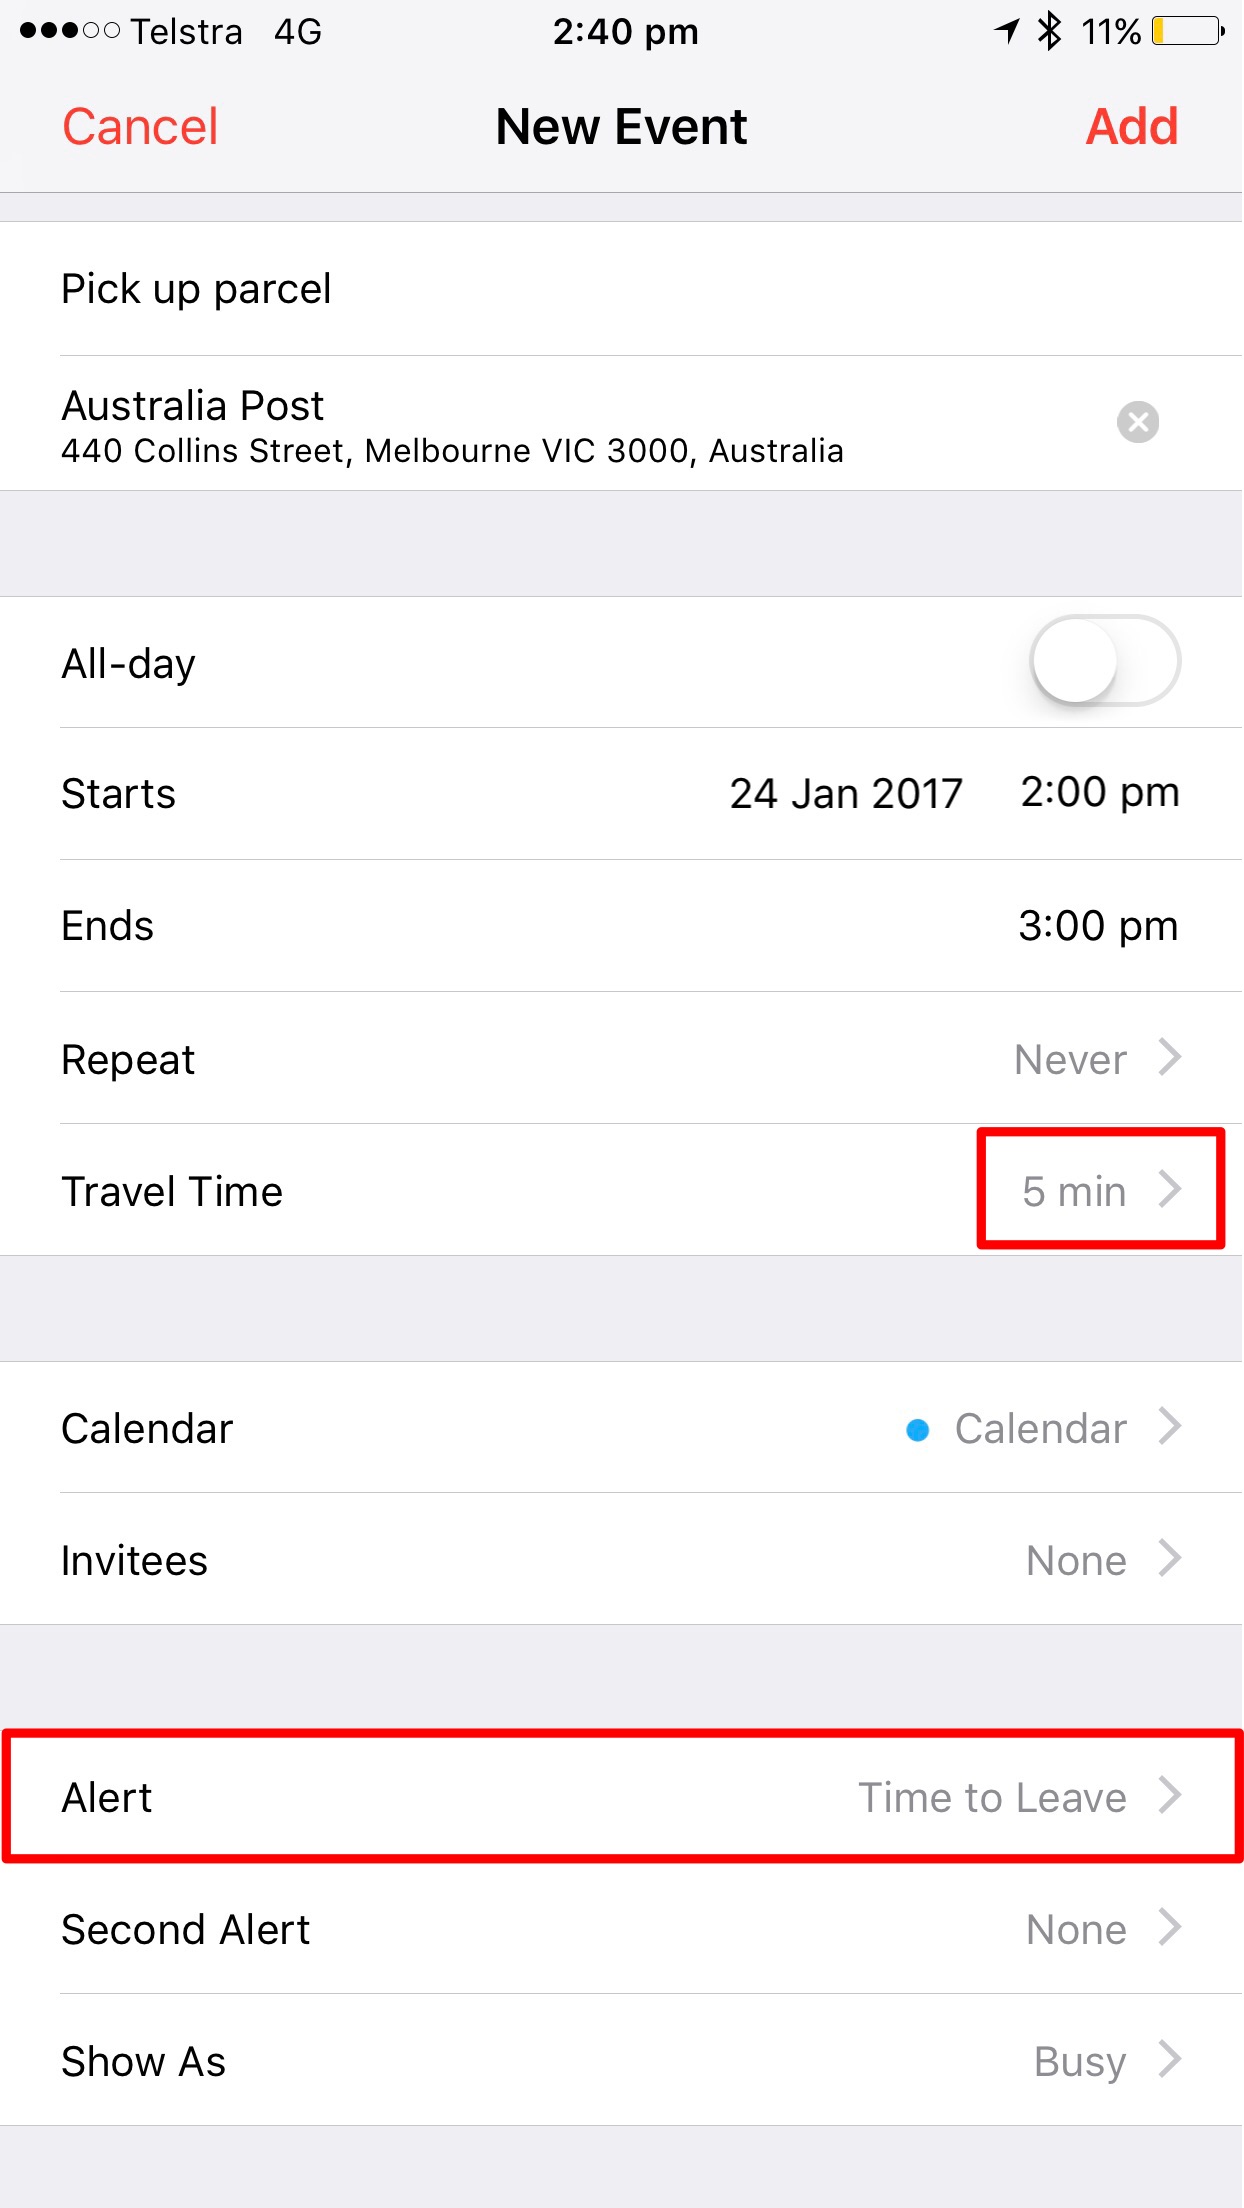
9) This is the final sprint: as marked below, Travel Time will now have the predicted duration locked in. Finally, make sure that the Alert field reads Time to Leave.
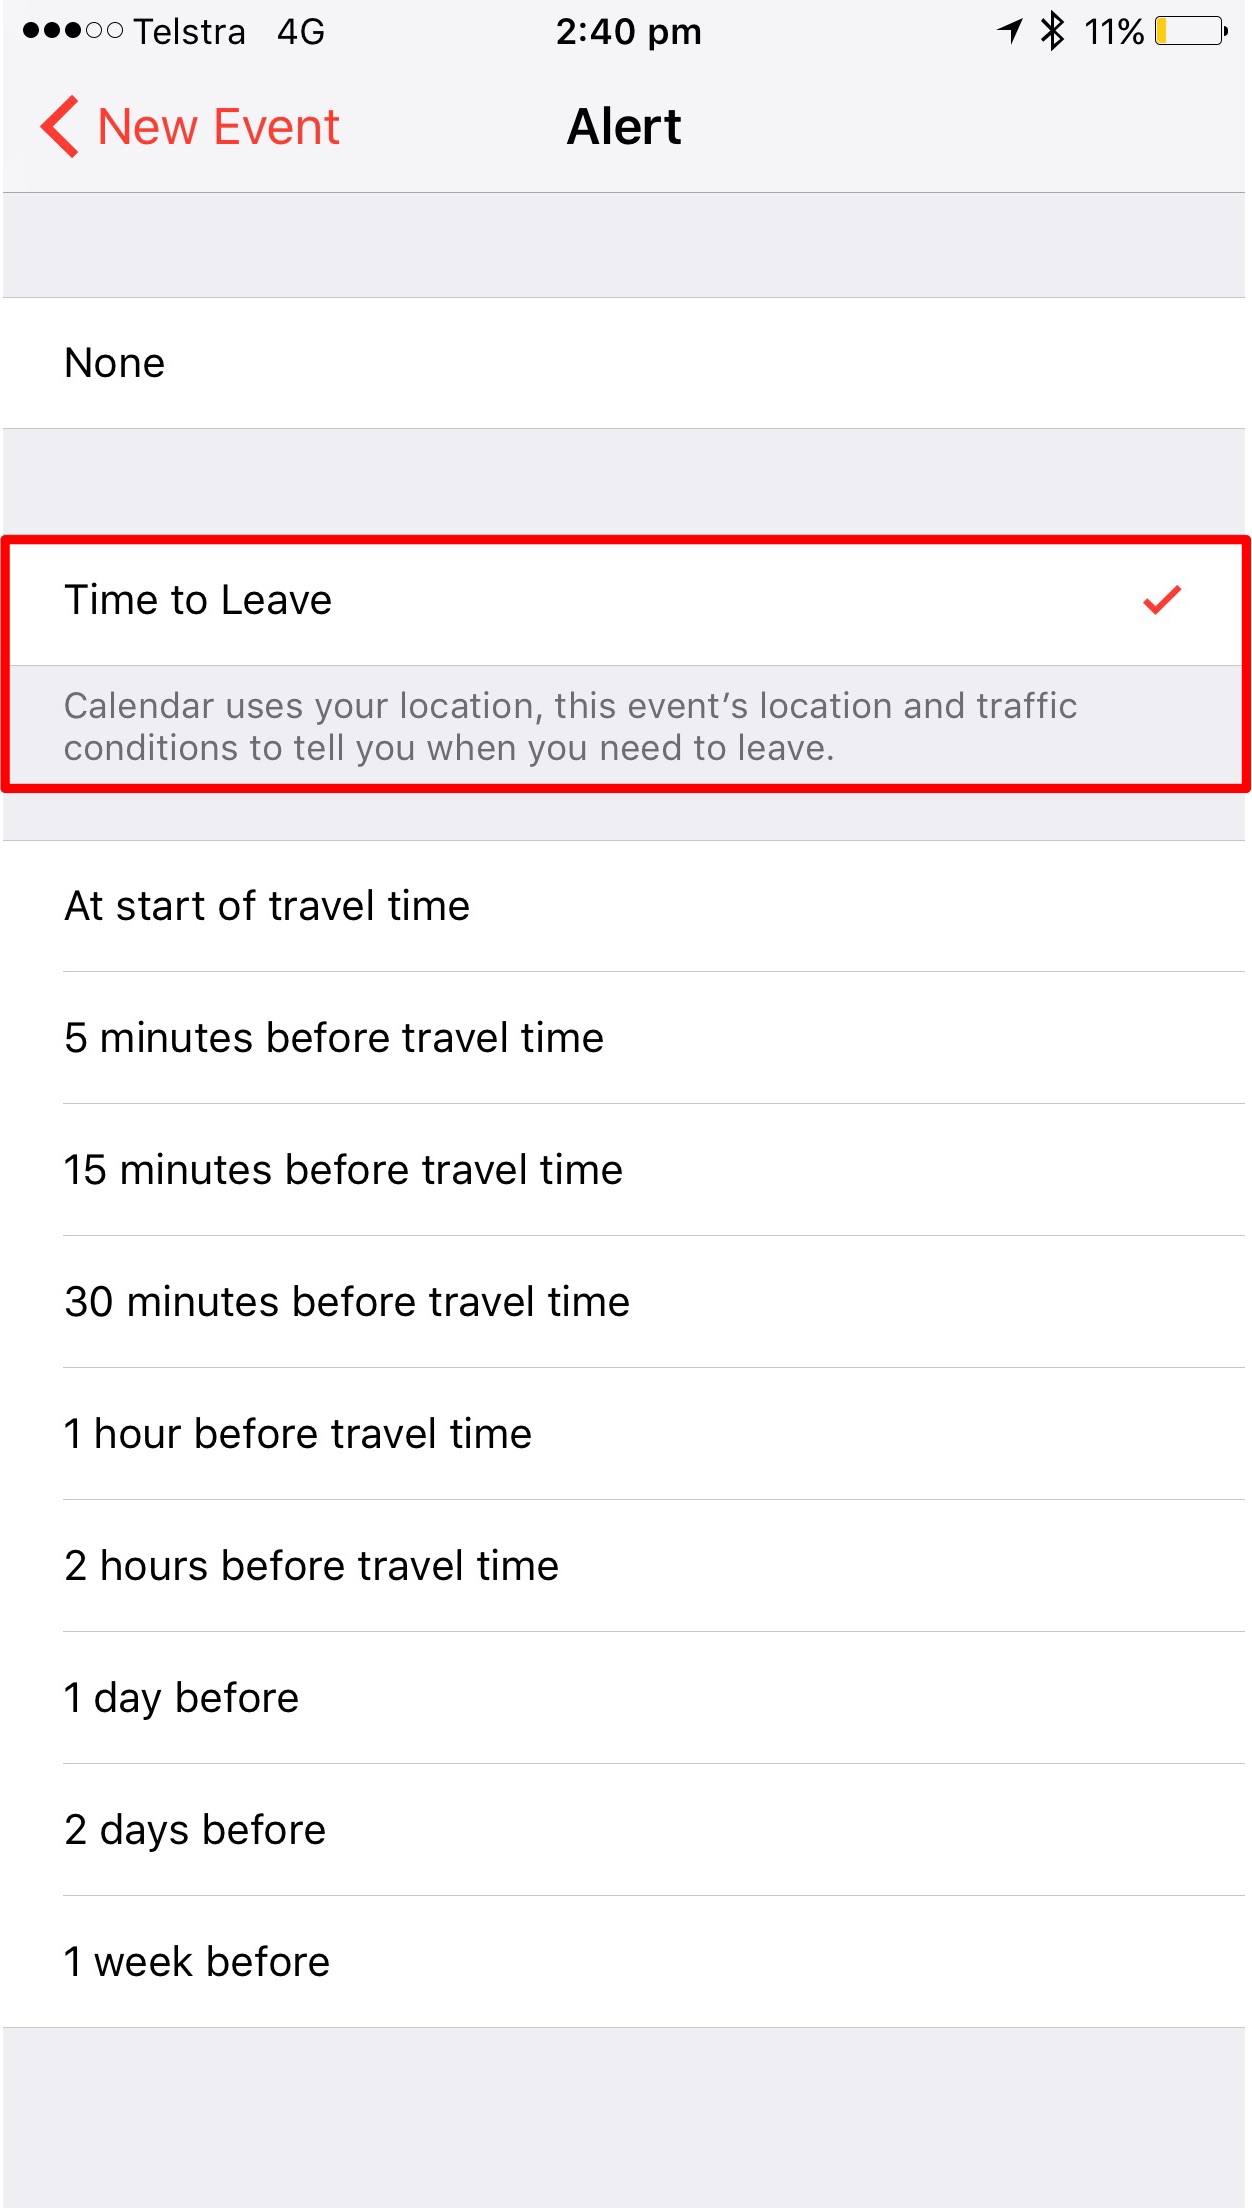
10) When clicked, the tab preceding the fine print Calendar uses your location, this event’s location and traffic conditions to tell you when you need to leave should be active. This option is auto selected and will not be a concern of yours for future events you create.
11) You are all set for the first entry. Click Add to place the appointment in your Calendar.
While thus far the process may look like an awful ordeal, do know that from here on, things get easier for two reasons.
- Step 9 and 10 can be skipped from here onwards.
- More importantly, and this is where Travel Time really shines, subsequent Calendar entries (taking place on the same day) are still going to ask you for the event’s location, but they will adopt your previous event’s location as the starting point for route calculations to your next event. If that is too technical, next time you arrive at Step 5 and toggle on Travel Time, the location will automatically appear based on where you have been roaming around before. You can of course choose to edit that if you travelled elsewhere in the meantime, but if you have a tight schedule this will be correct most often and function as a welcome shortcut.
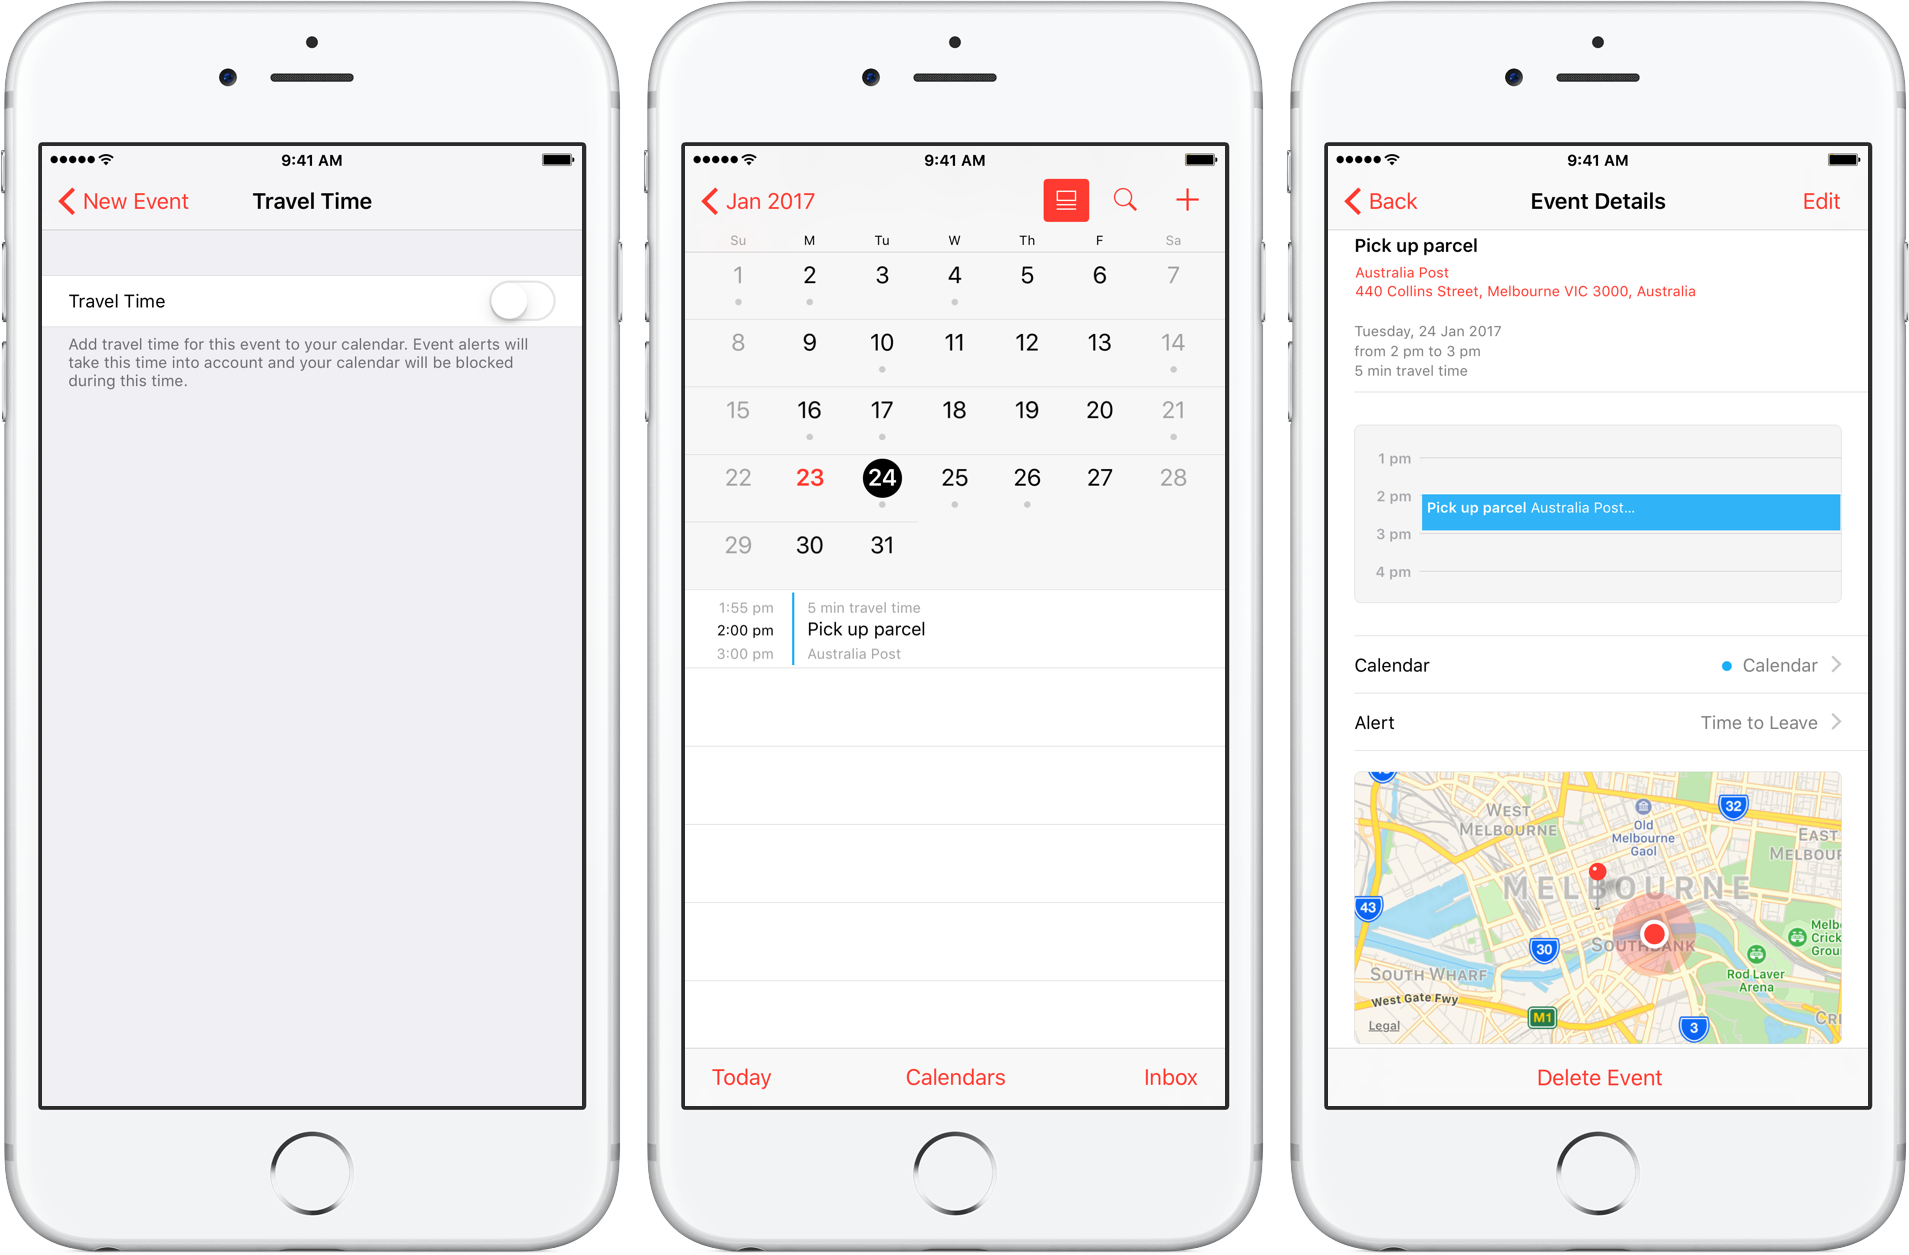
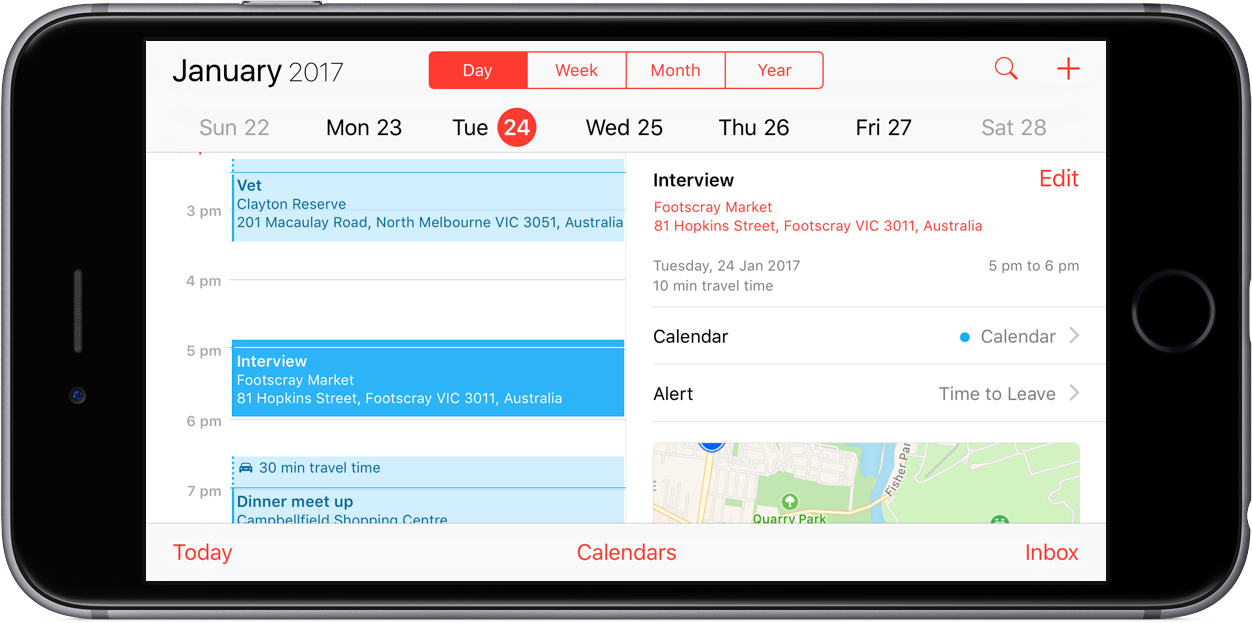
As soon as you have implemented Travel Time for your day, Calendar entries will reflect the additional travel time in block size and inform you when you need to scoot to get from from home to point A, or from A to B and so on and so forth:
How to add Travel Time on macOS
The steps required to make your Calendar entries a whole lot smarter on Mac are perhaps a little faster thanks to the trackpad. Navigation tools aside, it is pretty similar to the process on iOS, which is why I recommend skimming through the upper half of the tutorial first to get an overview of what Travel Time does and where it ultimately pays off.
As alluded to earlier, events including smart Travel Time settings are going to take up more space in your Calendar. Here is a look at what three entries of that kind look like on my Mac. Instead of going through the basics again, this time we will hit the ground running and simply add another (green) smart Calendar entry to the already existing ones. We don’t have to start from square one here chiefly for two reasons: one, the clicks necessary are largely identical and two, you can always refer back to the iOS tutorial if you feel a question is unanswered.
1) In the final screenshot of the iOS rubric, you can see that I have created three blue Calendar entries, all of which already have locations attached to them.
2) We will now create a new entry (the green box) and squeeze it between two existing appointments. What a day!
Double click on the timeline (that’s in the Day view). Or click + and adjust the time of the event.
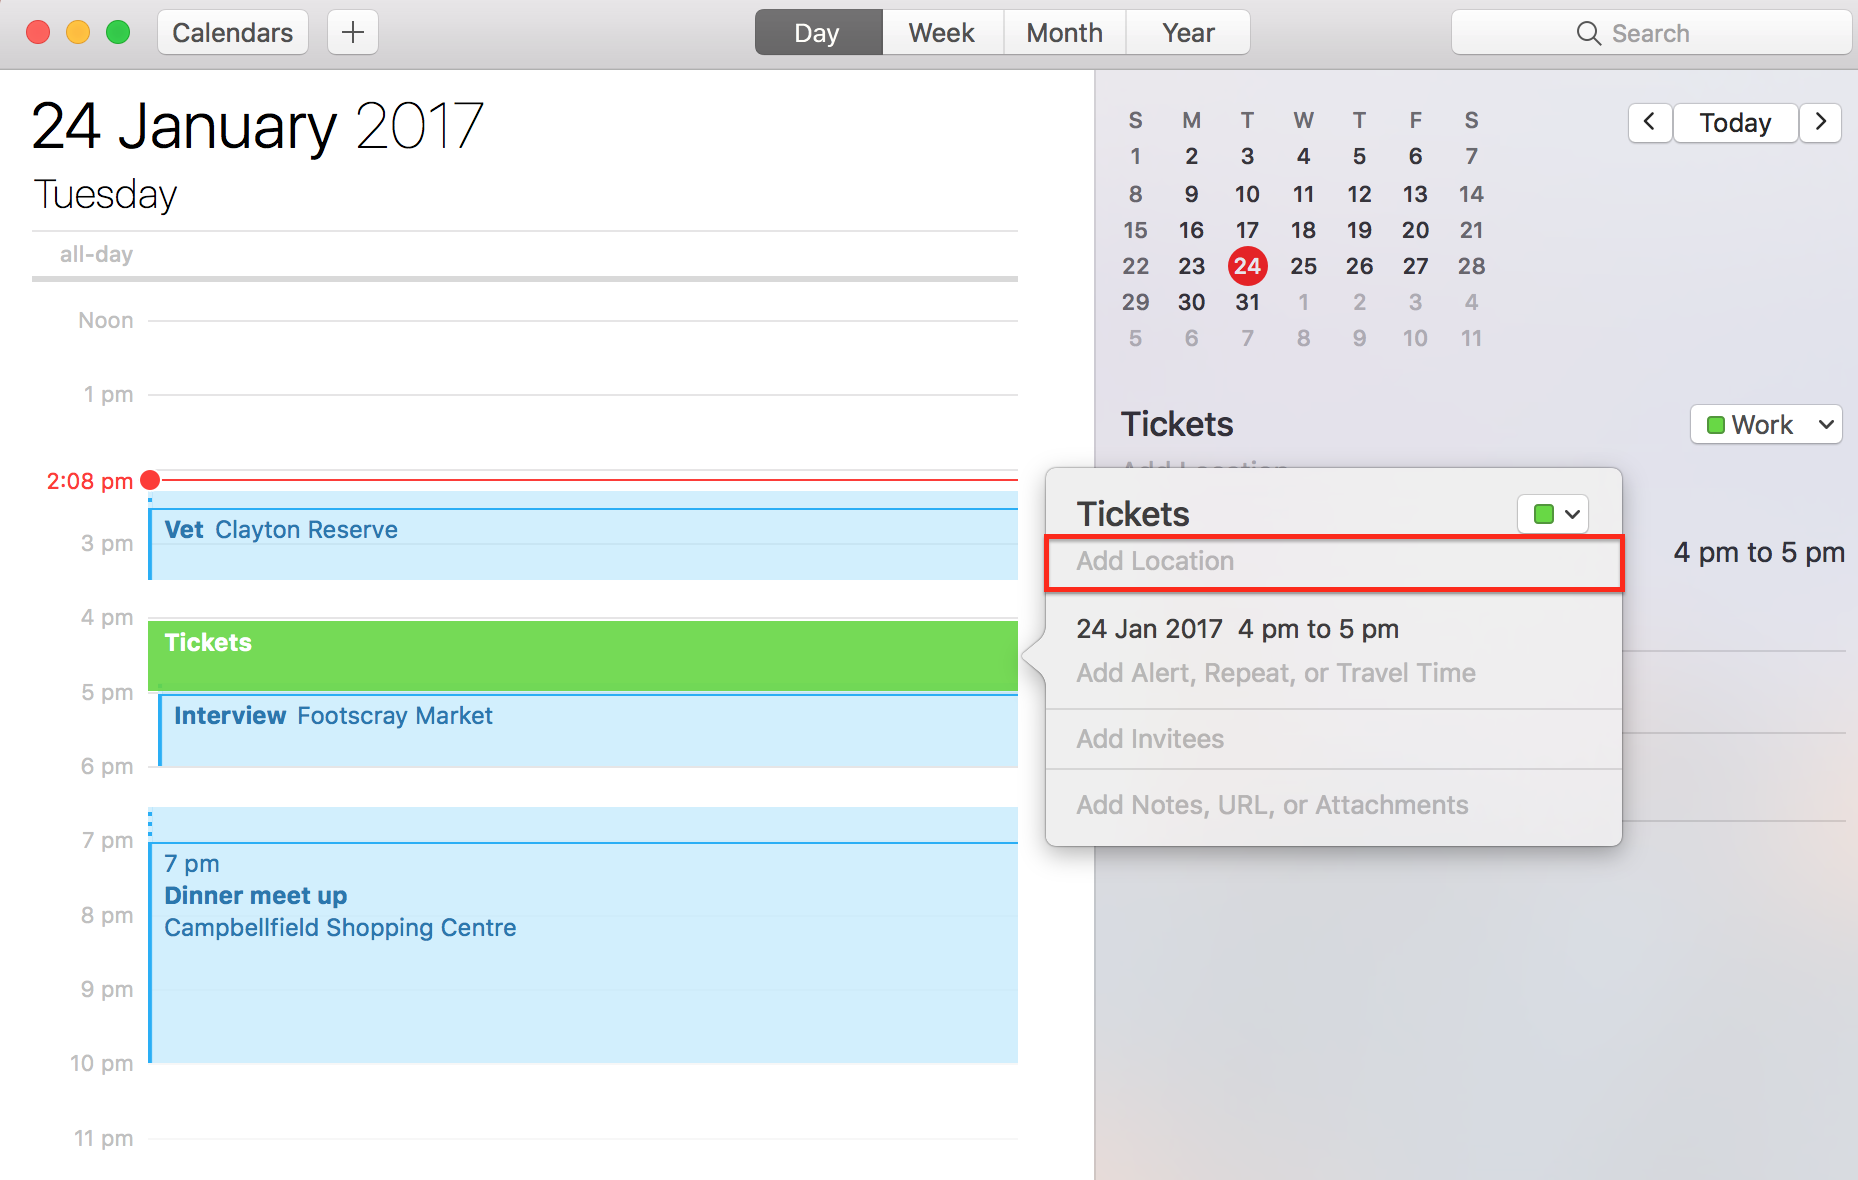
3) What’s vital for Travel Time to work is that your Mac knows the location of the event (this step) and the point you are starting out from (next step). Start typing the appointment’s exact location at Add Location. Click it once suggested to confirm.
4) The only difference compared to the iOS tutorial is that we are planting an event in the midst of others, which are each already assigned to locations. In other words, the fifth line reading travel time is already magically delivering travel estimates on the basis that Calendar knows your whereabouts before the green event. Simply select if you are travelling from the preceding event by car, foot or public transport.
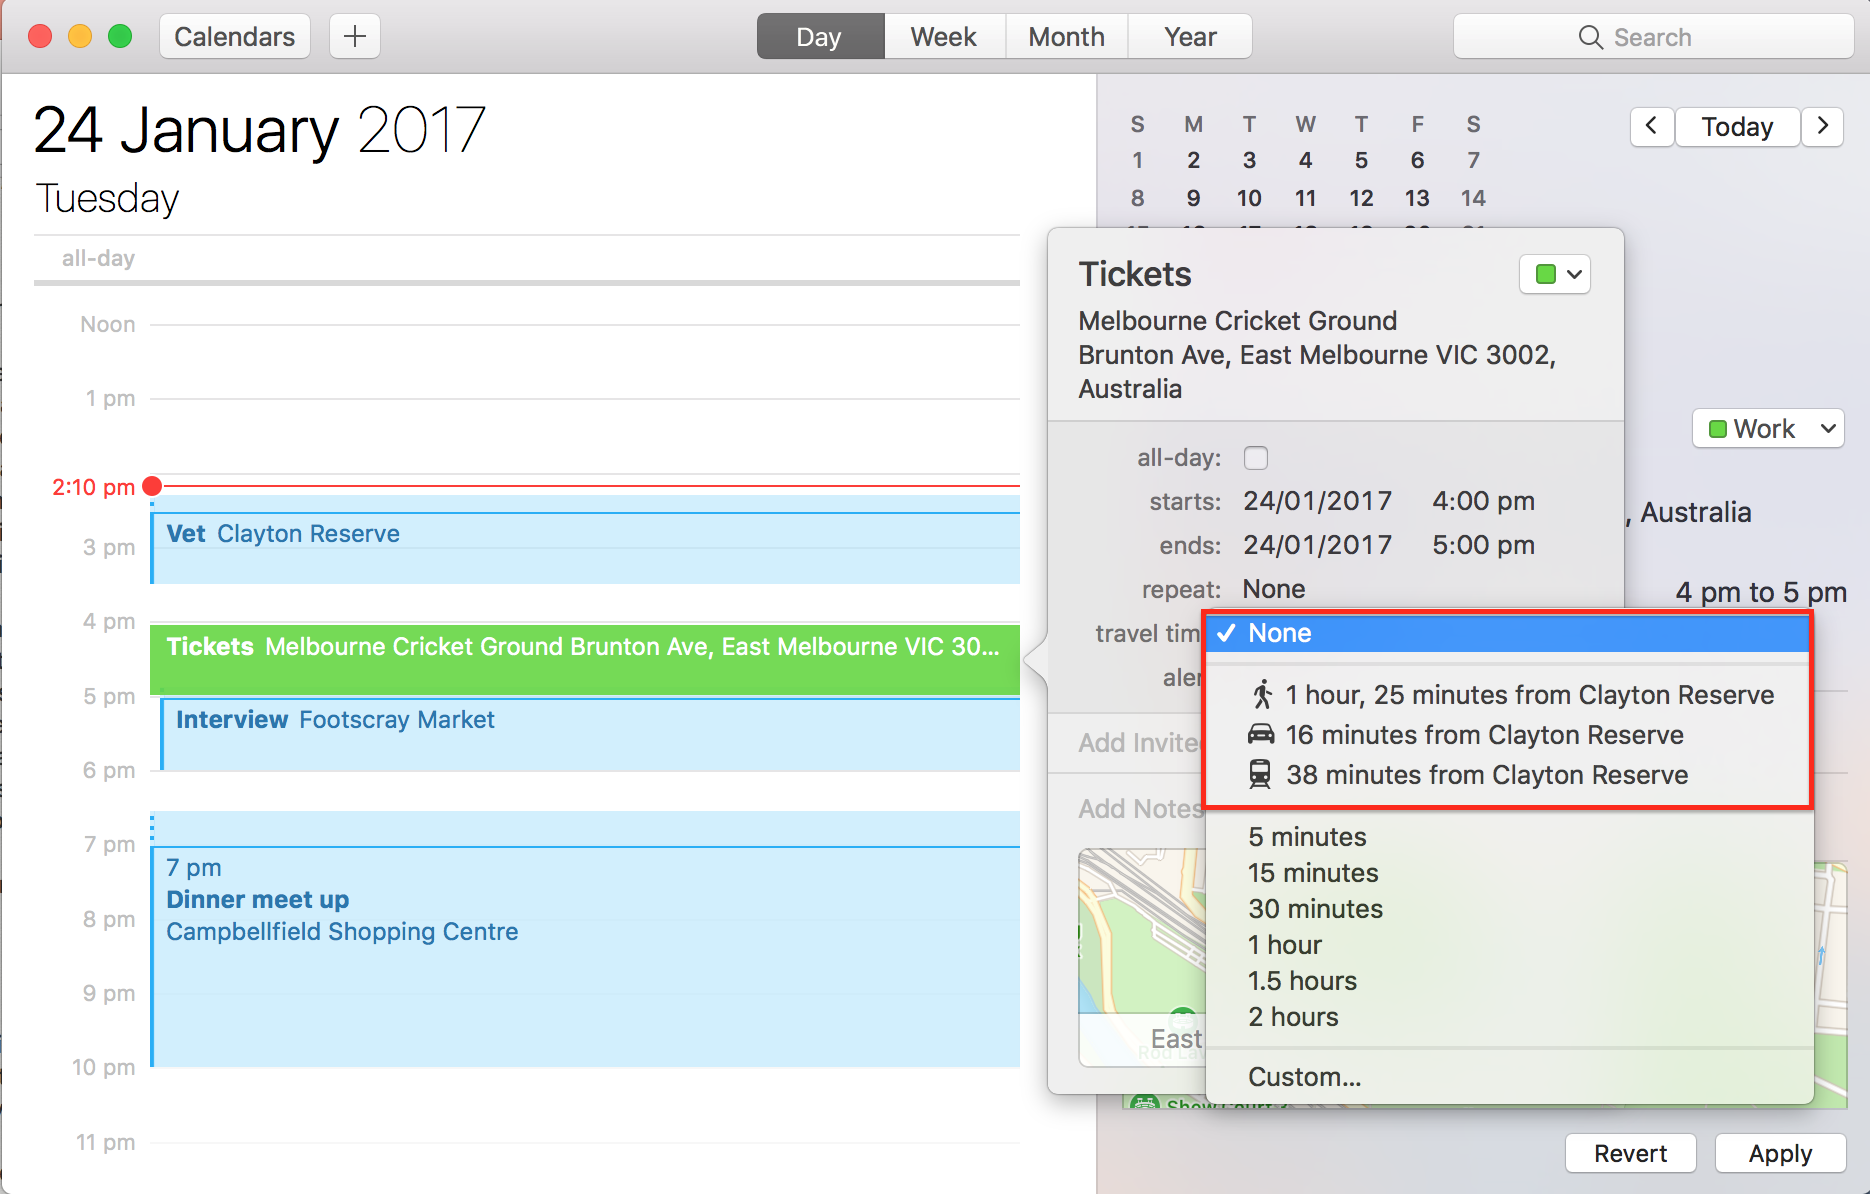
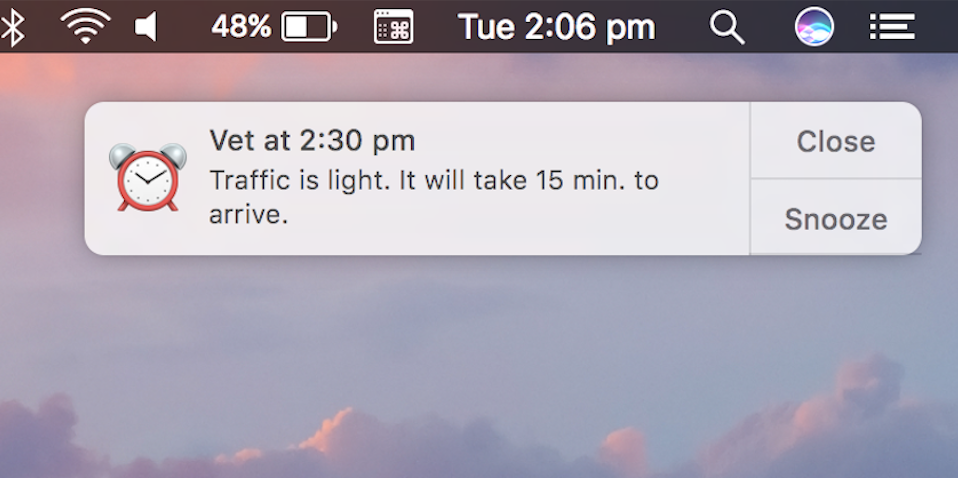
5) Click apply and your Mac will notify you whenever you need to get up from your last appointment, intelligently taking into account changing traffic conditions and alerting you if you need to leave earlier.
To reiterate a point made earlier, if you do not have a location-based appointment scheduled prior to the entry you are currently working on, the Travel Time bracket is not going to automatically generate an approximate travel time until you actually click it once. In that event, as soon as you hit Travel Time, it is going to calculate the travel time required from home, inferring this is your first event of the day.
Congratulations, you have made it to the end of it. Let me tell you that it takes a certain amount of discipline to perpetuate the habit of feeding the Travel Time bracket with your locations – but in the end it does save you some headaches and adds a lot of convenience to your day. If you are an avid Calendar user and have heaps of commitments day in and day out, on all accounts try to force yourself to make use of this feature.