iCloud Notes should sync across all your Apple devices – iPhone, iPad, and Mac. Plus, they should also be available on the web at iCloud.com. But, if your notes stored in iCloud are not syncing across your other devices, here are the solutions to fix this problem.
First, know where your notes are saved
This is an important section to ensure you don’t lose your existing notes. So, please read carefully.
Your iPhone, iPad, and Mac can create and store notes in three places – iCloud, third-party accounts like Google, and locally on the device.
While setting up their iPhone or Mac, a few people do not sign in using their Apple ID. They keep taking notes which are saved locally to their device. Local notes do not sync to other iPhone, iPad, or Mac.
Before proceeding, you must know where your notes are saved. To do that:
On iPhone or iPad
Open Settings > Notes. Here do you see the “On My iPhone” Account enabled? If yes, that means some or all notes are also saved locally.
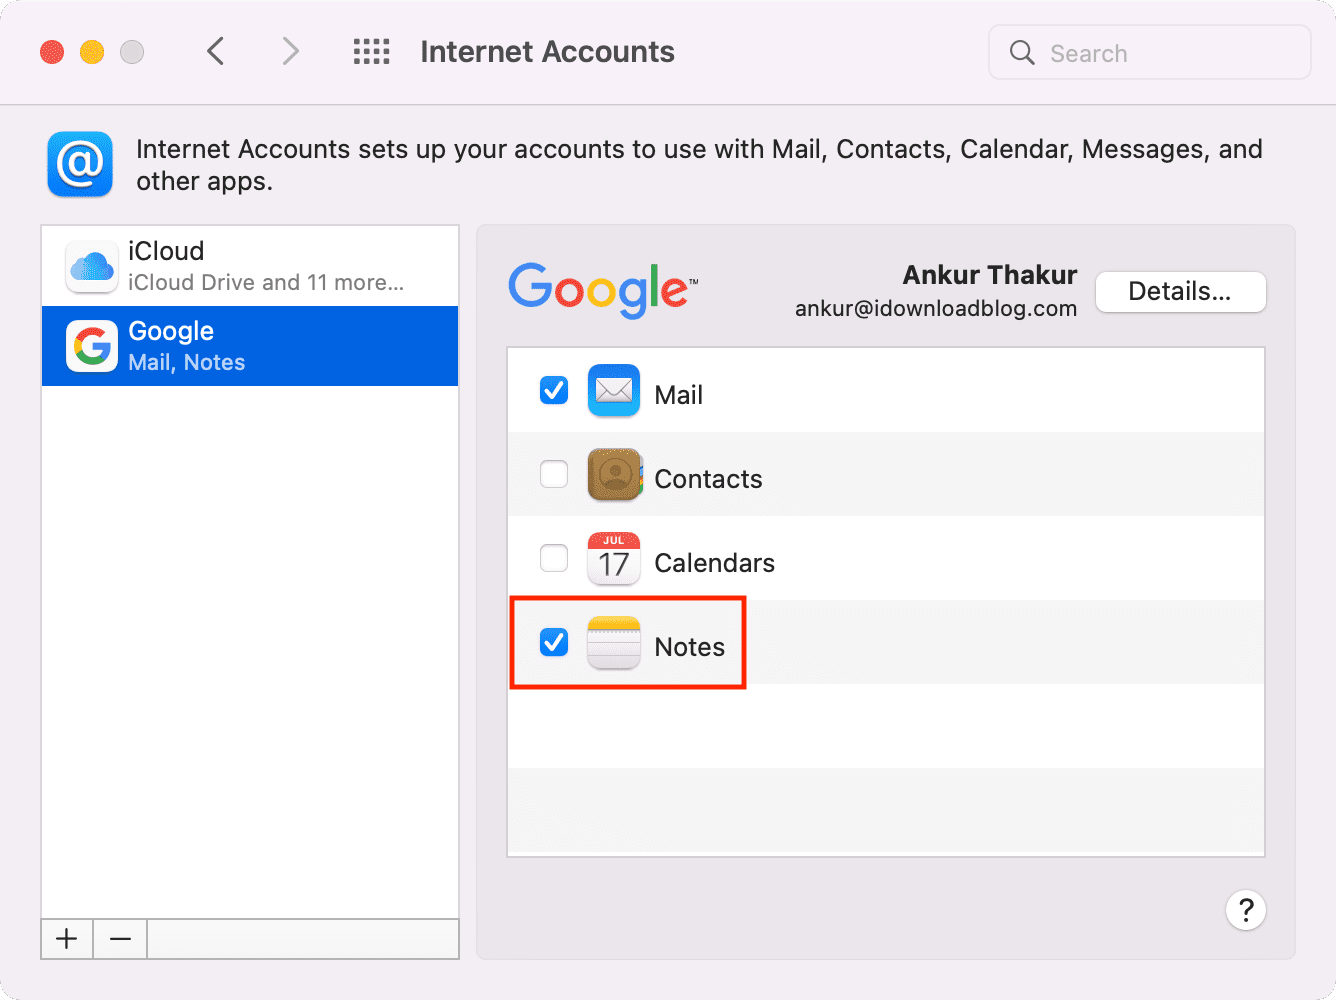
Next, tap Accounts > account name, and if its Notes toggle is green, that means this service (iCloud, Gmail, etc.) is enabled for creating and storing notes.
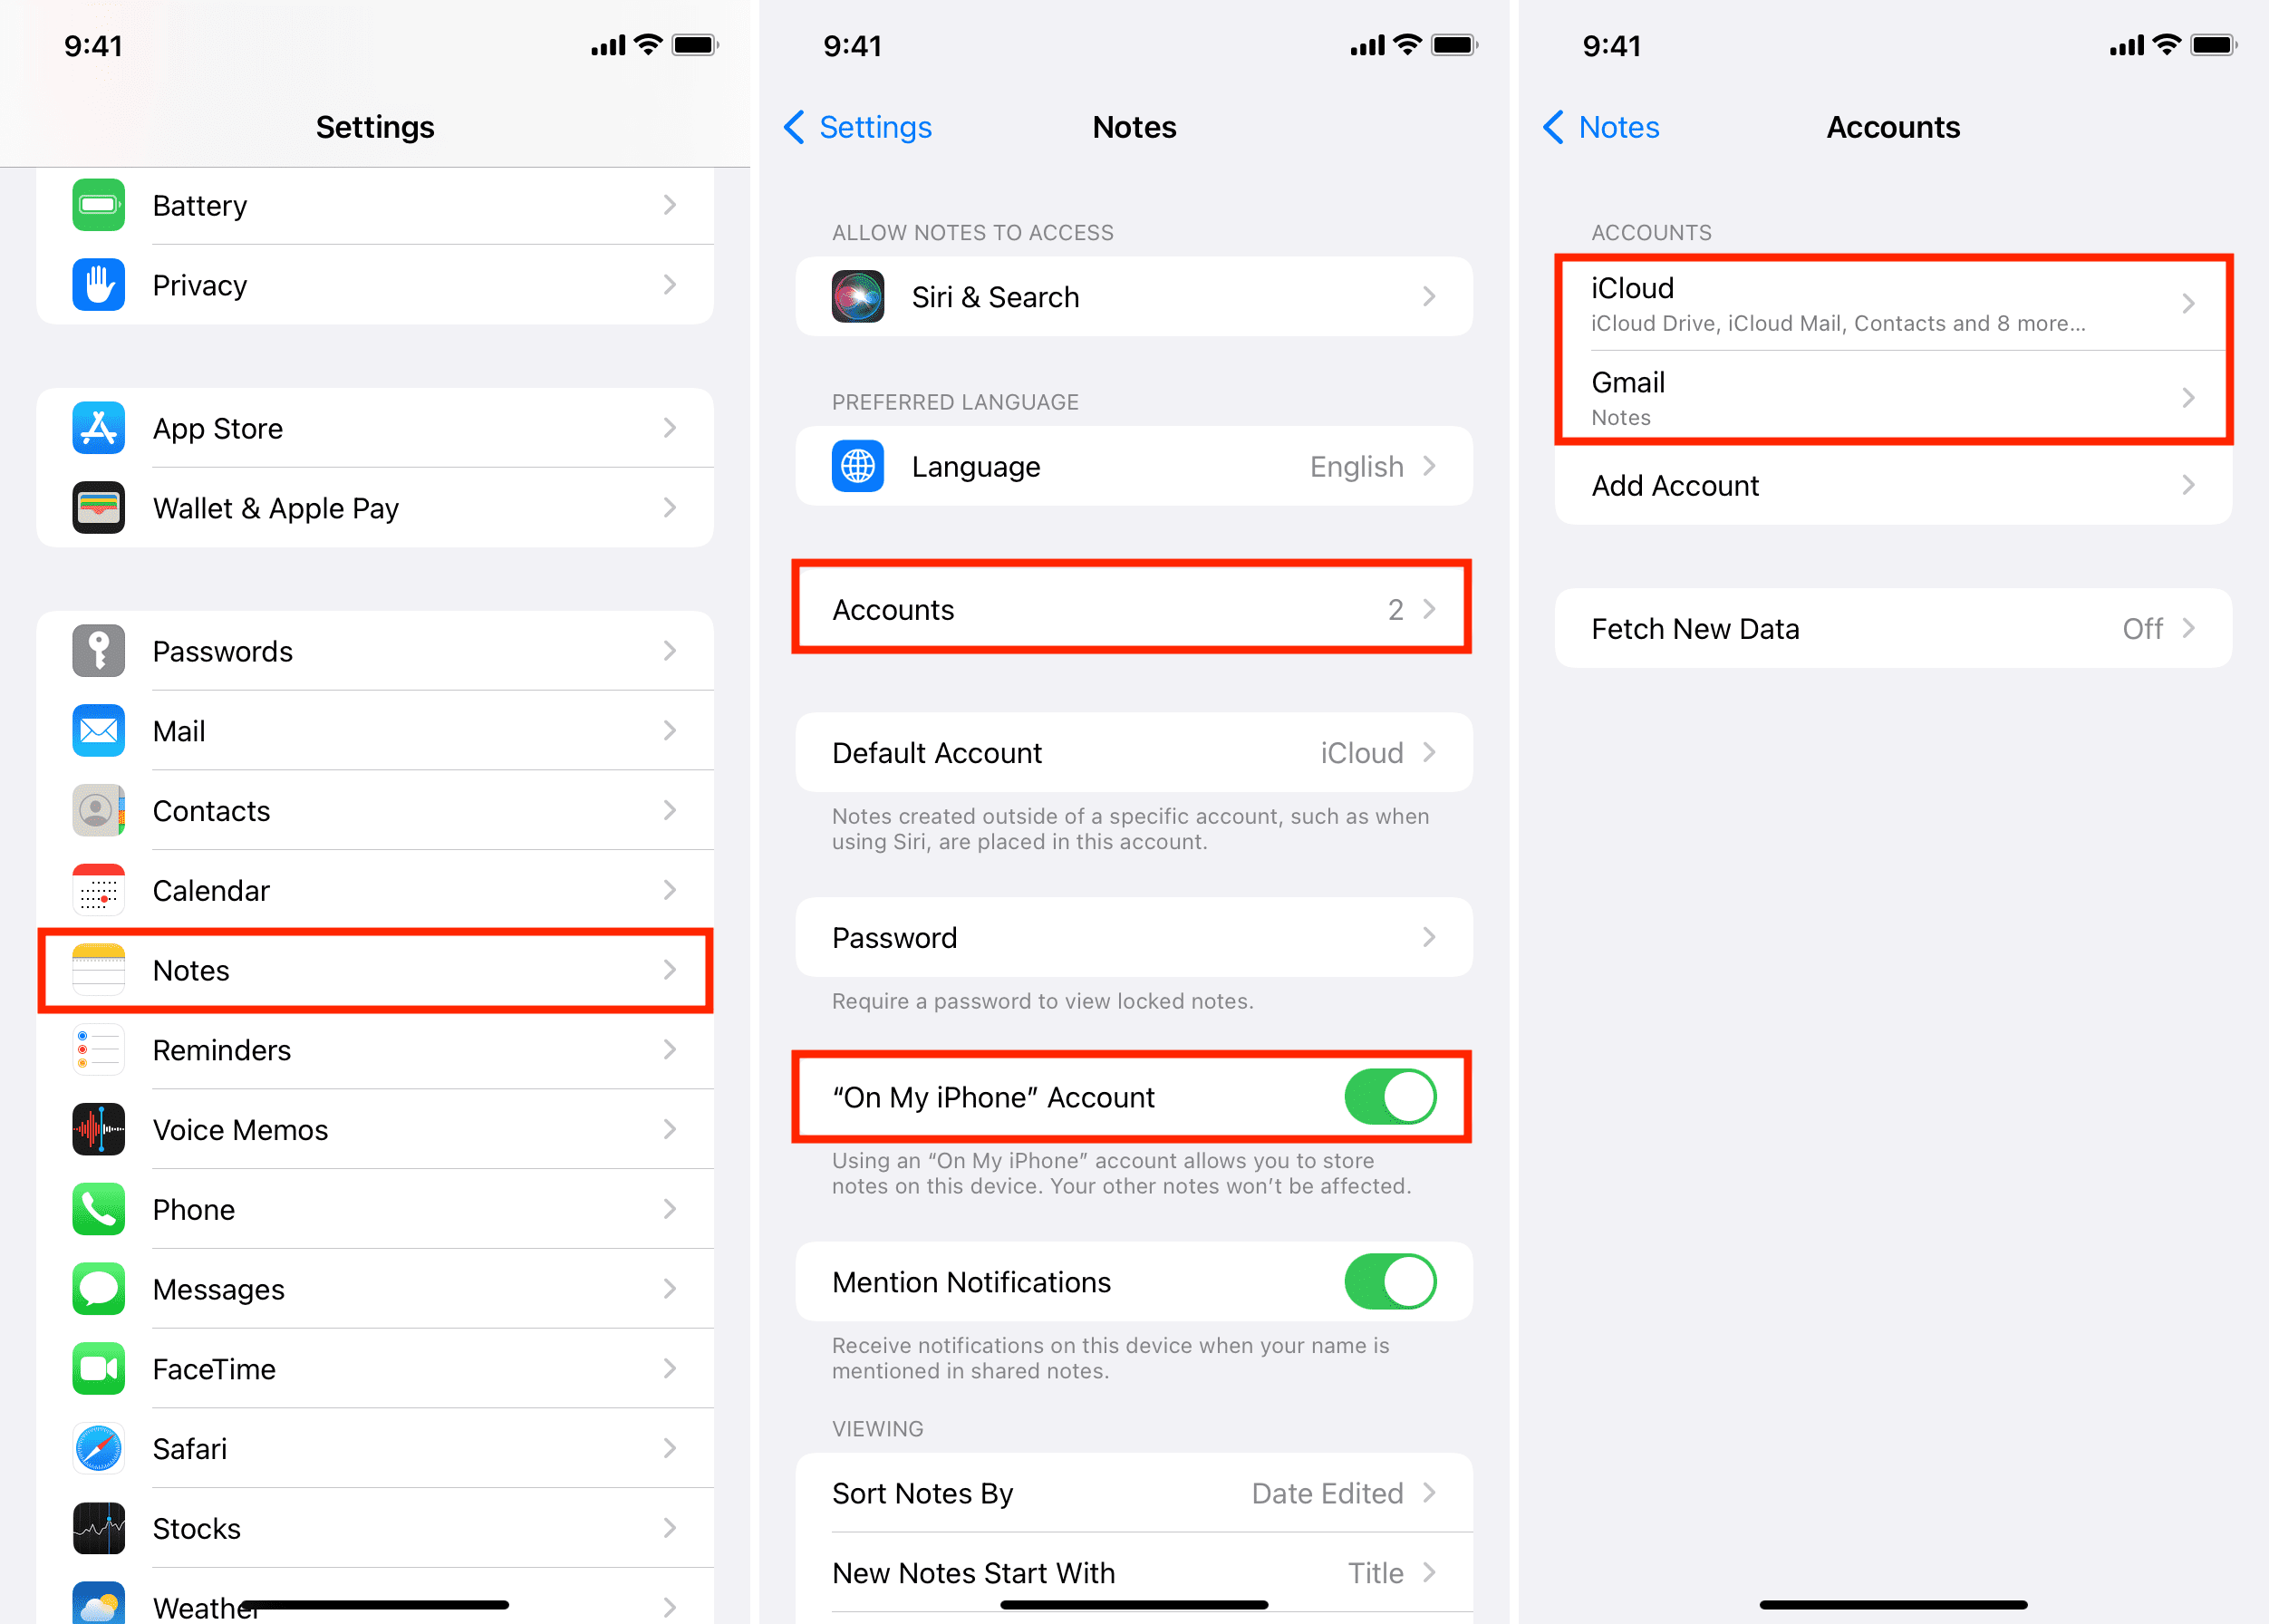
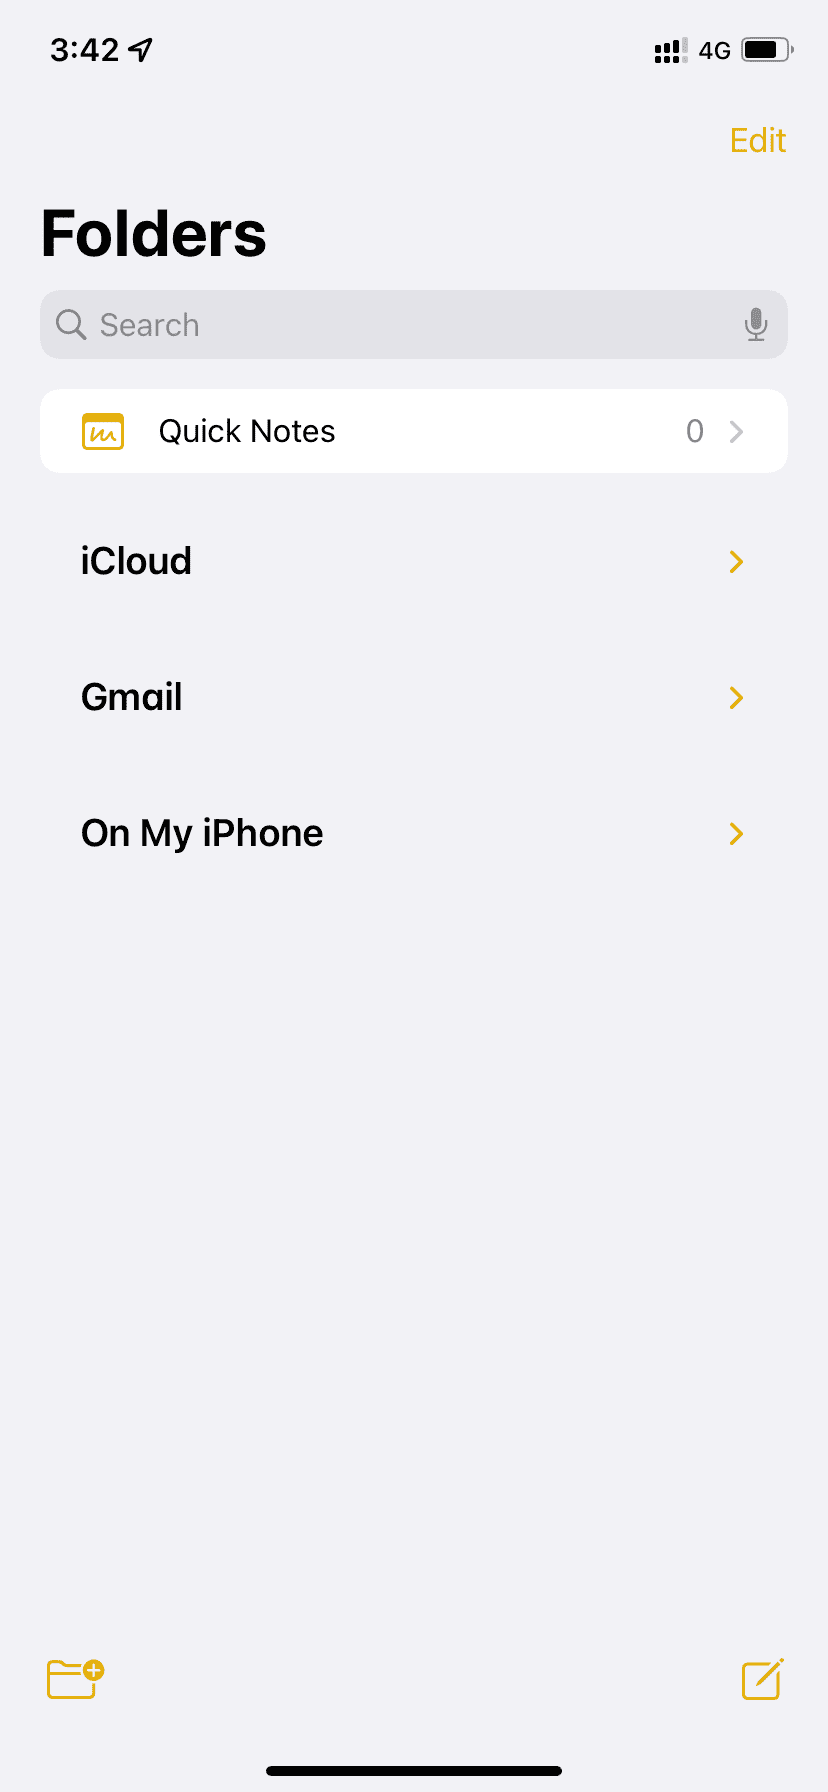
Next, open the Notes app and tap < Folders from the top left if required. This will display all the places your Notes app can save the notes you take. In the screenshot below, you can see that I can create notes in iCloud, Gmail, and On My iPhone. If you have not enabled the “On My iPhone” Account or added a Gmail account, you will only see iCloud here.
On Mac
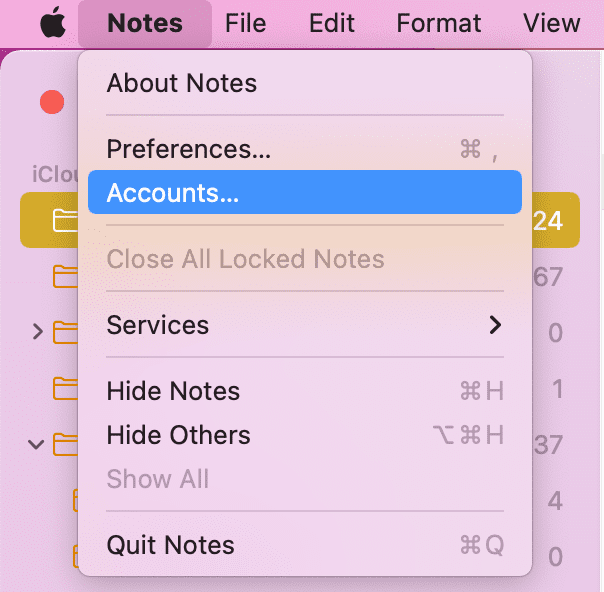
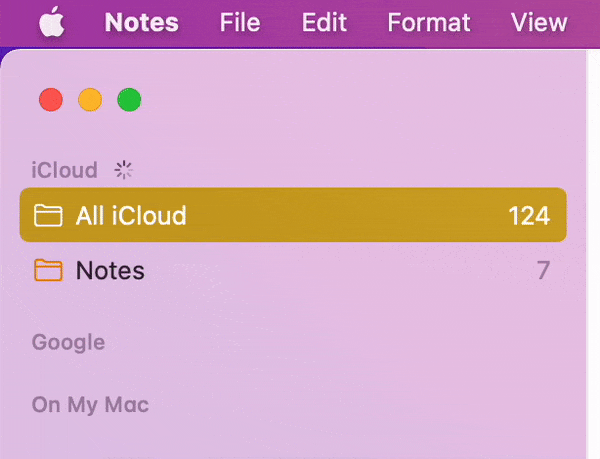
You can see the same information in your Mac’s Notes app. To know the exact account (iCloud, Google, etc.), go to the Menu Bar and click Notes > Accounts.
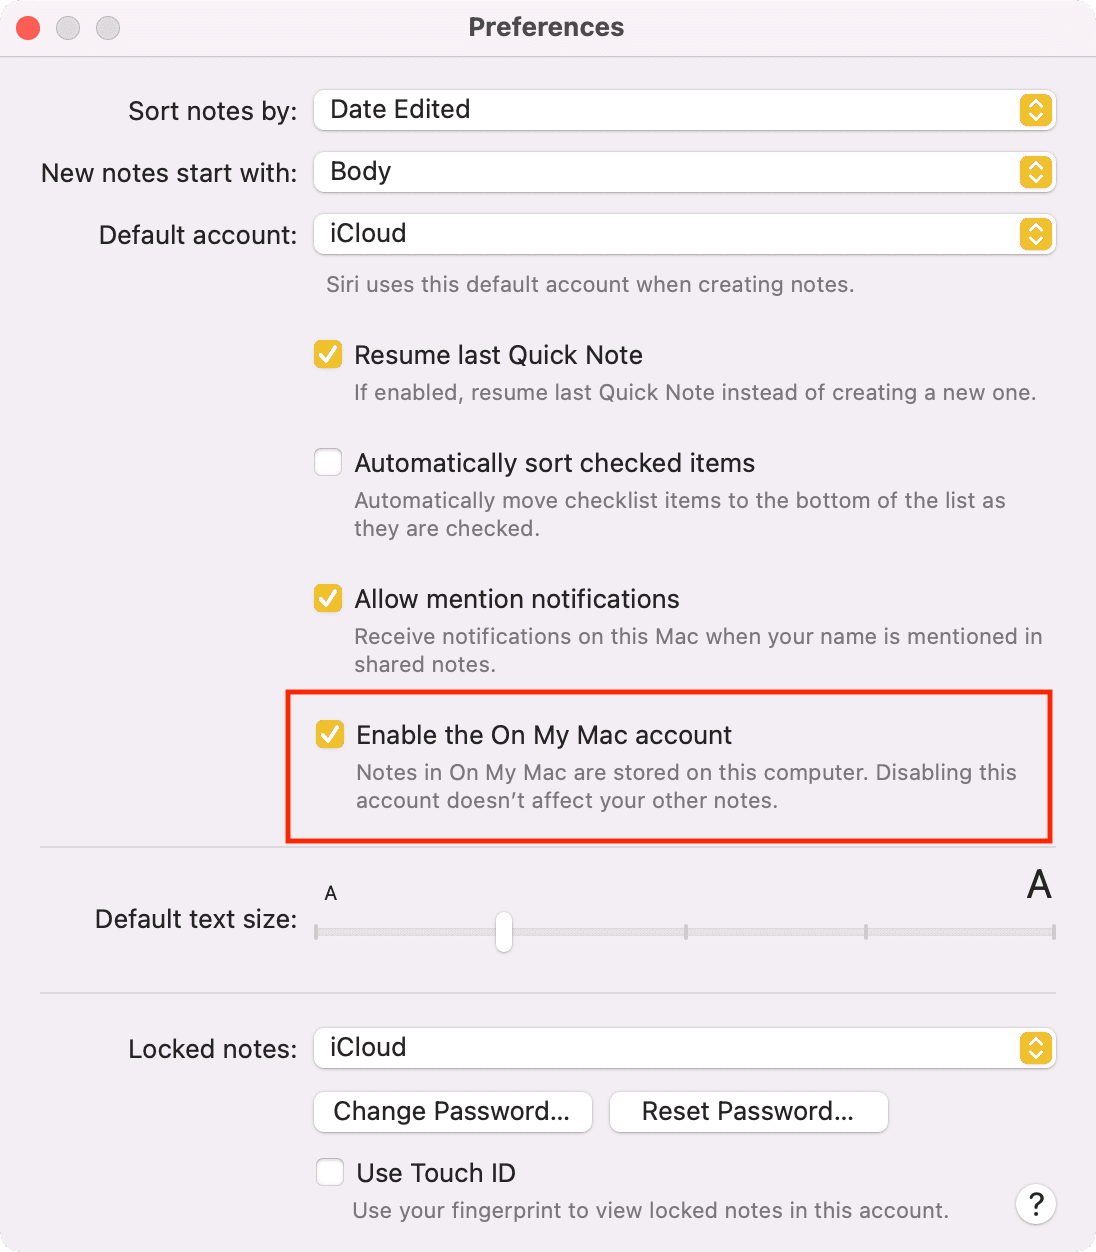
To see whether the local On My Mac Account is enabled or not, open the Notes app and press the Command + comma (,) keys. Here, you can see if you have checked “Enable the On My Mac account” or not.
How to fix iCloud Notes not syncing on iPhone, iPad, Mac
Here’s what to do if your iCloud Notes aren’t syncing correctly.
1. Ensure iCloud Notes is enabled on all devices
iCloud Notes must be enabled on all your different devices, and then only notes can sync. Here’s how to do that.
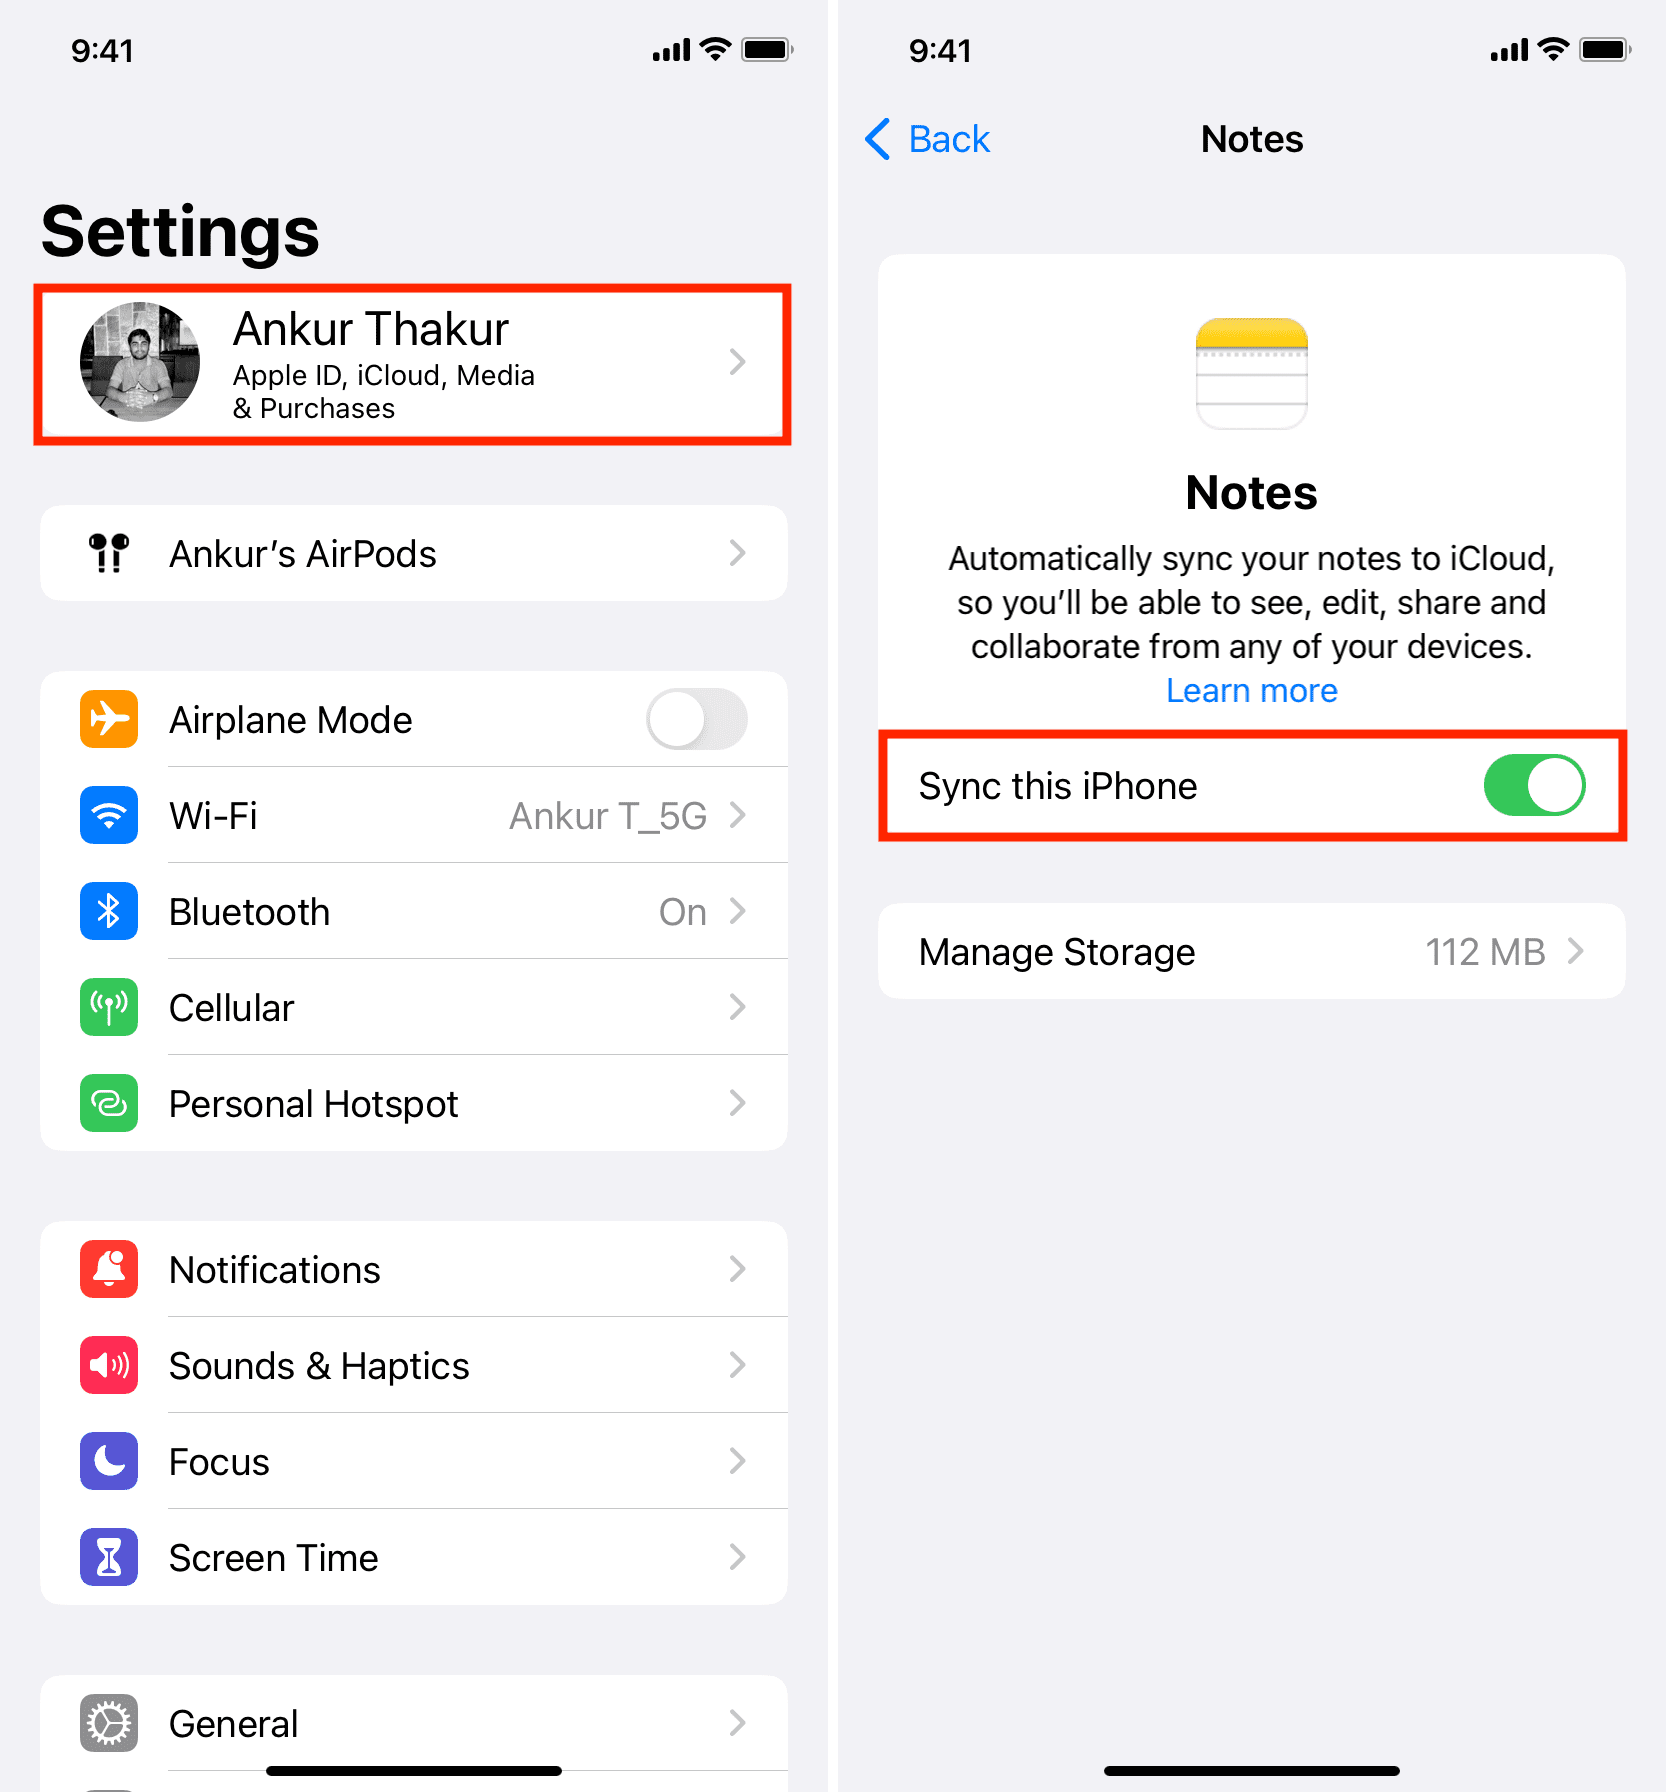
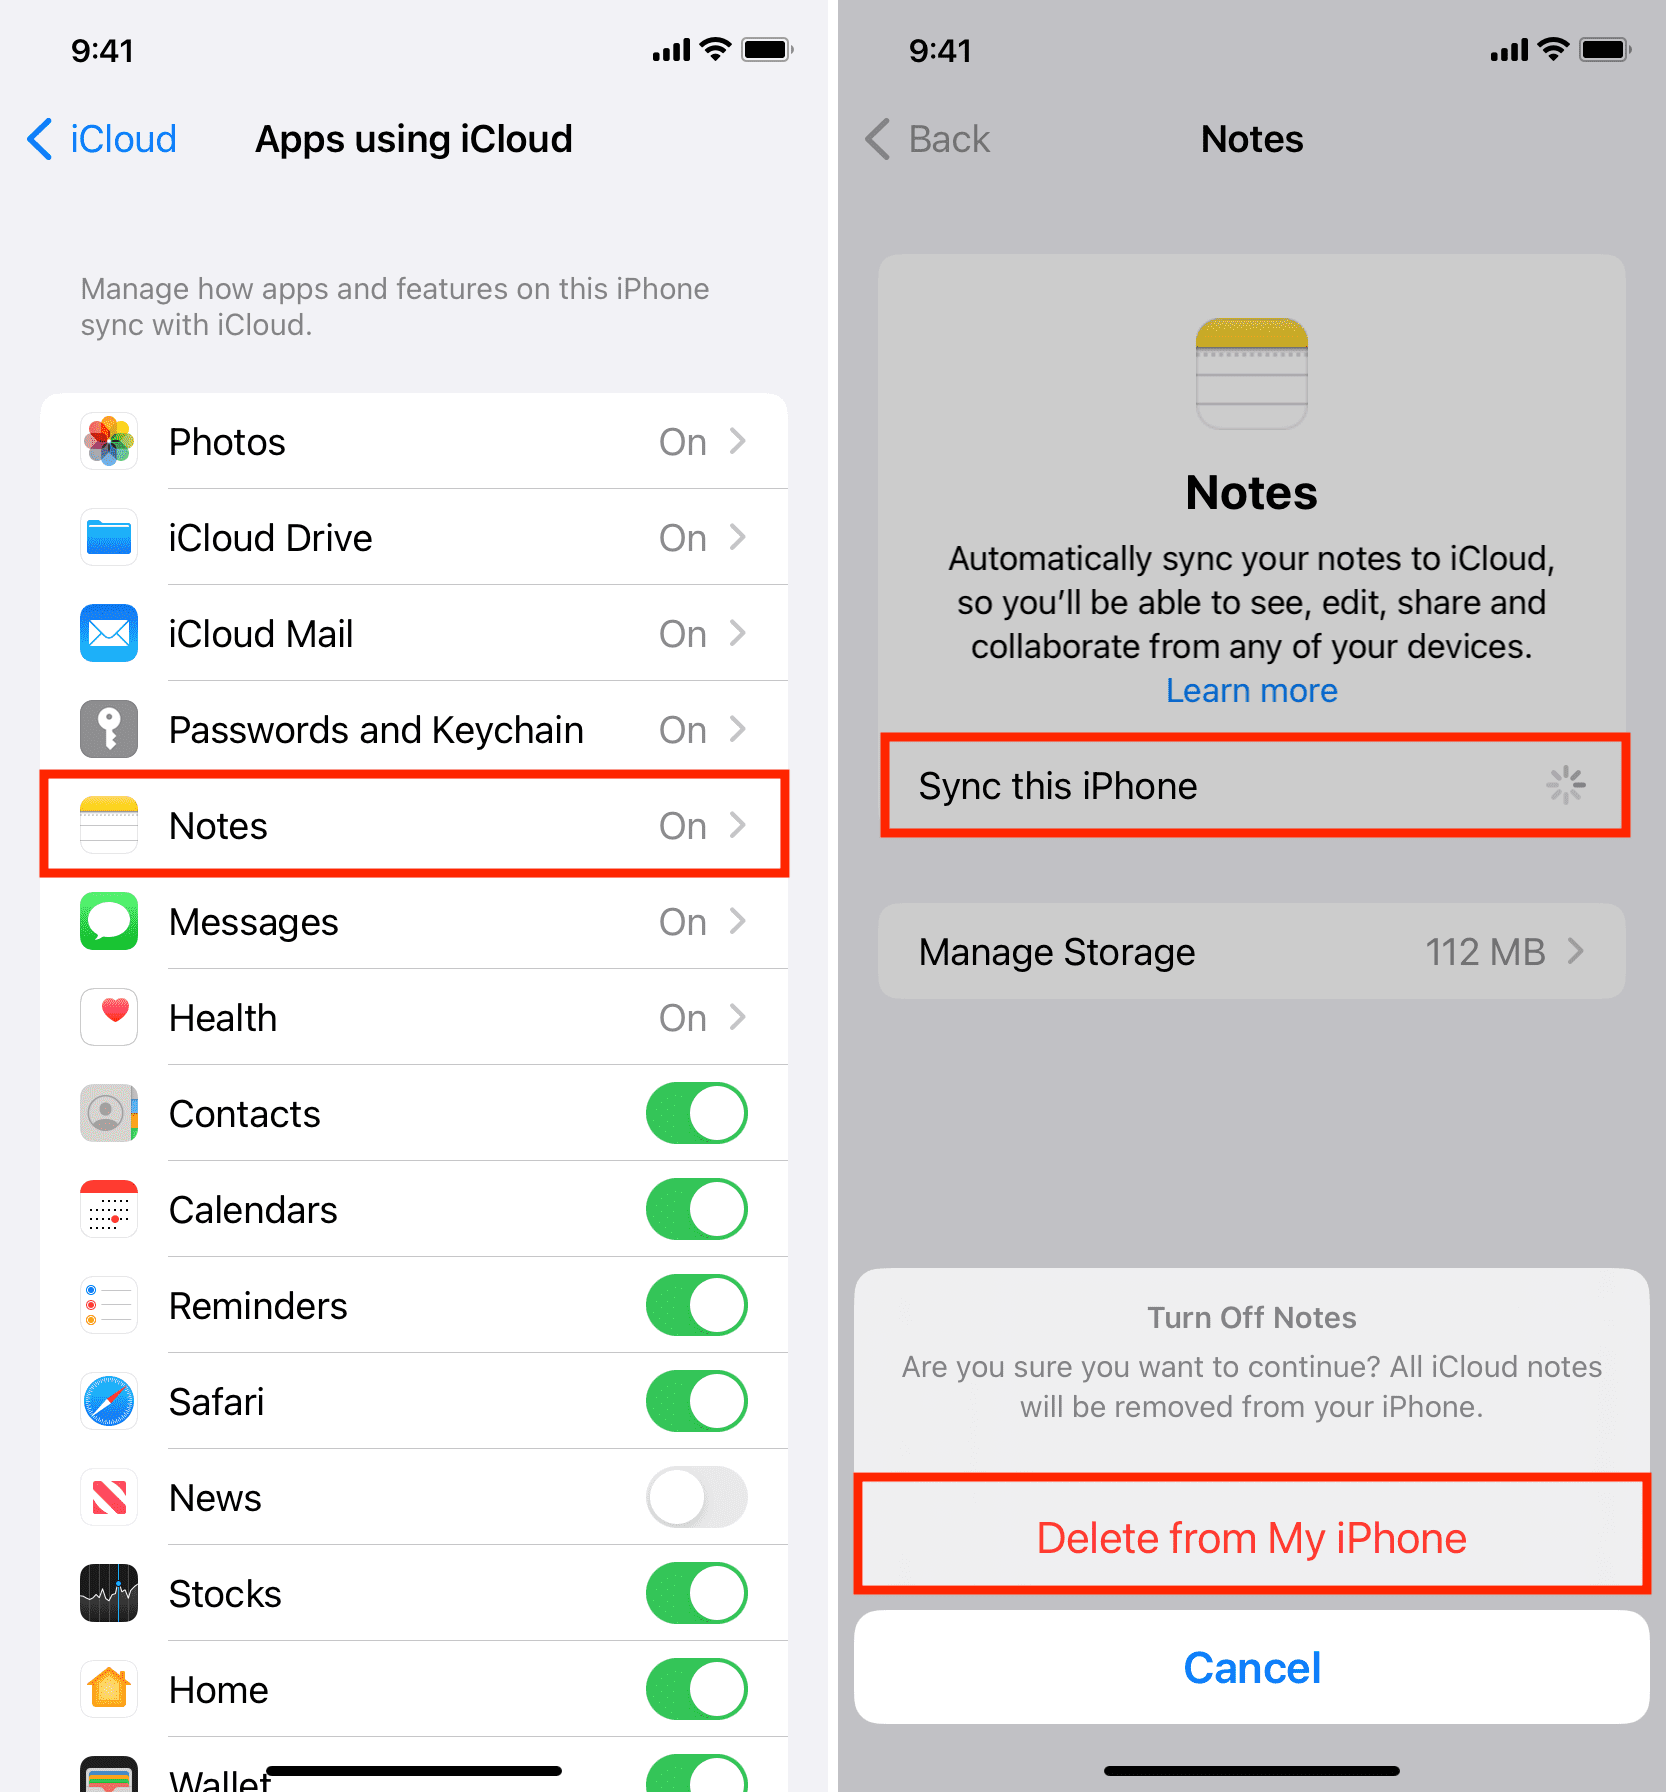
On iPhone and iPad: Go to Settings > your name > iCloud > Show All > Notes and enable the switch for Sync this iPhone.
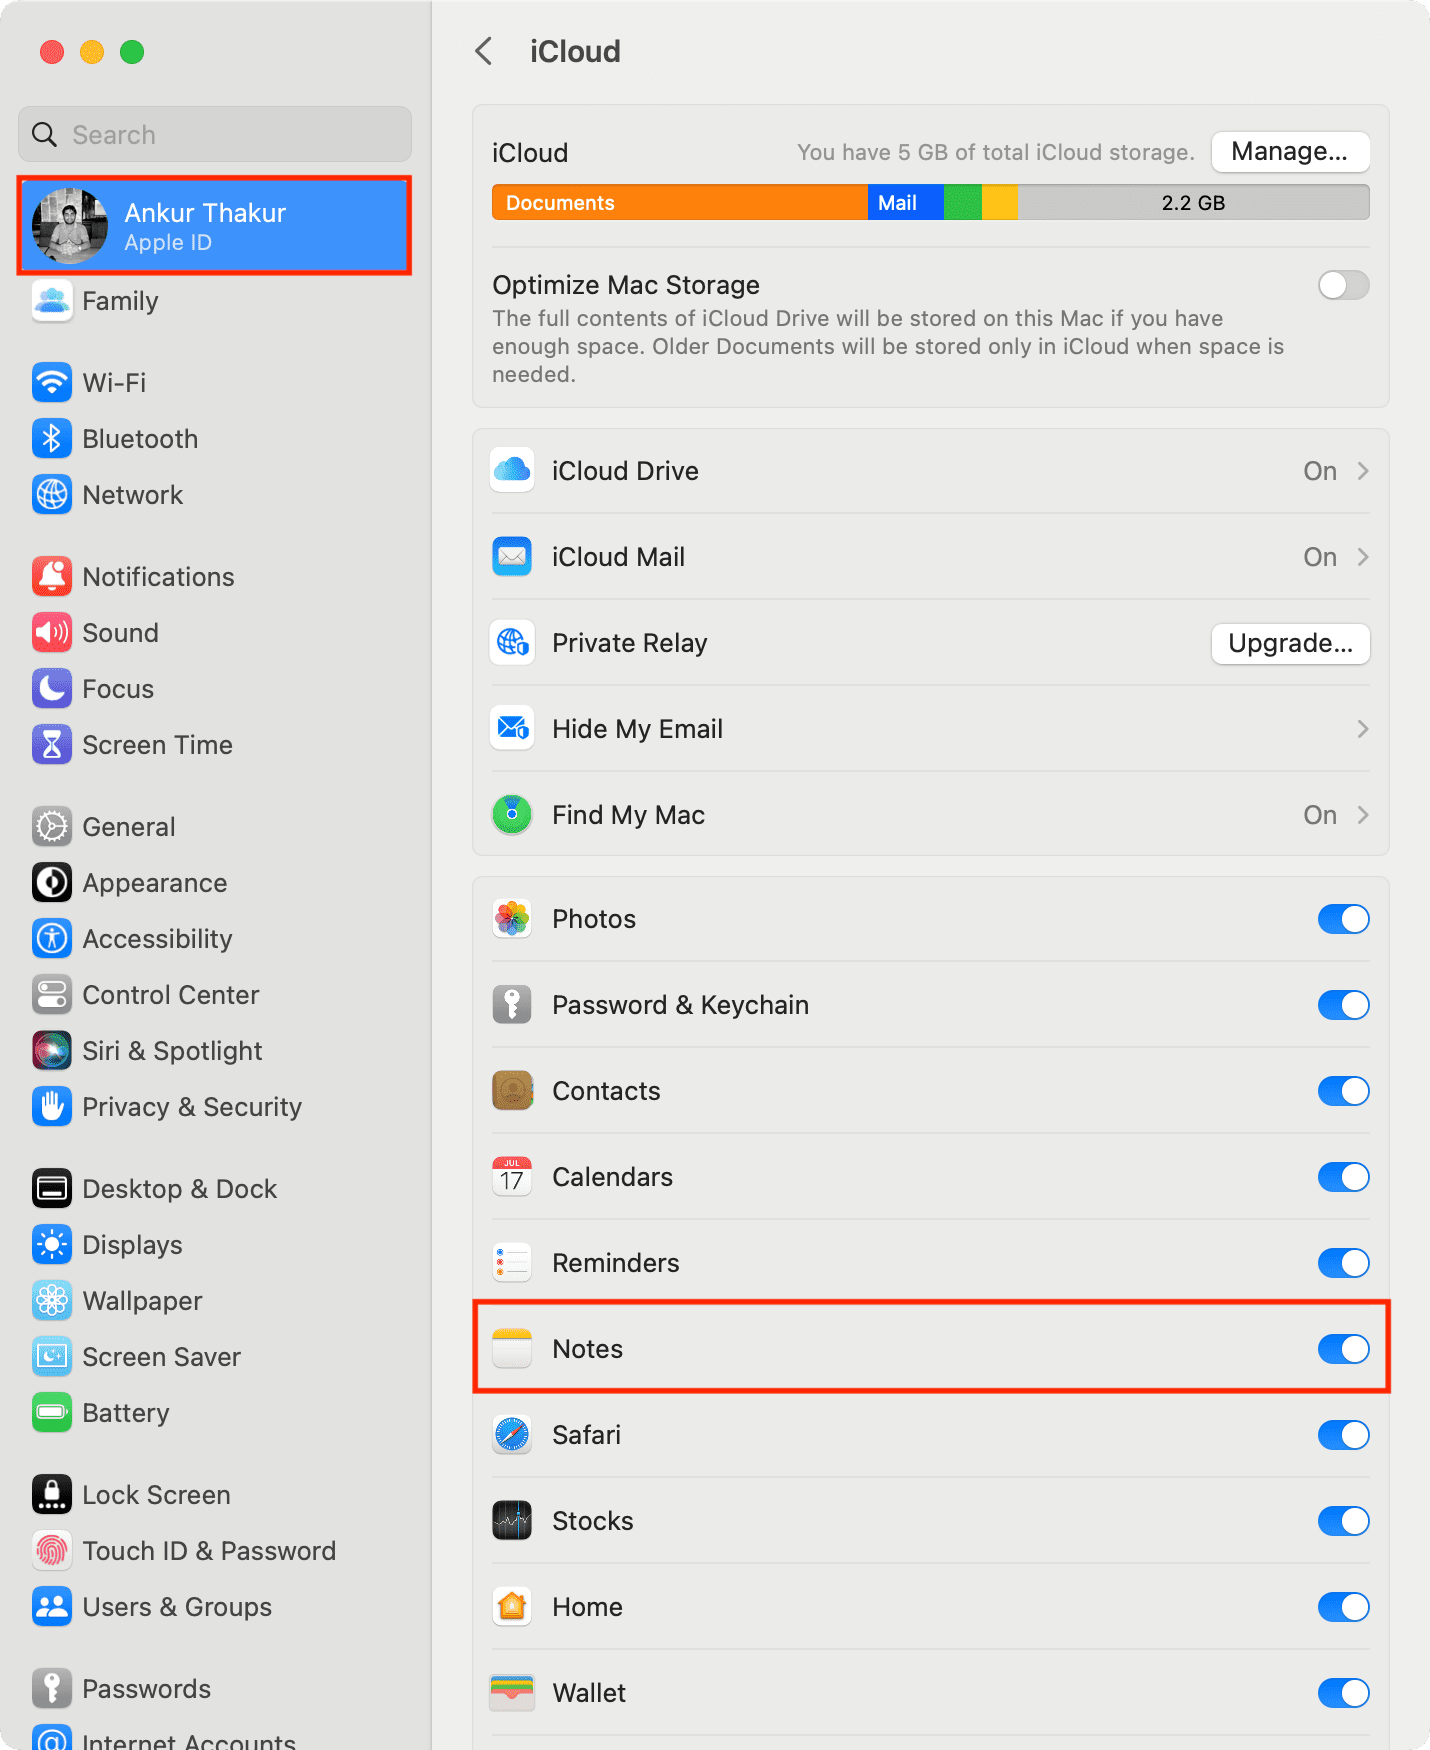
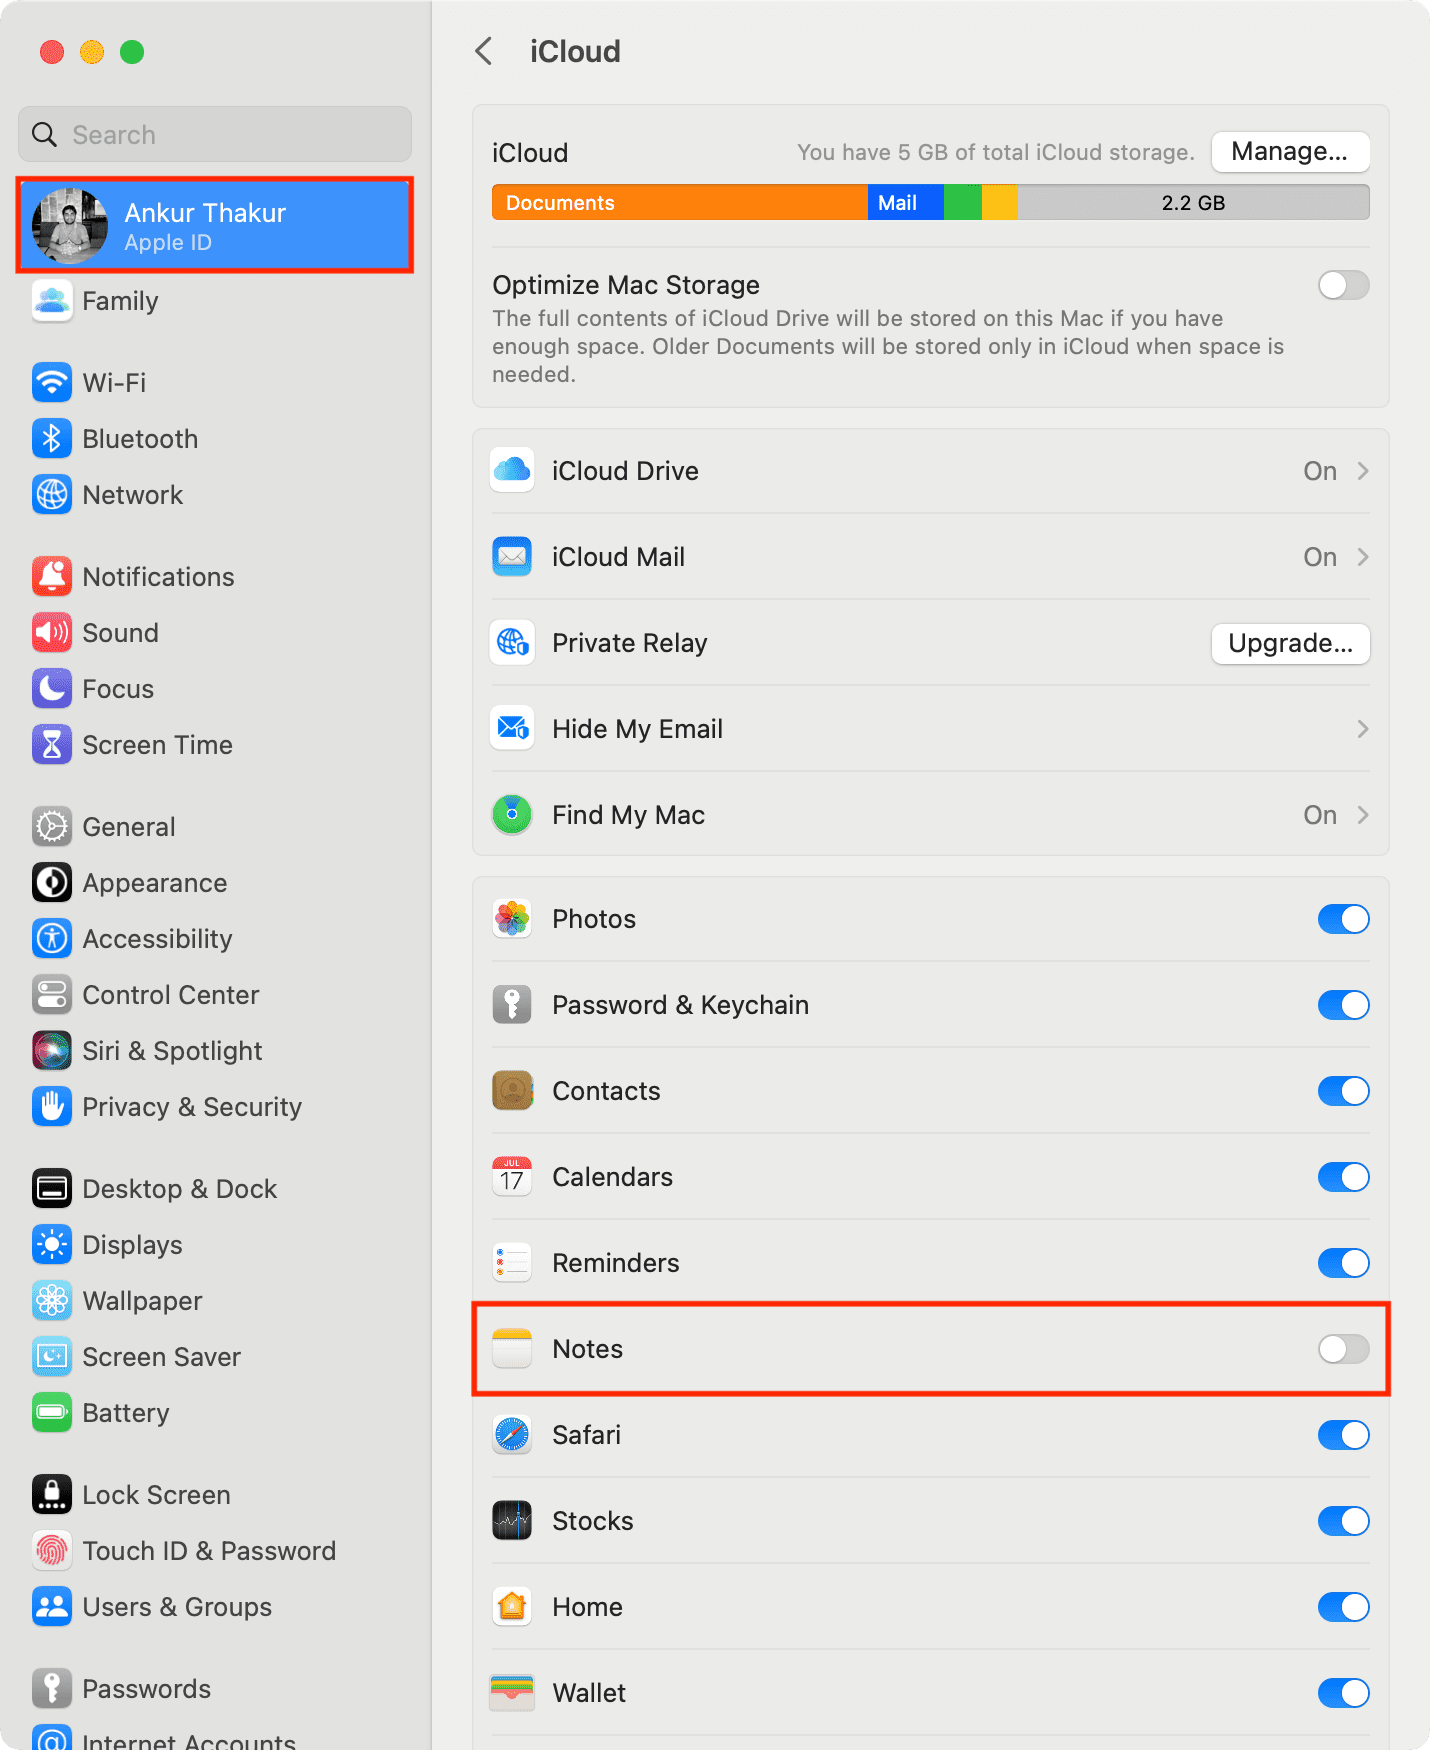
On Mac: Click the Apple icon > System Settings or System Preferences > Apple ID > iCloud and enable the switch for Notes.
Take care of other notes
Suppose you had added your Google account to your iPhone and enabled Notes. Now, if your notes are saved to your Google account, then you have two options:
- Move the notes in Google to your iCloud (steps below), or
- Add the same Google account on your other Apple devices by following these steps:
On iPhone and iPad: Go to Settings > Notes > Accounts > Add Account > Google and sign in with your same Google account. Once signed in, make sure to keep the Notes switch green.
On Mac: Open the Notes app and from the top menu bar, click Notes > Accounts > Add Account or the plus icon > Google and sign in with your Google account. Once that’s done, make sure Notes is checked.
2. Move local notes to iCloud
Keep in mind that only your notes in iCloud and Gmail sync across devices. You don’t need to back up your notes saved in cloud services as one copy of these notes is already on Apple or Google servers. Even if you remove these accounts from your device and sign in again, these notes will re-sync.
Note: I said to remove the account (steps below) and not delete the notes. If you delete a note from one device, it will be deleted from everywhere. So, avoid deleting individual notes from the Notes app.
On My iPhone, On My iPad, or On My Mac notes do not sync to other devices. To back up and sync these, you’ll have to move them to iCloud. Here’s how to do that. These steps also help you move notes stored in Google or elsewhere to iCloud.
On iPhone and iPad:
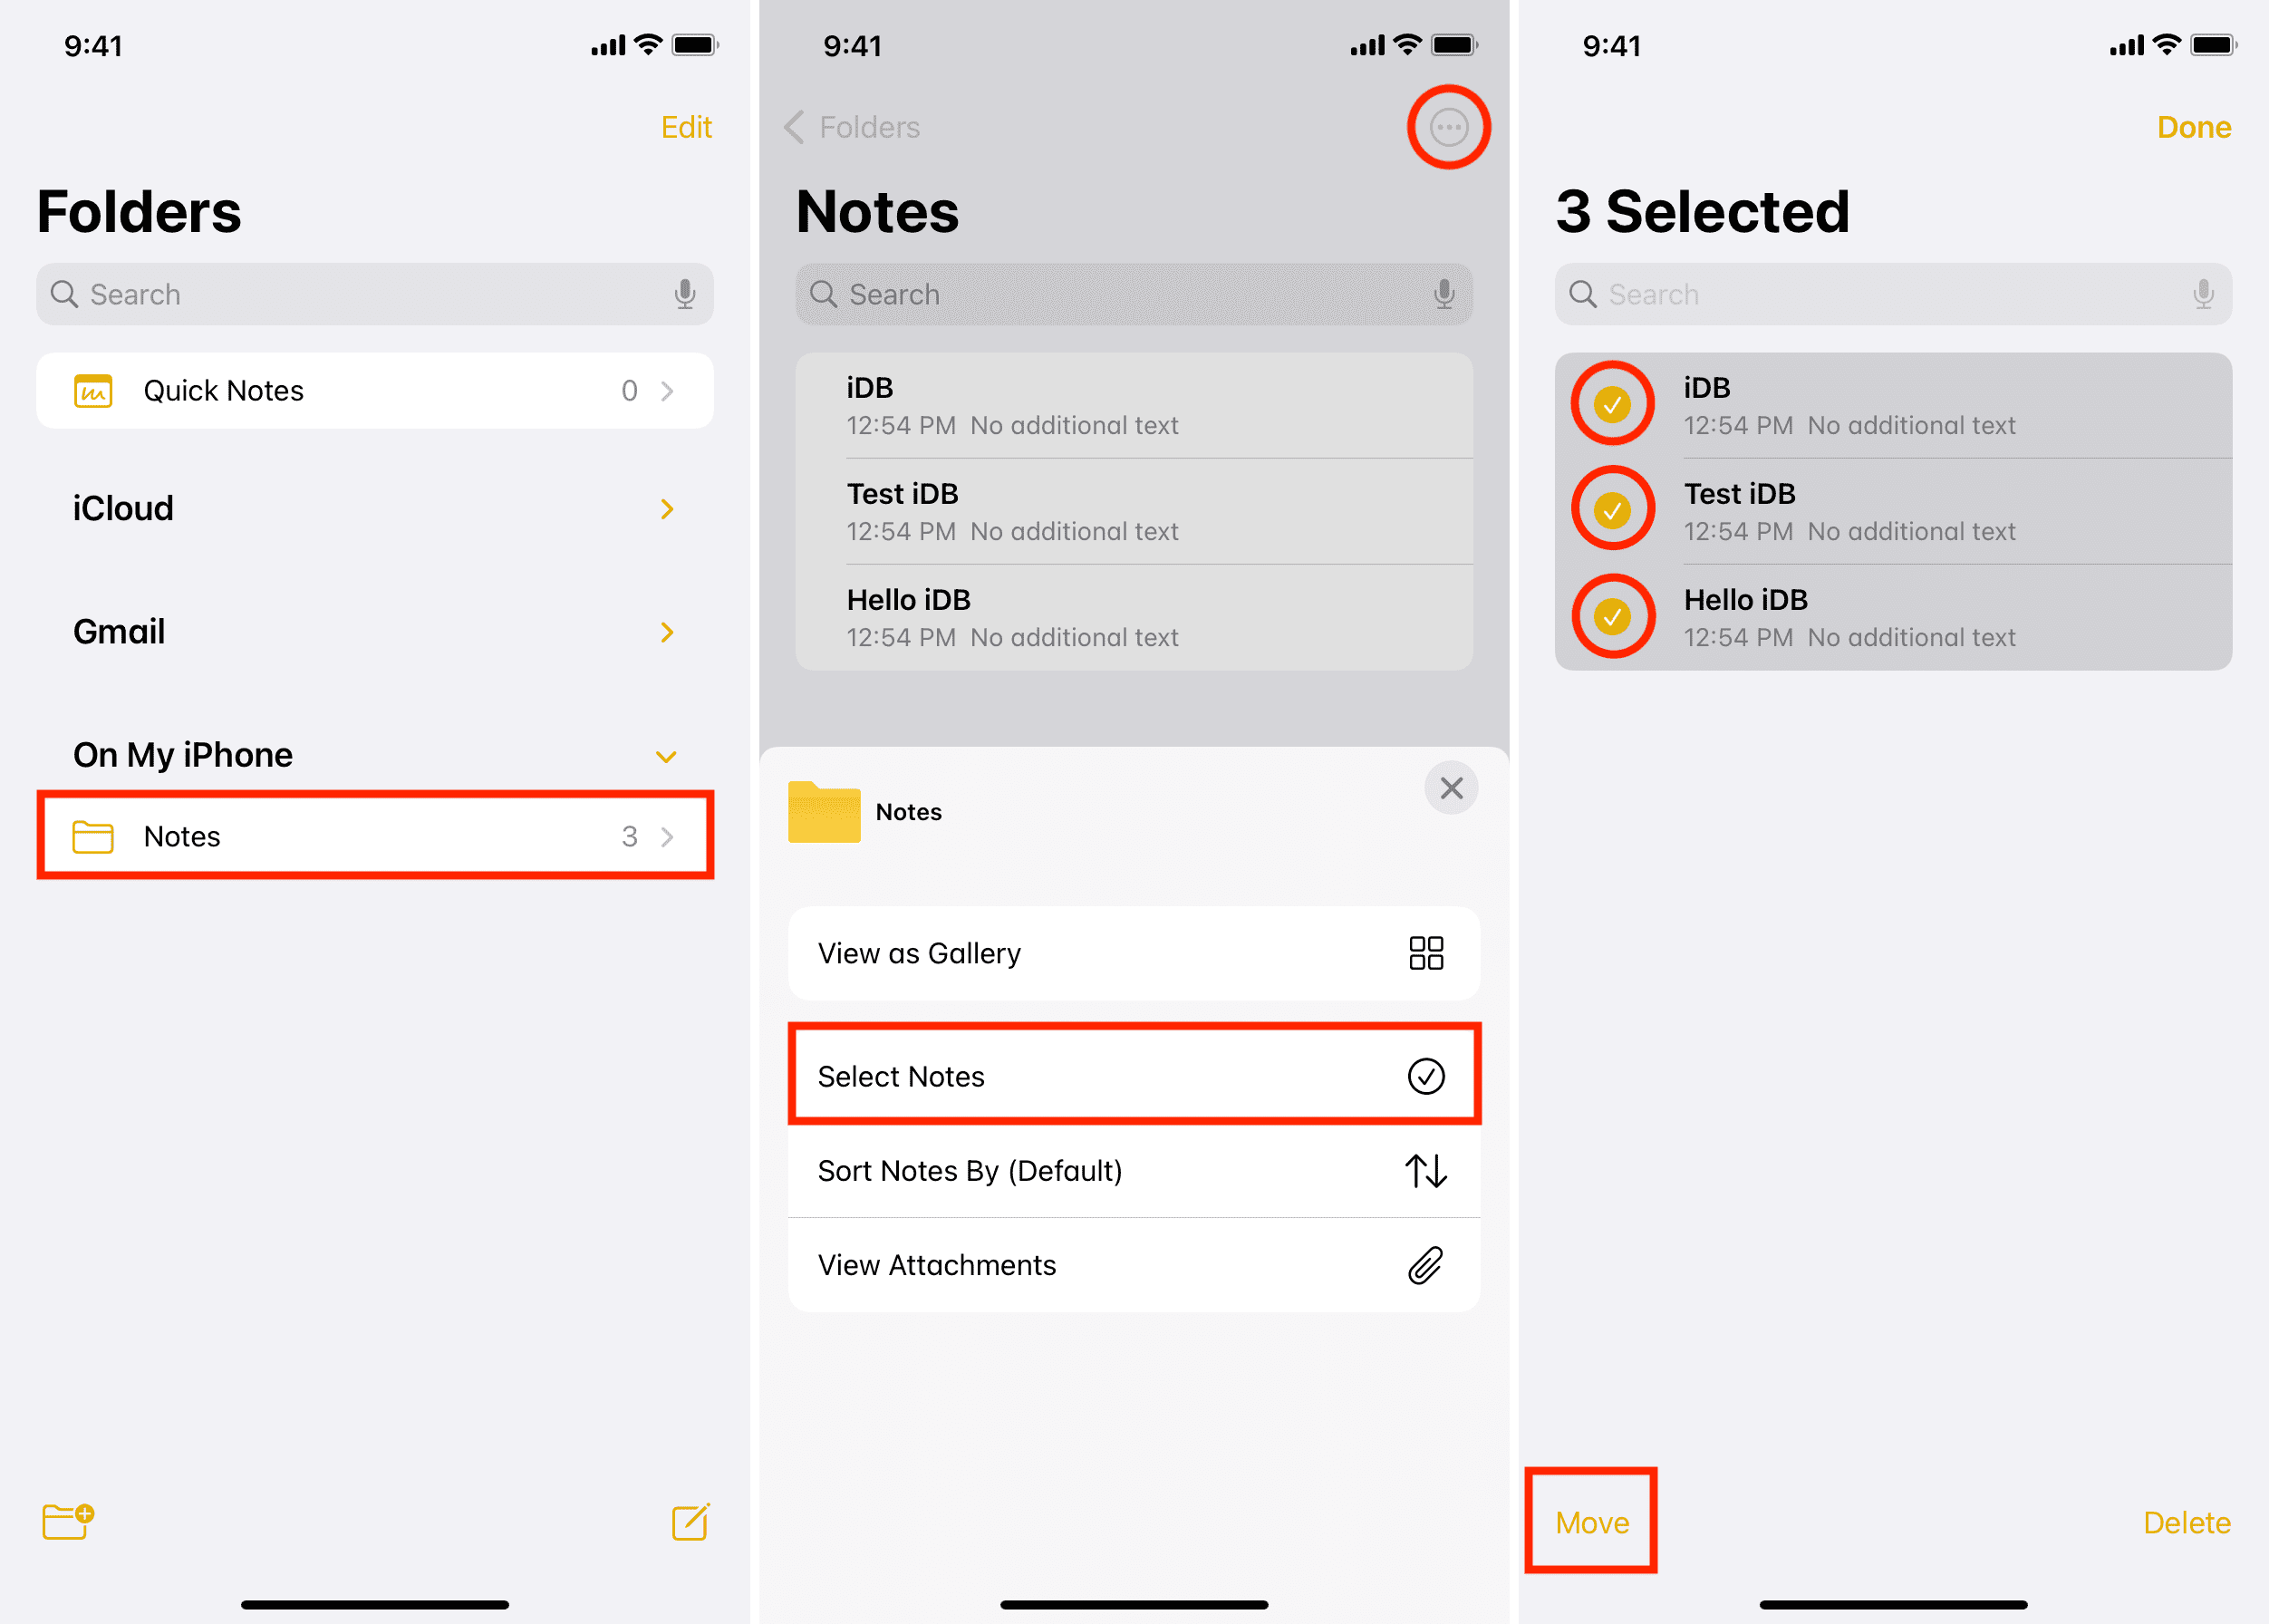
- Open the Notes app and tap <Folder.
- Below On My iPhone, tap Notes.
- Tap the more icon (three dots inside a circle) and choose Select Notes.
- Now, select all the locally stored notes and tap Move.
- Tap an existing folder under iCloud or create a new folder. The selected notes will now move to iCloud, from where they will sync to all your other devices.
On Mac:
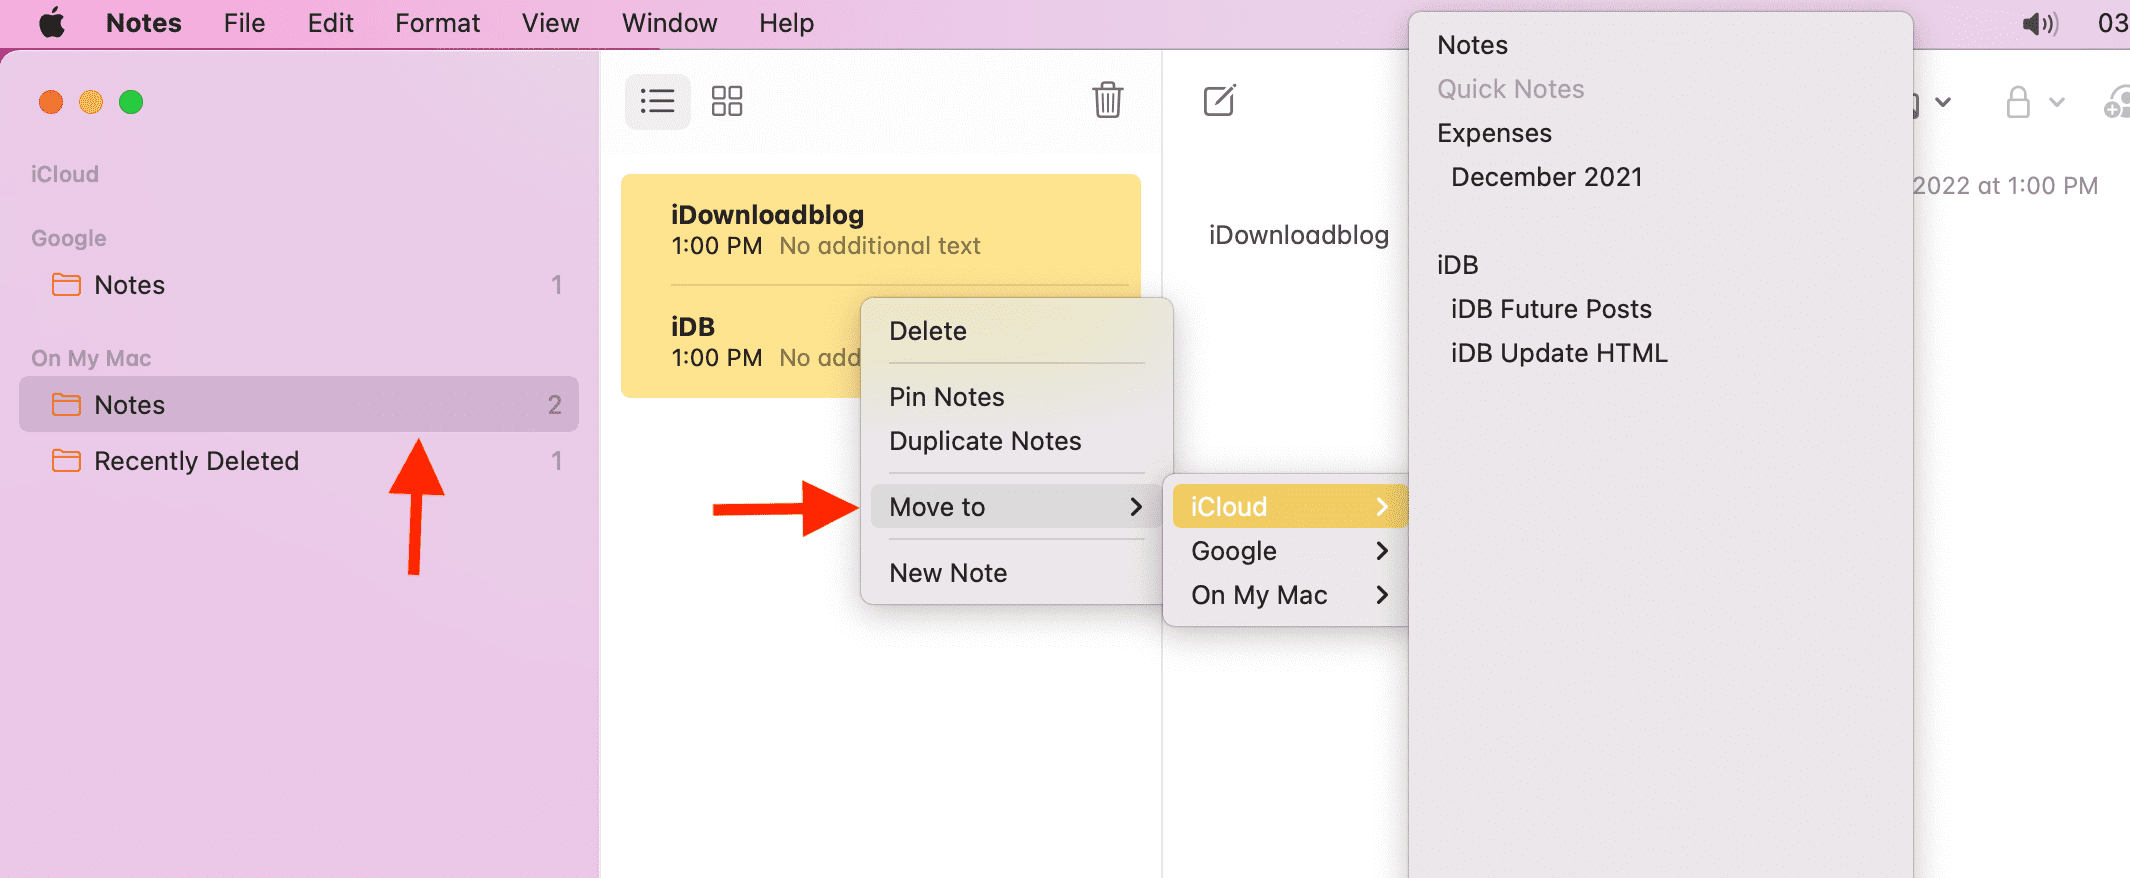
- Select notes under the On My Mac section. You can press Command + A to select all or hold the Command key and select the desired notes one by one.
- Drag the selected notes under iCloud. Or, right-click > Move to > iCloud and select a folder.
You have successfully moved your local notes to iCloud. They should now upload to Apple servers and be available on all your devices. But it will take a while. So, make sure your iPhone, iPad, and Mac, where you followed the above steps, are connected to the internet.
After a minute, check if these notes have been uploaded to iCloud or not. Here’s how to do that:
- Go to iCloud.com and sign in using your Apple ID.
- Click Notes. Give it a while, and you should see all your notes here. Carefully make sure the latest notes you see in the Notes app on your iPhone, iPad, and Mac are all visible in iCloud Notes on the web.
- Further, to check, create a new note in the iCloud section of your iPhone or Mac Notes app. After a minute, refresh the iCloud web page, and you should see the new note here.
3. Connect the device to the internet
For new notes to sync and be available everywhere, your devices – iPhone, iPad, Mac must be connected to the internet. To check this, play a YouTube video. If the internet isn’t working, follow these guides:
- Internet not working on your Mac? Here’s how to fix it
- What to do when your iPhone or iPad can’t connect to Wi-Fi
4. Turn off VPN
Are you using a VPN on your iPhone, iPad, or Mac? If yes, make sure to turn it off, as some iCloud services may not work well with a VPN.
5. Add and delete a note
Using the Notes app for the last nine years, I have developed a few tricks that work for me.
On my iPhone, the total number of notes is 1,115. But on my Mac, it just shows 1,112. This means a few new notes have not synced to my Mac. To fix this, I create a new note on my Mac. After 30 seconds, I delete this note. Doing this simple thing seems to force the system to fetch new notes. Give it a try and see if it works for you or not.
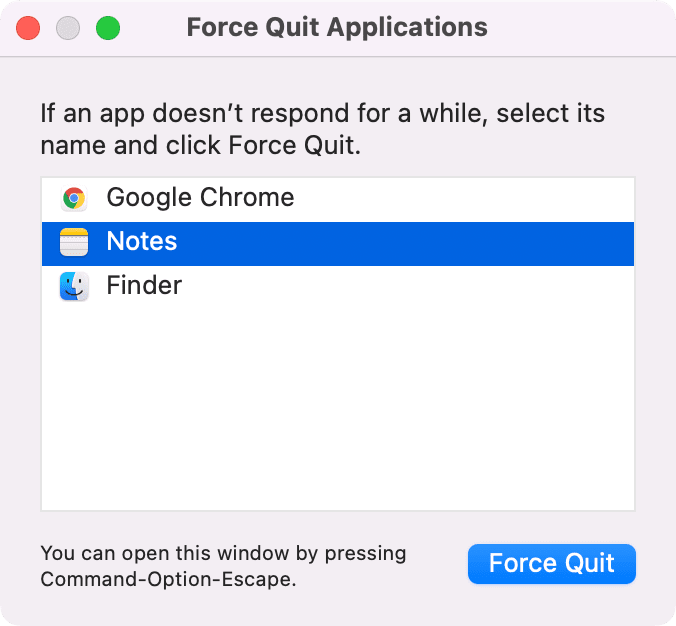
6. Force quit the Notes app
On Mac, press Command + Option + esc. Now, select Notes and click Force Quit. Reopen the Notes app, and give it some time to sync and show all your iCloud notes.
On iPhone and iPad, swipe up from the bottom of the screen and drag the Notes app card all the way up. On iPhone with the Home button, quickly double-press it and drag the Notes app card up to force quit it.
7. Restart your devices
Before moving to the other solutions, quickly turn off your iPhone or iPad and turn it back on. On Mac, click and choose Restart. After restarting, give it a few minutes and see if iCloud Notes sync or not.
8. Make sure your Apple ID is correct
- On iPhone and iPad: Go to Settings and tap your name from the top. You will see your Apple ID here.
- On Mac: Click the Apple icon () > System Settings or System Preferences > Apple ID, and under your name, you should see your Apple ID.
For iCloud notes to sync, make sure your Apple ID on all devices is the same. If they are different, sign out and sign in with the same Apple ID. In case you aren’t signed in to your Apple ID, tap or click sign in. After this, all iCloud Notes will sync in a few minutes.
Related: How to find and know your Apple ID on iPhone, iPad, and Mac
9. Check Apple System Status
Go to Apple’s official System Status page and make sure things like iCloud Notes, iCloud Web Apps (iCloud.com), Apple ID, iCloud Account & Sign In have a green dot next to them. If it’s yellow or red, that means there is a problem on Apple’s side. Please wait for a while until Apple fixes this.
10. Update your devices
The possibility of iCloud Notes not syncing because of software bugs can’t be ruled out. So, before proceeding, update your Apple devices.
- On iPhone and iPad: Go to Settings > General > Software Update.
- On Mac: Click the Apple icon () > System Settings > General > Software Update. On older macOS versions, go to System Preferences > Software Update.
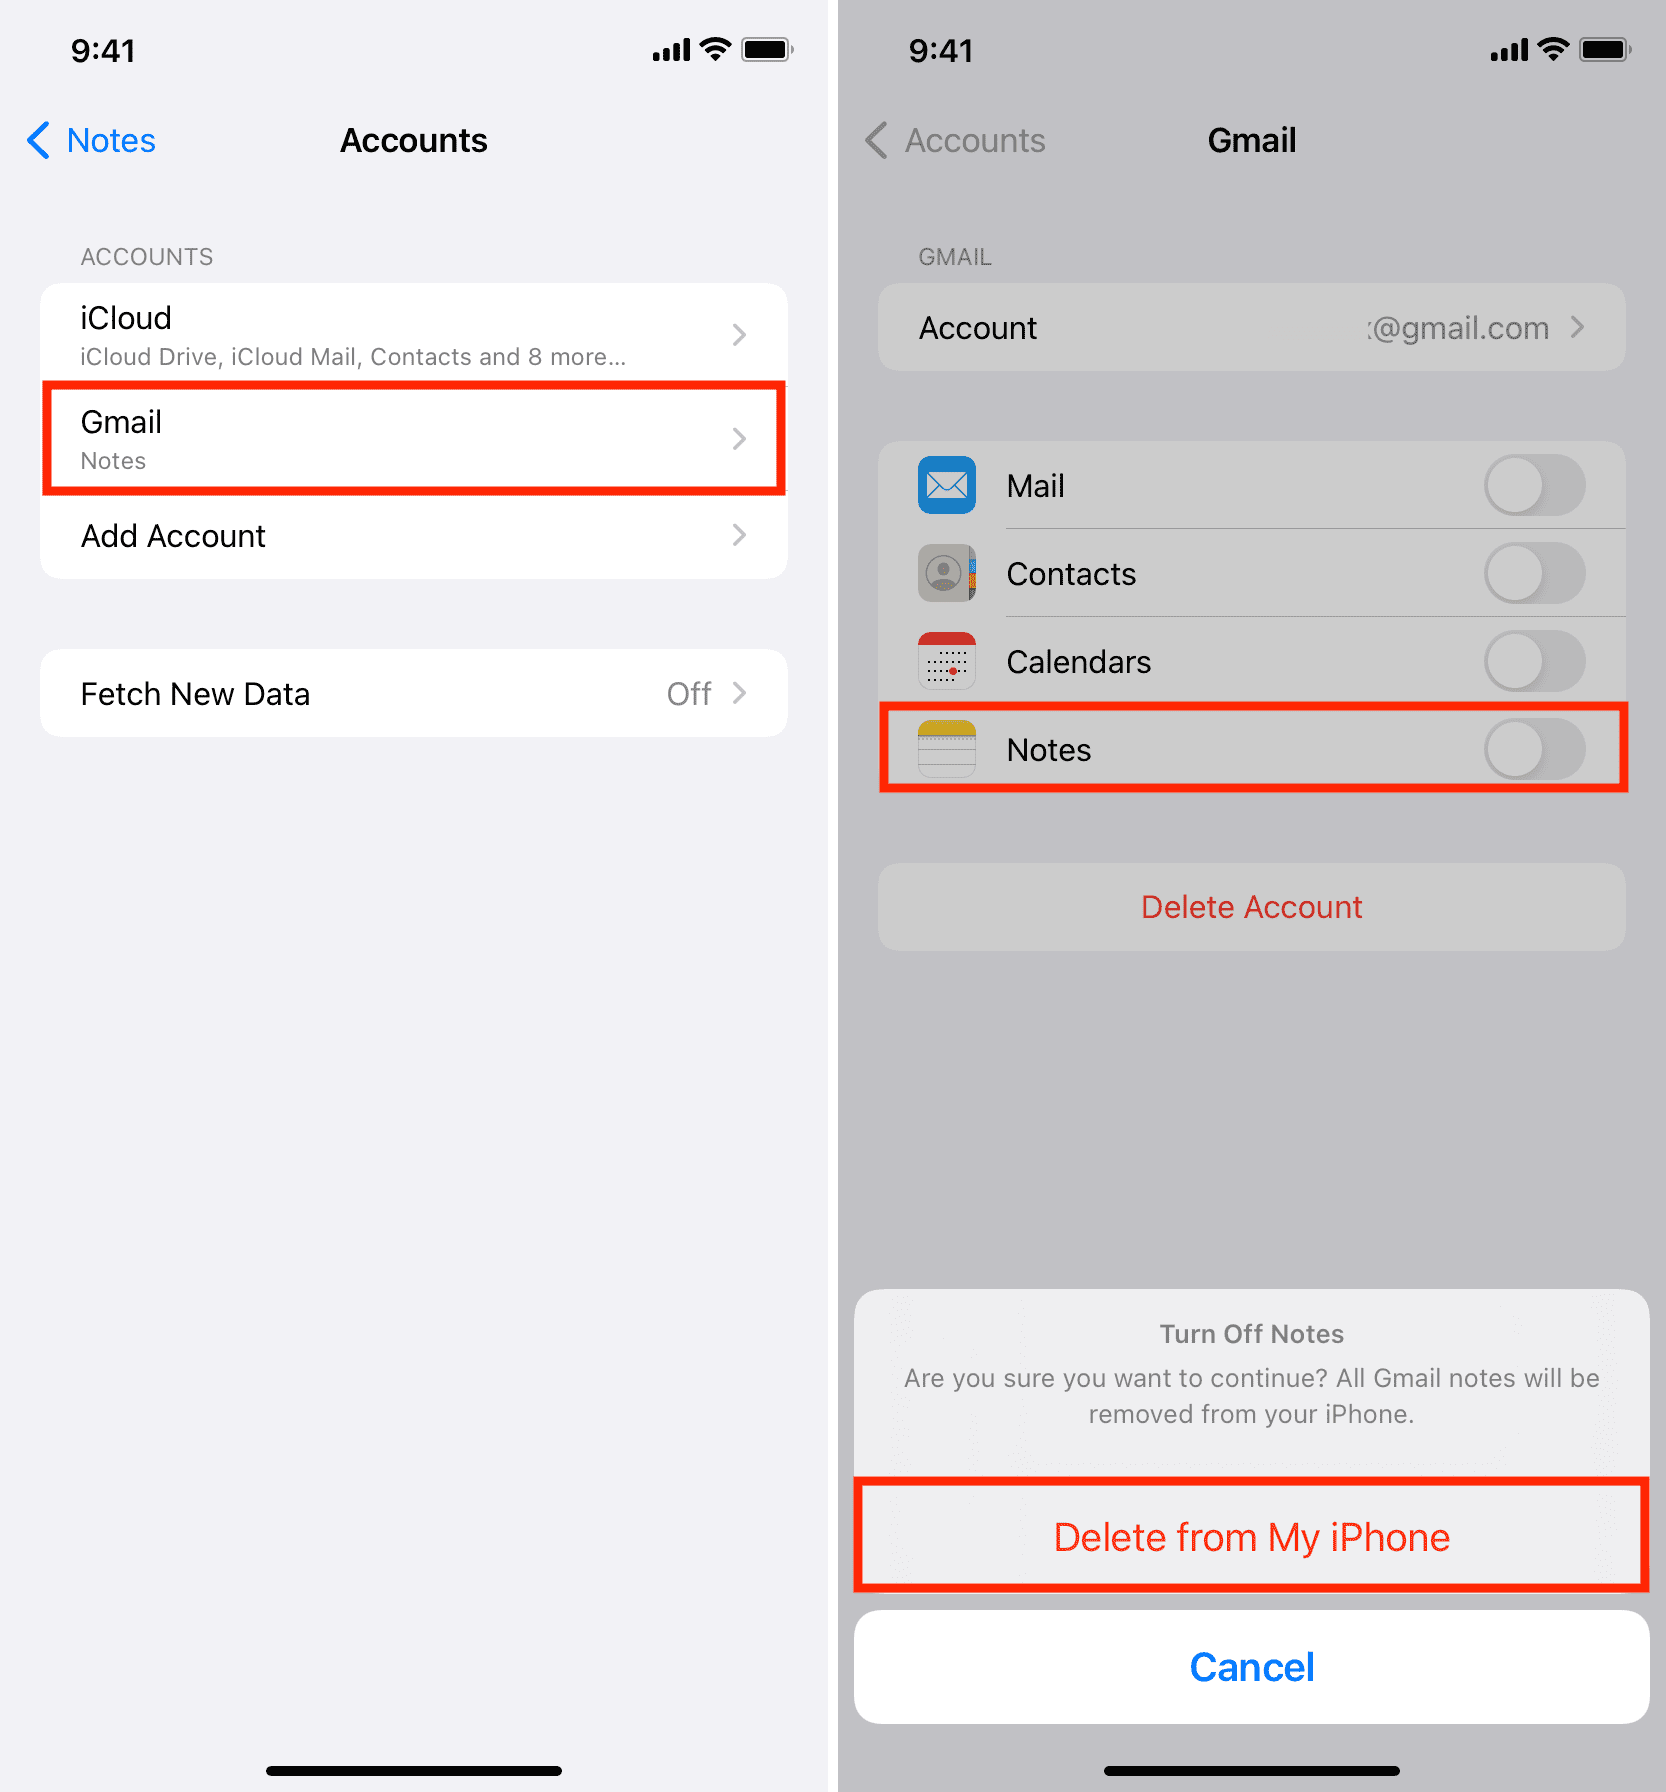
11. Disable other accounts
If you have multiple accounts set up, temporarily disabling the non-iCloud account may force the iCloud notes to sync correctly.
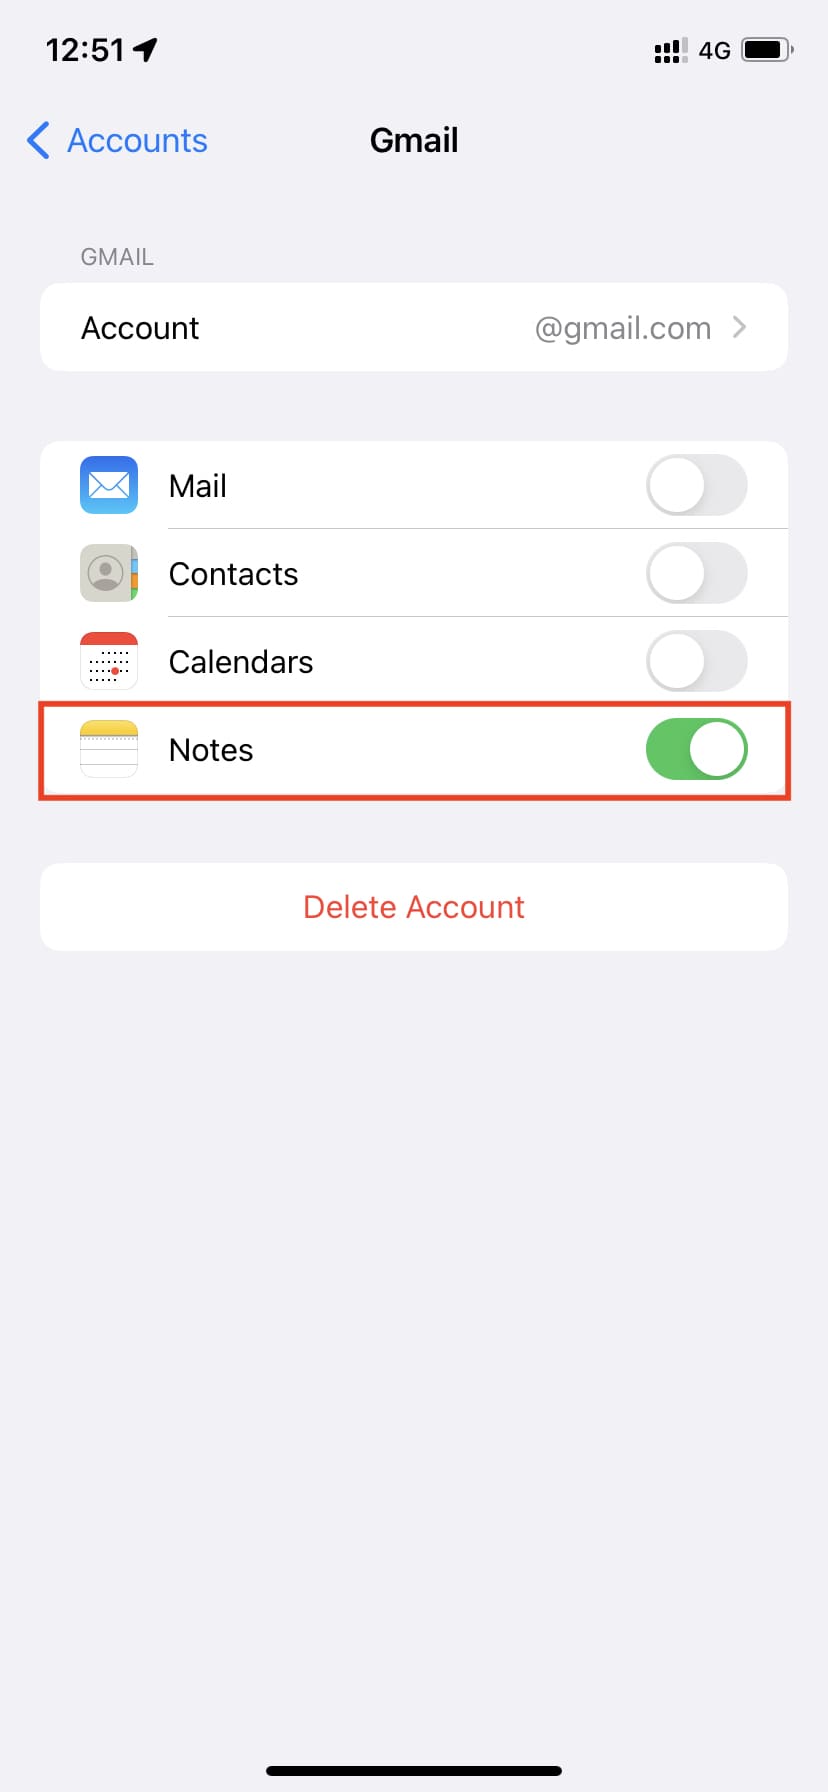
On iPhone or iPad: Go to Settings > Notes > Accounts > Gmail and turn off Notes.
On Mac: Open the Notes app > click the word Notes > Accounts > Google and uncheck Notes or turn off its toggle.
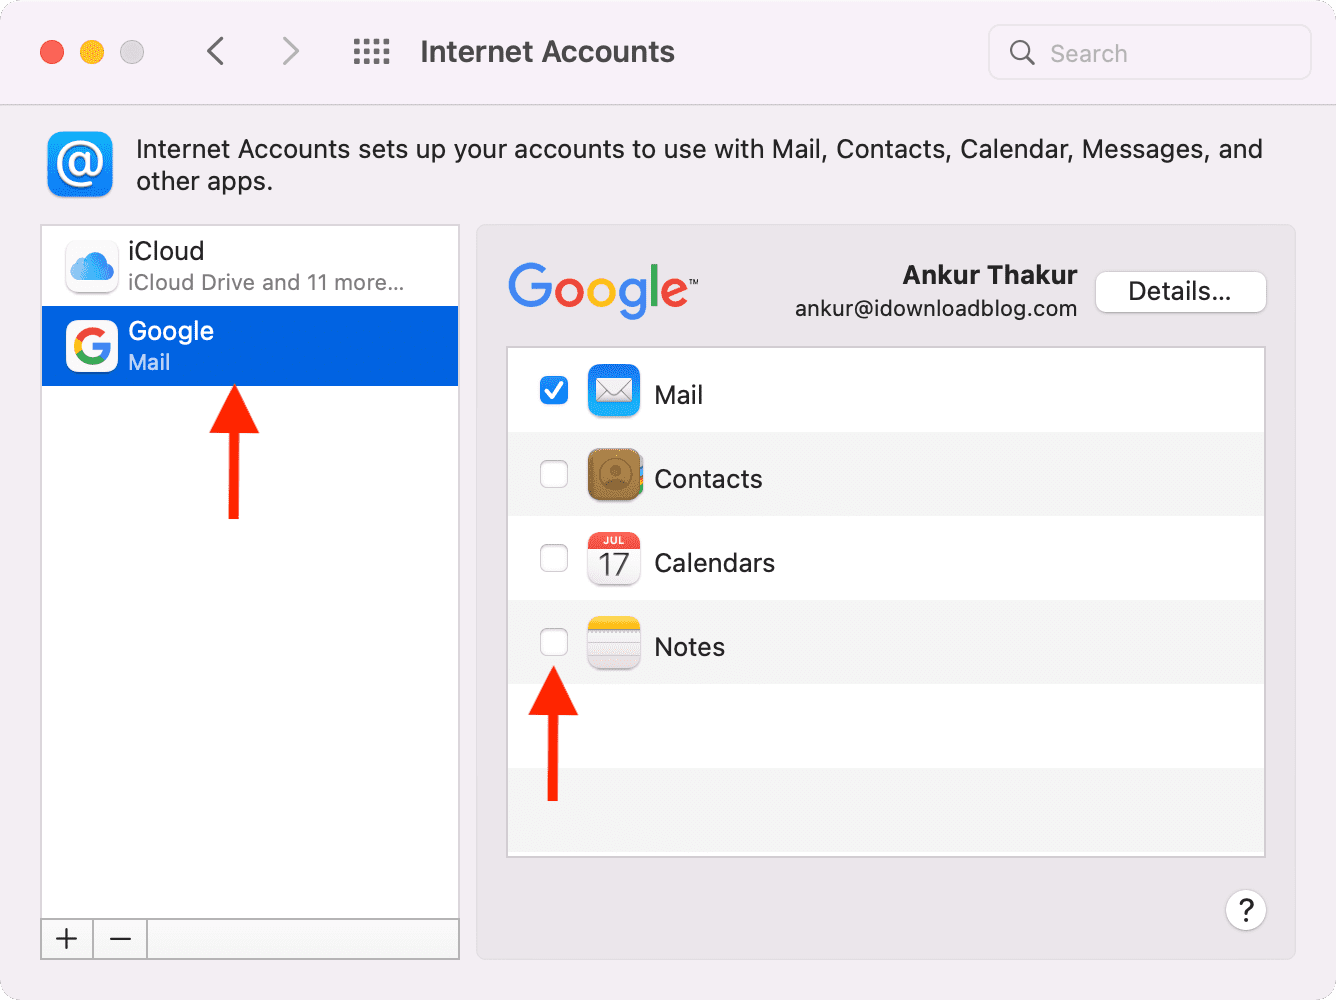
Once your problem is solved, enable these accounts again.
12. Turn off iCloud Notes and turn it back on
By now, you have tried all the basic solutions. If none of the above methods worked for you, follow the steps below.
Important: You’ll be deleting all the notes from the device. Once you enable it again, all iCloud Notes will sync. But this also means that a few notes that aren’t uploaded to iCloud will be deleted. To address this, you can sign in to iCloud Web and see if the latest notes are there or not (steps explained above). If you recently created some important notes, copy them and temporarily save them to a third-party notes app like Google Keep, Simplenote, etc. You may also take a screenshot. The primary purpose of this is to ensure you do not lose anything.
Here’s how to turn off and turn on iCloud Notes to fix the syncing issues.
On iPhone and iPad:
- Open Settings and tap your name from the top.
- Tap iCloud > Show All > Notes.
- Turn off the switch for Sync this iPhone.
- Tap Delete from iPhone or iPad.
- Restart your device.
- Follow steps 1 and 2 and re-enable Notes. Next, open the Notes app, and in a few minutes, all your notes should sync back.
On Mac:
- Click the Apple icon and choose System Settings or System Preferences.
- Select your Apple ID and pick iCloud.
- From the iCloud section, turn off the switch for Notes.
- Restart your Mac.
- Follow step 1 and re-enable Notes. Now open the Notes app on Mac, and all your iCloud notes will sync. While it syncs, you will see a small progress icon. If it doesn’t, restart your Mac and then open the Notes app.
You have refreshed the stuck or faulty sync issues by following the above steps. From now, all new notes you create on your Apple devices should sync with one another.
13. Sign out of Apple ID and sign in again
Still, no luck, and sync issues continue? To fix this, sign out of Apple ID on your Apple devices where notes are not syncing. Then sign in again.
14. Reset iPhone or iPad network settings
If iCloud Notes still fail to sync across your iOS or iPadOS devices, reset their network settings. After that, open the Notes app, and the sync problem should no longer exist.
iCloud Notes sync issues solved successfully
By now, the old and new notes you create should sync to all your Apple devices via iCloud. If the problem exists, please contact Apple Support.
In most cases, force quit, restart, and software update resolves the issue. And if they fail, turning off iCloud Notes and turning it back on is almost the sure-shot fix. I hope this guide addressed your Notes sync problems.
Check out next: