The infamous ‘Other’ storage section displayed in iTunes after connecting an iPhone, iPod touch or iPad to a computer is definitely one of the pain points for users mainly because it keeps increasing on its own.
‘Other’ storage is a combination of system settings, caches and various files that iOS stores temporarily to speed up system performance and minimize your dependency on network connectivity.
This all happens automatically and without any intervention on part of the user. That said, software can (and will) break and so these files may not get cleaned out properly. And when that happens, a large amount of storage will be lumped into the ‘Other’ category. The good news is, your proactiveness in dealing with this issue should pay off.
It’s actually fairly easy to recover your usable storage lost to ‘Other’ space hogs by specifically targeting certain items. In this post, we’ll lay out a few different techniques to decrease ‘Other’ storage on your iPhone or iPad.
iOS doesn’t break down the ‘Other’ storage category, but iTunes does.
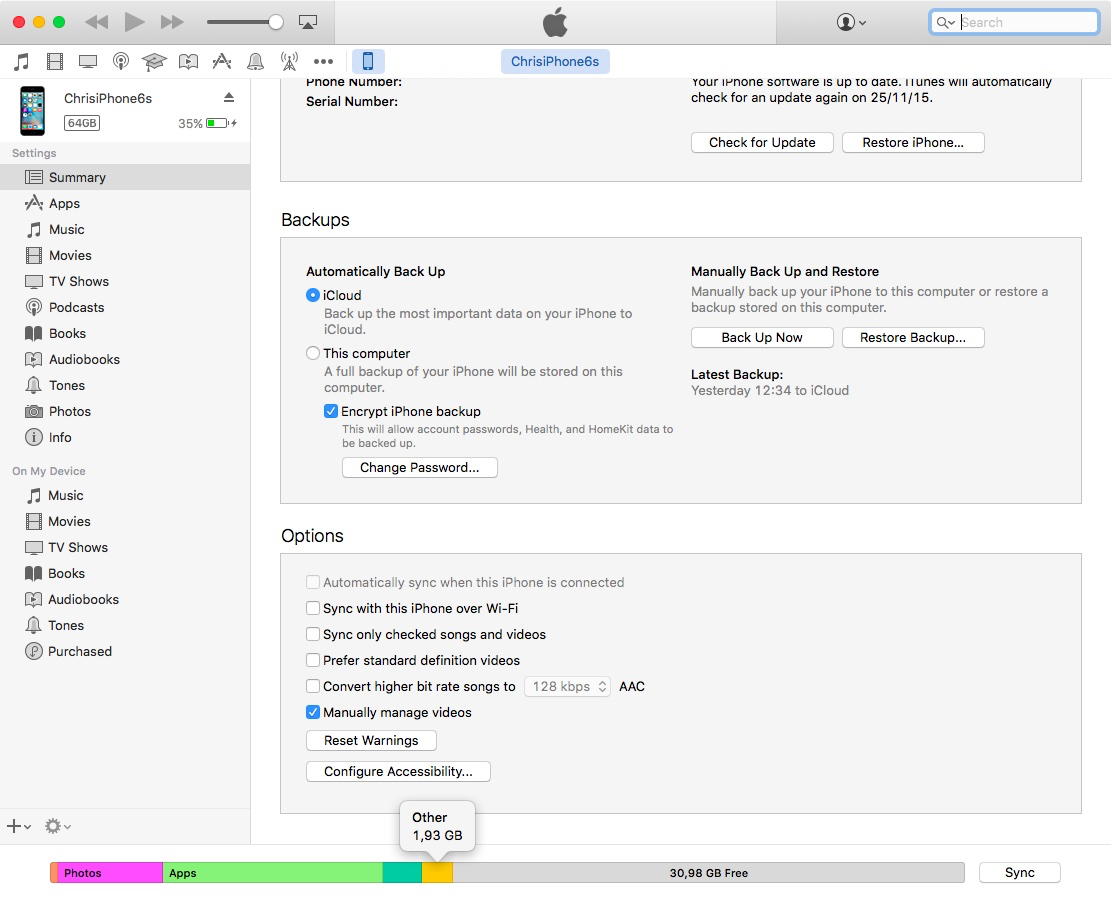
To check how much device storage is lost to the ‘Other’ category, hook up your device to a computer with the included USB cable, launch iTunes and select the device.
At the bottom of the Summary pane there is a bar that shows how much storage your iOS content uses, divided by content type. Wait for iTunes to scan your device’s storage and then hover your mouse over the ‘Other’ category to find more information.
What is ‘Other’ iOS storage?
The ‘Other’ iOS storage is comprised of the following items:
- Settings
- Siri voices
- System data
- Cached files created when streaming or viewing content like music, videos, and photos
Equally important to making the most from this tutorial, here’s what iTunes reports as separate storage items rather than fold them under the ‘Other’ category:
- Audio: Songs, audio podcasts, audiobooks, voice memos, music memos and ringtones
- Video: Movies, music videos and TV shows
- Photos: Camera Roll content, Photo Stream and Photo Library
- Apps: Installed apps
- Books: iBooks books and PDF files
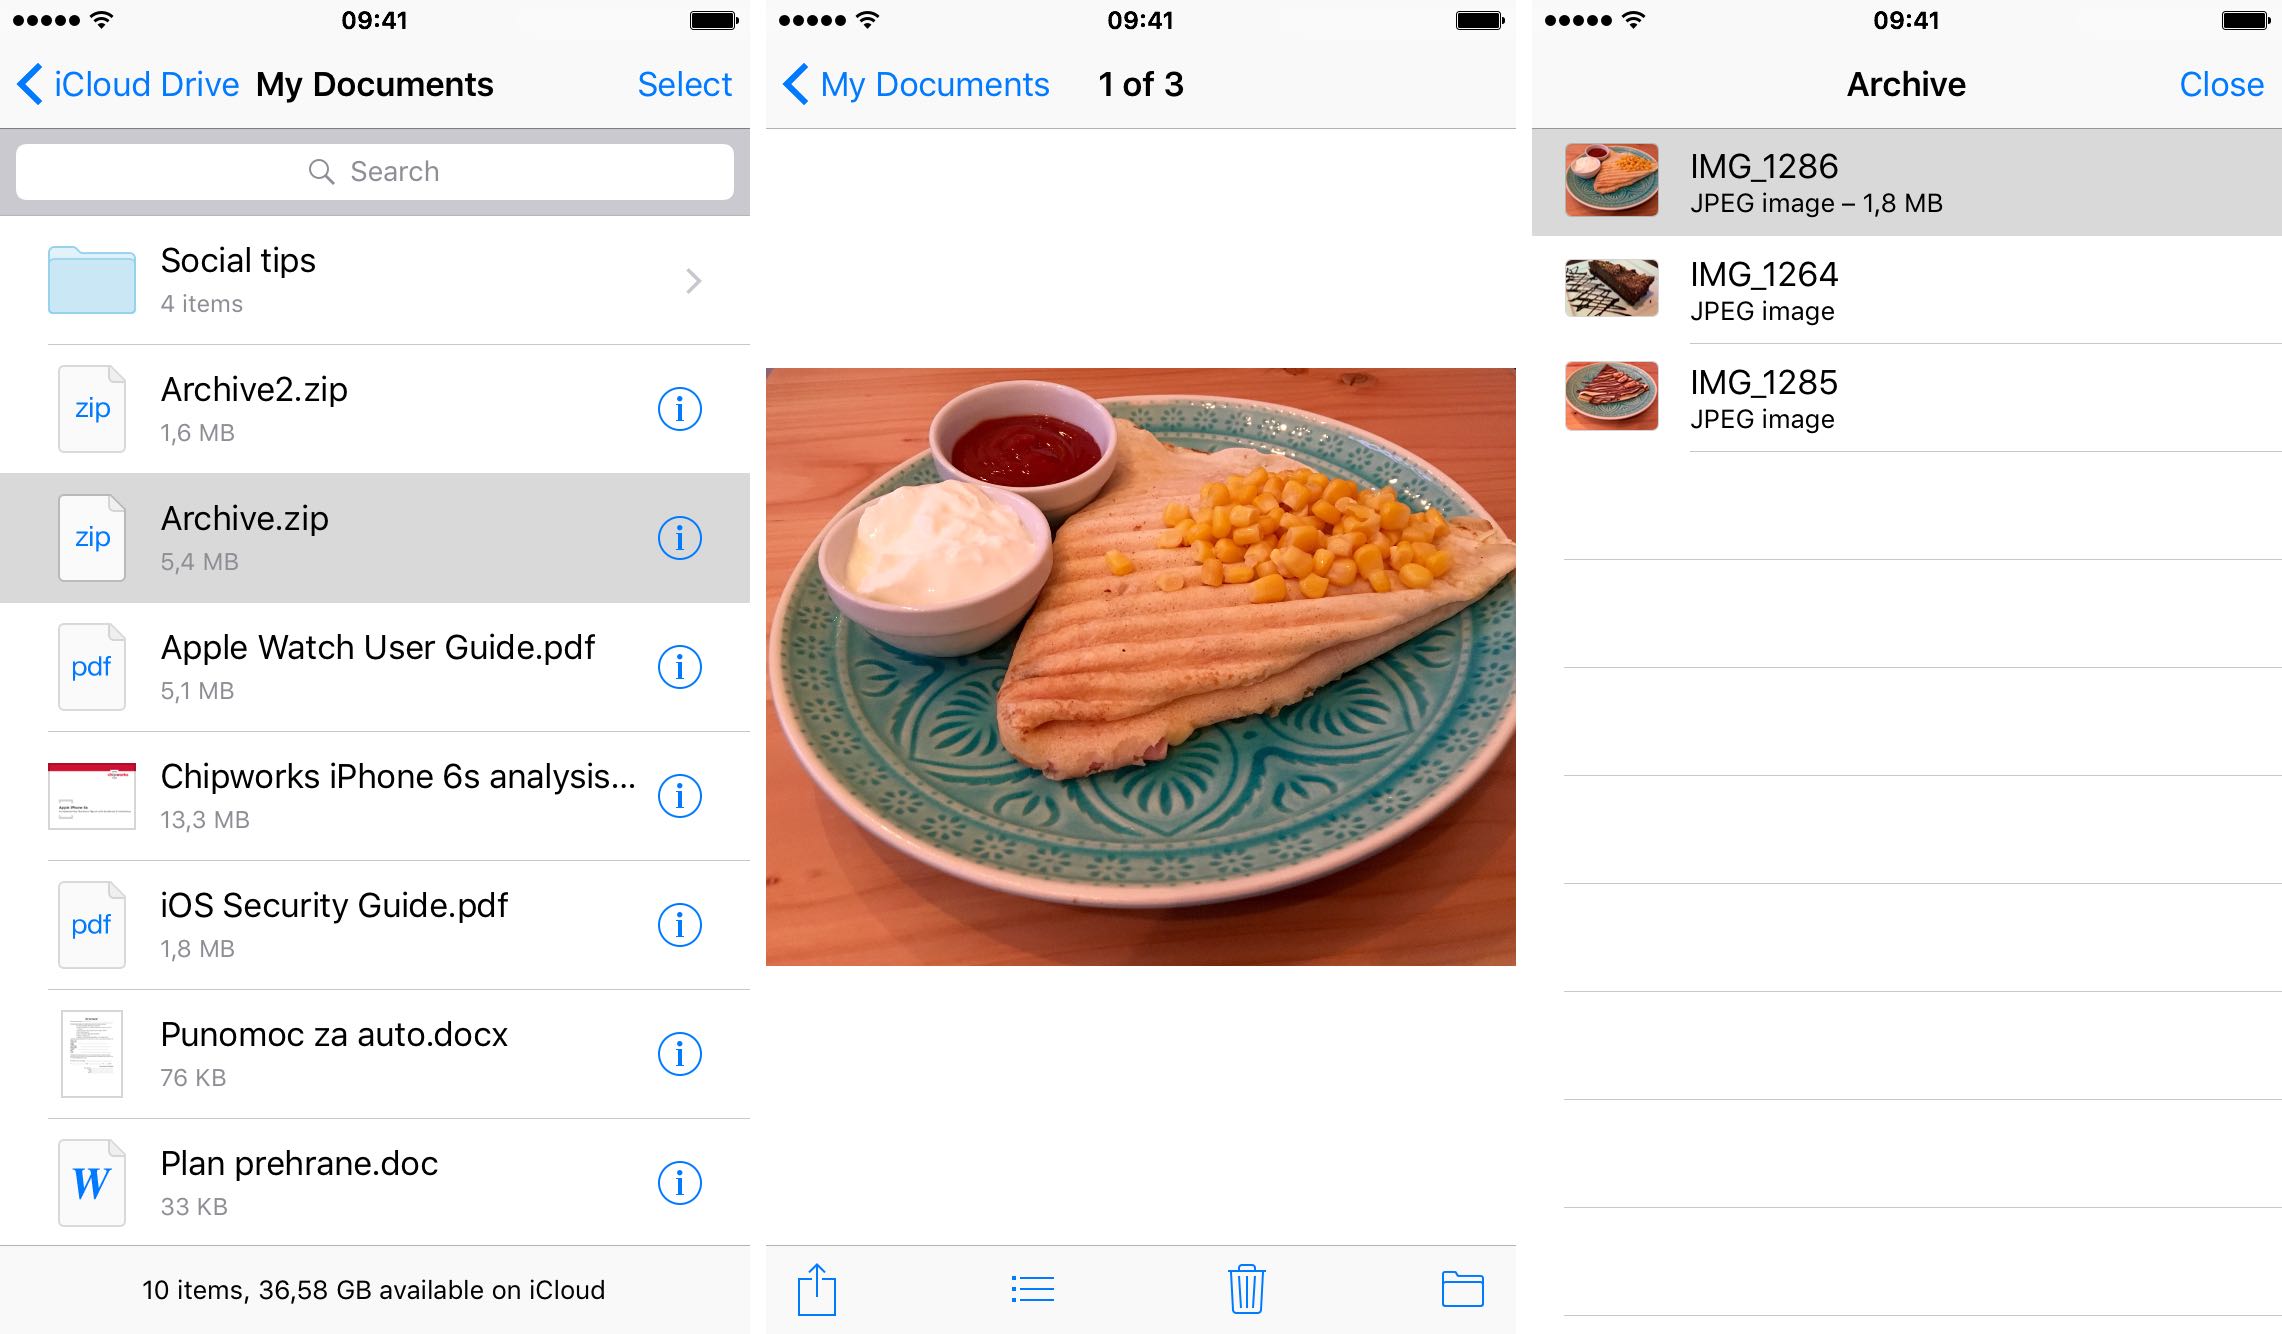
- Documents & Data: Safari Offline Reading List, files created within apps, and app content like contacts, calendars, messages and emails (and their attachments)
Now, iTunes categorizes cached music, videos and photos as ‘Other’ storage.
Your iOS device, on the other hand, reports these items as actual songs, videos and photos: that’s why storage amounts for Music or Videos seen on the device in Settings → General → iPhone Storage might differ from what you see reported in iTunes.
Before we begin, let me just bring to your attention the fact that iTunes has been found to sometimes erroneously report the size of ‘Other’ storage. To force the app to recalculate the correct iOS storage usage, de-select and re-select the “Open iTunes when this iPhone is connected” option available in the Options section of iTunes’ Summary pane.
Flush app caches manually
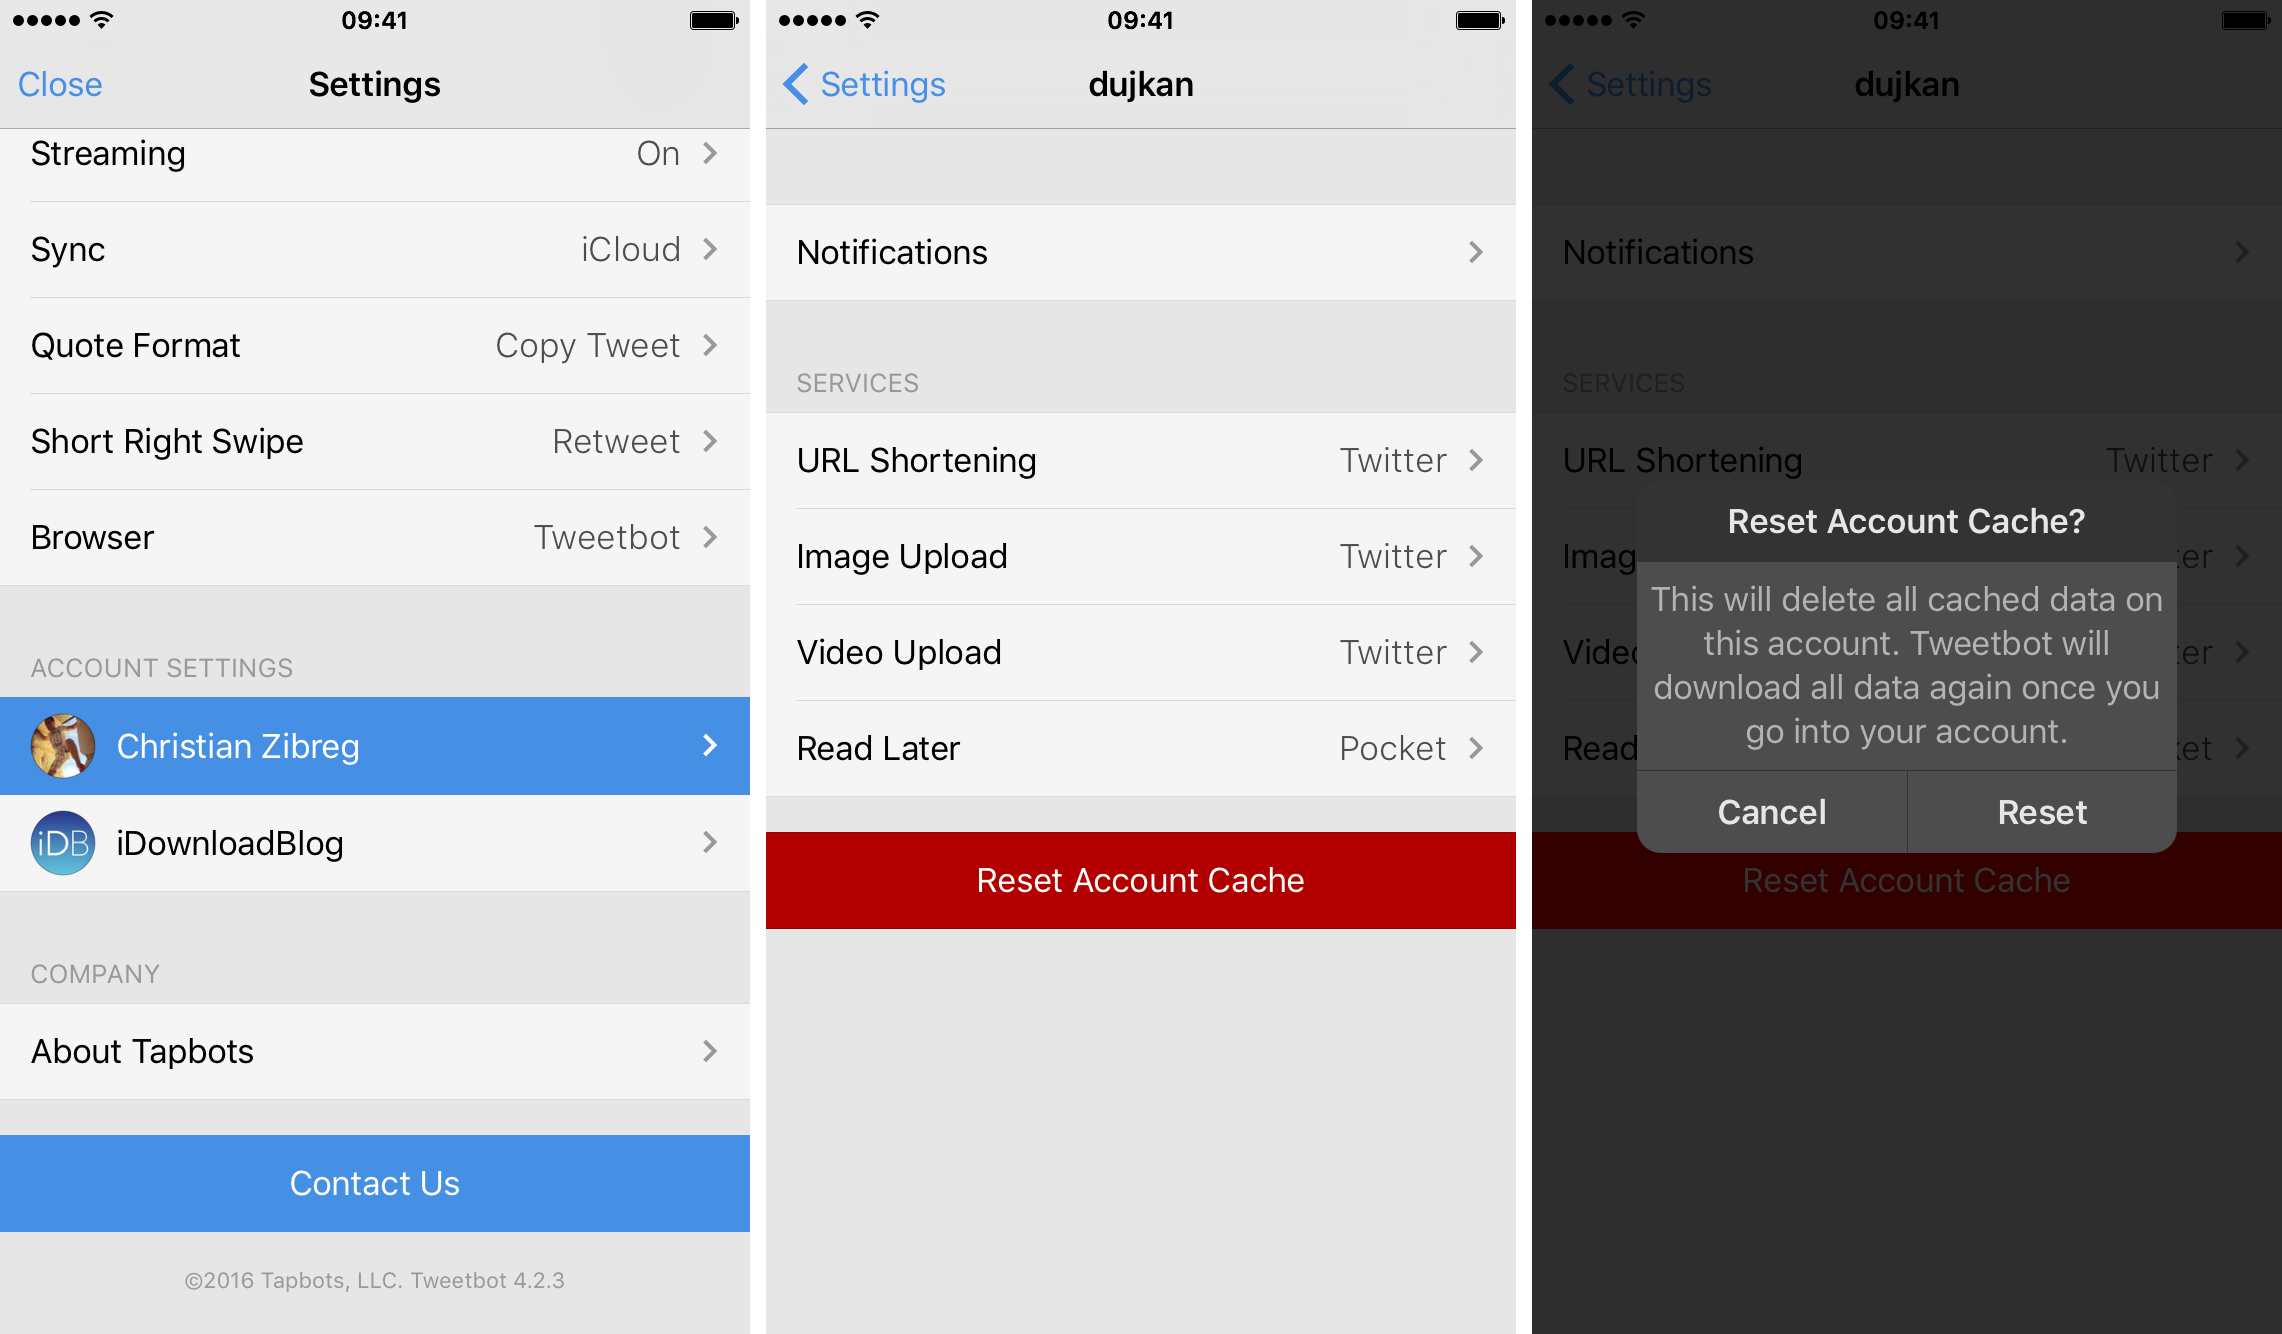
Some apps include a user-facing option to delete their own caches. Tweetbot, for example, has a Reset Account Cache option for each account in the settings. To see if your favorite app supports this feature, launch it and take a closer look at its built-in settings.
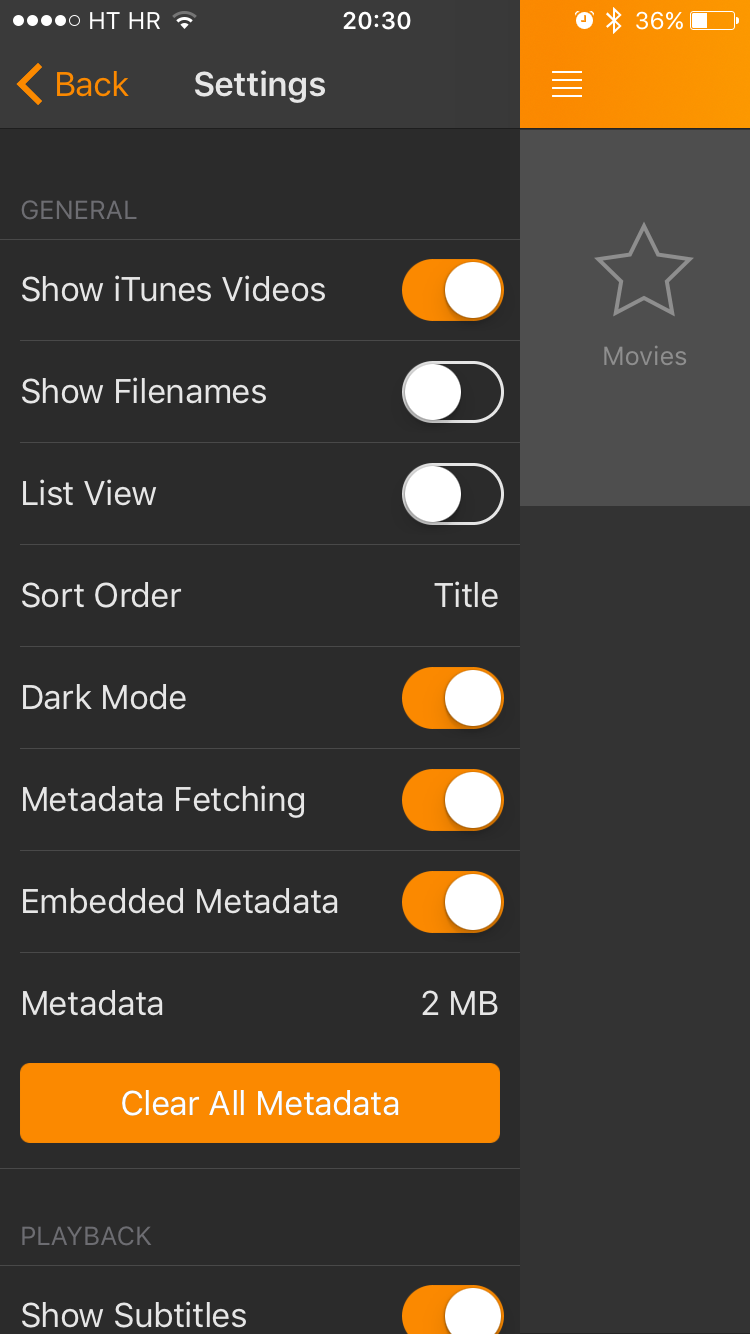
I freed up two megabytes of storage space wasted on cached metadata content by tapping the Clear All Metadata button in Infuse, FireCore’s versatile media player for iOS.
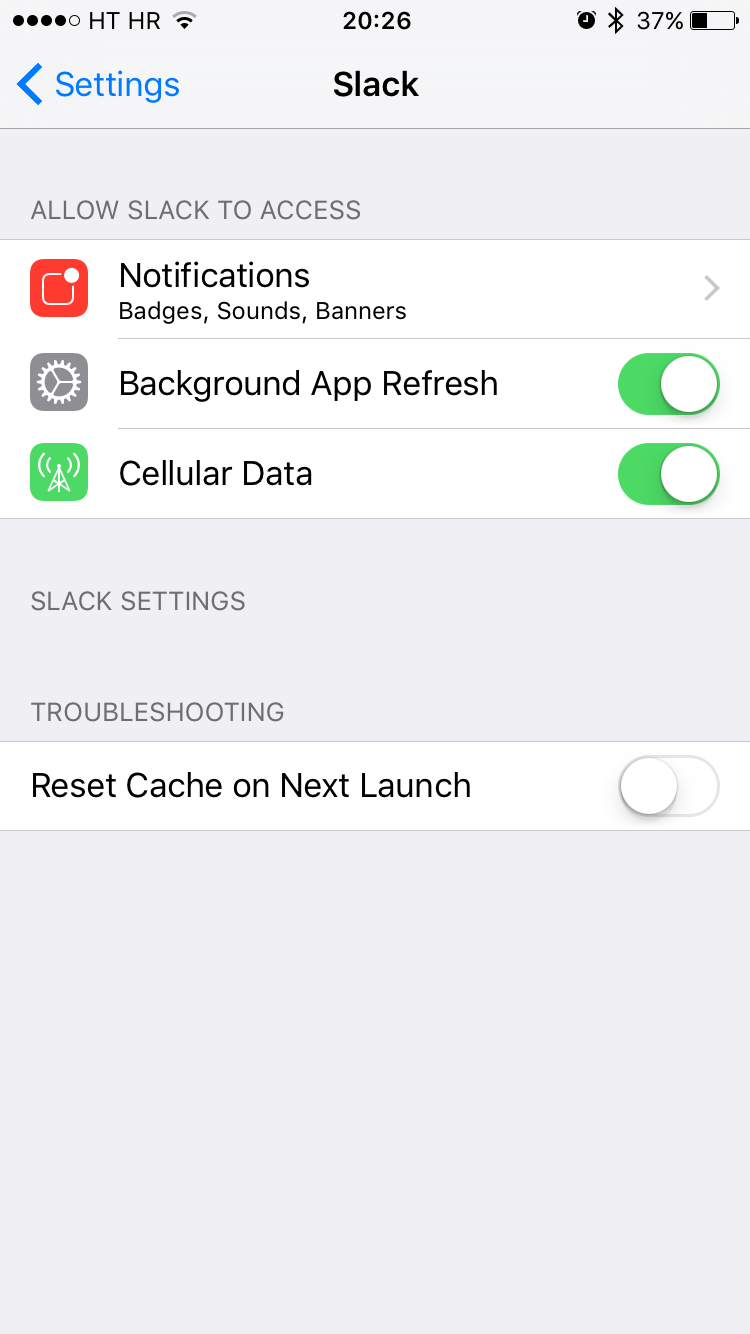
I also recommend checking out your frequently used apps in the stock Settings app to see if developers put a cache-cleaning option in there. Slack, for example, provides the Reset Cache on Next Launch toggle in Settings → Slack even though that option is nowhere to be found within the app itself.
Sadly, too few apps allow users to flush their caches with a tap of a button. Instagram, for example, is one app that can be quite a storage hog and yet it lacks a similar cache-cleaning solution. As much as I searched, I couldn’t find cache-cleaning switches in such apps like Facebook, Facebook Messenger, WhatsApp, Viber, Dropbox and OneDrive.
Delete offline content in apps
Some apps that manage online content allow you to mark items for offline use. As a result, you are able to consume cached content without an Internet connection. Apple Music, for instance, lets you download songs for offline listening, which takes up to ten megabytes of on-device storage per song or more, depending on the song length and audio quality.
When a song is downloaded for offline listening, you’ll see a tiny device icon next to its name in the list. You can even download whole albums to listen to on the go without incurring unwanted cellular charges. It’s also very easy to forget that offline songs are probably taking up a significant amount of storage space on your device.
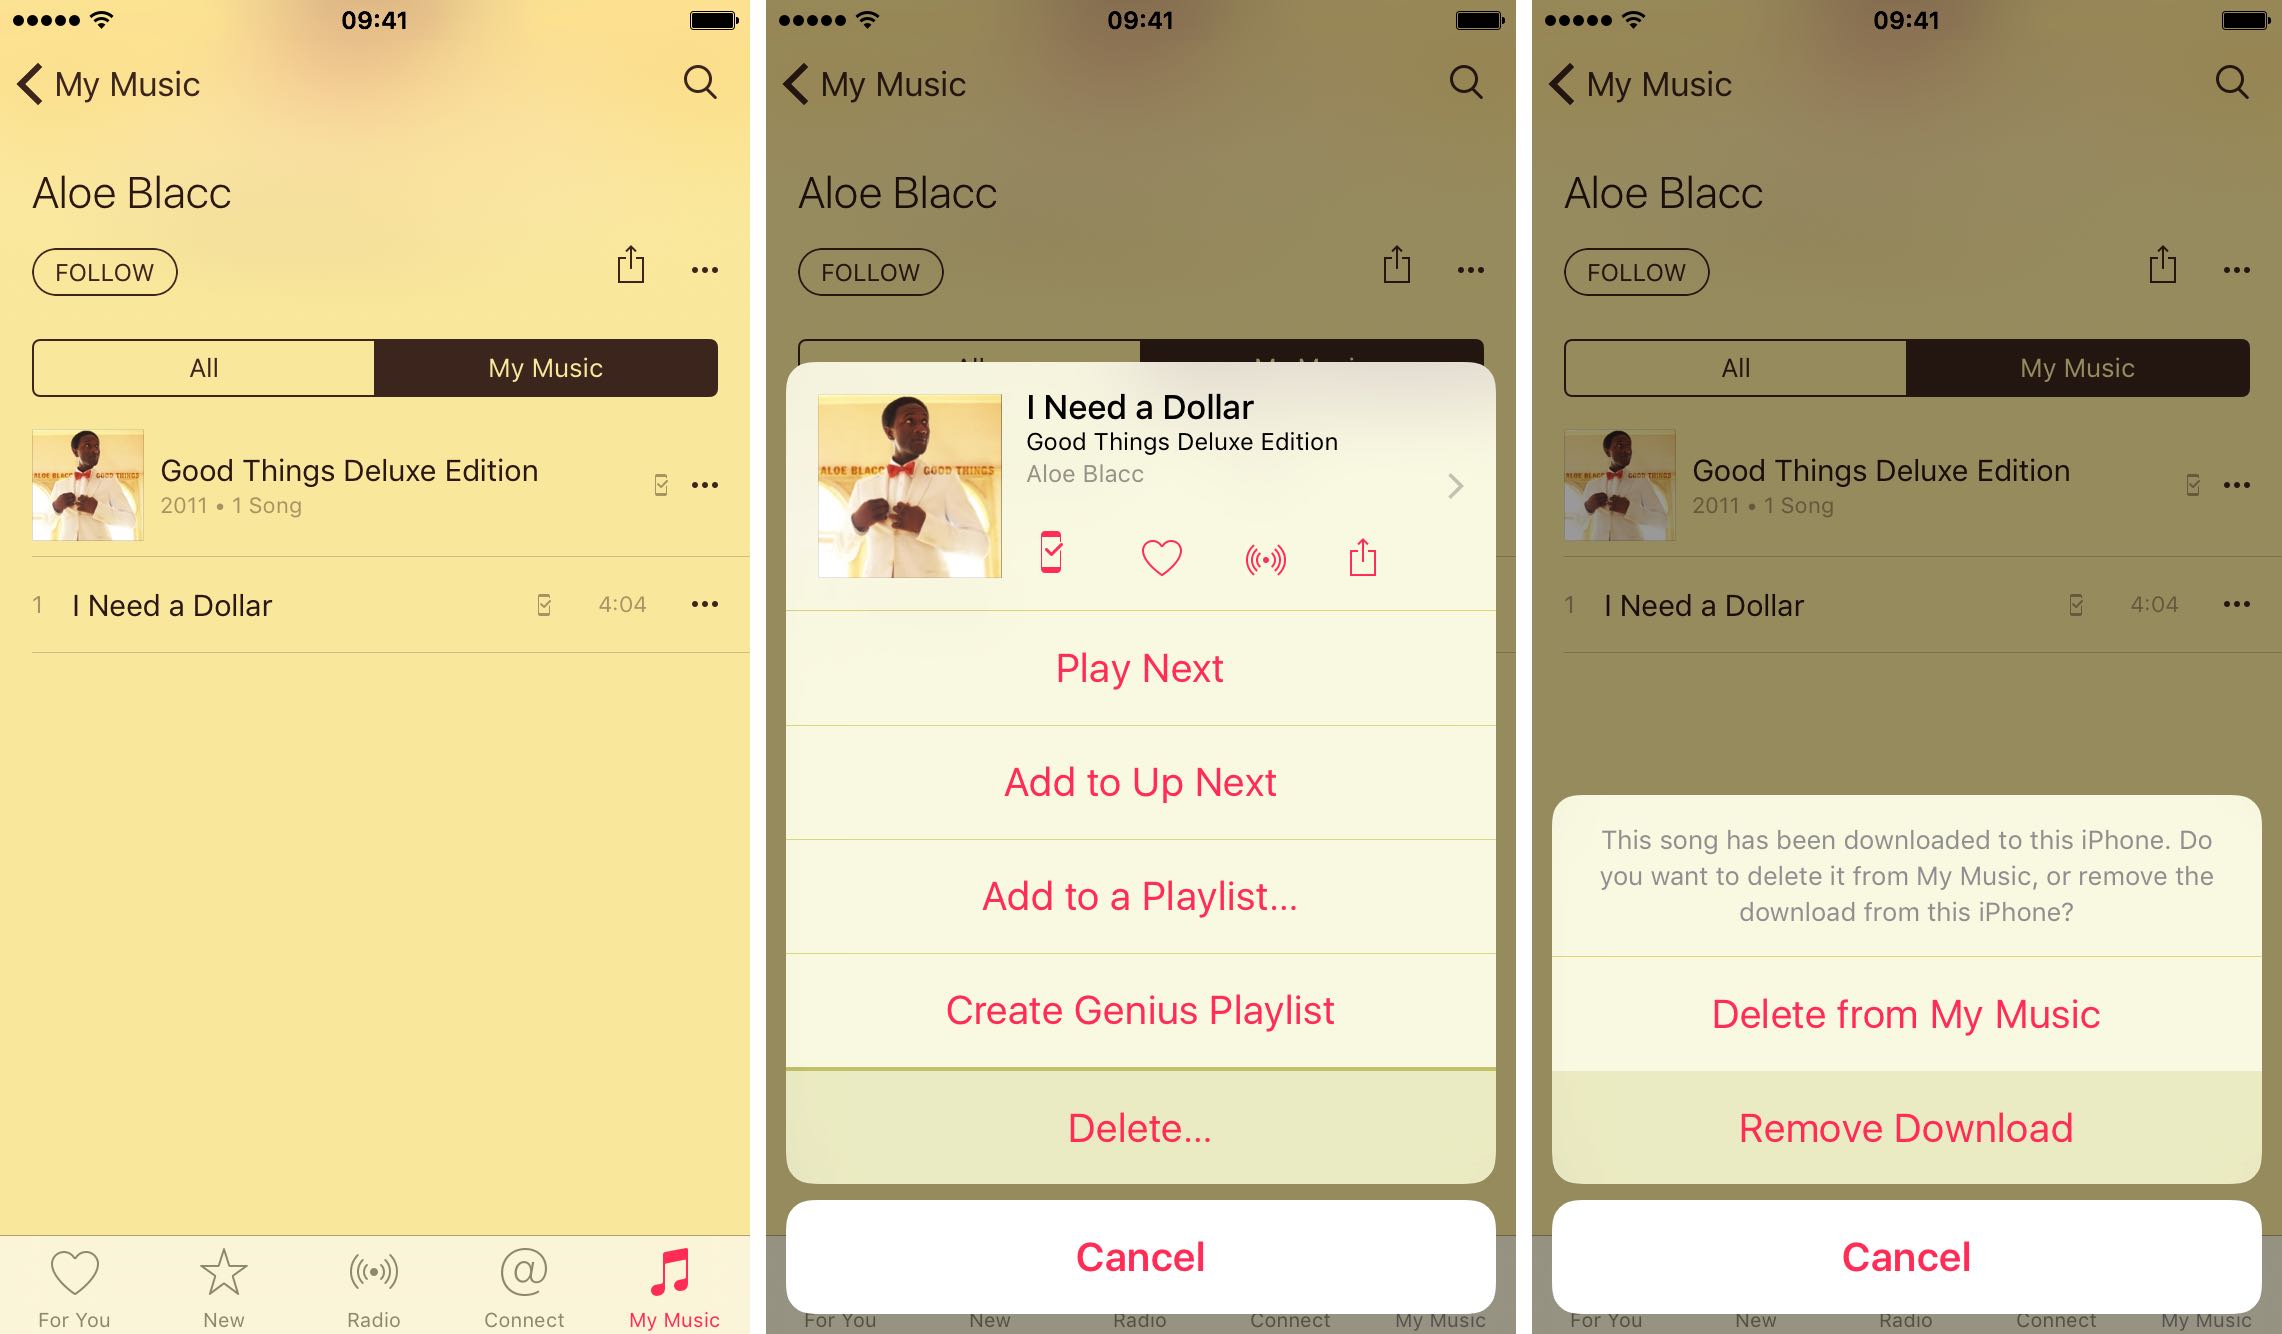
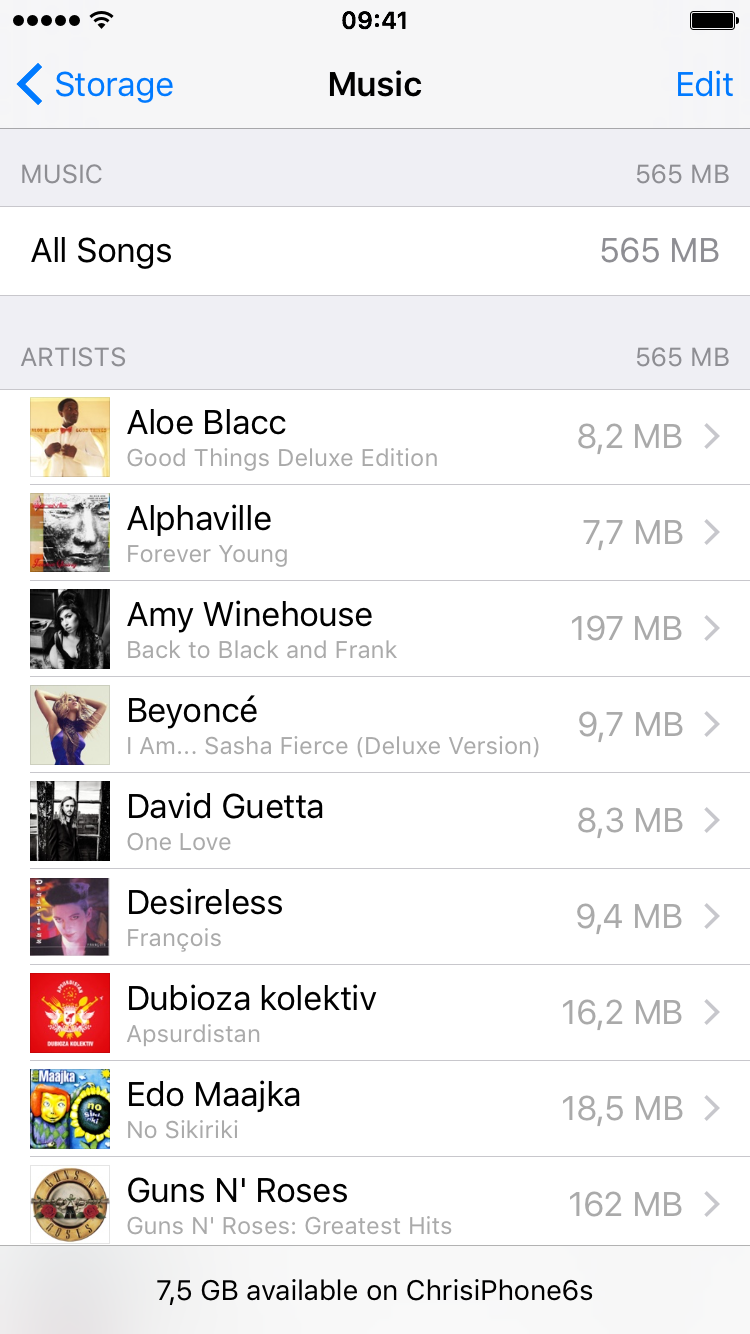
To reclaim it, tap the ellipsis icon next to a song, hit Delete in the pop-up menu and then select Remove Download. To see how much storage offline tracks and locally synced songs are taking up on your device, go to Settings → General → Storage & iCloud Usage → Manage Storage → Apple Music.
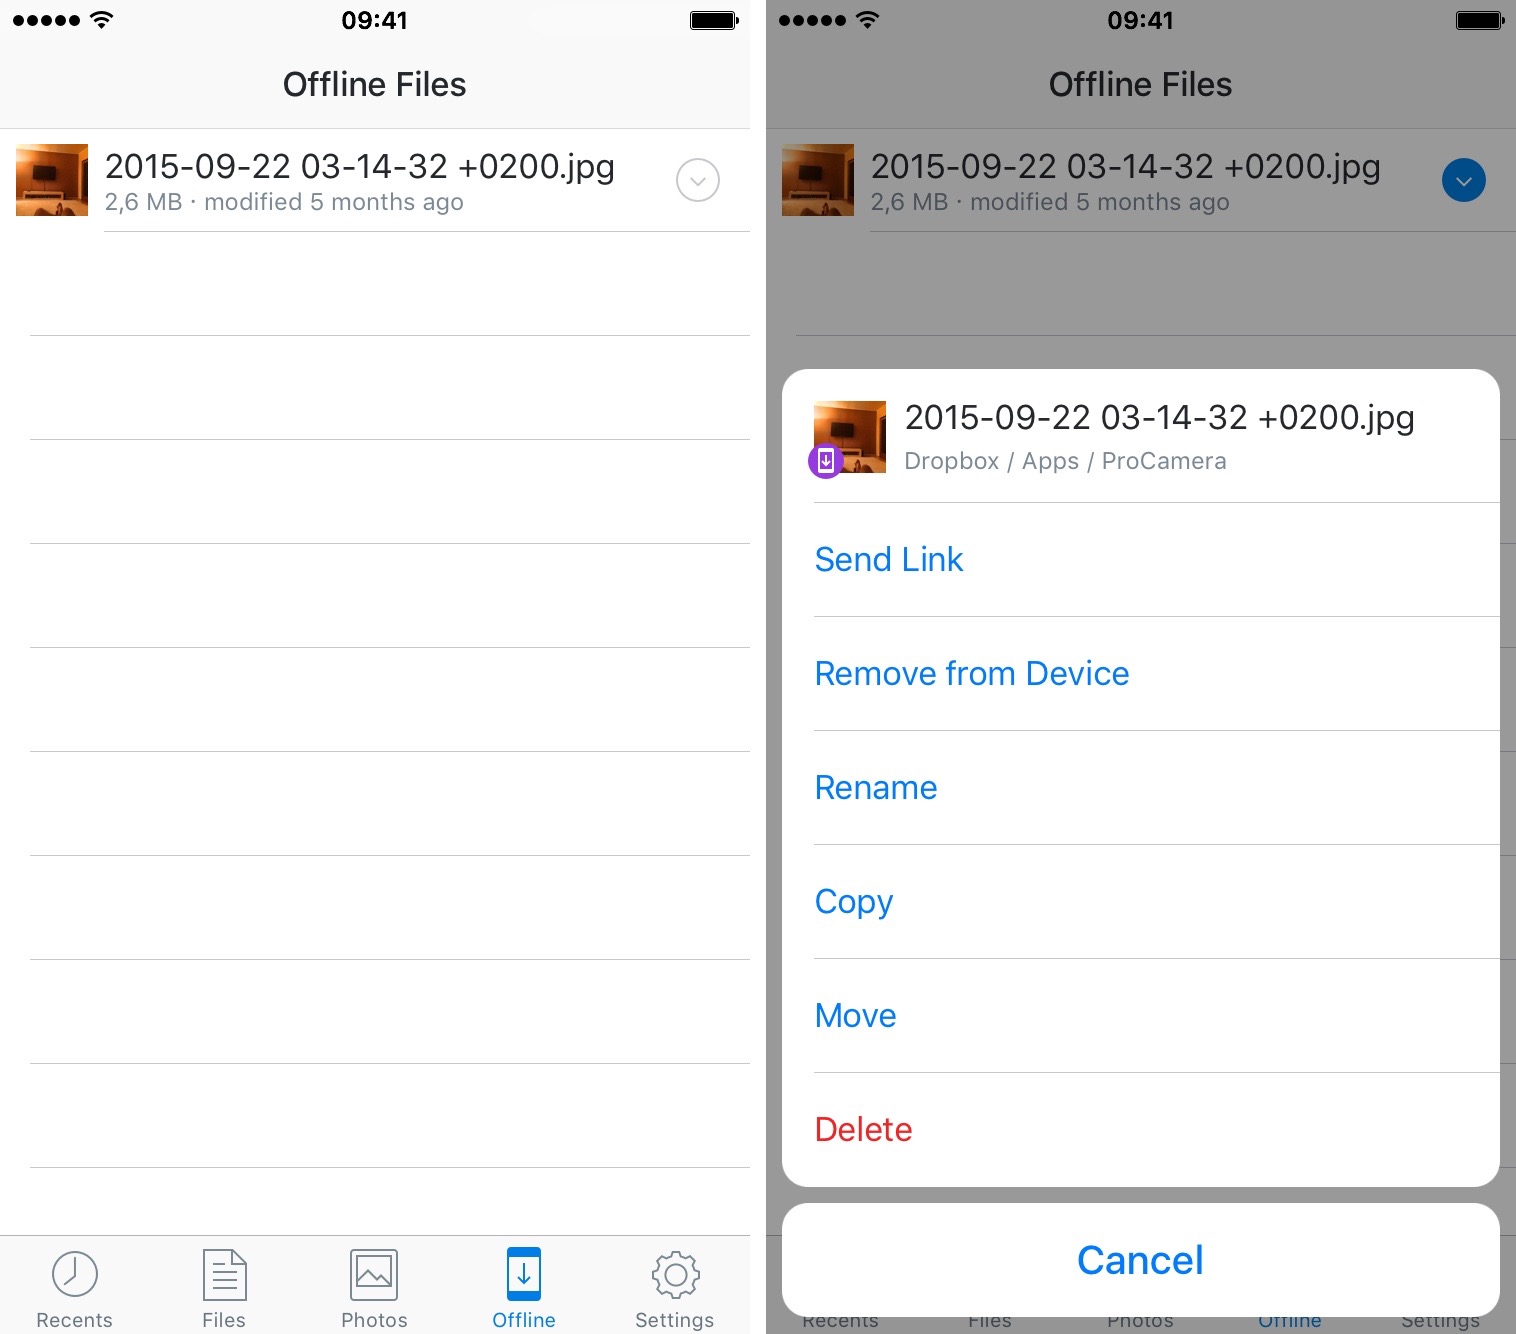
There, you can tap Edit and then hit the minus sign next to a song or album, offline or not, that you wish to remove from your device. So far so good. But what about other apps? Glad you asked. In Dropbox, for instance, items in the Offline section have been downloaded and cached on your device, and can be safely removed to free up storage.
Beyond Dropbox, cloud-storage apps like OneDrive and Google Drive also support downloading files for offline use, which you can delete in order to decrease ‘Other’ storage.
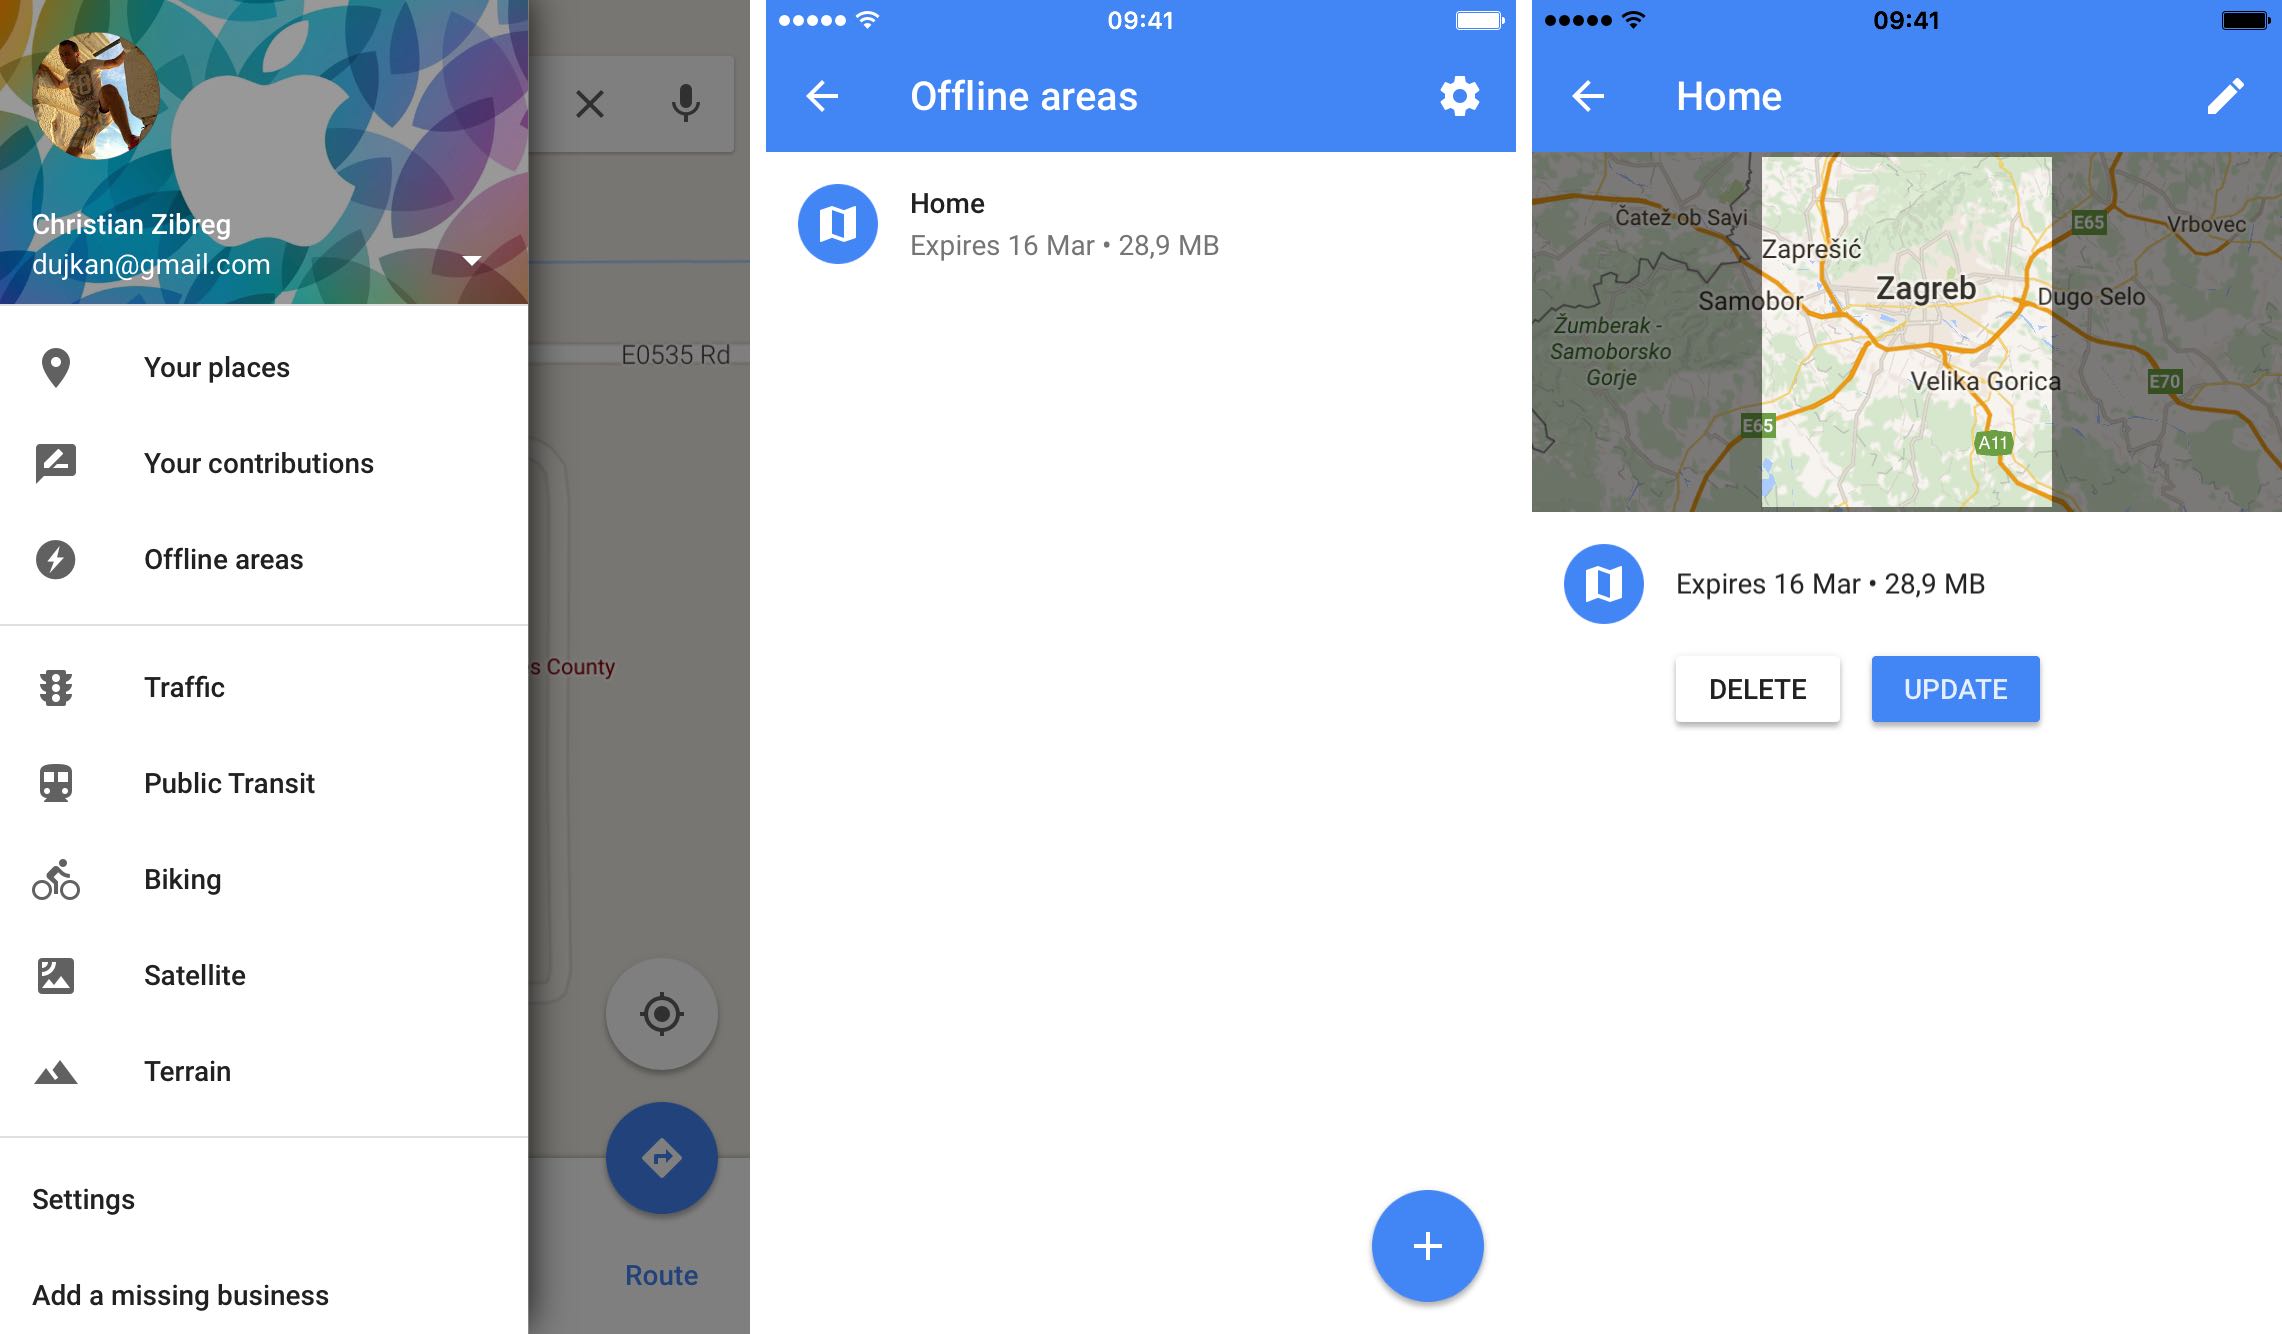
Another great example: Google Maps.
As of recently, Google’s mapping app on iOS lets you download local areas for offline use. An offline map will eat up anywhere between ten megabytes to a few hundred megabytes of storage. Google Maps lacks a “Clean Caches” button, but you can tap the hamburger icon and then Offline areas to quickly delete your saved maps.
For those wondering, Apple Maps offers built-in offline support but that feature pretty much runs on auto-pilot as there’s no manual override.
Reset iTunes streaming caches
If you purchase or rent movies and television shows on the iTunes Store and stream them through Apple’s stock Videos app, iOS will cache those videos for as long as possible. And sometimes, the operating system just isn’t as aggressive as it should be about flushing video caches, even in the extreme scenario of storage being almost full.
If restarting or force-restarting the device didn’t release storage space consumed by cached video streams, launch iTunes Store on your device, tap the Featured tab, scroll to the bottom, tap your Apple ID and choose Sign Out. Next, go to Settings → Videos and sign out of Home Sharing at the bottom.
Now force-restart your device and then log back into iTunes Store and sign into Home Sharing. This should force iOS to flush its video caches created every time a purchased movie or a TV show episode is being streamed inside the Videos app.
Disable iCloud Drive
If you store files in iCloud Drive, especially if you are on a 200GB or higher storage tier, iOS’s smart file management may decide that you have enough free storage space to keep those cloud files cached locally on the device so you can access them very quickly.
If you’re running low on storage, iOS will in most cases decide to remove cached iCloud Drive files in order to make more room for your stuff, but sometime it won’t. If that’s your story, disabling iCloud Drive in Settings → iCloud → iCloud Drive will reclaim significant amount of storage lost to cached cloud content.
Of course, disabling iCloud Drive means you won’t be able to access it in third-party apps.
Restart your device
iOS automatically dumps temporary files when the devices runs low on storage. Still, restarting an iOS device from time to time (I restart my iPhone before nap time) gives the iOS boot procedure a chance to trash temporary files that are no longer needed. In addition, restarting the device will also cause iOS to effectively recalculates the usage data.
Reinstall apps that have large caches
Local app caches are generated by the very virtue of yours using them on a regular basis. To keep tabs on these temporary files, go to Settings → General → Storage & iCloud Usage → Manage Storage. A list of all apps installed on your device will pop up—sorted by the amount of storage being consumed, with the biggest storage hogs listed at the top.
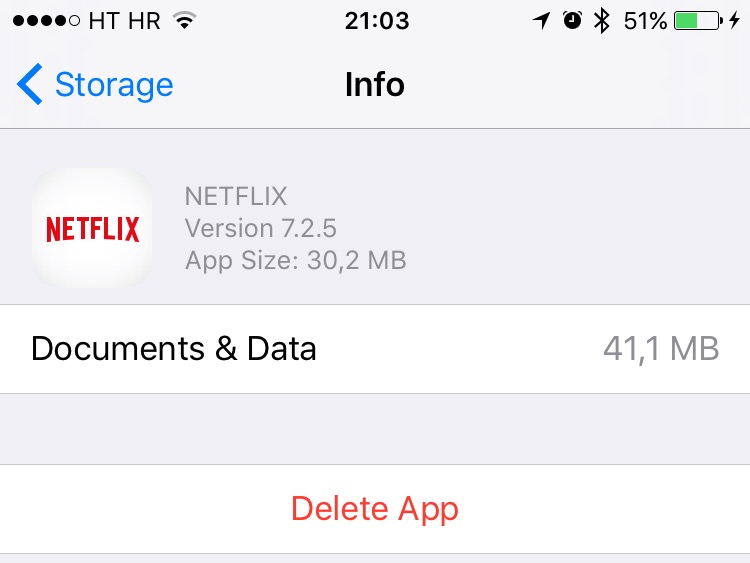
Tap an app to check out how much storage its documents and other data take up on the device. Note: some apps don’t provide this information. Tapping Delete App on this screen will remove the app from your device and release any storage space occupied by its documents and other data.
This is a good method of identifying apps whose caches are ten times or more the size of the app itself. Yes, you’ll be inconvenienced by having to re-download certain apps and adjust their settings, but reclaiming huge chunks of storage space lost to video streaming caches has got to be worth it.
A word of warning: even though you can freely reinstall content streaming apps such as Netflix, Instagram and Facebook, deleting apps that keep content you create on the device may cost you important data.
Use specialized cache-cleaning apps
The easiest method to keep your ‘Other’ iOS storage from spiraling out of control involves using specialized apps. They can be especially useful in clearing out leftover files from previous iOS installations, junk left after applying over-the-air updates and caches which iOS stubbornly refuses to delete due to unforeseen system errors or corrupted files.
There are many desktop apps for Mac and Windows that can help clear the cruft that has been clogging up your ‘Other’ storage. Here are some you might want to consider:
- PhoneExpander for Mac
- iMyfone Umate for Mac and Windows
- PhoneClean for Mac and Windows
- iFunBox for Mac and Windows
- iMazing for Mac and Windows
- Decipher Phone Cleaner (coming soon for Mac and Windows)
If you’re jailbroken, these jailbreak tweaks will do a good job of trimming that ‘Other’ storage, and the best thing is you’re not required to use a computer at all:
These jailbreak apps (feel free to add suggestions of your own in comments) let you selectively clean various system and app caches with ease, including those of apps like Facebook Messenger, WhatsApp and more.
People with non-jailbroken devices have a few options at their disposal, such as an app called Battery Doctor, depicted below, which implements a cache-cleaning future.
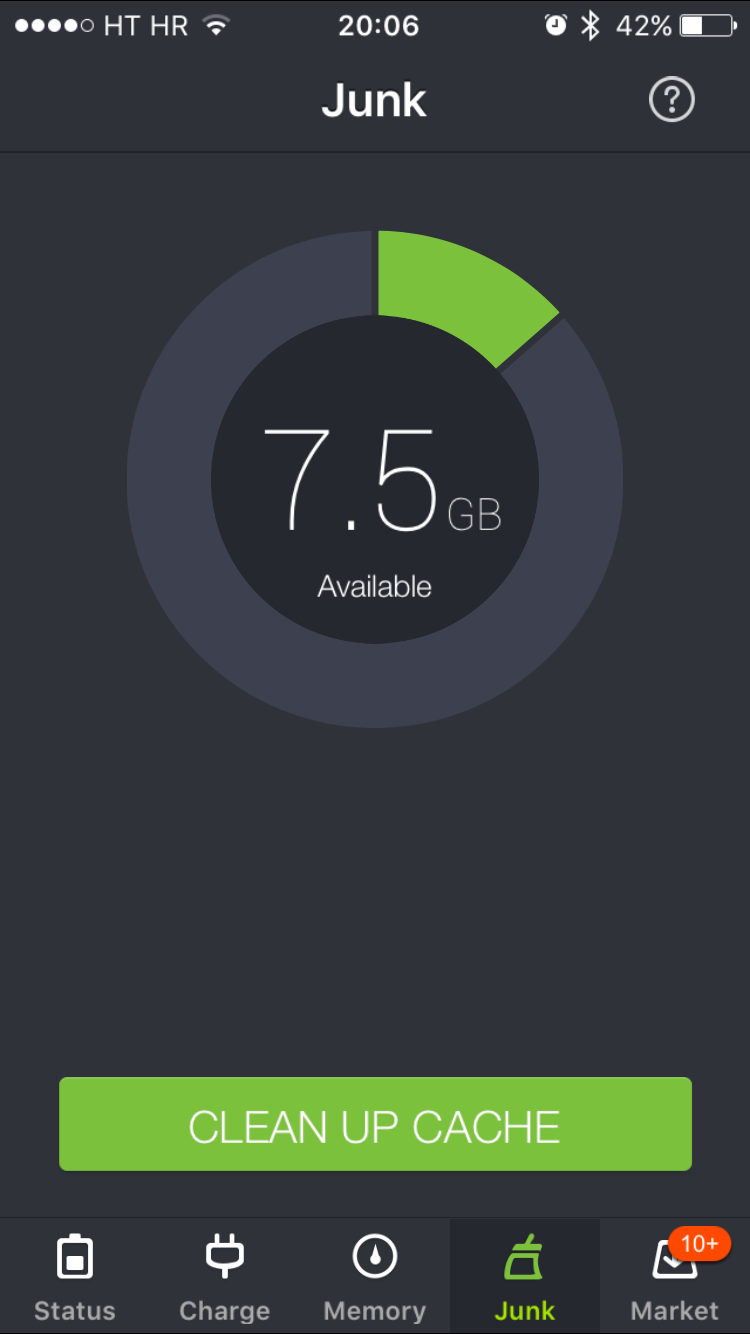
Battery Doctor is available free in the App Store.
Regardless of your preferred app, you might encounter a “Disk Almost Full” message when trying to delete cached files. This is normal behavior caused by the cleaning process so simply tap Done to dismiss the message.
Delete Safari’s browsing cache
As one of the most frequently used stock applications, Safari tends to use quite a bit of storage to cache webpages so they load faster. To delete it, go to Settings → Safari → Clear History and Website Data. Additionally, delete data that websites you visit store on your device by selecting Settings → Safari → Advanced → Website Data → Remove All Website Data.
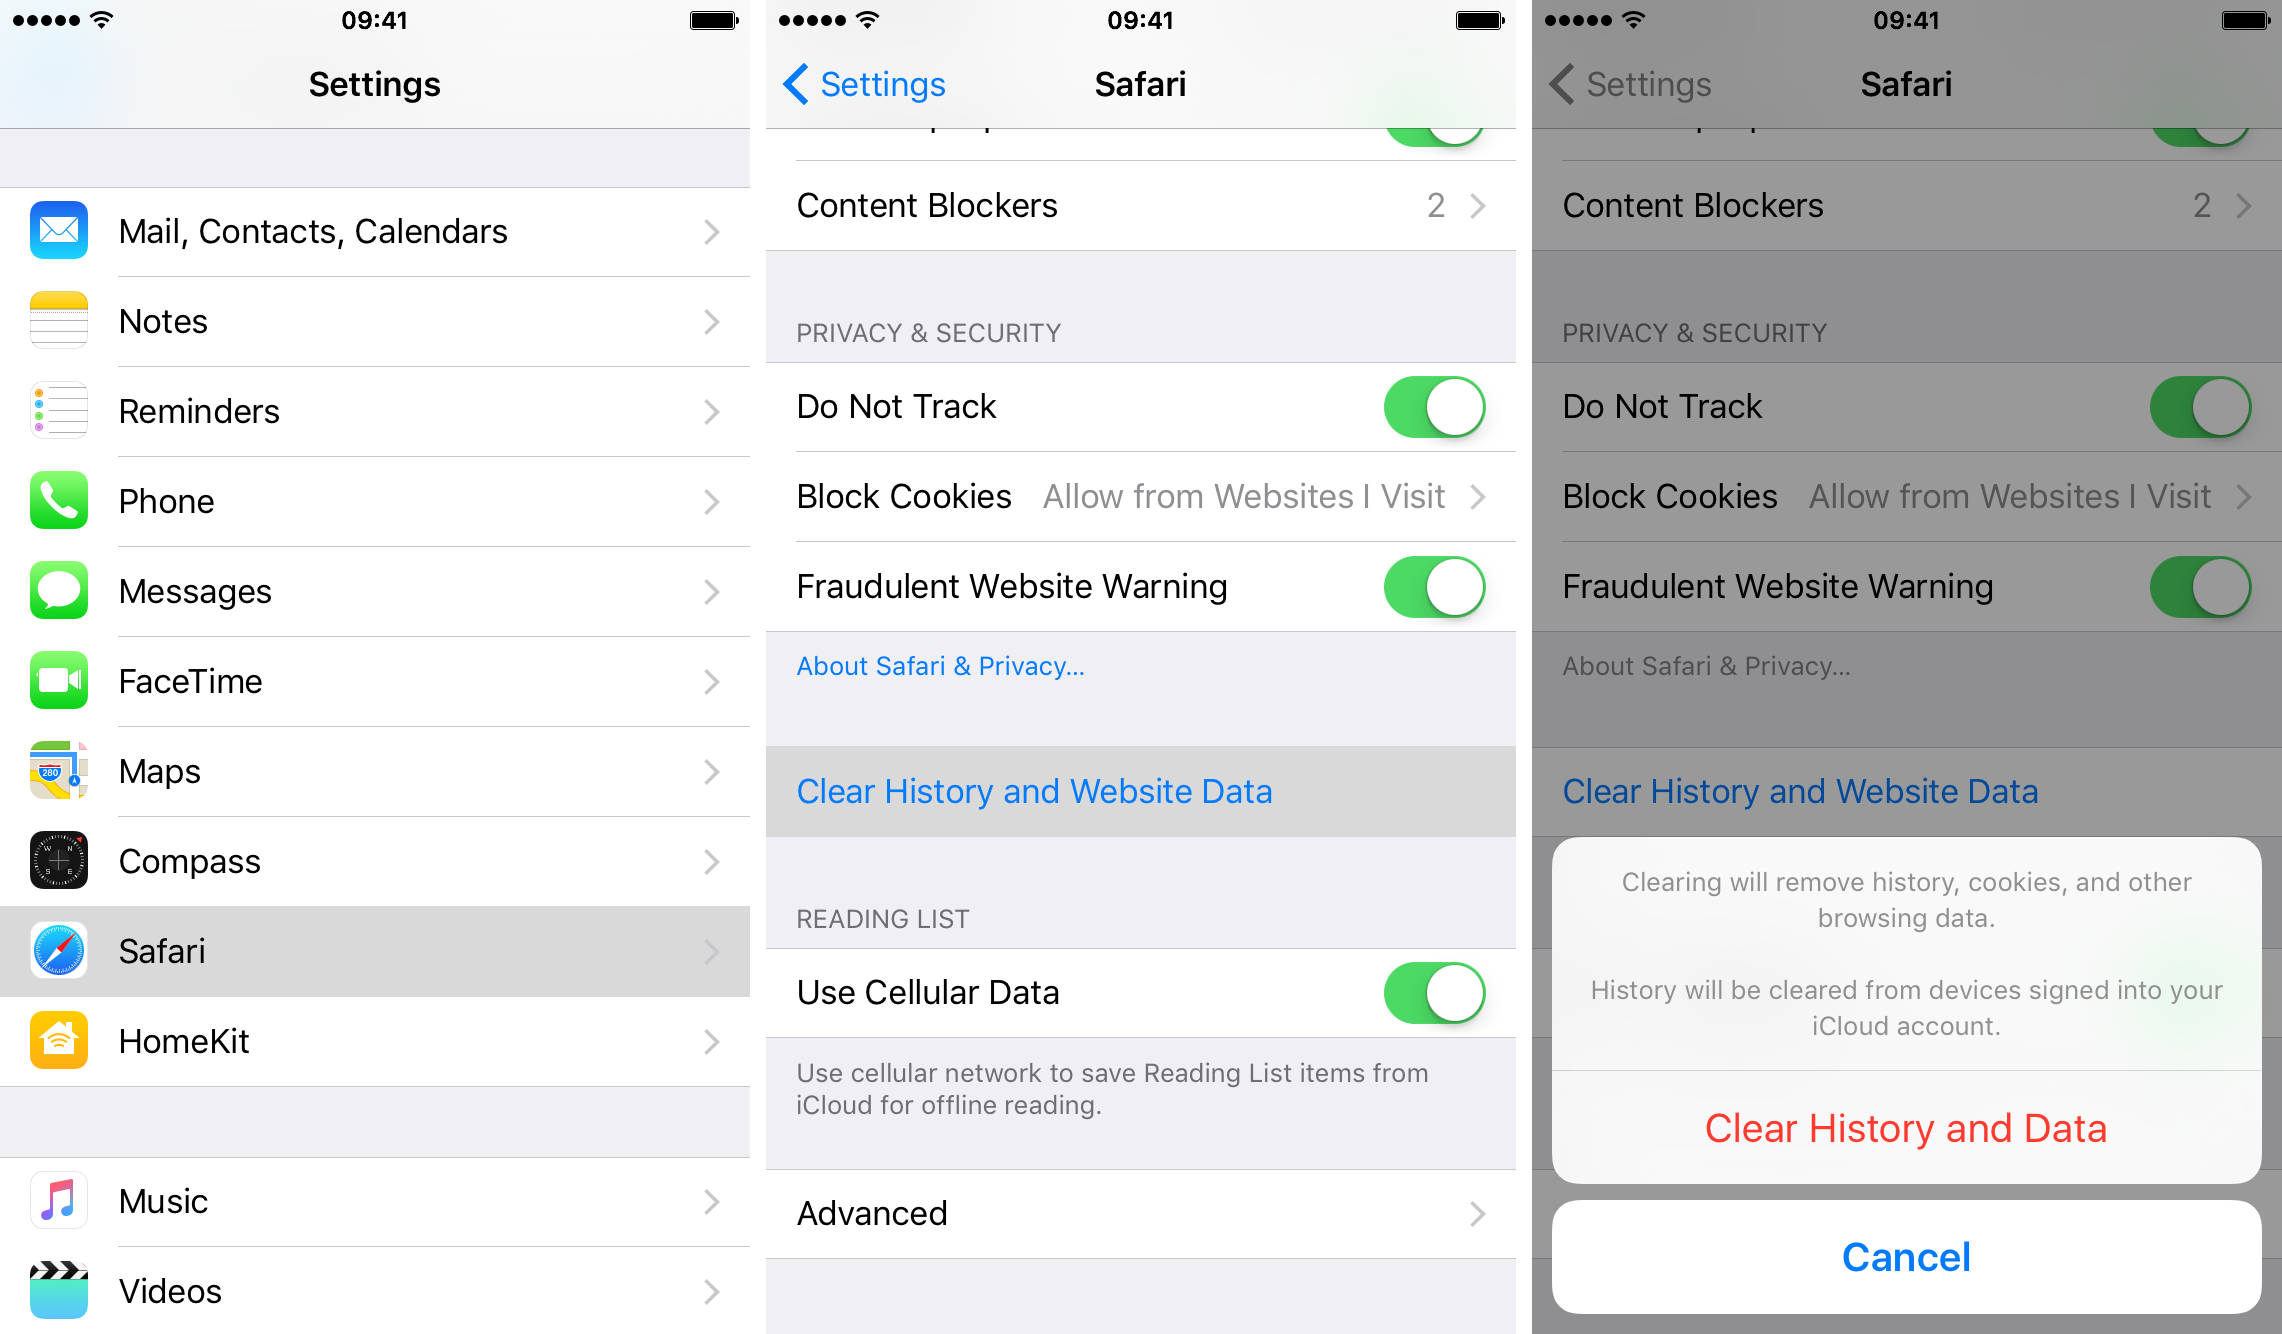
TUTORIAL: How to erase Safari’s browsing history and cached data
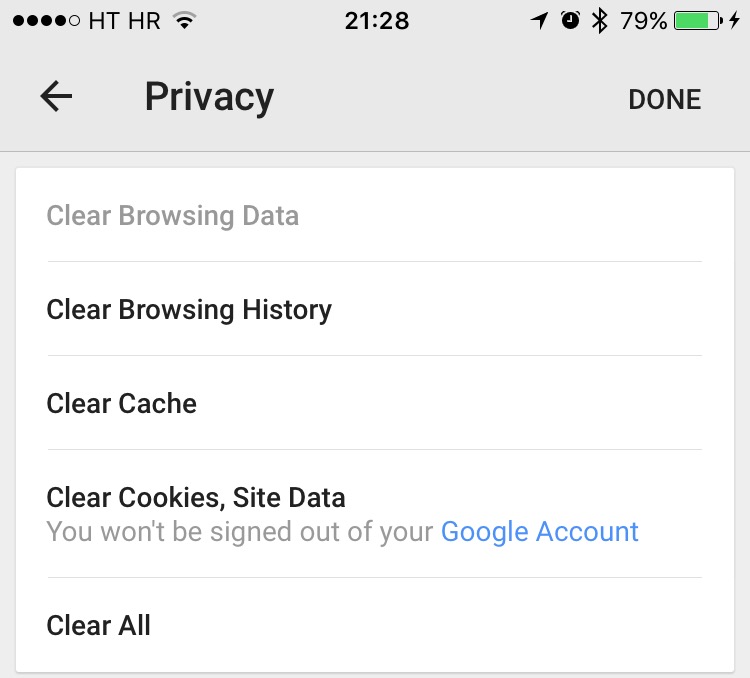
Those who use a third-party browser may find an option to erase browsing caches in the app’s settings interface. Google Chrome fans, for example, can tap the hamburger icon and select Privacy. There, you can delete Chrome’s browsing history, cache, cookies and website data independently of each other.
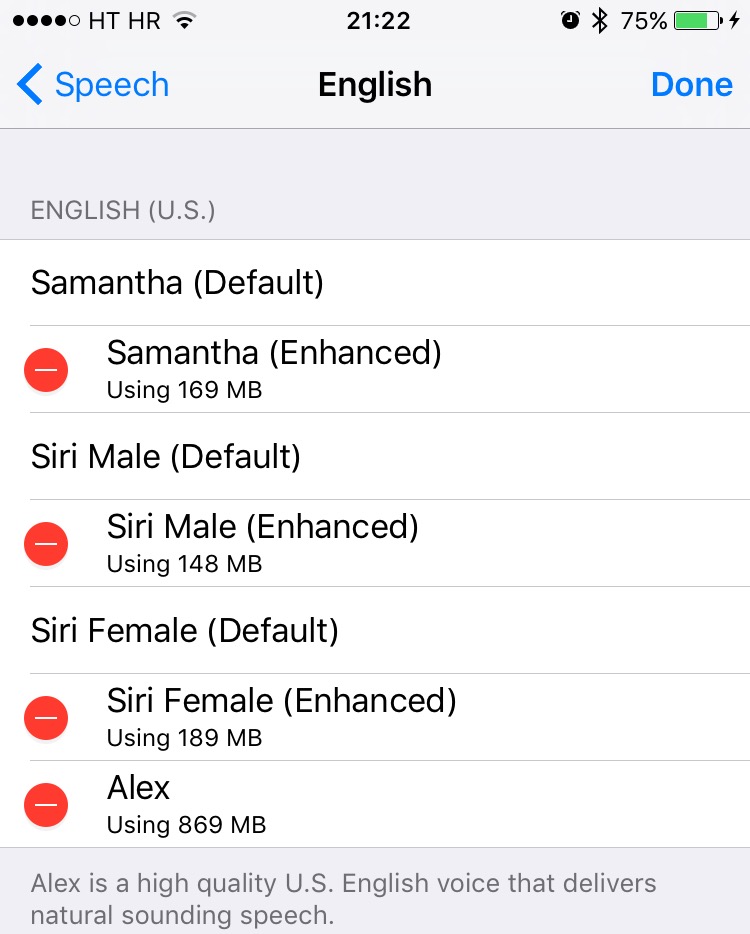
Delete Siri voices you no longer need
If you use iOS’s Speak Screen and Speak Selection features, you may have enabled multiple voices that are downloaded and kept on your device. On 16GB devices, that’s a waste of precious storage. For instance, downloading the high-quality Alex as your English-speaking voice for VoiceOver, Speak Screen and Speak Selection features will cost you a whopping 870 MB of available free space.
To remove a downloaded voice, go to Settings → General → Accessibility → VoiceOver → Speech and swipe from right to left on the voice, then tap the Delete button.
Force-restart your device
This is a more efficient method that will prompt iOS be more aggressive about flushing the caches. Just press and hold the Sleep/Wake and Home button simultaneously until an Apple logo appears. But don’t overuse this option: although force-resetting won’t cause damage to iOS, it can (in specific situations) damage your apps.
Should that happen, reinstalling a damaged app will get you back on track.
Reset all settings
Some users have reported that resetting all device preferences and settings has successfully cleaned up a lot of cached files without needing to restore form an iTunes or iCloud backup.
To reset all preferences and settings, go to Settings → General → Reset and tap Reset All Settings. This will not delete your apps nor your content.
Restore from backup
Some of the cached files that their creator apps have marked as safe to delete are not saved in iCloud/iTunes backups because they can be recreated as needed. That’s why restoring from a backup may actually help decrease your ‘Other’ iOS storage. For space reasons, iCloud backups contain fewer cached files than their iTunes counterparts.
While restoring an iOS device from a backup will preserve your data, sometimes it will also retain that ‘Other’ storage you wanted to get rid of in the first place. In that case, you should consider setting up your device from scratch.
Reset to factory settings
This may sound like an overly extreme proposal, but resetting your device to its factory settings will delete everything and reinstall iOS. Just make sure to set up the device as new to maximize your available storage. Yes, you will need to re-download your apps, adjust settings, bring back your photos, documents and other data, but it’ll be worth it—your rusty old device will feel like new again with none of the cruft that you had before.
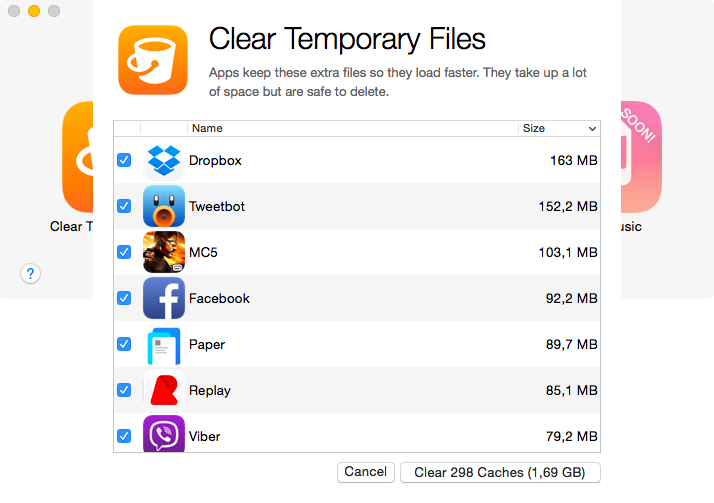
PhoneExpander: clearing temporary files in apps.
Your emails won’t be affected—they’re stored on servers. And if you use iCloud Photo Library or Google Photos and keep all your other things in Dropbox, OneDrive, Google Drive or another cloud-storage service, the process will be as painless as painless gets.
RELATED: Best ways to store photos in the cloud
To wipe your device clean, go to Settings → General → Reset → Erase All Content and Settings. Starting anew is an especially viable option if your ‘Other’ storage contains corrupted files that you can’t easily get rid of.
TUTORIAL: How to erase everything on iPhone or iPad
RELATED TUTORIALS:
Related articles
The following articles provide even more in-depth information on ‘Other’ storage for those who want to really dive deep into this topic, including valuable tips on saving storage space on your iPhone, iPod touch or iPad by disabling features, apps and content you no longer need.
- 7 ways to get rid of junk files and recover storage space on iPhone
- How to reclaim ‘Other’ storage on your iOS device
- How to delete documents and data stored in iCloud
- 40+ ways to save storage space on iPhone and iPad
Have suggestions of your own to share with the community?
Meet us in comments!