![]()
If you’re a minimalist type of person, then you might prefer to keep your Mac’s desktop free of any icons.
Yes, you can easily drag documents and other files that have been cluttering your desktop and put them in a folder on your Mac. However, that doesn’t change the fact that icons for external hard drives, USB thumb drives and other hardware devices will still pop up on the desktop as soon as they’re connected to your Mac.
Wouldn’t it be nice if you could do something about that? Thankfully, Apple’s engineers though of that, too, because macOS makes it easy to optionally remove desktop icons for different types of devices with just a few clicks.
How to hide desktop device icons in Finder
The first method for achieving a clean, neat desktop involves making a quick trip to Finder’s preferences to untick a few boxes.
Step 1: Click on the desktop and then select Preferences… in the Finder menu.
Step 2: Choose the General tab in the Finder Preferences window.
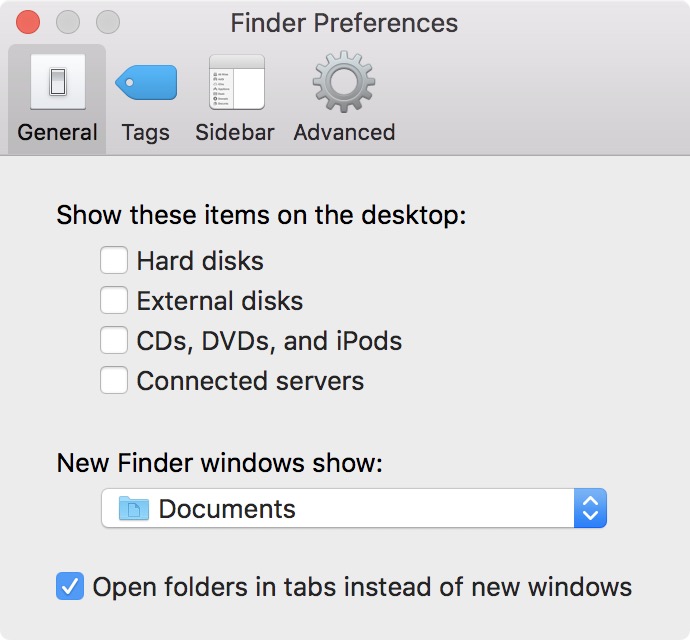
Step 3: Untick boxes next to Hard disks, External disks, CDs, DVDs, and iPods, and Connected servers which are located right below the heading Show these items on the desktop.
There you go, instead of the usual desktop appearance with device icons…
![]()
…you now have a clean-looking desktop free of any icons, like this.
![]()
How to hide desktop device icons in Terminal
You can also remove all device icons from the desktop using a Terminal command.
Step 1: Launch the Terminal application.
Step 2: Type the following line into the Terminal window, and press Enter to execute it:
defaults write com.apple.finder CreateDesktop -bool false
To apply the changes, enter the following command, and press Enter.
killall Finder
This will relaunch the Finder with all device icons gone from your desktop.
To show device icons again on your desktop, enter the following command in the Terminal window and press Enter:
defaults write com.apple.finder CreateDesktop -bool true; killall Finder
Boom, your desktop is now back to its default state.
How to access devices with desktop icons hidden
Now, you might be wondering, “How do I access my devices after hiding their desktop icons?” Say you plugged a USB thumb drive into your Mac, or connected to a remote server.
To access your device, launch a new Finder window by right-clicking Finder in the Dock and selecting New Finder Window, or hit the Command (⌘) – N when the Finder is active.
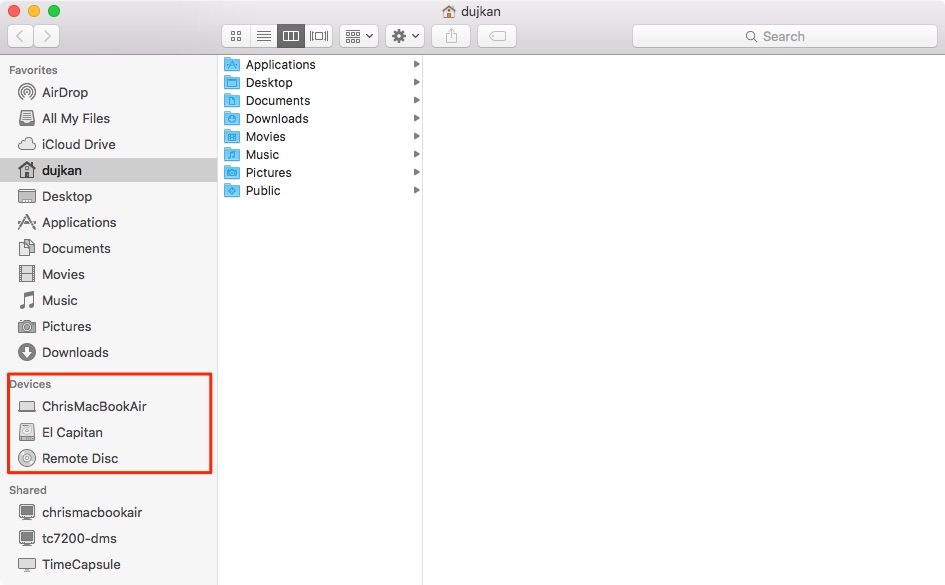
You’ll notice the Devices section in the Finder’s lefthand column.
This is where you’ll find shortcuts to quickly access and browse all your currently active devices, connected servers, external storage devices and other devices that would normally appear on the desktop, including your Mac’s boot drive.
NOTE: Screenshots you capture on your Mac will still be saved to the desktop, but don’t you worry—a quick Terminal command lets you select a custom folder on your Mac where screenshots will be saved.
I prefer to keep my desktop as tidy as possible so I have my screenshots saved in the Downloads folder along with the rest of temporary files, Internet downloads and other documents that I don’t need to keep forever. Then, from time to time, I just select everything in the Downloads folder and trash the files.
Submit your how-to suggestions at tips@iDownloadBlog.com.